Main Restorations Software Audio/Jukebox/MP3 Everything Else Buy/Sell/Trade
Project Announcements Monitor/Video GroovyMAME Merit/JVL Touchscreen Meet Up Retail Vendors
Driving & Racing Woodworking Software Support Forums Consoles Project Arcade Reviews
Automated Projects Artwork Frontend Support Forums Pinball Forum Discussion Old Boards
Raspberry Pi & Dev Board controls.dat Linux Miscellaneous Arcade Wiki Discussion Old Archives
Lightguns Arcade1Up Try the site in https mode Site News

Unread posts | New Replies | Recent posts | Rules | Chatroom | Wiki | File Repository | RSS | Submit news


Author Topic: The CoffeeCade (build info added)  (Read 17896 times)

0 Members and 1 Guest are viewing this topic.

GSXRMovistar

  • Trade Count: (0)
  • Full Member
  • ***
  • Offline Offline
  • Posts: 436
  • Last login:April 16, 2025, 06:01:17 pm
  • Gez, this is gonna be expensive!
    • forum.arcadecontrols.com/index.php/topic,148135.0.html
    • CoffeeCade
The CoffeeCade (build info added)
« on: November 05, 2015, 12:56:33 pm »
After an absolute age (on and off for the past year) my latest cabinet is now complete. The CoffeeCade:-


CoffeeCade 01 by Andy Baker, on Flickr

The Concept

I wanted an arcade machine that could be placed in the house without looking too much like an arcade machine which would be used as a game encyclopaedia for nostalgia purposes rather than full on gaming.

About 10 years ago I mocked up a cocktail cabinet for this but never got around to making it. Revisiting 10 years later and so much had changed so I decided to just re-design from scratch.

My criteria
  • Ability to play both Arcade and retro Console games
    2 Player, want it to be a social thing
    Focused more towards horizontal games
    To be used as a coffee table so glass top and limited height
    Side by side controls so it can be played from sofa
    Small foot print but big enough to be used comfortably
    Controls not prominent

Anyway this is what I came up with and if I can find a bit of spare time I’ll do a write up on the build and include WIP photos.


CoffeeCade 02 by Andy Baker, on Flickr


CoffeeCade 03 by Andy Baker, on Flickr


CoffeeCade 04 by Andy Baker, on Flickr


CoffeeCade 05 by Andy Baker, on Flickr


CoffeeCade 06 by Andy Baker, on Flickr


CoffeeCade 07 by Andy Baker, on Flickr


CoffeeCade 08 by Andy Baker, on Flickr


CoffeeCade 09 by Andy Baker, on Flickr


CoffeeCade 10 by Andy Baker, on Flickr
« Last Edit: November 06, 2015, 10:37:02 am by GSXRMovistar »

mozzer

  • Trade Count: (0)
  • Full Member
  • ***
  • Offline Offline
  • Posts: 293
  • Last login:March 02, 2019, 10:38:25 pm
  • How Soon Is Now?
Re: The CoffeeCade
« Reply #1 on: November 05, 2015, 12:58:08 pm »
Gorgeous  :applaud:

vwalbridge

  • Trade Count: (0)
  • Full Member
  • ***
  • Offline Offline
  • Posts: 2082
  • Last login:July 31, 2021, 12:21:09 pm
  • Don't half-ass two things, whole-ass one thing.
Re: The CoffeeCade
« Reply #2 on: November 05, 2015, 01:04:54 pm »
That's purdy.  :cheers: The lack of a theme is actually a good thing is this case so that it blends in as furniture.

However, I've always had a personal problem with cocktail style arcades because of the viewing angle giving an awful kink in the neck.  How does it feel, comfort-wise, to play on?
If you can read this, it means Photobucket's money grab ruined my signature photos.

yotsuya

  • Trade Count: (+21)
  • Full Member
  • ***
  • Offline Offline
  • Posts: 19958
  • Last login:April 26, 2025, 06:30:57 pm
  • 2014 UCA Winner, 2014, 2015, 2016 ZapCon Winner
    • forum.arcadecontrols.com/index.php/topic,137636.msg1420628.html
Re: The CoffeeCade
« Reply #3 on: November 05, 2015, 01:05:33 pm »
I like how you integrated the control panel as opposed to bolting it on like a big ol' goiter. Good job!
***Build what you dig, bro. Build what you dig.***

emphatic

  • Trade Count: (0)
  • Full Member
  • ***
  • Offline Offline
  • Posts: 2017
  • Last login:Today at 10:40:59 am
  • -"Suck it, Donny!" -"No, YOU suck it.... more".
    • Emphatic's Video Game Collection
Re: The CoffeeCade
« Reply #4 on: November 05, 2015, 01:07:19 pm »
Superb design. A cocktail table that actually looks comfortable to play, kudos. :cheers:

harveybirdman

  • Trade Count: (0)
  • Full Member
  • ***
  • Offline Offline
  • Posts: 2540
  • Last login:December 28, 2024, 01:21:59 am
  • SHMUP'EM
Re: The CoffeeCade
« Reply #5 on: November 05, 2015, 01:27:26 pm »
Despite two things I hate,  great looking project!

johnrt

  • Guest
  • Trade Count: (0)
Re: The CoffeeCade
« Reply #6 on: November 05, 2015, 01:40:39 pm »
Beautiful! And here the RGB buttons really made a difference! Great work!  :applaud: Would love to see some WIP pictures.

Token

  • Trade Count: (0)
  • Full Member
  • ***
  • Offline Offline
  • Posts: 490
  • Last login:September 20, 2021, 03:45:43 pm
Re: The CoffeeCade
« Reply #7 on: November 05, 2015, 03:22:23 pm »
Purdy! :applaud:

We need one more pic -- of the top with the screen turned off.

Aceldamor

  • Trade Count: (0)
  • Full Member
  • ***
  • Offline Offline
  • Posts: 878
  • Last login:October 25, 2019, 05:10:51 pm
  • You know you hear the music in your head...
Re: The CoffeeCade
« Reply #8 on: November 05, 2015, 03:39:45 pm »
 That is pretty smexy!! Whose buttons are those?
Fuzzy Wuzzy was a woman!

Token

  • Trade Count: (0)
  • Full Member
  • ***
  • Offline Offline
  • Posts: 490
  • Last login:September 20, 2021, 03:45:43 pm
Re: The CoffeeCade
« Reply #9 on: November 05, 2015, 03:44:26 pm »
That is pretty smexy!! Whose buttons are those?

Looks like Ultimarc RGB Ultralux - http://www.ultimarc.com/ultralux.html

GSXRMovistar

  • Trade Count: (0)
  • Full Member
  • ***
  • Offline Offline
  • Posts: 436
  • Last login:April 16, 2025, 06:01:17 pm
  • Gez, this is gonna be expensive!
    • forum.arcadecontrols.com/index.php/topic,148135.0.html
    • CoffeeCade
Re: The CoffeeCade
« Reply #10 on: November 05, 2015, 04:33:40 pm »
Thanks for the comments.

How does it feel, comfort-wise, to play on?
Actually quite good, been playing it a lot with my daughter and neither of us have found in uncomfortable. Saying that it's not something that’s played for hugely extended times.

Despite two things I hate,  great looking project!
Haha I’m gonna have to ask what they are? Guessing 8 button setup, and illuminated buttons?

That is pretty smexy!! Whose buttons are those?
Yes as above Ultimarc RGB Ultralux.

Would love to see some WIP pictures.
Will do it over the weekend, have quite a few throughout.

harveybirdman

  • Trade Count: (0)
  • Full Member
  • ***
  • Offline Offline
  • Posts: 2540
  • Last login:December 28, 2024, 01:21:59 am
  • SHMUP'EM
Re: The CoffeeCade
« Reply #11 on: November 05, 2015, 04:48:16 pm »
Quote
Haha I’m gonna have to ask what they are? Guessing 8 button setup, and illuminated buttons?


CheffoJeffo

  • Cheffo's right! ---saint
  • Wiki Master
  • Trade Count: (+2)
  • Full Member
  • *****
  • Offline Offline
  • Posts: 7780
  • Last login:Today at 11:44:23 am
  • Worthless button pusher!
Re: The CoffeeCade
« Reply #12 on: November 05, 2015, 08:14:52 pm »
Working: Not Enough
Projects: Too Many
Progress: None

Token

  • Trade Count: (0)
  • Full Member
  • ***
  • Offline Offline
  • Posts: 490
  • Last login:September 20, 2021, 03:45:43 pm
Re: The CoffeeCade
« Reply #13 on: November 05, 2015, 09:16:03 pm »
How do you like the ultralux buttons? I know they look great, but how do they feel for gameplay? I'm wary to buy them based on the flat button tops. I'm a concave button guy, and am leaning towards the ultimate classic RGB buttons.

GSXRMovistar

  • Trade Count: (0)
  • Full Member
  • ***
  • Offline Offline
  • Posts: 436
  • Last login:April 16, 2025, 06:01:17 pm
  • Gez, this is gonna be expensive!
    • forum.arcadecontrols.com/index.php/topic,148135.0.html
    • CoffeeCade
Re: The CoffeeCade
« Reply #14 on: November 06, 2015, 10:36:22 am »
Ok so a quick and dirty build log.

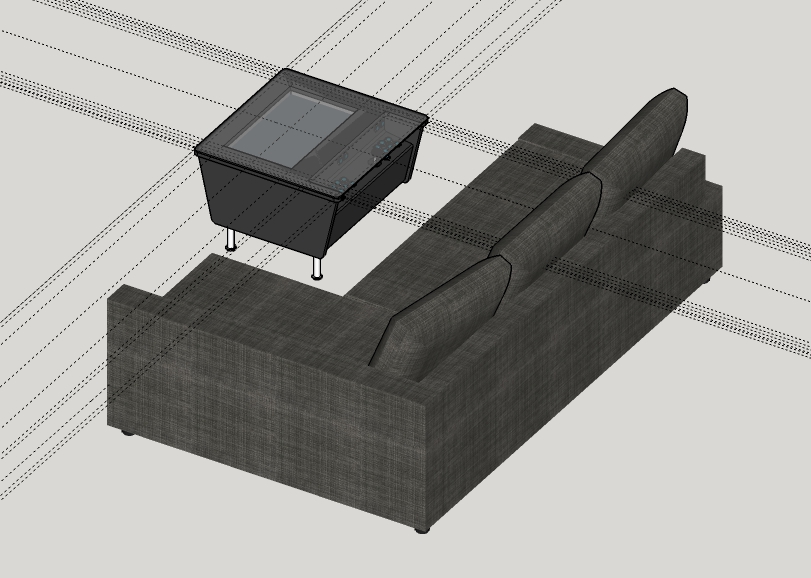
Firstly set about drafting a design in Sketch-up and after several revisions I came up with the following:-


In parallel I worked on the controls and software; So much has changed over the past ten years so lots of new options and toys to consider.

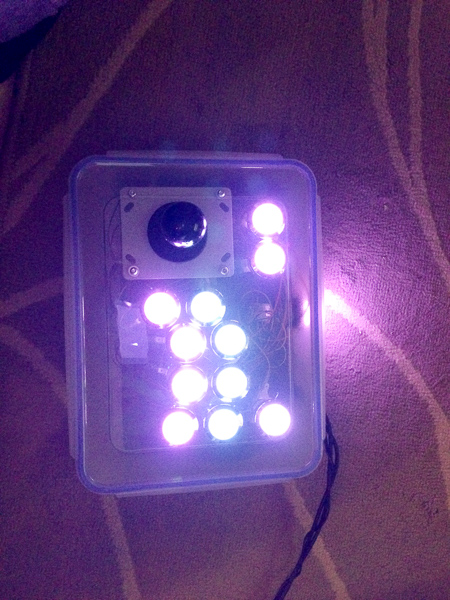
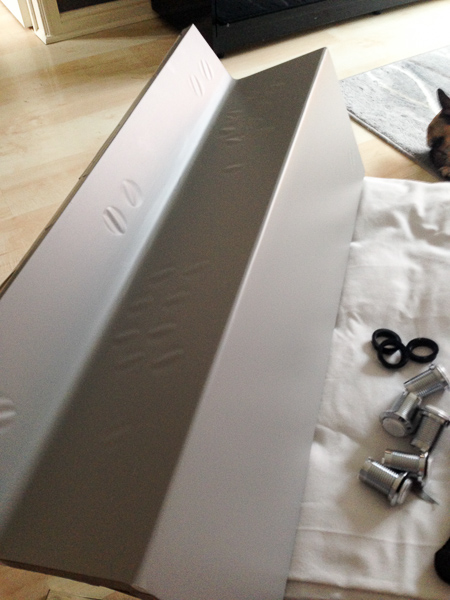
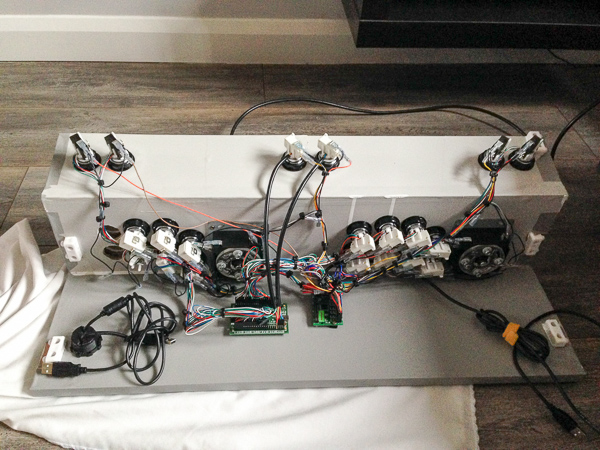
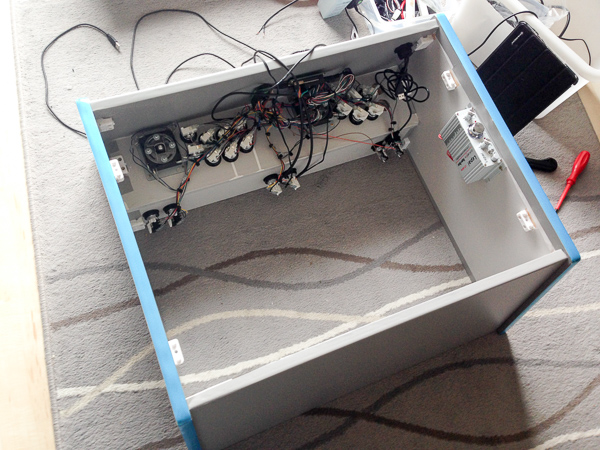
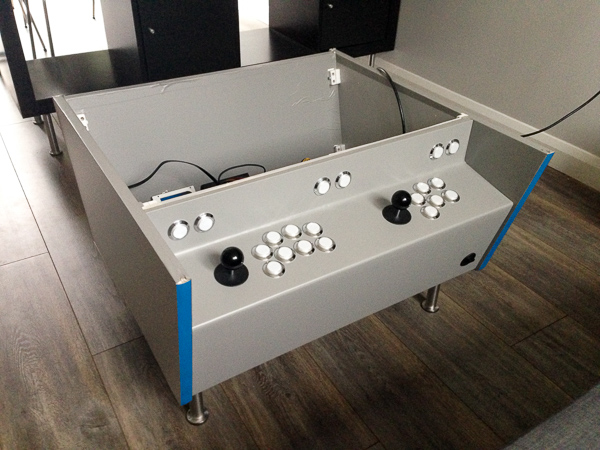
I opted for a MiniPac with the pre-assembled wiring harness, PacLED64 and UltraLux buttons for some flashy but cheesy lighting (illuminated buttons are all new to me).

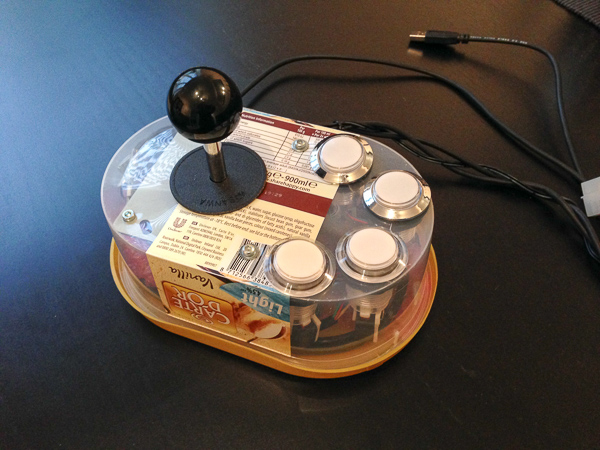
With the aid of a empty ice cream container and tupperware box I now had a coupe of prototype controllers. First was to test stick/buttons before ordering more. Second was a full set of single player controls so I could work on config.


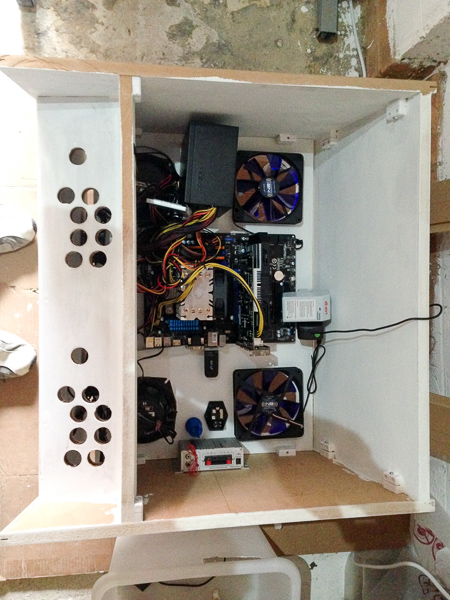
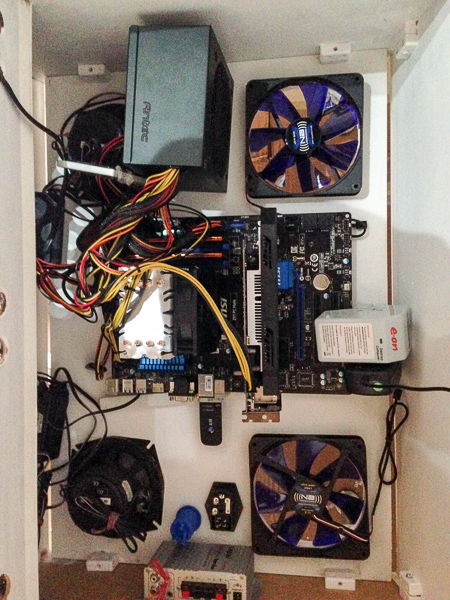
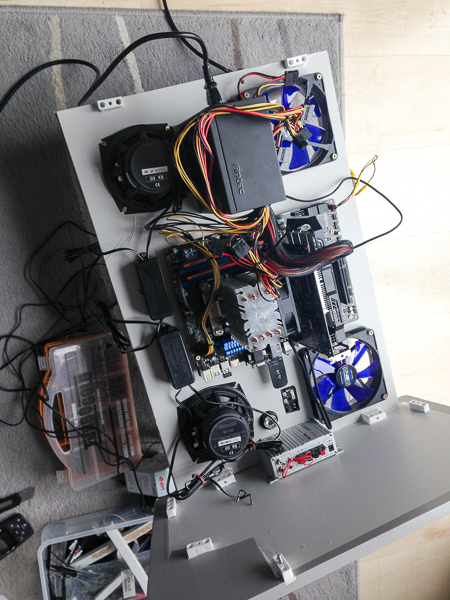
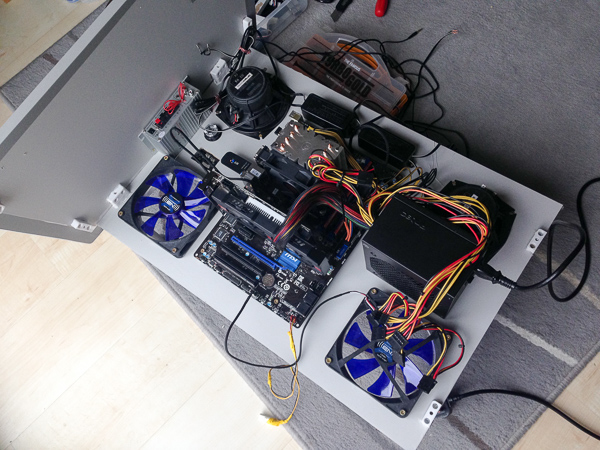
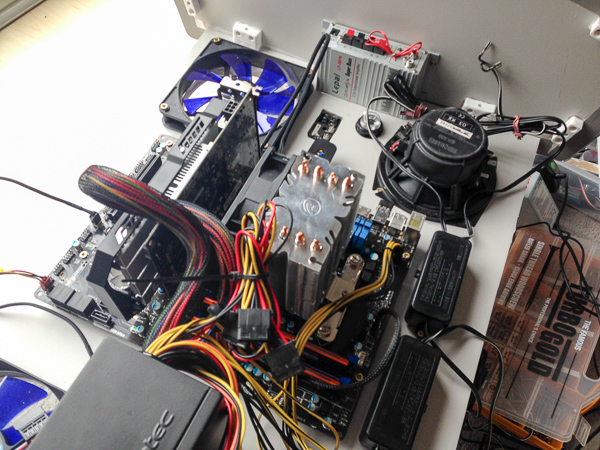
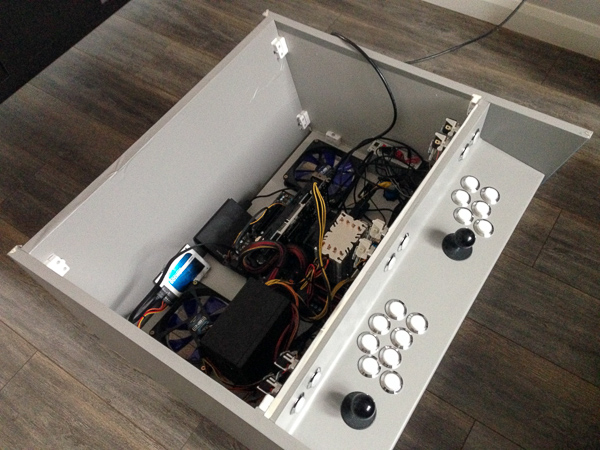
This then hooked up to a cheap PC i put together (MSI Z97, 8GB DDR3, Intel Pentium K Anniversary G3258, SSD for O/S, external USB3 drive for roms/data) running Win8.1 and HyperSpin as my fronted. Everything ran very well but later added a cheap Nvida GFX card for Mame HLSL and improvements to some of the heavier console emulation.

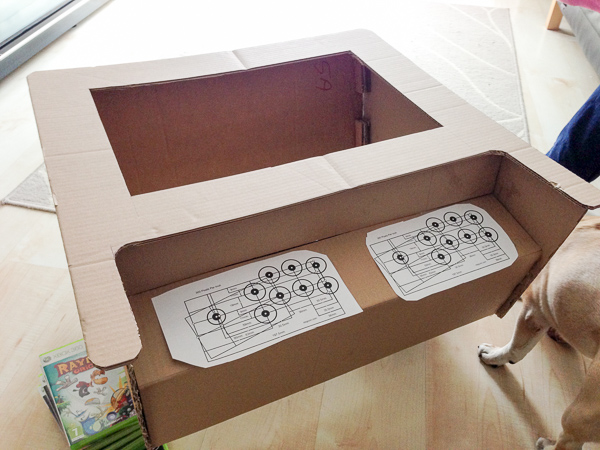
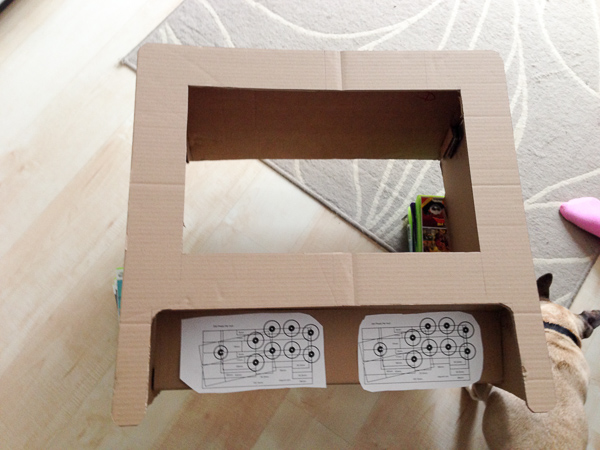
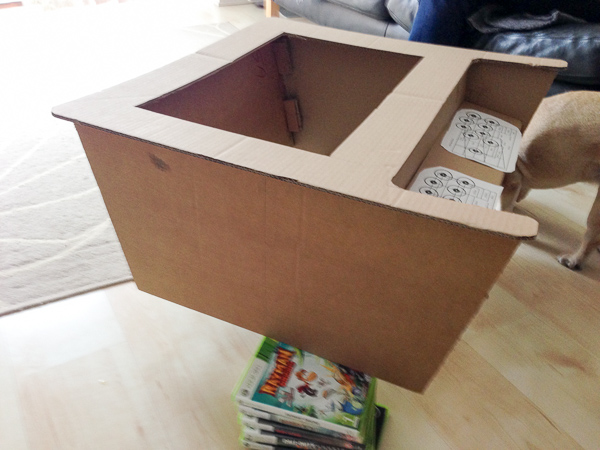
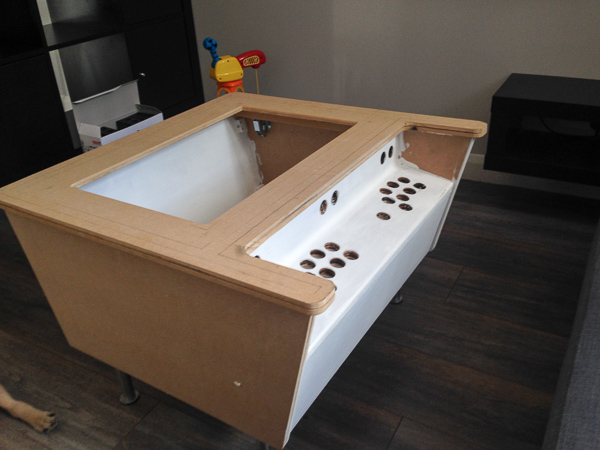
With design and internals in hand it was on to cabinet fabrication but first a quick cardboard mock-up to give me a feel for size and layout.


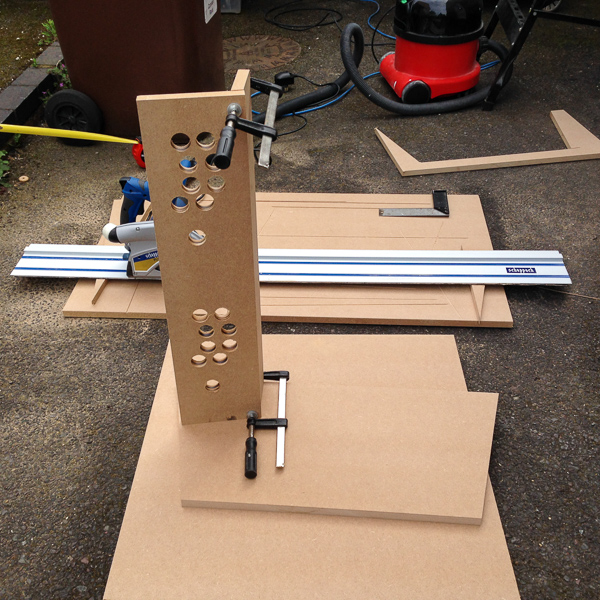
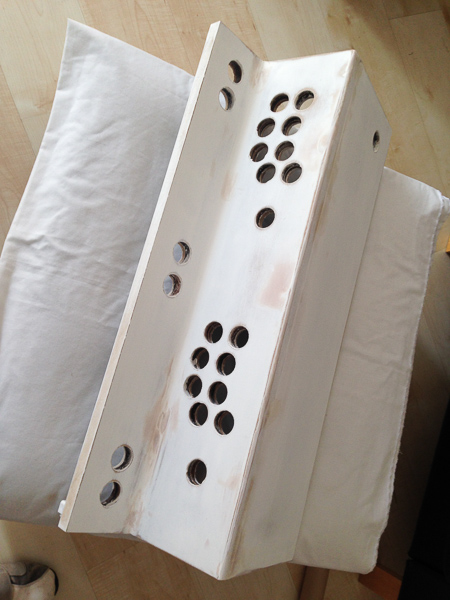
Everything was to be made from 18mm MDF using a plunge rail saw for straight cuts and a mixture of jigsaw and router for curves and bevels. Side pieces and top also had a t-molding slot cut using router and appropriate bit.

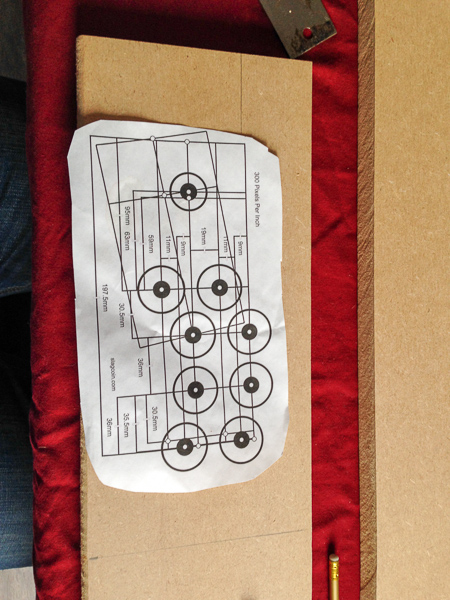
Having everything measured up in Sketchup first meant cutting the panels took no time at all.


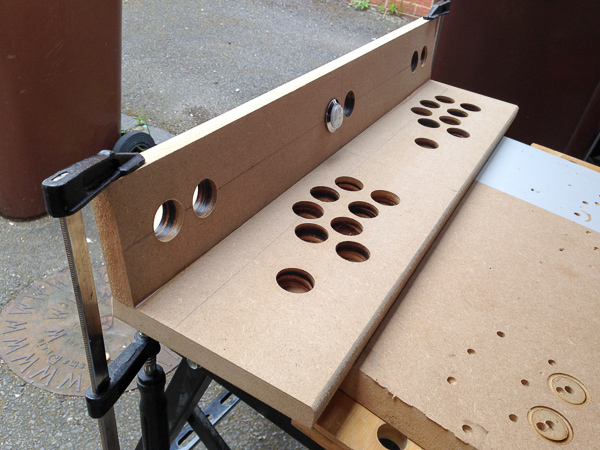
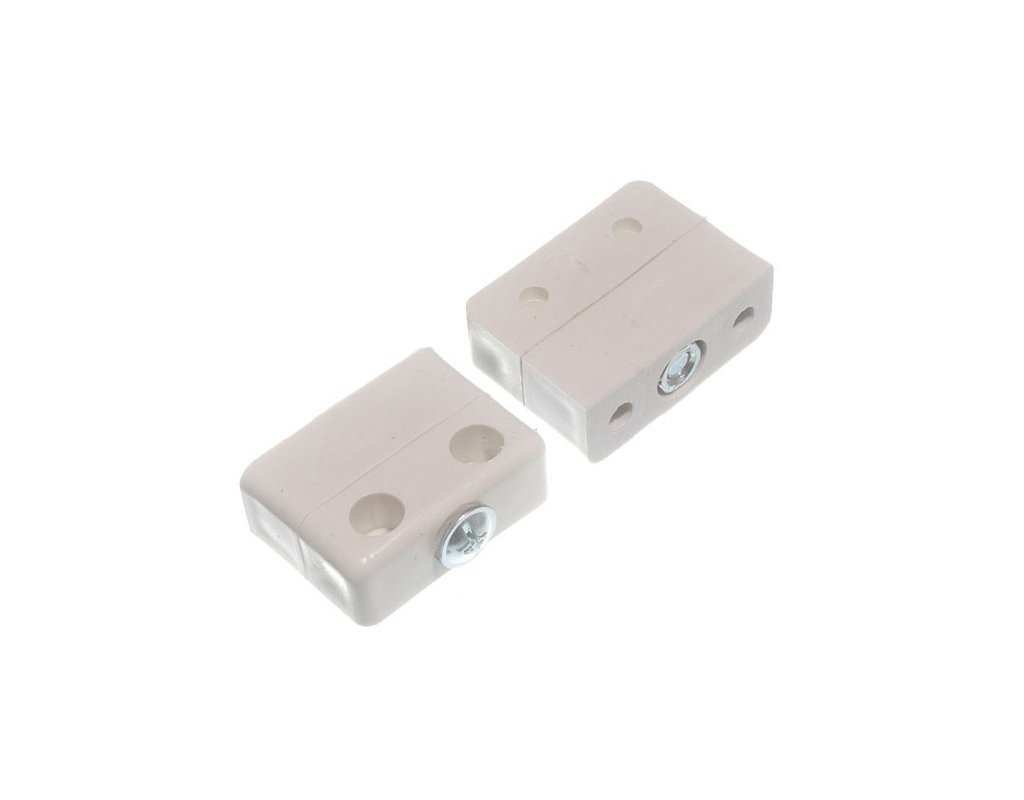
I used fixing blocks similar to these which allow me to assembly/disassemble throughout the fabrication without having to re-screw any of the MDF (which never ends well).


Side and rear panels were straight forward but I also wanted the front section to be seamless so this is made from three separate pieces, some filler, and LOTS of sanding.


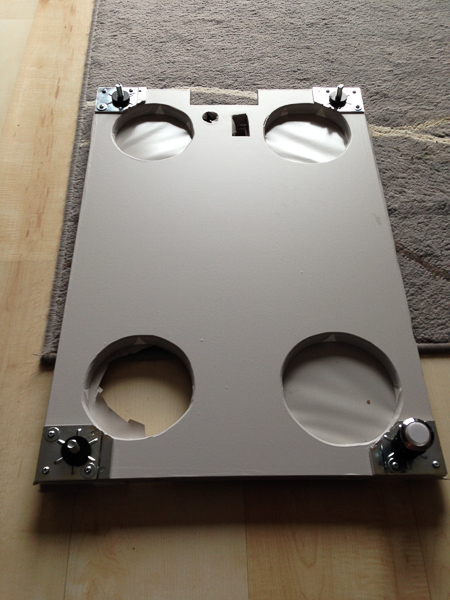
I also wanted to hide as much of the gubbins as possible so speakers, fans, amp controls, switches were all to be mounted on the base. Leaving just games controls and a double USB port on show.

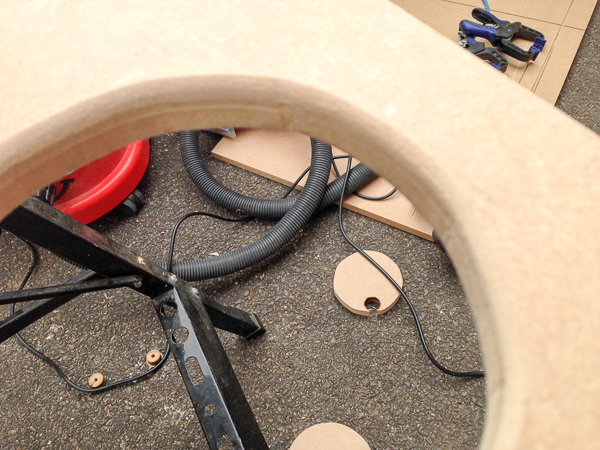
Used the fans and speakers to mark out positions then cut the holes with a jigsaw and bevelled the edges with the router. The results were far from perfect but as this was on the bottom I wasn’t too fussed.


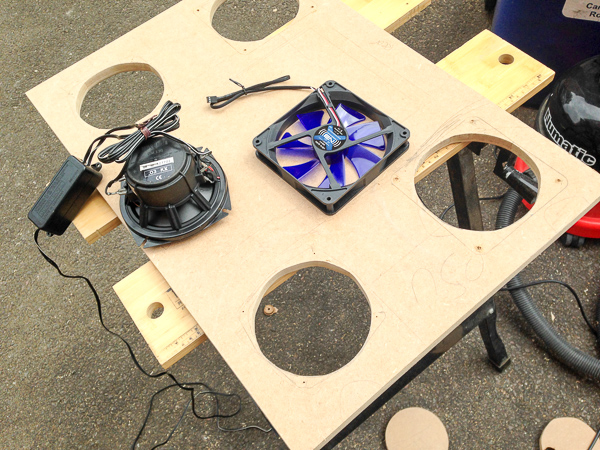
The speakers themselves were an ancient pair of MB Quarts I had in one of my cars probably 20 years ago. However old they were pretty damm good (i.e. expensive) from what I recalled so thought I’d try them out. Probably overkill for purpose but keeps the cost down. Both powered by a little Lepai LP-A6FM amp.

Legs which match another another piece of furniture in the room are from Ikea called Captia. Here I made a mistake, I positioned the speaker/fan holes too close to the corners of the base meaning part of the leg fixing brackets over hang. This was easy to rectify by taking the Dremel to them and notching off a corner on each.
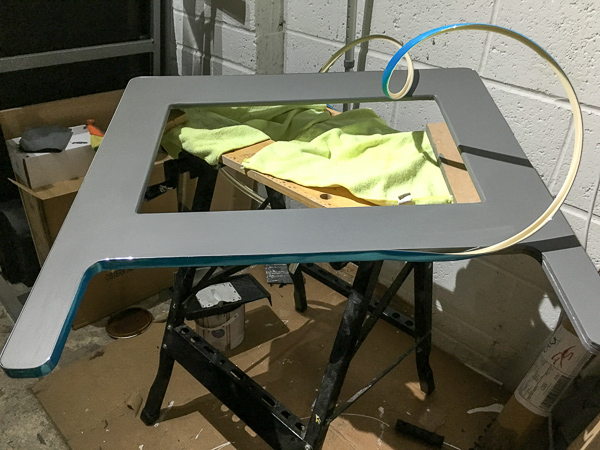
The top panel I don’t have appeared to have taken any pics of whilst cutting, but the only real interesting (‘ish) bit here was I routed approx 8mm off the bottom of it where the un-cased monitor would fit. Not only did this bring the screen closer to the glass top but also created a snug fit to put the screen into, therefore no issues with placement/alignment when taking the screen in and out. I also bevelled the top side around the screen edge.

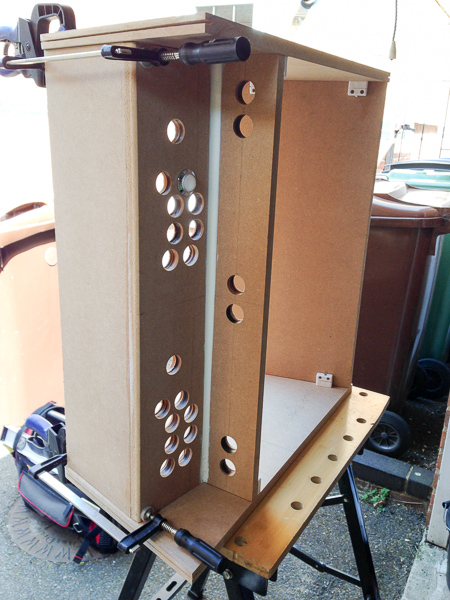
With most of the basic fabrication done it was re-assembly to see if everything fit.


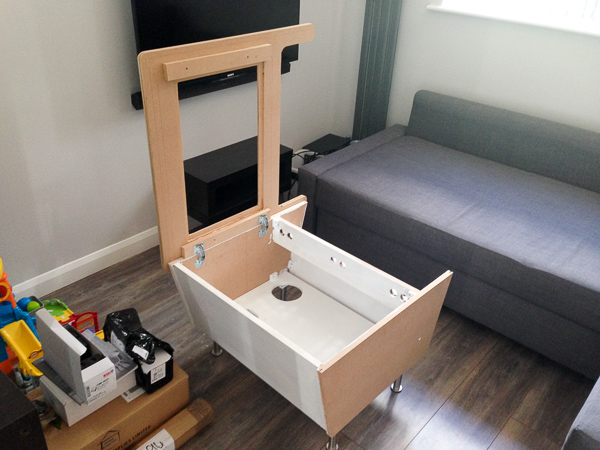
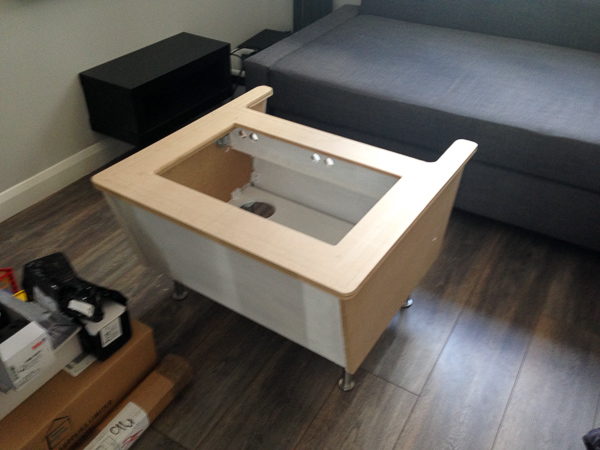
Quick trial placement of components then time to take it all apart again.


I originally wanted to cover the cabinet with laminate but due to the curved front piece it wasn’t going to be practical. I did look into heating and bending options but seems you need some specialised equipment. So after looking about at options (wanting to avoid painting) I found a sticky back vinyl wrap material. The finish is great as long as the surface welll prepared. And by well prepared I mean it will show the most minor of defects so lots and lots of filling, priming and sanding to be done.

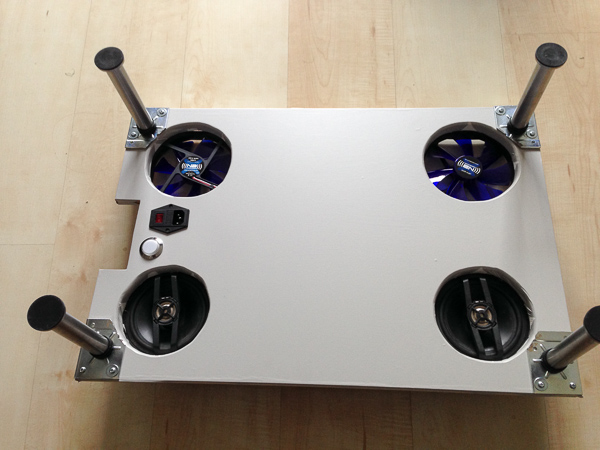
Covered the base panel and fitted the legs


I opted for a flat medium grey which went well with the room it was going in. Supplier incorrectly sent me a lighter grey first but let me keep it so I decided to use that on the inside to keep things tidy. Speakers, fans, and switches fitted.


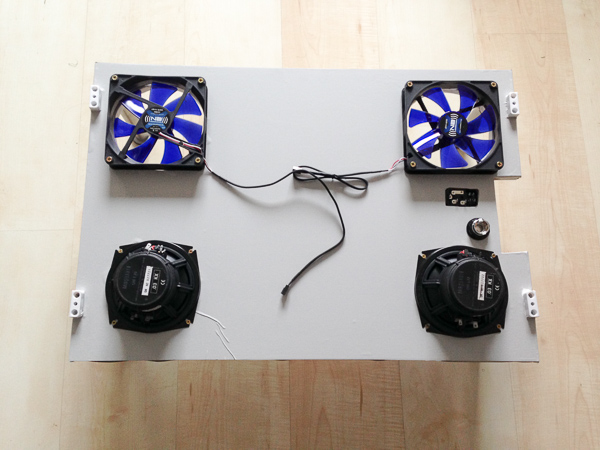
The notch out on the left is for the amp controls.

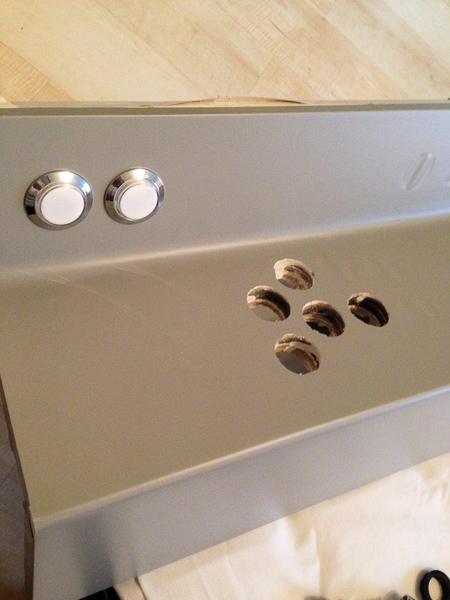
The front panel was without doubt the hardness piece to prep for vinyl, it actually took me two attempts requiring some extra vinyl to be ordered. First time round I found that joins between the pieces were visible plus I managed to stretch a bit of the vinyl whilst going round the buttons holes which meant it wouldn’t lay flat afterwards.


Doh!!


I used P38 for filling (the stuff you use on car bodywork) but it’s also fantastic for wood work, very easy to work with and sand, with the added bonus it does not shrink.

Second attempt and now happy with the finish.


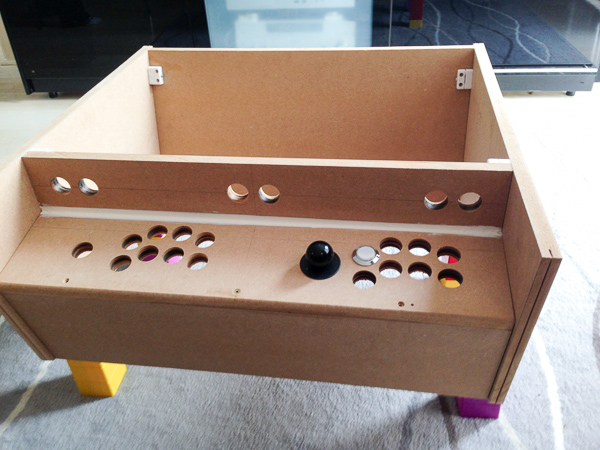
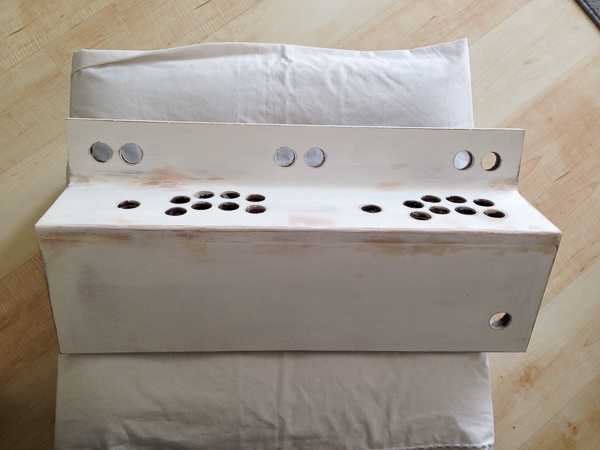
Vinyl covering holes trimmed and buttons fitted.


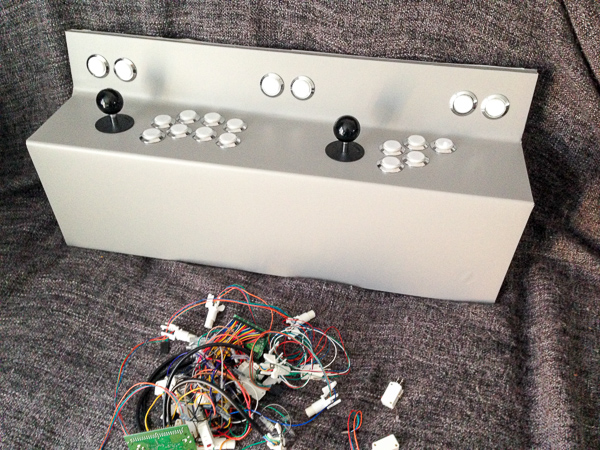
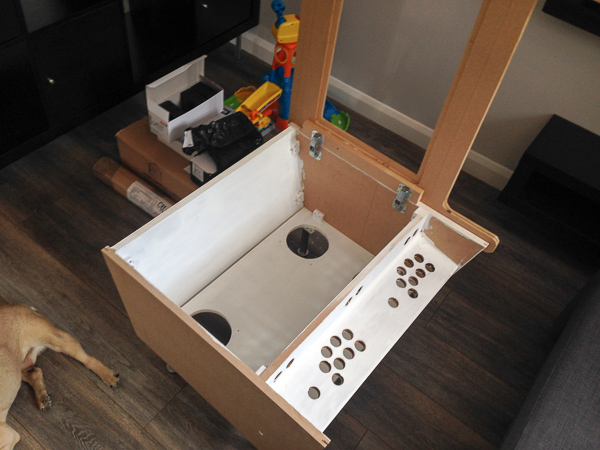
As this point I finally felt things were coming together and it was on to final assembly. Controls fitted and wired up.


Recently built some PAX wardrobes from Ikea and the glass fronts come in packaging which contained strips of rubber/foam   (~15mm square). This stuff is brilliant for mounting all the components on, keeps everything off base and also acts as a vibration dampener to reduce noise. Can see some of it in the bottom left of this photo.


Then one by one, adding all the bits and screwed them down. The fixing blocks worked great and I’ve also laid things out so sections can be (if needed) dissembled without have to cut/break anything.


Hooked it up to the TV to test wiring before putting the top panel which makes access a little harder.


I originally went for a black finish on the top piece but once fitted (only first coat applied) I wasn’t happy with it, far too dark.


So off it came, sanded down and then applied a grey paint that was intentionally a little darker than the cabinet vinyl; happy with this the t-molding was applied.


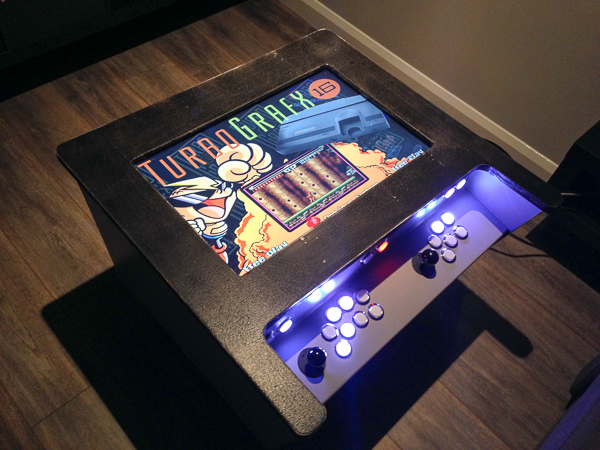
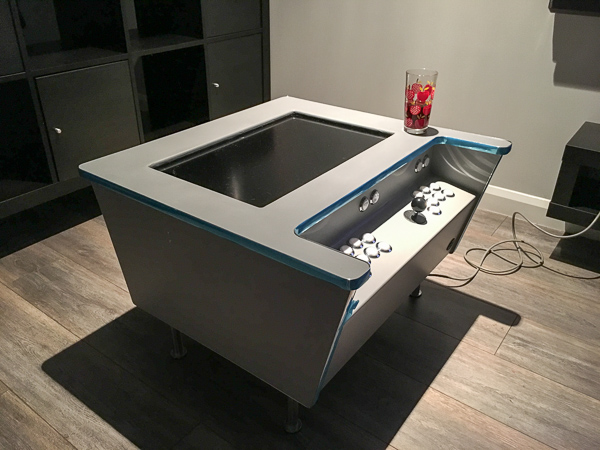
Screen fitted (made simple brackets out of MDF) and attached to cabinet.
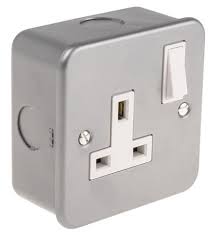
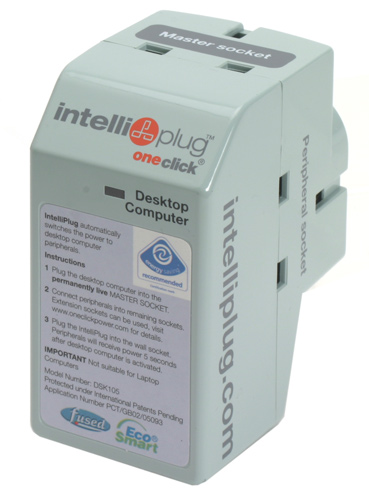


I think the only other thing I haven’t got a photo of is the power setup. The C14 inlet feeds power to a single power socket like the below which is mounted to the inside side panel. Plugged into this is a smart socket so when the PC is powered on it then also feeds power to the screen and audio amp.


Glass came from a local firm, it took a lot longer than expected due to a couple of mishaps but happy with the results. It’s 6mm toughened, bronze tinted (which looks grey), with edges rounded and polished. They even put the kite mark and info required by regs along the edge to keep the top clean.

Overall I’ve really pleased with how this project turned out, would I make any changes? Yes but I think just one, and that would be thicker vinyl to reduce the amount of prep work, but hey I can do that with the next project.

harveybirdman

  • Trade Count: (0)
  • Full Member
  • ***
  • Offline Offline
  • Posts: 2540
  • Last login:December 28, 2024, 01:21:59 am
  • SHMUP'EM
Re: The CoffeeCade (build info added)
« Reply #15 on: November 06, 2015, 11:22:57 am »
:jawdrop

Dang dude, cocktail of the year material, I had no idea it was even MDF...  Lots of WIN here.

BorgDog

  • Trade Count: (0)
  • Full Member
  • ***
  • Offline Offline
  • Posts: 436
  • Last login:August 22, 2021, 02:22:52 pm
  • Not a hipster for over 50 years!
Re: The CoffeeCade (build info added)
« Reply #16 on: November 06, 2015, 11:27:25 am »
Nice writeup, and great little cocktail cab.   :applaud:

Have you overclocked the little Pentium yet?  Probably don't need to for MAME, but it is a great little chip.
My Projects:
MisSpent Youth a Vigolix bartop,  Little Bastard a rotating tablet/display bartop,
Pin-Dog a mini pin-cab on vpforums.org  Star Wars a wedgehead pincab on vpinball.com

Knievel

  • Trade Count: (+3)
  • Full Member
  • ***
  • Offline Offline
  • Posts: 965
  • Last login:July 10, 2016, 10:29:09 pm
  • Who's up for a game of Stunt Cycle??
    • Knievel Kustoms
Re: The CoffeeCade (build info added)
« Reply #17 on: November 06, 2015, 11:58:21 am »
Awesome, professional as always.  :cheers:

So with the tinted glass I suspect it goes into stealth mode. Looks like a normal coffee table when turned off?

GSXRMovistar

  • Trade Count: (0)
  • Full Member
  • ***
  • Offline Offline
  • Posts: 436
  • Last login:April 16, 2025, 06:01:17 pm
  • Gez, this is gonna be expensive!
    • forum.arcadecontrols.com/index.php/topic,148135.0.html
    • CoffeeCade
Re: The CoffeeCade (build info added)
« Reply #18 on: November 06, 2015, 12:12:17 pm »
How do you like the ultralux buttons? I know they look great, but how do they feel for gameplay?
Sorry I missed this, I’m sure for professional type gaming concave buttons would be better but for my needs these have been fine.

Have you overclocked the little Pentium yet?  Probably don't need to for MAME, but it is a great little chip.
I had planned to but as yet nothing is running slowly.

Lots of WIN here.
Thanks

So with the tinted glass I suspect it goes into stealth mode. Looks like a normal coffee table when turned off?
You can still tell there is a screen there but it’s a lot less noticeable. To completely flatten the top so the screen isn’t visible it would need a massive tint and then it could be a struggle to see the screen when on.

rablack97

  • Trade Count: (+3)
  • Full Member
  • ***
  • Offline Offline
  • Posts: 2215
  • Last login:August 09, 2024, 08:49:57 pm
  • If you don't try, you have no chance at innovation
Re: The CoffeeCade (build info added)
« Reply #19 on: November 06, 2015, 12:48:02 pm »
Man ridiculously awesome work.....those fixing block are pretty slick, batons are going to be obsolete for cocktail and bartop builds.

 :applaud: :applaud: :applaud:

vwalbridge

  • Trade Count: (0)
  • Full Member
  • ***
  • Offline Offline
  • Posts: 2082
  • Last login:July 31, 2021, 12:21:09 pm
  • Don't half-ass two things, whole-ass one thing.
Re: The CoffeeCade (build info added)
« Reply #20 on: November 06, 2015, 12:58:37 pm »
The bezel shape reminds me of the original Apple Cinema Displays
If you can read this, it means Photobucket's money grab ruined my signature photos.

opt2not

  • Trade Count: (+15)
  • Full Member
  • ***
  • Offline Offline
  • Posts: 6173
  • Last login:April 02, 2024, 07:42:30 pm
Re: The CoffeeCade
« Reply #21 on: November 06, 2015, 01:52:34 pm »
Quote
Haha I’m gonna have to ask what they are? Guessing 8 button setup, and illuminated buttons?


Really? I thought you hated coffee and tables...  :lol

BAMBOO

  • Trade Count: (+1)
  • Full Member
  • ***
  • Offline Offline
  • Posts: 290
  • Last login:June 30, 2016, 06:51:20 am
Re: The CoffeeCade (build info added)
« Reply #22 on: November 06, 2015, 02:01:30 pm »
That )#*@ is tight.  I hate cocktails in general, but it's really not a typical cocktail and it looks pretty freakin sweet.
"Every arcade we restore preserves history that we will never experience again..."

yotsuya

  • Trade Count: (+21)
  • Full Member
  • ***
  • Offline Offline
  • Posts: 19958
  • Last login:April 26, 2025, 06:30:57 pm
  • 2014 UCA Winner, 2014, 2015, 2016 ZapCon Winner
    • forum.arcadecontrols.com/index.php/topic,137636.msg1420628.html
Re: The CoffeeCade (build info added)
« Reply #23 on: November 06, 2015, 02:04:04 pm »
I enjoy seeing projects that take things I don't care for, but put them together in a way that deserves props. Well done.
***Build what you dig, bro. Build what you dig.***

harveybirdman

  • Trade Count: (0)
  • Full Member
  • ***
  • Offline Offline
  • Posts: 2540
  • Last login:December 28, 2024, 01:21:59 am
  • SHMUP'EM
Re: The CoffeeCade
« Reply #24 on: November 06, 2015, 02:12:53 pm »

Really? I thought you hated coffee and tables...  :lol

Nah, as evidenced by my disgusting desk and GOTG mug....


talkgeek

  • Trade Count: (0)
  • Full Member
  • ***
  • Offline Offline
  • Posts: 199
  • Last login:September 06, 2024, 04:19:32 am
  • Every day you wake up breathing is a GOOD day!
Re: The CoffeeCade (build info added)
« Reply #25 on: November 09, 2015, 07:44:52 pm »
seriously nice build  :applaud:

changes my opinion on aesthetics of horizontal cocktail cabs
Currently building http://forum.arcadecontrols.com/index.php/topic,137777.0.html Mass-Replicate
Built "n0tsq3" cocktail cab http://forum.arcadecontrols.com/index.php/topic,133913.0/all.html
..and restoring a Sega MegaLo 410 Candy Cab & Moon Patrol Cab

DeLuSioNal29

  • Global Moderator
  • Trade Count: (+6)
  • Full Member
  • *****
  • Offline Offline
  • Posts: 4779
  • Last login:June 08, 2025, 06:02:40 pm
  • Build the impossible -"There is no Spoon"
    • DeLuSioNaL's YouTube Videos
Re: The CoffeeCade (build info added)
« Reply #26 on: November 10, 2015, 11:31:05 am »
So with the tinted glass I suspect it goes into stealth mode. Looks like a normal coffee table when turned off?
I had the same question.  Any pics of it turned off?

Great build by the way!

D
Stop by my Youtube channel and leave a comment:

n3wt0n

  • Trade Count: (0)
  • Full Member
  • ***
  • Offline Offline
  • Posts: 540
  • Last login:January 27, 2024, 05:03:38 pm
Re: The CoffeeCade (build info added)
« Reply #27 on: November 11, 2015, 07:31:06 am »
As others have also stated, cocktails aren't really my thing but this cocktail is a beautiful piece of furniture. To me it looks modern, understated and sleek and after seeing how you built it I can really appreciate the craftmanship that went into it. While you haven't swayed me into wanting a cocktail (yet), you have obviously turned a lot of heads and shown people how badass a cocktail can be.

Alejo I

  • Trade Count: (0)
  • Full Member
  • ***
  • Offline Offline
  • Posts: 94
  • Last login:Yesterday at 05:55:56 pm
  • Trying something new
Re: The CoffeeCade (build info added)
« Reply #28 on: November 11, 2015, 09:48:07 am »
I'm shocked by how much I enjoy the look of this project despite my general dislike towards cocktail cabs. The aesthetics, planning and building are just fantastic. Great job.

I only have two small questions: is it actually comfortable? It looks like the glass top may get in the way of the button/joystick action. Also, are those speakers properly shielded? I'd be concerned about their impact on the PSU, although they look like enclosed high end drivers with their own shielding.

GSXRMovistar

  • Trade Count: (0)
  • Full Member
  • ***
  • Offline Offline
  • Posts: 436
  • Last login:April 16, 2025, 06:01:17 pm
  • Gez, this is gonna be expensive!
    • forum.arcadecontrols.com/index.php/topic,148135.0.html
    • CoffeeCade
Re: The CoffeeCade (build info added)
« Reply #29 on: November 11, 2015, 05:29:43 pm »
Thanks again for the kind comments, and yes it is actually comfortable to play on. It may not be if the sofa/chair height was higher but the current setup works well. Regarding the speakers yes they are shielded and I haven't noticed any issues with the PSU so far.

flylear45

  • Trade Count: (0)
  • Full Member
  • ***
  • Offline Offline
  • Posts: 35
  • Last login:January 31, 2021, 11:55:08 am
  • I want to build my own arcade controls!
Re: The CoffeeCade (build info added)
« Reply #30 on: January 08, 2016, 04:48:09 pm »
I'm a new guy still working my way through the treasures on this board, and this is simply gorgeous! My head was never turned by a cocktail........ until NOW!

Great work and a fantastic result.

churchyuk

  • Trade Count: (0)
  • Jr. Member
  • **
  • Offline Offline
  • Posts: 1
  • Last login:June 05, 2020, 04:14:44 pm
  • I want to build my own arcade controls!
Re: The CoffeeCade (build info added)
« Reply #31 on: July 09, 2019, 04:31:40 am »
Absolutely Love your work.  So much so that I decided to make my very own.

Here it is.


Alejo I

  • Trade Count: (0)
  • Full Member
  • ***
  • Offline Offline
  • Posts: 94
  • Last login:Yesterday at 05:55:56 pm
  • Trying something new
Re: The CoffeeCade (build info added)
« Reply #32 on: July 09, 2019, 08:26:14 am »
It looks like a pretty nicely made replica. The paintjob appears to be well done.

You should consider painting the top black like GSXRMovistar, as it blends with the display and provides a nice depth to it. I imagine that you are looking into using a set of proper legs. Those are cheap and would elevate your build.

javeryh

  • Trade Count: (+1)
  • Full Member
  • ***
  • Offline Offline
  • Posts: 7959
  • Last login:June 12, 2025, 03:49:41 pm
Re: The CoffeeCade (build info added)
« Reply #33 on: July 09, 2019, 03:52:34 pm »
@churchyuk - post your build log in a separate thread so we can all see what you did.  It came out nice.   :cheers:

GSXRMovistar

  • Trade Count: (0)
  • Full Member
  • ***
  • Offline Offline
  • Posts: 436
  • Last login:April 16, 2025, 06:01:17 pm
  • Gez, this is gonna be expensive!
    • forum.arcadecontrols.com/index.php/topic,148135.0.html
    • CoffeeCade
Re: The CoffeeCade (build info added)
« Reply #34 on: July 13, 2019, 05:16:04 am »
Wow hows that for timing, not logged in for ages and when I do I see this has just been posted. Great effort @churchyuk!

As above would love to see a build thread, did you take many photos?