 Introduction
Reco PCB is a microcontroller based device that allows you to change the button layout in your arcade cabinet (or superguns joypad/arcade stick) on-the-fly. It also has a fully configurable autofire feature for every button.
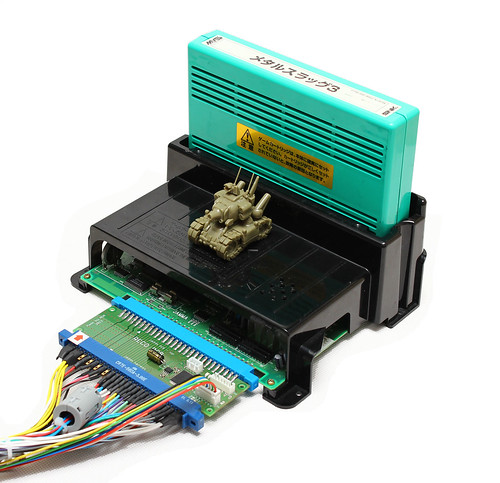
Reco PCB plugs between a JAMMA PCB game and an arcade cabinets/superguns JAMMA harness. By pressing a combination of buttons, you can access the configuration mode which allows you to remap the buttons, enable autofire and access the PCB games test/service modes.
Features of the Reco PCB- Compatible with the JAMMA and JAMMA+ standards.
- 6 fully configurable button inputs (or even 7-8 inputs in custom setups)* and 6 outputs for both Player 1 and 2*.
- VSYNC synchronised autofire feature for each button.
- VSYNC is extracted from the PCB games SYNC line for the ultimate compatibility and stability. There are 6 different VSYNC synchronised autofire rates to choose from.
- Lagless.
- Allows you to access the PCB games test/service mode by using a combination of buttons.
- Your new button layout and autofire settings are saved and stored in the microcontrollers internal memory and stay there even when you disconnect the Reco PCB.
- On top of the on-board status LEDs , the Reco PCB allows you to additionally connect your own, external LEDs.
- * 5 button inputs via the JAMMA edge and 3 additional button inputs via an auxiliary connector on the Reco PCB for both Player 1 and 2.
- ** 5 output signals via the JAMMA connector that plugs into the PCB game, and 3 output signals via an auxiliary connector on the Reco PCB for both Player 1 and 2.
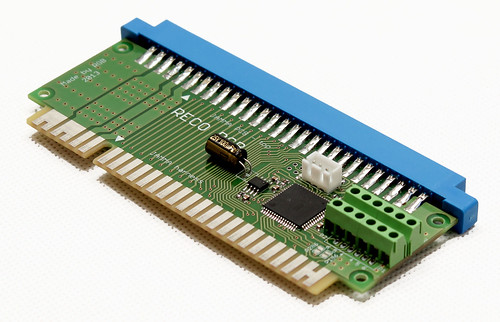
JAMMA+ info- For the PCB games that use more than 3 buttons, but dont handle them via the JAMMA connector (CPS1, CPS2, CPS3, Namco System12 etc.), you just connect a kick harness to the auxiliary connector on the Reco PCB.
The way the button remapping and autofire features work, creates a whole new level of functionality. For example, in a 6 button panel setup you can assign all 6 buttons to work as the button "A", then, you can additionally set a different autofire rate for each button "A" clone if you want.
This systems gives you the incomparable freedom in experimenting with, and finally using your own button layouts and autofire.
OperationReco PCB has two main configuration modes, one is the button configuration mode that allows you to remap the buttons, and the other is the autofire mode, to enable the autofire feature for selected buttons. There is also a sub mode called extra mode which is used to access the PCB games test/service mode.
- Button configuration mode:
1. Press and hold down two arbitrary buttons and the START button for 3 or more seconds. After 3 seconds an appropriate status LED on the board will light up this means you are in the remapping mode and you can release the buttons.
2. Right after you release the last of the three buttons held down, you can make changes to the layout.
Each press of a button on the arcade cabinet panel/supergun joypad corresponds to the JAMMA button number.
If you press a button once, it will be your JAMMA button 1, twice - button 2, thrice - button 3, it works up to button 6. The seventh press will disable the button; the eighth press will start the countdown over. No button press = no button set.
Every time you press a button, the status LED will blink.
3. To exit the button configuration mode and save your new layout, press the START button.
Side note: Every time you access this mode, your previous layout will be erased and you will need to set your button layout anew. This is an easy and fast way to reset your settings. - Autofire mode:
1. Press and hold down one arbitrary button and the START button for 3 or more seconds. After 3 seconds an appropriate status LED on the board will light up this means you are in the autofire mode and you can release the buttons.
2. Right after you release the last of the two buttons held down, you can enable the autofire for each button by simply pressing it.
Each press of a button corresponds to the autofire rate.
- One press -> 1/2 of the games VSYNC, its the fastest you can have,
- Two presses -> 1/3 of the games VSYNC,
- Three presses -> 1/4 of the games VSYNC,
- Four presses -> 1/6 of the games VSYNC,
- Five presses -> 1/8 of the games VSYNC,
- Six presses -> 1/10 of the games VSYNC,
- The seventh press will disable the autofire feature for the button; the eighth press will start the countdown over. No button press = no autofire set.
Every time you press a button, the status LED will blink.
3. To exit the autofire mode and save the settings, press the START button.
Side note: Just like in the button remapping mode, your previous autofire settings are being erased the moment you access the autofire mode.
Consequently, if you want to reset all the autofire settings, just go into the autofire mode and exit it without pressing any button. - Extra mode:
- Test:
1. Press and hold down the Player 1 START button for 10 or more seconds. After 10 seconds the red LED on the board will light up. Release the START button.
2. Now youre in the extra mode. While in this mode, all the buttons are disabled and each of them now has a different function they allow you to go into the PCB games test mode. You simply press an arbitrary button and it will act as the JAMMA button TEST.
3. The moment you release the button, the Reco PCB will come back to its normal operation mode and you can make use of the test mode youve just accessed in the game. - Service:
Works in the same fashion as the Test, but is activated by using Player 2 START button; the green LED will light up.
Side note: If you activated the extra mode by mistake, you can exit it without going into the test mode, by pressing the START button once.
- Reco PCBs internal memory reset:
You can consider this a full device reset. It will erase the layouts for both Player 1 and 2. To do the reset, press and hold down either of the START buttons on the arcade cabinet/supergun start up.
Installation- 1. Make sure your arcade cabinet or supergun is OFF.
2. Plug the Reco PCB between your JAMMA PCB game and the JAMMA harness. Reco PCB is marked as top, additionally two white triangles indicate the JAMMA KEY so that you dont connect the device the other way round. Connect the harness for additional buttons and the kick harness if necessary.
3. Turn on your arcade cabinet or supergun.
4. If used for the first time, test the Reco PCB by going into either of the programming modes and see if the LEDs light up.
Gallery
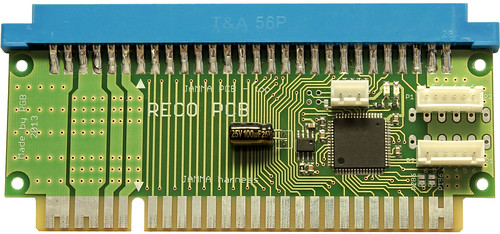
It also comes with screw terminals instead of connectors.


 Home
Home Help
Help Search
 Login
Login Register

 Send this topic
 Print
Print Topic: Reco PCB - a JAMMA button remapping and autofire device (Read 3025 times)


