Main Restorations Software Audio/Jukebox/MP3 Everything Else Buy/Sell/Trade
Project Announcements Monitor/Video GroovyMAME Merit/JVL Touchscreen Meet Up Retail Vendors
Driving & Racing Woodworking Software Support Forums Consoles Project Arcade Reviews
Automated Projects Artwork Frontend Support Forums Pinball Forum Discussion Old Boards
Raspberry Pi & Dev Board controls.dat Linux Miscellaneous Arcade Wiki Discussion Old Archives
Lightguns Arcade1Up Try the site in https mode Site News

Unread posts | New Replies | Recent posts | Rules | Chatroom | Wiki | File Repository | RSS | Submit news


Author Topic: Another First Arcade Build - "Noiseland Video Arcade"  (Read 7634 times)

0 Members and 1 Guest are viewing this topic.

Dechene

  • Trade Count: (0)
  • Full Member
  • ***
  • Offline Offline
  • Posts: 39
  • Last login:April 22, 2021, 07:17:00 pm
Another First Arcade Build - "Noiseland Video Arcade"
« on: October 17, 2010, 09:49:46 am »
Well, like many who post on here, I randomly stumbled on the site from somewhere ages ago, and the build bug gnawed at me from that day for months & months & months til I could ignore it no more.

So I sat down and designed me a mame Cab.

My plan was simple, I wanted an upright cab that fits 2 people playing Street Fighter.
Other than that I didn't really know what else I wanted / needed.

After searching all over the web looking at other peoples designs & plans, I couldn't find any that really suited what I wanted.
I've never played a game with a spinner or trackball, I've only ever seen one game with a ball in real life, think it was Tiger woods golf, and it didn't impress me at all. Strange cos I spent my youth in arcades, guess I've always liked fighting n shooting games too much, Raiden anyone?

So anyways, I'd had an old TV hooked up to my pc for years which I used for video editing, so I tested mame on it and it looks fantastic, way better than it does on my 21 or 19in lcd's. So the idea evolved around that TV.
After reading all the 'don't do this at home' warnings on the web about removing the tv case, I chickened out and didn't remove it. So that pretty much set the size of my cab, 600mm wide by around 720mm deep, enough to fit the TV case perfectly & squeeze 2 player controls in as well.

I started of by drawing out what I wanted, then I designed it in Google Sketchup. The great thing about this was that I modelled the TV first, then designed the Cab around the TV size, = perfect fitting TV. (I hope). (FYI a Cabinet is a great project to learn Sketchup on, not so simple that you get bored, not so hard that you give up straight away)
This is what I ended up with:


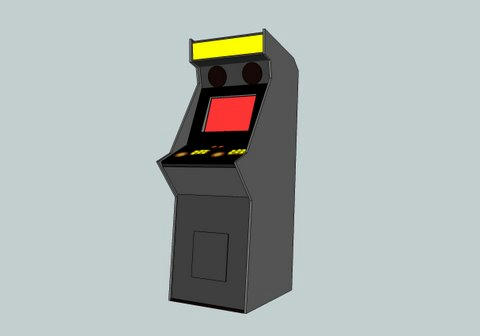
I didn't want a control panel that sits forward of the cabinet & extends past the sides like most do. I like how it is all contained. If once I build it I find it too small to fit 2 people comfortably on, then I can make a separate CP which is bigger, 4 wing bolts will keep the CP attached to the cab so it's an easy changeover.

And as for the angle at the back, I just love it. It makes the Cab seem bigger and more imposing to me, just like when I was a little kid walking up to StreetFighter for the first time...

Day 1
So I figured out the dimensions & angles, and got to work cutting out the sides.
I wanted to use 18mm MDF but the guys at Bunnings won't cut it to fit in the car because of the chemicals in it, so I had to settle on 18mm Particle Board.
After 2-3 hours of cutting and sanding, I had 2 sides with the exact same flaws in them. That's good enough for me.


Day 2
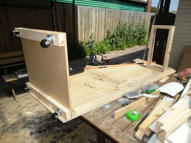
I made the base from MDF & pine. I put 4 castors on it, the back ones rotate 360 for steering.
Then I mounted the base to one panel, and a frame for the top half, and stuck the other panel on the top of it all.
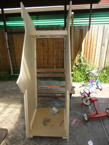
I could have made this step a LOT easier by properly marking the side panels first so I could align them easily, but dumbass here didn't think of that beforehand.


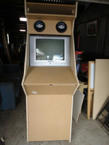
But, I eventually got there, and was able to stand the Cab upright for the first time.


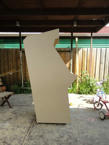
Of course, I also dropped it cos it weighs a tonne so I damaged the left hand bottom corner. Awesome. Luckily I can curve off the front corners and it will look like it was designed that way, but I'll always know the truth...

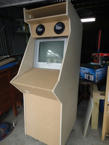
Once it was upright, I installed the fixed front panel, all access is through the rear, (insert cheeky joke here) and screwed it. ( <--There's your cheeky joke)
I also installed the Roof of the Cab and a sliding drawer for the KB, Mouse, PS2 & extra Controllers.

Look at that lean! I love it, it 'makes' the cab for me!

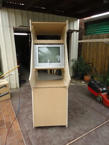
Test fit with the TV:

Day 3
I work 13 hr night shifts, so I probably shouldn't have picked up the tools after one of them, but waddya gonna do? There's a cab to be built right? who needs all 10 fingers??? Luckily I kept them all attached, and if anyone's ever wondered, circular saws really wake you up quickly.
So I managed to create the front of the "secret" drawer, it has a crescent cut out of the top for easy access, and also a couple of pieces of MDF for the Marquee to sit on.

I also cut the holes for the Speakers in MDF and test fitted them in the Cab, with the TV, and the MDF panel for the CP as well.
I've never made anything as nice as this before, it was such a great feeling when I slid the TV in and it fitted perfectly, less than a 4mm gap on both sides, looks great too.


And that's where the build is at, at the moment.
I'm designing my CP & Marquee artwork in Photoshop, but struggling to come up with a theme...

Parts & Plans:
Connection:
I'm using a I-Pac from Ultimarc.
My buttons wiring & the I-Pac will be wired directly to these thingies from eBay:

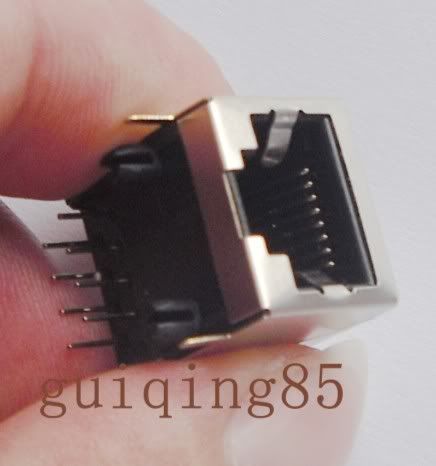
This way, I can use standard network cable to plug them in and be able to easily change CP's & even individual parts. In theory of course.
The I-Pac will not be on the CP in case I make multiple CP's.
Sound:
Now, I was going to use a set of PC speakers that I had lying around but going through the garage, I found something much, much better. Pioneer 220w 4-Way Car speakers better. Jumping on the net, I find all I need is an Amp to run them and they'll work great with my system. I tested them out by ripping open the amp from the PC speakers I was planning to use, the sound was spectacularly clear and full, but way too quiet. So eBay to the rescue, $14aud for a 2 channel amp which is on it's way to me from Hong Kong as I type.
Coin Door:
I will be installing one, as soon as I can find a cheapo on eBay or around the place.
Admin Buttons:
Other than dedicated P1, P2 & Pause buttons, I think I'll be using shortcuts for any other functions.
Computer:
I was having Power Supply issues with my old comp, so off to eBay again. $50 for a 2ghz AMD with 1gb RAM, I've tried out the games I'll be playing, they all ran perfectly on it, I'm rapt, what a great buy.
Extra's:
I'll have my old PS2 hooked up in there as well.
Possibly a couple of USB gamepads for 4 player NBA Jam & Simpson's, but I'll wait and see if the screen is big enough for 4 guys to stand that close together first...  

I think that's it, sorry for all the writing, but when I'm reading the project builds I like the ones that are 'wordy'.
Feel free to let me know what I've done wrong / right (if anything),
Cheers, Mario
« Last Edit: August 15, 2011, 06:26:28 am by Dechene »

DKong101

  • Trade Count: (0)
  • Full Member
  • ***
  • Offline Offline
  • Posts: 22
  • Last login:January 29, 2011, 04:33:27 pm
Re: Another First Arcade Build
« Reply #1 on: October 17, 2010, 10:40:20 am »
This looks SUPER cool to me!

If you are looking for a cheap coin door, here is one off of Ebay:
http://cgi.ebay.com/Coin-Control-Door-/270646627957?pt=LH_DefaultDomain_0&hash=item3f03cbce75

I wish you good luck in making your cab

EvilNuff

  • Trade Count: (0)
  • Full Member
  • ***
  • Offline Offline
  • Posts: 430
  • Last login:February 24, 2024, 04:41:13 pm
Re: Another First Arcade Build
« Reply #2 on: October 17, 2010, 10:44:34 am »
Pretty nice start for a first build.  Welcome to the hobby. :)

Dechene

  • Trade Count: (0)
  • Full Member
  • ***
  • Offline Offline
  • Posts: 39
  • Last login:April 22, 2021, 07:17:00 pm
Re: Another First Arcade Build
« Reply #3 on: October 17, 2010, 10:50:21 am »
This looks SUPER cool to me!

If you are looking for a cheap coin door, here is one off of Ebay:
http://cgi.ebay.com/Coin-Control-Door-/270646627957?pt=LH_DefaultDomain_0&hash=item3f03cbce75

I wish you good luck in making your cab


Thanks for the comments guys.
I should mention that I'm in Melbourne, Australia, I checked out the postage on that coin door, roughly 60 odd bucks...Maybe not from the states for that part...  ;)

BurgerKingDiamond

  • Trade Count: (+4)
  • Full Member
  • ***
  • Offline Offline
  • Posts: 690
  • Last login:July 01, 2021, 11:12:14 am
Re: Another First Arcade Build
« Reply #4 on: October 18, 2010, 02:28:51 pm »
You have an interesting design, very cool. The only concern I see is the possibility of your CP being to sloped. It looks like it would be uncomfortable to play for long.  But without actually playing you can't tell. How does it feel to you?
-Welcome to the Fantasy Zone.

DirtyDachshunds

  • Trade Count: (+1)
  • Full Member
  • ***
  • Offline Offline
  • Posts: 360
  • Last login:December 18, 2014, 01:14:25 pm
    • First Project: MillerCade
Re: Another First Arcade Build
« Reply #5 on: October 18, 2010, 04:24:17 pm »
I like your design.  Seems unique.  I'll be sure to watch this one.

Dechene

  • Trade Count: (0)
  • Full Member
  • ***
  • Offline Offline
  • Posts: 39
  • Last login:April 22, 2021, 07:17:00 pm
Re: Another First Arcade Build
« Reply #6 on: October 19, 2010, 10:19:37 am »
You have an interesting design, very cool. The only concern I see is the possibility of your CP being to sloped. It looks like it would be uncomfortable to play for long.  But without actually playing you can't tell. How does it feel to you?

At the moment it seems okay.
But of course that's just me standing there and tapping my fingers on the plain mdf board, and pretending to wiggle a joystick around as well.
Oh, and shouting out 'HADOOKEN' every 7 seconds.

Don't laugh, you guys all did that too!
Didn't you?

I'll be making the cp on saturday, fingers crossed, I'll update soon as I know how bad it is!

Dechene

  • Trade Count: (0)
  • Full Member
  • ***
  • Offline Offline
  • Posts: 39
  • Last login:April 22, 2021, 07:17:00 pm
Re: Another First Arcade Build
« Reply #7 on: October 25, 2010, 09:07:46 am »
There never seems to be enough hours in the day when you actually want to do something, but I finally had some time to get to work on my Control Panel.

I printed out the button template on A3 sheets and stickytaped them down on the panel to mark the centre of all the holes.
All the button holes were drilled out just using a 28mm Spade bit.
I've seen some people say that spade bits are a bad choice, but they've always worked a treat for me, and this was exactly the case here too.

All the buttons just popped into place, and are just where I wanted them. I'll be bottom mounting the joysticks but I haven't routed out a groove for them yet, they are just temp screwed in to see how they feel.
The player 2 buttons are slightly off angle to make more space for the players to stand.
Player 1 stands normally on the left, while Player 2 stands on a slight angle on the right.
This way 2 full size guys can play without bumping each other on the 600mm panel.

I actually prefer to stand on an angle when playing arcades so the Player 2 position feels more natural to me than Player 1, but both feel very comfortable. It seems to be a good fit with the height & angle but of course I haven't spent hours in front of it yet playing away...Fingers crossed it stays as comfy as it is now.


I've also been able to finally name my Arcade and design the artwork for the Control Panel.
The name shall be "Noiseland Video Arcade" (the name of the arcade in The Simpsons.)

I'm sure it's been used on 50 cabinets already but it really fits my cabinet, #1 - I LOOOOOVE the Simpsons and #2 - Today I received the amplifier I ordered from Hong Kong to drive my Car Speakers - Let me just say - HOLY CRAP!!
This is one LOUD & crystal clear cabinet, I'm not going to install a woofer because there is no need, it really will be "Noiseland" when you start playing!

So anyways, I created the Noiseland logo, added Ken & Ryu, and then was stuck.
I wanted some fireballs but ones that fit my panel design, not real life flames.
A bit of mucking around in Photoshop and I ended up with these blue fireballs to border the Player 1 & 2 buttons.


I'll get it printed in the next day or two, but to help with tweaking the design, I manipulated this photo:


I must have made around 15 different versions of this image, but I'm glad I did, it's a very bright, colourful and clean image, I think it'll look good under plexiglass.

As for printing, I think I'll just get it printed on a thick gloss paper, then it will be covered with plexiglass.
Any reason why I should pay extra to have it printed on a thicker laminate type material over the net?
It will cost me around $15 at the local officeworks to get it done my way, any advice?

So that's where I'm at at the moment, hopefully my network dongle thingamajigs arrive soon, once I have them I can wire this baby up!
« Last Edit: August 15, 2011, 06:30:12 am by Dechene »

eds1275

  • Trade Count: (0)
  • Full Member
  • ***
  • Offline Offline
  • Posts: 2165
  • Last login:June 13, 2025, 11:04:26 am
  • Rock and Roll!
Re: Another First Arcade Build - "Noiseland Video Arcade"
« Reply #8 on: October 25, 2010, 11:10:22 am »
That looks great, I like the side profile! I was wondering why you ordered those jack for the ethernet cable off the web though, most hardware stores [around here anyway] sell them. The most popular or at least readily available are the Leviton quickport jacks.

emphatic

  • Trade Count: (0)
  • Full Member
  • ***
  • Offline Offline
  • Posts: 2017
  • Last login:Yesterday at 04:32:47 am
  • -"Suck it, Donny!" -"No, YOU suck it.... more".
    • Emphatic's Video Game Collection
Re: Another First Arcade Build - "Noiseland Video Arcade"
« Reply #9 on: October 25, 2010, 11:54:43 am »
Very cool cabinet! Kudos.  :applaud:

Rick

  • Trade Count: (+1)
  • Full Member
  • ***
  • Offline Offline
  • Posts: 2787
  • Last login:May 19, 2025, 11:21:11 am
  • Bartop, Cocktail and Pinball Arcade Cabinets
    • Gameroom Designs Canada
Re: Another First Arcade Build
« Reply #10 on: October 25, 2010, 12:33:13 pm »
The name shall be "Noiseland Video Arcade" (the name of the arcade in The Simpsons.)

I found a startup video for you.


dfmaverick

  • Trade Count: (0)
  • Full Member
  • ***
  • Offline Offline
  • Posts: 343
  • Last login:July 03, 2016, 11:17:27 am
  • I want to build my own arcade controls!
Re: Another First Arcade Build - "Noiseland Video Arcade"
« Reply #11 on: October 25, 2010, 01:16:46 pm »
Lookin' Good.

Does having the buttons & joysticks up inside the sides hinder gameplay at all for player one or two when you are both playing? Just wondering since it looks like it could be uncomfortable for player two.

Dechene

  • Trade Count: (0)
  • Full Member
  • ***
  • Offline Offline
  • Posts: 39
  • Last login:April 22, 2021, 07:17:00 pm
Re: Another First Arcade Build - "Noiseland Video Arcade"
« Reply #12 on: October 25, 2010, 11:22:15 pm »
Lookin' Good.

Does having the buttons & joysticks up inside the sides hinder gameplay at all for player one or two when you are both playing? Just wondering since it looks like it could be uncomfortable for player two.

It doesn't seem to at the moment. I convinced my arcade hating wife to stand next to me and play with the controls after I set them up, both positions feel very 'right' and natural. It looks stranger than it feels I promise.

I found a startup video for you.
Absolute gold - thank you very much!  :applaud:

That looks great, I like the side profile! I was wondering why you ordered those jack for the ethernet cable off the web though, most hardware stores [around here anyway] sell them. The most popular or at least readily available are the Leviton quickport jacks.

I've actually never seen anything like what i ordered in the shops before, but can't say I actively went looking for them either. It was just a lazy night in front of ebay buying parts and these seemed like a good idea.
I had a look at the Leviton jacks, they look great but are around $4-$5 each one. I bought 10 of the other ones for $4.50 inc postage... Yep, I'm a tight-ass...

Very cool cabinet! Kudos.  :applaud:

Thanks!

Dechene

  • Trade Count: (0)
  • Full Member
  • ***
  • Offline Offline
  • Posts: 39
  • Last login:April 22, 2021, 07:17:00 pm
Re: Another First Arcade Build - "Noiseland Video Arcade"
« Reply #13 on: October 28, 2010, 09:08:09 am »
Well I got a stack of work done today, very happy with Noiseland's build so far!

I gave the cab a coat of primer yesterday, then today I realised that, bugger, I hadn't routed out the groove for the t-moulding!
But everything turned out well in the end, I headed straight down to my local Bunnings, and found the exact slot cutter I needed straight away, woo-hoo!


I've been using routers for about...25minutes now, so I thought I better practice heaps so I didn't ruin the cab so I grabbed some offcuts from the side panels and started to play around.
It took me longer to figure out the height needed, (with copious amounts of double checking) than it did to rout out both panel grooves. Routers are awesome, it went through the wood like it was butter and left a beautiful smooth groove all the way around.
Here's the result:


It may be a boring photo to you, but man, routers are magical machines which I have just now discovered!

I also built the frame that the CP will sit on and fixed that to the cabinet.


And this is what it looks like when the CP is mounted to that.


I've routed out the CP to raise the joysticks a little, no photo of that cos I didn't do a perfect flush job of it. :-[

I like the bolt heads showing on the CP, but I have to sand / polish the heads of the bolts as they have the manufacturer logo on them.
I'll start googling how to do that after I finish this post.

I also took the artwork to the printshop for the CP, I pick that up tomorrow when I'll buy some more plexi for the CP as well.
Hopefully the cp is complete in 24hrs from now...

I didn't take any photos but I also cut up 2 pieces of acrylic for the marquee and the main screen piece which I will spray the edges black to create a bezel.

Photos of that tomorrow, cos I'm damn tired now...

I'm on the home stretch now I think!  :'(
« Last Edit: August 15, 2011, 06:32:25 am by Dechene »

Vebbo

  • Trade Count: (0)
  • Full Member
  • ***
  • Offline Offline
  • Posts: 145
  • Last login:September 22, 2015, 01:35:18 pm
    • Overaged Lucky Drivers
Re: Another First Arcade Build - "Noiseland Video Arcade"
« Reply #14 on: October 28, 2010, 10:21:06 am »
I like the bolt heads showing on the CP, but I have to sand / polish the heads of the bolts as they have the manufacturer logo on them.
I'll start googling how to do that after I finish this post.

Have a look at this http://forum.arcadecontrols.com/index.php?topic=87061.80

I used that method and ended up with these babies :-) very happy with the result.

Vebbo
I was elected to lead, not to read!

Vebbo turning x-men cab to custom 1942 cab

Dechene

  • Trade Count: (0)
  • Full Member
  • ***
  • Offline Offline
  • Posts: 39
  • Last login:April 22, 2021, 07:17:00 pm
Re: Another First Arcade Build - "Noiseland Video Arcade"
« Reply #15 on: November 08, 2010, 08:14:53 am »
Holy crap I haven't updated for ages, blame that on Bubble Bobble...

I'm a bit behind on my photos, but here's a couple more.

The plexiglass being drilled in prep to be routed out:


This was great fun to do, my router is definitely my new favourite tool!

The plexi bezel being sprayed:


I was a bit worried that it would look like a real crappy bodged together sort of bezel, but it actually looks really really nice & glossy.

Just to make sure that you can't really tell it's just a TV in there, I also sprayed the front casing of it black too:


And the result of 1 coat primer & 2 top coats:


I picked up and almost bought a can of gloss black paint in the store, but changed my mind at the last minute.
I thought that black may be just too boring especially if I don't have artwork on the sides for a while.
I figure the brown will complement the orange & yellow used in the marquee & control panel, and will also look nice with the Red T-moulding I bought.

The control panel art sandwiched between mdf and plexi with buttons installed, I love it!


I've also done a fair bit of work on the PC for the arcade.
MALA will be my frontend, I've setup a simple & clean design using the same graphics & colours from my CP.
The comp boots straight into MALA and the Simpson's clip posted earlier by Rick is played on startup as well.
However I need some help with hiding windows.
I can hide everything except for the blue screen which says 'Welcome' and displays for 10secs or so before the desktop / mala loads up.
I have my own boot screen come up, but after that is displayed this damn blue one comes along and looks very out of place.
If anyone knows how to get rid of that screen it would be much appreciated!

Now I guessed that because the build went so well, I was going to have a hard time with the electronics, and I am...

Wiring:
I gave up on waiting on the network plugs to arrive from china, they've gone missing methinks.
Seeing as I probably won't be making another CP for this cab, the setup works quite well I think, I figured that I may as well just wire the buttons up
as you normally would. So I did, and then spent 4hrs in front of my computer "testing" the wiring in every game I knew.
Works GREAT! The I-Pac is a brilliant device, if you're thinking of getting one and are in Australia at the moment, buy it now!
The USD is very weak compared to normal, I nearly bought the I-Pac 6 months ago, it would have cost me $96 but I backed out.
I bought it for $72 just 2 months ago, and priced it at only $59 just a week ago, the rate will change back soon so if you plan on a cab in the next year, buy one now!

Speakers:
OMG. During the build I thought to myself, "hmm, my speakers aren't magnetically shielded, (car speakers), will that be a problem later on...?
Nah, they'll be far enough away from the TV to not affect it, she'll be right mate."

Nope, I was wrong. They certainly are close enough to affect the TV, in fact, when I plugged the PC in for a test fit, the whole top half was an awful blue / green / yellow colour, it looked ridiculous and was unplayable.
So back to google I went. And found out that the only thing people did to fix it was to move the speakers away. Not really an option for me at this stage...
So racking my brain for a while and reading up on how speakers are shielded, it occurred to me that I could easily shield them myself.
If anyone is interested in my high tech fix, here it is -> I went into the kitchen cupboards and got out 2 cake tins that are a bit bigger than the speaker magnets. I placed them on the back of the speakers, the magnets held them in place, and looked at the TV, the interference was all gone! Woohoo!! The cake tins absorbed & diverted the magnetic field away from the TV, and made it all pretty again!
I will mount them properly but just so you know, metal cake tins work fine in Mame Cabs!

Video cord:
My TV only has RCA inputs, my PC only outputs S-VIDEO
I ordered an s-video to RCA cord on ebay last week. It came today and I plugged it into the arcade pc and tv, but was very disappointed, the picture was in B&W! I had only tested the TV with my home PC which outputs RCA, it had always worked perfectly.
Searching around I realised that I had ordered a S-VHS to RCA cord which is different to a s-video cord. Stupid similar naming conventions!
So i headed out to the shops, but not one freaking store had the cord I wanted! Not even the home theatre stores had them, WTF?
I didn't want to wait 7 days for it to come in the post, so I Wikipedia'd it.
Wiki has the "schematics?" of the plugs, it was an easy matter to get an s-video and then an RCA cord and slice them both open to see the wires inside.
By connecting the grounds and the image carrying wires together from both, I made my own s-video to RCA converter, a bit of sticky tape and I was done!
I plugged it in not expecting it to work, but the picture came out perfectly! It is actually a more vibrant and stable picture than I had before so I am very very happy with it!

A mate came over today, we spent about 3 hrs playing '1944' and 'bubble bobble', had an absolute blast!
The control panel design also held up really well, no bumping and no sore hands so I think I'm safe with that.
I can't wait to complete this cab, every challenge has been so much fun to overcome, I can't wait to stand back and just watch it work seamlessly.
More photos will be up tomorrow, just a few finishing touches to get this finished and put it to work!
« Last Edit: August 15, 2011, 06:35:46 am by Dechene »

severdhed

  • Trade Count: (0)
  • Full Member
  • ***
  • Offline Offline
  • Posts: 2975
  • Last login:December 14, 2024, 05:01:52 pm
  • RIP Dinosaur Hippo
Re: Another First Arcade Build - "Noiseland Video Arcade"
« Reply #16 on: November 08, 2010, 09:30:10 pm »
that looks great, i like the brown paintjob, very unique.   

as for hiding windows, look through the Wiki, there is a section on hiding windows, including hiding that welcome screen.


http://wiki.arcadecontrols.com/wiki/Hiding_Windows

here is how to hide the welcome screen, but you may want to read through that wiki page also, because there may be tweaks there you missed.

To hide the Welcome Screen (where you'd normally log in) you'll need to change from the default windows XP welcome screen to the other style by going to Control Panels >User Accounts >Change the way users logon or off. Deselect the “Use Welcome Screen” checkbox.

Current Projects:      Zak-Man | TMNT Pedestal | SNES Pi | N64 Odroid
Former Projects:     4 Player Showcase | Donkey Kong | iCade

BurgerKingDiamond

  • Trade Count: (+4)
  • Full Member
  • ***
  • Offline Offline
  • Posts: 690
  • Last login:July 01, 2021, 11:12:14 am
Re: Another First Arcade Build - "Noiseland Video Arcade"
« Reply #17 on: November 09, 2010, 09:13:27 am »
yeah man, it's amazing how good MAME can look on a nice CRT TV. I have it going to a 27" Trinitron thru s-video and it is awesome. Nice job on the cable hack. I guess it's not really s-video anymore, just normal composite, but if it looks good then nice.
-Welcome to the Fantasy Zone.

Dechene

  • Trade Count: (0)
  • Full Member
  • ***
  • Offline Offline
  • Posts: 39
  • Last login:April 22, 2021, 07:17:00 pm
Re: Another First Arcade Build - "Noiseland Video Arcade"
« Reply #18 on: November 10, 2010, 06:49:30 am »
Almost done!

Here's a before & after of my shiny new bolt heads thanks to Vebbo's tip:

They look great thanks heaps!

The obligatory under CP shot with a birds nest of wires, I could have made it neater but, meh.
The white button in the middle of my CP is now a pause button, very useful for when the kids start yelling at daddy to come inside...


The only major work I have left to do is install the back doors on the machine.
Hopefully I have time to do that soon as I don't really like leaving all those tantalising wires & cords for my dog to stare at all night...


You can see the cake tins behind the speakers at the back, I need to mount them properly, at the moment they are only held on by the force of the speaker magnets. I also need to clean up the wires a bit so it doesn't look so haphazard in there, but that shouldn't take too long.

And this is what it looks like from the front,

I have 3 different marquees that I've designed to choose from, it only takes a minute & a screwdriver to change them over.

But here's the biggest stuffup that I've made on this whole build.
I cut my T-Mold slot WAY to big! CRAP!

My brother-in-law is a builder and has some sort of a powerful 'glue' which you apply with a caulk gun, I'll be doing that soon as I can get the glue off of him, it should be fine though, just a bit fiddly to do and I won't be able to change colours if I don't like the red later on. Oh well, too bad, so sad.

Noiseland is almost finished, but I have 3 mates dying to have their own cabs, hmmm, I better strike while they've got their wallets out!
« Last Edit: August 15, 2011, 06:38:45 am by Dechene »

Rick

  • Trade Count: (+1)
  • Full Member
  • ***
  • Offline Offline
  • Posts: 2787
  • Last login:May 19, 2025, 11:21:11 am
  • Bartop, Cocktail and Pinball Arcade Cabinets
    • Gameroom Designs Canada
Re: Another First Arcade Build - "Noiseland Video Arcade"
« Reply #19 on: November 10, 2010, 08:07:04 am »
You can see the cake tins behind the speakers at the back

Dude, you owe me a "Loca Moca" Java Monster drink.  I read that, went, "what the --?", peered closely, saw them, and spit coffee flavoured energy drink all over my screen!

 :laugh2:

HanoiBoi

  • Trade Count: (+1)
  • Full Member
  • ***
  • Offline Offline
  • Posts: 649
  • Last login:April 13, 2016, 09:52:03 pm
Re: Another First Arcade Build - "Noiseland Video Arcade"
« Reply #20 on: November 10, 2010, 08:14:07 am »
Use wood filler for the slot and start again

BobA

  • Trade Count: (+14)
  • Full Member
  • ***
  • Offline Offline
  • Posts: 5943
  • Last login:July 11, 2018, 09:52:14 pm
  • What Me Worry?
Re: Another First Arcade Build - "Noiseland Video Arcade"
« Reply #21 on: November 10, 2010, 08:17:51 am »
Use wood filler for the slot and start again

Or use hot glue (strong) it sets up in seconds as you work the t-molding in.