Main Restorations Software Audio/Jukebox/MP3 Everything Else Buy/Sell/Trade
Project Announcements Monitor/Video GroovyMAME Merit/JVL Touchscreen Meet Up Retail Vendors
Driving & Racing Woodworking Software Support Forums Consoles Project Arcade Reviews
Automated Projects Artwork Frontend Support Forums Pinball Forum Discussion Old Boards
Raspberry Pi & Dev Board controls.dat Linux Miscellaneous Arcade Wiki Discussion Old Archives
Lightguns Arcade1Up Try the site in https mode Site News

Unread posts | New Replies | Recent posts | Rules | Chatroom | Wiki | File Repository | RSS | Submit news


Author Topic: Pinky McJuke - Believe it or not, work continues =)  (Read 49983 times)

0 Members and 1 Guest are viewing this topic.

Jimbo

  • Trade Count: (+1)
  • Full Member
  • ***
  • Offline Offline
  • Posts: 1014
  • Last login:January 04, 2025, 12:18:10 pm
  • I have no idea what I'm doing.
    • Wood Finishes Direct
Re: Pinky McJuke (CNC'd Ally I/O panel complete)
« Reply #80 on: October 10, 2008, 05:34:17 am »
Franco, you're a tart.  You know that, don't you? ;)

thatitalian

  • Don't worry about the chicken, I feed my friends human all the time...
  • Trade Count: (0)
  • Full Member
  • ***
  • Offline Offline
  • Posts: 887
  • Last login:March 27, 2018, 10:52:37 am
  • The Revolution Is Coming...
Re: Pinky McJuke (CNC'd Ally I/O panel complete)
« Reply #81 on: October 10, 2008, 06:34:40 am »
Franco, why do you feel the need to constantly tease me! You know that I want an I/O panel, and then you go and make TWO! :P

This is progressing nicely, Christmas is approaching though, tick tock, tick tock, tick tock.... >:D

Franco B

  • Trade Count: (+10)
  • Full Member
  • ***
  • Offline Offline
  • Posts: 3766
  • Last login:February 15, 2024, 09:14:06 am
Re: Pinky McJuke (CNC'd Ally I/O panel complete)
« Reply #82 on: October 10, 2008, 07:59:53 am »
Jimbo: Yes, yes I am, now go get on with your artwork :P ;)

thatitalian: I know, i know, its getting closer  :-\  Ill need to get you to send me a proof of the artwork soon (outline etc at least) so I can get it proof printed to check the size etc.

Im going to pop to B&Q after work to see if they have some nice mesh for the speaker and ventaltion vents, I seem to remember they have quite a good selection. I may have a go at getting the back panel etc cut out this afternoon seeing as the weather is nice.

thatitalian

  • Don't worry about the chicken, I feed my friends human all the time...
  • Trade Count: (0)
  • Full Member
  • ***
  • Offline Offline
  • Posts: 887
  • Last login:March 27, 2018, 10:52:37 am
  • The Revolution Is Coming...
Re: Pinky McJuke (CNC'd Ally I/O panel complete)
« Reply #83 on: October 10, 2008, 08:26:49 am »
NICE? Are we in the same country!? It is flippin frezzing outside! :scared

Franco B

  • Trade Count: (+10)
  • Full Member
  • ***
  • Offline Offline
  • Posts: 3766
  • Last login:February 15, 2024, 09:14:06 am
Re: Pinky McJuke (CNC'd Ally I/O panel complete)
« Reply #84 on: October 10, 2008, 08:36:44 am »
Wuss  >:D

By 'nice', read 'not raining'  ;)

You know what its like over here, you have to get things done whilst you get the chance. Saying that, it will probably be raining by the time I get home.  :-\

Franco B

  • Trade Count: (+10)
  • Full Member
  • ***
  • Offline Offline
  • Posts: 3766
  • Last login:February 15, 2024, 09:14:06 am
Re: Pinky McJuke (CNC'd Ally I/O panel complete)
« Reply #85 on: October 10, 2008, 12:34:07 pm »
Shock horror, its still sunny!!  :)

I was going to get the back panel cut out but I wanted to run something past you guys first.

Ive been playing around with the components inside the juke and I'm hoping to place the HDD directly on top of the PSU with some foam in between them to stop vibration. I'm a bit worried about mounting the HDD so close to the PSU so I had a dig around and found [this] thread. The general consensus is that it should be fine, I thought I would get you guys input too before I proceed.

This is a pic of where I'm intending to mount the PSU/HDD:


You can also see a large square on the LH side of the back panel, this is where I'm intending to place the back panel. The mother board will be fastened directly to it. There will be a intake fan next to the PSU to draw air directly over the CPU and I'm going to have an exhaust vent at the top of the cab. The smaller square just above the HDD is where I'm planning to mount the I/O plate. Any thoughts?

leapinlew

  • Some questionable things going on in this room with cheetos
  • Trade Count: (+4)
  • Full Member
  • ***
  • Offline Offline
  • Posts: 7919
  • Last login:June 17, 2025, 10:08:30 pm
Re: Pinky McJuke (CNC'd Ally I/O panel complete)
« Reply #86 on: October 10, 2008, 01:41:17 pm »
Shock horror, its still sunny!!  :)

I was going to get the back panel cut out but I wanted to run something past you guys first.

Ive been playing around with the components inside the juke and I'm hoping to place the HDD directly on top of the PSU with some foam in between them to stop vibration. I'm a bit worried about mounting the HDD so close to the PSU so I had a dig around and found [this] thread. The general consensus is that it should be fine, I thought I would get you guys input too before I proceed.

This is a pic of where I'm intending to mount the PSU/HDD:


You can also see a large square on the LH side of the back panel, this is where I'm intending to place the back panel. The mother board will be fastened directly to it. There will be a intake fan next to the PSU to draw air directly over the CPU and I'm going to have an exhaust vent at the top of the cab. The smaller square just above the HDD is where I'm planning to mount the I/O plate. Any thoughts?

I wouldn't do it. Possible if you could create a buffer. I would get a laptop hard drive instead of a full sized hard drive. Can't you mount it to the wall on the back?

Franco B

  • Trade Count: (+10)
  • Full Member
  • ***
  • Offline Offline
  • Posts: 3766
  • Last login:February 15, 2024, 09:14:06 am
Re: Pinky McJuke (Question: Mount HDD on top of PSU?)
« Reply #87 on: October 10, 2008, 01:43:17 pm »
Funny you should say that, I was just talking to mountain and we thought of using a 2.5" drive. I could mount it on the left hand side of the base. That would also give me room to mount the LED Wiz and encoder above the PSU  :cheers:

javeryh

  • Trade Count: (+1)
  • Full Member
  • ***
  • Offline Offline
  • Posts: 7959
  • Last login:Yesterday at 11:24:08 am
Re: Pinky McJuke (Question: Mount HDD on top of PSU?)
« Reply #88 on: October 10, 2008, 02:55:16 pm »
Funny you should say that, I was just talking to mountain and we thought of using a 2.5" drive. I could mount it on the left hand side of the base. That would also give me room to mount the LED Wiz and encoder above the PSU  :cheers:

This is what I would do.  I'm not a computer guy AT ALL but I wouldn't want the HDD that close to the power supply.  It just doesn't seem like a good idea...   :cheers:

leapinlew

  • Some questionable things going on in this room with cheetos
  • Trade Count: (+4)
  • Full Member
  • ***
  • Offline Offline
  • Posts: 7919
  • Last login:June 17, 2025, 10:08:30 pm
Re: Pinky McJuke (Question: Mount HDD on top of PSU?)
« Reply #89 on: October 10, 2008, 03:29:11 pm »
I'm sure you'll end up fabricating some glow in the dark metal space invader themed hard drive brackets, but I use 3/4" L brackets and mount screw them into the screw holes on the hard drive. Works good.

mountain

  • Trade Count: (+9)
  • Full Member
  • ***
  • Offline Offline
  • Posts: 1205
  • Last login:January 29, 2025, 08:31:47 am
    • Mountain Jukeboxes
Re: Pinky McJuke (Question: Mount HDD on top of PSU?)
« Reply #90 on: October 10, 2008, 03:34:26 pm »
I'm sure you'll end up fabricating some glow in the dark metal space invader themed hard drive brackets, but I use 3/4" L brackets and mount screw them into the screw holes on the hard drive. Works good.

He is fresh out of glow in the dark stainless steel... :)

javeryh

  • Trade Count: (+1)
  • Full Member
  • ***
  • Offline Offline
  • Posts: 7959
  • Last login:Yesterday at 11:24:08 am
Re: Pinky McJuke (Question: Mount HDD on top of PSU?)
« Reply #91 on: October 10, 2008, 04:03:34 pm »
I'm sure you'll end up fabricating some glow in the dark metal space invader themed hard drive brackets, but I use 3/4" L brackets and mount screw them into the screw holes on the hard drive. Works good.

He is fresh out of glow in the dark stainless steel... :)

You know he's thinking about doing it right now though - just for fun.   >:D

Franco B

  • Trade Count: (+10)
  • Full Member
  • ***
  • Offline Offline
  • Posts: 3766
  • Last login:February 15, 2024, 09:14:06 am
Re: Pinky McJuke (Question: Mount HDD on top of PSU?)
« Reply #92 on: October 10, 2008, 05:28:26 pm »
Lol, you guys. :P

If it was anything to do with my project hell yeah there would be spacies involved (it seems I am that obvious!) She will have to make do with a custom made dual platform to hold the LED Wiz and GP encoder.

Anyone would think that im making this juke for me rather than her ;)

I can tell that leapinlew is going to hate the 'F-117a alevitas tractus pervasor scamnum' thats under constuction.

kizer

  • Trade Count: (0)
  • Full Member
  • ***
  • Offline Offline
  • Posts: 200
  • Last login:January 30, 2012, 07:25:30 pm
    • Links4jeeps.com
Re: Pinky McJuke (Question: Mount HDD on top of PSU?)
« Reply #93 on: October 10, 2008, 06:00:47 pm »
I'd personally mount the drive on the side wall so its away from the PSU and I'd probably mount an exahust fan up near the top opposed to a vent so it creates a vaccum so it would pull the heat up and out of the cabinet. As well maybe some small holes or another fan to pull air in low thats colder than the heat leaving.

2.5 inch fans are cheaper than they used to be. Worst case just use an adapter if there isn't an interface with the motherboard.

Franco B

  • Trade Count: (+10)
  • Full Member
  • ***
  • Offline Offline
  • Posts: 3766
  • Last login:February 15, 2024, 09:14:06 am
Re: Pinky McJuke (Question: Mount HDD on top of PSU?)
« Reply #94 on: October 10, 2008, 06:44:32 pm »
Thanks for the concern kizer.

I cannot mount a drive to the side wall due to the slimness of the juke. I also cannot mount a exhaust fan near the top due to the same constraint. The CPU is only small and will only be running at stock speed so I cannot see any need for a push pull system. There will be a 120mm fan mounted into the base of the juke to supply cool air directly below the CPU which should provide quiet and adequate cooling.

polaris

  • You're a genius! Sheer genius!
  • Wiki Contributor
  • Trade Count: (+1)
  • Full Member
  • ***
  • Offline Offline
  • Posts: 1405
  • Last login:May 21, 2012, 05:18:59 pm
  • veni vidi congai
Re: Pinky McJuke (Question: Mount HDD on top of PSU?)
« Reply #95 on: October 11, 2008, 08:53:04 am »
franco, could you perhaps go solid state on the juke, could you put a usb hub and 4 usb sticks  for storage and a cf for the hard drive, bear in mind its for a chick so shes gonna have what abba gold and another seventies album on there at most ;)
seriously , is it doable, don't reckon she'd need the storage you'd want  ive no idea if it would work but its an idea

 :burgerking:

im only using that smiley cos ive just seen it, i dont know what its for
got COLOR codes from projects, post them here

add stuff to the uk wiki section

thatitalian

  • Don't worry about the chicken, I feed my friends human all the time...
  • Trade Count: (0)
  • Full Member
  • ***
  • Offline Offline
  • Posts: 887
  • Last login:March 27, 2018, 10:52:37 am
  • The Revolution Is Coming...
Re: Pinky McJuke (Question: Mount HDD on top of PSU?)
« Reply #96 on: October 11, 2008, 12:24:20 pm »
It looks like the "burger king" guy!

 :duckhunt

Franco B

  • Trade Count: (+10)
  • Full Member
  • ***
  • Offline Offline
  • Posts: 3766
  • Last login:February 15, 2024, 09:14:06 am
Re: Pinky McJuke (Update: Back panel + PSU vent reliefs complete)
« Reply #97 on: October 12, 2008, 02:25:09 pm »
God knows whats going on with those smileys, I just want someone to build an 70s themed cab so I can over use this one  :afro:

polaris, good thinking on the solid state. It sure would be small enough but there wont be enough capacity even with a few 8+GB sticks. I'm going to have some MAME games as well as emulators etc as well as some films so I'm going to need plenty of space. Ive been having a play and I think I'm going to go for a 2.5" drive.

Made a little more progress today. I used the back panel templates to cut the back panel opening and door. I also got the relief vents cut for the PSU cooling.


I still need to pick up a cam lock to secure the panel.

Ive been having a play around with the components on the base of the juke. I think this is what I'm going to go for.


I'm going to have the PSU on the right, the CPUs fan will draw air up from the bottom of the juke and expel it straight out the back. Next to it I'm going to have a fan to draw air over the CPU/MB. I was going to use a 120mm fan and it will fit but I think some of the wiring will be too cramped. That is an 80mm fan there but I think I'm going to get a 100mm case fan. The MDF block on the right is the same size as a 2.5" drive which should fit nicely.

Ive also redone the speaker mount (3rd time lucky :P)


Ass bottom shot:


Back view:


The 3mm gap may seem a little large (it needs moving up a gnats cock too) but I had to have a 3mm gap as the piano hinge is 3mm wide and I wanted to have an equal distance around the edges, especially for clearance at the opening. I don't think it will be quite as noticeable when the acrylic is on the back. If it does bug be I may mask the gap.

I'm going to get the acrylic ordered tomorrow, I'm really looking forward to that part but at the same time I'm rather bricking it too. I bought a couple of 1/4" shaft + 1/4" OD trim bits today as well as a round over bit. I thought it would help to have some nice sharp bits for the acrylic. I think I'm going to have a go at flame polishing as well just for fun. If I don't post next week its because I've burnt my fingers off  :D

Edit: You can also see the rough placement of the I/O plate on that last pictue. I have removed the euro socket from the PSU and im going to relocate it to the right of that last shot so I can tap into the 240v mains for the monitor and speaker transformers. Im going to put some mesh between the plexi and the CPU vent relief. Im also going to cut a large mesh covered ~12"x2" vent at the top to allow the exhaust air to vent.
« Last Edit: October 12, 2008, 02:30:32 pm by Franco B »

thatitalian

  • Don't worry about the chicken, I feed my friends human all the time...
  • Trade Count: (0)
  • Full Member
  • ***
  • Offline Offline
  • Posts: 887
  • Last login:March 27, 2018, 10:52:37 am
  • The Revolution Is Coming...
Re: Pinky McJuke (Update: Back panel + PSU vent reliefs complete)
« Reply #98 on: October 12, 2008, 04:33:55 pm »
(it needs moving up a gnats cock too).

MUST BE A BIG GNAT! :laugh2:

mountain

  • Trade Count: (+9)
  • Full Member
  • ***
  • Offline Offline
  • Posts: 1205
  • Last login:January 29, 2025, 08:31:47 am
    • Mountain Jukeboxes
Re: Pinky McJuke (Update: Back panel + PSU vent reliefs complete)
« Reply #99 on: October 12, 2008, 04:42:10 pm »
(it needs moving up a gnats cock too).

MUST BE A BIG GNAT! :laugh2:

No, just a popular one  :o

Looking great Franco!

javeryh

  • Trade Count: (+1)
  • Full Member
  • ***
  • Offline Offline
  • Posts: 7959
  • Last login:Yesterday at 11:24:08 am
Re: Pinky McJuke (Update: Back panel + PSU vent reliefs complete)
« Reply #100 on: October 12, 2008, 10:27:23 pm »
Looking great!!  I really like the speaker mount.  I didn't take any speakers into consideration in my design and the Dell bar is a few inches longer than the opening I cut.  I'm hoping it doesn't affect the sound too much.  I also have some really small Bose from an old Gateway I could try to use except they are powered off of the subwoofer which I won't have room for... 

You are making really great progress...   :cheers:

Franco B

  • Trade Count: (+10)
  • Full Member
  • ***
  • Offline Offline
  • Posts: 3766
  • Last login:February 15, 2024, 09:14:06 am
Re: Pinky McJuke (Update: Back panel + PSU vent reliefs complete)
« Reply #101 on: October 13, 2008, 06:00:17 am »
Cheers guys.

Jav, that speaker mount is just to hold the speaker bar in place. In front of it wil be 5mm pink acrylic with some mesh behind it. The opening of the 'vent(s)' on mine will be smaller than the speaker bar too as I need to leave space either side for the touch controls. The opening will be about 40mm narrower than the speaker bar but I dont think it will affect the sound too much tho.

Ive been playing around with the speaker opening shape and have come up with a couple of ideas:

Long Oval:


Long with tapered sides (similar shape to the speaker bar):


Two short ovals:


Seven circles:


I keep changing my mind about which one I like. Any preferences guys? Or maybe a different shape(s)?

mountain

  • Trade Count: (+9)
  • Full Member
  • ***
  • Offline Offline
  • Posts: 1205
  • Last login:January 29, 2025, 08:31:47 am
    • Mountain Jukeboxes
Re: Pinky McJuke (Question: Which speaker opening shape?)
« Reply #102 on: October 13, 2008, 06:34:55 am »
What about a long rectangle the same width as your monitor opening and finishing the corners to match the monitor's corners?

Franco B

  • Trade Count: (+10)
  • Full Member
  • ***
  • Offline Offline
  • Posts: 3766
  • Last login:February 15, 2024, 09:14:06 am
Re: Pinky McJuke (Question: Which speaker opening shape?)
« Reply #103 on: October 13, 2008, 07:12:02 am »
I would have the shape the same width as the monitor opening but I need a little space to the left and the right to mount those touch PCBs.

I was talking to Jimbo this morning and he came up with this shape which I like:


I modified it slighty to this:


I think that is my favourite so far. I would probably make a stainless ring to match the 'ring' in the center of the opening. Hmmm.

mountain

  • Trade Count: (+9)
  • Full Member
  • ***
  • Offline Offline
  • Posts: 1205
  • Last login:January 29, 2025, 08:31:47 am
    • Mountain Jukeboxes
Re: Pinky McJuke (Question: Which speaker opening shape?)
« Reply #104 on: October 13, 2008, 07:15:04 am »
I think that is my favourite so far. I would probably make a stainless ring to match the 'ring' in the center of the opening. Hmmm.

I agree, that looks great!

thatitalian

  • Don't worry about the chicken, I feed my friends human all the time...
  • Trade Count: (0)
  • Full Member
  • ***
  • Offline Offline
  • Posts: 887
  • Last login:March 27, 2018, 10:52:37 am
  • The Revolution Is Coming...
Re: Pinky McJuke (Question: Which speaker opening shape?)
« Reply #105 on: October 13, 2008, 08:06:45 am »
Agree, the bottom one of the second design set is the best looking! Afro man says: Nice job!  :afro:

javeryh

  • Trade Count: (+1)
  • Full Member
  • ***
  • Offline Offline
  • Posts: 7959
  • Last login:Yesterday at 11:24:08 am
Re: Pinky McJuke (Question: Which speaker opening shape?)
« Reply #106 on: October 13, 2008, 08:54:48 am »
 :afro:

I agree.  Too cool.

Franco B

  • Trade Count: (+10)
  • Full Member
  • ***
  • Offline Offline
  • Posts: 3766
  • Last login:February 15, 2024, 09:14:06 am
Re: Pinky McJuke (Front plexi template underway)
« Reply #107 on: October 29, 2008, 10:59:49 am »
Thanks for the input guys, I've decided to go with that profile.

I've not made a lot of progress as I have been sourcing the acrylic etc and making a couple of templates to help route the monitor and speaker reliefs. I have the acrylic now and I made the templates last night so I was able to get on with the master template for the front piece.

I am not having a backing to the 5mm acrylic that is on the front of the juke but I still needed a template to mount the acrylic to whilst routing the reliefs. I cut out a piece of MDF to the size of the acrylic and routed out the hole for the monitor. I used a 1/2" bit to leave a 1/4" radius in the corners.

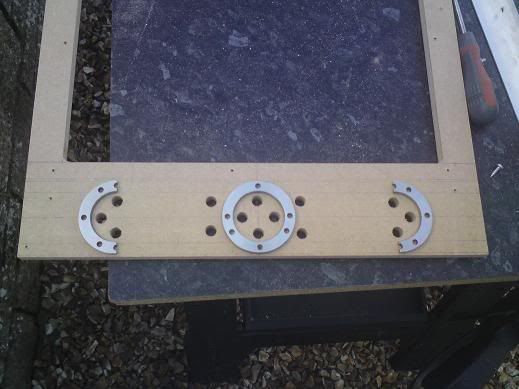
To route out the speaker relief I made three radius templates for the router to follow. You can see them in position here. The 10mm holes are just there so I can get the jigsaw in to remove the bulk of the material:


I jigsawed out the bulk and cut some aluminium to size for the router to follow for the straight edges of the cut out. I'm using a 1/2" bit again so I will get a 1/4" radius at the 'sharp' corners near the center piece.


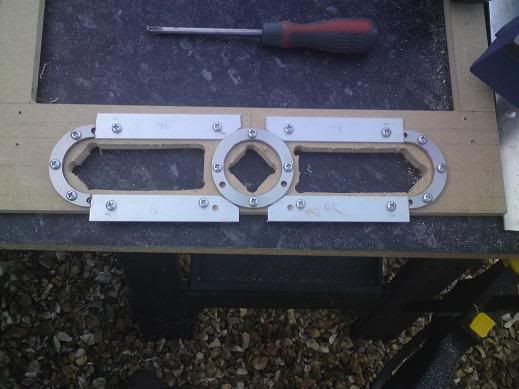
This is the semi finished template:


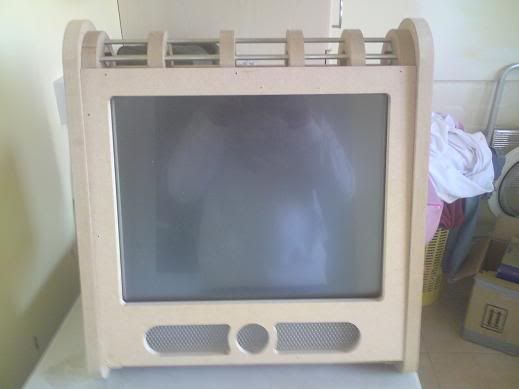
I was having trouble finding some nice mesh for the relief but mountain kindly offered to send me a piece that he had left over from his Dads juke. (Thanks again buddy  :cheers:). I taped it into position just to see what it would look like :)


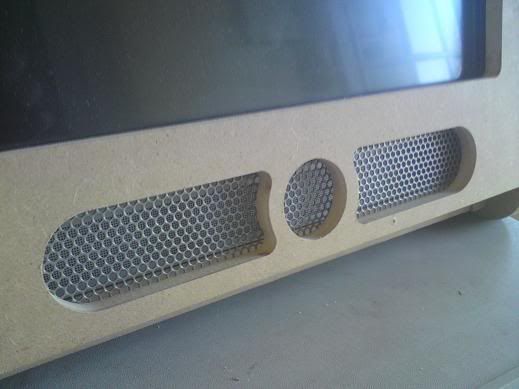
Obviously the mesh will be much closer to the front of the 5mm acrylic. I'm also going to bevel all of the speaker and monitor opening edges.

Everything didn't quite go according to plan though. I took the wrong measurement of the horizontal part of the screen and so the monitor opening is 10mm to wide. Its no big deal tho as I can easily use this template to make another template with the correct size opening.

Ive brought the template into work with me tonight as I need to drill 64 holes around the monitor for the alternating 32 pink LEDs and 32 stainless 'LEDs'. I'm going to drill 5mm holes 3/4 of the way through the MDF and then use the template as a drilling jig and clamp it to the acrylic to drill the holes. The holes will be approx 20mm apart.

I'm going to drill them on a CNC mill so I get the holes in the exact positions. I could do it by hand but if I even get one or two holes slightly out it will look crap.

Before I forget, this is the pink acrylic I'm using to cover the front and back of the juke:


Think that's it for now. :)


javeryh

  • Trade Count: (+1)
  • Full Member
  • ***
  • Offline Offline
  • Posts: 7959
  • Last login:Yesterday at 11:24:08 am
Re: Pinky McJuke (Front plexi template underway)
« Reply #108 on: October 29, 2008, 11:13:23 am »
Damn Franco - that is really really slick.  I love the speaker design and that pink acrylic looks fantastic!  I can't wait to see it all cut out.  Those router jigs are a great idea too.   :applaud:

Martijn

  • Trade Count: (0)
  • Full Member
  • ***
  • Offline Offline
  • Posts: 822
  • Last login:January 25, 2024, 10:34:36 am
  • Akira!
    • ModMyBox
Re: Pinky McJuke (Front plexi template underway)
« Reply #109 on: October 29, 2008, 11:23:19 am »
nice work ! i love it when people use templates and then router like a madman  ;D
Its so satisfying

are you going to laminate also the top? if so, can it make that angle?

btw, now i can finally see what the 3 metal stick trick was for the top angle of the juke.
you also could have used a wood round piece of pine or half a PVC pipe, maybe a little tip for people who also want to build this dont have access to metal construction recourses


Franco B

  • Trade Count: (+10)
  • Full Member
  • ***
  • Offline Offline
  • Posts: 3766
  • Last login:February 15, 2024, 09:14:06 am
Re: Pinky McJuke (Front plexi template underway)
« Reply #110 on: October 29, 2008, 11:33:32 am »
Thanks guys. Template routing is so satisfying  ;D

Martijn, I have actually milled a 165 degree section of pipe to go round the top, I just didn't have it on in that picture. The 3 dowels/wood 'c' pieces are just to support the pipe. This is an earlier pic:


As for covering the top, I did think about pink laminate but I couldn't justify spending a load of £££ on a large piece of laminate for a small project. I was also concerned about the bending radius of the laminate although I believe laminate (especially the thinner grades) can go round quite tight bends, just like on kitchen worktops.

I'm going to ask thatitalian to do me some matching artwork to cover the top section as well as the bottom section.

Martijn

  • Trade Count: (0)
  • Full Member
  • ***
  • Offline Offline
  • Posts: 822
  • Last login:January 25, 2024, 10:34:36 am
  • Akira!
    • ModMyBox
Re: Pinky McJuke (Front plexi template underway)
« Reply #111 on: October 29, 2008, 11:39:27 am »
what an excellent support system then, that's what i call detail for something so simple

 :cheers:


mountain

  • Trade Count: (+9)
  • Full Member
  • ***
  • Offline Offline
  • Posts: 1205
  • Last login:January 29, 2025, 08:31:47 am
    • Mountain Jukeboxes
Re: Pinky McJuke (Front plexi template underway)
« Reply #112 on: October 29, 2008, 11:54:46 am »
Looking mighty fine there Franco!  :applaud:

Idea: Paint the grill material white with a piece of black grill cloth behind it for a nice contrast.  :angel:

Franco B

  • Trade Count: (+10)
  • Full Member
  • ***
  • Offline Offline
  • Posts: 3766
  • Last login:February 15, 2024, 09:14:06 am
Re: Pinky McJuke (Front plexi template underway)
« Reply #113 on: October 29, 2008, 02:18:29 pm »
Cheers buddy :)

I think I'm going to keep the grill silver to match the other silver bits but I may have some white grill cloth behind it for some contrast  :)

Whilst I'm here, template is drilled 10mm deep leaving 2mm for the drill to start cutting before it drills the acrylic:


mountain

  • Trade Count: (+9)
  • Full Member
  • ***
  • Offline Offline
  • Posts: 1205
  • Last login:January 29, 2025, 08:31:47 am
    • Mountain Jukeboxes
Re: Pinky McJuke (Front plexi template underway)
« Reply #114 on: October 29, 2008, 02:43:46 pm »
Cheers buddy :)

I think I'm going to keep the grill silver to match the other silver bits but I may have some white grill cloth behind it for some contrast  :)

Whilst I'm here, template is drilled 10mm deep leaving 2mm for the drill to start cutting before it drills the acrylic:


Doh! I forgot about the SS "LEDs" you are using. Should look really nice. !  :cheers:

Franco B

  • Trade Count: (+10)
  • Full Member
  • ***
  • Offline Offline
  • Posts: 3766
  • Last login:February 15, 2024, 09:14:06 am
Re: Pinky McJuke (Front plexi template underway)
« Reply #115 on: October 29, 2008, 03:02:57 pm »
Yeah should look pretty good I hope. Im looking forward to programming the LED sequences :)

Im going to put a ~3mm bevel on the inner circle and two outer parts. The ring in the center is 10mm wide so putting those bevels on will leave a flat of 4mm between the outer parts and inner circle. Im going to turn a 4mm wide stainless low profile bevel ring to sit on the flat part.


Jigenjuke

  • Trade Count: (0)
  • Full Member
  • ***
  • Offline Offline
  • Posts: 482
  • Last login:October 02, 2016, 12:00:50 am
Re: Pinky McJuke (Front plexi template underway)
« Reply #116 on: October 29, 2008, 08:40:51 pm »
Awsome work Franco! :applaud: I wish that I could get that level of quality on the projects that I am making now. 

Franco B

  • Trade Count: (+10)
  • Full Member
  • ***
  • Offline Offline
  • Posts: 3766
  • Last login:February 15, 2024, 09:14:06 am
Re: Pinky McJuke (Front plexi 'finished')
« Reply #117 on: October 31, 2008, 10:52:12 am »
Thanks Jigenjuke. Its just practice I guess, I couldn't do half the stuff I'm doing now a year ago.

Well Ive had a full morning and part of the afternoon but Ive managed to get a fair bit done. The first thing I had to do was to remake the plexi template so that the screen opening was 10mm narrower. Once I had done that I used the two templates to mark, cut, route and drill the plexi. It took a long time but I didn't want to rush it as it needs to look nice as its on the front of the juke. Its easy to mess up so I just went slowly.

This is how she is looking at the moment:


The protective film is still on the front face, the true colour is the bevel edge. I was tempted to remove the film but I want to get the bevels polished up first. I also need to mill a relief in the back of the plexi for the LED wires.

You can see the 4mm wide semi circular bezel that I made. I routed the openings so that they would match the profile of the ring.

javeryh

  • Trade Count: (+1)
  • Full Member
  • ***
  • Offline Offline
  • Posts: 7959
  • Last login:Yesterday at 11:24:08 am
Re: Pinky McJuke (Front plexi 'finished')
« Reply #118 on: October 31, 2008, 12:22:33 pm »
Holy :censored:!!!!!

I am seriously considering building something small for my daughter again just to have a chance to use that beautiful PINK acrylic.  I love it.  Damn Franco - you sure are raising the bar.  :notworthy: :notworthy: :notworthy: :notworthy:

Nvts

  • Trade Count: (0)
  • Full Member
  • ***
  • Offline Offline
  • Posts: 76
  • Last login:September 15, 2010, 02:30:14 pm
Re: Pinky McJuke (Front plexi 'finished')
« Reply #119 on: October 31, 2008, 12:26:49 pm »
man, your raw router cuts look a whole lot smoother then mine did.  Are those raw cuts, or did you smooth it out a little?
"A common mistake that people make when trying to design something completely foolproof was to underestimate the ingenuity of complete fools."