Main Restorations Software Audio/Jukebox/MP3 Everything Else Buy/Sell/Trade
Project Announcements Monitor/Video GroovyMAME Merit/JVL Touchscreen Meet Up Retail Vendors
Driving & Racing Woodworking Software Support Forums Consoles Project Arcade Reviews
Automated Projects Artwork Frontend Support Forums Pinball Forum Discussion Old Boards
Raspberry Pi & Dev Board controls.dat Linux Miscellaneous Arcade Wiki Discussion Old Archives
Lightguns Arcade1Up Try the site in https mode Site News

Unread posts | New Replies | Recent posts | Rules | Chatroom | Wiki | File Repository | RSS | Submit news


Author Topic: FINALLY! Star Wars Cockpit Measurements  (Read 51356 times)

0 Members and 1 Guest are viewing this topic.

modessitt

  • Trade Count: (+1)
  • Full Member
  • ***
  • Offline Offline
  • Posts: 402
  • Last login:October 17, 2021, 07:02:28 pm
  • Technician
FINALLY! Star Wars Cockpit Measurements
« on: May 13, 2007, 02:42:55 am »
PLEASE READ THIS BEFORE POSTING!!!!

Who's excited? :woot

Okay, before we get started, I'd like to ask everyone to refrain from posting in the thread until I give the links to the off-site album of all the photos.  I've planned it out and the links will be in post #13 (this is #1).  Thanks.

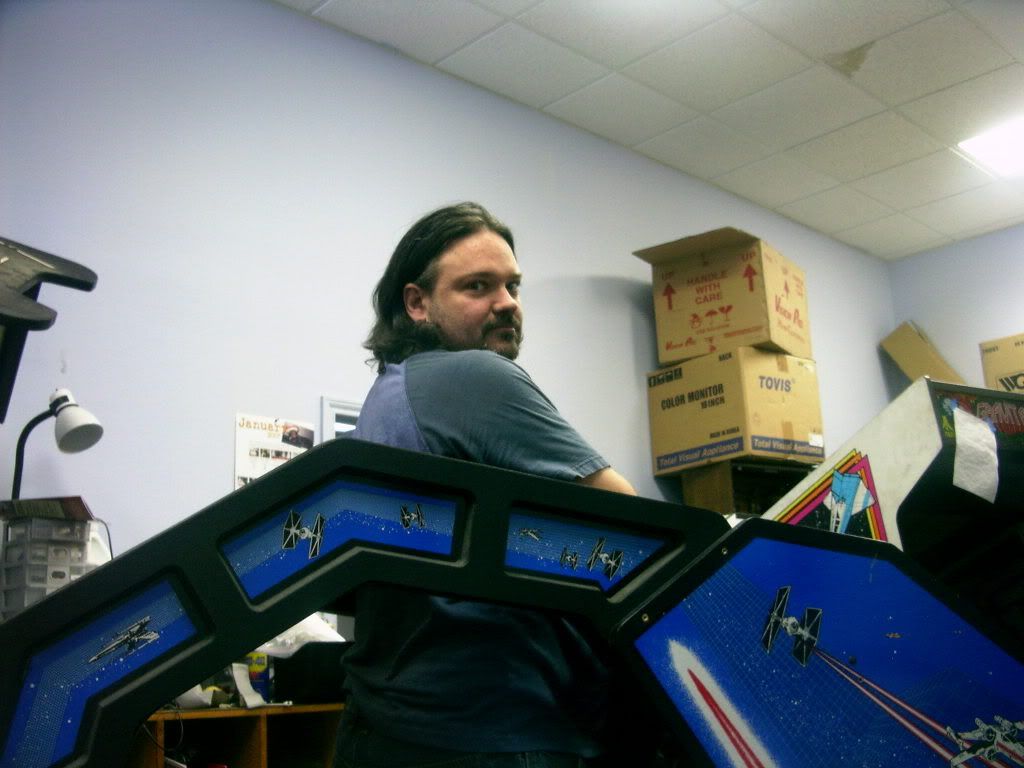
I'd also like to thank my wife who gave up 4 hours of her Saturday to help me do this.  You can see her in the background of a couple photos.  Without her help (and forbearance) this would not have been done.   :notworthy:

So,  what is all the hype about?  This:


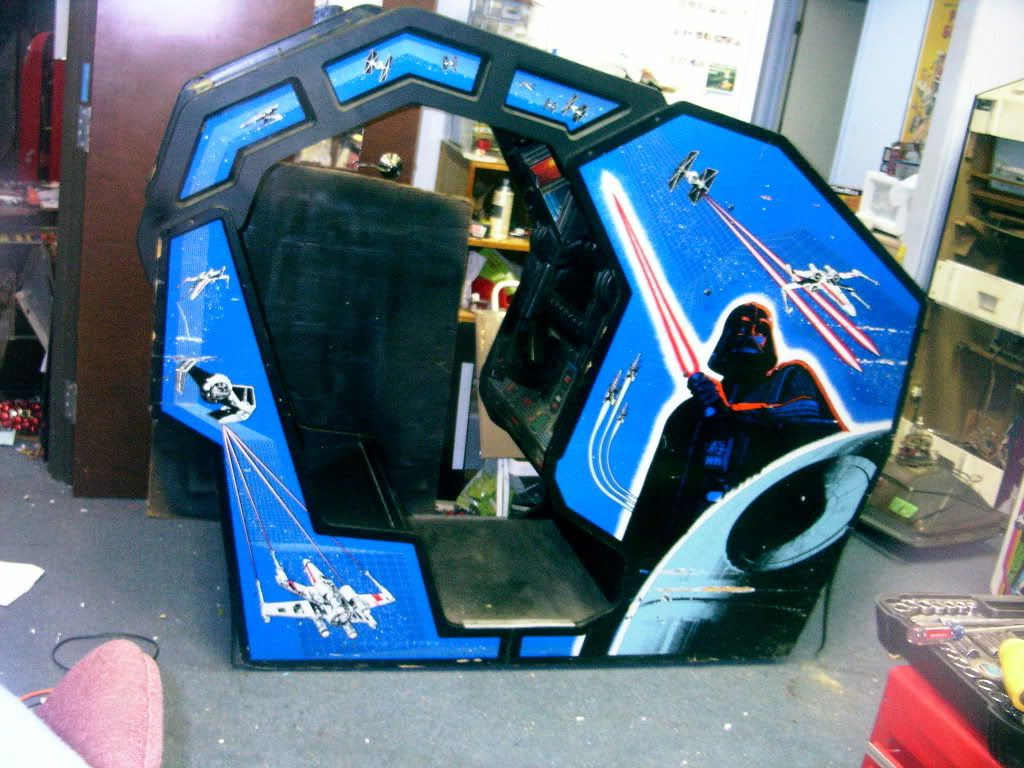
What a babe!  I guess this would be a good time to mention that the only digital camera I have access to is a 3.2 megapixel, so the pics may not be as high-def as some may wish.  They are all 2048x1536.  A few pics came out a little blurry, and I will be retaking them as I can.  Also, don't worry if you can't read everything in the photos, as it will be clear when you see the larger picture in the album.  These are more for reference and comments.  Get the proper info from the pic in the album.

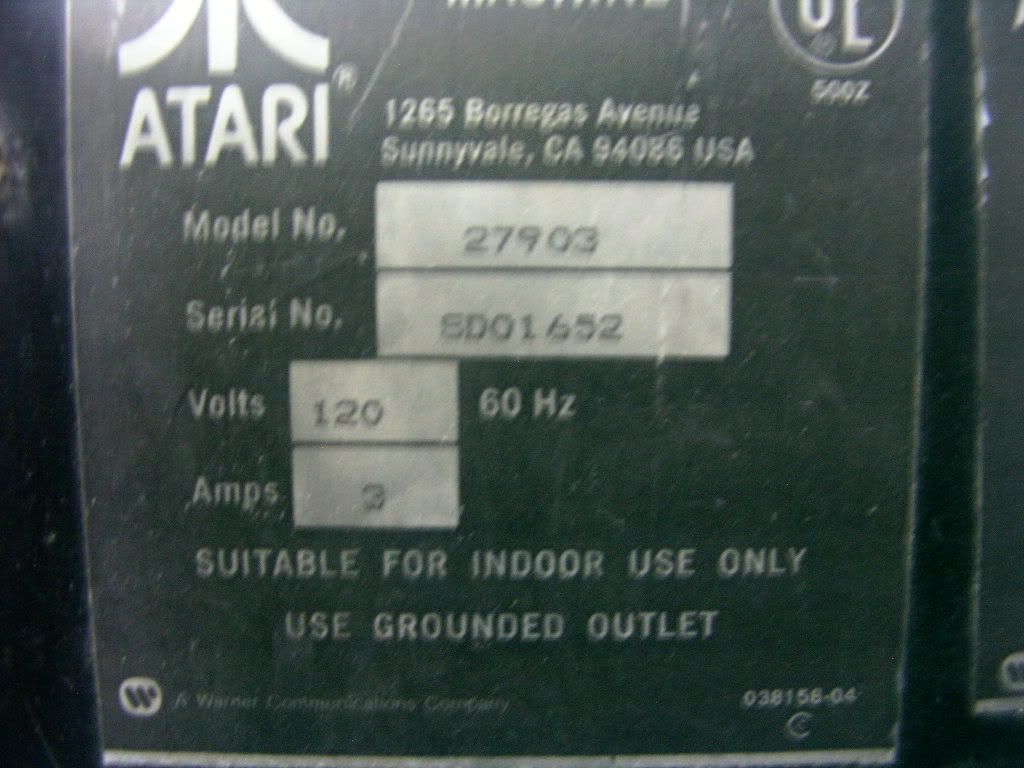
Here's a little something for those who think it's important:


By the way, I now understand why it's taken someone this long to tackle this.  This cabinet is put together with about a million screws and nails (mostly hidden from the inside) and I soon gave up trying to remove the canopy, although my wife got a good pic of me trying:


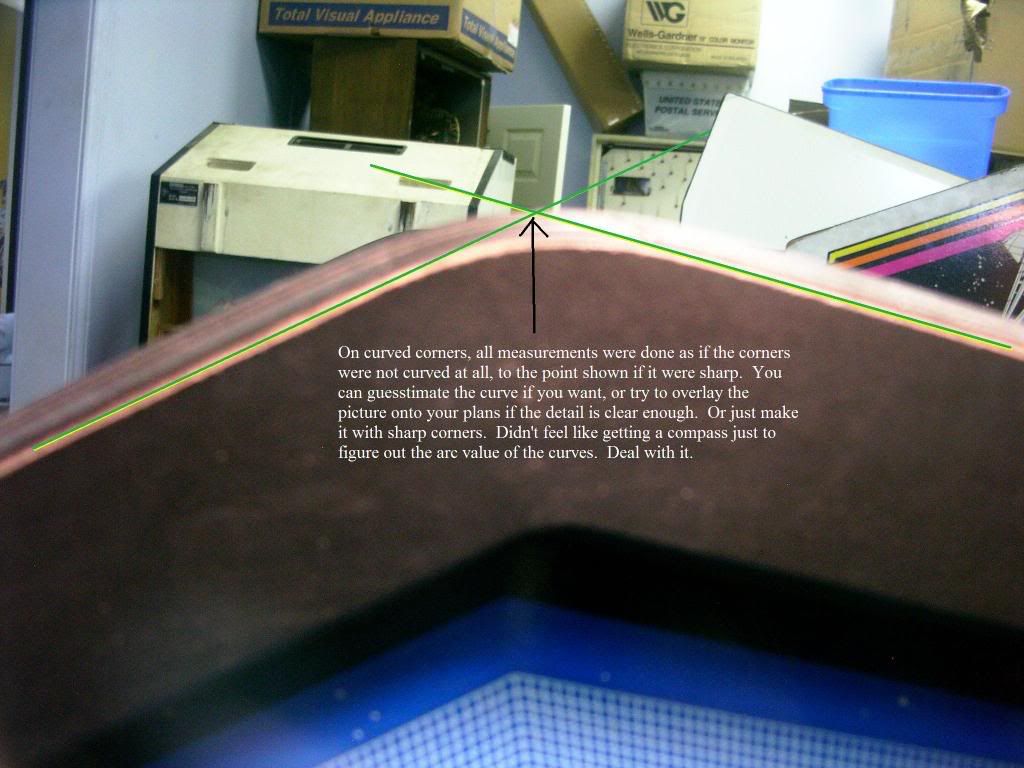
The designers of this cabinet must have had an aversion to hard corners, as every corner was a curve.  In order to make measurements, I had to find a reference point.  Hopefully it's understandable.  This is what I came up with:


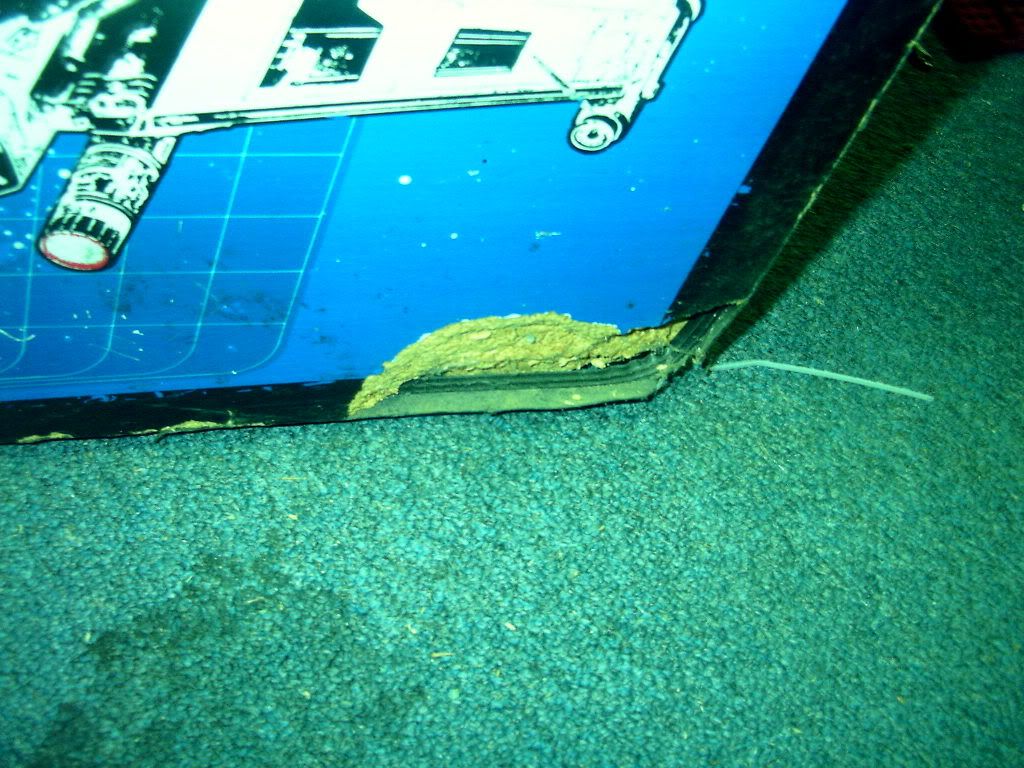
Finally, both sides are the same, mirror-imaged.  One side has some damage as you can see below.  For this reason, almost all pics (except where noted) are of the right side as you sit in the game.  You can easily flip the picture to get the opposite side.  All art is exactly the same, except mirrored.


By the way. the width from the outside edges of the base is 25-1/2".  The width from the outside edges of the canopy is 24".  The width of the inside edges of the base is 23-3/4".  Since this is a constant throughout the cab, most pictures won't include this information.  Thanks for reading.  Now on with the pics.
« Last Edit: May 13, 2007, 04:44:24 am by modessitt »
Working Games:Joust CT,Gyruss UR,Pong,Battlezone UR#1
Current Proj's:Battlezone UR#2
Cheap/Free Cabs Wanted: DK,KarateChamp,Shinobi,Ghosts&Goblins,CircusCharlie,10ydFight,PolePositnCP,RallyX,Frogger

modessitt

  • Trade Count: (+1)
  • Full Member
  • ***
  • Offline Offline
  • Posts: 402
  • Last login:October 17, 2021, 07:02:28 pm
  • Technician
Re: FINALLY! Star Wars Cockpit Measurements
« Reply #1 on: May 13, 2007, 02:55:18 am »
For reference, the section of the cab with the monitor will be referred to as the back or rear, and the section with the seat will be referred to as the front.  If you're wondering how big this cab really is - and want to know if you'll be able to fit it in your gameroom, this will give you an idea of the size of the game.  Width is mentioned in the post above:


Here is the rear portion of the right side.  There will unmodified photo's in the albums for those who may want to use this as a basis to reproduce artwork:


And here is the front portion of the right side:

Working Games:Joust CT,Gyruss UR,Pong,Battlezone UR#1
Current Proj's:Battlezone UR#2
Cheap/Free Cabs Wanted: DK,KarateChamp,Shinobi,Ghosts&Goblins,CircusCharlie,10ydFight,PolePositnCP,RallyX,Frogger

modessitt

  • Trade Count: (+1)
  • Full Member
  • ***
  • Offline Offline
  • Posts: 402
  • Last login:October 17, 2021, 07:02:28 pm
  • Technician
Re: FINALLY! Star Wars Cockpit Measurements
« Reply #2 on: May 13, 2007, 03:09:55 am »
This post will reference the inside of the cockpit area.

Of course we need something to sit on.  This is the base of the seat where we plant our butts:


And where we rest our backs.  Note that both speaker grills are the same size and evenly spaced on the seatback.  I only measured the outsides of the speaker grills.  They are mounted flush into the seatback, so whatever kind you use will need to be mounted that way.  You can see through the grill the cut-outs for the speaker, and I figure you can do it however you want.  Also, was there a cushion or something here originally?  There are small holes up the length of the left and right sides but no screws or bolts in thos holes.  Just wondering.


Here is the area between the seat base and the inside floor.  the speaker grills are the same size and spaced the same way left-to-right as the other speaker grills.


Here is the area for your feet.  It is covered in ribbed rubber matting.  Notice the metal plates holding the two side portions together.


Here is the kick panel below the control panel.  The angles may not be obvious.  Hopefully you can figure out how to incorporate this, as it's not easy to photograph in detail.


There has been some discussion as to whether the control panel and bezel are the same for the upright as they are for the cockpit.  While I can't answer that, I include this pic of the area in question, along with a few measurements.  Once I remove these items during the repair, I will take a few more pics in better detail for those who still might wonder.

« Last Edit: May 13, 2007, 03:16:42 am by modessitt »
Working Games:Joust CT,Gyruss UR,Pong,Battlezone UR#1
Current Proj's:Battlezone UR#2
Cheap/Free Cabs Wanted: DK,KarateChamp,Shinobi,Ghosts&Goblins,CircusCharlie,10ydFight,PolePositnCP,RallyX,Frogger

modessitt

  • Trade Count: (+1)
  • Full Member
  • ***
  • Offline Offline
  • Posts: 402
  • Last login:October 17, 2021, 07:02:28 pm
  • Technician
Re: FINALLY! Star Wars Cockpit Measurements
« Reply #3 on: May 13, 2007, 03:22:52 am »
This is an area above the bezel and partially under the canopy.  It was almost impossible to remove the canopy without breaking the cabinet.  I was able to get this section of the canopy off a little to take some pics, but was unable to get a full pic of this panel.

Here is a crappy, self-made concept of what the panel is shaped like"


Here are partial pics of this panel.  You can see the curves, as well as the portion which fits under the canopy.

The left side:


and the right side:

« Last Edit: May 13, 2007, 03:24:25 am by modessitt »
Working Games:Joust CT,Gyruss UR,Pong,Battlezone UR#1
Current Proj's:Battlezone UR#2
Cheap/Free Cabs Wanted: DK,KarateChamp,Shinobi,Ghosts&Goblins,CircusCharlie,10ydFight,PolePositnCP,RallyX,Frogger

modessitt

  • Trade Count: (+1)
  • Full Member
  • ***
  • Offline Offline
  • Posts: 402
  • Last login:October 17, 2021, 07:02:28 pm
  • Technician
Re: FINALLY! Star Wars Cockpit Measurements
« Reply #4 on: May 13, 2007, 03:31:36 am »
Now, the rear cabinet panels.

Here is a top panel directly behind the panel in the above post.  The grill is centered in the panel.  The top portion is a routed inset for the plexi of the canopy to sit flush into the wood.  Set it for the thickness of the plexi you use.

Right after this pic was taken, my wife said, "Did you just take my picture?"  Yep!


Here is the larger panel directly behind it.  The grill is the same size as the other and also centered:


And here is the panel below the back door (if it were there).  If I had been smart I would have measure the inset from the back, as well as the hole for the back door (which is missing from this game).  The Groove is centered in the panel, as is the cut-out for the power cord.  The measurements in the top right corner are for proper positioning on the power switch hole.

Working Games:Joust CT,Gyruss UR,Pong,Battlezone UR#1
Current Proj's:Battlezone UR#2
Cheap/Free Cabs Wanted: DK,KarateChamp,Shinobi,Ghosts&Goblins,CircusCharlie,10ydFight,PolePositnCP,RallyX,Frogger

modessitt

  • Trade Count: (+1)
  • Full Member
  • ***
  • Offline Offline
  • Posts: 402
  • Last login:October 17, 2021, 07:02:28 pm
  • Technician
Re: FINALLY! Star Wars Cockpit Measurements
« Reply #5 on: May 13, 2007, 03:39:41 am »
Okay, now we get to the "marquee".  This is what we're talking about.


And this is what's behind it:


It's not much, but you can see the bracing used inside the left:


and inside on the right:


Here is the wood crossbar above the marquee.  Most of this is covered by a metal bracket which, of course, I forgot to measure.


And the panel below the marquee:

Working Games:Joust CT,Gyruss UR,Pong,Battlezone UR#1
Current Proj's:Battlezone UR#2
Cheap/Free Cabs Wanted: DK,KarateChamp,Shinobi,Ghosts&Goblins,CircusCharlie,10ydFight,PolePositnCP,RallyX,Frogger

modessitt

  • Trade Count: (+1)
  • Full Member
  • ***
  • Offline Offline
  • Posts: 402
  • Last login:October 17, 2021, 07:02:28 pm
  • Technician
Re: FINALLY! Star Wars Cockpit Measurements
« Reply #6 on: May 13, 2007, 03:43:57 am »
Speaking of the marquee.  This is silk-screened onto the backside of glass.  Unfortunately there is a bit of minor flaking on the edges, although it is mostly behind the mounting brackets and not that noticeable once in the game.

This is glass, probably tempered, which is 3/16" thick.

Here is a pic with no flash.  It is a little blurry, sorry:


Here is the same pic with the flash.  Besides the reflection, this shows the art in better detail and focus, especially the ships:

Working Games:Joust CT,Gyruss UR,Pong,Battlezone UR#1
Current Proj's:Battlezone UR#2
Cheap/Free Cabs Wanted: DK,KarateChamp,Shinobi,Ghosts&Goblins,CircusCharlie,10ydFight,PolePositnCP,RallyX,Frogger

modessitt

  • Trade Count: (+1)
  • Full Member
  • ***
  • Offline Offline
  • Posts: 402
  • Last login:October 17, 2021, 07:02:28 pm
  • Technician
Re: FINALLY! Star Wars Cockpit Measurements
« Reply #7 on: May 13, 2007, 03:48:04 am »
Here are some crappy photos of the coin door positioning on the left side.  This seems to be a standard over/under coin door which is used on a lot of games (like Dig Dug, Afterburner, etc...)  I didn't remove the coin door, but guesstimated the size of the hole.  It is perpindicular to the floor.

This pic shows the spacing from the left edge:


And this from the right edge and the base:

Working Games:Joust CT,Gyruss UR,Pong,Battlezone UR#1
Current Proj's:Battlezone UR#2
Cheap/Free Cabs Wanted: DK,KarateChamp,Shinobi,Ghosts&Goblins,CircusCharlie,10ydFight,PolePositnCP,RallyX,Frogger

modessitt

  • Trade Count: (+1)
  • Full Member
  • ***
  • Offline Offline
  • Posts: 402
  • Last login:October 17, 2021, 07:02:28 pm
  • Technician
Re: FINALLY! Star Wars Cockpit Measurements
« Reply #8 on: May 13, 2007, 04:06:25 am »
Okay, on to the canopy.  The canopy is made of three separate pieces (on each side) which are sandwiched together.  You can see this from underneath.  Notice that all have their own t-molding on the bottom.


The two outside pieces are exactly the same (except for the cut-outs for the art), but the inside piece has a different shape altogether.  Because of this, there is a single wide piece of t-molding across the top of the two outside pieces to give the illusion of one solid piece.


Because of the difficulty (or inability) of taking the canopy off, I had to measure the pieces and superimpose the shape onto the full-side-view.  the measurements and shape are what's important, not the scale, so keep that in mind.  Here is the shape of the two outer pieces:


Here are the measurements for the inner piece:


Here is a view of that inner piece (the left side - the pic above is for the right side).  You can see all the screws used to keep the boards sandwiched tightly.


As you can see in the above pic, there is a crossbar which provides stability, as well as a centerpiece for the plexiglass.  Didn't notice it at the time, but got the wife again at the perfect angle in the mirror:


Here is a close-up view of how the crossbar mounts into the side pieces:

Working Games:Joust CT,Gyruss UR,Pong,Battlezone UR#1
Current Proj's:Battlezone UR#2
Cheap/Free Cabs Wanted: DK,KarateChamp,Shinobi,Ghosts&Goblins,CircusCharlie,10ydFight,PolePositnCP,RallyX,Frogger

modessitt

  • Trade Count: (+1)
  • Full Member
  • ***
  • Offline Offline
  • Posts: 402
  • Last login:October 17, 2021, 07:02:28 pm
  • Technician
Re: FINALLY! Star Wars Cockpit Measurements
« Reply #9 on: May 13, 2007, 04:13:36 am »
Which brings us to the art on the canopy.  Only because the machine is not here, I see that I forgot to measure the spacing for the separate art portions.  Also, there is about a 1/4" difference between the inside edge and outside edge.  It is beveled and appears to be completely through the first piece, so that the art is mounted directly onto the middle piece.

When looking at the right side, here is the left piece:


Here is the middle piece:


And the right piece.  This came out blurry and will be retaken:

Working Games:Joust CT,Gyruss UR,Pong,Battlezone UR#1
Current Proj's:Battlezone UR#2
Cheap/Free Cabs Wanted: DK,KarateChamp,Shinobi,Ghosts&Goblins,CircusCharlie,10ydFight,PolePositnCP,RallyX,Frogger

modessitt

  • Trade Count: (+1)
  • Full Member
  • ***
  • Offline Offline
  • Posts: 402
  • Last login:October 17, 2021, 07:02:28 pm
  • Technician
Re: FINALLY! Star Wars Cockpit Measurements
« Reply #10 on: May 13, 2007, 04:23:15 am »
So we need plexi for the canopy.  There are two pieces, both smoked (looks brown, though), and about 3/16" thick.

Here is the flat piece above the monitor:


If you notice there are holes in the plexi for mounting one end to the panel above the bexel.


This is the angled plexi that goes above and behind the head.


If you want to try to create (or have created) this plexi, here are top-side pics of each angle.  You can super-impose them onto your plans to get the exact angles.

Here is the angle between the two longest pieces:


and the angle between the long and shortest side:

Working Games:Joust CT,Gyruss UR,Pong,Battlezone UR#1
Current Proj's:Battlezone UR#2
Cheap/Free Cabs Wanted: DK,KarateChamp,Shinobi,Ghosts&Goblins,CircusCharlie,10ydFight,PolePositnCP,RallyX,Frogger

modessitt

  • Trade Count: (+1)
  • Full Member
  • ***
  • Offline Offline
  • Posts: 402
  • Last login:October 17, 2021, 07:02:28 pm
  • Technician
Re: FINALLY! Star Wars Cockpit Measurements
« Reply #11 on: May 13, 2007, 04:30:29 am »
Finally, here are some pics of the interior of the cab.  I will try to get some better detailed pics once I get into repairing this game.  I won't comment on these pics at this time, although I'll be happy to answer questions later.


Working Games:Joust CT,Gyruss UR,Pong,Battlezone UR#1
Current Proj's:Battlezone UR#2
Cheap/Free Cabs Wanted: DK,KarateChamp,Shinobi,Ghosts&Goblins,CircusCharlie,10ydFight,PolePositnCP,RallyX,Frogger

modessitt

  • Trade Count: (+1)
  • Full Member
  • ***
  • Offline Offline
  • Posts: 402
  • Last login:October 17, 2021, 07:02:28 pm
  • Technician
Re: FINALLY! Star Wars Cockpit Measurements
« Reply #12 on: May 13, 2007, 04:40:47 am »
Finally!  Post #13!  I hope everyone enjoyed the pics!

As far as I can tell, 3/4" MDF was used throughout this cab.  Also, my measurements were done on the outside.  Obviously, there must be areas where panels will use angled cuts or overlap for joining purposes.  In your planning, make sure you compensate for this, otherwise your cabinet will not join together properly.

Don't forget the width measurements mentioned in the first post for your planning as well.

I'd like to thank everyone from refraining from posting until now.

Here are the promised links!  First to the album showing all the modified pictures shown so far:

http://s172.photobucket.com/albums/w7/modessitt/Star%20Wars%20Modified/

And the link to the album showing all the pictures as they were taken originally - unmodified:

http://s172.photobucket.com/albums/w7/modessitt/Star%20Wars%20Unmodified/

Hope y'all have enjoyed it!  Drive safe and don't forget to tip your waitress!   :cheers:
Working Games:Joust CT,Gyruss UR,Pong,Battlezone UR#1
Current Proj's:Battlezone UR#2
Cheap/Free Cabs Wanted: DK,KarateChamp,Shinobi,Ghosts&Goblins,CircusCharlie,10ydFight,PolePositnCP,RallyX,Frogger

ChadTower

  • Chief Kicker - Nobody's perfect, including me. Fantastic body.
  • Trade Count: (+12)
  • Full Member
  • ***
  • Offline Offline
  • Posts: 38212
  • Last login:Yesterday at 07:54:48 pm
Re: FINALLY! Star Wars Cockpit Measurements
« Reply #13 on: May 13, 2007, 08:48:11 am »
 :notworthy: :notworthy: :notworthy: :notworthy: :notworthy: :notworthy:

CheffoJeffo

  • Cheffo's right! ---saint
  • Wiki Master
  • Trade Count: (+2)
  • Full Member
  • *****
  • Offline Offline
  • Posts: 7781
  • Last login:Yesterday at 06:36:21 pm
  • Worthless button pusher!
Re: FINALLY! Star Wars Cockpit Measurements
« Reply #14 on: May 13, 2007, 09:00:19 am »
A HUGE props to modessitt and profound thanks to Mrs. modessitt!

That was a nice thing to do!

 :applaud: :cheers: :notworthy: :cheers: :notworthy: :cheers: :applaud:
Working: Not Enough
Projects: Too Many
Progress: None

Zeppo

  • Trade Count: (0)
  • Full Member
  • ***
  • Offline Offline
  • Posts: 165
  • Last login:February 14, 2024, 10:26:44 am
  • Greetings Program!
Re: FINALLY! Star Wars Cockpit Measurements
« Reply #15 on: May 13, 2007, 01:50:46 pm »
Awesome.
This deserves a sticky or a big star or something.

Thanks for all the hard work!

 :notworthy:
Z

miles2912

  • Trade Count: (0)
  • Full Member
  • ***
  • Offline Offline
  • Posts: 706
  • Last login:October 31, 2019, 05:30:24 pm
  • My first Home Game. Fairchild System F.
Re: FINALLY! Star Wars Cockpit Measurements
« Reply #16 on: May 13, 2007, 02:13:53 pm »
This needs to be put in the Wiki under a Star Wars cab from scratch section.  Awesome job.  If someone decides to make a visio or a cad file of this please post it too.  Talk about the holy grail of arcade cabs...


Don
  Scratch built upright MAME Cab

zorg

  • Trade Count: (0)
  • Full Member
  • ***
  • Offline Offline
  • Posts: 1102
  • Last login:May 19, 2022, 09:00:38 am
Re: FINALLY! Star Wars Cockpit Measurements
« Reply #17 on: May 13, 2007, 04:44:50 pm »
what to say ???

a big thanks to you and your wife for this work.

 :applaud: :applaud: :applaud: :applaud: :applaud: :applaud: :applaud: :applaud: :applaud: :applaud: :applaud: :applaud: :applaud:
I'm on the planning stage

Level42

  • Wiki Contributor
  • Trade Count: (+5)
  • Full Member
  • ***
  • Offline Offline
  • Posts: 5965
  • Last login:November 13, 2018, 01:56:39 am
  • A Suzo stick is a joy forever...
Re: FINALLY! Star Wars Cockpit Measurements
« Reply #18 on: May 13, 2007, 05:12:54 pm »
 :applaud: :notworthy: :dizzy: :cheers: :applaud:

JoyMonkey

  • Voodoo Wiki Master . . .
  • Wiki Master
  • Trade Count: (+5)
  • Full Member
  • *****
  • Offline Offline
  • Posts: 2899
  • Last login:June 16, 2025, 09:16:27 pm
  • Candy is Dandy but Liquor is Quicker
    • JoyMonkey.com
Re: FINALLY! Star Wars Cockpit Measurements
« Reply #19 on: May 13, 2007, 08:20:31 pm »

SavannahLion

  • Wiki Contributor
  • Trade Count: (+1)
  • Full Member
  • ***
  • Offline Offline
  • Posts: 5986
  • Last login:December 19, 2015, 02:28:15 am
Re: FINALLY! Star Wars Cockpit Measurements
« Reply #20 on: May 13, 2007, 10:46:34 pm »
Holy ---steaming pile of meadow muffin---, you are a god.

Photobucket?! Get this stuff on Saints servers and we need to zip all the pics and all the explanations up as a megadownload. Better yet, put it on that drive with all the side art.

ChadTower

  • Chief Kicker - Nobody's perfect, including me. Fantastic body.
  • Trade Count: (+12)
  • Full Member
  • ***
  • Offline Offline
  • Posts: 38212
  • Last login:Yesterday at 07:54:48 pm
Re: FINALLY! Star Wars Cockpit Measurements
« Reply #21 on: May 14, 2007, 09:00:57 am »

Not many people have access to that drive with all the side art.

I did download the marked up pics, I think there were 52 of them.  I can zip them up and send them along to someone who would be willing to host them as an archive, pending modessitt's approval of course.

rovingmind

  • Trade Count: (+1)
  • Full Member
  • ***
  • Offline Offline
  • Posts: 632
  • Last login:October 17, 2023, 11:13:48 pm
  • If you only knew the POWER of the Dark Side
    • rovingmind
Re: FINALLY! Star Wars Cockpit Measurements
« Reply #22 on: May 14, 2007, 09:08:16 am »
 :notworthy:

And now my work begins.

Thank you thank you thank you

AAAAAAAAAAAAAAAAAAAAAAAAAAAAAAAAAAAAAAAAAHHHH!!!!!

rovingmind

  • Trade Count: (+1)
  • Full Member
  • ***
  • Offline Offline
  • Posts: 632
  • Last login:October 17, 2023, 11:13:48 pm
  • If you only knew the POWER of the Dark Side
    • rovingmind
Re: FINALLY! Star Wars Cockpit Measurements
« Reply #23 on: May 14, 2007, 11:10:19 am »
Does the plexi overlap on what looks like a strip of cork?
AAAAAAAAAAAAAAAAAAAAAAAAAAAAAAAAAAAAAAAAAHHHH!!!!!

ChadTower

  • Chief Kicker - Nobody's perfect, including me. Fantastic body.
  • Trade Count: (+12)
  • Full Member
  • ***
  • Offline Offline
  • Posts: 38212
  • Last login:Yesterday at 07:54:48 pm
Re: FINALLY! Star Wars Cockpit Measurements
« Reply #24 on: May 14, 2007, 11:16:57 am »

It appears to be just the MDF end grain.

rovingmind

  • Trade Count: (+1)
  • Full Member
  • ***
  • Offline Offline
  • Posts: 632
  • Last login:October 17, 2023, 11:13:48 pm
  • If you only knew the POWER of the Dark Side
    • rovingmind
Re: FINALLY! Star Wars Cockpit Measurements
« Reply #25 on: May 14, 2007, 11:17:27 am »

It appears to be just the MDF end grain.

Then why the staples?

If you zoom way in there appears to be a gap under it.   Veiwing Canopycrossbar photo
« Last Edit: May 14, 2007, 11:19:12 am by rovingmind »
AAAAAAAAAAAAAAAAAAAAAAAAAAAAAAAAAAAAAAAAAHHHH!!!!!

ChadTower

  • Chief Kicker - Nobody's perfect, including me. Fantastic body.
  • Trade Count: (+12)
  • Full Member
  • ***
  • Offline Offline
  • Posts: 38212
  • Last login:Yesterday at 07:54:48 pm
Re: FINALLY! Star Wars Cockpit Measurements
« Reply #26 on: May 14, 2007, 11:20:43 am »

Do you mean the yellow strip?  Looks like thin manuf wood there, stapled on to provide a bit of support.  Cork would work just as well.

rovingmind

  • Trade Count: (+1)
  • Full Member
  • ***
  • Offline Offline
  • Posts: 632
  • Last login:October 17, 2023, 11:13:48 pm
  • If you only knew the POWER of the Dark Side
    • rovingmind
Re: FINALLY! Star Wars Cockpit Measurements
« Reply #27 on: May 14, 2007, 11:23:38 am »

Do you mean the yellow strip?  Looks like thin manuf wood there, stapled on to provide a bit of support.  Cork would work just as well.

Yep thats the piece. 
AAAAAAAAAAAAAAAAAAAAAAAAAAAAAAAAAAAAAAAAAHHHH!!!!!

rovingmind

  • Trade Count: (+1)
  • Full Member
  • ***
  • Offline Offline
  • Posts: 632
  • Last login:October 17, 2023, 11:13:48 pm
  • If you only knew the POWER of the Dark Side
    • rovingmind
Re: FINALLY! Star Wars Cockpit Measurements
« Reply #28 on: May 14, 2007, 11:54:20 am »
Is it too late to get the panel setbacks? ie. how far in from the edges?
AAAAAAAAAAAAAAAAAAAAAAAAAAAAAAAAAAAAAAAAAHHHH!!!!!

modessitt

  • Trade Count: (+1)
  • Full Member
  • ***
  • Offline Offline
  • Posts: 402
  • Last login:October 17, 2021, 07:02:28 pm
  • Technician
Re: FINALLY! Star Wars Cockpit Measurements
« Reply #29 on: May 14, 2007, 02:39:23 pm »
Is it too late to get the panel setbacks? ie. how far in from the edges?

No, not too late.  I'll get it done soon.

The strip on the crossbar goes between the plexis.
Working Games:Joust CT,Gyruss UR,Pong,Battlezone UR#1
Current Proj's:Battlezone UR#2
Cheap/Free Cabs Wanted: DK,KarateChamp,Shinobi,Ghosts&Goblins,CircusCharlie,10ydFight,PolePositnCP,RallyX,Frogger

squirrellydw

  • Trade Count: (0)
  • Full Member
  • ***
  • Offline Offline
  • Posts: 1584
  • Last login:April 12, 2021, 11:30:22 am
Re: FINALLY! Star Wars Cockpit Measurements
« Reply #30 on: May 14, 2007, 05:21:12 pm »

Not many people have access to that drive with all the side art.

I did download the marked up pics, I think there were 52 of them.  I can zip them up and send them along to someone who would be willing to host them as an archive, pending modessitt's approval of course.

I can host them, email me the zip file to squirrellydw at gmail

if its OK with him
« Last Edit: May 14, 2007, 05:23:39 pm by squirrellydw »
I b**ch. People listen!!

modessitt

  • Trade Count: (+1)
  • Full Member
  • ***
  • Offline Offline
  • Posts: 402
  • Last login:October 17, 2021, 07:02:28 pm
  • Technician
Re: FINALLY! Star Wars Cockpit Measurements
« Reply #31 on: May 14, 2007, 07:26:35 pm »
Fine by me....
Working Games:Joust CT,Gyruss UR,Pong,Battlezone UR#1
Current Proj's:Battlezone UR#2
Cheap/Free Cabs Wanted: DK,KarateChamp,Shinobi,Ghosts&Goblins,CircusCharlie,10ydFight,PolePositnCP,RallyX,Frogger

modessitt

  • Trade Count: (+1)
  • Full Member
  • ***
  • Offline Offline
  • Posts: 402
  • Last login:October 17, 2021, 07:02:28 pm
  • Technician
Re: FINALLY! Star Wars Cockpit Measurements
« Reply #32 on: May 14, 2007, 08:00:14 pm »
Okay, while others are more than welcome to create their own, I have created Zipped archives of the 44 original and unmodified photos and the 50 modified photos.  I have also creates .exe self-extracting archive of each also, in case someone can't figure out how to get a free copy of Winzip.

Unfortunately, I can't post them here, nor do I have my own site to post them to.  If someone whould like them directly from me, PM me with an e-mail address. 

Even zipped, they are still fairly big.  I may not have used the proper compression.  Here are the file sizes:

Original .zip file - 36.2MB
Original .exe file - 36.3MB

Modified .zip file - 34.1MB
modified .exe file - 34.2MB

Maybe someone can compress them better.  Either way, I have them.
Working Games:Joust CT,Gyruss UR,Pong,Battlezone UR#1
Current Proj's:Battlezone UR#2
Cheap/Free Cabs Wanted: DK,KarateChamp,Shinobi,Ghosts&Goblins,CircusCharlie,10ydFight,PolePositnCP,RallyX,Frogger

ahofle

  • Trade Count: (+1)
  • Full Member
  • ***
  • Offline Offline
  • Posts: 4544
  • Last login:August 30, 2023, 05:10:22 pm
    • Arcade Ambience Project
Re: FINALLY! Star Wars Cockpit Measurements
« Reply #33 on: May 14, 2007, 09:23:24 pm »
I created you an FTP account on my site...PM'd you the details.  I will host them for you at http://hofle.com/sw if you haven't gotten hosting yet.

Thanks for your awesome work.  :cheers:
« Last Edit: May 14, 2007, 09:26:02 pm by ahofle »

modessitt

  • Trade Count: (+1)
  • Full Member
  • ***
  • Offline Offline
  • Posts: 402
  • Last login:October 17, 2021, 07:02:28 pm
  • Technician
Re: FINALLY! Star Wars Cockpit Measurements
« Reply #34 on: May 15, 2007, 12:59:40 am »
Thanks!  All four files are now there.  I will add to it as I get more info..... I also have my notes from my measuring still, just in case i need to answer questions.... looks like i may have the game for another week yet...
Working Games:Joust CT,Gyruss UR,Pong,Battlezone UR#1
Current Proj's:Battlezone UR#2
Cheap/Free Cabs Wanted: DK,KarateChamp,Shinobi,Ghosts&Goblins,CircusCharlie,10ydFight,PolePositnCP,RallyX,Frogger

HoopstarsGarage

  • Scratch Building Demi-God!
  • Trade Count: (0)
  • Full Member
  • ***
  • Offline Offline
  • Posts: 240
  • Last login:April 19, 2016, 09:24:11 pm
  • Scratch Building Demi-God..
    • Hoopstars Garage
Re: FINALLY! Star Wars Cockpit Measurements
« Reply #35 on: May 15, 2007, 01:55:17 am »
Great work..!!

Only one thing missing is all the angles for the cuts - without them, it would be very difficult to replicate..

Are you able to use a protractor and measure them up to the nearest degree?


Hoops

rovingmind

  • Trade Count: (+1)
  • Full Member
  • ***
  • Offline Offline
  • Posts: 632
  • Last login:October 17, 2023, 11:13:48 pm
  • If you only knew the POWER of the Dark Side
    • rovingmind
Re: FINALLY! Star Wars Cockpit Measurements
« Reply #36 on: May 15, 2007, 08:15:05 am »
Great work..!!

Only one thing missing is all the angles for the cuts - without them, it would be very difficult to replicate..

Are you able to use a protractor and measure them up to the nearest degree?


Hoops

The angles for the cuts can be calculated once we get the setback dimensions, they will be included in the final piece drawings.  Since we know the thickness of the material they used (posted earlier) that isn't that difficult of a problem.  The only angle that will be a fudge to fit is the ones on the metal bracket at the seat edge along with a what looks good radius on the corners.  A french curve will solve the radius question when this thing gets plotted full size.
AAAAAAAAAAAAAAAAAAAAAAAAAAAAAAAAAAAAAAAAAHHHH!!!!!

HoopstarsGarage

  • Scratch Building Demi-God!
  • Trade Count: (0)
  • Full Member
  • ***
  • Offline Offline
  • Posts: 240
  • Last login:April 19, 2016, 09:24:11 pm
  • Scratch Building Demi-God..
    • Hoopstars Garage
Re: FINALLY! Star Wars Cockpit Measurements
« Reply #37 on: May 15, 2007, 08:55:45 am »
The only angle that will be a fudge to fit is the ones on the metal bracket at the seat edge along with a what looks good radius on the corners.  A french curve will solve the radius question when this thing gets plotted full size.

We have everything we need :)


Hoops

rovingmind

  • Trade Count: (+1)
  • Full Member
  • ***
  • Offline Offline
  • Posts: 632
  • Last login:October 17, 2023, 11:13:48 pm
  • If you only knew the POWER of the Dark Side
    • rovingmind
Re: FINALLY! Star Wars Cockpit Measurements
« Reply #38 on: May 15, 2007, 09:15:16 am »
The only angle that will be a fudge to fit is the ones on the metal bracket at the seat edge along with a what looks good radius on the corners.  A french curve will solve the radius question when this thing gets plotted full size.

We have everything we need :)


Hoops

ooooh thats evil. 

*hiding club*  :angel:

where do you live??? :angel:
« Last Edit: May 15, 2007, 09:47:59 am by rovingmind »
AAAAAAAAAAAAAAAAAAAAAAAAAAAAAAAAAAAAAAAAAHHHH!!!!!

HoopstarsGarage

  • Scratch Building Demi-God!
  • Trade Count: (0)
  • Full Member
  • ***
  • Offline Offline
  • Posts: 240
  • Last login:April 19, 2016, 09:24:11 pm
  • Scratch Building Demi-God..
    • Hoopstars Garage
Re: FINALLY! Star Wars Cockpit Measurements
« Reply #39 on: May 15, 2007, 09:18:52 am »
where do you live??? :angel:
Australia... :)

Can you imagine how much it's cost to get this crap down here???  :cry:


Hoops

rovingmind

  • Trade Count: (+1)
  • Full Member
  • ***
  • Offline Offline
  • Posts: 632
  • Last login:October 17, 2023, 11:13:48 pm
  • If you only knew the POWER of the Dark Side
    • rovingmind
Re: FINALLY! Star Wars Cockpit Measurements
« Reply #40 on: May 15, 2007, 09:42:38 am »
where do you live??? :angel:
Australia... :)

Can you imagine how much it's cost to get this crap down here???  :cry:


Hoops

not quite, i'm still in shock over the last piece i had shipped here.
AAAAAAAAAAAAAAAAAAAAAAAAAAAAAAAAAAAAAAAAAHHHH!!!!!

rovingmind

  • Trade Count: (+1)
  • Full Member
  • ***
  • Offline Offline
  • Posts: 632
  • Last login:October 17, 2023, 11:13:48 pm
  • If you only knew the POWER of the Dark Side
    • rovingmind
Re: FINALLY! Star Wars Cockpit Measurements
« Reply #41 on: May 15, 2007, 11:53:06 am »
dimension request please, triangulation to be used for calculating all the various angles of the large flat pieces.

Can you please measure these points?  (turquoise lines)


AAAAAAAAAAAAAAAAAAAAAAAAAAAAAAAAAAAAAAAAAHHHH!!!!!

modessitt

  • Trade Count: (+1)
  • Full Member
  • ***
  • Offline Offline
  • Posts: 402
  • Last login:October 17, 2021, 07:02:28 pm
  • Technician
Re: FINALLY! Star Wars Cockpit Measurements
« Reply #42 on: May 16, 2007, 03:28:51 am »
Okay, I'll try to get to it tomorrow if I have time.  If not, then thurs for sure.  I can definately get the setbacks on Thursday.  Tomorrow is supposed to be a full day so not sure how much time I'll have....
Working Games:Joust CT,Gyruss UR,Pong,Battlezone UR#1
Current Proj's:Battlezone UR#2
Cheap/Free Cabs Wanted: DK,KarateChamp,Shinobi,Ghosts&Goblins,CircusCharlie,10ydFight,PolePositnCP,RallyX,Frogger

rovingmind

  • Trade Count: (+1)
  • Full Member
  • ***
  • Offline Offline
  • Posts: 632
  • Last login:October 17, 2023, 11:13:48 pm
  • If you only knew the POWER of the Dark Side
    • rovingmind
Re: FINALLY! Star Wars Cockpit Measurements
« Reply #43 on: May 16, 2007, 08:35:07 am »
thats fine.  I know real work has to take precedent.  Thats why my wife has paint on her new walls and i dont have my main computer together yet. 
AAAAAAAAAAAAAAAAAAAAAAAAAAAAAAAAAAAAAAAAAHHHH!!!!!

HoopstarsGarage

  • Scratch Building Demi-God!
  • Trade Count: (0)
  • Full Member
  • ***
  • Offline Offline
  • Posts: 240
  • Last login:April 19, 2016, 09:24:11 pm
  • Scratch Building Demi-God..
    • Hoopstars Garage
Re: FINALLY! Star Wars Cockpit Measurements
« Reply #44 on: May 16, 2007, 08:45:49 am »
There is a MASSIVE difference between "real work" and work requested by our wives :blah:

One we do to earn a living, the other we do to stay out of trouble  ;D


Hoops

patrickl

  • I cannot know for certain which will be tastiest
  • Trade Count: (+2)
  • Full Member
  • ***
  • Offline Offline
  • Posts: 4614
  • Last login:August 27, 2021, 09:25:30 am
  • Yo momma llama
    • PocketGalaga
Re: FINALLY! Star Wars Cockpit Measurements
« Reply #45 on: May 16, 2007, 11:01:53 am »
How can you be sure the triangulation measurements are correct when there are only rounded corners (ie points to measue between don't actually exist)
This signature is intentionally left blank

ChadTower

  • Chief Kicker - Nobody's perfect, including me. Fantastic body.
  • Trade Count: (+12)
  • Full Member
  • ***
  • Offline Offline
  • Posts: 38212
  • Last login:Yesterday at 07:54:48 pm
Re: FINALLY! Star Wars Cockpit Measurements
« Reply #46 on: May 16, 2007, 11:13:41 am »

That could be a matter of closest possible result.  It probably doesn't really matter if the plans are a half inch off in side shape.

Too bad he won't have the cab longer, he could take a template from the side for full accuracy.

rovingmind

  • Trade Count: (+1)
  • Full Member
  • ***
  • Offline Offline
  • Posts: 632
  • Last login:October 17, 2023, 11:13:48 pm
  • If you only knew the POWER of the Dark Side
    • rovingmind
Re: FINALLY! Star Wars Cockpit Measurements
« Reply #47 on: May 16, 2007, 12:36:27 pm »
How can you be sure the triangulation measurements are correct when there are only rounded corners (ie points to measue between don't actually exist)

He says he extended the lines to where they would be if they crossed instead of an arc.  Easily done with a pair of 12" school rulers.  This gives us between 1/16" to 1/4" accuracy.  Since we do not have a cabinet to take full outlines off of, (even though the request has been sent out to people with cabs in states of dissassembly) this is the next best thing.  If the initlial outline looks good, i'm going to do a fullsize layout.  If not i'll print a poster sized side image and scale it up to verify.  For the rounded corners i'm going to use a french curve to pick a radius that most closely matches.

I have the artwork files coming at some point along with high-res piece scans of the corners, i can figure the angles from those if it comes down to it.  They were taken by arcadeguy, he set the scanner right on the cabinet to take the scans.  I would rather not work straight off his scans since he does not have complete coverage posted that i could get.

This may not be the closest set of plans available but its going to be as close as possible without actually tearing one completely apart and using the sides to make patterns from.

I'm extremely confident in Modessitts ability to get accurate dimensions based on seeing some of the other cabinet projects he's helped gather them for and posted.
AAAAAAAAAAAAAAAAAAAAAAAAAAAAAAAAAAAAAAAAAHHHH!!!!!

ChadTower

  • Chief Kicker - Nobody's perfect, including me. Fantastic body.
  • Trade Count: (+12)
  • Full Member
  • ***
  • Offline Offline
  • Posts: 38212
  • Last login:Yesterday at 07:54:48 pm
Re: FINALLY! Star Wars Cockpit Measurements
« Reply #48 on: May 16, 2007, 01:12:39 pm »

You wouldn't have to tear it apart to get a side template.  You could just turn it onto its side.

rovingmind

  • Trade Count: (+1)
  • Full Member
  • ***
  • Offline Offline
  • Posts: 632
  • Last login:October 17, 2023, 11:13:48 pm
  • If you only knew the POWER of the Dark Side
    • rovingmind
Re: FINALLY! Star Wars Cockpit Measurements
« Reply #49 on: May 16, 2007, 01:23:30 pm »
you would for the canopy beam and seat panels. 

heck for the sides i'm thinking go all out and lay a sheet of luan on there, clamp in place and route a template.   :) i'd pay for the luan.

Although a sheet off a roll of painters paper would work well for tracing out the sides.  double side tape to hold it in place and outline the machine using an exacto knife.  third set of hands holding the paper so it doesnt slip. that way the cutter only has to guide the knife and can worry about not slicing up the t-molding.
AAAAAAAAAAAAAAAAAAAAAAAAAAAAAAAAAAAAAAAAAHHHH!!!!!

ChadTower

  • Chief Kicker - Nobody's perfect, including me. Fantastic body.
  • Trade Count: (+12)
  • Full Member
  • ***
  • Offline Offline
  • Posts: 38212
  • Last login:Yesterday at 07:54:48 pm
Re: FINALLY! Star Wars Cockpit Measurements
« Reply #50 on: May 16, 2007, 01:42:22 pm »

The canopy beam and seat panels could easily be calculated from measurements.  The side panels are fairly complex, though, so I'd say using a router template would be the most accurate way to go.  Those raised panels would be a problem, though.

rovingmind

  • Trade Count: (+1)
  • Full Member
  • ***
  • Offline Offline
  • Posts: 632
  • Last login:October 17, 2023, 11:13:48 pm
  • If you only knew the POWER of the Dark Side
    • rovingmind
Re: FINALLY! Star Wars Cockpit Measurements
« Reply #51 on: May 16, 2007, 01:59:41 pm »

The canopy beam and seat panels could easily be calculated from measurements.  The side panels are fairly complex, though, so I'd say using a router template would be the most accurate way to go.  Those raised panels would be a problem, though.

not really he said at the beginning its a built up 3 piece. the outside panel is cut through, the middle panel holds the artwork and the inside panel provides support for the plexi and the ends are the contact surface.  would have to use a straight edge measure the offset to get the angle.

If a router template was made for the outside panel complete with cutouts 4 of the 6 panels could be cut with it.

which reminds me, were the cutout dimensions to the outside or the inside of the cutout?
AAAAAAAAAAAAAAAAAAAAAAAAAAAAAAAAAAAAAAAAAHHHH!!!!!

ChadTower

  • Chief Kicker - Nobody's perfect, including me. Fantastic body.
  • Trade Count: (+12)
  • Full Member
  • ***
  • Offline Offline
  • Posts: 38212
  • Last login:Yesterday at 07:54:48 pm
Re: FINALLY! Star Wars Cockpit Measurements
« Reply #52 on: May 16, 2007, 02:05:59 pm »
not really he said at the beginning its a built up 3 piece. the outside panel is cut through, the middle panel holds the artwork and the inside panel provides support for the plexi and the ends are the contact surface.  would have to use a straight edge measure the offset to get the angle.

Right, but what I'm saying, is that it would make it hard to just flush trim a template with a router, seeing as how the side isn't completely flat.  It would be more work, that's all.

rovingmind

  • Trade Count: (+1)
  • Full Member
  • ***
  • Offline Offline
  • Posts: 632
  • Last login:October 17, 2023, 11:13:48 pm
  • If you only knew the POWER of the Dark Side
    • rovingmind
Re: FINALLY! Star Wars Cockpit Measurements
« Reply #53 on: May 16, 2007, 02:35:00 pm »
not really he said at the beginning its a built up 3 piece. the outside panel is cut through, the middle panel holds the artwork and the inside panel provides support for the plexi and the ends are the contact surface.  would have to use a straight edge measure the offset to get the angle.

Right, but what I'm saying, is that it would make it hard to just flush trim a template with a router, seeing as how the side isn't completely flat.  It would be more work, that's all.

very true


That will perhaps have to be up to whoever is actually doing the building of their cabinets.  for me when it gets to that point it will be beveled.  It just wouldn't look right for it not to be.  Sadly quite a few people probably wouldn't even notice.

AAAAAAAAAAAAAAAAAAAAAAAAAAAAAAAAAAAAAAAAAHHHH!!!!!

modessitt

  • Trade Count: (+1)
  • Full Member
  • ***
  • Offline Offline
  • Posts: 402
  • Last login:October 17, 2021, 07:02:28 pm
  • Technician
Re: FINALLY! Star Wars Cockpit Measurements
« Reply #54 on: May 16, 2007, 06:32:37 pm »
Quote
which reminds me, were the cutout dimensions to the outside or the inside of the cutout?

The dimensions were of the actual art inside the hole, or as you put it, the inside edge of the cut-outs.  Probably the best way to do it would be to produce the art to the exact size it's supposed to be.  Lay (don't stick) it on the outer piece of the canopy (with it clamped to the middle piece to make sure the alignment and placing are accurate, and trace the shape of the art onto the outer piece.  Then unclamp and cut the shapes out of the outer piece.  Verify the size is a very close fit (perhaps a tiny bit small and trim the art to fit).  Then just route a beveled edge - angled out - around the holes.  Paint all three side pieces black.  Route t-molding grooves in them and install t-molding.  Clamp them together in perfect alignment and drill holes for mounting screws from the inside (probably 2" screws) all around to make sure they stay together nice and tight.  Figure out how to mount it to the rest of the cab.

Since it was almost impossible to remove the canopy without damaging the rest of the cab (due to stresses from internal nailing), it would probably be a good idea to take some design liberties and figure out a way to atttach the canopy so that it can be removed easily, while maintaining the illusion that it is just as solidly attached as the original.  It might also be beneficial for moving if the same was done to make the seat assembly detachable as well, especially since it appears that way from outside.  Actually have to look at the bottom to see that it is all one piece...

As for lying the cab on it's side for exact measurements, it's easier said than done, especially with a game worth a couple grand that doesn't belong to me.  And some minor (and major in one spot) corner damage would still throw off an "exact" tracing, even if my hand was steady enough when cutting to get good results anyway.  (I can just see trying to get underneath the feet area to trace the side covered up by it.)
Working Games:Joust CT,Gyruss UR,Pong,Battlezone UR#1
Current Proj's:Battlezone UR#2
Cheap/Free Cabs Wanted: DK,KarateChamp,Shinobi,Ghosts&Goblins,CircusCharlie,10ydFight,PolePositnCP,RallyX,Frogger

rovingmind

  • Trade Count: (+1)
  • Full Member
  • ***
  • Offline Offline
  • Posts: 632
  • Last login:October 17, 2023, 11:13:48 pm
  • If you only knew the POWER of the Dark Side
    • rovingmind
Re: FINALLY! Star Wars Cockpit Measurements
« Reply #55 on: May 16, 2007, 06:51:15 pm »
the bottom is a one piece box.  I can email you photos of the bottom dissassembled
AAAAAAAAAAAAAAAAAAAAAAAAAAAAAAAAAAAAAAAAAHHHH!!!!!

ChadTower

  • Chief Kicker - Nobody's perfect, including me. Fantastic body.
  • Trade Count: (+12)
  • Full Member
  • ***
  • Offline Offline
  • Posts: 38212
  • Last login:Yesterday at 07:54:48 pm
Re: FINALLY! Star Wars Cockpit Measurements
« Reply #56 on: May 16, 2007, 07:44:05 pm »

If it's for home use, you could do something as simple as use velcro for the canopy.  No one is going to vandalize it in your basement.

rovingmind

  • Trade Count: (+1)
  • Full Member
  • ***
  • Offline Offline
  • Posts: 632
  • Last login:October 17, 2023, 11:13:48 pm
  • If you only knew the POWER of the Dark Side
    • rovingmind
Re: FINALLY! Star Wars Cockpit Measurements
« Reply #57 on: May 16, 2007, 08:13:16 pm »

If it's for home use, you could do something as simple as use velcro for the canopy.  No one is going to vandalize it in your basement.

i wouldn't use velcro, but with a little planning a modification to the box would be possible to split the front and back sections.  the canopy beams could be made moderately removable using t-nuts and hex headed bolts instead of nails and internal attachments.  the only visible additions would be the rounded bolt heads.  A change to the canopy edges would involve a series of retaining screws (black anodized) to make the canopy one piece.  It already has a cross brace for strength and that would make the entire cabinet able to be taken apart for moving in approximately 15 minutes including ciggarette break.  A molex connector would be used at the bottom cabinet joint for the speaker and marquee light connection.  ideally a waterproof automotive style connector would be better for that.

How much interested would there be in this modification to the bottom box?  The visible modifications would be 2 - 4 bolts (black headed) at the cabinet base, series of small screws on the sides of the plexi canopy, 4 bolts per side of the canopy (also black allen headed bolts).  the bolts would go in and tighten to T-nuts.  There would also be an extra castor in the middles of the two bottom bases.  This might actually increase the usuable lifespan of the cockpit by adding support to the middle.

Hmm might just do this for myself anyway.

edit:
linkto andysarcade photos of a dissassembled cabinet showing the base
« Last Edit: May 16, 2007, 08:36:46 pm by rovingmind »
AAAAAAAAAAAAAAAAAAAAAAAAAAAAAAAAAAAAAAAAAHHHH!!!!!

modessitt

  • Trade Count: (+1)
  • Full Member
  • ***
  • Offline Offline
  • Posts: 402
  • Last login:October 17, 2021, 07:02:28 pm
  • Technician
Re: FINALLY! Star Wars Cockpit Measurements
« Reply #58 on: May 16, 2007, 11:59:57 pm »
You wouldn't have to make the bolts visible with some different planning...

You could make it "fit" together like the seat assembly on sitdown racers do, with a "male" end that fits into a "female" end.  Have it bolt INSIDE the cab with access under the feet panel.  Make the feet panel removable by attaching with an internal (hidden) hinge on one end and countersunk bolts that are set beneath the metal strips already on the sides of the feet panel. 

Worth thinking about.....maybe......
Working Games:Joust CT,Gyruss UR,Pong,Battlezone UR#1
Current Proj's:Battlezone UR#2
Cheap/Free Cabs Wanted: DK,KarateChamp,Shinobi,Ghosts&Goblins,CircusCharlie,10ydFight,PolePositnCP,RallyX,Frogger

Zeppo

  • Trade Count: (0)
  • Full Member
  • ***
  • Offline Offline
  • Posts: 165
  • Last login:February 14, 2024, 10:26:44 am
  • Greetings Program!
Re: FINALLY! Star Wars Cockpit Measurements
« Reply #59 on: May 17, 2007, 08:07:34 am »
Ok, so who is going to make out a parts list and building instructions complete with diagrams and measurements now?

My wife actually thinks this would be a cool project, and if she thinks so, then that is saying something.
Z

Havok

  • Keeper of the __Blue_Stars___
  • Trade Count: (+17)
  • Full Member
  • ***
  • Offline Offline
  • Posts: 4530
  • Last login:February 05, 2025, 10:41:40 pm
  • Insufficient facts always invite danger.
Re: FINALLY! Star Wars Cockpit Measurements
« Reply #60 on: May 17, 2007, 08:14:39 am »
Ok, so who is going to make out a parts list and building instructions complete with diagrams and measurements now?

My wife actually thinks this would be a cool project, and if she thinks so, then that is saying something.


If you wait long enough, Ram Controls will be working on this. He will even be offering kits eventually. However, considering how long it is taking for his repro Star Wars yoke, that may be some time indeed...

rovingmind

  • Trade Count: (+1)
  • Full Member
  • ***
  • Offline Offline
  • Posts: 632
  • Last login:October 17, 2023, 11:13:48 pm
  • If you only knew the POWER of the Dark Side
    • rovingmind
Re: FINALLY! Star Wars Cockpit Measurements
« Reply #61 on: May 17, 2007, 08:34:36 am »
Um....... dude.  Thats what this current project is about.  making building plans.  Its a multi part project. 
The dimensions are being procured and posted here for all, thankfully, by modesitt.

My post is covering a plans file.

Cad layouts of the side panels will be made available as dxf files.  We have the thickness of the panel material and outside dimensions of the access panels so with setbacks an accurate 3d model can be made to calculate their edge angles.   

For this part of the project the end result is going to be a cad package and possibly  an eps or pdf file to print patterns out on a plotter for the complex side panels.  Take to the local kinkos and print full scale for the sides.  (for that part i will probably have to pull a favor from my brother-inlaw)

AAAAAAAAAAAAAAAAAAAAAAAAAAAAAAAAAAAAAAAAAHHHH!!!!!

unclet

  • Trade Count: (+4)
  • Full Member
  • ***
  • Offline Offline
  • Posts: 3561
  • Last login:March 17, 2025, 11:51:15 am
Re: FINALLY! Star Wars Cockpit Measurements
« Reply #62 on: May 17, 2007, 08:44:03 am »
Possibly "eps" and "pdf" files both could be produced ......

rovingmind

  • Trade Count: (+1)
  • Full Member
  • ***
  • Offline Offline
  • Posts: 632
  • Last login:October 17, 2023, 11:13:48 pm
  • If you only knew the POWER of the Dark Side
    • rovingmind
Re: FINALLY! Star Wars Cockpit Measurements
« Reply #63 on: May 17, 2007, 08:57:30 am »
You wouldn't have to make the bolts visible with some different planning...

You could make it "fit" together like the seat assembly on sitdown racers do, with a "male" end that fits into a "female" end.  Have it bolt INSIDE the cab with access under the feet panel.  Make the feet panel removable by attaching with an internal (hidden) hinge on one end and countersunk bolts that are set beneath the metal strips already on the sides of the feet panel. 

Worth thinking about.....maybe......

I havn't had the luxury of taking one of them apart.  Does anybody have a picture of it?  
That would actually work rather well.

I just looked at andy's pictures of the base.
The foot panel would have to have relief angles on the front and back edges and be a two peice to take into account the slanting of the seat base.  A thin piece to bring the edge of the removable one directly under the outer most edge of the seat so it would be able to arc out.  Their would be a seam there but it would work well.  It could easily be hidden under a rubber floor mat and retain with pop-in locks. (like speaker grill pegs or dzus fasteners)  The rubber mat could then just overlay over the thinner section making it completely smooth.  For a non-commercial installation rubber cement or velcro.  I would probably break down and just leave a thin seam there.  In the long run the rubber flap would tear loose.  I would rather have a thin seam then change the angles of the seat base.

A much neater option.  Good call.  the part with the monitor and hardware section would be the only part that actually needed an extra caster i think.  the seat section should be light enough to just slip in place if a pair of guide pins were used to locate it for reattaching.
AAAAAAAAAAAAAAAAAAAAAAAAAAAAAAAAAAAAAAAAAHHHH!!!!!

rovingmind

  • Trade Count: (+1)
  • Full Member
  • ***
  • Offline Offline
  • Posts: 632
  • Last login:October 17, 2023, 11:13:48 pm
  • If you only knew the POWER of the Dark Side
    • rovingmind
Re: FINALLY! Star Wars Cockpit Measurements
« Reply #64 on: May 17, 2007, 08:58:56 am »
Possibly "eps" and "pdf" files both could be produced ......

That would depend on how much i could talk him into doing.  Illustrator files could also be a possibility.

AAAAAAAAAAAAAAAAAAAAAAAAAAAAAAAAAAAAAAAAAHHHH!!!!!

ChadTower

  • Chief Kicker - Nobody's perfect, including me. Fantastic body.
  • Trade Count: (+12)
  • Full Member
  • ***
  • Offline Offline
  • Posts: 38212
  • Last login:Yesterday at 07:54:48 pm
Re: FINALLY! Star Wars Cockpit Measurements
« Reply #65 on: May 17, 2007, 09:05:47 am »
i wouldn't use velcro, but with a little planning a modification to the box would be possible to split the front and back sections.

I was thinking canopy meant the plexiglass only. 

Zeppo

  • Trade Count: (0)
  • Full Member
  • ***
  • Offline Offline
  • Posts: 165
  • Last login:February 14, 2024, 10:26:44 am
  • Greetings Program!
Re: FINALLY! Star Wars Cockpit Measurements
« Reply #66 on: May 17, 2007, 09:50:51 am »
Um....... dude.  Thats what this current project is about.  making building plans.  Its a multi part project. 
The dimensions are being procured and posted here for all, thankfully, by modesitt.

My post is covering a plans file.

Cad layouts of the side panels will be made available as dxf files.  We have the thickness of the panel material and outside dimensions of the access panels so with setbacks an accurate 3d model can be made to calculate their edge angles.   

For this part of the project the end result is going to be a cad package and possibly  an eps or pdf file to print patterns out on a plotter for the complex side panels.  Take to the local kinkos and print full scale for the sides.  (for that part i will probably have to pull a favor from my brother-inlaw)


That's great.
That's what I was hoping for, but sometimes people will just take the information and not share with those of us who don't know anything about reverse-engineering something.

Now given some plans and measurements I could build it, but no way I could ever make the plans from a built model.

Great job, and thanks for all the hard work.
Z

rovingmind

  • Trade Count: (+1)
  • Full Member
  • ***
  • Offline Offline
  • Posts: 632
  • Last login:October 17, 2023, 11:13:48 pm
  • If you only knew the POWER of the Dark Side
    • rovingmind
Re: FINALLY! Star Wars Cockpit Measurements
« Reply #67 on: May 17, 2007, 11:53:36 am »
i wouldn't use velcro, but with a little planning a modification to the box would be possible to split the front and back sections.

I was thinking canopy meant the plexiglass only. 

I'm considering the canopy as the entire piece including the plexi and the beams.  Thats just me though.
AAAAAAAAAAAAAAAAAAAAAAAAAAAAAAAAAAAAAAAAAHHHH!!!!!

rovingmind

  • Trade Count: (+1)
  • Full Member
  • ***
  • Offline Offline
  • Posts: 632
  • Last login:October 17, 2023, 11:13:48 pm
  • If you only knew the POWER of the Dark Side
    • rovingmind
Re: FINALLY! Star Wars Cockpit Measurements
« Reply #68 on: May 17, 2007, 01:55:03 pm »
link

handles on ebay 7 hours to go
AAAAAAAAAAAAAAAAAAAAAAAAAAAAAAAAAAAAAAAAAHHHH!!!!!

HoopstarsGarage

  • Scratch Building Demi-God!
  • Trade Count: (0)
  • Full Member
  • ***
  • Offline Offline
  • Posts: 240
  • Last login:April 19, 2016, 09:24:11 pm
  • Scratch Building Demi-God..
    • Hoopstars Garage
Re: FINALLY! Star Wars Cockpit Measurements
« Reply #69 on: May 17, 2007, 11:05:11 pm »
link

handles on ebay 7 hours to go
Went for $53..!!   :laugh2:

The same buyer bought the Yoke cover for $77.00 - the guy has rocks in his head.  :dizzy:


Hoops

rovingmind

  • Trade Count: (+1)
  • Full Member
  • ***
  • Offline Offline
  • Posts: 632
  • Last login:October 17, 2023, 11:13:48 pm
  • If you only knew the POWER of the Dark Side
    • rovingmind
Re: FINALLY! Star Wars Cockpit Measurements
« Reply #70 on: May 18, 2007, 09:19:20 am »
link

handles on ebay 7 hours to go
Went for $53..!!   :laugh2:

The same buyer bought the Yoke cover for $77.00 - the guy has rocks in his head.  :dizzy:

yeah, i think i'll just keep tabs on ram controls....

Hoops
AAAAAAAAAAAAAAAAAAAAAAAAAAAAAAAAAAAAAAAAAHHHH!!!!!

modessitt

  • Trade Count: (+1)
  • Full Member
  • ***
  • Offline Offline
  • Posts: 402
  • Last login:October 17, 2021, 07:02:28 pm
  • Technician
Re: FINALLY! Star Wars Cockpit Measurements
« Reply #71 on: May 21, 2007, 10:29:08 pm »
Just a quick note to let everyone know I haven't forgotten.  Have done a few more measurements, but still need to get the setbacks done.  I'll try to get them done this week.

In the meantime, ran across this SW cockpit art.  Don't know if anyone has seen it before.  Price is $300 for 10 pieces (both sides of front, back, and canopy):

http://www.mamemarquees.com/starwars-cockpit-sideart-p-402.html

Working Games:Joust CT,Gyruss UR,Pong,Battlezone UR#1
Current Proj's:Battlezone UR#2
Cheap/Free Cabs Wanted: DK,KarateChamp,Shinobi,Ghosts&Goblins,CircusCharlie,10ydFight,PolePositnCP,RallyX,Frogger

rovingmind

  • Trade Count: (+1)
  • Full Member
  • ***
  • Offline Offline
  • Posts: 632
  • Last login:October 17, 2023, 11:13:48 pm
  • If you only knew the POWER of the Dark Side
    • rovingmind
Re: FINALLY! Star Wars Cockpit Measurements
« Reply #72 on: May 22, 2007, 08:42:10 am »
In the meantime, ran across this SW cockpit art.  Don't know if anyone has seen it before.  Price is $300 for 10 pieces (both sides of front, back, and canopy):

http://www.mamemarquees.com/starwars-cockpit-sideart-p-402.html


Thank you for the update.

I've seen that artwork post before but havn't the funds to consider it at this time.  Ram controls - yoke comes first, apres cabinet construction.
AAAAAAAAAAAAAAAAAAAAAAAAAAAAAAAAAAAAAAAAAHHHH!!!!!

rovingmind

  • Trade Count: (+1)
  • Full Member
  • ***
  • Offline Offline
  • Posts: 632
  • Last login:October 17, 2023, 11:13:48 pm
  • If you only knew the POWER of the Dark Side
    • rovingmind
Re: FINALLY! Star Wars Cockpit Measurements
« Reply #73 on: May 29, 2007, 05:02:04 pm »
tiny bump, project is still alive
AAAAAAAAAAAAAAAAAAAAAAAAAAAAAAAAAAAAAAAAAHHHH!!!!!

Level42

  • Wiki Contributor
  • Trade Count: (+5)
  • Full Member
  • ***
  • Offline Offline
  • Posts: 5965
  • Last login:November 13, 2018, 01:56:39 am
  • A Suzo stick is a joy forever...
Re: FINALLY! Star Wars Cockpit Measurements
« Reply #74 on: July 03, 2007, 06:27:37 am »
Modessitt, what did you have to work on on this cab ? Did you have to repair it and if so what ?

I bought a SW cockpit very recently and so I'm interesed in you experiences.

Is think this is a 25" am I right ?

I also wonder what that big green PCB is where the connectors are put on the side. On my cab, the connectors are straight on the PCB !


BrentRadio

  • Trade Count: (+6)
  • Full Member
  • ***
  • Offline Offline
  • Posts: 440
  • Last login:March 11, 2021, 06:26:04 am
  • Stop by for a game and a beer!
    • Jack Daniel's Barcade!
Re: FINALLY! Star Wars Cockpit Measurements
« Reply #75 on: July 03, 2007, 06:07:40 pm »
That green board is an EMI shield, mandated by the government. It has no effect on the game so it's not needed. Might as well keep it to keep the game complete, but if you don't have it you won't even notice.

See page 67 here:

http://arcarc.xmission.com/PDF_Arcade_Atari_Kee/Star_Wars_Cockpit/Star_Wars_Cockpit_TM-245_1st_Printing.pdf

Brent

rovingmind

  • Trade Count: (+1)
  • Full Member
  • ***
  • Offline Offline
  • Posts: 632
  • Last login:October 17, 2023, 11:13:48 pm
  • If you only knew the POWER of the Dark Side
    • rovingmind
Re: FINALLY! Star Wars Cockpit Measurements
« Reply #76 on: December 09, 2014, 04:05:11 am »
Can somebody measure the setback where i've put the red A?
AAAAAAAAAAAAAAAAAAAAAAAAAAAAAAAAAAAAAAAAAHHHH!!!!!

ark_ader

  • Trade Count: (0)
  • Full Member
  • ***
  • Offline Offline
  • Posts: 5645
  • Last login:March 02, 2019, 07:35:34 pm
  • I glow in the dark.
Re: FINALLY! Star Wars Cockpit Measurements
« Reply #77 on: December 09, 2014, 05:00:11 am »
Is there room for a 737 flight simulator in there?
If I had only one wish, it would be for three more wishes.

rovingmind

  • Trade Count: (+1)
  • Full Member
  • ***
  • Offline Offline
  • Posts: 632
  • Last login:October 17, 2023, 11:13:48 pm
  • If you only knew the POWER of the Dark Side
    • rovingmind
Re: FINALLY! Star Wars Cockpit Measurements
« Reply #78 on: December 10, 2014, 02:15:59 am »
Theres not even enough room for me in there.

For that setback (the red A in the picture below) (after playing with the 2002 side scans of the cabinet to get angle measurements) I came out to 10 1/2" for that setback.  However, my overall height ended up being 54 1/3" and length of the bottom section where he shows 31, i get 31 1/3.  The cad plan thats floating around shows an overall cabinet length of 56 1/2" where as Modessit measured it at 56" across the base.  I seem to be ending up just over halfway between the 2 measurements.

Can anybody verify overall length and or that setback length so i can see how far off I am?
AAAAAAAAAAAAAAAAAAAAAAAAAAAAAAAAAAAAAAAAAHHHH!!!!!

rovingmind

  • Trade Count: (+1)
  • Full Member
  • ***
  • Offline Offline
  • Posts: 632
  • Last login:October 17, 2023, 11:13:48 pm
  • If you only knew the POWER of the Dark Side
    • rovingmind
Re: FINALLY! Star Wars Cockpit Measurements
« Reply #79 on: December 10, 2014, 05:05:22 am »
After going through and laying it up by hand with a protractor and ruler at 1/8 scale, i plugged dimensions into sketchup to see what lengths i'm coming up with and how far i'm off. 

as close as i can get making sure i've got the angles as close as i can get them for the bezel, control panel area i end up with a main body panel height of only 53 25/64" with a bottom length of 30 25/64. 

Here is the sketchup file if anybody would chime in. 

I'm measuring the inside top cab corner where the canopy attaches as an angle of 87 degrees.  is that correct or should it be a 90 there?
AAAAAAAAAAAAAAAAAAAAAAAAAAAAAAAAAAAAAAAAAHHHH!!!!!

Deadpool

  • Trade Count: (0)
  • Full Member
  • ***
  • Offline Offline
  • Posts: 80
  • Last login:January 06, 2015, 02:59:55 pm
  • I want to build my own arcade controls!
Re: FINALLY! Star Wars Cockpit Measurements
« Reply #80 on: December 10, 2014, 01:43:37 pm »
I think a office almost like this would be neat!  Or almost like a small movie theater!
Checkout my blog retroarcadegamer - a blog about retro gaming
Recent purchase: Bespoke Arcades Apex Elite cab

rovingmind

  • Trade Count: (+1)
  • Full Member
  • ***
  • Offline Offline
  • Posts: 632
  • Last login:October 17, 2023, 11:13:48 pm
  • If you only knew the POWER of the Dark Side
    • rovingmind
Re: FINALLY! Star Wars Cockpit Measurements
« Reply #81 on: December 10, 2014, 11:00:45 pm »
i've been following the CP-1 Gaming chair build thread and my brain keeps wandering toward borrowing some ideas from that and from the cockpit and combining them into something that i could actually fit in.  But then i think, why not 3 screens, and purchasing elite dangerous.  next thing you know, an entire room is the game cabinet.
AAAAAAAAAAAAAAAAAAAAAAAAAAAAAAAAAAAAAAAAAHHHH!!!!!

Generic Eric

  • Trade Count: (+2)
  • Full Member
  • ***
  • Offline Offline
  • Posts: 4520
  • Last login:July 15, 2024, 09:18:25 pm
  • Restore! Don't maim for MAME, build from scratch!
    • forum.arcadecontrols.com/index.php/topic,143226.0.html
Re: FINALLY! Star Wars Cockpit Measurements
« Reply #82 on: December 10, 2014, 11:25:37 pm »
i've been following the CP-1 Gaming chair build thread and my brain keeps wandering toward borrowing some ideas from that and from the cockpit and combining them into something that i could actually fit in.  But then i think, why not 3 screens, and purchasing elite dangerous.
Search your feelings, you *know* them to be true!

Don't forget Rockey Rocket's video of controlling it with the yoke!

rovingmind

  • Trade Count: (+1)
  • Full Member
  • ***
  • Offline Offline
  • Posts: 632
  • Last login:October 17, 2023, 11:13:48 pm
  • If you only knew the POWER of the Dark Side
    • rovingmind
Re: FINALLY! Star Wars Cockpit Measurements
« Reply #83 on: December 11, 2014, 12:03:34 am »
i've been searching for my old nostromo n50 but i can not find it. :( 
AAAAAAAAAAAAAAAAAAAAAAAAAAAAAAAAAAAAAAAAAHHHH!!!!!

rovingmind

  • Trade Count: (+1)
  • Full Member
  • ***
  • Offline Offline
  • Posts: 632
  • Last login:October 17, 2023, 11:13:48 pm
  • If you only knew the POWER of the Dark Side
    • rovingmind
Re: FINALLY! Star Wars Cockpit Measurements
« Reply #84 on: December 17, 2014, 01:08:19 am »
anybody?  Bueller? Bueller?

After going through and laying it up by hand with a protractor and ruler at 1/8 scale, i plugged dimensions into sketchup to see what lengths i'm coming up with and how far i'm off. 

as close as i can get making sure i've got the angles as close as i can get them for the bezel, control panel area i end up with a main body panel height of only 53 25/64" with a bottom length of 30 25/64. 

Here is the sketchup file if anybody would chime in. 

I'm measuring the inside top cab corner where the canopy attaches as an angle of 87 degrees.  is that correct or should it be a 90 there?
AAAAAAAAAAAAAAAAAAAAAAAAAAAAAAAAAAAAAAAAAHHHH!!!!!