Main Restorations Software Audio/Jukebox/MP3 Everything Else Buy/Sell/Trade
Project Announcements Monitor/Video GroovyMAME Merit/JVL Touchscreen Meet Up Retail Vendors
Driving & Racing Woodworking Software Support Forums Consoles Project Arcade Reviews
Automated Projects Artwork Frontend Support Forums Pinball Forum Discussion Old Boards
Raspberry Pi & Dev Board controls.dat Linux Miscellaneous Arcade Wiki Discussion Old Archives
Lightguns Arcade1Up Try the site in https mode Site News

Unread posts | New Replies | Recent posts | Rules | Chatroom | Wiki | File Repository | RSS | Submit news


Author Topic: Centipede restoration - My first - There will be plenty of pics  (Read 30533 times)

0 Members and 1 Guest are viewing this topic.

bperkins01

  • Trade Count: (0)
  • Full Member
  • ***
  • Offline Offline
  • Posts: 895
  • Last login:November 15, 2024, 12:32:54 pm
  • Plenty of skills.. gaining experience..
Centipede restoration - My first - There will be plenty of pics
« on: November 27, 2019, 08:35:43 am »
I was warned by those on the BYOAC Forum that you could end up with more than one machine..

My Mame cabinet - Lakeside Arcade - was fun to build and gets considerable use.  But it's at a summer home and isn't all that available in the winter.  My game is Centipede - it has been since college - it was the break between dinner and the library that I enjoyed..  Two quarters and about 45 minutes..

Recently I started keeping an eye on Facebook marketplace for a *real* Centipede machine..  Some showed up, $700, $900, $1,200  - but all were 2-3 states away..
Then this machine appeared locally for $450 - however the screen showed a test pattern.. Asking some friends who know better then me (Mike A.)...   he said.. "I'd keep looking.."

So I did, and after about 2 months..  It popped back in for $300.  Now he said "Go take a look!"  (agreed)..

My wife says I lead a charmed life..(I've had some weird luck now and then)..  On the way to pick it up - the owner plugs it in and it boots into the game.  He told me that had I not been on the way (we had been texting)..  He would have pulled it down and doubled the price..

So here I go - my first (last?) original arcade machine - and my personal holy grail..  Centipede.


Triage

I was fortunate the machine actually worked.. well..  worked??


The good news was it booted and I actually played it a couple times.  Overall the machine is in pretty good shape.  Everything seems to be very original (except the CRT definitely was from a Pacman machine at some point).  The marquee and bezel are in great shape on the original tempered glass.

The game board, audio board and cabinet have matching serial numbers.  No real work has been done to it other than the coin button modification.

First observations:
  • CRT - Upper left corner of game pulled up.  Large margin at the bottom of the screen and the playfield is off on the right a bit
  • Trackball barely rolls
  • A coin button was added to the control panel
  • Control panel overlay was covered with black material
    • The original was underneath and torn/worn
       
  • Audio quality was ok at best..  after about 5-10 minutes..  Volume changed by itself
  • Unable to retain top 3 high scores after power down
  • Coin slot 1 mechanism had missing bracket and switch
  • Marquee light not working
  • Fire button way too stiff (ok that is just a personal preference.. it worked..)
  • Everything coated in dust as would be expected


Cosmetically:
  • Front panel has holes from security bar
  • Rear door panel all moisture damage
  • Typical bottom and edge damage all the way around the side panels
  • Leg levelers all broken
  • Side art dinged up some
  • T-molding falling out at the bottom and dinged up in places


I haven't decided the extent of the cosmetic restoration just yet.  My plan is to get it fully functional and running properly.

There were a few old tokens kicking around in the dust..


More to come...


My Arcade Cabinet Build and other projects here:
Centipede, Joust, Joust Cocktail, Asteroids, Galaga, Ms. Pacman Cabaret, Defender, Space Invaders Cocktail
https://bperkins.wordpress.com/

Mike A

  • Trade Count: (0)
  • Full Member
  • ***
  • Offline Offline
  • Posts: 5905
  • Last login:Today at 03:44:37 am
  • This plan is foolproof
Re: Centipede restoration - My first - There will be plenty of pics
« Reply #1 on: November 27, 2019, 08:48:48 am »
Should I apologize to your wife now or after you pick up your next machine?

bperkins01

  • Trade Count: (0)
  • Full Member
  • ***
  • Offline Offline
  • Posts: 895
  • Last login:November 15, 2024, 12:32:54 pm
  • Plenty of skills.. gaining experience..
Re: Centipede restoration - My first - There will be plenty of pics
« Reply #2 on: November 27, 2019, 08:52:08 am »
She was ok with this one..  but it cuts into me doing *her* project time... (rustic mirror frames at the moment..)
So we will see ...   ;)
My Arcade Cabinet Build and other projects here:
Centipede, Joust, Joust Cocktail, Asteroids, Galaga, Ms. Pacman Cabaret, Defender, Space Invaders Cocktail
https://bperkins.wordpress.com/

wp34

  • Trade Count: (+3)
  • Full Member
  • ***
  • Offline Offline
  • Posts: 4794
  • Last login:April 10, 2022, 09:48:19 pm
Re: Centipede restoration - My first - There will be plenty of pics
« Reply #3 on: November 27, 2019, 09:09:03 am »
This won't be your last. Congratulations.  :cheers:

Arroyo

  • Trade Count: (0)
  • Full Member
  • ***
  • Offline Offline
  • Posts: 1558
  • Last login:June 04, 2025, 07:47:21 am
  • Budgets are boring
    • newforum.arcadecontrols.com/index.php/topic,156267.0.html
Re: Centipede restoration - My first - There will be plenty of pics
« Reply #4 on: November 27, 2019, 09:30:50 am »
At a boy!  The addiction begins.

BTW -  Most (not sure about Centipede)  early Atari cabs had a relatively special flat T-Molding.  There has been considerable effort made to remake the flat molding as no vendor currently does.  Over on KLOV there is a production run going on right now:

https://forums.arcade-museum.com/showthread.php?t=458336&highlight=ATARI+FLAT

Will be watching with great interest.

bperkins01

  • Trade Count: (0)
  • Full Member
  • ***
  • Offline Offline
  • Posts: 895
  • Last login:November 15, 2024, 12:32:54 pm
  • Plenty of skills.. gaining experience..
Re: Centipede restoration - My first - There will be plenty of pics
« Reply #5 on: November 27, 2019, 09:43:37 am »
I DO have the flat T-Molding...
I noticed that but have't really gotten that far.
I would be interested in getting some

And I just made a donation so I can see the thread.  I've already got more than my donation work of value with the downloaded schematics, etc..
« Last Edit: November 27, 2019, 09:47:23 am by bperkins01 »
My Arcade Cabinet Build and other projects here:
Centipede, Joust, Joust Cocktail, Asteroids, Galaga, Ms. Pacman Cabaret, Defender, Space Invaders Cocktail
https://bperkins.wordpress.com/

bperkins01

  • Trade Count: (0)
  • Full Member
  • ***
  • Offline Offline
  • Posts: 895
  • Last login:November 15, 2024, 12:32:54 pm
  • Plenty of skills.. gaining experience..
Re: Centipede restoration - My first - There will be plenty of pics
« Reply #6 on: November 27, 2019, 10:36:51 am »
Actually - I thought it was flat..  my T-molding has a crown to it..
Now I wonder - was the original rounded or flat?
(new thing to research)
My Arcade Cabinet Build and other projects here:
Centipede, Joust, Joust Cocktail, Asteroids, Galaga, Ms. Pacman Cabaret, Defender, Space Invaders Cocktail
https://bperkins.wordpress.com/

bperkins01

  • Trade Count: (0)
  • Full Member
  • ***
  • Offline Offline
  • Posts: 895
  • Last login:November 15, 2024, 12:32:54 pm
  • Plenty of skills.. gaining experience..
Re: Centipede restoration - My first - There will be plenty of pics
« Reply #7 on: November 29, 2019, 10:07:28 am »
Control Panel and Coin Door
Both need some work....

This is not a Centipede control panel if you ask me...


The Original overlay was under this black stuff and they added a third button as a coin button.  The trackball barely rolled and the fire button was way to stiff for my liking..

Step 1: Take it all apart.

I got some closeups so that I know how it goes back together - but the coin switch is going away..


It's amazing the trackballs haven't changed at all..  this is nearly identical to the new one I purchased for my Mame cabinet.


Explains why the trackball didn't roll.  I got a rebuild kit from arcadeshop.com


The new bearings had some lube in them that was a little sticky for my liking.  I soaked all of them in WD40 to loosen them up and reassembled the track ball..  Its cleaned and ready to roll.

The control panel overlay got peeled off.  The original was under the black one and you can see where it was torn away by the rust stain at the trackball opening.  Getting this sticky mess off took a while.  I couldn't find my heat gun - so I used a chemical stripper to get it down to bare metal.  Of course I found my heat gun about an hour after I finished..


It took a couple of hours to get the paint, sticky backing glue, etc. off.  Overall these are pretty solid panels.


What to do about the coin button hole.  My goal was to not have it pop out after the new CP overlay is in place (i.e.  Don't just fill with Bondo).  I considered a welding shop to fill it.  But figured I'd try soldering in my own patch first..  To begin - I sanded the paint off the inside and used a countersink bit to bevel the inside and outside of the hole so there would be center ridge for the filler to grab onto..


I got a small square of scrap steel, cleaned it up, added flux and clamped it in place.  Heated it up with a torch and got the solder to flow.  I was a bit surprised it actually worked..


After that I sanded it all down smooth.  There will not be any pressure to this small spot.  I like knowing that I should not have any issues with it popping out or impressioning through the new overlay.


There were a few areas that I wasn't crazy about and a skim coat of bondo was worth the effort.  Mostly pitting and the area where the hole got filled had a tiny bit of distortion.


Sanded down it came to this.


And painted - ready for the new overlay.


All those years of playing Centipede - I had no idea this was the extent of the fire button technology.  A $1.99 button.  The new one is identical and not nearly as stiff as the original.


The coin door is a little dinged up - I haven't decided if I'm going to repaint it or not just yet.  There is a lot of wiring compared to the Mame coin door I have.  Coin counters, solenoids that deflect coins when the machine is powered off (took me a minute to figure that out..)  A slam switch (equals tilt on a pinball machine)  I looked that up to see what it was supposed to do..  Keeps you from kicking the machine to get free credits.. dam kids!

Issues with my coin mechanism: No coin mechanisms
arcadeshop.com had the ones I needed.  I also ordered LED bulbs to replace the coin eject ones.


Something that I thought was going to be impossible to find..  I found..

When the prior owner bypassed the coin 1 switch - they removed the switch and this little bracket that the switch is mounted too..  For no good reason..

Luckily I found The Arcade Boneyard

They had this little part (and the switch) needed to make coin slot 1 fully functional again.  My plan is this machine will use quarters (at least for now)


Coin slot 1 ready for wire connectors.


More to come..
My Arcade Cabinet Build and other projects here:
Centipede, Joust, Joust Cocktail, Asteroids, Galaga, Ms. Pacman Cabaret, Defender, Space Invaders Cocktail
https://bperkins.wordpress.com/

Arroyo

  • Trade Count: (0)
  • Full Member
  • ***
  • Offline Offline
  • Posts: 1558
  • Last login:June 04, 2025, 07:47:21 am
  • Budgets are boring
    • newforum.arcadecontrols.com/index.php/topic,156267.0.html
Re: Centipede restoration - My first - There will be plenty of pics
« Reply #8 on: November 29, 2019, 12:00:58 pm »
Nice work!  You are moving quick.  That hole fill and paint job are excellent.  Looking forward to the next updates.

bperkins01

  • Trade Count: (0)
  • Full Member
  • ***
  • Offline Offline
  • Posts: 895
  • Last login:November 15, 2024, 12:32:54 pm
  • Plenty of skills.. gaining experience..
Re: Centipede restoration - My first - There will be plenty of pics
« Reply #9 on: December 18, 2019, 10:54:29 pm »
This will all be old news to the experienced guys - but its my first time through a restoration so hopefully some other noob to this will get something useful..

I've been jumping all over the cabinet and messing with different parts.  My plan is to go through the machine and each component...
It's fun (to me anyway) to learn how to make sure everything is working properly.  Understanding how it all works when its functioning correctly makes it easier to figure out whats happening when something goes wrong.

First up is the what is known as the "Power Brick"

Here is a bad picture of it:


And after a bath in the kitchen to clean out all the crud.


The large capacitor below (called Big Blue) is a new one.  Pretty much every video says spend the $14 and replace what is there so you don't have any issues.  Mine was the original from 1981.  So It got replaced.  I supposed technically it is the first part of an arcade machine that I have ever recapped...  But does it count if its not even soldered?...  It has a couple of screws that hold the leads connections in place.


In the lower right corner - there is a rectifier.  It consists of 4 diodes connected back to back.  I did learn you need to disconnect the wires before testing with your meter.  Otherwise you will get false readings.  Testing diodes with a meter is very well documented - but essentially - you get about .5V in with the leads on one way and 0V if you reverse the leads.  Work your way around the rectifier and the pattern repeats on all 4 sides.  Otherwise replace it.


The last part of testing the power brick is actually plugging it in and checking voltages at the Molex connectors.

This site had very useful information: bitslicer

I used this graphic to create my test chart:


There are a number of YouTube videos on testing these - but I didn't find a actual test plan written down.  The one item you need to address to *actually* bench test the power brick is the 6 pin Molex connector.  Its the connector between the power cord and the rest of the power supply and cabinet.

This connector is where the interlock switches terminate - these are the switches on the coin door and back panel that shut off the machine when you open them.   I picked up a Molex connector to match and made a jumper block to simulate closed switches.

Jump pins 1-4 and 2-5 on the 6 pin Molex to power up the brick.

The 3 pin Molex on the power brick should have 120v AC on pins 1-3 - this powers the marquee light..

On the 15 pin connector:

DC Voltage Test with the meter
Pin 5 is negative

Pin 1 - 5 -> 10.6 vDC
Pin 2 - 5 -> 10.6 vDC
Pin 3 - 5 -> 10.6 vDC

AC Voltages
Pin 6 - 7 -> 36 vAC
Pin 8 - 9 -> 6.1 vAC

The remaining pins are specific to Centipede
Pin 10 - 11 -> 30 vAC
Pin 11 - 12 -> 30 vAC
Pin 10 - 12 -> 60 vAC

Pin 13 - 14 -> 30 vAC
Pin 14 - 15 -> 30 vAC
Pin 13 - 15 -> 60 vAC

One other item I learned is that the power brick is unregulated power - meaning the voltages can vary considerably..  But they all should be reasonably close to these numbers.  Thankfully mine seems to be fine.

Most of the power ends up in the ARII board.  Mine *seemed* to be working fine and the consensus is that the only component that you really should replace is this power transistor.   The 2N3055.  So I did...


There is some bench testing that can be done with this too.  But I will likely need the harness from the cabinet to do any of that - or maybe I do the testing with the board in the cabinet.  It doesn't really make sense to build a bench harness unless I go buy more Atari machines...


More to come on the ARII board..
« Last Edit: December 18, 2019, 10:58:13 pm by bperkins01 »
My Arcade Cabinet Build and other projects here:
Centipede, Joust, Joust Cocktail, Asteroids, Galaga, Ms. Pacman Cabaret, Defender, Space Invaders Cocktail
https://bperkins.wordpress.com/

pbj

  • Trade Count: (+4)
  • Full Member
  • ***
  • Offline Offline
  • Posts: 11044
  • Last login:Yesterday at 10:25:07 pm
  • Obey.
    • The Chris Burke Band
Re: Centipede restoration - My first - There will be plenty of pics
« Reply #10 on: December 18, 2019, 11:15:21 pm »
Might as well sand that rust off the power block while you have it out, or hit it with a wire brush...


bperkins01

  • Trade Count: (0)
  • Full Member
  • ***
  • Offline Offline
  • Posts: 895
  • Last login:November 15, 2024, 12:32:54 pm
  • Plenty of skills.. gaining experience..
Re: Centipede restoration - My first - There will be plenty of pics
« Reply #11 on: December 19, 2019, 07:04:06 am »
Might as well sand that rust off the power block while you have it out, or hit it with a wire brush...
hmmm..  I'm not sure its rust as much as where the plating has gone bad..  I'll hit a couple spots with a wire wheel and see what it does.  It actually looks worse in the picture than it really is..  thanks for the tip
My Arcade Cabinet Build and other projects here:
Centipede, Joust, Joust Cocktail, Asteroids, Galaga, Ms. Pacman Cabaret, Defender, Space Invaders Cocktail
https://bperkins.wordpress.com/

Arroyo

  • Trade Count: (0)
  • Full Member
  • ***
  • Offline Offline
  • Posts: 1558
  • Last login:June 04, 2025, 07:47:21 am
  • Budgets are boring
    • newforum.arcadecontrols.com/index.php/topic,156267.0.html
Re: Centipede restoration - My first - There will be plenty of pics
« Reply #12 on: December 19, 2019, 07:47:59 am »
Great documentation, this is going to come in handy for a Tempest restore I’ve got planned.  Nice work, keep it coming!

bperkins01

  • Trade Count: (0)
  • Full Member
  • ***
  • Offline Offline
  • Posts: 895
  • Last login:November 15, 2024, 12:32:54 pm
  • Plenty of skills.. gaining experience..
Re: Centipede restoration - My first - There will be plenty of pics
« Reply #13 on: December 19, 2019, 07:55:53 am »
Yea - if a project Joust or Galaga came along...  I'd find room in the basement for them..
My Arcade Cabinet Build and other projects here:
Centipede, Joust, Joust Cocktail, Asteroids, Galaga, Ms. Pacman Cabaret, Defender, Space Invaders Cocktail
https://bperkins.wordpress.com/

Arroyo

  • Trade Count: (0)
  • Full Member
  • ***
  • Offline Offline
  • Posts: 1558
  • Last login:June 04, 2025, 07:47:21 am
  • Budgets are boring
    • newforum.arcadecontrols.com/index.php/topic,156267.0.html
Re: Centipede restoration - My first - There will be plenty of pics
« Reply #14 on: December 19, 2019, 08:40:10 am »
Yea - if a project Joust or Galaga came along...  I'd find room in the basement for them..

And so the addiction begins....I hope your marriage is rock solid.  :lol

Mike A

  • Trade Count: (0)
  • Full Member
  • ***
  • Offline Offline
  • Posts: 5905
  • Last login:Today at 03:44:37 am
  • This plan is foolproof
Re: Centipede restoration - My first - There will be plenty of pics
« Reply #15 on: December 19, 2019, 08:44:43 am »
You can hire me to negotiate. Your whole house will be an arcade.

pbj

  • Trade Count: (+4)
  • Full Member
  • ***
  • Offline Offline
  • Posts: 11044
  • Last login:Yesterday at 10:25:07 pm
  • Obey.
    • The Chris Burke Band
Re: Centipede restoration - My first - There will be plenty of pics
« Reply #16 on: December 19, 2019, 10:05:29 am »
I used to have a Tempest that had been converted to Dig Dug.. and then Black Tiger... and then DJ Boy... and it used an AR2 as the JAMMA power supply.  That thing kicked ass for getting problematic boards to run.  Seemed like I had... NBA JAM? or something similar that wouldn't run unless I bumped the 5VDC line up to around 6.


bperkins01

  • Trade Count: (0)
  • Full Member
  • ***
  • Offline Offline
  • Posts: 895
  • Last login:November 15, 2024, 12:32:54 pm
  • Plenty of skills.. gaining experience..
Re: Centipede restoration - My first - There will be plenty of pics
« Reply #17 on: December 19, 2019, 03:54:17 pm »
I have it pretty easy in the get what I want department for the most part..  :)
There is a little negotiation here and there - but if she had it her way - we would have 4 dogs, 3 cats, chickens and an alpaca. 
My issue is space - no good places to put a collection and use them.. 
But things change  :P
My Arcade Cabinet Build and other projects here:
Centipede, Joust, Joust Cocktail, Asteroids, Galaga, Ms. Pacman Cabaret, Defender, Space Invaders Cocktail
https://bperkins.wordpress.com/

jennifer

  • Trade Count: (0)
  • Full Member
  • ***
  • Offline Offline
  • Posts: 2895
  • Last login:August 11, 2023, 06:24:58 am
Re: Centipede restoration - My first - There will be plenty of pics
« Reply #18 on: December 19, 2019, 04:35:40 pm »
A collection is subjective, Somewhere in this mess Jenn has machines I haven't seen for years, possibly decades, The fun is in the build, not just polishing fingerprints off a trailer queen late in the night...Love the Centipede   :applaud:.

bperkins01

  • Trade Count: (0)
  • Full Member
  • ***
  • Offline Offline
  • Posts: 895
  • Last login:November 15, 2024, 12:32:54 pm
  • Plenty of skills.. gaining experience..
Re: Centipede restoration - My first - There will be plenty of pics
« Reply #19 on: December 19, 2019, 05:03:43 pm »
Jenn - 100% correct - the fun is in the build.  Many many years ago I did RC Planes - I liked building more than flying back then..

Centipede for some reason - I really do still love playing that game..  I haven't tired of it yet.

After watching videos of guys going through PCB's and testing voltages and logic and reading schematics and replacing a chip and finding the next issue..  I KNOW that is my kind of puzzle.. Too many interests and too little time.

My Arcade Cabinet Build and other projects here:
Centipede, Joust, Joust Cocktail, Asteroids, Galaga, Ms. Pacman Cabaret, Defender, Space Invaders Cocktail
https://bperkins.wordpress.com/

bperkins01

  • Trade Count: (0)
  • Full Member
  • ***
  • Offline Offline
  • Posts: 895
  • Last login:November 15, 2024, 12:32:54 pm
  • Plenty of skills.. gaining experience..
Re: Centipede restoration - My first - There will be plenty of pics
« Reply #20 on: December 21, 2019, 12:45:34 am »
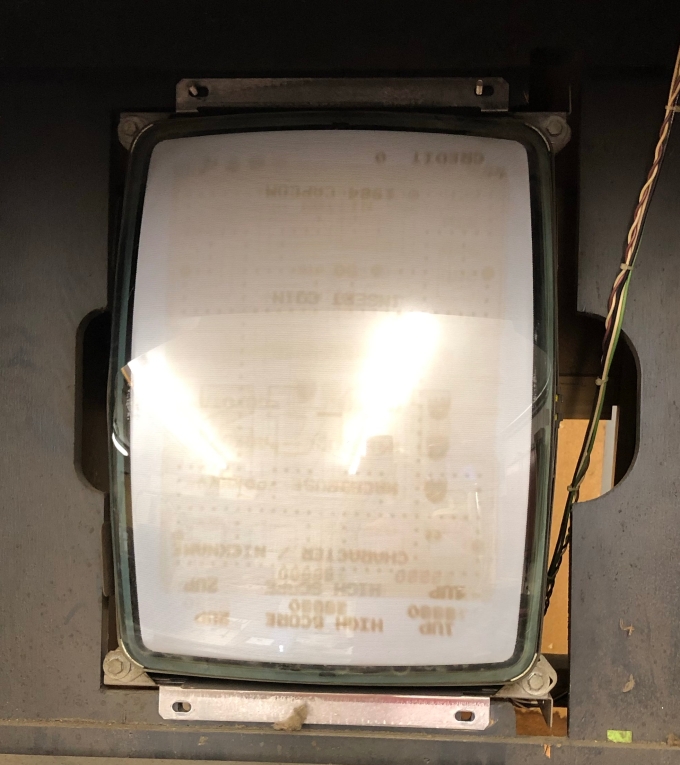
My machine has a working, but not very good looking CRT.

At some point someone did a tube swap..  There is upside down pacman burn in - and two sizes of it.  Centipede had a swoop in the playfield from the top left down and parts were off the sides..

Research and friendly advice says - recap the monitor (replace all of the electrolytic capacitors) and swap the tube.  People who restore arcade machines and monitors do this all the time - the wealth of information available is insane.

So - I'm not even going to attempt to come up with a *tutorial* so to speak.  I am going to describe my CRT work from the perspective of a guy who has a reasonably good grasp of electronics, circuits and no fear of jumping into things.  But this is my first one.

Not the nicest - but its what I have for now.  I'll have the chassis recapped and back together before I find a donor TV.   Once I find a new CRT - I'll replace it.


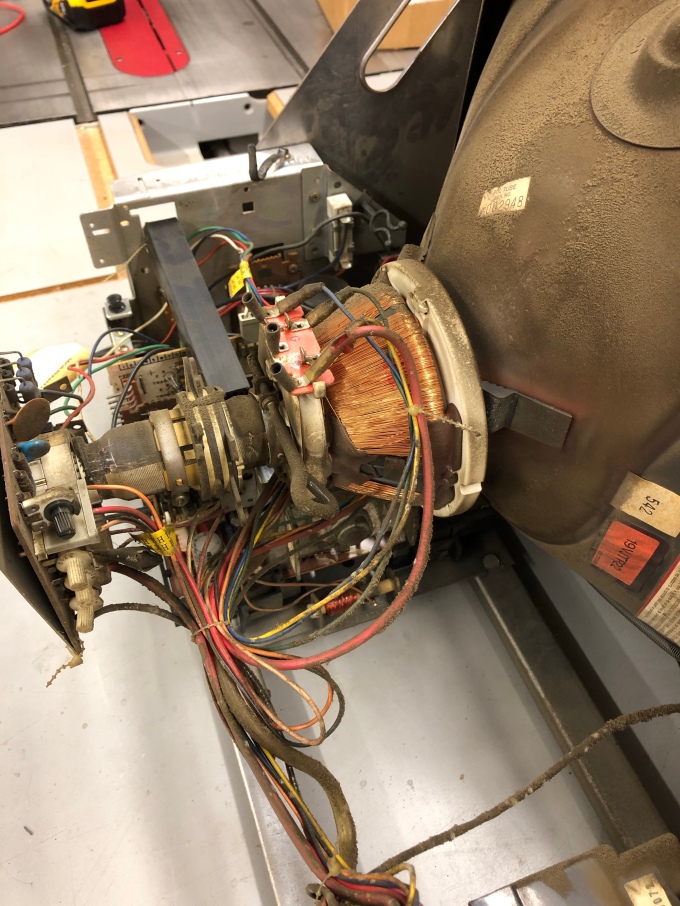
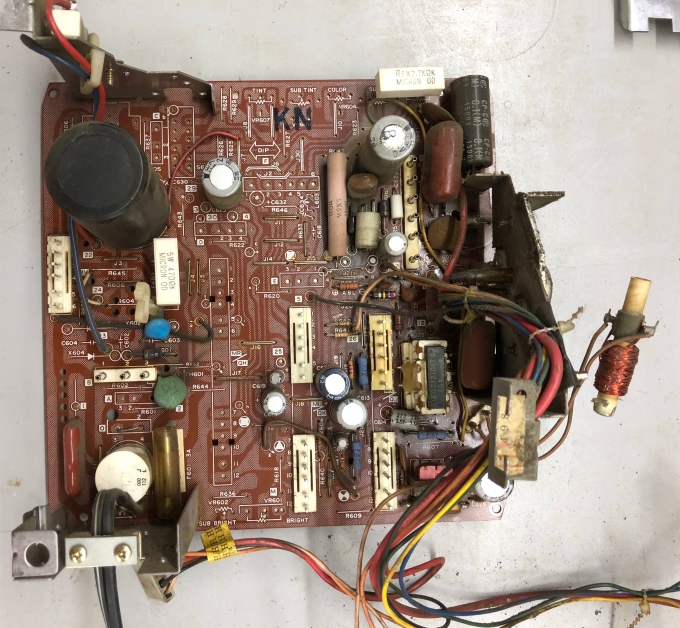
Here is the standard inside of the chassis - many years of dust and crud.  I took pictures of everything with many closeups.  These are pretty well documented - I downloaded the manual for this CRT - A Wells-Gardner K4600.  There were a number of YouTube videos on this specific model.  I can say - most of the people working on them didn't care for the design..


I'll say I was quite nervous about the shock hazards inside the CRT.  Every video out there shows you how to pop the anode (suction cup) off the CRT and drain any voltage using a screwdriver with a wire on.  Once I understood that it is essentially discharging a big capacitor - it made more sense.  Find some videos and pop that anode connector right off!  Nothing to fear  ;)

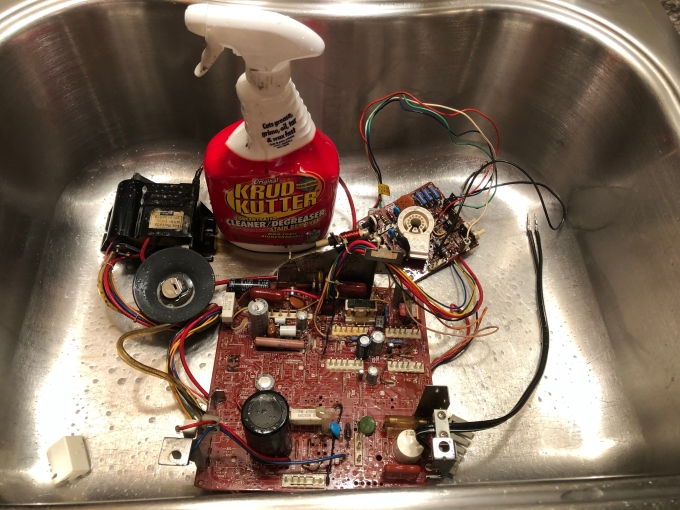
The next set of videos I watched were a bit astonishing..  Grab your CRT and give it a bath - literally!  But after watching about 5-6 of them..  It wasn't a scam.  Most of them used Simple Green - which I just do not like the smell of.  One guy used this stuff - Krud Kutter - available at Home Depot.  He raved about it.  I have to say - it really worked great cleaning up the boards.  It will likely replace some of our other under-the-sink cleaners.

Here it all is - soak it down real good - let is set and wash away..  freaky..


I used warm running water and a soft bristle paint brush to clean in and around components.  Once you get past the not-common sense of washing the inside of a TV..  Use common sense and brush and clean - but be somewhat delicate with it all..

The hand brush I did use on the backside of the boards.  It cleaned up 40 year old flux and other crud on the solder side of the board.  Be careful as well if there are jumpers and resistors on the back.


On the neck board - there is a black ground and the red wire soldered on under a white removable cap.  It goes back to the flyback transformer.  The black wire went to the ground wire on the tube.  The simplest way to remove the neck board was to desolder them.  Guys on the videos did it and it wasn't a big deal.
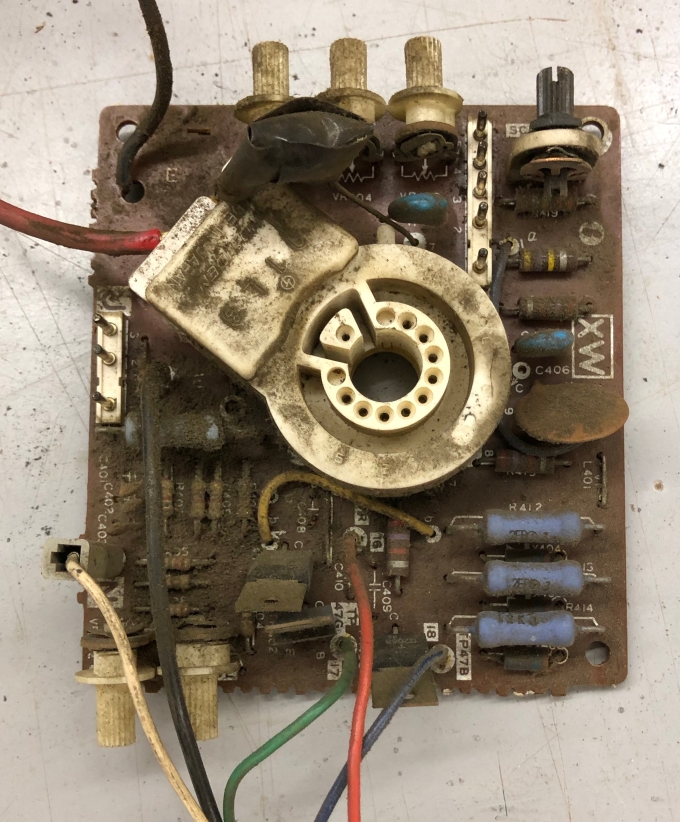
Neck board before.


Neck board after..


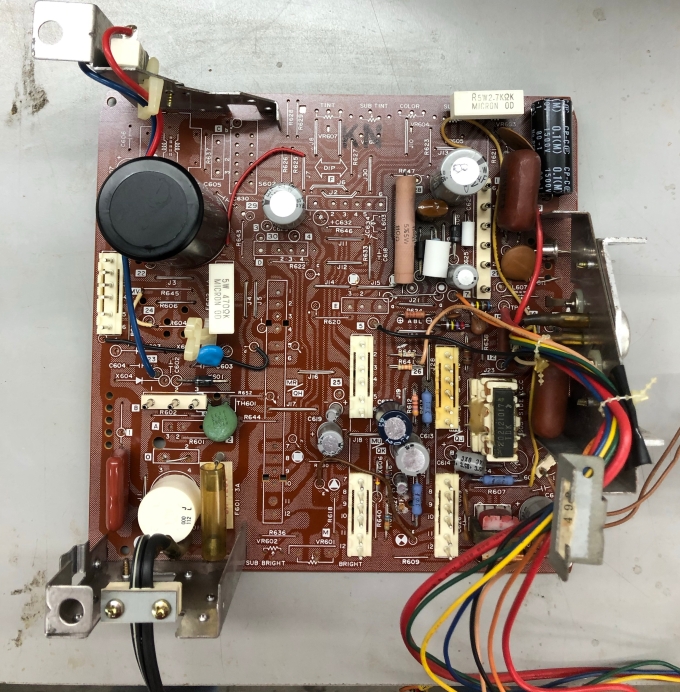
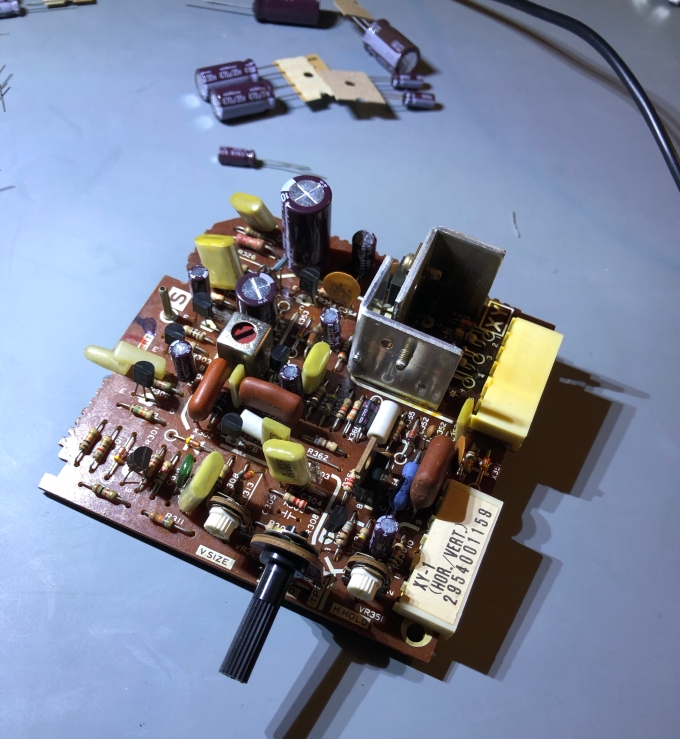
On the main board - there is one little delicate part to be aware of.  The little red coil hanging out on the right.  It can be removed from a holder that is part of the chassis.  Some of the videos they desolder it.  Just don't break it!

Main board before:


Main board after:


One thing in the "wash your TV videos" that I didn't care for was they basically sat them out in the sun to dry..  (except for one guy)..  USE COMPRESSED AIR!   A compressor will blow out every little bit of water out of every little nook and cranny..   Do not blow apart your boards - again - be careful.  Just use some air to get the water out.

Now - I love tools - I really love tools.  There is nothing better than having the right tool for the job.  Replacing all of the capacitors (and reflowing pins..  I will touch on that later) requires removing old solder.  There are a bunch of ways to do it

  • Heat the old part and push it through the board
  • Use a solder wick and soak up the old stuff
  • Use a bulb style solder removal tool
  • Use a pump style removal tool

or

Get something that is fun and easy to use.  I had a 5 day tangent just reading up and watching videos on these machines.  As with anything else - you can spend as much as you want.  But finding a sweet spot for the non-pro is where I was at.  In the end - this was ~$140 and it really works very well.  The vast majority of the caps just fell out of the board after sucking up the solder..  The others required a slight tug.  ZD-985 Desoldering station.


I have a descent multimeter - I think it was ~$50 at Home Depot when I got it.  But while I was at it I decided to upgrade and demote my old one to my secondary tool set that stays at the camp.  I now get why everyone likes the Fluke meters.  You can feel the quality immediately when you pick it up..

While I was replacing the capacitors - I tested the old one coming out AND the new one going in.  My reasoning was simple:
  • Play with the new meter
  • See if there were any *really bad* capacitors coming out
  • Make sure I identified the correct one going in AND check its tolerance for comparison to the originals

Checking the caps coming out and going in also slowed me down and made sure I double and triple checked my work.  Many of the caps coming out were off by 20%-30%.  All of the new ones going in were within 10% and more often within 5%.


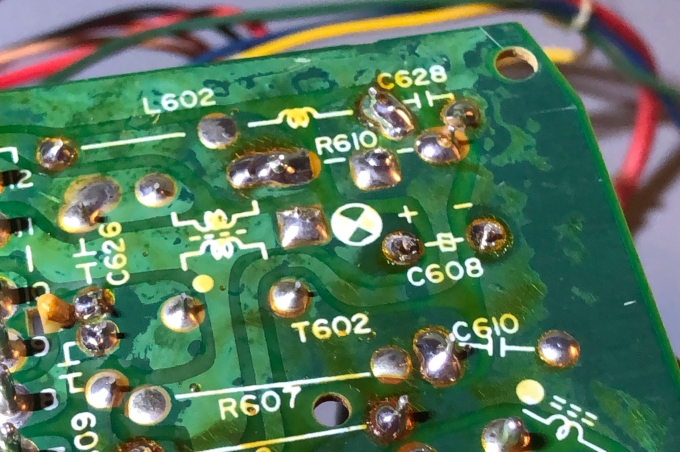
Here is the desoldering tool heating up a solder pad.  Once it gets liquid (2-4 seconds)  hit the trigger and it sucks it all up..


Both pads in C608 desoldered.  Pops right out..


To get the new one in and keep it tight to the board - there are a bunch of ways to do it.

My first few I held one lead in place with an alligator clip, trimmed the other lead, soldered it and then clipped the remaining long lead and soldered it.


Eventually I just bent the leads outward just enough to hold the capacitor in place, then clipped and soldered.  I'm going to hit this board again with water/cleaner to remove the flux.


The recap kit these guys provided was complete.  One thing you will bump into - not every board has every capacitor.  I had about 5 left over.  If your original board didn't have it - then don't add it!  I used the sheet as a checklist and went through each one in order.


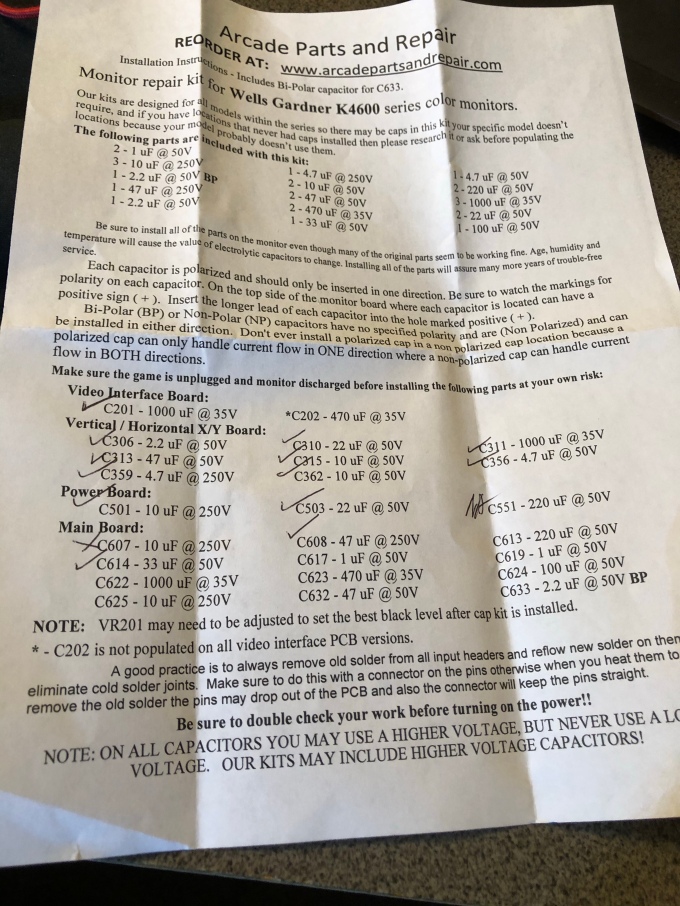
Pretty much every recapping video said - reflow all of the connector joints.  Meaning any place there is an edge connector, the 40 year old solder is likely failing or will fail.  At first glance I checked my boards and figured.. naaahh....  these joints are all good.  Why fix what isn't broken..

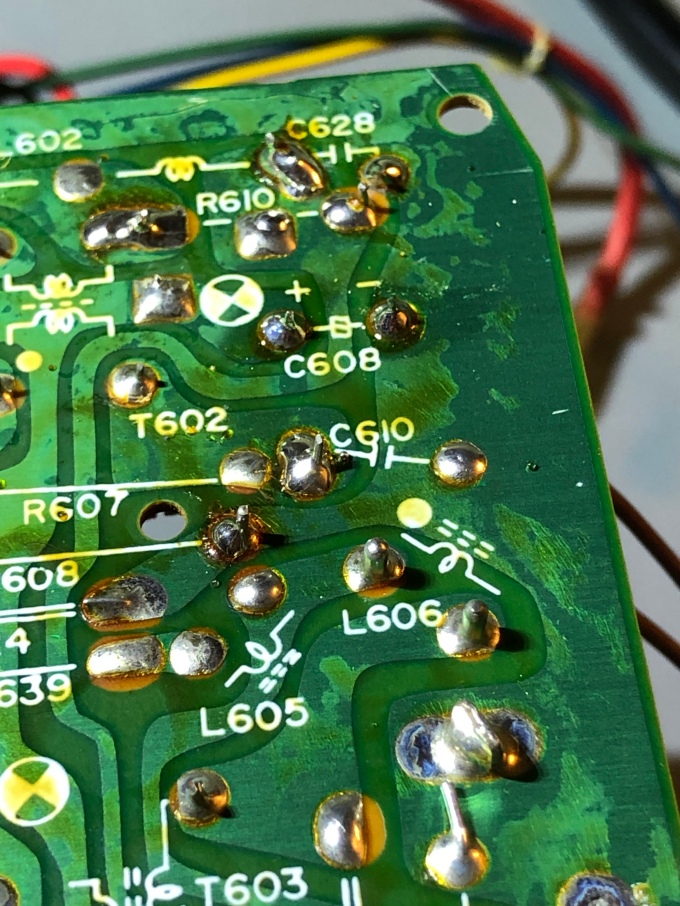
Upon further review I noticed a hair line at this connector.  Took a pic and blew it up.  The guys who do it all the time know what they are talking about. 4,5,6 show the failing joints very clearly.  1,2,3 certainly are suspect.

For reflowing the solder - some of the video guys just heated it up and added a little fresh.  The guys who really seemed to be experts recommended REMOVING the solder and adding all fresh.  This is the route I chose.  The desoldering gun didn't fit over these flat tabs, but it did remove a majority of the old solder.
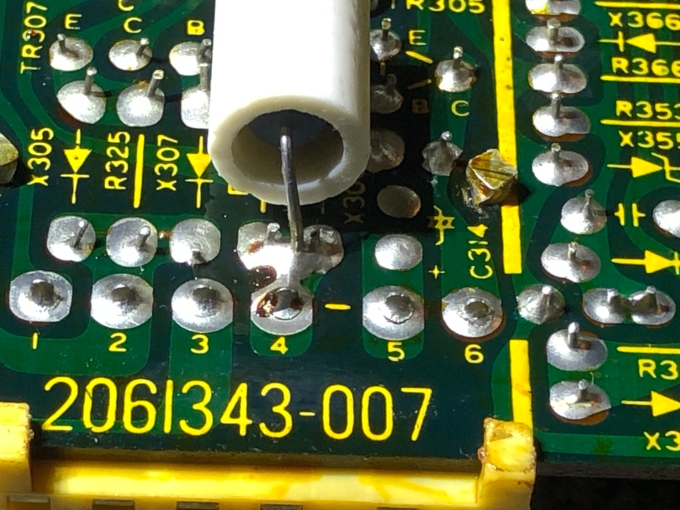


Reflowed..


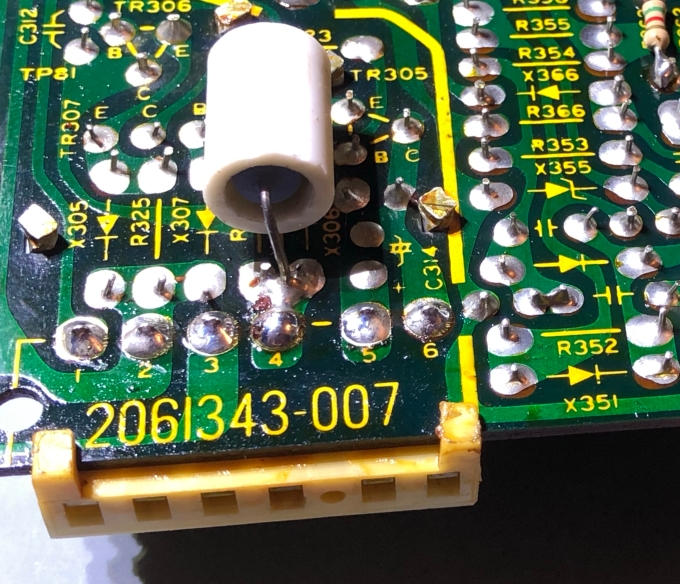
I was also warned about this style of connector.  If you have a matching connector, use it to hold the pins so they do not fall out.  I do not...


So I used a binder clip.  Desolder and resolder 1 or 2 at a time so that there is a fixed pin to help hold the others steady.


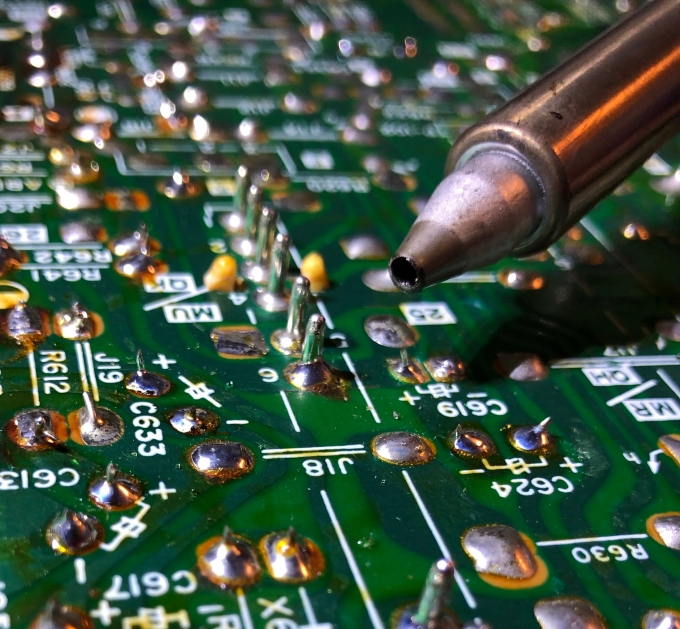
There were some large diameter pins for the connectors in the center of the board.  My gun came with 3 tips, small, medium and large.  Medium is perfect for the caps.  But large was too small to get over these pins so that I could desolder and reflow them.  My solution was a 3/32" drill bit to drill open the hole in the tip enough to get over the pin AND allow solder to be sucked up around it.  My large tip is now XL.


Here is a board all recapped.


I've finished all of the recapping and reflowing of the pins.

Next up will be washing the tube and chassis and putting it all back together.
« Last Edit: December 21, 2019, 12:49:06 am by bperkins01 »
My Arcade Cabinet Build and other projects here:
Centipede, Joust, Joust Cocktail, Asteroids, Galaga, Ms. Pacman Cabaret, Defender, Space Invaders Cocktail
https://bperkins.wordpress.com/

Mike A

  • Trade Count: (0)
  • Full Member
  • ***
  • Offline Offline
  • Posts: 5905
  • Last login:Today at 03:44:37 am
  • This plan is foolproof
Re: Centipede restoration - My first - There will be plenty of pics
« Reply #21 on: December 21, 2019, 09:23:50 am »
That is great documentation.

I never have the patience to give my PCBs a bath. I may have to reconsider.

A desoldering gun makes all the difference in the world.

I helped a guy out at Zapcon and he just handed me a brand new desoldering gun.

This hobby pays generosity back with interest.

Arroyo

  • Trade Count: (0)
  • Full Member
  • ***
  • Offline Offline
  • Posts: 1558
  • Last login:June 04, 2025, 07:47:21 am
  • Budgets are boring
    • newforum.arcadecontrols.com/index.php/topic,156267.0.html
Re: Centipede restoration - My first - There will be plenty of pics
« Reply #22 on: December 21, 2019, 09:28:20 am »
This thread is now book marked as my reference for original machine repair work.  Good on ya Bob, keep it coming!

BTW - can’t use that tube you found recently?

bperkins01

  • Trade Count: (0)
  • Full Member
  • ***
  • Offline Offline
  • Posts: 895
  • Last login:November 15, 2024, 12:32:54 pm
  • Plenty of skills.. gaining experience..
Re: Centipede restoration - My first - There will be plenty of pics
« Reply #23 on: December 21, 2019, 09:58:32 am »
Thanks guys -

Washing the PCB's is worth the effort (if you have compressed air in my opinion)  We all know heat is the enemy of electronics and all that dust prevents heat dissipation to some small extent. 

I couldn't imaging doing this stuff w/o a gun..  very happy to not have done it the hard way.

@arroyo - The tube I found is pristine.. but it it has the wrong size neck.. i.e.  3 strikes
- wrong connector
- wrong size neck
- wrong resistance on the yoke.

If it were 2 out of the 3 - I could swap the yoke, or get an adapter for the connector..  But there doesn't seem to be a way to make it work. 
I documented all of the details and I'll store the TV..  at some point I'll be able to use it or help someone who can..

Next stop is the transfer station next Saturday hunting for donors..
« Last Edit: December 21, 2019, 12:32:54 pm by bperkins01 »
My Arcade Cabinet Build and other projects here:
Centipede, Joust, Joust Cocktail, Asteroids, Galaga, Ms. Pacman Cabaret, Defender, Space Invaders Cocktail
https://bperkins.wordpress.com/

Arroyo

  • Trade Count: (0)
  • Full Member
  • ***
  • Offline Offline
  • Posts: 1558
  • Last login:June 04, 2025, 07:47:21 am
  • Budgets are boring
    • newforum.arcadecontrols.com/index.php/topic,156267.0.html
Re: Centipede restoration - My first - There will be plenty of pics
« Reply #24 on: December 21, 2019, 10:05:10 am »
@arroyo - The tube I found is pristine.. but it it has the wrong size neck.. i.e.  3 strikes
- wrong connector
- wrong size neck
- wrong resistance on the yolk.

If you swap the yolk the resistance of the current one doesn’t matter, the connector can get an adapter, and the neck size shouldn’t be an issue then....at least that’s everything I’ve read and watched on KLOV and YouTube. :dunno:  I would look into that further before moving on, unless you have another tube handy.

pbj

  • Trade Count: (+4)
  • Full Member
  • ***
  • Offline Offline
  • Posts: 11044
  • Last login:Yesterday at 10:25:07 pm
  • Obey.
    • The Chris Burke Band
Re: Centipede restoration - My first - There will be plenty of pics
« Reply #25 on: December 21, 2019, 10:16:31 am »
I don’t think running circuit boards through tap water is a good idea.  I use lighter fluid when I clean mine... evaporates quickly and doesn’t cause rust...


bperkins01

  • Trade Count: (0)
  • Full Member
  • ***
  • Offline Offline
  • Posts: 895
  • Last login:November 15, 2024, 12:32:54 pm
  • Plenty of skills.. gaining experience..
Re: Centipede restoration - My first - There will be plenty of pics
« Reply #26 on: December 21, 2019, 10:48:42 am »
I don’t think running circuit boards through tap water is a good idea.  I use lighter fluid when I clean mine... evaporates quickly and doesn’t cause rust...

One of the guys used denatured alcohol - I'd use that before lighter fluid.  But really - the water is fine with the compressed air.  A quick spray with contact cleaner wouldn't hurt.  Many of the guys used this stuff called 'Deoxit' - I got a can of that for the connectors to spray on during reassembly..
My Arcade Cabinet Build and other projects here:
Centipede, Joust, Joust Cocktail, Asteroids, Galaga, Ms. Pacman Cabaret, Defender, Space Invaders Cocktail
https://bperkins.wordpress.com/

bperkins01

  • Trade Count: (0)
  • Full Member
  • ***
  • Offline Offline
  • Posts: 895
  • Last login:November 15, 2024, 12:32:54 pm
  • Plenty of skills.. gaining experience..
Re: Centipede restoration - My first - There will be plenty of pics
« Reply #27 on: December 21, 2019, 10:52:57 am »
If you swap the yoke the resistance of the current one doesn’t matter, the connector can get an adapter, and the neck size shouldn’t be an issue then....at least that’s everything I’ve read and watched on KLOV and YouTube. :dunno:  I would look into that further before moving on, unless you have another tube handy.

The yoke on the original is for a large neck - but the new neck is smaller.  So a yoke neck size adapter too?  I didn't see reference to that - but I'll research a bit further.  It has to clamp into position.. 
« Last Edit: December 21, 2019, 12:33:37 pm by bperkins01 »
My Arcade Cabinet Build and other projects here:
Centipede, Joust, Joust Cocktail, Asteroids, Galaga, Ms. Pacman Cabaret, Defender, Space Invaders Cocktail
https://bperkins.wordpress.com/

yotsuya

  • Trade Count: (+21)
  • Full Member
  • ***
  • Offline Offline
  • Posts: 19959
  • Last login:June 16, 2025, 05:43:24 pm
  • 2014 UCA Winner, 2014, 2015, 2016 ZapCon Winner
    • forum.arcadecontrols.com/index.php/topic,137636.msg1420628.html
Re: Centipede restoration - My first - There will be plenty of pics
« Reply #28 on: December 21, 2019, 12:11:00 pm »
Nice job so far. Centipede is one of those “should have” games if you want a party room. Mine has a Millipede board running the Multipede kit.

And it’s YOKE. All these references to eggs is driving me crazy.
***Build what you dig, bro. Build what you dig.***

Mike A

  • Trade Count: (0)
  • Full Member
  • ***
  • Offline Offline
  • Posts: 5905
  • Last login:Today at 03:44:37 am
  • This plan is foolproof
Re: Centipede restoration - My first - There will be plenty of pics
« Reply #29 on: December 21, 2019, 12:14:12 pm »
I thought we we talking about eggs. :dunno

yotsuya

  • Trade Count: (+21)
  • Full Member
  • ***
  • Offline Offline
  • Posts: 19959
  • Last login:June 16, 2025, 05:43:24 pm
  • 2014 UCA Winner, 2014, 2015, 2016 ZapCon Winner
    • forum.arcadecontrols.com/index.php/topic,137636.msg1420628.html
Re: Centipede restoration - My first - There will be plenty of pics
« Reply #30 on: December 21, 2019, 12:15:38 pm »
I thought we we talking about eggs. :dunno

I should have kicked you in the huevos when I had the chance.... ;)
***Build what you dig, bro. Build what you dig.***

Mike A

  • Trade Count: (0)
  • Full Member
  • ***
  • Offline Offline
  • Posts: 5905
  • Last login:Today at 03:44:37 am
  • This plan is foolproof
Re: Centipede restoration - My first - There will be plenty of pics
« Reply #31 on: December 21, 2019, 12:17:03 pm »
You had your chance. I was drunk as hell. I wouldn't remember.

bperkins01

  • Trade Count: (0)
  • Full Member
  • ***
  • Offline Offline
  • Posts: 895
  • Last login:November 15, 2024, 12:32:54 pm
  • Plenty of skills.. gaining experience..
Re: Centipede restoration - My first - There will be plenty of pics
« Reply #32 on: December 21, 2019, 12:32:02 pm »
Nice job so far. Centipede is one of those “should have” games if you want a party room. Mine has a Millipede board running the Multipede kit.

And it’s YOKE. All these references to eggs is driving me crazy.

I know that - and I KEEP F**king it up..  grrrr.. 
Hmmmmm  eggggsssss

Updated:  I unscrambled all my yolks
« Last Edit: December 21, 2019, 12:34:27 pm by bperkins01 »
My Arcade Cabinet Build and other projects here:
Centipede, Joust, Joust Cocktail, Asteroids, Galaga, Ms. Pacman Cabaret, Defender, Space Invaders Cocktail
https://bperkins.wordpress.com/

Arroyo

  • Trade Count: (0)
  • Full Member
  • ***
  • Offline Offline
  • Posts: 1558
  • Last login:June 04, 2025, 07:47:21 am
  • Budgets are boring
    • newforum.arcadecontrols.com/index.php/topic,156267.0.html
Re: Centipede restoration - My first - There will be plenty of pics
« Reply #33 on: December 21, 2019, 12:38:25 pm »
See boys and girls this is why you don’t type in an empty stomach .  Sorry Bob I kept that one going.

Back to the topic, I would put the YOKE on and try it.  You won’t hurt anything as everything is electrically compatible.  The YOKE just induces the magnetic fields to control the beams.  The worst that happens is you get poor geometry.  Bring the convergence rings from the TV over and fire it up. 

The difference in neck size should be less than .25”, I bet a good cut in a PVC pipe or some wood would act as an adapter.  The sticky foam should do most of the work holding the YOKE in place.

How’s my spelling teach?


yotsuya

  • Trade Count: (+21)
  • Full Member
  • ***
  • Offline Offline
  • Posts: 19959
  • Last login:June 16, 2025, 05:43:24 pm
  • 2014 UCA Winner, 2014, 2015, 2016 ZapCon Winner
    • forum.arcadecontrols.com/index.php/topic,137636.msg1420628.html
Re: Centipede restoration - My first - There will be plenty of pics
« Reply #34 on: December 21, 2019, 01:21:44 pm »
See boys and girls this is why you don’t type in an empty stomach .  Sorry Bob I kept that one going.

Back to the topic, I would put the YOKE on and try it.  You won’t hurt anything as everything is electrically compatible.  The YOKE just induces the magnetic fields to control the beams.  The worst that happens is you get poor geometry.  Bring the convergence rings from the TV over and fire it up. 

The difference in neck size should be less than .25”, I bet a good cut in a PVC pipe or some wood would act as an adapter.  The sticky foam should do most of the work holding the YOKE in place.

How’s my spelling teach?

Bruh, it’s not a spelling error, it’s the complete wrong word.
***Build what you dig, bro. Build what you dig.***

Arroyo

  • Trade Count: (0)
  • Full Member
  • ***
  • Offline Offline
  • Posts: 1558
  • Last login:June 04, 2025, 07:47:21 am
  • Budgets are boring
    • newforum.arcadecontrols.com/index.php/topic,156267.0.html
Re: Centipede restoration - My first - There will be plenty of pics
« Reply #35 on: December 21, 2019, 01:34:37 pm »
Bruh, it’s not a spelling error, it’s the complete wrong word.

Teacher.

yotsuya

  • Trade Count: (+21)
  • Full Member
  • ***
  • Offline Offline
  • Posts: 19959
  • Last login:June 16, 2025, 05:43:24 pm
  • 2014 UCA Winner, 2014, 2015, 2016 ZapCon Winner
    • forum.arcadecontrols.com/index.php/topic,137636.msg1420628.html
Re: Centipede restoration - My first - There will be plenty of pics
« Reply #36 on: December 21, 2019, 02:26:49 pm »
Anyhoo, looking forward to seeing how this comes out!
***Build what you dig, bro. Build what you dig.***

Mike A

  • Trade Count: (0)
  • Full Member
  • ***
  • Offline Offline
  • Posts: 5905
  • Last login:Today at 03:44:37 am
  • This plan is foolproof
Re: Centipede restoration - My first - There will be plenty of pics
« Reply #37 on: December 21, 2019, 02:48:54 pm »
Don't you mean seaing how this comes out?

bperkins01

  • Trade Count: (0)
  • Full Member
  • ***
  • Offline Offline
  • Posts: 895
  • Last login:November 15, 2024, 12:32:54 pm
  • Plenty of skills.. gaining experience..
Re: Centipede restoration - My first - There will be plenty of pics
« Reply #38 on: December 21, 2019, 08:30:27 pm »
I did run into what I would think would be a rare issue - there is a U-bolt in the flyback transformer that holds a ferrite core in place.  Mine was broken - I'm guessing some metal fatigue.


It turned out to be a bit easier to repair than I thought.
First was a trip to the hardware store - I determined the original threading was metric (3mm).  I also checked the original and it was non-magnetic and hard to cut.  That tells me it was stainless steel. 

I picked up 3/32" stainless rod,  a 4-40 thread tap and a couple of small nuts and washers.  Next I bent the wire with a tool I had for crimping ducts and a couple of needle nose pliers. 


Once I got it to shape I clamped it in the vice and tapped the 4-40 threads onto my replacement.  Little 4-40 die cost $5


Fits perfect and is nice and snug.


« Last Edit: December 22, 2019, 07:56:09 am by bperkins01 »
My Arcade Cabinet Build and other projects here:
Centipede, Joust, Joust Cocktail, Asteroids, Galaga, Ms. Pacman Cabaret, Defender, Space Invaders Cocktail
https://bperkins.wordpress.com/

Mike A

  • Trade Count: (0)
  • Full Member
  • ***
  • Offline Offline
  • Posts: 5905
  • Last login:Today at 03:44:37 am
  • This plan is foolproof
Re: Centipede restoration - My first - There will be plenty of pics
« Reply #39 on: December 21, 2019, 08:49:09 pm »
You are just showing off now. :cheers:

pbj

  • Trade Count: (+4)
  • Full Member
  • ***
  • Offline Offline
  • Posts: 11044
  • Last login:Yesterday at 10:25:07 pm
  • Obey.
    • The Chris Burke Band
Re: Centipede restoration - My first - There will be plenty of pics
« Reply #40 on: December 21, 2019, 09:43:49 pm »
Once I got it to shape I clamped it in the vice


 :banghead:

He’s just messing with us now.


bperkins01

  • Trade Count: (0)
  • Full Member
  • ***
  • Offline Offline
  • Posts: 895
  • Last login:November 15, 2024, 12:32:54 pm
  • Plenty of skills.. gaining experience..
Re: Centipede restoration - My first - There will be plenty of pics
« Reply #41 on: December 22, 2019, 08:37:08 am »
Down to final cleaning and reassembly

The K4600 has a metal shield that comes off real easy with 4 screws.  The shield has the degaussing coil attached.  Cleaner and the paint brush did a nice job.  A couple of the original stickers were laying around inside the cabinet.  I'm going to re-stick them later.


More cleaner and a hose..  I didn't realize it the first couple of times I moved the chassis - the oval holes on the sheet metal sides are carrying handles.  Just in case this is your first time too..


Metal degaussing shield cleaned up.


The CRT is very front heavy.  Clamp it to the bench - I would not consider this optional.


Like the day it was made.  I spent about 15 minutes on the tube with the compressor blowing air under the yoke and down the windings to push out any remaining water.  If a little dribble came out - the air would dry it.


First up was the degaussing shield and the flyback transformer.


After that I reattached the ground wire and the red wire (that was from the flyback to the neckboard.


Add the main PCB and daughter cards


This CRT is ready to get bench tested and adjusted.  One thing I would do differently on the next one.

Here and there - there will be a single little wire that you pull off (like a ground line) or pop off a screw to unhook something.  I took a bunch of *before* pictures but not so many afters.  I spent a little extra time trying to figure out - where did this attach?

So - If you are going to pull off a specific wire - take a pic of it on and right after that show it disconnected next to where you pulled it off.. That way the pics are beside each other in your phone. (or camera?  does anyone use cameras anymore?)

I found all of the right pics - but there were not next to each other and a before/after of the wire in the same spot would have helped.

Same for zip ties.  Show the before and cut tie so you know where it went..  Just for the sake of completeness.  On this chassis they use a couple of ties just to hold boards in place.

More to come..

My Arcade Cabinet Build and other projects here:
Centipede, Joust, Joust Cocktail, Asteroids, Galaga, Ms. Pacman Cabaret, Defender, Space Invaders Cocktail
https://bperkins.wordpress.com/

Arroyo

  • Trade Count: (0)
  • Full Member
  • ***
  • Offline Offline
  • Posts: 1558
  • Last login:June 04, 2025, 07:47:21 am
  • Budgets are boring
    • newforum.arcadecontrols.com/index.php/topic,156267.0.html
Re: Centipede restoration - My first - There will be plenty of pics
« Reply #42 on: December 22, 2019, 09:38:11 am »
Well thanks a lot, after seeing these pics, I feel like I gotta take apart all my machines and clean em. :lol.  Looks great, nice work.

opt2not

  • Trade Count: (+15)
  • Full Member
  • ***
  • Offline Offline
  • Posts: 6173
  • Last login:April 02, 2024, 07:42:30 pm
Re: Centipede restoration - My first - There will be plenty of pics
« Reply #43 on: December 22, 2019, 01:57:54 pm »
Here and there - there will be a single little wire that you pull off (like a ground line) or pop off a screw to unhook something.  I took a bunch of *before* pictures but not so many afters.  I spent a little extra time trying to figure out - where did this attach?

So - If you are going to pull off a specific wire - take a pic of it on and right after that show it disconnected next to where you pulled it off.. That way the pics are beside each other in your phone. (or camera?  does anyone use cameras anymore?)

I found all of the right pics - but there were not next to each other and a before/after of the wire in the same spot would have helped.

You can also refer to the manual to figure out what wires go where, in case you forget or didn’t take pics.
https://www.arcade-museum.com/manuals-monitors/Wells%20Gardner%2019K4601%20service%20manual.pdf

But really, you should be referring to the manual anyway if you’re working on monitor repair in general.

Also, here’s the troubleshooting flowchart, these come in handy when trying to figure out repairs:
http://www.wwyss.ch/Arcades_Manuals/Manuals/Monitors/FLOWCHART_-_WELLS_GARDNER_K4600_(U).pdf

Highly recommended reading when tackling monitor repair.  :cheers:

bperkins01

  • Trade Count: (0)
  • Full Member
  • ***
  • Offline Offline
  • Posts: 895
  • Last login:November 15, 2024, 12:32:54 pm
  • Plenty of skills.. gaining experience..
Re: Centipede restoration - My first - There will be plenty of pics
« Reply #44 on: December 22, 2019, 02:24:38 pm »
Thanks opt2not

I had the service manual - but not the flow chart.

The manual shows the schematic - but not where the stupid ground wire screwed in originally.  I could have put it anywhere of course..  But I wanted it back in its original spot.  I found it eventually in one of the pics I had.
Either way - it wasn't a big deal.  But thanks for the info!
The flow chart will come in handy for sure.
My Arcade Cabinet Build and other projects here:
Centipede, Joust, Joust Cocktail, Asteroids, Galaga, Ms. Pacman Cabaret, Defender, Space Invaders Cocktail
https://bperkins.wordpress.com/

jennifer

  • Trade Count: (0)
  • Full Member
  • ***
  • Offline Offline
  • Posts: 2895
  • Last login:August 11, 2023, 06:24:58 am
Re: Centipede restoration - My first - There will be plenty of pics
« Reply #45 on: December 22, 2019, 02:32:39 pm »
I find pictures confusing and rarely take any at all, Just keeping the job at hand more specific as an assembly rather than do everything at once...That's not to say dont take pics cause its not cool, it's just not as helpful as one might think once you understand what is is you are working on.
« Last Edit: December 22, 2019, 02:34:15 pm by jennifer »

bperkins01

  • Trade Count: (0)
  • Full Member
  • ***
  • Offline Offline
  • Posts: 895
  • Last login:November 15, 2024, 12:32:54 pm
  • Plenty of skills.. gaining experience..
Re: Centipede restoration - My first - There will be plenty of pics
« Reply #46 on: January 01, 2020, 10:44:44 am »
Bench Testing the Wells Gardner K4600

The good news - everything worked exactly as before!
The bad news - everything worked exactly as before...

Screen is too far to the left and a little too far down.  It also has  distortion along the sides of the grid.  The CraftyMech Test Pattern Generator has been very useful in learning about monitors.  When using the Centipede PCB - I was getting the same distortion and horizontal centering issue.


I've also been hunting for a donor TV to replace this badly burned in screen.  So far no luck.  I've come across many TV's with the CR31 neck (newer TV's) but none with the CR23 neck to match the K4600 tube.  It won't fix the distortion - but having upside down Pacman burn-in on Centipede is just wrong. The search continues.

The amount of information available is almost overwhelming.  KLOV/Arcade Museum is the place to go to get all of the manuals, schematics and access to many people who have worked on these CRT's.   The tricky part is knowing how to search using the correct terms or ask a question without someone telling you its been answered 50 times already and "USE THE SEARCH!".  Yet another vocabulary to learn...

I've been messing with the CRT for a couple weeks while figuring it and the terminology out.

Here are a few items that I've picked up:

No matter how many times you have looked at the board - look again..  You may still have missed something.  Maybe give each component a wiggle or magnified inspection.

On VR605 and VR603 (which is one big power resistor on the other side) - after taking the board in/out 4-5 times - the cold solder joints gave out.  I resoldered them - but it did't correct the issues.


Another one I just found:  C627 is completely missing.  I checked the *before* pictures and it wasn't there before I washed everything - so at least it wasn't self induced.  This tiny speck of a capacitor is part of the horizontal sync circuit - maybe it will get rid of some of the distortion?  The local electronics store did not stock these - but Amazon.com did - go figure.  It will be here in a couple of days and I'll test again.


I've been checking components in place with the meter - diodes, transistors, resistors and capacitors.  If any seemed suspect - I'd pop them out and bench test them..  No real smoking guns as far as each component goes.  It's possible there is a weak part in there someplace.  I found you get a feel for how they test on the board. 

Anther tip on these from KLOV: 
There is a horizontal width adjustment coil that is exceptionally delicate and not very replaceable.  It pops in/out of this little holder.  The downside is just trying to pop it in/out of the holder is the best way to break the coil and it has to come out to work on the main board.  I found a suggestion that said to drill out the rivets for the mounting bracket and replace them with small bolts.   Great idea.


Now when I pull it apart - the bracket stays with the coil with less risk of destruction.  BTW - this coil adjusts with a small hex wrench that turns 'something' inside the coil.  It made the screen shift horizontally a tiny bit, but didn't have much of an effect.


One other oddity that I've run into:
On the TPG - you can turn off each gun independently with a dip switch.  If I turn off red switch - the whole screen goes red (it *should* just turn red off - not full on).  It does the same for green and blue.  CraftyMech says that it should not work this way and maybe the signal line is floating.  I haven't determined if this is an issue with my CRT or if it is something that is weird about the K4600.  In the short term - I'll turn off the guns with the controls on the neck board.


After my capacitor shows up (and likely makes no difference) I'm going to try a couple more things:

I picked up used K4600 chassis boards on KLOV for $40.  I'll swap the interface board and the XY board to see if anything changes and maybe I can localize the issues to a particular board.

There is also good information on later model K4600's that have a horizontal centering adjustment pot on the interface card.  Most models do not have it (including mine) - but it looks like I can swap a resistor, add a resistor and a couple of jumpers on the main PCB to *enable* the mod.  This is supposed to let the P317 interface card adjust the horizontal centering. 

But I don't have a P317: It looks like the horizontal adjustment part of the circuit has nothing to do with the actual P317 card.  I plan to experiment and see if I can just add the mod to the main PCB.  If it works - I *may* be the first person to have done it.  Those parts are on order too..  It will be a good test and I can't fry anything by trying.

More to come..


My Arcade Cabinet Build and other projects here:
Centipede, Joust, Joust Cocktail, Asteroids, Galaga, Ms. Pacman Cabaret, Defender, Space Invaders Cocktail
https://bperkins.wordpress.com/

opt2not

  • Trade Count: (+15)
  • Full Member
  • ***
  • Offline Offline
  • Posts: 6173
  • Last login:April 02, 2024, 07:42:30 pm
Re: Centipede restoration - My first - There will be plenty of pics
« Reply #47 on: January 01, 2020, 11:08:23 am »
For tube swapping, I recommend checking out this spreadsheet of possible TVs that have tubes you can keep a lookout for.  https://docs.google.com/spreadsheets/d/1uI8qD_1waAlgb6fghcIDqJabmRegSQ_h2-N05UHEm-o/htmlview?sfns=mo#

Try your local craigslist, garage sales and thrift stores. Bring a flashlight or use your phone’s light and look into the back vent holes and usually you can see the tube models without having to open it up.
Of course, you could always look for a replacement tube from another K4600, but TV scouring might be easier.

Also, if you can find a CRT rejuvenator for sale, snatch it up. Tube swapping, and CRT repair in general benefits greatly by having a rejuvenator on-hand. It’s great for extending the life of a tube, cleaning up emissions and testing the health of your tubes.

Arroyo

  • Trade Count: (0)
  • Full Member
  • ***
  • Offline Offline
  • Posts: 1558
  • Last login:June 04, 2025, 07:47:21 am
  • Budgets are boring
    • newforum.arcadecontrols.com/index.php/topic,156267.0.html
Re: Centipede restoration - My first - There will be plenty of pics
« Reply #48 on: January 01, 2020, 11:09:15 am »
Great documentation Bob.  There isn’t enough of this on monitors in BYOAC, and I’m glad you are putting it out there for everyone.

bperkins01

  • Trade Count: (0)
  • Full Member
  • ***
  • Offline Offline
  • Posts: 895
  • Last login:November 15, 2024, 12:32:54 pm
  • Plenty of skills.. gaining experience..
Re: Centipede restoration - My first - There will be plenty of pics
« Reply #49 on: January 01, 2020, 01:04:10 pm »
For tube swapping, I recommend checking out this spreadsheet of possible TVs that have tubes you can keep a lookout for.  https://docs.google.com/spreadsheets/d/1uI8qD_1waAlgb6fghcIDqJabmRegSQ_h2-N05UHEm-o/htmlview?sfns=mo#

Try your local craigslist, garage sales and thrift stores. Bring a flashlight or use your phone’s light and look into the back vent holes and usually you can see the tube models without having to open it up.
Of course, you could always look for a replacement tube from another K4600, but TV scouring might be easier.

Also, if you can find a CRT rejuvenator for sale, snatch it up. Tube swapping, and CRT repair in general benefits greatly by having a rejuvenator on-hand. It’s great for extending the life of a tube, cleaning up emissions and testing the health of your tubes.

Thanks for the info - I've seen that spreadsheet - Its very useful.  You wouldn't believe how hard it is to get someone to just send the model number of a TV...  Facebook Marketplace has been the most responsive so far..  I found a great 25" donor at the dump..  Its now in storage.  I also have a pristine 19" Zenith with a CR31 neck.  The Zenith was bought for the guys father 20 years ago..  Who lived 6 months after that..  the TV has been barely used since.  It didn't even have dust in it when I took it apart.

Great documentation Bob.  There isn’t enough of this on monitors in BYOAC, and I’m glad you are putting it out there for everyone.

Thanks Arroyo - I'm trying to put out info that is not just the main stream stuff, but items I've had to really dig to find..  i.e.  No need to document the actual recapping process.
« Last Edit: January 01, 2020, 01:08:47 pm by bperkins01 »
My Arcade Cabinet Build and other projects here:
Centipede, Joust, Joust Cocktail, Asteroids, Galaga, Ms. Pacman Cabaret, Defender, Space Invaders Cocktail
https://bperkins.wordpress.com/

pbj

  • Trade Count: (+4)
  • Full Member
  • ***
  • Offline Offline
  • Posts: 11044
  • Last login:Yesterday at 10:25:07 pm
  • Obey.
    • The Chris Burke Band
Re: Centipede restoration - My first - There will be plenty of pics
« Reply #50 on: January 01, 2020, 05:25:51 pm »
I mean, when you’re tooling around town buying free/$10 TVs, I think you just take what you get and put it in your neighbor’s trash can if it’s not suitable....


bperkins01

  • Trade Count: (0)
  • Full Member
  • ***
  • Offline Offline
  • Posts: 895
  • Last login:November 15, 2024, 12:32:54 pm
  • Plenty of skills.. gaining experience..
Re: Centipede restoration - My first - There will be plenty of pics
« Reply #51 on: January 04, 2020, 11:54:15 am »
Overall this cabinet is in decent shape, but its not without its issues.

The rear access door, rear panel for the power switch / powercord and the front coin panel were not in good shape.  They had been wet for some period of time.  The sides and side art at the bottom have expanded too - Not 100% sure of how I'm going to approach them at this time.  But I'm experimenting.  Replacing the original side art is not an option for me.  The vast majority of it is very nice and I want to preserve it.


The coin door panel has screws connected to battens on the sides and staples across the bottom.  It all popped apart pretty easily.  Remove the screws and hit it a few times with a mallet.  Out it came.  The side battens were stapled in place and popped off. Same for the power panel / kick plate across the bottom rear.


At one point there *should* have been some 1/4" ply across the rotten part on the rear panel to secure the lower part.  I can see where it was anyway..  It also appears there was a cover across the slot?  I'm guessing to keep stuff from poking inside the cabinet.  I'll figure out what it looked like and restore it.


Here is the lower power/kick plate.  I'm certain this SHOULD be 3/4" - this is a full 1 1/8" thick.  The black areas on the top and bottom are where it expanded - I knew particle board sucked with water - but I've never seen it show it so clearly.


The measurements came off the existing part pretty easily.  It's 5" wide, 3/4" thick and 23 3/4" long.  The angled part points downward.  It appeared to be a 45 deg angle - but I put a gauge on it - and it was a 41 deg angle..  So I reproduced it at 41 deg.


Now I just duplicate the original.  Screw the old part to the new one and cut the power cord slot and power switch hole.  The little blocking I will move to the replacement.  My machine has the original plastic plate that slides into these blocks to retain the power cord.  One more bit of info I get is how much overlap I need on the 1/4" plywood on the rear panel/door.  Obviously just enough not to hit these blocks.


Ready for paint and transfer of the power plate blocking.

One thing I can say about particle board - it hasn't changed in 40 years.  The original material was exactly 3/4" thick - the new stuff - exactly 3/4" thick.  I wish plywood was as consistent.


The original back panel was all blown up at the bottom.  I cut the replacement to the exact size.  Above I cut the slot part of the panel off and screwed it to the new back just to make it easier to work with.  I like using the tablesaw fence as an alignment point so that I only need to get things lined up in one direction (east/west).   Screw them together with a couple drywall screws and.....


Cut the new slot on the router with a pattern matching bit.  You can't see it in the picture - but there was a bit of a wiggle in the cut from the factory original right where the straight part of the opening meets the rounded end - its perfectly replicated.  I'll have to look at another centipede to see if this is in all of them - just because I can.


While I was at it - I recessed and drilled the opening for the rear door cam lock.  The original is destroyed.  But they are easy to come by..


Last major part I was unhappy with was the coin door panel.  They used glue where they screwed it to the battens - but it popped right off.  I can replace it to look original.  Same steps - square it up to the fence and screw the old to the new.  This is very doable even without a table saw.  You could cut a replacement panel a little oversized and use the router to copy it exactly around the outer perimeter.


The original panel had 1/2" rounded out corners on the inside - so I used a 1/2" pattern bit.  I precut the opening with a jigsaw to reduce the workload on the router bit.  Here I don't have a problem using "ok" quality bits..  The wood and glue in particle board will chew them up..  No need to ruin expensive bits on this stuff.


After routing the inside - I used the original holes as drill guides to copy them to the new panel.  Use backer boards on the far side to prevent blowout.


New panel ready for lamination.
My Arcade Cabinet Build and other projects here:
Centipede, Joust, Joust Cocktail, Asteroids, Galaga, Ms. Pacman Cabaret, Defender, Space Invaders Cocktail
https://bperkins.wordpress.com/

Mike A

  • Trade Count: (0)
  • Full Member
  • ***
  • Offline Offline
  • Posts: 5905
  • Last login:Today at 03:44:37 am
  • This plan is foolproof
Re: Centipede restoration - My first - There will be plenty of pics
« Reply #52 on: January 04, 2020, 12:36:40 pm »
 :cheers:

yotsuya

  • Trade Count: (+21)
  • Full Member
  • ***
  • Offline Offline
  • Posts: 19959
  • Last login:June 16, 2025, 05:43:24 pm
  • 2014 UCA Winner, 2014, 2015, 2016 ZapCon Winner
    • forum.arcadecontrols.com/index.php/topic,137636.msg1420628.html
Re: Centipede restoration - My first - There will be plenty of pics
« Reply #53 on: January 04, 2020, 01:02:45 pm »
That’s a good looking back door. I just threw a piece of 3/4 MDF back there and it’s been good ever since .
***Build what you dig, bro. Build what you dig.***

bperkins01

  • Trade Count: (0)
  • Full Member
  • ***
  • Offline Offline
  • Posts: 895
  • Last login:November 15, 2024, 12:32:54 pm
  • Plenty of skills.. gaining experience..
Re: Centipede restoration - My first - There will be plenty of pics
« Reply #54 on: January 05, 2020, 06:24:36 pm »
Back to fixing the CRT

I took a break from messing the the K4600 to build an Bench isolation power supply
It will make working on this and any future CRT's much easier to set up/tear down.

My teeny speck of a capacitor arrived - it came very well packed in this box.  Not sure what is worse - that the box is stupid big or that a human taped it inside, filled it will air pillows and sent it on its way..


I put in on the main PCB (C627) - it made no difference to the horizontal centering circuit.

Now to try something that I do not think has been done this way before.  The K4600 had many revisions and model numbers.  Each with different schematics, components, interface cards, etc.  The later releases of the PCB supported the P317 interface card which had a horizontal centering pot.  I found a few references on KLOV that detailed the "Horizontal Centering Mod" for the K4600.  It took a couple hours to decipher a few threads and consolidate all of the information.  I'll assume if you got this far - you have recapped your boards and have the schematics.  The centering mod is for K4600's where you cannot get the screen to move far enough left or right (obviously).

Basically here is the Horizontal Centering Mod summarized from other threads:

On your main PCB:  (mine is a K4606 just for reference)

  • Replace resistor R635 with a 6.8K 1/2W resistor
  • Remove jumper J19 and put a 6.8K 1/2W resistor in its place
  • If you HAVE  a P317 Interface card
    • Add a jumper wire on the back side of the board from pin 7 of the XY board connector to pin 1 of the Interface board connector  (P302 pin 7 --> P201 pin 1)
      This connects one side of R635 to P201 - you can see it if you follow the trace.
    • Add a jumper wire from the opposite side of R635 to pin 2 of the interface board connector.  (R635 --> P201 pin 2)
  • The horizontal centering pot on the P317 interface card should now work with your older main PCB.
After printing out both the P306 and P317 interface card schematics - it quickly became clear that the 'Horizontal Centering Pot' had no interaction with the actual P317 board.  It just happens to be on it (I'm guessing because it was easier to do a mod on the much smaller board than the main PCB when they were being manufactured)

If you DO NOT HAVE a P317 interface board - give this a try.

Here is a schematic snippet (hopefully this is OK)  - Copied from KLOV.


On the edge of my PCB there are many unused holes - I took a small 10K pot, bent a single leg down and soldered it to the ground trace on the perimeter of the PCB.  Not perfect - but it holds it in place on the single leg.


Steps for mod:
  • Solder one leg of the pot through an unused hole into the ground trace on the main PCB.
  • On the center wiper pin - solder a 680pF Z5F  (C204) capacitor.
  • Add a jumper wire on the back side of the board from pin 7 of the XY board connector to the second bottom leg of the pot opposite the ground leg.
    This connects one side of R635 to this leg.  (P302 pin 7 --> pot leg not soldered through the board)
  • Add a jumper wire from the opposite side of R635 on the back of the PCB to the capacitor on the wiper on the pot.
  • This bypasses needing a P317 card completely and gives you the ability to center horizontally.

The furthest right I could get this screen before was this: (not sure how the get an iPhone to scan at a different rate than the screen - the bottom is not dim as shown)


With the centering mod:


This CRT still has a way to go.  For starters I've been hunting for a few weeks for a donor TV - no joy yet.  I'll experiment with convergence/purity on this one to get a feel for it.  I have plenty of distortion and the tube is badly burned in.  I'm not certain if the distortion is 100% a tuning issue or is having a crappy tube contributing to the distortion problem.

Two other things happened as a result of the mod:

  • L351 - the Horizontal Oscillator adjustment (seems) to have become way more responsive.  Before the mod it either held sync or didn't.  Now it helped with centering and gave me some 'range' to work with.
  • The Horizontal size coil (L702) also started doing more - I was able to make better adjustments.  Previously I could get the screen to move maybe 1/4 inch.
I could not have tried any of this without all of the information available on KLOV and the work done by others.  Hopefully someone will find this useful.
My Arcade Cabinet Build and other projects here:
Centipede, Joust, Joust Cocktail, Asteroids, Galaga, Ms. Pacman Cabaret, Defender, Space Invaders Cocktail
https://bperkins.wordpress.com/

Arroyo

  • Trade Count: (0)
  • Full Member
  • ***
  • Offline Offline
  • Posts: 1558
  • Last login:June 04, 2025, 07:47:21 am
  • Budgets are boring
    • newforum.arcadecontrols.com/index.php/topic,156267.0.html
Re: Centipede restoration - My first - There will be plenty of pics
« Reply #55 on: January 08, 2020, 01:21:10 pm »
Nice work, saw your write up on KLOV as well, this is some good digging.  I know what a crazy amount of time it takes to solve one of these types of problems so kudos for sticking it out.

bperkins01

  • Trade Count: (0)
  • Full Member
  • ***
  • Offline Offline
  • Posts: 895
  • Last login:November 15, 2024, 12:32:54 pm
  • Plenty of skills.. gaining experience..
Re: Centipede restoration - My first - There will be plenty of pics
« Reply #56 on: January 08, 2020, 01:48:47 pm »
Thanks - I'm not sure about cross posting etiquette.  But this particular mod I had not seen and its been super useful. So it really needed to be in both places.
 
 I just discovered the little pot I used came with a knob!  Even better!

My Arcade Cabinet Build and other projects here:
Centipede, Joust, Joust Cocktail, Asteroids, Galaga, Ms. Pacman Cabaret, Defender, Space Invaders Cocktail
https://bperkins.wordpress.com/

bperkins01

  • Trade Count: (0)
  • Full Member
  • ***
  • Offline Offline
  • Posts: 895
  • Last login:November 15, 2024, 12:32:54 pm
  • Plenty of skills.. gaining experience..
Re: Centipede restoration - My first - There will be plenty of pics
« Reply #57 on: January 09, 2020, 11:58:49 pm »
Quick update, but I thought it was worth documenting.  Old cabinets made of particle board ...  I guess they were not really supposed to last this long.  If someone told Henry Ford that a Model T would still be running in the year 2020 .. he would have laughed at them.

Well - my restoration will not be museum quality - but I would like to try to keep things relatively authentic.  My buddy saw this machine tonight and I showed him the particle board replacement parts - he said "why not use something better?".  After a little back and forth banter, I left at "dude you don't get it.."


This is a bit of a close up.  It is the area inside the back of the cabinet where the rear panel cam lock chews up the particle board.  In my opinion, here is the best way to fix this:


Sawdust sifted through a strainer.  This dust is from the particleboard replacement panels I made for the rear and front that I'll get to later.  My goto glue is System3 epoxy.  It is a 2 part epoxy that is very strong and dries hard.  I especially like it because it is a 2:1 epoxy.  I measure it in small cups on a digital scale - grams are the easiest measure.   10 grams of resin, 5 grams of hardener - mix well.  Add sawdust until the mixture is very stiff.  If its a little runny - add more.  It needs to be stiffer than peanut butter - but not dry.  Wood glue's are strong - but still soft when they set and add no true rigidity to the material.  Ex:  squirt a stripe of wood glue on plastic wrap.  Next to it the same size stripe of epoxy.  When it dries - the wood glue will be nice and bendy and the epoxy will shatter.  It dries hard - and when the right filler is added - is extra strong.


I have a piece of wood that I clamped onto the edge to act as a mold.  It is coated in packing tape (you can't see it - its clear).  The filler will not stick to the tape and provides a smooth edge.  Using a putty knife press the filler into the void and leave it just a little thicker than the surface.  Let it cure overnight.


This  picture does it no justice - but the chunk is completely filled and rock solid.  Once it's fully cured - I used a small sander and flatten it all out.  I'll add a small metal plate so that the new cam lock can't re-chew the panel. 


Same treatment to the outside of the same panel.  Over the years - its obvious screwdrivers were used to pry the back off.  Here is a 3/4" scrap of wood, wrapped in packing tape and used as a mold for the filler. 


Here it is sanded and painted.  I'm using oil based flat black Rust-Oleum and wiping it on with a rag.  This repair is invisible.


Three of the four leg levelers came out without much issue.  But there is always a troublemaker.  The fourth one just pulled out and the hole it left behind was useless.  Epoxy based wood filler to the rescue.  Filled everything, sanded it smooth, drilled a new hold and added a new blind nut. 


One of the old ones the left - still plenty strong and held in with large staples.  New on the right with screws. 


I did finish up the replacement coin door panel.  Its identical.  Just new.


Ok - its nearly identical.  I didn't use staples for the most part, I used screws.  The original cleats I'm pretty sure were luan (3/4" x 3/4").  I just happened to have some leftover mahogany in the exact same dimension.  I'll bet real money there isn't another Centipede machine on the planet with mahogany cleats on the coin door panel.

Rear door painted in flat black.


I even decided to replicate the missing slot cover from the original.  Now this part was easier to install with staples! 


Mostly I'm doing all of these small items because I'm still contemplating how to fix the sides w/o ruining the original side art.   I have a loose plan in my head - but haven't fully committed just yet.


The bottom part of this panel is really crap.. 


Here is the original T-molding with almost 1/8" of expansion on either side on that same panel.  Eventually everything else will be done and I will have no choice but to come up with some clever way to repair this.
My Arcade Cabinet Build and other projects here:
Centipede, Joust, Joust Cocktail, Asteroids, Galaga, Ms. Pacman Cabaret, Defender, Space Invaders Cocktail
https://bperkins.wordpress.com/

mourix

  • Trade Count: (0)
  • Full Member
  • ***
  • Offline Offline
  • Posts: 309
  • Last login:May 24, 2025, 02:30:39 pm
Re: Centipede restoration - My first - There will be plenty of pics
« Reply #58 on: January 10, 2020, 06:14:50 am »
This resto is one of my favorites of this year already. I love the attention to detail and use of original parts, even if I would also have probably used some different wood as well :afro:

Mike A

  • Trade Count: (0)
  • Full Member
  • ***
  • Offline Offline
  • Posts: 5905
  • Last login:Today at 03:44:37 am
  • This plan is foolproof
Re: Centipede restoration - My first - There will be plenty of pics
« Reply #59 on: January 10, 2020, 07:28:42 am »
There will definitely be more than one glass of beer hoisted in your direction at Zapcon for this resto.

I like my games to show their age. I don't do much if any cosmetic work. I am very picky that they play correctly though.

I do, however,  appreciate when someone goes to great lengths to preserve a game and make it look all pretty.

Keep posting. I am learning new stuff, and different ways to do old stuff.

Arroyo

  • Trade Count: (0)
  • Full Member
  • ***
  • Offline Offline
  • Posts: 1558
  • Last login:June 04, 2025, 07:47:21 am
  • Budgets are boring
    • newforum.arcadecontrols.com/index.php/topic,156267.0.html
Re: Centipede restoration - My first - There will be plenty of pics
« Reply #60 on: January 10, 2020, 08:54:06 am »
That’s some fine work. 

I’m sure I am in the minority but for some reason the idea of putting on new artwork doesn’t bother me. 

Phoenix arcade sells screen printed just like the originals and guys of KLOV have vouched the quality:

https://www.phoenixarcade.com/products/centipede/centipede-full-sized-upright-side-art

:dunno:


Mike A

  • Trade Count: (0)
  • Full Member
  • ***
  • Offline Offline
  • Posts: 5905
  • Last login:Today at 03:44:37 am
  • This plan is foolproof
Re: Centipede restoration - My first - There will be plenty of pics
« Reply #61 on: January 10, 2020, 08:59:15 am »
Quote
I’m sure I am in the minority but for some reason the idea of putting on new artwork doesn’t bother me.

We are going to have a little talk later. :bat

bperkins01

  • Trade Count: (0)
  • Full Member
  • ***
  • Offline Offline
  • Posts: 895
  • Last login:November 15, 2024, 12:32:54 pm
  • Plenty of skills.. gaining experience..
Re: Centipede restoration - My first - There will be plenty of pics
« Reply #62 on: January 10, 2020, 09:00:19 am »
I have their CPO now (still need to put it on the control panel - I figured I'd wait until later so it doesn't get knocked around too much)
The side art is a bit different - mine has a yellow outline and their's is pink.  Maybe they make it both ways - but as a fallback - if I mess mine up beyond stupidity - I can absolutely make the side panel perfectly flat and add the one they make.

Actually - that takes off a little bit of the pressure  :)

(but I won't mess it up for fear of MikeA clubbing me to death and leaving my corpse in a desert to be eaten by tics)
My Arcade Cabinet Build and other projects here:
Centipede, Joust, Joust Cocktail, Asteroids, Galaga, Ms. Pacman Cabaret, Defender, Space Invaders Cocktail
https://bperkins.wordpress.com/

Mike A

  • Trade Count: (0)
  • Full Member
  • ***
  • Offline Offline
  • Posts: 5905
  • Last login:Today at 03:44:37 am
  • This plan is foolproof
Re: Centipede restoration - My first - There will be plenty of pics
« Reply #63 on: January 10, 2020, 09:12:28 am »
I would only replace the side art as a last resort.

When you are finished it might not look right if the rest of the cab is pristine and your side art is rough.

That will be a judgement call you need to make at that time.

Arroyo

  • Trade Count: (0)
  • Full Member
  • ***
  • Offline Offline
  • Posts: 1558
  • Last login:June 04, 2025, 07:47:21 am
  • Budgets are boring
    • newforum.arcadecontrols.com/index.php/topic,156267.0.html
Re: Centipede restoration - My first - There will be plenty of pics
« Reply #64 on: January 10, 2020, 09:17:15 am »
(but I won't mess it up for fear of MikeA clubbing me to death and leaving my corpse in a desert to be eaten by tics)

Hide the children, he takes no prisoners.

opt2not

  • Trade Count: (+15)
  • Full Member
  • ***
  • Offline Offline
  • Posts: 6173
  • Last login:April 02, 2024, 07:42:30 pm
Re: Centipede restoration - My first - There will be plenty of pics
« Reply #65 on: January 10, 2020, 02:46:23 pm »
Yeah, I'd try to keep that original art if it's possible. It's really not that bad, just the bottom needs some attention. I don't know what your plans are to approach that, but if I were to take a stab at it, I'd probably use some kind of filler to level the art to the missing portions of the damaged wood, then try to colour-match some paint for the off-white of the art, then "blend" it in with a fine fan brush. Since it's at the bottom, if you get the blend looking nice and the colour is close enough, then people might not even notice it.

bperkins01

  • Trade Count: (0)
  • Full Member
  • ***
  • Offline Offline
  • Posts: 895
  • Last login:November 15, 2024, 12:32:54 pm
  • Plenty of skills.. gaining experience..
Re: Centipede restoration - My first - There will be plenty of pics
« Reply #66 on: January 15, 2020, 11:29:34 pm »
I'm making some progress on repairing the particle board - but that is a much longer post.  While I was standing around I decided to try something - this worked out pretty good.


Here is the same spot - with only the black lines filled in with a Sharpie... freehand.. I wish I could make a sharpie in the other colors.. this would be a simple repair.. I'll clean this up a bit more - but simple is better in this case.   It passes the 3 foot test easy.
« Last Edit: January 15, 2020, 11:34:59 pm by bperkins01 »
My Arcade Cabinet Build and other projects here:
Centipede, Joust, Joust Cocktail, Asteroids, Galaga, Ms. Pacman Cabaret, Defender, Space Invaders Cocktail
https://bperkins.wordpress.com/

yotsuya

  • Trade Count: (+21)
  • Full Member
  • ***
  • Offline Offline
  • Posts: 19959
  • Last login:June 16, 2025, 05:43:24 pm
  • 2014 UCA Winner, 2014, 2015, 2016 ZapCon Winner
    • forum.arcadecontrols.com/index.php/topic,137636.msg1420628.html
Re: Centipede restoration - My first - There will be plenty of pics
« Reply #67 on: January 16, 2020, 12:09:03 am »
Oh yeah, a black Sharpie is the quick restorer’s friend in this hobby!
***Build what you dig, bro. Build what you dig.***

Arroyo

  • Trade Count: (0)
  • Full Member
  • ***
  • Offline Offline
  • Posts: 1558
  • Last login:June 04, 2025, 07:47:21 am
  • Budgets are boring
    • newforum.arcadecontrols.com/index.php/topic,156267.0.html
Re: Centipede restoration - My first - There will be plenty of pics
« Reply #68 on: January 16, 2020, 01:08:09 am »

bperkins01

  • Trade Count: (0)
  • Full Member
  • ***
  • Offline Offline
  • Posts: 895
  • Last login:November 15, 2024, 12:32:54 pm
  • Plenty of skills.. gaining experience..
Re: Centipede restoration - My first - There will be plenty of pics
« Reply #69 on: January 26, 2020, 09:54:58 am »
Repairing the expanded part of the particle board at the bottom and at the control panel are where I've been focusing most my attention.  The right side of the cabinet is much worse than the left - so I started with the left side.  Better to experiment on it. 


Step 1 - put the patient on the operating table.  Its much easier to work at this level and the lighting is better. 


Here is the particle board expansion - can't see it in the picture very well..  but its all bumpy and pebbly.  It's expanded up to 1/8" at spots beyond the T-molding.


Keep the T-molding in place and use it as a guide.  Power sand with 80 grit paper and a slow sanding speed.  Don't concentrate on a single spot - work your way back and forth over the entire area and continually sneak up on bringing the surface into a uniform flatness right up to the edge of the old T-molding. I did avoid the artwork however..


This part was chewed up too  It got sanded and filled with epoxy/wood filler.  I was using particle board dust which is good for some of the larger areas.  For the smaller holes I had to switch to wood flour (its just very fine saw dust - most of the epoxy manufacturers sell it)  The particle board dust was too chunky for the small dings.


This rear corner was chewed up pretty good - over fill it and sand it to shape later.


Can't really see it - but this part is very important in my opinion.  Seal the particle board with a wood stabilizer.  There are a number of companies that make it.

I use Smith and Company - CPES - It is a 2 part epoxy and solvent solution.  You mix it and brush it on heavy to really wet out the wood.  It penetrates into the fibers and the solvent flashes off.  What's left is the epoxy to cure and stabilize the wood fibers.  I slathered this on all of the bare areas and along the edge where the old T-molding came out to firm it all up.  Its perfectly fine to add a second coat too.  It goes on like water and wicks into the material. 

CPES is not for everyone - You need a carbon respirator because the fumes are nasty. System3 makes a similar product that is a little less volatile.  Minwax Wood Hardener is another variant that is not epoxy based.   I use CPES because its on my shelf - I've heard good things about the other two.  The point is - the particleboard has already been compromised by moisture.  The stabilizer will help prevent any further damage and strengthen what is there.


Finish sanding with 220 grit paper to  clean up around the crappy areas. 


Now to paint the white areas.   I took a shot and tried something that worked exceptionally well.  Home Depot sells $5 paint samples that they can color match and mix.  The Behr Marquee semi-gloss worked better than expected.  I brought in the tiniest little chip from the white part of the side art and they mixed up the little container.  Its a perfect match..  You have to look VERY hard to see the difference.  If I can find a way to do it without cutting into the original artwork - I may try color matching some of it too..  At $5 a try - the price is right.

It didn't happen without a little trial and error though..  My first pass used a brush..  I ended up with thick gloppy paint and brush marks.  So I wet sanded that off..  I had some Floetrol from other projects.  It is a latex paint conditioner that thins the paint a bit, but more importantly it helps the paint to self level and eliminate brush marks.  You can add 10-20% of this stuff to the paint.  I also switched from the brush to these High Density Foam Rollers.  The combination of the three really worked great.


After the white paint - I rolled on black around the edge (like factory original) so the T-Molding would blend.  The new T-molding is a very nice replica of the original Atari flat stock.  The lighting isn't the greatest here - but I give this side an A- overall.  In the bright light of the shop - the color match is nearly imperceptible.  In a dimly lit game room.  It will be impossible to see.  I hope I can get the crappy other side as nice as this one.
My Arcade Cabinet Build and other projects here:
Centipede, Joust, Joust Cocktail, Asteroids, Galaga, Ms. Pacman Cabaret, Defender, Space Invaders Cocktail
https://bperkins.wordpress.com/

pbj

  • Trade Count: (+4)
  • Full Member
  • ***
  • Offline Offline
  • Posts: 11044
  • Last login:Yesterday at 10:25:07 pm
  • Obey.
    • The Chris Burke Band
Re: Centipede restoration - My first - There will be plenty of pics
« Reply #70 on: January 26, 2020, 10:24:41 am »
Looking good, pick up some sharpie brand paint markers for the touch ups.  Doing the black outlines does a lot to make flaws fade away, though.


wp34

  • Trade Count: (+3)
  • Full Member
  • ***
  • Offline Offline
  • Posts: 4794
  • Last login:April 10, 2022, 09:48:19 pm
Re: Centipede restoration - My first - There will be plenty of pics
« Reply #71 on: January 26, 2020, 10:49:45 am »
That is really impressive work.  I'm in the market for a Centipede and you are making me rethink my restoration plan. 

Those sharpie paint markers pbj mentioned come in other colors and work better than just plain sharpies.  I used a white one on my Asteroids Deluxe.


bperkins01

  • Trade Count: (0)
  • Full Member
  • ***
  • Offline Offline
  • Posts: 895
  • Last login:November 15, 2024, 12:32:54 pm
  • Plenty of skills.. gaining experience..
Re: Centipede restoration - My first - There will be plenty of pics
« Reply #72 on: January 26, 2020, 11:05:39 am »
Thanks guys - the regular sharpie is not good enough for the black lines.  I ended up wiping it off with acetone.  I'll look into the Sharpie Paint markers - never heard of them.  I did pick up some little bottles of the acrylic paints at the craft store and the black works great with a small brush.  I'm testing the yellow and other colors now.    I'm not an artist - but I may try mixing some colors to see if I can get better matches on the red, green and oranges.  We'll see if I get that far on the side art. 
My Arcade Cabinet Build and other projects here:
Centipede, Joust, Joust Cocktail, Asteroids, Galaga, Ms. Pacman Cabaret, Defender, Space Invaders Cocktail
https://bperkins.wordpress.com/

opt2not

  • Trade Count: (+15)
  • Full Member
  • ***
  • Offline Offline
  • Posts: 6173
  • Last login:April 02, 2024, 07:42:30 pm
Re: Centipede restoration - My first - There will be plenty of pics
« Reply #73 on: January 26, 2020, 01:45:35 pm »
That’s an impressive blend! Looks completely new! Nice job  :applaud:

Arroyo

  • Trade Count: (0)
  • Full Member
  • ***
  • Offline Offline
  • Posts: 1558
  • Last login:June 04, 2025, 07:47:21 am
  • Budgets are boring
    • newforum.arcadecontrols.com/index.php/topic,156267.0.html
Re: Centipede restoration - My first - There will be plenty of pics
« Reply #74 on: January 27, 2020, 07:54:22 am »
Wow!  I can’t believe you pulled that off.  I honestly didn’t think there was any way you could make that look good again, but damn was I wrong.

Is the flat T-molding on in that picture?  Nice work getting details like that down, really makes a difference.

Mike A

  • Trade Count: (0)
  • Full Member
  • ***
  • Offline Offline
  • Posts: 5905
  • Last login:Today at 03:44:37 am
  • This plan is foolproof
Re: Centipede restoration - My first - There will be plenty of pics
« Reply #75 on: January 27, 2020, 07:59:56 am »
Nice. I wish I had the patience to do that kind of work.

bperkins01

  • Trade Count: (0)
  • Full Member
  • ***
  • Offline Offline
  • Posts: 895
  • Last login:November 15, 2024, 12:32:54 pm
  • Plenty of skills.. gaining experience..
Re: Centipede restoration - My first - There will be plenty of pics
« Reply #76 on: January 27, 2020, 08:12:11 am »
@Arroyo - yes - that is the new T-Molding you pointed me too - really nice stuff.  Its installed on there.  Looks just like the original.
 
This side wasn't *too* bad.  I started on the other side.. Its a bit more of a challenge - so glad I practiced on the good side.  I'm hoping to have the second side done this week.

@Mike - thanks man  ;)
My Arcade Cabinet Build and other projects here:
Centipede, Joust, Joust Cocktail, Asteroids, Galaga, Ms. Pacman Cabaret, Defender, Space Invaders Cocktail
https://bperkins.wordpress.com/

bperkins01

  • Trade Count: (0)
  • Full Member
  • ***
  • Offline Offline
  • Posts: 895
  • Last login:November 15, 2024, 12:32:54 pm
  • Plenty of skills.. gaining experience..
Re: Centipede restoration - My first - There will be plenty of pics
« Reply #77 on: January 27, 2020, 11:18:43 am »
Ok - here is a sneak preview of the next installment.

Yesterday I sanded the expanded particleboard down to the old T-molding and sealed the wood with CPES.

I ran out to the shop and mixed up a batch of epoxy and wood flower, filled in all the bad parts and skimmed the rough particle board surface (just like drywall).
I prefer to let epoxy cure 24-36 hours.  Tomorrow night I'll smooth it out and see what I get.   ???


My Arcade Cabinet Build and other projects here:
Centipede, Joust, Joust Cocktail, Asteroids, Galaga, Ms. Pacman Cabaret, Defender, Space Invaders Cocktail
https://bperkins.wordpress.com/

bperkins01

  • Trade Count: (0)
  • Full Member
  • ***
  • Offline Offline
  • Posts: 895
  • Last login:November 15, 2024, 12:32:54 pm
  • Plenty of skills.. gaining experience..
Re: Centipede restoration - My first - There will be plenty of pics
« Reply #78 on: February 09, 2020, 08:15:53 am »
Now for the bad side....


Having practiced on the better of the two sides.  This side had particleboard that had expanded quite a bit larger than the T-molding.  This line is very noticeable - it was 1/8" along the bottom edge and the surface of the panel has a pebbly texture to it..


I put the T-molding back and sanded the side down to the edge of the molding as a guide (same as the first side) and generally tried to keep the area as flat as I could.  The artwork is a bit raised due to the wood expansion - but its a trade-off - it stays as is..

Once it was all leveled off, it got a couple coats of CPES.  After it set over night I mixed up epoxy and wood flour and skimmed on a coat to fill in the texture of the particle board and filled in all the dings around the edges.  I let this cure overnight.


The goal is not to add to the surface - more to fill in the texture - same as Bondo.  Epoxy is just stronger than Bondo and will add some stability to the material and limit moisture absorption.


Looks like a big mess - I was a bit nervous about it myself..


But it worked out nearly as good as the first side.  The color match of the paint is right there.  I had to roll on a 2 coats, wet sand with 320 to blend it a bit, then roll on another coat and wet sand with 600 to blend it a bit.. Then added here and there where it was thin.

After that I ran into a problem that took me about a week to resolve.  The color match was great - in flat lighting.  If you caught the light from the side to see the gloss - you got several different glosses.   Shiny glossy original, the scuffed areas where the latex meets the original surface, flat areas, dull areas, etc.   

My first inclination - spray on semi-gloss clear (standard Rustoleum)   Did a quick test spray on the newly fixed areas.  It turned the latex yellow instantly.  REALLY not a compatible paint.  I had to sand it off and repaint.  Thankfully I only did a small area..

I tried a water based spray on clear coat Minwax Polycrylic  - On a test piece this time.  It just beaded up like water on a windshield..  Fail...

I even tried buffing and polishing compound used for auto detailing, but it just didn't seem to work right with the different materials.


Final answer:  Wipe on (or brush) water based polyurethane.  Quick wipe with a cloth over all of the repaired areas and just overlapped the artwork a bit.  It leveled the sheen to be a lot less noticeable.  In flat light - you can't see the repairs.  I'm going to mess with this a bit more.  Maybe a light rub with extra fine Scotchbright pad to see how that works.  But this sealed up the surface and took away most of the differences in gloss.


New T-molding on and a good 1/8" of expanded particle board removed.  I painted the edges black before adding the T-molding of course.


If you run a flat hand over the bottom area - there surface is not flat.  The wood below the artwork had puffed up a bit.  When its upright next to the floor.  Looks like new.


I still need to go back and correct the side art itself.  There are many black lines that are easy to correct.  I also found a very good match for the yellow.  The other colors I'm going to try to color match and use the sample paints from HD.  But I wanted to get it on its feet again.
My Arcade Cabinet Build and other projects here:
Centipede, Joust, Joust Cocktail, Asteroids, Galaga, Ms. Pacman Cabaret, Defender, Space Invaders Cocktail
https://bperkins.wordpress.com/

bperkins01

  • Trade Count: (0)
  • Full Member
  • ***
  • Offline Offline
  • Posts: 895
  • Last login:November 15, 2024, 12:32:54 pm
  • Plenty of skills.. gaining experience..
Re: Centipede restoration - My first - There will be plenty of pics
« Reply #79 on: February 09, 2020, 08:24:42 am »
It's been a while since I worked on the coin door - I've been working on the cabinet.


The cabinet is now going back together and it's time to reinstall the coin door.


Not a huge update - screw heads cleaned and repainted.  Coin door and marquee brackets repainted.  Nothing complicated.  But I will say this particular paint is perfect for the job.  The sheen matches the original nearly perfectly..  One thin coat and all the parts look original.  
My Arcade Cabinet Build and other projects here:
Centipede, Joust, Joust Cocktail, Asteroids, Galaga, Ms. Pacman Cabaret, Defender, Space Invaders Cocktail
https://bperkins.wordpress.com/

bperkins01

  • Trade Count: (0)
  • Full Member
  • ***
  • Offline Offline
  • Posts: 895
  • Last login:November 15, 2024, 12:32:54 pm
  • Plenty of skills.. gaining experience..
Re: Centipede restoration - My first - There will be plenty of pics
« Reply #80 on: February 09, 2020, 08:48:10 am »
The restoration is at a point were I can get the cabinet back together and work out the final kinks..


Replacement rear kick panel(?) in place.  Not sure what its called - the original was junk.


New rear panel fitted - I added a small metal plate to prevent the destruction of the top panel.


I showed the new coin door panel getting fabricated earlier.  To put it in place - I clamped the sides and bottom to pull everything tight before screwing it into place.  It helps to square up the cabinet and close any small gaps so the screws don't have to work so hard.


When I removed the wiring harness - I wanted it to go back to the exact same spot.  Down to the screw holes.  I found these cheap cable ties I could label and take pictures of the mounting locations (not every one - just enough to be able to sort them out)


It worked out pretty well.  Got the harness back in its original spot - no screws left over!


I plugged it in, used the MikeA "pull the interlock switch" trick and got the marquee to light up. 

Working on the coin door and control panel this weekend.  Hopefully I'll get a quick test in with everything up and running.  The monitor is still not where I want it to be.  It will be the last hill I climb!


My Arcade Cabinet Build and other projects here:
Centipede, Joust, Joust Cocktail, Asteroids, Galaga, Ms. Pacman Cabaret, Defender, Space Invaders Cocktail
https://bperkins.wordpress.com/

Mike A

  • Trade Count: (0)
  • Full Member
  • ***
  • Offline Offline
  • Posts: 5905
  • Last login:Today at 03:44:37 am
  • This plan is foolproof
Re: Centipede restoration - My first - There will be plenty of pics
« Reply #81 on: February 09, 2020, 09:29:34 am »
I feel honored that I am the poster boy for people who didn't know how the interlock switch worked. A guy I bought my first cab from showed me that.

Arroyo

  • Trade Count: (0)
  • Full Member
  • ***
  • Offline Offline
  • Posts: 1558
  • Last login:June 04, 2025, 07:47:21 am
  • Budgets are boring
    • newforum.arcadecontrols.com/index.php/topic,156267.0.html
Re: Centipede restoration - My first - There will be plenty of pics
« Reply #82 on: February 09, 2020, 03:06:09 pm »
Beautiful work Bob, all around.  The attention to detail, and effort in getting the right look is really coming through.  You kept this thing from getting MAME’d for sure!  Keep doing God’s work

bperkins01

  • Trade Count: (0)
  • Full Member
  • ***
  • Offline Offline
  • Posts: 895
  • Last login:November 15, 2024, 12:32:54 pm
  • Plenty of skills.. gaining experience..
Re: Centipede restoration - My first - There will be plenty of pics
« Reply #83 on: February 09, 2020, 05:20:41 pm »
The last few bits have gone quick - I guess because I had all of the prep-work done already. 


Coin door reassembled and in place.


I got my control panel overlay at Phoenix Arcade.  Nice screen printed reproduction of the original artwork.   


There are many videos on putting this stuff on.  I basically installed the fire button and the track ball - then taped the sides in place on the front. 

Next I cut & peeled half of the backing off so that the cut line fell roughly down the center of the front edge.  Pull it snug and press it into position smoothing it all away around the bottom.  One thing I did was put on latex gloves so that I could touch the sticky part without leaving fingerprints and ruining the adhesive.  It worked quite well.

Once the underside was on, I removed the button and trackball and, peeled the remaining backing and smoothed it on around the front.  No problem.


Trackball, volcano buttons and fire button back in place.


How packaging never ceases to amaze me..  They had a selection of 10 of these for $3-4 and 100 for $10.  So I have a lifetime supply.


It runs!!!!!!  I didn't make anything worse.  But there is more to do on the video side of the house.  The screen is still compressed horizontally.  I have a suspicion that this is now something happening on the PCB.  The screen is more normal sized on the test pattern generator.  I'll have to start looking at the PCB horizontal circuit looking for bad caps..


New old stock - just what I was going for.  Once I get the video fixed I'll get it off the dolly and into a more permanent place in my shop.   


Hit the test switch for the first time.  I have convergence issues and (I think) a problem with the blue transistor on the neck board.  But this screen is much smaller than the same one from the test pattern generator.  Which makes me think the horizontal circuit on the PCB is involved.  I could be way off..
My Arcade Cabinet Build and other projects here:
Centipede, Joust, Joust Cocktail, Asteroids, Galaga, Ms. Pacman Cabaret, Defender, Space Invaders Cocktail
https://bperkins.wordpress.com/

Arroyo

  • Trade Count: (0)
  • Full Member
  • ***
  • Offline Offline
  • Posts: 1558
  • Last login:June 04, 2025, 07:47:21 am
  • Budgets are boring
    • newforum.arcadecontrols.com/index.php/topic,156267.0.html
Re: Centipede restoration - My first - There will be plenty of pics
« Reply #84 on: February 09, 2020, 05:41:10 pm »
Wow that’s clean!

That the new tube?

bperkins01

  • Trade Count: (0)
  • Full Member
  • ***
  • Offline Offline
  • Posts: 895
  • Last login:November 15, 2024, 12:32:54 pm
  • Plenty of skills.. gaining experience..
Re: Centipede restoration - My first - There will be plenty of pics
« Reply #85 on: February 09, 2020, 06:07:10 pm »
Yes - new tube..  I'm forever hunting for CR23 necks at this point.
I *just * found a bad transistor on the interface board causing issues with the blue. 
Thanks to Randy Fromm -  I swapped it with the green transistor and the issue moved.  So that is at least figured out.. 

Now to figure out where to get one..  hopefully it will fix more that one thing once replaced :)

The CRT still needs some converging, etc. But *so far* everything else works.
My Arcade Cabinet Build and other projects here:
Centipede, Joust, Joust Cocktail, Asteroids, Galaga, Ms. Pacman Cabaret, Defender, Space Invaders Cocktail
https://bperkins.wordpress.com/

Arroyo

  • Trade Count: (0)
  • Full Member
  • ***
  • Offline Offline
  • Posts: 1558
  • Last login:June 04, 2025, 07:47:21 am
  • Budgets are boring
    • newforum.arcadecontrols.com/index.php/topic,156267.0.html
Re: Centipede restoration - My first - There will be plenty of pics
« Reply #86 on: February 09, 2020, 06:13:28 pm »
That first game is gonna be very satisfying.

bperkins01

  • Trade Count: (0)
  • Full Member
  • ***
  • Offline Offline
  • Posts: 895
  • Last login:November 15, 2024, 12:32:54 pm
  • Plenty of skills.. gaining experience..
Re: Centipede restoration - My first - There will be plenty of pics
« Reply #87 on: February 15, 2020, 09:55:19 am »
Working on the electronics..

Thoughts of a first timer..

Once I got everything back together and the machine fired up I was in a position to actually do some testing.  When I first got the machine, I determined there was a sound issue and no high score retention.  During bench testing of the CRT - I was having trouble with the blue gun..  It worked - but there was no blue scale - it was either on or off in the test pattern.

Guys who have been doing this for years have a process and a routine - but this is my first time..  I had checked the power brick and was 100% certain it was good.  Then it hit me... The ARII board and the PCB have voltage test points all over them - I'll check them all and see whats going on.

PCB Test Points
Test Point            Actual Voltage

+5v                        +5.063v
-5v                          0.569v
+15v                        0.001v
-15v                        -15.12v
+22v                       +24.72v    (unregulated)
-22v                        -24.93v    (unregulated)
-30v                        -14.00v

ARII Test Points
Test Point            Actual Voltage
-5v                        -1.263v
+12v                     +12.08v
+10.3v                  +12.66v      (unregulated)
-sense                     0.187
+22v                      +24.86       (unregulated)
-22v                        -24.87      (unregulated)
+Sense                  +5.125
36v AC                   36.91vac

All this stuff wrong?  Why is anything working at all?  I was rather surprised, in fact I thought I was doing a few things wrong at the start.  After digging into this a bit further - the machine is more than a power cord in and a screen showing the game.  All of these are little power supplies for all of the different circuits that require different voltages.


First troubleshooting task was the blue gun on the CRT.  After watching Randy Fromm videos - his video circuit troubleshooting advice made sense.  Each color (Red, Green, Blue) have identical circuitry which makes it easier to diagnose.  One of the transistors on the interface board (one of the blue ones) read just a little different than the other two.

So I swapped the questionable blue transistor with the green one.  Problem moved to green!  Bad transistor identified.


On the ARII board - The -5v test wasn't working.  Checking the schematic - there is a -5v regulator chip.  I put the meter on it, no -5v!  Another bad chip identified.  Reading the schematic, -5v is part of the audio circuit.  During testing - the audio did weird things after 10-15 minutes of play.  Maybe its resolved?  Time will tell.


On to my +15v issue.  From the schematic - There is a 7815 +15v Voltage regulator (VR2).  It should be +22v on the input side and +15v on the output side.  Quick check with the meter..  Bad voltage regulator!  Another chip identified.


The good part of this is that the +15v is part of the retain high score circuit feeding the 555 timer chip.  My -30v issue is also in the same area.  If I replace the +15v regulator - It should fix the -30v issue too, right?
Well I replaced the voltage regulator and there was no change on the -30v side.  A quick check of the the diode and capacitor said they were fine.

The only thing left is the 555 chip.  So I socketed and replaced it.  Problem solved!  -30v at the test point.


Here is the 7815 voltage regulator, +15v test point and the 555 chip - before replacing.  All pretty close to each other and very serviceable.


Purchasing parts:  Its a real balancing act.  If I could plan and make big purchases - I'd get everything from mouser or the arcade repair sites that keep a lot of the parts on the shelf.  The issue really comes down to shipping.  A single +15v regulator costs $0.49 at mouser.com - shipping is $7.99.   Not an issue when you have a cart full of stuff.  The kit above has a selection of 70 voltage regulators (many also on these PCBs) and was delivered Amazon Prime for $17.   Same story for transistors.  $0.15 for a single.  $8.99 delivered for an assortment of 250.   I'm 100% certain they are not the same quality - but everything is a trade off.  If you can be patient (I'm not) - make a big list and get a bunch of stuff at once.


Here are my offending components at the moment.

Game status:

  • All of the power test points are showing proper voltages.
  • Still need to test high score retention and the audio.
  • CRT - still needs converging and testing.
  • PCB - Not convinced the video is outputting correctly.  Need to test with a known working monitor.

All of this checking, thinking, looking at schematics happened over the course of a week or so..  Once I got the feel for it - it starting going faster.  It was pretty cool to look at the schematic - look at the chips around a test point and go..  hmm.. that should have one voltage on one side and a different one of the other - then find a bad chip - replace it and get the right voltage.   The Atari PCB schematics are really good about supplying great detail.   
I'm now looking to do the same sort of thing on the K4600 monitor.  The schematics are not nearly as good.  More thinking, looking and testing to do.
« Last Edit: February 18, 2020, 05:33:36 pm by bperkins01 »
My Arcade Cabinet Build and other projects here:
Centipede, Joust, Joust Cocktail, Asteroids, Galaga, Ms. Pacman Cabaret, Defender, Space Invaders Cocktail
https://bperkins.wordpress.com/

jennifer

  • Trade Count: (0)
  • Full Member
  • ***
  • Offline Offline
  • Posts: 2895
  • Last login:August 11, 2023, 06:24:58 am
Re: Centipede restoration - My first - There will be plenty of pics
« Reply #88 on: February 15, 2020, 10:48:32 am »
I can understand the impatience factor but sometimes it is a shipping sucks thing And I need it so Whatever (unless you live in Canada) apparently they got some other issues with VAT or something...That super kit of everything looks fun, and I would have to agree with your quality assessment, Normally I buy quantity of things, when you buy in bulk the parts get cheaper and you got  control over quality...However that's not for everybody, since that gets really expensive buying virtually everything virtually for every machine ever built (service truck mentality)...Nice job on this project man 😉

bperkins01

  • Trade Count: (0)
  • Full Member
  • ***
  • Offline Offline
  • Posts: 895
  • Last login:November 15, 2024, 12:32:54 pm
  • Plenty of skills.. gaining experience..
Re: Centipede restoration - My first - There will be plenty of pics
« Reply #89 on: February 15, 2020, 11:45:16 am »
I can understand the impatience factor but sometimes it is a shipping sucks thing And I need it so Whatever (unless you live in Canada) apparently they got some other issues with VAT or something...That super kit of everything looks fun, and I would have to agree with your quality assessment, Normally I buy quantity of things, when you buy in bulk the parts get cheaper and you got  control over quality...However that's not for everybody, since that gets really expensive buying virtually everything virtually for every machine ever built (service truck mentality)...Nice job on this project man 😉

Thanks Jennifer.   When I looked at the small parts kits..  there were a fair amount of the other components on the board that I had not determined to be bad. 
Plus those little voltage regulators are on everything.. 
My Arcade Cabinet Build and other projects here:
Centipede, Joust, Joust Cocktail, Asteroids, Galaga, Ms. Pacman Cabaret, Defender, Space Invaders Cocktail
https://bperkins.wordpress.com/

Arroyo

  • Trade Count: (0)
  • Full Member
  • ***
  • Offline Offline
  • Posts: 1558
  • Last login:June 04, 2025, 07:47:21 am
  • Budgets are boring
    • newforum.arcadecontrols.com/index.php/topic,156267.0.html
Re: Centipede restoration - My first - There will be plenty of pics
« Reply #90 on: February 18, 2020, 05:21:46 pm »
This is some EXCELLENT documentation.  I like how you describe your thought process, it helps to see the approach and of course the solution.  Keep it up!
« Last Edit: March 26, 2020, 04:57:50 pm by Arroyo »

wp34

  • Trade Count: (+3)
  • Full Member
  • ***
  • Offline Offline
  • Posts: 4794
  • Last login:April 10, 2022, 09:48:19 pm
Re: Centipede restoration - My first - There will be plenty of pics
« Reply #91 on: February 18, 2020, 10:07:27 pm »
This is some EXCELLENT documentation.  I like how you get describe your thought process, it helps to see the approach and of course the solution.  Keep it up!

+1 

Some great info in here.  Your documentation is top notch.

bperkins01

  • Trade Count: (0)
  • Full Member
  • ***
  • Offline Offline
  • Posts: 895
  • Last login:November 15, 2024, 12:32:54 pm
  • Plenty of skills.. gaining experience..
Re: Centipede restoration - My first - There will be plenty of pics
« Reply #92 on: February 18, 2020, 10:14:23 pm »
This is some EXCELLENT documentation.  I like how you get describe your thought process, it helps to see the approach and of course the solution.  Keep it up!

+1 

Some great info in here.  Your documentation is top notch.

Thanks guys - more to come as I get the video figured out...
My Arcade Cabinet Build and other projects here:
Centipede, Joust, Joust Cocktail, Asteroids, Galaga, Ms. Pacman Cabaret, Defender, Space Invaders Cocktail
https://bperkins.wordpress.com/

bperkins01

  • Trade Count: (0)
  • Full Member
  • ***
  • Offline Offline
  • Posts: 895
  • Last login:November 15, 2024, 12:32:54 pm
  • Plenty of skills.. gaining experience..
Re: Centipede restoration - My first - There will be plenty of pics
« Reply #93 on: February 19, 2020, 03:24:10 pm »
I bumped into this today:  bitslicer -30v power

Great article on how the 555 timer creates the -30V circuit for the high score circuit.  When I replaced it - I didn't know how it worked - but I was pretty sure it was the cause of my problem.  Now I know. 
My Arcade Cabinet Build and other projects here:
Centipede, Joust, Joust Cocktail, Asteroids, Galaga, Ms. Pacman Cabaret, Defender, Space Invaders Cocktail
https://bperkins.wordpress.com/

bperkins01

  • Trade Count: (0)
  • Full Member
  • ***
  • Offline Offline
  • Posts: 895
  • Last login:November 15, 2024, 12:32:54 pm
  • Plenty of skills.. gaining experience..
Re: Centipede restoration - My first - There will be plenty of pics
« Reply #94 on: February 29, 2020, 08:13:57 pm »
I've been out of town for a few days, but started back at it.
Except - I took a bit of a side route.

I've been unhappy with the the screen width (extra room below the shooter).  I was convinced there was something wrong with the video circuit on the PCB.  Inquiry and asking over on KLOV was interesting to say the least. 

What I learned was - Go check MAME if you have questions about screen sizes!
MAME say's Centipede is: 256x240
Other vertical games such as dig dug and ms pacman are 288x224

So there is my shorter screen, 4 rows..   Even then I was a little skeptical that I didn't have some odd thing happening making the screen artificially small.

Part of digging into this is because I'm teaching myself board repair like so may others. I'm an above average problem solver - but when you don't know what you don't know - it takes a while to gain experience. I picked up a pair of dead Centipede boards from a KLOV'r purely to learn how to fix them. Having a working Centipede as a reference is helpful of course.

Long story short - I managed to get one of the two boards working enough that the game fired up and displayed. The screen width was identical (to the millimeter) as my game.. (Its on my LCD at the moment).

Here is what I did with the dead boards:

I connected them to my cabinet and checked voltages - both boards had all of them (surprised)
Board 1 - locked up dead - LED - but nothing...
Board 2 - managed to get it into self test screen.. and it all worked.. but no game play

I decided to pop, clean and reseat all of the EPROMS.
Lost the Self test screen... however I got activity on the screen - but it was a mess.. Screwed up graphics, it was the attract screen.  A red block centipede was moving through green lines.
Pulled the board to check my work and ROM 211 was hot! (forget where I saw that ... feel the chips for heat.. they're probably bad)
So I swapped it from the dead Board 1
Test screen came back (I'm pretty sure, I forget the order now..)..
But no game play..
So I swapped each EPROM one at a time from the dead board.. ROM 207 was also bad it turns out.
Once I replaced that - game popped up!

Normal display screen - but during play - fleas only drop mushrooms either far right or far left..
I believe that is a RAM error, but I'm pretty happy about the progress for not really trying.

I still have to get my K4600 running a bit better and (grrrrr) converged properly.. I don't cave to stuff like that.. I'll win.  But its been kicking my butt for a while now.

A friend had access to an old analog oscilloscope - I connected that up and managed to see signals on my board.. I'd never touched one until this week. I'll use a logic probe on the dead boards to find the issues for now.

Overall - happy to get to work on some other boards.
All I really have left is to get my CRT converged and the machine will be fully operational.
There are a few little items after that..
I'll update until its 100%!

My Arcade Cabinet Build and other projects here:
Centipede, Joust, Joust Cocktail, Asteroids, Galaga, Ms. Pacman Cabaret, Defender, Space Invaders Cocktail
https://bperkins.wordpress.com/

bperkins01

  • Trade Count: (0)
  • Full Member
  • ***
  • Offline Offline
  • Posts: 895
  • Last login:November 15, 2024, 12:32:54 pm
  • Plenty of skills.. gaining experience..
Re: Centipede restoration - My first - There will be plenty of pics
« Reply #95 on: March 22, 2020, 08:43:11 am »
Its been a while since I've updated this entry..  I've made incremental progress on the K4600 monitor.

I picked up a dead chassis so that I could compare and potentially swap components, etc.
One thought I was having was that the neck board was giving me issues in general.  Earlier in this thread I mentioned to check, double check and check again for broken off parts.  Turns out there were 3 tiny capacitors on the neck board broken off.


Look at C408, C409, C410.   These ones are not even shown on the schematic that I have, but they are on the parts list.  I swapped the neck boards and it appeared a little color bleeding went away..  But nothing significant.

On the inability to shut off color guns with the TPG, I figured out why that was an issue. My K4600 uses the P305 interface card which doesn't have pull down resistors like nearly all of the other cards:


You can see the 3 resistors connected to the RGB pins 1,2,3 on the right.  I added the resistors to my card so that I can turn off the individual guns. When I was turning off the guns with the TPG, the voltage was floating and the guns just made the entire screen the color I was turning off.  One more thing learned...

During this Learning to fix crt phase - I've watched many Randy Fromm videos.  He has a book - Randy Fromm's Big Blue Book of Really Great Technical Information that I picked up.. 

One thing I thought I understood - but not well enough was this:
The alignment of the convergence rings on the neck of the tube.


My swapped tube had an all in one unit of yoke and rings.  I had to use the K4600 yoke and rings.  Turns out the geometry of the swapped tube didn't allow for the proper alignment  The gun gap was in a position that the 2 part yoke/ring combination would not line up vs the one part original.  I had a LOT of practice aligning and un-alignable configuration..

I have another donor tube to experiment with - I'm pretty sure I can get them lined up and I'll try again..

All that said - this chassis probably was not the original since it had Pacman and 1942 burned into the tube.  I've been watching Facebook Marketplace and came across a guy who was selling 3 arcade monitors.

One of which is impossible to believe:  BTW - I did not know this is what I was going to pick up..  The owner never sent the model# picture.. 


This is a brand new, never used, K7200.  Manufactured in 2003.  If you look at the power wires - they have never seen a connector.    It came as is - I'm guessing the guy who sold it to me took it out of a box or bag or something..   I did a quick test on the TPG to make sure it fired up and finished the monitor portion of the Centipede machine.


My wife tells me I lead a charmed life when this sort of thing happens..  I'm not disagreeing on this one..


My Arcade Cabinet Build and other projects here:
Centipede, Joust, Joust Cocktail, Asteroids, Galaga, Ms. Pacman Cabaret, Defender, Space Invaders Cocktail
https://bperkins.wordpress.com/

Mike A

  • Trade Count: (0)
  • Full Member
  • ***
  • Offline Offline
  • Posts: 5905
  • Last login:Today at 03:44:37 am
  • This plan is foolproof
Re: Centipede restoration - My first - There will be plenty of pics
« Reply #96 on: March 22, 2020, 01:41:09 pm »
 :applaud:

jennifer

  • Trade Count: (0)
  • Full Member
  • ***
  • Offline Offline
  • Posts: 2895
  • Last login:August 11, 2023, 06:24:58 am
Re: Centipede restoration - My first - There will be plenty of pics
« Reply #97 on: March 22, 2020, 02:13:37 pm »
Congratulations, That is Awesome!...On that other tube, Convergence is a big deal, some claim to do that by feel, and eyeballs, But they lie, Personally I use a Klein Convergence scope with excellent results, You can actually see the convergence and purity, Not perfect mind you, but certianly good enough for the quality control inspectors on this side of the tracks,, If you go sourcing one they make different ones for different resolutions (Diddnt know that when I got mine, and just lucky) since Jenn is not a rich girl, that could have gotten spendy buying all 3...But luckily it has already all worked out for you on this project, That is just a little sweetie.

bperkins01

  • Trade Count: (0)
  • Full Member
  • ***
  • Offline Offline
  • Posts: 895
  • Last login:November 15, 2024, 12:32:54 pm
  • Plenty of skills.. gaining experience..
Re: Centipede restoration - My first - There will be plenty of pics
« Reply #98 on: March 22, 2020, 02:58:08 pm »
Congratulations, That is Awesome!...On that other tube, Convergence is a big deal, some claim to do that by feel, and eyeballs, But they lie, Personally I use a Klein Convergence scope with excellent results, You can actually see the convergence and purity, Not perfect mind you, but certianly good enough for the quality control inspectors on this side of the tracks,, If you go sourcing one they make different ones for different resolutions (Diddnt know that when I got mine, and just lucky) since Jenn is not a rich girl, that could have gotten spendy buying all 3...But luckily it has already all worked out for you on this project, That is just a little sweetie.

This?
https://www.kleininstruments.com/convergence-gauge

If I could get it remotely close with the test pattern generator I'd be happy... 
I have a few monitors to work on now, once the game restorations are done.

Haven't started the 'Asteroids' restoration thread yet..

My Arcade Cabinet Build and other projects here:
Centipede, Joust, Joust Cocktail, Asteroids, Galaga, Ms. Pacman Cabaret, Defender, Space Invaders Cocktail
https://bperkins.wordpress.com/

opt2not

  • Trade Count: (+15)
  • Full Member
  • ***
  • Offline Offline
  • Posts: 6173
  • Last login:April 02, 2024, 07:42:30 pm
Re: Centipede restoration - My first - There will be plenty of pics
« Reply #99 on: March 22, 2020, 03:38:38 pm »
NOS monitor?! You lucky sonava... :lol

Nice get, this restoration just kicked up a notch in quality now. And if/when you re-sell, you can definitely ask for top dollar!

Arroyo

  • Trade Count: (0)
  • Full Member
  • ***
  • Offline Offline
  • Posts: 1558
  • Last login:June 04, 2025, 07:47:21 am
  • Budgets are boring
    • newforum.arcadecontrols.com/index.php/topic,156267.0.html
Re: Centipede restoration - My first - There will be plenty of pics
« Reply #100 on: March 22, 2020, 04:28:26 pm »
:applaud:

That’s looking like a museum quality piece with that final touch.  Especially knowing it’s your grail, I can only imagine how happy you must be.


Just thought I’d leave this here:

So here I go - my first (last?) original arcade machine

Based on that pic I’d say this question is answered.

Welcome to the club.....lifer  ;)

bperkins01

  • Trade Count: (0)
  • Full Member
  • ***
  • Offline Offline
  • Posts: 895
  • Last login:November 15, 2024, 12:32:54 pm
  • Plenty of skills.. gaining experience..
Re: Centipede restoration - My first - There will be plenty of pics
« Reply #101 on: March 22, 2020, 04:57:12 pm »
NOS monitor?! You lucky sonava... :lol

Nice get, this restoration just kicked up a notch in quality now. And if/when you re-sell, you can definitely ask for top dollar!

Yea - I made a nuisance of myself yesterday with MikeA and Arroyo about it ..  Pretty sure MikeA blocked me  :P
Arroyo said it - its my Grail - So It won't be going anywhere..

:)
 
My Arcade Cabinet Build and other projects here:
Centipede, Joust, Joust Cocktail, Asteroids, Galaga, Ms. Pacman Cabaret, Defender, Space Invaders Cocktail
https://bperkins.wordpress.com/

bperkins01

  • Trade Count: (0)
  • Full Member
  • ***
  • Offline Offline
  • Posts: 895
  • Last login:November 15, 2024, 12:32:54 pm
  • Plenty of skills.. gaining experience..
Re: Centipede restoration - My first - There will be plenty of pics
« Reply #102 on: March 22, 2020, 05:00:01 pm »
:applaud:

That’s looking like a museum quality piece with that final touch.  Especially knowing it’s your grail, I can only imagine how happy you must be.


Just thought I’d leave this here:

So here I go - my first (last?) original arcade machine

yea yea.. If I find the right clunkers..  I'll get them :)

Based on that pic I’d say this question is answered.

Welcome to the club.....lifer  ;)
My Arcade Cabinet Build and other projects here:
Centipede, Joust, Joust Cocktail, Asteroids, Galaga, Ms. Pacman Cabaret, Defender, Space Invaders Cocktail
https://bperkins.wordpress.com/

Mike A

  • Trade Count: (0)
  • Full Member
  • ***
  • Offline Offline
  • Posts: 5905
  • Last login:Today at 03:44:37 am
  • This plan is foolproof
Re: Centipede restoration - My first - There will be plenty of pics
« Reply #103 on: March 22, 2020, 06:53:57 pm »
I didn't block you. It was just hard to get a noose around my neck while balancing on a chair ,holding a beer and texting at the same time.

bperkins01

  • Trade Count: (0)
  • Full Member
  • ***
  • Offline Offline
  • Posts: 895
  • Last login:November 15, 2024, 12:32:54 pm
  • Plenty of skills.. gaining experience..
Re: Centipede restoration - My first - There will be plenty of pics
« Reply #104 on: March 26, 2020, 02:52:20 pm »
My machine did not come with a coin box, and the originals are pretty ratty looking.  So I'm a little off script in that I made one from some scrap materials laying around the shop.

This is left over from a boat I made - its marine grade Okume plywood.  Really nice to work with.  I created a quick model in Sketchup and put it together over the course of two evenings.


A few pics of the parts and getting assembled - Simple box with a 7 deg slope to match the coin box mount in the machine.


 Here are 2 small strips of aluminum, rounded to the radius of the washer.  The were drilled and used as the arms of the handle.


Per MikeA - it would not sound right unless there was metal for the coins/tokens to hit.  So I give you the MikeA 304 scrap stainless steel sound bar.  Every time you feel a little poke in the head - Centipede got a coin. 


My Arcade Cabinet Build and other projects here:
Centipede, Joust, Joust Cocktail, Asteroids, Galaga, Ms. Pacman Cabaret, Defender, Space Invaders Cocktail
https://bperkins.wordpress.com/

J_K_M_A_N

  • Trade Count: (0)
  • Full Member
  • ***
  • Offline Offline
  • Posts: 983
  • Last login:June 05, 2025, 10:37:05 pm
Re: Centipede restoration - My first - There will be plenty of pics
« Reply #105 on: March 26, 2020, 03:18:34 pm »
Good lord that thing looks great! Well done.  :applaud: :cheers:

J_K_M_A_N

wp34

  • Trade Count: (+3)
  • Full Member
  • ***
  • Offline Offline
  • Posts: 4794
  • Last login:April 10, 2022, 09:48:19 pm
Re: Centipede restoration - My first - There will be plenty of pics
« Reply #106 on: March 26, 2020, 03:30:26 pm »
In some of the pictures that cabinet is starting to look NOS.  Very nice work.

Arroyo

  • Trade Count: (0)
  • Full Member
  • ***
  • Offline Offline
  • Posts: 1558
  • Last login:June 04, 2025, 07:47:21 am
  • Budgets are boring
    • newforum.arcadecontrols.com/index.php/topic,156267.0.html
Re: Centipede restoration - My first - There will be plenty of pics
« Reply #107 on: March 26, 2020, 03:38:30 pm »
Well done buddy, that’s some fine metal work.  Love the handle!

Mike A

  • Trade Count: (0)
  • Full Member
  • ***
  • Offline Offline
  • Posts: 5905
  • Last login:Today at 03:44:37 am
  • This plan is foolproof
Re: Centipede restoration - My first - There will be plenty of pics
« Reply #108 on: March 26, 2020, 03:49:28 pm »
The metal plate is the best part.

pbj

  • Trade Count: (+4)
  • Full Member
  • ***
  • Offline Offline
  • Posts: 11044
  • Last login:Yesterday at 10:25:07 pm
  • Obey.
    • The Chris Burke Band
Re: Centipede restoration - My first - There will be plenty of pics
« Reply #109 on: March 26, 2020, 03:50:54 pm »
I would like to hear more about the boat.


bperkins01

  • Trade Count: (0)
  • Full Member
  • ***
  • Offline Offline
  • Posts: 895
  • Last login:November 15, 2024, 12:32:54 pm
  • Plenty of skills.. gaining experience..
Re: Centipede restoration - My first - There will be plenty of pics
« Reply #110 on: March 26, 2020, 03:51:02 pm »
The metal plate is the best part.
I only wish I could have stenciled it or something  :P
My Arcade Cabinet Build and other projects here:
Centipede, Joust, Joust Cocktail, Asteroids, Galaga, Ms. Pacman Cabaret, Defender, Space Invaders Cocktail
https://bperkins.wordpress.com/

bperkins01

  • Trade Count: (0)
  • Full Member
  • ***
  • Offline Offline
  • Posts: 895
  • Last login:November 15, 2024, 12:32:54 pm
  • Plenty of skills.. gaining experience..
Re: Centipede restoration - My first - There will be plenty of pics
« Reply #111 on: March 26, 2020, 03:53:41 pm »
I would like to hear more about the boat.

You won't be able to shut me up about the boat....


The Miss Sheri Lynn
My Arcade Cabinet Build and other projects here:
Centipede, Joust, Joust Cocktail, Asteroids, Galaga, Ms. Pacman Cabaret, Defender, Space Invaders Cocktail
https://bperkins.wordpress.com/

Mike A

  • Trade Count: (0)
  • Full Member
  • ***
  • Offline Offline
  • Posts: 5905
  • Last login:Today at 03:44:37 am
  • This plan is foolproof
Re: Centipede restoration - My first - There will be plenty of pics
« Reply #112 on: March 26, 2020, 04:01:59 pm »
When I come out there we definitely have to reenact scenes from Indiana Jones with that boat.

bperkins01

  • Trade Count: (0)
  • Full Member
  • ***
  • Offline Offline
  • Posts: 895
  • Last login:November 15, 2024, 12:32:54 pm
  • Plenty of skills.. gaining experience..
Re: Centipede restoration - My first - There will be plenty of pics
« Reply #113 on: March 26, 2020, 04:04:53 pm »
When I come out there we definitely have to reenact scenes from Indiana Jones with that boat.

Except for the part where it gets cut in half/explodes and otherwise is destroyed..   :cheers:
My Arcade Cabinet Build and other projects here:
Centipede, Joust, Joust Cocktail, Asteroids, Galaga, Ms. Pacman Cabaret, Defender, Space Invaders Cocktail
https://bperkins.wordpress.com/

Mike A

  • Trade Count: (0)
  • Full Member
  • ***
  • Offline Offline
  • Posts: 5905
  • Last login:Today at 03:44:37 am
  • This plan is foolproof
Re: Centipede restoration - My first - There will be plenty of pics
« Reply #114 on: March 26, 2020, 04:49:28 pm »
That is why you have to build a couple of stunt boats to take the damage.