Main Restorations Software Audio/Jukebox/MP3 Everything Else Buy/Sell/Trade
Project Announcements Monitor/Video GroovyMAME Merit/JVL Touchscreen Meet Up Retail Vendors
Driving & Racing Woodworking Software Support Forums Consoles Project Arcade Reviews
Automated Projects Artwork Frontend Support Forums Pinball Forum Discussion Old Boards
Raspberry Pi & Dev Board controls.dat Linux Miscellaneous Arcade Wiki Discussion Old Archives
Lightguns Arcade1Up Try the site in https mode Site News

Unread posts | New Replies | Recent posts | Rules | Chatroom | Wiki | File Repository | RSS | Submit news


Author Topic: Dig Dug Arcade Cabinet  (Read 12237 times)

0 Members and 1 Guest are viewing this topic.

mackey256

  • Trade Count: (0)
  • Jr. Member
  • **
  • Offline Offline
  • Posts: 4
  • Last login:July 23, 2020, 12:04:01 pm
Dig Dug Arcade Cabinet
« on: December 07, 2012, 03:17:05 pm »
This is my first post on this forum so go a bit easy on me if my pictures are too big or anything like that.  The information on this forum was incredible useful in helping me create my first arcade cabinet and I want to thank you all for everything you have done to help the community.  I hope I can contribute in my own small way with this post and feel free to ask questions and I'll answer as best I can.

The Dig Dug Arcade Cabinet


For years I've heard about people who build their own arcade cabinets to play old video games and the idea was always in the back of my mind.  Finally after mulling the idea over for about 10 years or so I set out to build my own arcade cabinet.

I hit the internet hard and started to learn all I could about how to go about building my own cabinet.  I really liked the look of the classic Dig Dug arcade cabinet so I decide that I would build my very own Dig Dug arcade cabinet.

I knew right away that I couldn't make an exact replica of Dig Dug as I wanted to have two sets of player controls on the control panel and I also wanted a trackball for games like Golden Tee, Missile Command and Marble Madness.  I would also need a widescreen monitor for new games like Street Fighter IV and Super Meat Boy.

Before I could do anything I had to be sure I could make this thing work.  Rather than put this idea on the back burner once again I ordered some Joysticks and Push buttons from Ultimarc and I set out to build a test system to be sure I could pull this project off.   
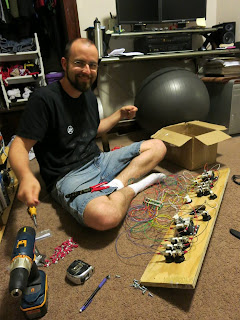


Shortly after everything arrive I started to piece together my test cabinet.  I took some old plywood, drilled some holes, sanded it down and started to wire up the control panel.  After a few hours of wiring and trying to figure out what the hell I was doing I ended up with a pretty good control panel. 
 
So far so good but it didn't really look like much of an arcade cabinet yet.  In fact it looked more like a board with some buttons in it and a tangle of wires underneath.  Definitely not like the Dig Dug cabinet you see above.  What I really needed was a frame for this thing and a monitor. 
 
I made a frame out of some spare 2x4s I had in the basement and mounted a 32" monitor on it so I could begin testing.  I hooked up my computer and fired up Mame to test come games.  Nothing worked. 
 
At this point I was racing against the clock as I had a bunch of friends coming over for your annual Drunkin' Bike Rides and what would be a better time for testing an arcade cabinet then with a bunch of drunk people? 
 
I took a quick break from working on the control panel and focused my attention on cutting down the sides to the arcade cabinet. 
 
I had purchased some MDO a few weeks prior and I had been itching to get those cut down.  Without any size measurements from an actual Dig Dug arcade cabinet I decided to go with some measurements from a Centipede cabinet (available at http://arcadecontrols.com/arcade_cabinet_plans.shtml) and modify it a bit.  Centipede looked close enough to a Dig Dug cabinet so I essentially I just winged it and hoped for the best. 
 
With the sides cut down I could again return my focus to the broken control panel.  A lot of internet research later and a few more hours working on the control panel and I finally had something that worked.  Not only could you play games but with the sides leaned against the frame it was starting to actually look like an arcade cabinet. 
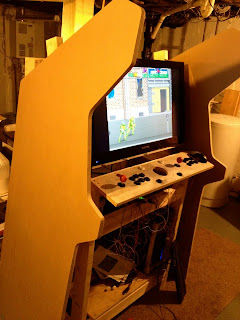


After the test run at Drunkin' Bike Rides we had a system that worked and could stand up to drunk people abusing it for hours on end.  Now I could get to work on building something that looks even more like an arcade cabinet.  I took the leftover MDO from the side panels and started to cut down the rest of the pieces needed for the cabinet. 
 
This is where construction took a major slowdown.  I talking to my wife and we both thought it would be cool if this thing took actual quarters.  After all if you are going to build a full sized arcade cabinet it might as well look legit.  Unfortunately a coin door was not in my original budget so I had to hold off on construction for a bit before I could afford the coin door. 
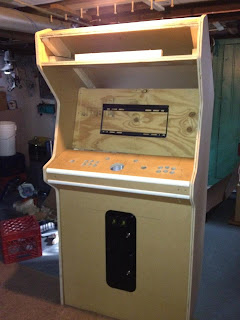


Flash forward about a month or two and now we have something that looks like an arcade cabinet.  I ended up not using the original 32" monitor and instead opted for a 27" monitor.  This put construction on hold for a second time while I set aside extra cash for a monitor that wasn't in the original budget. 
 
This second hold on construction gave me the perfect opportunity to work on the graphical elements of the arcade cabinet. 
 
When I added the second set of controls, trackball and widescreen monitor I ended up making the cabinet much wider than the original Dig Dug cabinet.  This meant that I had to recreate new wider artwork for the whole project. 
 
Over at the Arcade Art Library I was able to find Illustrator files for the Dig Dug marquee and brezel.  With these in hand I was able to recreate both a wider marquee and brezel which would fit my cabinet. 
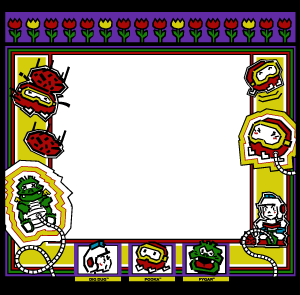
 

Original Dig Dug Brezel
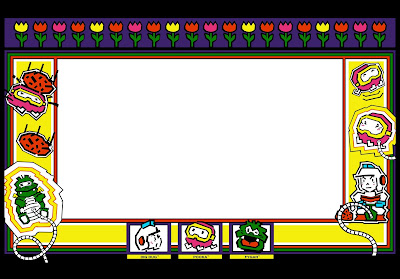

Widescreen Dig Dug Brezel I Created


Original Dig Dug Marquee


Wider Dig Dug Marquee
 
As you can see the artwork is not only wider but it still looks like the original Dig Dug artwork. 
 
The Arcade Art Library also had the control panel overlay and the side art but I decided to go a different direction with those.  For the side art I figured I would just order the Dig Dug version available at gameongrafix.com.  (http://www.gameongrafix.com/products/dig-dug-sideart)  They already had the side art ready to order so why waste time recreating it? 
 
The control panel was a different story completely.  Since my cabinet was not only wider but had more buttons I would have to redesign the entire overlay while keeping as close to the original design aesthetic as I could. 

 

Original Dig Dug Control Panel Overlay


New Dig Dug Control Panel Overlay
 
In the end I thought I came pretty close to the original design even if I did have to lose some of the original artwork in the process. 
 
With my graphics finalized and the extra money saved up for the new monitor I put in my order to gameongrafix.com for the artwork and to newegg for the monitor.  While I waited I primed and painter all the parts. 
 
Once the last of the parts arrived I put everything together and this is what I ended up with.   


Not bad for a complete woodworking novice.  While it looked finished I still had some work to do.  I did spend some time doing a few other odds and ends to make it seem more like an arcade cabinet.  One of the major drawbacks of having a PC inside an arcade cabinet is that when you boot into Windows you get the default windows branded boot screen.  So I changed the Windows 7 boot screen from this...


...to this. 


I also changed the default wallpaper to something a bit more arcade-y. 


The computer now boots directly into Hyperspin so unless you know what you are looking for you only see the Dig Dug loading screen and then the wallpaper for a few seconds before the Hyperspin front end takes over. 
 
In the end it turned out be a fun project but as with any project there are a few things I would change if I did it all over again.  We had a few people over to the house two weeks ago and the arcade cabinet got quite the workout.  Besides a few little tweaks here and there it performed perfectly with "Tapper" being by far the most played game.

I can't wait to spend the winter months plugging quarters into this thing.

« Last Edit: December 07, 2012, 03:23:11 pm by mackey256 »

dgame

  • Trade Count: (0)
  • Full Member
  • ***
  • Offline Offline
  • Posts: 620
  • Last login:June 01, 2025, 11:09:55 pm
  • I am no Jedi
Re: Dig Dug Arcade Cabinet
« Reply #1 on: December 07, 2012, 03:33:26 pm »
Nice!  :applaud:

yotsuya

  • Trade Count: (+21)
  • Full Member
  • ***
  • Offline Offline
  • Posts: 19959
  • Last login:June 16, 2025, 05:43:24 pm
  • 2014 UCA Winner, 2014, 2015, 2016 ZapCon Winner
    • forum.arcadecontrols.com/index.php/topic,137636.msg1420628.html
Re: Dig Dug Arcade Cabinet
« Reply #2 on: December 07, 2012, 03:44:01 pm »
At first I was afraid it was going to be too wide, but seeing the end product, all I can say is "Nicely done!"  :cheers:
***Build what you dig, bro. Build what you dig.***

Unstupid

  • Trade Count: (+2)
  • Full Member
  • ***
  • Offline Offline
  • Posts: 997
  • Last login:September 08, 2021, 08:46:34 am
Re: Dig Dug Arcade Cabinet
« Reply #3 on: December 07, 2012, 03:45:56 pm »
Hey welcome to the forums....  Nice work.... Ya know for a moment there I though you hacked up an original DigDug to make your box...  :scared

Acids

  • Trade Count: (0)
  • Full Member
  • ***
  • Offline Offline
  • Posts: 184
  • Last login:March 13, 2023, 05:50:45 am
  • Bring It.. Smart arse!
Re: Dig Dug Arcade Cabinet
« Reply #4 on: December 07, 2012, 04:53:01 pm »


Nice job, looks great!!!
how does the trackball play?  do you hit the right joystick when playing hard out?

Would you be kind enough to post plans?  (assuming you have any ??? some of the best cabs ive seen were made on the fly  :notworthy:)

kuchta

  • Trade Count: (0)
  • Full Member
  • ***
  • Offline Offline
  • Posts: 40
  • Last login:October 27, 2024, 09:03:28 pm
Re: Dig Dug Arcade Cabinet
« Reply #5 on: December 07, 2012, 06:49:35 pm »
Great job! How did you implement the monitor bezel? Is it attached to plexi or something?

Jumpman64

  • Trade Count: (0)
  • Full Member
  • ***
  • Offline Offline
  • Posts: 164
  • Last login:October 12, 2017, 04:58:42 pm
  • I want to build my own arcade controls!
Re: Dig Dug Arcade Cabinet
« Reply #6 on: December 07, 2012, 06:54:33 pm »
Looks great!  I love how the control panel graphics fit perfectly with your additional controls.

 :cheers:

koolmoecraig

  • Trade Count: (+2)
  • Full Member
  • ***
  • Offline Offline
  • Posts: 1433
  • Last login:April 05, 2014, 07:07:20 pm
    • My Intervention
Re: Dig Dug Arcade Cabinet
« Reply #7 on: December 08, 2012, 12:44:49 am »
Great job man.

mackey256

  • Trade Count: (0)
  • Jr. Member
  • **
  • Offline Offline
  • Posts: 4
  • Last login:July 23, 2020, 12:04:01 pm
Re: Dig Dug Arcade Cabinet
« Reply #8 on: December 08, 2012, 09:14:31 am »
Thank you all for the positive feedback. I think we can all breath a sigh of relief that no original Dig Dug cabinet was harmed during the construction of this cab.

Unfortunately for this project I never drew up any plans.  I did rely heavily on the Centipede plans available at the following urls.

http://arcadecontrols.com/arcade_cabinet_plans.shtml

http://www.jakobud.com/plan.php?id=5

For the most part I used the jakobud plans and went from there.  Once I had the sides and the kick plate I just put the rest together.  (Then took it apart because something didn't fit, then put it back together.  I repeated that process about 12 times per cut.)

The main differences between jakobud's plans and what I build was that I used rounded corners on everything and I made my cab 33" wide.

If I were to do it again I would change the back measurement from 56" to something a bit taller.  Perhaps around 60" or so.


As you can see in this picture the artwork on the top back got cut off a small bit.  The extra height would have saved that little piece.  Nothing anyone would really notice but I see it all the time.

And yes real men do construction in Spider-man pajama pants.  Also I'm standing on a milk crate in this picture.  I'm not that tall/the cab isn't that small.  :)

If anyone wants exact measurements I'd be more than happy to provide them for you.  Here are a few other pictures that might help you see how this was constructed.


This is a good one because you can see the control panel before it was cut down to size and before the corner round was added to make the rounded edge.  I just attached 1" corner round with finishing nails and then sanded it to make a clean edge.  A little filler and it looks great with the control panel overlay.  (I used the same method for the top of the cab)


I really wish I would have taken more progress pictures while I was working on this.  Like I said, if anyone wants more info on anything just let me know.

Here you can see how the marquee is put together.


The entire top of the cab comes off for easy access to the marquee light and speakers.  You can see I attached foil to a piece of cardboard to reflect more light toward the marquee.  It also stops light from leaking through the speaker grills.  (I use the term grill but I don't have grills on this cab.  I actually routed out slots for the speakers to keep it looking like something that would have been built in the early 80's)

Those last two pictures also give you a good look at how the bezel is held in place.  It's actually sandwiched between two 1/4" sheets of glass.  You can see the glass sitting on a 2x4 support and behind it it's held in place by a 2x2 on each side.  The control panel slides into place and supports the glass from the front.

The glass was found on my way to work in someones trash.  I took it to a local glass cutter to have it cut to size.  Unfortunately the glass is pretty heavily scratched up but since I went way over budget with the new monitor and the coin door It will have to do for now.

As for game play this cab plays really well.

The trackball has plenty of space for left and right movement and I've yet to hit the right joystick.  The only problem I have with it is when playing Golden Tee you will hit the glass every time you go to do a long drive.  I would love the have the trackball sit a few inches lower on the control panel but the large footprint of it stops it fitting any lower on the control panel.  I'm not sure if you can see it from the pictures above but it's very snug against the front of the panel.

The other problem I've been having is with the joysticks.  I cut the holes about 1/16" too large and the dust washers are starting to catch on the edge of the overlay.  While not a big problem in and of itself it does become a problem when you remember that people like to pick at peeling stickers.


I did contact Andy at Ultimarc about getting some bigger washers for the sticks but that is the biggest size they have the for J-Stiks.  I do have to say that Andy was incredibly helpful and patient with me as I tried to explain my problem.

Luckily for me there is a maker space (http://www.sector67.org/) down the street from me and they are willing to help me with some injection molding to make bigger washers.  (that will be a huge project onto itself and I'll be sure to keep everyone updated on that as it develops)

I think I'll end up switching to the Servostiks at some point anyway which would result in a control panel redesign.  I've found that people just don't get the pull up 4way to 8way switching mechanic.  I guess you have to get a feel for it.  I would say 99% of the time people were just using 8way controls and dealing with the problems.

Not even a month old and I'm already thinking about a control panel redesign.  I guess that's how the hobby goes.  :)

kuchta

  • Trade Count: (0)
  • Full Member
  • ***
  • Offline Offline
  • Posts: 40
  • Last login:October 27, 2024, 09:03:28 pm
Dig Dug Arcade Cabinet
« Reply #9 on: December 08, 2012, 01:14:11 pm »
Those last two pictures also give you a good look at how the bezel is held in place.  It's actually sandwiched between two 1/4" sheets of glass.  You can see the glass sitting on a 2x4 support and behind it it's held in place by a 2x2 on each side.  The control panel slides into place and supports the glass from the front.

The glass was found on my way to work in someones trash.  I took it to a local glass cutter to have it cut to size.  Unfortunately the glass is pretty heavily scratched up but since I went way over budget with the new monitor and the coin door It will have to do for now.

Gotcha. 2 pieces of glass -- that explains why I couldn't figure out if it was in front of or behind the glass. Thanks for all of this info. I love seeing how other people handle certain issues. Again, great cab!

mgb

  • Trade Count: (0)
  • Full Member
  • ***
  • Offline Offline
  • Posts: 3500
  • Last login:January 06, 2025, 09:39:00 pm
  • North East, US
Dig Dug Arcade Cabinet
« Reply #10 on: December 08, 2012, 03:10:38 pm »
Great job. That's a slick cabinet.
 Nice classic Dig Dug style but wider for more modern games.
Very nicely done

mackey256

  • Trade Count: (0)
  • Jr. Member
  • **
  • Offline Offline
  • Posts: 4
  • Last login:July 23, 2020, 12:04:01 pm
Re: Dig Dug Arcade Cabinet
« Reply #11 on: December 09, 2012, 12:02:18 pm »
Thanks everyone. 

Louis Tully

  • Trade Count: (+5)
  • Full Member
  • ***
  • Offline Offline
  • Posts: 1800
  • Last login:February 13, 2015, 09:41:03 pm
Re: Dig Dug Arcade Cabinet
« Reply #12 on: December 09, 2012, 01:16:09 pm »
.
« Last Edit: February 12, 2015, 03:08:18 pm by Louis Tully »

Well Fed Games

  • Trade Count: (+6)
  • Full Member
  • ***
  • Offline Offline
  • Posts: 1884
  • Last login:January 07, 2025, 04:42:47 pm
  • Delicious!
Re: Dig Dug Arcade Cabinet
« Reply #13 on: December 09, 2012, 01:50:47 pm »
Agreed, fantastic build. Love the wider re-imagining of a classic cab!  :cheers:
Completed projects: Pac bartop (Plug & Play), 30th Anniversary Pac cab (MAME), Point Blank (PS1), Centipede (arcade hardware- light restore), VS. Super Mario Bros (arcade hardware- light restore) Tetris Cocktail (SNES), Arcade Classics upright (60-in-1, then MAME), Multi-Raiden (arcade hardware). Pac Man vs.(Gamecube),

Working on: Pinball Re-theme, Homebrew arcade arena shooter

wp34

  • Trade Count: (+3)
  • Full Member
  • ***
  • Offline Offline
  • Posts: 4794
  • Last login:April 10, 2022, 09:48:19 pm
Re: Dig Dug Arcade Cabinet
« Reply #14 on: December 09, 2012, 02:03:44 pm »
At first I was afraid it was going to be too wide, but seeing the end product, all I can say is "Nicely done!"  :cheers:

I thought the same thing but your cabinet turned out fantastic.  Nice job.   :applaud: