Main Restorations Software Audio/Jukebox/MP3 Everything Else Buy/Sell/Trade
Project Announcements Monitor/Video GroovyMAME Merit/JVL Touchscreen Meet Up Retail Vendors
Driving & Racing Woodworking Software Support Forums Consoles Project Arcade Reviews
Automated Projects Artwork Frontend Support Forums Pinball Forum Discussion Old Boards
Raspberry Pi & Dev Board controls.dat Linux Miscellaneous Arcade Wiki Discussion Old Archives
Lightguns Arcade1Up Try the site in https mode Site News

Unread posts | New Replies | Recent posts | Rules | Chatroom | Wiki | File Repository | RSS | Submit news


Author Topic: Monkey Racing Cabinet  (Read 12233 times)

0 Members and 2 Guests are viewing this topic.

Monkey

  • Trade Count: (0)
  • Full Member
  • ***
  • Offline Offline
  • Posts: 89
  • Last login:September 30, 2018, 10:15:37 am
Monkey Racing Cabinet
« on: August 29, 2011, 06:45:39 pm »
Background

This is the First part of the Monkey Arcade, I am going to build hopefully 3 arcade machines, and this will be the first one.

This is going to be a racing cabinet, mainly for Arcade racing and not simulation, but It will be able to do simulation.

I am going to be as detailed as possible, as I may help someone else achieve the same or better, as well as give me a log of what I’ve done.

the room is going to be turned in to my Arcade/Games room, its not “that” big, its too small and on the wrong floor for a dining room, its on the wrong floor to be a bedroom, its is the only real access to the garden, so I didn’t want to turn it in to a “private” room, like a study, and I wanted it to be a communal room for when I have people over and have BBQ’s etc. I live in a Town house (3 Floors) and the living room and Kitchen is on the first floor, the bedrooms on the second floor, and the games room, garage and utility room are on the ground floor. 

so a games room was the only logical choice, and surprisingly when I told my G/F my idea, se agreed and has let me have the room and do what ever I want.

The spec:

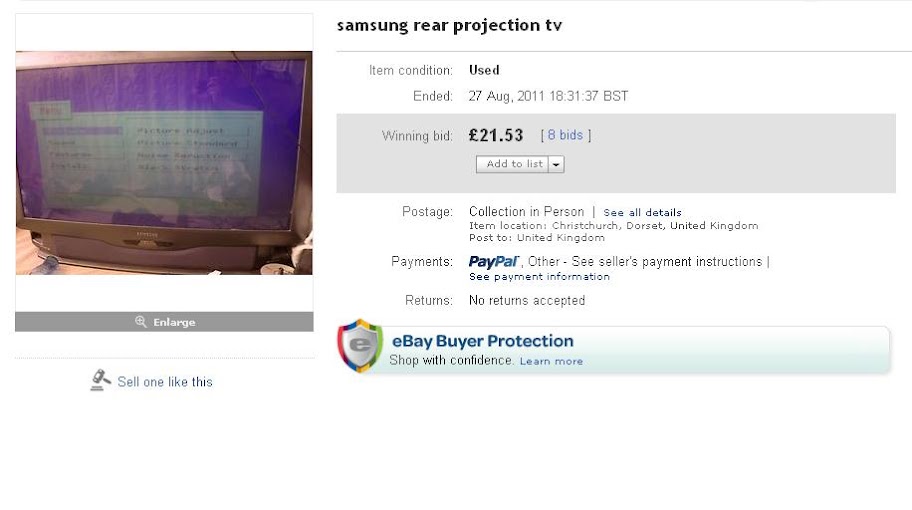
Screen :40” rear Projection Samsung SP403JHAX screen 16:9 format
Cost : £21.53 from Ebay

The auction


Source: Playstation 2 and PC, not sure on the PC as I haven’t bought it yet
Cost: nothing, as I had it from years ago

Steering Wheel and pedals: Ferrari Branded Thrustmaster,
£10 from CEX, it was cheap and does the job for now, I will get a G25 when I have the cash, but for now the Thrustmaster is good enough.


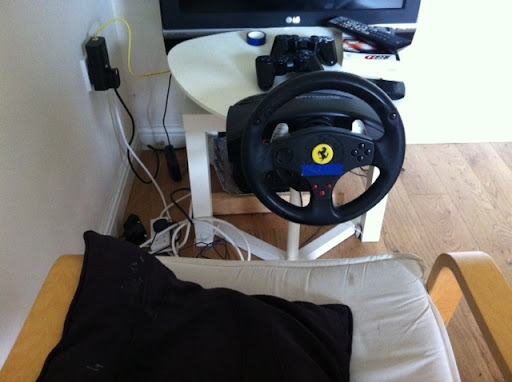
Seat : I have a choice of 2, one from a Rover 200 Coupe, or one from a MK2 Ford Capri, both in good condition, it will go down to which one is more comfortable

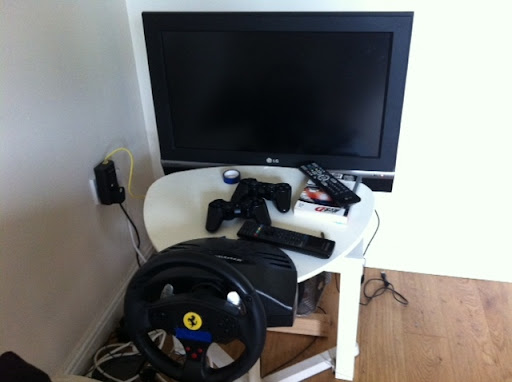
Origionally I was going to use my PS3 and my “gaming” 26” LCD,


the ideas

But when I saw the cost of the LCD rear Projections, I knew I had to have one, and I had to go large. When I got it hone and plugged it all in, I realised  the TV only has Scart connections, and the PS3 does not look the best at low res via Scart. The text is all blurred, but the games (especially the Outrun Arcade) looked fine, I then realised I have my old PS2 kicking around, I tested it and it look really good.

The other reason not to use my PS3, was that I wanted to build the everything into the cabinet, and that the cabinet was purely for racing games. I thought that was a waste of my PS3, as i  play other types of games on it. But I will add a couple of ports on the side so I can plug it in, as well as other stuff if I want to.

I’m going to put a harddisc in the PS2 and have all my games load from that, it says in the internet that this reduces loading times. I will also be putting a PC in so I have arcade emulation of some other racing games.

This is the setup now, the screen in BIG


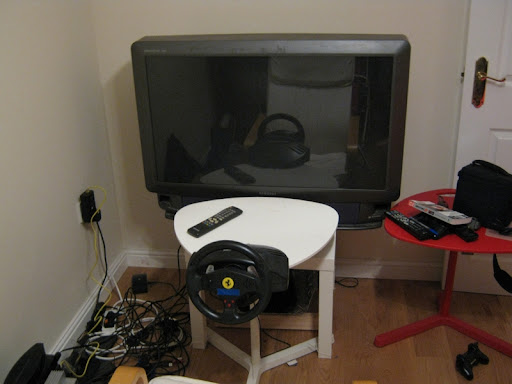
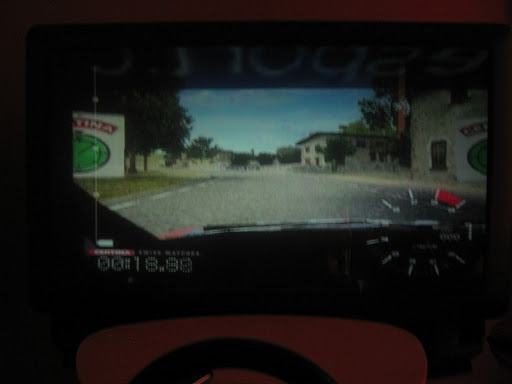
I have been “testing” Gran Turismo 4 and Colin McRae 3, and its all good
Colin McRae 3, cockpit view
</td></tr></table>

This is my test setup

Ikea Poang Chair , the sterring wheel is on a Ikea laptop table, tie wrapped to a Ikea Coffe Table, which the screen sits on. This was to check everything worked, and to workout heights, etc of everything. All of the Ikea stuff I was given when I moved out


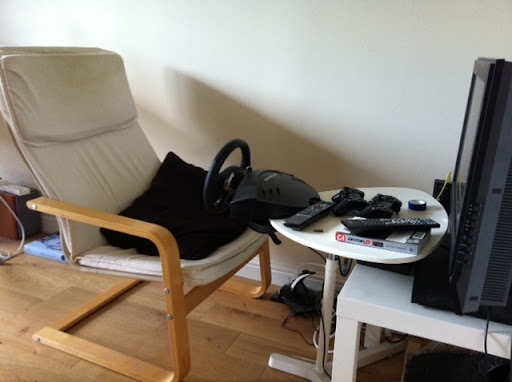
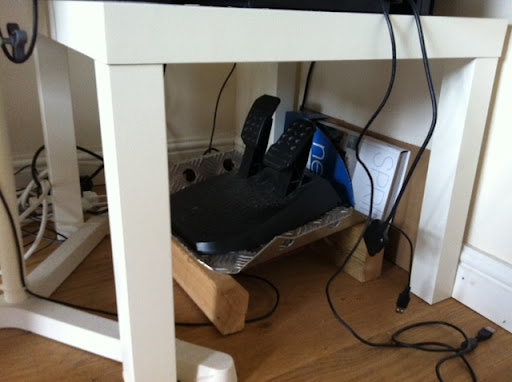
the Pedals are screwed to a “rally” co-pilots foot rest, I bought this years ago for my Almera, and took it out when I sold it, it makes a good base for the pedals. I just used this to test the height and angle. I will put a proper pedal box in when later when I get the G25


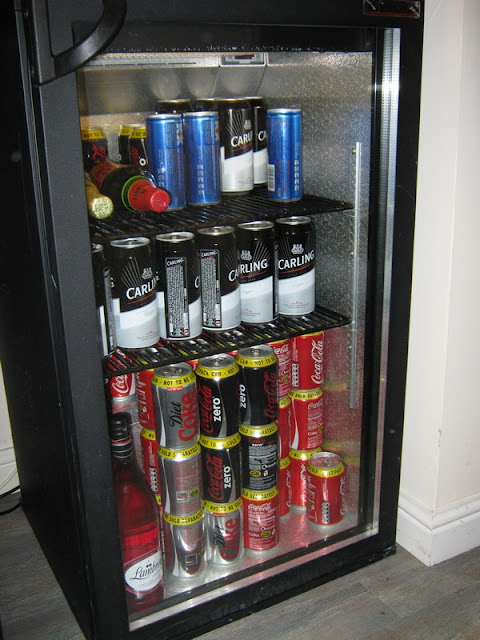
oh and don’t worry, in the Utility room next door I have a fully stocked beer fridge, a proper one from a pub, it has a light and everything.
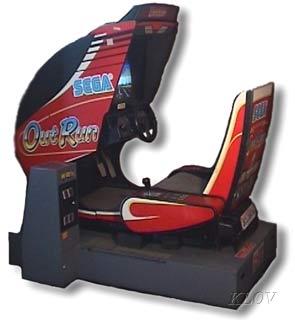


to do


The Design

this is what i basing it on, a proper racing cabinet


the desing isnt sorted yet, most of it will be designed on the fly.

The screen isn’t in its prime, the bulb needs replacing as the picture is dim, to get the best from it, it needs to be played in a dark room, the contrast has been turned right up, which is “blowing” the whites, I will sort this as I can get a replacement bulb for between £50 - £80. Also there is some discolouration on the screen, not sure why this is, it look like smudge marks, and can only really be seen on a pure white screens.

The first job is to take the screen apart tomorrow and give it a good clean, as it’s a bit dirty, and to see what the discoluration marks are.

i havent got a colour scheme or a logo yet, i just cant decide, as when i'm finished i want all the machines to look different, but have similar design ques.

« Last Edit: August 29, 2011, 06:59:19 pm by Monkey »

Monkey

  • Trade Count: (0)
  • Full Member
  • ***
  • Offline Offline
  • Posts: 89
  • Last login:September 30, 2018, 10:15:37 am
Re: Monkey Racing Cabinet
« Reply #1 on: August 29, 2011, 07:35:54 pm »
Discoloration may be mold/crud in the oil on your RGB in that TV if this projection TV is anything like the bigger ones I've seen.

its a LCD Projector, it doesnt have sepearate RGB "guns", but u suspect it dirt/crap/candle wax as the TV seems tohave alot of dust in it, and the previous owner put candle on top of it. hopefully a good clean out of the insides will sort this.

Nice to see both kinds of diet soda in that fridge.  Now I know I'm not the only person that does that...

i am too glad i'm not the only one

Monkey

  • Trade Count: (0)
  • Full Member
  • ***
  • Offline Offline
  • Posts: 89
  • Last login:September 30, 2018, 10:15:37 am
Re: Monkey Racing Cabinet
« Reply #2 on: September 12, 2011, 02:30:16 pm »
Right, the “tomorrow” wasn’t tomorrow, Life, women and a wedding got in the way.

Finally got the back of the Screen, and my god is it full of dust/dirt.

Tempted to just jetwash it LOL


The back of the screen the trapezoid shape is the Mirror, they marked the back with a red do, it looks dull, but that’s because of the dust, remove the dust and its just like a normal mirror. The front is not as dusty, but its still dusty


There was cobwebs inside, and a nice layer of dust over all the optics

You cant really tell from this pic, but it is bad


The full optics assembly, with the bulb removed (it fits in the right hand side, and the case from the optics removed


The 3 coloured filter’s you can see the dust on them


The bulb, this is about £50-£80 to replace, and I think it needs replacing, there is a weired residue on the inside of the glass.


This is the LCD, the LCD itself is approx 30mm wide and projecting on a screen approx 1000mm wide, so there is a lot magnification going on, and the smallest mark on the LCD or any part of the optics will show up


I’ve ordered 1 litre of isopropnol alcohol (IPA) 99.5% pure. I’m going to clean all the optics with it, by rinsing/bathing the filters/lenses in it, and wipe (very gently) the LCD and magnifier. This hopefully will remove the discolouration.
« Last Edit: September 12, 2011, 02:38:54 pm by Monkey »

Monkey

  • Trade Count: (0)
  • Full Member
  • ***
  • Offline Offline
  • Posts: 89
  • Last login:September 30, 2018, 10:15:37 am
Re: Monkey Racing Cabinet
« Reply #3 on: October 09, 2011, 05:52:35 pm »
Finally!! I have been able to start building, Life work etc was pushed to one side for a couple of days. The progress hasn’t bee as fast as I would have liked, mainly due to designing it as I build it, hitting a problem and having to either rethink what I am doing or re-do what I have already done

A couple of pics to show what I’m working with, apologies for the crap phone pics

Wood; 2” x 2” to become the base,


Car parts, Yes I am going to be putting a Nissan 200SX S13 dash in with centre console and get as much of the dash working


Dash


Cup of tea, you cant build anything with out a good cup of tea, my cup hold about 4- times the typical amount of tea than a standard cup.


This is the start of the base, its in 2 parts, 750mm x 500mm and 750mm x 1100mm, the smaller part is for the seat and arm rest and the bigger part is for the dash, computer, PS3 etc all the workings mainly. I need to build a third part for the screen t sit on. The reason I am building it in 3 parts is so I can move it through the doors from my garage into the room I want it in and incase I move house next year, I want to be able to move it with out taking it all apart. I will be securing all 3 parts together so it becomes 1 solid cabinet when in use

I am fitting castors to the base when its finished 75mm draper ones


I wanted a nice sturdy base to work from, over the top of this I have put 1 sheet of 18mm chip/particle board.


Once the base was done, it was time to start to size things up

Checking the height the armrest needed to be to be comfortable and functional, as well as positioning the temporary pedals to make sure I have enough room


Once that was done it was on to build a frame for the armrest to sit on

This was made out of 22 x 19mm wood with some scrap melamine on top


I have on purposely made it narrower as it is the right width at the back but the front widens, and I wanted space to build the finished board to match the contours


A quick test it check it fits and is comfortable


Next dash, I didn’t want the full dash, I dint need the passenger side, as this will only be 1 player, so 5 mins with ha jigsaw had me a cut down dash. This is not the finished width, but it made it easier to manage


A quick test fit to make sure it wasn’t too high or low


All Is ok so I can start on building the frame for the dash. When I got the dash I took the support bar, as it will make it easier to fit the dash to, and if I need to remove the dash for any reason in the future I don’t need to take the cabinet apart

I also cut the support bar down


This is the temporary support on the left (right hand side of the dash. It all fitted and was comfortable


The more eagle eye of you, will have noticed the seat has changed, a friend had a spare Capri seat he was going to bin, and as the rails are designed on fit on a flat bottom it was going to make my life a lot easier mounting it, an it has a tilt mech, which will come in handy for plans later on

I offered up the screen to get a feel for it height, I had a panic moment, when I thought the screen was going to be too high to be comfortable, and thought you’d be looking up at it


Drivers eye view


Finished – sort of


I have got to tidy up the edge and make perfectly flat.

That’s all for now, I probably wont be able to do much until this weekend, but it good to finally get start on the real part of this project
« Last Edit: October 09, 2011, 06:00:06 pm by Monkey »

BadMouth

  • Trade Count: (+6)
  • Full Member
  • ***
  • Offline Offline
  • Posts: 9270
  • Last login:Today at 06:18:43 pm
  • ...
Re: Monkey Racing Cabinet
« Reply #4 on: October 10, 2011, 09:10:06 am »
Awesome.  I always wanted to do one this way for sims.

Got a plan for the shifter?

Monkey

  • Trade Count: (0)
  • Full Member
  • ***
  • Offline Offline
  • Posts: 89
  • Last login:September 30, 2018, 10:15:37 am
Re: Monkey Racing Cabinet
« Reply #5 on: December 11, 2011, 08:14:41 pm »
Awesome.  I always wanted to do one this way for sims.

Got a plan for the shifter?

sorry for the delayed reply.

Yes, i'm using the gearstick from a Logitech G25, and taking it apart tolook and feel like a real gearsick

Monkey

  • Trade Count: (0)
  • Full Member
  • ***
  • Offline Offline
  • Posts: 89
  • Last login:September 30, 2018, 10:15:37 am
Re: Monkey Racing Cabinet
« Reply #6 on: December 11, 2011, 08:15:34 pm »
why cant i just spend all my avaliable time on doing waht i want?

life, work, shopping etc stopped me from progressing this build. but a challenge from my old man, saying that he wants to play on it when he comes over on Christmas day, put a rocket up my arse.

so i bought a Logitech G25 :thumbs:

and a friend donated the rest of the dash part i needed in exchange for some manual labour.

the real main factor for not progressing was needing the G25. picked it up on Saturday.

i realised that the original (non) design was wrong, it wasnt wide enough.

i hadnt taking into consideration the fact that the steering wheel needs to be in the centre of the screen, and because the dash is offset to the right, and not central, i need it to be wider.

so i went alot wider, i also thought about the design, building the screen support into the base for extra strength. anywahy some pictures

seat base and screen support half done and the main base


from the other angle, with seat


dash put on


you can see that the seat base is off set toward the left hand side of the dash,


screen test fit


when i offered up the screen, i realied how crap i cut the dash, i will probably be able to bodge some thing to mask this up, and TBH you only see it if your looking for it. no photos of that

now, my first major challenge

i need to extend the distance from the steering wheel to the main body of the G25.

i think i know how i'm going to do it, but that will have to wait till tomorrow to see if it works, as i need to buy a few things. my problem is i cant weld, if i could i would knock up an extension in 10 mins. but as i cant i need ot find ways round it.

if you have any ideas let me know.

any wat G25 with wheel removed


back of steering wheel


thats it for now, i have tomorrow off work to do some more. i'm hoping to have the steering wheel and pedals mounted tomorrow for a test.

RonnieC312

  • Trade Count: (0)
  • Full Member
  • ***
  • Offline Offline
  • Posts: 104
  • Last login:May 08, 2014, 09:27:57 am
Re: Monkey Racing Cabinet
« Reply #7 on: December 12, 2011, 08:41:56 am »
I like what you are thinking
NFL BLitz 2K GOLD / NBA Showtime GOLD 3.0, Mortal Kombat 1, Mortal Kombat 3, Neo Geo (4 slot), Lethal Enforcers, GT 99, Time Killers, Midway Classic PS2 stand-up, DreamCast HOD, 32 ' MAME machine, NBA Hangtime, Zombie Revenge, Touch Master


gbeef

  • Trade Count: (0)
  • Full Member
  • ***
  • Offline Offline
  • Posts: 325
  • Last login:October 22, 2018, 03:32:26 pm
    • arcadepix.com
Re: Monkey Racing Cabinet
« Reply #8 on: December 12, 2011, 12:49:14 pm »
to extend the G25 steering column, i used Black PVC pipe with the adapters. The PVC fits PERFECTLY around the column you need to build something in side the PVC that the screw mount into. I used Sintra.


My cabs
4 Player Arcade
X-men Arcade Remixed
My Pin Cab Attack of the PINZ cab
My Racing Cabinet Cab [URL=http://forum.arcadecontrols.com/index.php?topic=

Monkey

  • Trade Count: (0)
  • Full Member
  • ***
  • Offline Offline
  • Posts: 89
  • Last login:September 30, 2018, 10:15:37 am
Re: Monkey Racing Cabinet
« Reply #9 on: December 12, 2011, 03:47:42 pm »
Well bugger me, i managed to acheive what i set out to do, and a little bit more.

first up today is fitting the pedals.

started off with this


un bolt them from their plastic housing (16 screws held the top of the plastic case to the bottom, plus 12 holding in the pedals)

after alot of measuring etc, i screwed them to a piece of wood.


after alot of buggering around, screwing in, testing the height and angle, etc i settled on this as their final position


happy with that, i turn my attentions ot the steering wheel setup. i took the base unit apart to see whats inside, a couple of heafty motors, some wires and a circuit board, and some air


to my surprise. the unit fitted in the dash, without comprimising on space anywhere,


with with the whole dash on


still not sure how im going to or out of what i will make the steering column.

and this is how i left it for tonight


visually not much different from when i started, as most of the stuff i have done is internal, but the dash is not fully screwed in its final position, and the arm rest "pinned" for now.

next is to sort the seat out, take apart the gearstick arrangement and make it work and look like a real car, and lots of soldering.

Monkey

  • Trade Count: (0)
  • Full Member
  • ***
  • Offline Offline
  • Posts: 89
  • Last login:September 30, 2018, 10:15:37 am
Re: Monkey Racing Cabinet
« Reply #10 on: December 12, 2011, 03:50:27 pm »
I like what you are thinking

Thanks  ;D

to extend the G25 steering column, i used Black PVC pipe with the adapters. The PVC fits PERFECTLY around the column you need to build something in side the PVC that the screw mount into. I used Sintra.


i was thinking that, but i ideally want ot use metal and not plastic, as i want it to be very sturdy, as kids and drunk adults will give it abit of abuse.

have you got any photos of your mod?

whats Sintra?

SNAAKE

  • Trade Count: (+29)
  • Full Member
  • ***
  • Offline Offline
  • Posts: 3564
  • Last login:July 03, 2025, 03:15:44 pm
  • my joystick is bigger than your joystick !
Re: Monkey Racing Cabinet
« Reply #11 on: December 12, 2011, 05:03:04 pm »
nice car :burgerking:

gbeef

  • Trade Count: (0)
  • Full Member
  • ***
  • Offline Offline
  • Posts: 325
  • Last login:October 22, 2018, 03:32:26 pm
    • arcadepix.com
Re: Monkey Racing Cabinet
« Reply #12 on: December 13, 2011, 04:16:39 pm »
Ill see if i can find pics of my mod. i think a metal adapter would be a better solution also.


My cabs
4 Player Arcade
X-men Arcade Remixed
My Pin Cab Attack of the PINZ cab
My Racing Cabinet Cab [URL=http://forum.arcadecontrols.com/index.php?topic=

Monkey

  • Trade Count: (0)
  • Full Member
  • ***
  • Offline Offline
  • Posts: 89
  • Last login:September 30, 2018, 10:15:37 am
Re: Monkey Racing Cabinet
« Reply #13 on: December 13, 2011, 06:17:50 pm »
woh, steady on, 3 updates in 3 days - i'm really motoring now.

i decided to fit the gearstick and buttons. as i dont have the buttons i want to finally use, and i need to get the rig setup to test i temporarily fitted the gear stick and buttons.

first off what you get out of the box.


and now with the casing off


the top section


close up of the circuit board - i've got to do alot of soldering on this board, not looking forward to that as the connections are alot smaller that i thought, and am comfortble soldering.

back


front


as the gearstick uses the housing to hold its self together, i thought it was best to retain it, but as it was formed, it wouldnt fit in the rig. so after some fun with a jigsaw and nearly cutting my fingers off i ended up with a couple more parts than i started

bottom section cut


top section cut


i then put all the bits back into each section, and screwed them into the dash

again, this is not the final setup/positions for this, its just for a test, when i do finish them off they will look like a S13 setup


i also too alot of measurements of the steering base unit and back of the steeringwheel so i can design a steering column and brack arrangement. i'll draw these up when i'm at work tomorrow and throw up the design to see if anyone has any better ideas.

so thats it for now. i need some supplies now, cable, connectors, heatshrink, more screws etc and more wood to get this far enough to move out of the garage.

the plan is to move it out by the end of the week as the frame will be almost done.

« Last Edit: December 13, 2011, 06:20:45 pm by Monkey »

Monkey

  • Trade Count: (0)
  • Full Member
  • ***
  • Offline Offline
  • Posts: 89
  • Last login:September 30, 2018, 10:15:37 am
Re: Monkey Racing Cabinet
« Reply #14 on: December 13, 2011, 06:21:44 pm »
nice car :burgerking:

Thanks

Ill see if i can find pics of my mod. i think a metal adapter would be a better solution also.


cool, that would be great

Green Giant

  • Trade Count: (0)
  • Full Member
  • ***
  • Offline Offline
  • Posts: 1124
  • Last login:September 29, 2016, 06:50:57 pm
Re: Monkey Racing Cabinet
« Reply #15 on: December 14, 2011, 06:51:34 pm »
Looks pretty sweet, except I noticed a problem with your build.


It seems you misplaced the gear shifter.  It is on the wrong side of the arcade.  You might want to fix it on the right side before you finish the build.
"He lives down there in his valley,
The cat stands tall and green,
Well, he ain't no prize, and there's no women his size,
And that's why the cat's so mean"
Toxic Arcade, my first build

Malenko

  • KNEEL BEFORE ZODlenko!
  • Trade Count: (+58)
  • Full Member
  • ***
  • Offline Offline
  • Posts: 14019
  • Last login:July 02, 2025, 09:03:11 pm
  • Have you played with my GingerBalls?
    • forum.arcadecontrols.com/index.php/topic,142404.msg1475162.html
Re: Monkey Racing Cabinet
« Reply #16 on: December 14, 2011, 07:26:00 pm »
Looks pretty sweet, except I noticed a problem with your build.


It seems you misplaced the gear shifter.  It is on the wrong side of the arcade.  You might want to fix it on the right side before you finish the build.

I can never tell if posts like this are sarcastic or not. He's using a real car's dash which has the shifter on the left of the driver.......
If you're replying to a troll you are part of the problem.
I also need to follow this advice. Ignore or report, don't reply.

Green Giant

  • Trade Count: (0)
  • Full Member
  • ***
  • Offline Offline
  • Posts: 1124
  • Last login:September 29, 2016, 06:50:57 pm
Re: Monkey Racing Cabinet
« Reply #17 on: December 15, 2011, 12:34:22 am »
Looks pretty sweet, except I noticed a problem with your build.


It seems you misplaced the gear shifter.  It is on the wrong side of the arcade.  You might want to fix it on the right side before you finish the build.

I can never tell if posts like this are sarcastic or not. He's using a real car's dash which has the shifter on the left of the driver.......
He is British.  I am American.

Get it now?
"He lives down there in his valley,
The cat stands tall and green,
Well, he ain't no prize, and there's no women his size,
And that's why the cat's so mean"
Toxic Arcade, my first build

Monkey

  • Trade Count: (0)
  • Full Member
  • ***
  • Offline Offline
  • Posts: 89
  • Last login:September 30, 2018, 10:15:37 am
Re: Monkey Racing Cabinet
« Reply #18 on: December 15, 2011, 07:09:52 am »
Looks pretty sweet, except I noticed a problem with your build.


It seems you misplaced the gear shifter.  It is on the wrong side of the arcade.  You might want to fix it on the right side before you finish the build.

it is on the correct side, its everyone else who wrong  ;D

if you view your monitor through a mirror then its on YOUR side  :lol

I can never tell if posts like this are sarcastic or not. He's using a real car's dash which has the shifter on the left of the driver.......

it was sarcastic, and taken in jest

He is British.  I am American.

Get it now?

this

Drnick

  • Trade Count: (+2)
  • Full Member
  • ***
  • Offline Offline
  • Posts: 1642
  • Last login:June 21, 2024, 03:32:31 pm
  • Plodding Through Life
Re: Monkey Racing Cabinet
« Reply #19 on: December 15, 2011, 08:06:06 am »
You should have known he was British from the Extra large cup o Tea  :D :D  I also have a mug that holds about 4 cups, gotta get that PG Tips fix in the morning.

Keep up the good work, was amazed to see so many updates so quickly.

Monkey

  • Trade Count: (0)
  • Full Member
  • ***
  • Offline Offline
  • Posts: 89
  • Last login:September 30, 2018, 10:15:37 am
Re: Monkey Racing Cabinet
« Reply #20 on: December 15, 2011, 07:04:27 pm »
well today was more productive than i thought.

i unbolted the dash, i wasnt happy with the angle of it, it was tilted forward, which meant the arm rest part didnt line up right, so a bit of moving, rescrewing etc got it just right. surprisingly the front needed lifting my 25mm to get it just right.

the reason i didnt do anything last night, hence no update, was i had to go and purchase some stuff. and that took longer than expected.

this is what i bought

first of 2m of 5mm UPVC drain pipe


2 x 50mm UPVC 50mm push fit pipe couplings


and 2 heavy duty 190mm bars and 1 flat plate (i had started to work on these before i took this photo)


i also bought a shed loads of lock nuts and bolts no pic of those.

anyway after a bit of measuring, thinking and re thinking i started

what could i be making?


A Stering Column!!!! taking inspriation from gbeef, i decided to use UPVC for now

using the existing mounting bracket for the steering column, and some creative drilling, i mounted the plate and bars, cut the pipe to length and used the couplings as ends.

surprisingly everything fits perfect, its like Logitech made their wheel to be extended using these exact parts

Bracket, and column connected to base unit.


side view


top view


this is just a prototype and a to test with, once i'm happy i'll get a proper metal unit build with a bearing in the brace, but for now its perfect for the job.

with the dash and wheel fitted, the long screws/bolts will be either cut down or replaced tomorrow,


drivers view of the wheel


a little bit left to do to the steering column, then its done, should be able to easily do that tomorrow night.


tommywright

  • Trade Count: (0)
  • Full Member
  • ***
  • Offline Offline
  • Posts: 36
  • Last login:September 04, 2017, 11:41:52 am
Re: Monkey Racing Cabinet
« Reply #21 on: December 16, 2011, 06:25:43 pm »
...but the steering wheel is on the wrong side!   :lol

This is awesome.. where are you going to put it.. it's ginormous.


Monkey

  • Trade Count: (0)
  • Full Member
  • ***
  • Offline Offline
  • Posts: 89
  • Last login:September 30, 2018, 10:15:37 am
Re: Monkey Racing Cabinet
« Reply #22 on: December 17, 2011, 02:28:45 pm »
...but the steering wheel is on the wrong side!   :lol

This is awesome.. where are you going to put it.. it's ginormous.


the wheel is on the correct side, its everyone else is wrong :)

i've got a room which is my room, my Games room, yes its big but its worth it

Monkey

  • Trade Count: (0)
  • Full Member
  • ***
  • Offline Offline
  • Posts: 89
  • Last login:September 30, 2018, 10:15:37 am
Re: Monkey Racing Cabinet
« Reply #23 on: December 17, 2011, 02:29:33 pm »
update from last night

Soldering, i hate soldering and heat shrink.

first of cut, extend and add a plug/socket arrangement for the gearstick wires, aster i just the case in half. i used CAT5e cable and 9 pin serial plugs.

the gearstick has 8 wires, 4 wires are common, so that meant only 6 pins were used, and the LED to indicate triptronic had 2 wires (the switch is on the gearstick) used another 2, so 8 pins in total.

this is the result of my soldering

gearstick end


the other end


and the other end connected ot the board


i needed to bolt the seat down properly, so i did, i was happy with the dash position, and the arm rest position, so the seat could go in


and the seat wont be going anywhere with these coach screws in

6 of these are holding it down


the seat is on its original rails, so it still moves forward and back, i have positioned it so it moves back further than i require, so that when i'm playing game thats not a racer, its comfortable to hold the pad etc.

i also fitted some wheels, makes it easiner to move if need be


these give the setup 5mm ground clearance, just enough

whats this?


my garage is empty?!?! that can only mean one thing, the majority of the wood work is done for the frame, and its ready to have the electronitcs fitted and tested.

this was the moment of truth, was i correct with my measurements? was i accuraate with my cutting and screwing?


few, it fits through, with plenty to spare, when its complete there will be an additional 25mm ish on the width for the panneling. but thats later


i got the main part in the games room as well, no photo, as it was late, and i just wanted to move it

Monkey

  • Trade Count: (0)
  • Full Member
  • ***
  • Offline Offline
  • Posts: 89
  • Last login:September 30, 2018, 10:15:37 am
Re: Monkey Racing Cabinet
« Reply #24 on: December 17, 2011, 02:31:03 pm »
today i extended the wires in the steering column


i gave it loats of extra length so that when the wheel rotates its doesnt pull on the solders or connectors.

base unit fitted, steering column fitted and gearstick fitted (all again!)


sorted out all the wires, bolted the 2 parts together and thats it for now.


i'll just leave you with this video


OH YES!!!!!! it lives!!!!!


photo of setup


a few niggling issues, like the triptronic switch being a little bit sticky, easy fix and i'll look into that tommorrow, as well as finishing to bolt the dash in etc.

the wheel fees solid, more so that i thought it would, and surprisingly all my soldering works.

tomorrow is "test" day, or as my G/F says "playing games" day.

some serious testing is going to happen.

anyway i've opened a celebratory beer, as i didnt have one last night. going to have some good food, then i may start the "testing"

happy? you wouldnt beleive
« Last Edit: December 17, 2011, 02:34:08 pm by Monkey »

Monkey

  • Trade Count: (0)
  • Full Member
  • ***
  • Offline Offline
  • Posts: 89
  • Last login:September 30, 2018, 10:15:37 am
Re: Monkey Racing Cabinet
« Reply #25 on: December 18, 2011, 11:18:49 am »
right, minor update, but with major impact

after a bit of testing, i found the steering column bracket to be too much different angle to the column, so i adjusted it, and filed the inside of the bracket. then added some copper grease.


the wheel now moves free, and no squeaks etc

a vid to shoe how free it moves when switching on, compare it to the vid i posted earlier to see the difference


i then got the big tv out to have it setup properly


i have changed my mind, the PS3 is going to be part of this rig, meaning this TV is not high enough quaity, so after xmas i will buy a cheap 1080p LCD to put in, i hope Best Nuy has some decent discounts

i've also fitted all the dash parts now and it all fits and is very secure/solid

steering column cowl

https://lh6.googleusercontent.com/-ewStqVpEyec/Tu4J9a5CTvI/AAAAAAAAAp0/cbO8eXC0mcs/s640/2011-12-18%25252014.59.15.jpg

this wil lbe finished off properly, but for now its fine


a proper switch panel is going to be build and fitted, but that can wait till the xmas break.

so for now its done, and remarkidly a week early, i'm going to have fun playing on this..... err i mean its going to be hard testing to make sure everything it in the right place etc.

hopefully now my GT5 times will drop

Monkey

  • Trade Count: (0)
  • Full Member
  • ***
  • Offline Offline
  • Posts: 89
  • Last login:September 30, 2018, 10:15:37 am
Re: Monkey Racing Cabinet
« Reply #26 on: January 09, 2012, 04:06:58 pm »
small update,

its been a busy couple of weeks <s>playing games</s> err testing, yeah testing :D

found a couple niggling issues with the steering wheel, and the seat needs to be moved forward, as anyone smaller than 5' 10" cant use it. but for proper sized people its perfect.

i've been buying alot of stuff, buttons, switches, etc, i'll show all the buttons etc later

first major purchase is this

http://www.ebay.co.uk/itm/360409096433?ssPageName=STRK:MEWNX:IT&_trksid=p3984.m1497.l2649

a Tenda wireless router, i'm using it as an access point as well as a 3 port hub.

i need at least 2 RJ45 ports in there and i was just going to buy a hub/switch, but for £18 you cant argue at putting wifi in there as well. so this is going to become a Wireless access point, extending the Wifi in my house. it was easy to setup and surprisingly sorks in my setup which goes

BT Home Hub v3 - Powerline adaptor - house electrical wiring - powerline adaptor - Tenda Router

i also bought a pair of Turtle Beach P11 headset.


 its a really good piece of kit. i didnt buy these for their audio quality, i bought these so i couldnt hear the missus moaning that i'm always playing on my PS3 LOL. the sound quality is really good, as well as being able to shout at people for not playing fair.

next was a Xmas present from the G/F, was the Turtle Beach Earforce DSS dolby Digital 7.1 converter thing


this takes the optical output and turns your stereo headphones into surround sound ones, or so the box says. it doesnt really, but it does improve the convergence of the left and right channels, and gives much more depth to the sound, with a perceived front and back as well, if you shut your eyes, you cant tell the difference, but with visual ques, it really adds something.

and the last purchase was the screen for it, a Technika 42" LCD TV


its a good TV, its not amazing, but its good. its nice to have a screen that i can read the text on, as my other test screen wouldnt do 576i, this one does 1080p, and it shows


this isnt my poor picture taking, but it shows it party piece, yes the screen is 3D. how i ever got my G/F i needed a 3D TV i dont know, the 3D isnt amazing on this screen, my LG 42LW550T in the living room blows this screen away, i think its part due to the distance i'm sat, plus i need to play with some of the settings.

for now, thats it. i cant do much more untill my Electronics expert has a look and advises me on my next best route, there will be some work carried out this weekend hopefully

wizkid32

  • Trade Count: (0)
  • Full Member
  • ***
  • Offline Offline
  • Posts: 270
  • Last login:August 30, 2013, 07:27:03 pm
  • Portland Trailblazers, FTW!
Re: Monkey Racing Cabinet
« Reply #27 on: January 09, 2012, 10:07:54 pm »
Who says no one is building sit-down good cabs?
(\__/)
(='.'=) This is Bunny. Copy and paste him into your
(")_(") signature and help him on his quest for world domination.

Best,
Wizkid32

drventure

  • Trade Count: (+2)
  • Full Member
  • ***
  • Offline Offline
  • Posts: 4152
  • Last login:April 23, 2024, 06:53:06 pm
  • Laser Death Ray Bargain Bin! Make me an offer!
Re: Monkey Racing Cabinet
« Reply #28 on: January 09, 2012, 11:20:57 pm »
Nice. I hadn't seen this before. Using an actual dash is truly good stuff! Love that shifter and the pedal treatment...

nordemoniac

  • Trade Count: (0)
  • Full Member
  • ***
  • Offline Offline
  • Posts: 284
  • Last login:September 26, 2023, 02:41:28 am
  • Weee! Hahaha...
Re: Monkey Racing Cabinet
« Reply #29 on: January 10, 2012, 05:54:24 am »
a vid to shoe how free it moves when switching on, compare it to the vid i posted earlier to see the difference


I know it's better, but it's supposed to go even faster. I think you should prioritize making it easier for the wheel to turn. You might wear out the motors with it being to tight.