Ok, here is some build pics/info:
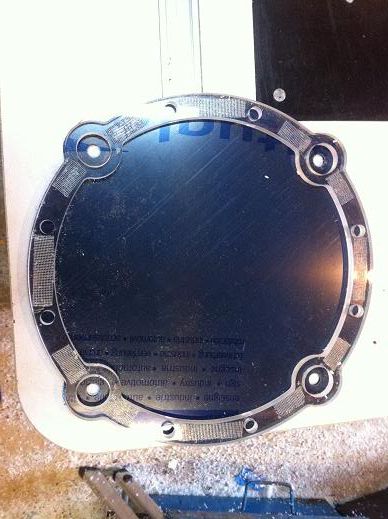
For a start I had made a cast iron template for the space invaders stools I was making at one point. I decided to use this ring as the bezel for the clock. I drilled and reamed 12 10mm holes for the hour markers. I also made some other template pieces which you will see later on:

To make the bezel and other clock faces I needed to make a template from the metal pieces. Luckily I had a scrap piece of 8mm thick acrylic that I could use. It needed to be a fairly thick piece so that it would stay rigid when routing out the clock pieces.
When routing plastics I tend to use two cutters in general. I use a 3/8" flush trim bit with a 1/2" bearing on it and I also use a standard 1/2" bit with a 1/2" bearing.
I use the 3/8" bit to rough the material out as I don't have a band saw or anything like that. Because it has a 1/2" bearing it cuts the profile under size and leaves 1/16" of material on for finishing. I find this to be a very useful technique as you can still run the bearing against the template but you don't remove too much material (i.e. more material than the cutter size) which can happen when cutting at the full diameter of the cutter. You are then left with a nice even 1/16" to trim off which should leave you with a half decent finish. You will still be left with machining marks but they should be much less then if you were plunging straight to finish size.
I then use the 1/2" bit to trim the remaining material off. The only times I need to use another cutter for the profiles is if the radius in the corners is smaller than 1/2" and in that case I use a 1/4" flush trim bit or if the section is too small to fit a 1/2" bit in.
Ok, onto cutting the template. I stuck the cast iron ring to the acrylic with carpet tape and used the roughing bit to remove the bulf of the material. I free handed it around the 3, 6, 9 and 12 o'clock sections as I needed to work on them with the other template bits afterwards:


I drilled though the hour positions with a 8mm drill bit and then routed them to 10mm using a 1/4" bit:

The next step was to route the sections at the 3, 6, 9 and 12 positions. This is what I made the other template pieces for. The piece with two diameters had a 9.99mm smaller diameter which then fits nicely in the 10mm reamed holes. This then centralises the larger ring which forms the profile for the outside of those sections. I just assembled the pieces at each quadrant and used the 1/2" bit to trim them to size along with the rest of the profile that had the 1/16" left on from the previous bit:


The bearing height was set so it would run round the larger ring as well as the smaller one:


The 3, 6, 9, and 12 o'clock positions then needed opening out. To do this I stuck the same outer ring I used in the previous operation in the four positions and then used a 1/4" bit to open them out


That is the template pretty much finished. I polished the machining marks out with some 240grit as the smoother your template is, the less polishing you will have to do to the finished pieces:

I then used the template to rough out the bezel and I also finished the inside of the profile and the inside of the quarter marks:


I used a 45 degree chamfer bit to put a 3mm chamfer on the profile:

I used the same template to route out the profile of the black middle piece:

This piece needed to have 10mm holes in the center of the quadrant sections so I used another stainless steel template I made along with a 1/4" trim bit to route these out.

To cut the profile of the invader out I used one of the templates I had already had CNC milled, I decided to go for the one on the left:

I stuck this to the piece and used the roughing bit to remove the bulk of the material but I then used a 1/4" bit to finish it as the radii in the corners is 3mm which is just under the radius of a 1/4" bit:

The bottom white layer of the clock was just a sheet with the same profile as the bezel but it didn't have any of the other cut outs, it just needed a 10mm hole in the centre for the clock mechanism so I used the same 10mm template as before to help route it out.

To make the eyes I routed out some small pieces using some square templates:

This is the clock then roughly assembled at this point:

I forgot to take any more photos after this point but basically the next step was tpo polish the inside of the bezel profile as well as the inside of the quadrant rings. To polish plastics I start with 240 grit and polish until the machining marks can no longer be seen. I then go up the grades using 400, 600, 800 and 1000 grit making sure the polishing marks from the previous grit have been removed each time. I then use Novus 3 followed by Novus 2 to bring it to a high gloss shine.
Once I had done that I removed the protective fim from the acrylic and used super glue to bond them together. Usually I use Extrufix but this only works on extruded acrylic and the black and white acrylic I used is cast.
I then just polished the outside profile using the same process and then assembled the clock mechanism. Job done

I hope that is of some help.


 Home
Home Help
Help Search
 Login
Login Register

 Send this topic
 Print
Print Topic: Space Invaders Clock (Read 4569 times)


