Wow thanks for the kind comments everyone! And it would be an honor indeed to see this on the cover of RetroBlast, or even an inside page for that matter!
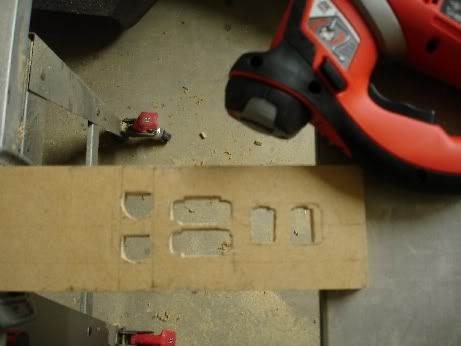
I have a few build pics at various stages. Here's how I made the holes for the adapters, basically I just traced them with a pencil against the MDF and then I used a scroll saw with a thin blade to cut them out just a hair smaller than they should be. Then I just filed and filed until each of the adapters would fit. They fit in so tight this way that I don't have to use anything to secure them. I actually broke one of the NES adapters, well just the backside of its plastic casing trying to get it out when I was testing the fit. The Adaptoid holes required a little routing on the back side as well in order for them to jut out a bit.
The front USB port is the only thing that didn't fit too well so I braced it with a large L bracket and some velcro in the back. Below is under the cp lol, what a mess! I have a powered USB port handling all the adapters. I placed some electrical tape over some of the metal areas under the cp, just in case, so they don't interfere with any buttons or wiring. I mounted a Sanwa button on a small piece of wood in the right corner and screwed it down. I also had to route some small areas out of the top edge of the cp front for the trackball plate to fit hehe it barely made it! I was just placing the bezel to see how it fit at this point I attached it to a piece of black foamboard then cut out the inside monitor area.
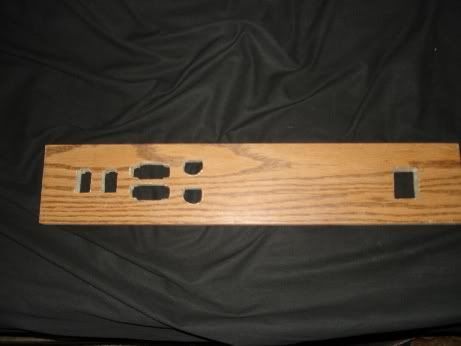
Cutting the holes in the CP material was tough, the adapter holes had rough edges... so after I cut them I masked the areas around the adapters with black vinyl, carefully cut to the shapes of the adapters with Parts Express Dayton sub material.

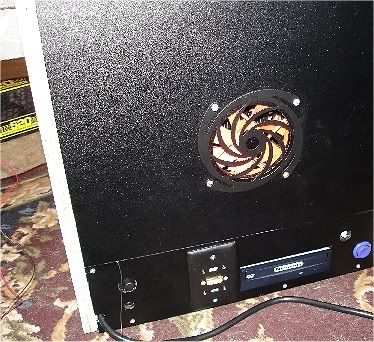
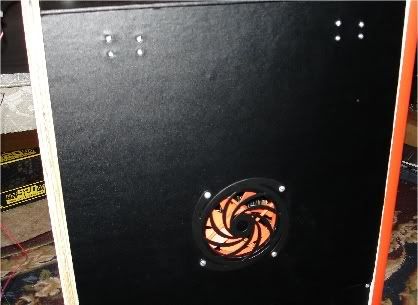
All the black areas of the cab are parts express vinyl. Here's a view from the back, I didn't install the t molding yet here. The back fan has a long enough wire on it that the back panel opens without any problems. I left the screws alone, thought about black screws or coloring them but I like the look of them. The bottom left is the Logitech's speaker pod, I hacksawed its plastic case in half and screwed it right into the 1/4" plywood. I used 1/4" plywood for the back and top in hopes of making it lighter but the brains really take their toll on the weight lol. I drilled two holes for the volume control and headphone input. Next to that is a 2 port USB and DVI panel from DataPro. The USB ports are overkill but were already on that panel. Next to this is an LG DVD drive - masked with a Nintendo logo from some leftover space on the Mamemarquees CP order

Next to the DVD drive is a small hole where the optical out is screwed in behind the plywood. The Creative adapter that connects from the audio card was a weird shape and I took it apart to place a couple small screws through barren areas of plastic inside it to mount it. Finally the pc power button is wired up to a Happs purple pushbutton. I wanted to place a lock on the back here about an inch or so under the fan, trouble is the Video card's DVI cable is blocking that area, it's a tight fit! I don't want to have it offset... so I just secure the back panel with a little strip of velcro -each stapled to the wood to ensure it stays put. I can open the panel with a finger in the fan hole. The hinges are concealed Euro style I bought on eBay, howeever the 1/4" plywood was too thin to conceal the screws hehe, I attached them to the panel with small machine screws and washers to sturdy it up. I also covered the strips of white on the side with parts express material later on. Both the back panel and front cp are screwed/l bracketed on... I could change them in the future this way.


 Home
Home Help
Help Search
 Login
Login Register

 Send this topic
 Print
Print Topic: Metroid Mother Brain Super Console (Mamey Winner!!) (Read 51326 times)


