Main Restorations Software Audio/Jukebox/MP3 Everything Else Buy/Sell/Trade
Project Announcements Monitor/Video GroovyMAME Merit/JVL Touchscreen Meet Up Retail Vendors
Driving & Racing Woodworking Software Support Forums Consoles Project Arcade Reviews
Automated Projects Artwork Frontend Support Forums Pinball Forum Discussion Old Boards
Raspberry Pi & Dev Board controls.dat Linux Miscellaneous Arcade Wiki Discussion Old Archives
Lightguns Arcade1Up Try the site in https mode Site News

Unread posts | New Replies | Recent posts | Rules | Chatroom | Wiki | File Repository | RSS | Submit news


Author Topic: NiteStick build in progress w/pics  (Read 6563 times)

0 Members and 1 Guest are viewing this topic.

NiteWalker

  • Trade Count: (0)
  • Full Member
  • ***
  • Offline Offline
  • Posts: 792
  • Last login:April 25, 2022, 07:33:24 pm
  • Routers can do anything.
    • SimpleCase Custom Arcade Stick Enclosures
NiteStick build in progress w/pics
« on: April 01, 2006, 08:45:20 pm »
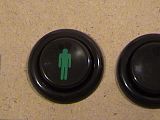
This isn't my first arcade stick I've built but it is the first I've decided to document this well. It's a traditional Street fighter layout 6 button joystick. I'vd decided to use green Happ horizontal buttons and competition stick and 2 black horizontal pushbuttons for start and select. It's going to be a PS1/PS2 joystick. I also put the little 1P start man in green on the black button. It is a few shades off but it's pretty close to Happ color green.


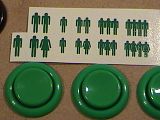
Here you can see the near color match of the green happ buttons and the stickers I got from MikeDeuce. Close enough for me. I also like the size of the newer guys (the bigger ones). The small ones are nice, but they seem more suited to sanwa 24mm buttons commonly used for start/select.


And here's what I have done so far. Only the control panel. More to come as I still have the following to do:
  • Make the rest of the box
  • Buy the plastic laminate and install it
  • Hack the street fighter pad to use as the interface
  • make the lexan top
  • design and print an overlay

A few notes about the building procedure:
MDF is MESSY. No joke there. I may switch to plywood for future projects. A bit more expensive but less harmful dust in the air. Without some sort of dust collection going on when you rout this stuff you will be coughing it up later on. It is very easy to work with though. I sanded the profile on the corners in a total of like 3 minutes.

I had a set of red competition button sitting around but I wanted the old school feel of horizontals. Thus green it is! I like the competition stick's feel and price ($8) so that's what I went with there. It works out real well because tmolding.com sells happ matched green t-molding. But I ordered on the 26th and haven't heard a peep since outside of the "your order has been succefully processed" email...  :hissy: Hope everything's ok there. If I don't hear anything back by Monday I'll call them up and see how my order's doing.  I ordered 40' each of 3 colors (light blue, yellow, happ green) so that may be the reason for the holdup. I hope.

I decided to use the street fighter pad as my controls interface for a few reasons:
It's very easy to solder to.
It's officially liscenced by Sony.
The cord is decently long.
Did I mention it's very easy to solder to? ;D
Seriously, it's one of the easiest pads I've ever soldered to. My philosophy on hacking pads is this: The simpler it is on the inside the easier it is to solder to. Nothing is on the pad that doesn't need to be. All the traces are very large as well and there even a few holes predrilled to slip the wire through. The wire I'll be using is $5 Radio Shack 22AWG stranded hook-up wire. Red for hots, black for ground. I like 22AWG stranded because it's flexible enough to give some slack and because it's not too thin so it won't break easily.

For the fit and finish I plan to use a black textured plastic laminate that kind of sparkels under light. That's a week or two away as I have to special order it at Lowe's. I'm only going to laminate the sides. The bottom of the control panel is going to be spray painted flat black after priming. I'll wait til it's attached and mask off the sides, back and front with blue painter's tape and then only spray the exposed area of the panel. The bottom will be 1/4" hardboard (the stuff clipboards are made of), cut to size after the rest of the box is assembled. I do this for an exact fit. The bottom will screw into some pine strips that are glued and screwed to the inside of the box. Attached to the bottom will be the rubber feet connected with small machine bolts and nuts. I prefer this over screws because they can strip out over time under heavy play. I want this thing to last and be able to take a beating...

For the overlay I'm not sure what to put yet but for sure I know the material to cover it will be .093 (3/32") Lexan. I love this stuff. You can cut or machine it with any tool known to man and it will NOT crack. I've read so many stick building blogs that go like this:
I was drilling the last button hole in the acrylic and...CRACK!
No thanks. I'll spend a few extra dollars on lexan and not have to worry about cracking. This stuff is that good.

There will be NO hole in the back for the cord. The rubber feet raise the stick enough where I'll just cut a small hole at the edge of the hardboard bottom and let the wire protrude from there. To ensure no sliced cord I'll put a 1/16" roundover on the inside bottom edges. Also all the laminated edges will get the same treatment. The bottom of the control panel will not be rounded over because I want the green t-molding (if I ever get it) to sit flush with the panel. The lexan will have the same profile so it also has no sharp edges.

That's about all for now but monday morning I'll go back down to the shop and do some more work and take more pics.

*Edit*
Here's the link to my photobucket album. I Also have some other pics in there as well from my 2 SFAC Joystick Happ mods.  There's also a misc album with other pics in it. Enjoy!
Photobucket Album

*Edit*
I made all images thumbnail clickable now to take up less space. Click on an image to see the full size.


« Last Edit: April 11, 2006, 12:19:38 pm by NiteWalker »


It's 9am. I'm calling it a nite.

NiteWalker

  • Trade Count: (0)
  • Full Member
  • ***
  • Offline Offline
  • Posts: 792
  • Last login:April 25, 2022, 07:33:24 pm
  • Routers can do anything.
    • SimpleCase Custom Arcade Stick Enclosures
Re: NiteStick build in progress w/pics
« Reply #1 on: April 05, 2006, 01:17:03 am »
T-Molding Update:
After exchanging a few emails with tmolding.com my t-molding shipped with no problems. It's only a 1 day transit for UPS so I wasn't waiting all that long. Anyway, after the 1 day wait I was taking a late morning nap ( I am NiteWalker after all  :P ) and the doorbell rang. I answer the door with half of an eye open knowing it was the UPS man and accepted my package with the excitedness of a 10 year old at christmas.

I bring in the package and open it up and...


The green is the wrong shade...
I ordered 40' each of light blue, yellow and Happ green (I plan on doing some other sticks too!). The blue and yellow were fine but the green was the wrong shade. It was supposed to be Happ matched green. I received galaxian green. I shot an email over to Richard at tmolding.com and here was his response:

Agh!  It's like I'm destined not to get your order to you!
 
We'll send a replacement that will go out tomorrow to arrive Thursday.  I'll get back to you on what to do with the incorrect molding.
 
Thank You,
Richard Arsenault
T-Molding.com


I had to laugh...
So everything's taken care of and I'll get my Happ green molding on Thursday. No problem. Plenty to do until then.
I hope he lets me keep the lime green or gives it to me at a reduced price because I think it's actually pretty nice. For a future project.  Overall I'm very satisfied with them and will be ordering some more from them.

As far as stick progress goes I'll post some more pics tomorrow as the base is now built along with a few extras.

Looking back I realized I never put up a pic of the semi-finished control panel :dizzy:
Here it is:


I liked the shape of the gigantic Street Fighter Anniversary stick but two things I didn't like:
1. It's GIGANTIC. Too big for single player lap play.
2. It has 8 buttons! I hate 8 buttons!  :angry: No good fighting game uses more than 6 buttons.

With that said I designed mine based off of that one. I made it smaller and it only has 6 buttons. It's actually very small for a Happ based stick. 13"x8.5" for the control panel. The base is 12 1/4"x7 3/4". It's 3 1/2" at the back and 2 3/4" at the front. It's a 6 degree slope. More pics tomorrow...
« Last Edit: April 11, 2006, 12:16:32 pm by NiteWalker »


It's 9am. I'm calling it a nite.

NiteWalker

  • Trade Count: (0)
  • Full Member
  • ***
  • Offline Offline
  • Posts: 792
  • Last login:April 25, 2022, 07:33:24 pm
  • Routers can do anything.
    • SimpleCase Custom Arcade Stick Enclosures
Re: NiteStick build in progress w/pics
« Reply #2 on: April 06, 2006, 05:16:10 pm »
Not too big of an update til later tonite, but I did get the Happ green t-molding today...


A perfect match! This stick is workin out nicely...

A big thanks to Richard at tmolding.com for taking the time to make my order right.
Also, I got my good camera back from my sis today so better pics from here on out.
« Last Edit: April 11, 2006, 12:20:35 pm by NiteWalker »


It's 9am. I'm calling it a nite.

NiteWalker

  • Trade Count: (0)
  • Full Member
  • ***
  • Offline Offline
  • Posts: 792
  • Last login:April 25, 2022, 07:33:24 pm
  • Routers can do anything.
    • SimpleCase Custom Arcade Stick Enclosures
Re: NiteStick build in progress w/pics
« Reply #3 on: April 07, 2006, 10:41:09 pm »
I got a lot done since the last update. The box is completely built, the Lexan routed, and the t-molding slot is routed in the control panel. So here's the pics with the building details:

Here you can see the completed box. I didn't make the bottom yet (tomorrow) or apply the laminate. I still need to order the laminate which I will do on friday. Since it's a special order I have to order a full 4'x8' sheet. No problem, as I'll have enough for quite a few joysticks. It's like $48 a sheet.
You can also see the routed recess in the back. This is so I can set the start and select buttons further back on the control panel. I did this with a router and template.
The wooden blocks in the picture are for the bottom to screw into. Since the whole stick will be pretty much resting on these I glued and screwed these in. I'm going to use red oak in the future, because even though the pine feels sufficient to support the weight of the stick, it's kind of soft. It's not very hard to dent at all.


The routed lexan. First of all, I chose Lexan (polycarbonate) over acrylic because it's shatter resistant and very easy to work with any tools you throw at it. Of course, you'll get better results by turning the tool on and controlling it rather than throwing it... :dizzy:
It's not much more than acrylic but makes up for the extra cost with the shatter resistant properties. The green side is up because this is the side treated to be UV resistant. Not like I'll be playing Street Fighter in the sun but it is useful if the stick is stored by a window or something.


I attached the Lexan to the control panel with plenty of double sided tape to make sure it doesn't move even a tiny bit. Since I'll be doing more than one operation with the Lexan in place I wanted to be sure it will not move at all. After the Lexan gets taped in place I rout it to the control panel shape, rout the button holes out, and rout the 1/16" roundover on the edge.  This way I have no sharp edges.
I drill pilot holes first so I can fit the router bit through. Then it's as simple as flush trimming the Lexan to the button and joystick holes.


Here's a close-up view of the t-molding slot. It also shows how cleanly the Lexan routs.


There's a bunch of other pics in my photobucket album, which can be viewed here:
Photobucket Album
There's more pics of my other projects in the other albums. I also updated my first post with the album url. Til later on... :cheers:
« Last Edit: April 11, 2006, 12:23:50 pm by NiteWalker »


It's 9am. I'm calling it a nite.

NiteWalker

  • Trade Count: (0)
  • Full Member
  • ***
  • Offline Offline
  • Posts: 792
  • Last login:April 25, 2022, 07:33:24 pm
  • Routers can do anything.
    • SimpleCase Custom Arcade Stick Enclosures
Re: NiteStick build in progress w/pics
« Reply #4 on: April 12, 2006, 03:07:06 am »
Since there hasn't been much to post about I'll give my experience with a t-molding slot cutter. First of all this is the slot cutter I used:

It's a Whiteside (best brand of router bits, period) 1/16" 3 wing slot cutter. I decided to use a 1/2" shank (the end that goes into the router) arbor because the thicker shank greatly reduces vibration and chatter somewhat common with large diameter 1/4" shanked bits.

Now observe the far right side of this photo:

You may notice the cut widened a bit there. What happened was that as I rounded the corner the router tipped ever so slightly and caused the dip in the cut. You have to be very careful when rounding corners with a router. Less than 20% of the base is riding along the worksurface and has to be supported by a balancing act. There are a few solutions to this problem. One is to make a clear polycarb offset base for the router so more of the router base's surface is in contact with the workpiece. Another is to instead of trying to round the corners with the router, just keep going straight as if I'm routing 4 straight pieces instead of one piece with four corners. I'm relatively new to t-molding though so I'm sure I'll get better as I get to know the router, router bit, and workpiece better.

I just wanted to share that because routing a slot for t-molding can be tricky at first. Oh yeah, as for depth setting, do it by eye first on a test piece or three and micro-adjust accordingly. I'll get enough practice as I'm building 3 or 4 of these at once.

More tomorrow on how I cut the sides on my table saw, as that, although less tricky than t-molding, did involve a tapering jig. I wasn't 100% sure how to set this up at first but figured it out quickly. Til later on...
« Last Edit: April 12, 2006, 03:10:28 am by NiteWalker »


It's 9am. I'm calling it a nite.

NiteWalker

  • Trade Count: (0)
  • Full Member
  • ***
  • Offline Offline
  • Posts: 792
  • Last login:April 25, 2022, 07:33:24 pm
  • Routers can do anything.
    • SimpleCase Custom Arcade Stick Enclosures
Re: NiteStick build in progress w/pics
« Reply #5 on: April 12, 2006, 03:23:20 am »
Here's the best pic I could take of the formica sample I'll be ordering Friday. It really is nice and I like the way it sparkles like metallic car paint sort of.


It's 9am. I'm calling it a nite.

NiteWalker

  • Trade Count: (0)
  • Full Member
  • ***
  • Offline Offline
  • Posts: 792
  • Last login:April 25, 2022, 07:33:24 pm
  • Routers can do anything.
    • SimpleCase Custom Arcade Stick Enclosures
Re: NiteStick build in progress w/pics UPDATE: 4/18
« Reply #6 on: April 18, 2006, 09:49:51 pm »
Another small update today. I ordered the laminate from Lowe's and bought the contact cement and small rollers to apply it. It's here:

 All that stuff came to $13 and the laminate sheet came to $45 which isn't bad for a 4'x8' sheet. Enough to do a bunch of joysticks. The laminate is scheduled to arrive on the 25th (on or before). While waiting I'll clean up the shop a bit and maybe get to work on another design.
Also to anyone who's interested, photobucket just raised their limits on all accounts.

UPDATE: 4/20/06
Got the call today saying the laminate is in. That's what I call quick shipping! I have to go to Lowe's first thing tomorrow morning to pick it up. Then it's back to building. Posts will be more frequent as the kids go back to school monday and I'll have my days again.
« Last Edit: April 20, 2006, 11:16:03 pm by NiteWalker »


It's 9am. I'm calling it a nite.

NiteWalker

  • Trade Count: (0)
  • Full Member
  • ***
  • Offline Offline
  • Posts: 792
  • Last login:April 25, 2022, 07:33:24 pm
  • Routers can do anything.
    • SimpleCase Custom Arcade Stick Enclosures
Re: NiteStick build in progress w/pics
« Reply #7 on: April 21, 2006, 09:30:53 am »
I went and picked my laminate today. I was surprised at how light and compact a 4'x8' sheet of laminate can be.


After opening the box I was a bit worried I got sent the wrong kind because it didn't have the same sparkle as my sample...


But it turns out it was just really dusty. In this pic you can see the sparkle clearly where the camera flash is concentrated. Simply beautiful...
I like how well packaged it was. In this pic you can also see how they used a piece of folded over cardboard to protect the exposed edge. It has a band around it too, so if I take it out of the box it won't quickly unravel and slap me silly, which is likely to happen when I cut the band...


That's all for now. The kids go back to school monday so that's when building will resume. I may get some time over the weekend though so maybe sooner...
I'm itchin to finish this up and start on my next project...
Well, off to bed for me...
« Last Edit: April 21, 2006, 09:34:17 am by NiteWalker »


It's 9am. I'm calling it a nite.

NiteWalker

  • Trade Count: (0)
  • Full Member
  • ***
  • Offline Offline
  • Posts: 792
  • Last login:April 25, 2022, 07:33:24 pm
  • Routers can do anything.
    • SimpleCase Custom Arcade Stick Enclosures
Re: NiteStick build in progress w/pics
« Reply #8 on: July 04, 2006, 06:51:44 am »
*Blows dust off of thread*

Wow it's been a while...
But I'm FINALLY done! :cheers:

A lot has happened since the last post. I'll sum it all up the best I can. Instead of green I went with red as the color theme for the joystick and buttons and t-molding. I made a matching art to go along with it.

My Ryobi router died on me near the end. She's on her way to the Great Woodshop Above. No quarrel there. I got my $60 out of it and then some. Now I need a PC 694VK to replace it. Not in a rush for that seeing as how I have 3 other routers..... Tool obsessed I am... :dizzy:

R.I.P.


Now away from the derpessing news.
Where I last left off, I was about to apply the laminate. I did so, and also attached the top. I used a double coat of Titebond III (to avoid glue joint starvation) and 6 coarse threaded drywall screws to keep the top on nice and tite. Also, when applying the plastic laminate I waited for the first coat to dry as the instructions say, and then added another light coat to the MDF surfaces to ensure proper adheasion. MDF is very absorbant... A second coat wasn't necessary on the plastic laminate itself, so what I did was coat the MDF, wait for it to dry, and then coat the MDF again and coat the laminate this time. It worked out great.


Trimming the laminate was a bit tricky, because the bearing on my flush trim bit is at the end of its short lifecycle. On test pieces it kept digging into the laminate. I remidied this by using blue painter's tape to give the bearing something to dig into. That bit is also dead now. She'll accompany the Ryobi router on her journey above...

After that, the next step was to print the art and wire it up. Kinko's does a good job with small prints and it only costed $3. Wiring wasn't as simple. The only reason behind this is because there is very little room inside the box...

...as you can see.
The Street Fighter pad hack was very easy. Among the easiest I've done, in fact. What made the wiring more difficult (and this was completely my fault), was that I pre-installed the joystick body and bolted it in. That made it really hard to reach the barrier strip on the right to tighten the small screws that secure the wires in. I took the microswitches off of the competition stick and this made it more managable. Next time though, I'll do the first half of the wiring (secure the PCB and barrier strips and the wiring to them) before mounting the joystick body. Once the first half of the wiring is in, THEN I'll mount the joystick, then apply the art and Lexan, and then put the buttons in. Then it's as simple as hooking up the wires from the barrier strips to the microswitches. Add a daisy-chain ground loop and viola! You have what's in the above pics.


It's 9am. I'm calling it a nite.

NiteWalker

  • Trade Count: (0)
  • Full Member
  • ***
  • Offline Offline
  • Posts: 792
  • Last login:April 25, 2022, 07:33:24 pm
  • Routers can do anything.
    • SimpleCase Custom Arcade Stick Enclosures
Re: NiteStick build in progress w/pics
« Reply #9 on: July 04, 2006, 06:58:53 am »
With the wiring done, all that was left was to put the bottom on and test it out!
It works great and it'll probably be one I use for a long time to come. I've learned a lot during this build and will apply all knowledge learned to future projects.
Here's the final pics.


Thanks go out to this website and forums and also to shoryuken's tech talk forum. Without either I never would have thought to build my own arcade controls.

Time for comments/suggestions/questions!
I know it's not a MAME cab, but I did put a lot into it.
Peace out.
NiteWalker


It's 9am. I'm calling it a nite.

Timoe

  • Trade Count: (+2)
  • Full Member
  • ***
  • Offline Offline
  • Posts: 1662
  • Last login:July 14, 2009, 09:50:12 am
  • Team-Oh-tAy-Oh
    • Rattlin' Trash
Re: NiteStick build in progress w/pics
« Reply #10 on: July 04, 2006, 08:18:29 am »
Finally.

Thats really great.  I need to build two of these for the xbox in my living room.  With hacked gamepads of course.

NiteWalker

  • Trade Count: (0)
  • Full Member
  • ***
  • Offline Offline
  • Posts: 792
  • Last login:April 25, 2022, 07:33:24 pm
  • Routers can do anything.
    • SimpleCase Custom Arcade Stick Enclosures
Re: NiteStick build in progress w/pics
« Reply #11 on: July 04, 2006, 08:20:20 am »
Thanks. What pads are you planning to use? The SFAC pads are best I think for Xbox hacking.


It's 9am. I'm calling it a nite.

Timoe

  • Trade Count: (+2)
  • Full Member
  • ***
  • Offline Offline
  • Posts: 1662
  • Last login:July 14, 2009, 09:50:12 am
  • Team-Oh-tAy-Oh
    • Rattlin' Trash
Re: NiteStick build in progress w/pics
« Reply #12 on: July 04, 2006, 08:25:08 am »
Thanks. What pads are you planning to use? The SFAC pads are best I think for Xbox hacking.

Whats that?  Are those the Street Fighter controllers that came out a year or so ago with the streetfighter art on them?


If so, I'll try and pick a few up real quick.

NiteWalker

  • Trade Count: (0)
  • Full Member
  • ***
  • Offline Offline
  • Posts: 792
  • Last login:April 25, 2022, 07:33:24 pm
  • Routers can do anything.
    • SimpleCase Custom Arcade Stick Enclosures
Re: NiteStick build in progress w/pics
« Reply #13 on: July 04, 2006, 08:28:42 am »
Yeah those are the ones. They're great because they're easy to solder to and have no analog anything. Take note, though, that they have 2 seperate grounds.
Come to think of it I need to build one for XBL too...


It's 9am. I'm calling it a nite.