Hi All,
Howard suggested I post my build here so here we go...
I love Daytona but due to being on a limited income and renting a house I can't have a full-size cabinet.
It all started when on holiday in June 2018, After having a few too many beers and playing on a couple of racers in the resort's arcade I thought I wonder if there is a Daytona steering wheel setup on eBay.... Before I knew it I had bought a wheel -

So the wheel arrives and at this point, I have no idea what I'm going to do with it -

The misses thinks I'm a complete idiot and wasting my money. As I had a few other car-related projects going on the project sat until around September 2018.
Once that was out the way I started crawling the web in hope of finding a way to get this connected up to the pc and that's when I came across BigPanik's M2Pac Solution.
The M2Pac project is based on converting a full Daytona cabinet to use a pc rather than the original PCB set. So I was going to have to design a few bits for myself.
Here is a diagram that belongs to BigPanik on how the project is connected together -
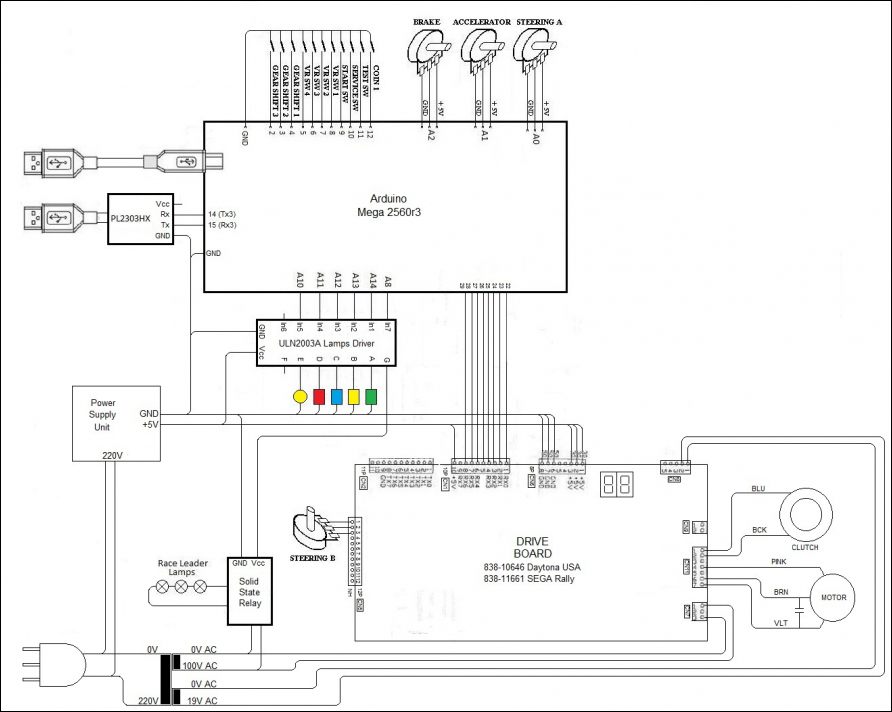
The Arduino is used as a joystick controller using UnoJoy and is also used to read the serial commands to drive the lamps and the force feedback board.
Parts start arriving that I've ordered -

^ Ordering a none genuine Arduino was a mistake as you cannot put it into DFU mode to flash the UnoJoy firmware.
Now the drive board has arrived I can finally start to wire stuff together.


^ As you can see I'm still using the none genuine Arduino here as I still haven't figured out my mistake yet.
Power on test of the drive board and comms of the still incorrect Arduino. The red board on top of the Arduino is a breakout board to make things easier to connect.

So next I start mounting all of the control gear to some wood as i want to drop it all into a box -

Power supplies -

^ The drive board uses 5v dc to power the electronics, 19v AC for the steering wheel clutch and 100v AC for the steering wheel motor. As I'm in the UK I have an AC AC step down transformer in there to get me close to 100v. I'm also using 12v dc to drive the VR lamps as I thought 5v wasn't bright enough.
I used USB panel mount passthrough connectors for quick release and used RJ45 ethernet connectors for all the other connections like lamps, pedals, steering pot and gears.
For the motor and clutch power, I used Bulgin connectors.

Testing has been going well and things are getting quite complete now -


Mark Haysman over at retro clinic made me this so I could switch between the sega rally and Daytona FFB rom.

So i needed a box to house the steering wheel in. My friend james built me this -


All Painted now and starting to mount -


So the black vent is directly behind the drive motor for ventilation. The big silver one is so i can get my hand and tools inside if i need to adjust the setting pots.
Not in the photo but the RJ45 connectors are all labeled.


The pedals being used here are Thrustmaster ones with a USB adaptor. I did have some cheap play station 2 ones being used through the Arduino but the reading on the pot would jump all over the place and cause it to make unwanted selections in-game menus.


So yeah it's lots of fun but currently limited to only sega rally and sega Daytona if you want FFB. I would like to somehow translate the ffb commands from other games like Daytona 2 to work with my current setup but not sure how to start with that currently and I think it's a very specific problem to me so it wouldn't grab the interest of others.
My daughter is only 4 years old and she uses this wheel with no force feedback on more modern games like Mariokart DX. So with Boomslangs output blaster and Howard's MAME hooker i'm hoping to get the lamp outputs working.
So yeah I think that's all I can think to write for now


 Home
Home Help
Help Search
 Login
Login Register


 Send this topic
 Print
Print Topic: Daytona in a box (Read 2689 times)


