Main Restorations Software Audio/Jukebox/MP3 Everything Else Buy/Sell/Trade
Project Announcements Monitor/Video GroovyMAME Merit/JVL Touchscreen Meet Up Retail Vendors
Driving & Racing Woodworking Software Support Forums Consoles Project Arcade Reviews
Automated Projects Artwork Frontend Support Forums Pinball Forum Discussion Old Boards
Raspberry Pi & Dev Board controls.dat Linux Miscellaneous Arcade Wiki Discussion Old Archives
Lightguns Arcade1Up Try the site in https mode Site News

Unread posts | New Replies | Recent posts | Rules | Chatroom | Wiki | File Repository | RSS | Submit news


Author Topic: Aliens Themed Cab  (Read 149331 times)

0 Members and 1 Guest are viewing this topic.

Martijn

  • Trade Count: (0)
  • Full Member
  • ***
  • Offline Offline
  • Posts: 822
  • Last login:January 25, 2024, 10:34:36 am
  • Akira!
    • ModMyBox
Re: Aliens Themed Cab *Speaker Shelf/bottom retainer and CP start* Feb 20 2010
« Reply #320 on: February 21, 2010, 06:30:44 am »
nice work

try to have the tv screen on with the hardware in place, when you can still move these parts

i found some purple magnetzone spotes in some corners of my display because of speakers or pc hardware

Epyx

  • Trade Count: (+1)
  • Full Member
  • ***
  • Offline Offline
  • Posts: 1961
  • Last login:December 25, 2023, 07:56:36 pm
  • "You're an oddity"
Re: Aliens Themed Cab *Speaker Shelf/bottom retainer and CP start* Feb 20 2010
« Reply #321 on: February 21, 2010, 12:07:15 pm »
Thanks guys!

@Kurt

Ya, can't wait to see them turned on...few more weeks I hope!  :cheers:


@Martijn

Quote
try to have the tv screen on with the hardware in place, when you can still move these parts

i found some purple magnetzone spotes in some corners of my display because of speakers or pc hardware

Good point Martijn, I will make sure to do that...I think I will also place the monitor's controls under the CP so I can get at it easily to degauss and change other settings.

Last Project


Epyx Tutorials:
Tutorials

Erik

  • Trade Count: (0)
  • Full Member
  • ***
  • Offline Offline
  • Posts: 181
  • Last login:August 10, 2013, 09:04:35 pm
Re: Aliens Themed Cab *Speaker Shelf/bottom retainer and CP start* Feb 20 2010
« Reply #322 on: February 21, 2010, 09:18:25 pm »
awesome!  one of my favorites

although as it turns out in the arcade someone can hear you scream unfortunately

Epyx

  • Trade Count: (+1)
  • Full Member
  • ***
  • Offline Offline
  • Posts: 1961
  • Last login:December 25, 2023, 07:56:36 pm
  • "You're an oddity"
Re: Aliens Themed Cab *Speaker Shelf/bottom retainer and CP start* Feb 20 2010
« Reply #323 on: February 21, 2010, 09:22:49 pm »
Quote
although as it turns out in the arcade someone can hear you scream unfortunately

Lol...true enough...but there is a fine line between hearing and...caring ;)

And well...if they don't care you screamed...you may as well have not bothered screaming  :laugh2:
Last Project


Epyx Tutorials:
Tutorials

bigpete405

  • Trade Count: (0)
  • Full Member
  • ***
  • Offline Offline
  • Posts: 152
  • Last login:April 30, 2014, 07:48:03 pm
Re: Aliens Themed Cab *Speaker Shelf/bottom retainer and CP start* Feb 20 2010
« Reply #324 on: February 21, 2010, 09:30:43 pm »
I have to say that I really like your current, and past projects.  :cheers: They get better and better each time.

Kman-Sweden

  • Trade Count: (+1)
  • Full Member
  • ***
  • Offline Offline
  • Posts: 526
  • Last login:October 23, 2015, 07:29:00 am
  • Up the Irons!
Re: Aliens Themed Cab *Speaker Shelf/bottom retainer and CP start* Feb 20 2010
« Reply #325 on: February 22, 2010, 03:14:07 am »
I have to say that I really like your current, and past projects.  :cheers: They get better and better each time.
+1.

SpaceHedgehog

  • Trade Count: (0)
  • Full Member
  • ***
  • Offline Offline
  • Posts: 937
  • Last login:February 06, 2023, 12:10:24 pm
  • Almost done ...
Re: Aliens Themed Cab *Speaker Shelf/bottom retainer and CP start* Feb 20 2010
« Reply #326 on: February 22, 2010, 05:44:33 am »
Great colours, great shape, great finish, great attention to detail. It's, well, just ........great :applaud:
Click a pic for a video tour 

Knievel

  • Trade Count: (+3)
  • Full Member
  • ***
  • Offline Offline
  • Posts: 965
  • Last login:July 10, 2016, 10:29:09 pm
  • Who's up for a game of Stunt Cycle??
    • Knievel Kustoms
Re: Aliens Themed Cab *Speaker Shelf/bottom retainer and CP start* Feb 20 2010
« Reply #327 on: February 23, 2010, 09:38:56 pm »

Beautiful..nice job on the curves. :cheers:

Having used that green T-mold in the past I know how well it 'pops' on a black cabinet. In my book, nothing beats it.
Tough finding a good green-based theme though..you chose wisely.

Epyx

  • Trade Count: (+1)
  • Full Member
  • ***
  • Offline Offline
  • Posts: 1961
  • Last login:December 25, 2023, 07:56:36 pm
  • "You're an oddity"
Re: Aliens Themed Cab *Speaker Shelf/bottom retainer and CP start* Feb 20 2010
« Reply #328 on: February 23, 2010, 10:14:35 pm »
Thanks guys...that is the beauty of this hobby...I had never operated a power tool other than a drill when I started and this great community with awesome helpful individuals inspired me to give it a try.  I still have a lot to learn but I do see the progress from project to project.  Best part of all is that my wife will actually use the words "handyman" and my name in the same sentence, a thing previously never uttered.

@Knievel

The neon rings and colour scheme were a blatant homage to your cabs and the curves were inspired by Martijn's awesome SF cab.   :notworthy:

I agree though, the green pops very nicely on black.  Sooo close to being able to finish it up and have her lit in the basement..can't wait.
Last Project


Epyx Tutorials:
Tutorials

Gamester

  • Trade Count: (0)
  • Full Member
  • ***
  • Offline Offline
  • Posts: 483
  • Last login:March 01, 2019, 03:00:10 pm
Re: Aliens Themed Cab *Speaker Shelf/bottom retainer and CP start* Feb 20 2010
« Reply #329 on: February 24, 2010, 01:31:01 am »

Beautiful..nice job on the curves. :cheers:

Having used that green T-mold in the past I know how well it 'pops' on a black cabinet. In my book, nothing beats it.
Tough finding a good green-based theme though..you chose wisely.

Whoa, do my eyes deceive me, or did Knievel post to the forum???    ;)  Welcome back!  We've missed you around here!

Epyx, again looking fantastic!  I know it's taken you longer than planned, but glad to see you're still taking the time to do everything right...   :cheers:
Current Project:                                                       First Project:
  

Epyx

  • Trade Count: (+1)
  • Full Member
  • ***
  • Offline Offline
  • Posts: 1961
  • Last login:December 25, 2023, 07:56:36 pm
  • "You're an oddity"
Re: Aliens Themed Cab *Speaker Shelf/bottom retainer and CP start* Feb 20 2010
« Reply #330 on: February 24, 2010, 06:27:57 pm »
Quote
Epyx, again looking fantastic!  I know it's taken you longer than planned, but glad to see you're still taking the time to do everything right...

Ya while you are playing im still building :(

Lol but all good...in due time...spring is almost here and if im done by then ill be happy.
Last Project


Epyx Tutorials:
Tutorials

blueznl

  • Trade Count: (0)
  • Full Member
  • ***
  • Offline Offline
  • Posts: 290
  • Last login:June 16, 2019, 04:50:02 pm
Re: Aliens Themed Cab *Speaker Shelf/bottom retainer and CP start* Feb 20 2010
« Reply #331 on: February 26, 2010, 09:06:17 am »
"In this Arcade All can hear you Scream..."

or perhaps

"All can hear you scream..."

Epyx

  • Trade Count: (+1)
  • Full Member
  • ***
  • Offline Offline
  • Posts: 1961
  • Last login:December 25, 2023, 07:56:36 pm
  • "You're an oddity"
Re: Aliens Themed Cab *Speaker Shelf/bottom retainer and CP start* Feb 20 2010
« Reply #332 on: February 26, 2010, 11:24:17 am »
Thanks but I still like the original...plus the marquee is done and I am happy with it. I am not sure which arcades some of you went to...but many of the arcades here in Vancouver's lower mainland were filled with lots of unsavory types...screaming, cursing etc...no one listened and no one really cared...thus the saying :)

Plus...the idea is that the noises in the arcade and the concentration of gameplay negates hearing someone scream...it gets drowned out by the background noise...am I the only one that frequented noisy arcades?  :laugh2:

« Last Edit: February 26, 2010, 11:27:18 am by Epyx »
Last Project


Epyx Tutorials:
Tutorials

Epyx

  • Trade Count: (+1)
  • Full Member
  • ***
  • Offline Offline
  • Posts: 1961
  • Last login:December 25, 2023, 07:56:36 pm
  • "You're an oddity"
Re: Aliens Themed Cab *Speaker Shelf/bottom retainer and CP start* Feb 20 2010
« Reply #333 on: February 27, 2010, 09:15:00 pm »
Quite a bit done today (for me!)...hopefully more tomorrow.

I got really lucky at a plastic shop yesterday. They had a 1/4" 30"x30" smoked plexi offcut in excellent condition for $5.  I figured I would finish the bezel and mount the speaker shelf for the goal of mounting the plexi.

I started with the speaker shelf which up to now has been hanging with clamps and mounted it.  As mentioned before the marquee is removed via the top retainer which is connected via 3 bolts.

After mounting the speaker shelf I measured up the distance from where the speaker shelf touches the bezel down to the bottom of the bezel...this ended up being 26.5" inner cab width by 22 1/4" in length.

I clamped the 30" x 30" plexi between to pieces of MDF...one piece was a template I cut as I did not want to use my actual bezel and risk scratching it... the template matched the measurements above.  I then flush trimmed the plexi.  If you want my 2 cents...don't waste your time scoring plexi...it is too prone to you running off the line and you risk scratching your investment...use a flush trim bit and you are good to go. I have zero melting as I maintained a decent clip and ensured I let my bit cool down each pass (each side).

A quick shot for those who are curious how I handled the bottom retainer. You can see the angled piece of wood glued to the speaker shelf on which the bottom retainer is in turn glued:


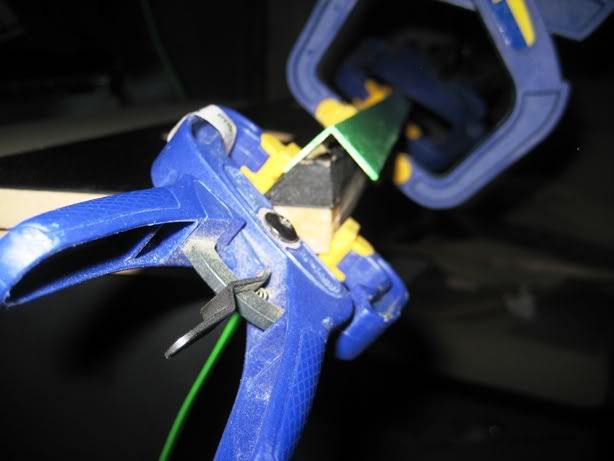
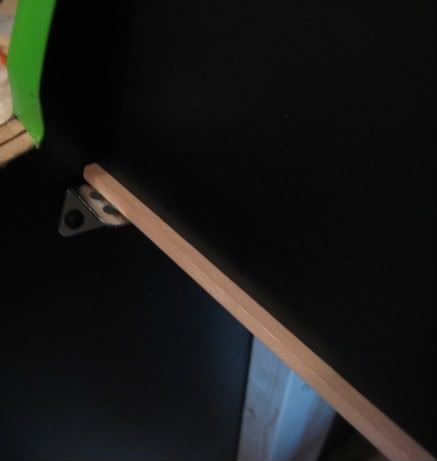
To keep the bezel in place I use an L shaped piece of pine from Home dept that sits atop two L braces mounted to the side of the cab.  The bezel and the retainer will rest on it.  A bolt is put in place behind the pine to keep it in place...pictures below:


Here you can see there is exactly 1/4" of the L Shape sticking out beyond the bezel...perfect fit for the 1/4" plexi! (EDIT: Now using 1/4" glass).


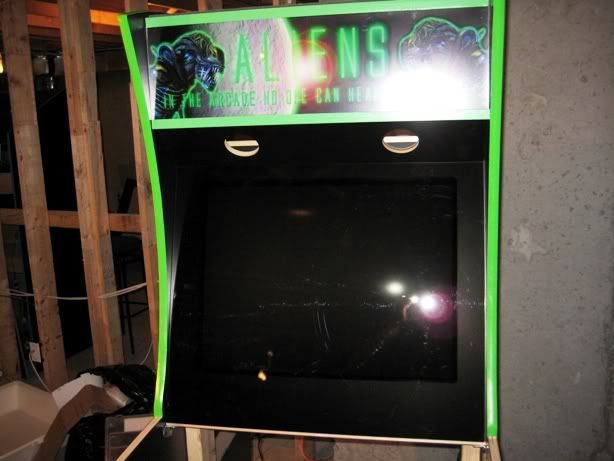
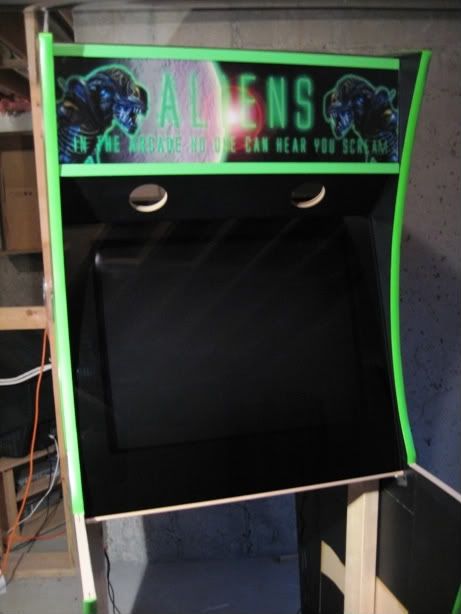
I then added the smokey plexi and voila a perfect fit.  Speakers will be covered as I am still working on them:


I then realized my CP was cut to not take into account plexi over the bezel...ooops...no big deal. I throw it on the table saw and do another 1/4" angle cut so it rests on the plexi flush. I also cut the T mold slot and rounded the edges. Lastly, I used my X arcade to template sketch the buttons (6 each player), trackball, p1/p2 and Spinner (to left of p1/p2):


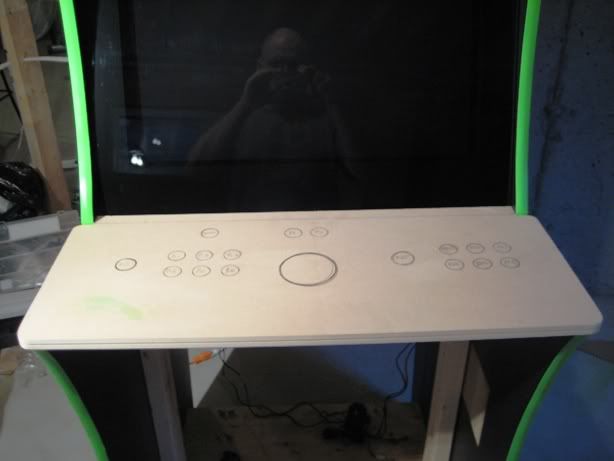
Tomorrow Ill try to finish the CP and the curved piece now...first few tests of the curved piece worked fine. To create my own bendable MDF I have been cutting slots to within 3/16" down, spaced 3/4" apart on 3/4" MDF.  I will then put glue in the slots and mold the curve.  Ill document this step in closer detail.


« Last Edit: March 22, 2010, 11:39:50 pm by Epyx »
Last Project


Epyx Tutorials:
Tutorials

javeryh

  • Trade Count: (+1)
  • Full Member
  • ***
  • Offline Offline
  • Posts: 7911
  • Last login:Yesterday at 09:39:33 am
Re: Aliens Themed Cab *Speaker shelf and bezel mounted with plexi* Feb 27 2010
« Reply #334 on: February 28, 2010, 10:25:29 am »
Looks GREAT.  I love all the detail shots.   :cheers:

Epyx

  • Trade Count: (+1)
  • Full Member
  • ***
  • Offline Offline
  • Posts: 1961
  • Last login:December 25, 2023, 07:56:36 pm
  • "You're an oddity"
Quote
Looks GREAT.  I love all the detail shots.

Thanks Javeryh.  I was hoping to finish the control panel today but a little thing called "Gold medal hockey game" got in the way...

You have any upcoming projects planned? You have a cab for the daughter...one for yourself...what a about a 3rd for the wife? *cough*...
Last Project


Epyx Tutorials:
Tutorials

Ryglore

  • Trade Count: (+1)
  • Full Member
  • ***
  • Offline Offline
  • Posts: 779
  • Last login:November 16, 2021, 05:49:39 pm
  • Likes to make things difficult.
    • The Brush Wizard
Excellent work so far! Have you tested the button layout to make sure it will be comfortable for long periods of gameplay? Then again, maybe that's just me and my preference for the Japanese 6 button layout.  ;)

Epyx

  • Trade Count: (+1)
  • Full Member
  • ***
  • Offline Offline
  • Posts: 1961
  • Last login:December 25, 2023, 07:56:36 pm
  • "You're an oddity"
Quote
Excellent work so far! Have you tested the button layout to make sure it will be comfortable for long periods of gameplay?

Aye, this is the same button layout I have always used...its the Capcom arcade default 6 button layout (Street Fighter 2):

http://www.arcade-museum.com/images/10/1048924503.jpg
http://www.arcade-museum.com/game_detail.php?game_id=9811

The template taken from the X arcade CP...the arcade games I played with 4 buttons/6 buttons were usually lined up and not staggered. I personally don't like a staggered button layout but that is just my preference! ;)
« Last Edit: March 01, 2010, 01:58:47 pm by Epyx »
Last Project


Epyx Tutorials:
Tutorials

javeryh

  • Trade Count: (+1)
  • Full Member
  • ***
  • Offline Offline
  • Posts: 7911
  • Last login:Yesterday at 09:39:33 am
You have any upcoming projects planned? You have a cab for the daughter...one for yourself...what a about a 3rd for the wife? *cough*...

I'm kicking around a few ideas.... either a full sized 2P cab with a 27" monitor or possibly a Virtual Pinball cab.  I have 2 problems though - I promised the wife I'd finish all current projects before starting anything new AND I don't have any room in my house for anything else so it might be a while.   :cheers:

Epyx

  • Trade Count: (+1)
  • Full Member
  • ***
  • Offline Offline
  • Posts: 1961
  • Last login:December 25, 2023, 07:56:36 pm
  • "You're an oddity"
Ya those Virtual Pinball cabs are very nice...definitely on my list as well. And I hear you on the "other projects pending"...I will be back to that myself after this one  :laugh2:
Last Project


Epyx Tutorials:
Tutorials

Epyx

  • Trade Count: (+1)
  • Full Member
  • ***
  • Offline Offline
  • Posts: 1961
  • Last login:December 25, 2023, 07:56:36 pm
  • "You're an oddity"
Got in a few hours last night and decided to document the process of flush mounting a trackball installation (Betson/Xgaming) without a mounting plate for those interested.  Working on the CP is always the most fun for me because it usually signifies you are down the final stretch.  I will hold off on wiring until the rest of the cab is complete but that shouldn't be too much longer.

With the Alien cab I am going for a 6 button layout with trackball and spinner.  I like the Capcom 6 button default layout and used my X gaming Tankstick as the template. Only thing I did a bit different is push the buttons and joy for each player out by about 1/2" from the trackball center and added a spinner above the player 1 button set.

I started with my 2 7/8" hole saw bit for the X Gaming trackball I use. This trackball is essentially a Betson trackball and already comes mod ready with a hole at the bottom for lighting. It is a trackball that feels very comfortable and is one of the few X Gaming peripherals I have no trouble recommending as its a user friendly plug and play device (USB) that feels like the trackballs I remember:


I then drilled the button holes (1 1/8" forstner bit) and joystick/trackball holes (1 1/8" forstner bit). Everything will be top and flush mounted so the laminate will cover all bolts including the trackball.  The joysticks will be top mounted using FrancoB's technique as they are JLWs:


Next step was to place the trackball through the hole and line it up for tracing the part that will get recess routed:


After tracing the mount I went back to my X Gaming CP to set the depth of my router. Both CP's are 5/8". I prefer this size for a CP when using laminate as it's easy have the T molding cover flush the edge of the laminate.  Using 5/8" CP I will route the Trackball recess to 1/4" of MDF left:


I then route the Trackball recess, note the mod friendly hole at the bottom for RGB lighting (Betson's have these too):


Next up is drilling the bolt holes to hold the trackball. Rather than eyeballing I just drill through the holes with the trackball in place:


For Trackball bolts (to replace ones it normally uses) I found these hex bolts which have a flat head of about 1/16":


I then placed the bolt in the holes I had drilled and traced around the head:


Then routed out 1/16" of MDF for a flush fit.  I left a bit of space so that once the CP is ready to get laminated I will glue the bolts in place:


Thursday night I will work on top mounting the JLWs.


« Last Edit: March 03, 2010, 11:33:41 am by Epyx »
Last Project


Epyx Tutorials:
Tutorials

Nacimroc

  • Trade Count: (0)
  • Full Member
  • ***
  • Offline Offline
  • Posts: 303
  • Last login:October 20, 2015, 03:46:25 pm
Looks great! Can't wait to see it finished! Hate the way all you guys can use the router freehand without have giants chunks everywhere!

javeryh

  • Trade Count: (+1)
  • Full Member
  • ***
  • Offline Offline
  • Posts: 7911
  • Last login:Yesterday at 09:39:33 am
Sweet dude.  Making CPs is the best part.  I really really really need to get a 2P 6-button + trackball cab up and running in my house.

Epyx

  • Trade Count: (+1)
  • Full Member
  • ***
  • Offline Offline
  • Posts: 1961
  • Last login:December 25, 2023, 07:56:36 pm
  • "You're an oddity"
Quote
Looks great! Can't wait to see it finished! Hate the way all you guys can use the router freehand without have giants chunks everywhere!

Hehe you and me both!

As for freehand routing...just go slooooow...I work in multiple passes and make sure I'm always going in the right feed direction. Going in the wrong direction is usually what causes the issues :(

Quote
Sweet dude.  Making CPs is the best part.  I really really really need to get a 2P 6-button + trackball cab up and running in my house.

>:D

Yes, yes you do...and then share it so we can enjoy.
Last Project


Epyx Tutorials:
Tutorials

Epyx

  • Trade Count: (+1)
  • Full Member
  • ***
  • Offline Offline
  • Posts: 1961
  • Last login:December 25, 2023, 07:56:36 pm
  • "You're an oddity"
Today I completed the CP. This involved routing out the Sanwa JLWs for flush top mounting.  Again the idea is to have everything under the laminate...no bolts.  

Before routing the joystick top mounts I needed to route out the laminate as the joysticks will be using 1 1/8" holes (could go smaller).  To route the laminate with no chipping I generally start all button holes with a 5/8" spade bit..that way any chips or splits are routed out with the flush trim bit after:


Next I routed the top portion of the Sanwa mount (Thanks to Franco B for his excellent tutorial on top mounting Sanwa sticks!):


Perfectly flush.  I used 6-32 flat head bolts which barely add any height to the profile...less than 1mm:


I then mounted the XGaming Betson clone with RGB ball from GGG and the modded Sanwas:


Man to say I can't wait to play is a massive understatement, but I promised myself...patience and attention to detail. Speaking of detail, you will notice a missing Green Novagem button. /SIGH...I had it for colour matching...and lost it...its somewhere in my house I hope!:


Tomorrow Ill post my progress with the bottom curve as that is next and then the back of the cab...then wiring. Speaker mounts are on the way from the German arcade parts store.

Now the question for you guys...I have asked Ond for his opinion (which I am leaning towards as well) but want some other opinions. Should I stick with the black T Molding for the CP or go with the same Galaxian Green as the rest of the cab?


« Last Edit: March 07, 2010, 03:08:51 am by Epyx »
Last Project


Epyx Tutorials:
Tutorials

rablack97

  • Trade Count: (+3)
  • Full Member
  • ***
  • Offline Offline
  • Posts: 2215
  • Last login:May 11, 2022, 06:50:10 pm
  • If you don't try, you have no chance at innovation
Are you serious, go with the green.  I'm looking at your renders on page 1 and I'm not liking the all black CP.  The green borders sort of complete the color lines throughout the cab. I'm thinking without you will have t-molding then a break of just green lights and then a continuation of the green t-molding.

Only reason I would see to go black would be the off-color of your novagems, if they are a darker green then maybe the black would suit it better due to the neon green - grass green clash....Although your lighted sticks would help with that as they are neon lit........

I would go green......your helping the environment at the same time.......
« Last Edit: March 07, 2010, 12:34:58 pm by rablack97 »

bigpete405

  • Trade Count: (0)
  • Full Member
  • ***
  • Offline Offline
  • Posts: 152
  • Last login:April 30, 2014, 07:48:03 pm
 :applaud: amazing work  :cheers:

dekar24k

  • Trade Count: (0)
  • Full Member
  • ***
  • Offline Offline
  • Posts: 378
  • Last login:April 28, 2019, 03:50:11 pm
    • ArcadeForum.com
Still possibly the coolest cab anyone has ever made. Seriously. :)  :notworthy:
Finished project: "The Saloon Arcade" - 2 player upright cabinet

Joystick.net - Retro gaming news and reviews

RobbyMac

  • Trade Count: (0)
  • Full Member
  • ***
  • Offline Offline
  • Posts: 228
  • Last login:January 05, 2019, 06:48:50 pm
  • My New years Resolution is 1400 x 900.
    • My cabinet build
Very odd. I'd used a green happ button for testing, and also lost it during my build. luckily I had bought one extra of each color 'just in case'

I agree with the previous post about the tmolding. The green continues the lines. Granted the black doesn't seem out of place, it's just the green finishes it off and blends well with the rest of the cab.

Kurt

  • Trade Count: (0)
  • Full Member
  • ***
  • Offline Offline
  • Posts: 104
  • Last login:September 13, 2010, 10:53:22 pm
Looks awesome nice job on the cp, id also go green with the T Molding otherwise it will look like you ran out of green :lol

Martijn

  • Trade Count: (0)
  • Full Member
  • ***
  • Offline Offline
  • Posts: 822
  • Last login:January 25, 2024, 10:34:36 am
  • Akira!
    • ModMyBox
green  ;)

Encryptor

  • Trade Count: (+34)
  • Full Member
  • ***
  • Offline Offline
  • Posts: 1287
  • Last login:December 21, 2023, 08:01:18 pm
I say green too. If you leave it black it kind of blends in with the sides.

Encryptor

opt2not

  • Trade Count: (+15)
  • Full Member
  • ***
  • Offline Offline
  • Posts: 6173
  • Last login:April 02, 2024, 07:42:30 pm
Definitely Green.

But, I'm hoping you put some artwork on the CP as well...seems like it could some nice graphics on there to compliment the Marquee.

Ryglore

  • Trade Count: (+1)
  • Full Member
  • ***
  • Offline Offline
  • Posts: 779
  • Last login:November 16, 2021, 05:49:39 pm
  • Likes to make things difficult.
    • The Brush Wizard
Green T-Molding for sure, as for CP graphics like Opt2Not suggests, I'd have to see it with the green t-molding first. But you don't want the cab to become too busy looking either....

 :cheers:

Firebat138

  • Trade Count: (0)
  • Full Member
  • ***
  • Offline Offline
  • Posts: 322
  • Last login:February 05, 2024, 01:20:35 pm
  • Head Brewer and Arcade Enthusiast
Def not black, it would blend too much..  Green or a silver... But green would be my first choice...  looking good.
Click below to see my Metal Gear/Splinter Cell Machine... http://forum.arcadecontrols.com/index.php?topic=108360.0

Click below to see my PinCab - PinWARS
http://forum.arcadecontrols.com/index.php/topic,164660.0.html

Epyx

  • Trade Count: (+1)
  • Full Member
  • ***
  • Offline Offline
  • Posts: 1961
  • Last login:December 25, 2023, 07:56:36 pm
  • "You're an oddity"
Thanks for the input guys. I'd like to keep the top of the CP clear of art...black like space with the art coming from the lighting of the trackball, buttons and joysticks ;)

Also...can't find that 12th button and RandyT is out of stock of Green Novagems so ordered a Translucent Green Happ from Lickstick which I understand are what RandyT uses with the addition of a hole at the bottom...so hopefully this is all I need to do (drill a hole)...anyone know?

Oh and here is the green T molding which looks like the clear winner!


« Last Edit: March 07, 2010, 11:11:25 pm by Epyx »
Last Project


Epyx Tutorials:
Tutorials

Ryglore

  • Trade Count: (+1)
  • Full Member
  • ***
  • Offline Offline
  • Posts: 779
  • Last login:November 16, 2021, 05:49:39 pm
  • Likes to make things difficult.
    • The Brush Wizard
Nice, I think I'm all for leaving the black CP top now.

Firebat138

  • Trade Count: (0)
  • Full Member
  • ***
  • Offline Offline
  • Posts: 322
  • Last login:February 05, 2024, 01:20:35 pm
  • Head Brewer and Arcade Enthusiast
Nice...Yes, the black top looks sweet..  Of course if you have seen mine, then you know I am all bout busy.  LOL... 

Are you ordering Two of those other buttons for symmetry? 

How are you lighting the side again?
Click below to see my Metal Gear/Splinter Cell Machine... http://forum.arcadecontrols.com/index.php?topic=108360.0

Click below to see my PinCab - PinWARS
http://forum.arcadecontrols.com/index.php/topic,164660.0.html

Kurt

  • Trade Count: (0)
  • Full Member
  • ***
  • Offline Offline
  • Posts: 104
  • Last login:September 13, 2010, 10:53:22 pm
Very nice, less is more so id leave the cp black also looks very clean.

The only thing id change is the marquee that solar flare disrupts the feel of the overall look.

Epyx

  • Trade Count: (+1)
  • Full Member
  • ***
  • Offline Offline
  • Posts: 1961
  • Last login:December 25, 2023, 07:56:36 pm
  • "You're an oddity"
Quote
Nice...Yes, the black top looks sweet..  Of course if you have seen mine, then you know I am all bout busy.  LOL... 

Are you ordering Two of those other buttons for symmetry? 

How are you lighting the side again?

Lol...busy CPs have their time and place...just not this theme :)

As for buttons...which buttons are you referring to?  I am ordering one replacement green button for the one missing in the pictures.  The sides are being lit in two ways...first through the Green Neon speaker ring (15") and from behind (art is backlit film)...the behind lighting will be subtle so it only illuminates the crevasse at the center of the picture.

Quote
The only thing id change is the marquee that solar flare disrupts the feel of the overall look.

Thanks Kurt. If you look at the sides you see a crevasse dead center that will illuminate light...maybe its a bit artsy fartsy but I wanted the theme to convey that even in the darkness...there is light.  You have the darkness of the CP illuminated by the buttons/trackball and joys...the sideart with the coiling alien and the crevasse and the flare in the marquee...you are in the darkness of the planets' spin but just as you are about to lose hope...light.

I know cheesy but for me it works ;)
Last Project


Epyx Tutorials:
Tutorials