Main Restorations Software Audio/Jukebox/MP3 Everything Else Buy/Sell/Trade
Project Announcements Monitor/Video GroovyMAME Merit/JVL Touchscreen Meet Up Retail Vendors
Driving & Racing Woodworking Software Support Forums Consoles Project Arcade Reviews
Automated Projects Artwork Frontend Support Forums Pinball Forum Discussion Old Boards
Raspberry Pi & Dev Board controls.dat Linux Miscellaneous Arcade Wiki Discussion Old Archives
Lightguns Arcade1Up Try the site in https mode Site News

Unread posts | New Replies | Recent posts | Rules | Chatroom | Wiki | File Repository | RSS | Submit news


Author Topic: Star Wars Cockpit......SHE LIVES !!!!!  (Read 158468 times)

0 Members and 1 Guest are viewing this topic.

Daviea

  • Trade Count: (+30)
  • Full Member
  • ***
  • Offline Offline
  • Posts: 299
  • Last login:December 10, 2010, 06:51:56 pm
    • RAM Controls
Re: Star Wars Cockpit......SHE LIVES !!!!!
« Reply #440 on: June 07, 2009, 08:18:29 pm »
Perfect!  I have all the information I need on the canopy glass parts.  Thank you.

Next item:  the seat corner bracket.

I've drawn up a quick 3D model of the part with some dimensions called out in centimeters.  Can you refer to your OEM part and correct these numbers?

Also, can you tell if the original part is painted, powder coated or anodized?

I'm open to discussion on the finish I should apply to the reproduction part.  I really have no preference on this one.

BTW, I DO have the original aluminum extrusion mold for this part, so I can get an exact part made. :-)  I just need the placement of the holes which is a secondary operation.

Thanks

David Adams
RAM Controls
« Last Edit: June 07, 2009, 08:38:17 pm by Daviea »

Level42

  • Wiki Contributor
  • Trade Count: (+5)
  • Full Member
  • ***
  • Offline Offline
  • Posts: 5965
  • Last login:November 13, 2018, 01:56:39 am
  • A Suzo stick is a joy forever...
Re: Star Wars Cockpit......SHE LIVES !!!!!
« Reply #441 on: June 08, 2009, 01:33:10 am »
I'm pretty sure it wasn't powder coated, it looks too smooth for it, but I'm not sure it's anodized or painted. Also, the years of people sliding over it has made it probably even smoother.

The sizes won't be a problem will measure them when I get back from work.

David, do you happen to know if the US built cockpits had glass on the monitor bezel or plexi ? I've worked on my friend Luc's cockpit which is US built but I can't remember !

Daviea

  • Trade Count: (+30)
  • Full Member
  • ***
  • Offline Offline
  • Posts: 299
  • Last login:December 10, 2010, 06:51:56 pm
    • RAM Controls
Re: Star Wars Cockpit......SHE LIVES !!!!!
« Reply #442 on: June 08, 2009, 02:49:41 am »
I'm leaning toward a smooth powder coat or a nice heavy black anodize.  Either should work fine.  After thinking about it for a few hours, I've decided that paint probably won't be a suitable option. :-)

BTW, I've drawn my first version of the small floor bracket based on what I see in the pictures you've taken.  It's only a loose interpretation of what the part should look like.  Once I have some real dimensions, the drawing will be cleaned up.  I included some attachments of the drawing as it is.  All of my dimensions are most likely off, but it's only a matter of plugging in the right numbers now.  All numbers are in centimeters, btw. :-)

I've owned at least six different cockpit star wars machines in the last decade alone.  Each one of them had a glass display shield (monitor bezel), not plexiglass.  I know for sure that they're glass because I broke one years ago.  I pulled it out, sat it down on the concrete floor in my garage and BOOM, it shattered into a million little pieces.  LOL  It was the only time I ever broke a piece of tempered glass, so it's a vivid memory.  I have never seen a SW cockpit with a plexiglass bezel in my life.  I always assumed from reading that it was something specific to the ones made at the Irish manufacturing plant.

David Adams
RAM Controls


I'm pretty sure it wasn't powder coated, it looks too smooth for it, but I'm not sure it's anodized or painted. Also, the years of people sliding over it has made it probably even smoother.

The sizes won't be a problem will measure them when I get back from work.

David, do you happen to know if the US built cockpits had glass on the monitor bezel or plexi ? I've worked on my friend Luc's cockpit which is US built but I can't remember !

Level42

  • Wiki Contributor
  • Trade Count: (+5)
  • Full Member
  • ***
  • Offline Offline
  • Posts: 5965
  • Last login:November 13, 2018, 01:56:39 am
  • A Suzo stick is a joy forever...
Re: Star Wars Cockpit......SHE LIVES !!!!!
« Reply #443 on: June 09, 2009, 01:12:05 pm »
Updated:

If you have more accurate data on the hole diameter than use that. I'm sure about the other sizes though.

Been looking at the part again and by the way it has wore it looks more and more to me that this one was anodized.

« Last Edit: June 09, 2009, 01:28:35 pm by Level42 »

Level42

  • Wiki Contributor
  • Trade Count: (+5)
  • Full Member
  • ***
  • Offline Offline
  • Posts: 5965
  • Last login:November 13, 2018, 01:56:39 am
  • A Suzo stick is a joy forever...
Re: Star Wars Cockpit......SHE LIVES !!!!!
« Reply #444 on: June 09, 2009, 01:34:18 pm »
I just won the battle with the most (only) stubbern screw that I couldn't get off.

The war was dirty though.....


I had to use the dremel on this one. I cut the complete 60 tooth gear to pieces, leaving a block that I could grip to. That block "contains" the screw that I couldn't get loose anymore. I feared that I couldn't get it loose at all which would mean needing a new shaft but it turned out just fine.

Daviea

  • Trade Count: (+30)
  • Full Member
  • ***
  • Offline Offline
  • Posts: 299
  • Last login:December 10, 2010, 06:51:56 pm
    • RAM Controls
Re: Star Wars Cockpit......SHE LIVES !!!!!
« Reply #445 on: June 09, 2009, 02:49:53 pm »
Ahhh, thank you.

I think I have everything I need for the corner bracket. :-)

I don't have in-house capability for aluminum extrusion, so I need to job this one out.  Luckily, this is a thriving industry in California, so it should be easy to find a local vendor. 

David Adams
RAM Controls


Updated:

If you have more accurate data on the hole diameter than use that. I'm sure about the other sizes though.

Been looking at the part again and by the way it has wore it looks more and more to me that this one was anodized.


« Last Edit: June 09, 2009, 02:56:32 pm by Daviea »

Daviea

  • Trade Count: (+30)
  • Full Member
  • ***
  • Offline Offline
  • Posts: 299
  • Last login:December 10, 2010, 06:51:56 pm
    • RAM Controls
Re: Star Wars Cockpit......SHE LIVES !!!!!
« Reply #446 on: June 09, 2009, 02:59:03 pm »
That's one harsh looking yoke!! 

I like the method you used for removing the difficult fastener.  Myself, I try to employ brute force methods as often as possible. :-)

David Adams
RAM Controls


I just won the battle with the most (only) stubbern screw that I couldn't get off.

The war was dirty though.....


I had to use the dremel on this one. I cut the complete 60 tooth gear to pieces, leaving a block that I could grip to. That block "contains" the screw that I couldn't get loose anymore. I feared that I couldn't get it loose at all which would mean needing a new shaft but it turned out just fine.


Level42

  • Wiki Contributor
  • Trade Count: (+5)
  • Full Member
  • ***
  • Offline Offline
  • Posts: 5965
  • Last login:November 13, 2018, 01:56:39 am
  • A Suzo stick is a joy forever...
Re: Star Wars Cockpit......SHE LIVES !!!!!
« Reply #447 on: June 09, 2009, 04:44:56 pm »
I only use force when all other options have failed. I'm positive this screw was completely fixed to the aluminium of the tooth gear.

The most dirt you see comes from the dremeling of the plastic of the tooth-gear. The liberal way they lubricated the yoke makes it stick all over.....

Quiz question for the SW yoke experts: what is the missing part on this picture ?


Daviea

  • Trade Count: (+30)
  • Full Member
  • ***
  • Offline Offline
  • Posts: 299
  • Last login:December 10, 2010, 06:51:56 pm
    • RAM Controls
Re: Star Wars Cockpit......SHE LIVES !!!!!
« Reply #448 on: June 09, 2009, 05:11:03 pm »
What's missing in the picture?

Spring pin
14-tooth gear
5K potentiometer
Fastener on inner collar
at least one retaining ring
at least one handle grip
all of the wiring
....a small chunk of the 60-tooth gear
oh, and a good cleaning. :-)

LOL

David Adams
RAM Controls

I only use force when all other options have failed. I'm positive this screw was completely fixed to the aluminium of the tooth gear.

The most dirt you see comes from the dremeling of the plastic of the tooth-gear. The liberal way they lubricated the yoke makes it stick all over.....

Quiz question for the SW yoke experts: what is the missing part on this picture ?


« Last Edit: June 09, 2009, 05:13:49 pm by Daviea »

Level42

  • Wiki Contributor
  • Trade Count: (+5)
  • Full Member
  • ***
  • Offline Offline
  • Posts: 5965
  • Last login:November 13, 2018, 01:56:39 am
  • A Suzo stick is a joy forever...
Re: Star Wars Cockpit......SHE LIVES !!!!!
« Reply #449 on: June 09, 2009, 05:37:03 pm »
Fastener on inner collar

Haha, I probably should have phrased it differently, but THAT was the part that was already missing when I opened it...... The other fastener looks to be too long....

No problem I found a source for all the screw and bolts etc. needed.

Level42

  • Wiki Contributor
  • Trade Count: (+5)
  • Full Member
  • ***
  • Offline Offline
  • Posts: 5965
  • Last login:November 13, 2018, 01:56:39 am
  • A Suzo stick is a joy forever...
Re: Star Wars Cockpit......SHE LIVES !!!!!
« Reply #450 on: June 26, 2009, 06:35:09 pm »
OK let's get done with it, I have to face the music:


Turned out I needed the entire tin of glue...

First I glued both the wood and the mat and let it dry a bit (as instructions say). Then put it in, there's NO moving around with this glue ! It was in pretty good. I couldn't take a pic since my hands were all sticky and my wife not around to take one... anyway, I went to the other side that was much harder to do. Had to cut and glue there at about the same time.


It turned out pretty decent. Not factory-like but good enough and a major improvement. So here's the usual "before":


and "after":


I re-installed the PCB set and the wiring, and pretty much everything needed to run the cab. After all, I wanted to do the "fine" convergence on my Amplifone....so here's the test set-up again that I also used for Luc's WG6100.

I was a little worried when powering it up since I had taken everything apart, but on power up  I got a comforting "The Force will be with you" and heared the well-known vector shatter-sound. When I looked at the pick I only saw the blue color though ! Since I had the problem with the green before, I checked the main connector and surely the green and red wire pins had clicked out of the connectors. Gently forced them back in place and everything was fine again.


Level42

  • Wiki Contributor
  • Trade Count: (+5)
  • Full Member
  • ***
  • Offline Offline
  • Posts: 5965
  • Last login:November 13, 2018, 01:56:39 am
  • A Suzo stick is a joy forever...
Re: Star Wars Cockpit......SHE LIVES !!!!!
« Reply #451 on: June 26, 2009, 06:39:32 pm »
O for David (and others): I recently visited Luc again and his cockpit (which is US built) has a glass bezel.

Just great.....now, of course, I cannot live without a tinted, non-glare glass bezel :)

Level42

  • Wiki Contributor
  • Trade Count: (+5)
  • Full Member
  • ***
  • Offline Offline
  • Posts: 5965
  • Last login:November 13, 2018, 01:56:39 am
  • A Suzo stick is a joy forever...
Re: Star Wars Cockpit......SHE LIVES !!!!!
« Reply #452 on: June 28, 2009, 01:01:10 pm »
I did the final (edge) convergence on my Amplifone and I figured some of you might like to see how it's done.

As mentioned, this is not a full converging because the center area was already perfect and it's just getting the corners convergence correct.


KissMyWookie

  • Trade Count: (0)
  • Full Member
  • ***
  • Offline Offline
  • Posts: 94
  • Last login:September 18, 2014, 04:57:34 pm
Re: Star Wars Cockpit......SHE LIVES !!!!!
« Reply #453 on: July 02, 2009, 04:00:46 am »
Really beautiful job you're doing.  :applaud:

The sit down SW cab was my favorite game as a kid, so it's especially nice to see that some of them are being preserved like this.

It's great that you can play TESB on the same cab too - is that just a ROM switchover board or is it a whole new game board on the new miniaturized PCB?

If you do feel like patching the particle board behind the coin door, the best thing to use would be Bondo (car body filler). Just dig out any of the loose particles beforehand and the Bondo will stick very well.

To make cleaning up the metal parts easier, use Phosphoric Acid (or Naval Jelly - which is a product sold in the US consisting of Phosphoric Acid, but is thicker and easier to apply to vertical surfaces). It dissolves the rust, leaving bare metal behind ... one thing I have found though, is that it will also remove the black oxide coating from bolts/screws too (not to mention strip off zinc plating). Another benefit to using Phosphoric Acid is that it microscopically etches the metal surface, providing a good "key" for paint.

Steve


Level42

  • Wiki Contributor
  • Trade Count: (+5)
  • Full Member
  • ***
  • Offline Offline
  • Posts: 5965
  • Last login:November 13, 2018, 01:56:39 am
  • A Suzo stick is a joy forever...
Re: Star Wars Cockpit......SHE LIVES !!!!!
« Reply #454 on: July 02, 2009, 04:55:09 am »
Thanks Steve,

Yeah I have some bondo around, not sure if I will do it as it's completely out of sight when the box of the coin buckets is mounted....

I did some experimenting with the phosphor stuff on the metal parts of the Pac Man joystick. Mainly because the big part is very hard to reach with any other method.  It works pretty well, but you need to do the following steps quickly as it will start rusting again very soon.

The plan is to collect all the metal parts that are supposed to be black from ALL my cabs and have them all sandblasted and powdercoated in one go. This would be most economic. And powedercoating rocks, I don't think I will need to worry about it for the rest of my lifetime..... :D

The SW/ESB kit is not really just a rom switchover only (as far as I understand it). Of course, the new eprom(boards) contain all the ROM data of both games, but there's some eleborate electronics on the main kit-board too. It comes from Mark Spaeth (you can find him on the KLOV forum).

Level42

  • Wiki Contributor
  • Trade Count: (+5)
  • Full Member
  • ***
  • Offline Offline
  • Posts: 5965
  • Last login:November 13, 2018, 01:56:39 am
  • A Suzo stick is a joy forever...
Re: Star Wars Cockpit......SHE LIVES !!!!!
« Reply #455 on: July 04, 2009, 06:42:03 am »
I just ordered all required bolts/screw etc. for the yoke.

I found this great website in the UK that sells all these weird screw/bolts and in both metric and imperial sizes:

http://www.modelfixings.co.uk/

Notice that they ship world-wide. They sell in small quantities for very moderate prices IMHO. Sure, maybe you can get them cheaper if you order large numbers but who needs 100's of these things (except for David  :laugh: )

The shipping prices are also very reasonable. The minium order is only UKP 3 so that's not an issue either.

I e-mailed with Ian there and on my request he added 1" long 8-32 button-cap screws, which I think are used all over the SW cockpit.

I'll put a list here with the order numbers and corresponding Atari part nrs.

I just put in my order, will report again when stuff arrives.

[edit] They also sell circlips and e-clips that are so often used on joysticks in lots of sizes:

http://www.modelfixings.co.uk/circlips.htm
« Last Edit: July 04, 2009, 06:49:56 am by Level42 »

Level42

  • Wiki Contributor
  • Trade Count: (+5)
  • Full Member
  • ***
  • Offline Offline
  • Posts: 5965
  • Last login:November 13, 2018, 01:56:39 am
  • A Suzo stick is a joy forever...
Re: Star Wars Cockpit......SHE LIVES !!!!!
« Reply #456 on: July 05, 2009, 09:25:24 am »
So, I've finalized the convergence on my Amplifone and I'm really happy with it. It's a 1000% improvement over what it was in the corners.....

BUT I still have one thing that annoys me on the monitor:


Pincushion ! You can clearly see that the lines are bend inwards, while on a CRT that is curved it looks much more natural to have it (slightly) following the curve of the CRT.

Now, the story is that SW (and some other color vectors by Atari) don't have a circuit for adjusting pincushion because this was "corrected" in the "specially designed" yokes.

Well, if this is the result, I'd say they obviously didn't do a very nice job.

I guess most would say you don't really notice it in gameplay, and to some extend, that's true, but.....I just want it fixed because I know it can be better.

F.I. when playing the intro of ESB, Darth Vader's ship really looks skewed when at the right edge of the screen and than "warps" to normal in the center. It looks wrong.

Now, the designer of the SW hardware, Jed Margolin put a nice pincushion circuit on his site, that was used for Atari's early vector games like Tempest:
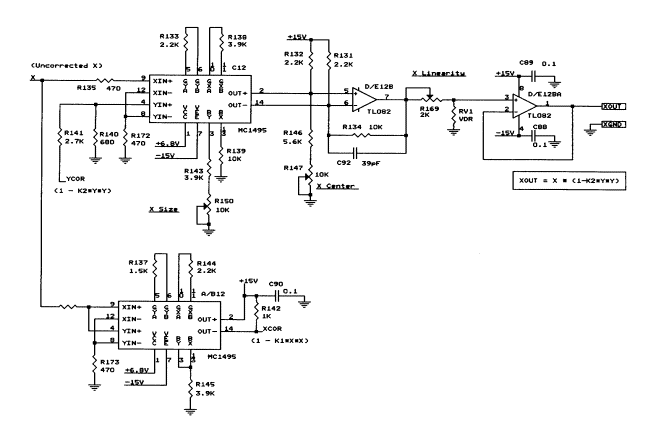


Now, I'd like to try and incorporate a circuit like that to be able to correct the pincushion as it should be.

Clay Cowgill once offered this ready built, mainly aimed at those who used a WG on SW, which as we all know has a different angled tube, and thus even worse pincushion issues:
http://www.multigame.com/display.html

However, it doesn't look like this kit is available anymore. If anyone has one around, I'm interested.

Alternatively, I'll have to build one myself....

Level42

  • Wiki Contributor
  • Trade Count: (+5)
  • Full Member
  • ***
  • Offline Offline
  • Posts: 5965
  • Last login:November 13, 2018, 01:56:39 am
  • A Suzo stick is a joy forever...
Re: Star Wars Cockpit......SHE LIVES !!!!!
« Reply #457 on: July 10, 2009, 05:04:28 am »
There's promissing news from Clay about the pincushion corrector boards, I'll add info here soon.

Meanwhile I stumbled on this thread on KLOV forum:

http://forums.arcade-museum.com/showthread.php?p=830258#post830258

where Talon2000 put up this link with a complete walk-through of a SW yoke rebuild in pictures. This is very handy to have around when you start on this job. And I thought it would be a good idea to link directly to it here:

http://picasaweb.google.com/Talon.K/YokeRebuild?authkey=Gv1sRgCLv99NCl-8jFUg&feat=directlink#


Level42

  • Wiki Contributor
  • Trade Count: (+5)
  • Full Member
  • ***
  • Offline Offline
  • Posts: 5965
  • Last login:November 13, 2018, 01:56:39 am
  • A Suzo stick is a joy forever...
Re: Star Wars Cockpit......SHE LIVES !!!!!
« Reply #458 on: July 10, 2009, 09:26:21 am »
....and what came with the mail today.......:


AND I have tonight ALL night for myself........operation YOKE will begin !
« Last Edit: July 10, 2009, 10:25:57 am by Level42 »

Level42

  • Wiki Contributor
  • Trade Count: (+5)
  • Full Member
  • ***
  • Offline Offline
  • Posts: 5965
  • Last login:November 13, 2018, 01:56:39 am
  • A Suzo stick is a joy forever...
Re: Star Wars Cockpit......SHE LIVES !!!!!
« Reply #459 on: July 10, 2009, 10:37:47 am »
Well that starts off really nice.

Included with the screws from www.modelfixings.co.uk there was this key-set that has all the required sizes.


So, using this I first released the one remaining cap-screw that was holding the front part to the back part.

Or so I thought. Because once I got it removed, I tried shifting the front and back parts loose (away from each-other) but it was _still_ stuck... So I examined what was going on and it turns out that the lower screw (there are 3) had been broken off before.......nothing I did, it already was like this.

I already noticed the last screw that I removed was not entirely straight anymore (you get that typical feeling where the screw goes nice and easy on one side, and very hard on the other...) and this probably caused that.

Look, there's no cap .....


Yet there is some remaining screw in there......:


So, I'm royally screwed here !

I have no clue how to solve this. I could try and drill it out but it's very hard to reach and I'm sure I will hurt the thread. I could try to hammer the shaft out with force but that will very likely (at least !) scratch the inside of where the shaft is......

Gotta love this hobby, but sometimes .................. :blowup:

KissMyWookie

  • Trade Count: (0)
  • Full Member
  • ***
  • Offline Offline
  • Posts: 94
  • Last login:September 18, 2014, 04:57:34 pm
Re: Star Wars Cockpit......SHE LIVES !!!!!
« Reply #460 on: July 10, 2009, 10:51:55 am »
Yet there is some remaining screw in there......:
-----8<----- image snipped -----8<-----
So, I'm royally screwed here !

I have no clue how to solve this. I could try and drill it out but it's very hard to reach and I'm sure I will hurt the thread. I could try to hammer the shaft out with force but that will very likely (at least !) scratch the inside of where the shaft is......

Gotta love this hobby, but sometimes .................. :blowup:

Don't panic - there are tools for that. Search for "screw extractor".

They work by attaching to your cordless screwdriver/drill and as you operate the drill in reverse, the bit bites into a dimple (you can make one with a small drill bit - sometimes the other end of the screw extractor has one on the end) and tightens it's grip as you reverse out the damaged screw.

You'll want to soak the thread of the damaged screw in WD-40 before doing this, to release any rust or gunky soda that might make extracting it even more difficult.

If the screw is too small to even use a screw extractor, you can drill it out - preferably with a drill press and a vise. Start with a small drill and go just large enough so that the thread of the socket is not damaged. If there's any remaining bits left after that, try picking them out with dental type picks and/or driving the correct size thread cutting tool into the hole.

If all else fails, drill it out with a large enough drill bit (thread as well), cut a new larger thread on the inside, then insert a thread repair bushing to reduce the size back down to what you need.

Good luck

Steve

PS: I just took another look at your image and another option would be to use a grinder or dremel to remove those tack welds that are holding the collar on ... then you can remove the shaft with the collar attached and work on the problem more easily.
« Last Edit: July 10, 2009, 10:55:03 am by KissMyWookie »

Level42

  • Wiki Contributor
  • Trade Count: (+5)
  • Full Member
  • ***
  • Offline Offline
  • Posts: 5965
  • Last login:November 13, 2018, 01:56:39 am
  • A Suzo stick is a joy forever...
Re: Star Wars Cockpit......SHE LIVES !!!!!
« Reply #461 on: July 10, 2009, 02:23:54 pm »
Thanks Steve, great advice. The screw extractors are way too big for this and the one's I found on the web all need to have at least a head (that needs to be drilled a hole in)....and all I got was a piece of the bolt/screw inside the thread....

So I chose the drill. (In the distance a voice said: Do or do not... there is no try.)

The thing is that there probably have been problems before. Only now I noticed this:


They cut out a "half" hole on one side to have free access to that very screw-hole...... I wouldn't be surprised if they forced a wrong-sized screw in there that broke later....

Anyway, using The Force I was able to separate the front and back parts:


Yes, there is now some damage inside the shaft holder, but since it's not turning there I don't think it really is a problem:


Now, next step is to get the rest of the screw out of the shaft. Or.........................order a new shaft from David.........:


Level42

  • Wiki Contributor
  • Trade Count: (+5)
  • Full Member
  • ***
  • Offline Offline
  • Posts: 5965
  • Last login:November 13, 2018, 01:56:39 am
  • A Suzo stick is a joy forever...
Re: Star Wars Cockpit......SHE LIVES !!!!!
« Reply #462 on: July 10, 2009, 03:19:25 pm »
And so.....operation yoke once again comes to a screeching halt.  :angry: :angry: :angry: :banghead: :badmood:

I gave it a bit of thought and I decided I will be replacing at least that shaft, but probably will opt for the entire "premium" kit stuff that I didn't order right away from David, which I should have.

Some advice to anyone else who starts on the journey of SW yoke rebuild: get the full (premium) kit. It will take away all your sorrows about those 25 year old,worn and maybe damaged mechanical parts.
Plus, once your working on this beast, you will never want to work on it again. Once I close the lid of this I don't ever want to have to open it again.....  :laugh:

OK then, with still some time, I can clean all the dirty gummy ---steaming pile of meadow muffin--- off the parts and get it as ready as possible....and I planned on sanding and painting the inside of the CP too.....

Level42

  • Wiki Contributor
  • Trade Count: (+5)
  • Full Member
  • ***
  • Offline Offline
  • Posts: 5965
  • Last login:November 13, 2018, 01:56:39 am
  • A Suzo stick is a joy forever...
Re: Star Wars Cockpit......SHE LIVES !!!!!
« Reply #463 on: July 10, 2009, 06:26:41 pm »
Goo gone:


The scratches are caused by the knife, I had to scrape the goo off with it. Am I right that the circular marks are caused because of the lacking spacer bearing ?
Anyway, will get new paint/powdercoating...

This is what was left of the bumpers....:

Spyridon

  • Trade Count: (+2)
  • Full Member
  • ***
  • Offline Offline
  • Posts: 1480
  • Last login:April 30, 2021, 02:47:05 pm
Re: Star Wars Cockpit......SHE LIVES !!!!!
« Reply #464 on: July 11, 2009, 12:07:15 pm »
Some advice to anyone else who starts on the journey of SW yoke rebuild: get the full (premium) kit. It will take away all your sorrows about those 25 year old,worn and maybe damaged mechanical parts.

What parts does the premium kit add?  (I could check his website, but it's probably good information for this thread)  I have the yoke rebuild, but you make a good point to only do it once.
My current collection:  Arkanoid^3, Asteroids Deluxe, Centipede, Donkey Kong w/DIIK, Frenzy w/Berzerk multi, Galaga, Galaxian, Gyruss, Mappy,  Missile Command, Multi-Williams, O'Boyles Arcade (Mame), Pac-man,  Sinistar, Star Wars, Tempest, War Gods

Spyridon

  • Trade Count: (+2)
  • Full Member
  • ***
  • Offline Offline
  • Posts: 1480
  • Last login:April 30, 2021, 02:47:05 pm
Re: Star Wars Cockpit......SHE LIVES !!!!!
« Reply #465 on: July 11, 2009, 12:09:40 pm »
Okay, I stopped being lazy:

Standard kit:

Deluxe kit:

Premium kit:
My current collection:  Arkanoid^3, Asteroids Deluxe, Centipede, Donkey Kong w/DIIK, Frenzy w/Berzerk multi, Galaga, Galaxian, Gyruss, Mappy,  Missile Command, Multi-Williams, O'Boyles Arcade (Mame), Pac-man,  Sinistar, Star Wars, Tempest, War Gods

Level42

  • Wiki Contributor
  • Trade Count: (+5)
  • Full Member
  • ***
  • Offline Offline
  • Posts: 5965
  • Last login:November 13, 2018, 01:56:39 am
  • A Suzo stick is a joy forever...
Re: Star Wars Cockpit......SHE LIVES !!!!!
« Reply #466 on: August 05, 2009, 10:50:24 am »
I had bought some cans of Rust-oleum black spray paint for "Superully" from Germany and had tested a bit, but I wanted to do a bit more testing. So I selected a part I still had to paint. Now , the plan is to have all the metal parts that need to be black of all my cabs to be powrdercoated in one go. However, I had two parts from my SW that I wanted (at least until ThisOldGame releases the full artwork set) to save the artwork from, but still needed some fresh paint.

The yoke cover and the CP.

Here's the usual pics:
Before: (not that bad really, but rust is beginning to surface. I only had to sand it lightly):


Some careful covering of the decall (yet still able to hit the edges with paint):


And the results:


VERY nice IMHO.

The CP needed it a bit more:


but I didn't sand it down completely. Only did the rusty parts and sanded everything until smooth:


Again some careful masking:


And the result:


Very impressive IMHO ! I'm not very good at spray-can painting but this Rust-oleum really is a quality product. It dries very quick too.

Same detail under different light:


And the decals were completely untouched by the paint I'm happy to say...

I'm kind of playing with the thought to do all the metal parts this way. Sure is a lot cheaper !

Spyridon

  • Trade Count: (+2)
  • Full Member
  • ***
  • Offline Offline
  • Posts: 1480
  • Last login:April 30, 2021, 02:47:05 pm
Re: Star Wars Cockpit......SHE LIVES !!!!!
« Reply #467 on: August 05, 2009, 08:12:47 pm »
this Rust-oleum really is a quality product. It dries very quick too.

No primer?  Lazy!    ;D

My current collection:  Arkanoid^3, Asteroids Deluxe, Centipede, Donkey Kong w/DIIK, Frenzy w/Berzerk multi, Galaga, Galaxian, Gyruss, Mappy,  Missile Command, Multi-Williams, O'Boyles Arcade (Mame), Pac-man,  Sinistar, Star Wars, Tempest, War Gods

Level42

  • Wiki Contributor
  • Trade Count: (+5)
  • Full Member
  • ***
  • Offline Offline
  • Posts: 5965
  • Last login:November 13, 2018, 01:56:39 am
  • A Suzo stick is a joy forever...
Re: Star Wars Cockpit......SHE LIVES !!!!!
« Reply #468 on: August 06, 2009, 01:32:08 am »
 :laugh2:

Yes I did primer it, just forgot to take a pic :) It's three thin layers of Rust-oleum on the CP, two on the yoke cover. The pics make it look a bit grey but that's because the extreme bright sunlight from the window, it looks really black in reality.
« Last Edit: August 06, 2009, 01:34:13 am by Level42 »

Level42

  • Wiki Contributor
  • Trade Count: (+5)
  • Full Member
  • ***
  • Offline Offline
  • Posts: 5965
  • Last login:November 13, 2018, 01:56:39 am
  • A Suzo stick is a joy forever...
Re: Star Wars Cockpit......SHE LIVES !!!!!
« Reply #469 on: August 07, 2009, 02:42:32 pm »
Working some more on the metal parts. I think I'm going to paint the parts that are more or less flat myself. The others have some pretty hard shapes to sand so those may need to be sandblasted anyway.

Something I only noticed now: The metal strips that retain the canopy plexi's and marquee have a different finish on both sides.

It looks like both sides were painted black, and then the top side was treated with some extra process to make a structure. A structure that also is more shiny than the base paint. It reminds me a bit of the Midway coindoor but this looks a lot different:

Bottom (in)side:


Top side:


And of course, the million dollar question is: How to reproduce it ?

Spyridon

  • Trade Count: (+2)
  • Full Member
  • ***
  • Offline Offline
  • Posts: 1480
  • Last login:April 30, 2021, 02:47:05 pm
Re: Star Wars Cockpit......SHE LIVES !!!!!
« Reply #470 on: August 07, 2009, 03:01:41 pm »

And of course, the million dollar question is: How to reproduce it ?

If you can answer that one, you can also solve the Midway coin door riddle.  Looks very similar as you stated.
My current collection:  Arkanoid^3, Asteroids Deluxe, Centipede, Donkey Kong w/DIIK, Frenzy w/Berzerk multi, Galaga, Galaxian, Gyruss, Mappy,  Missile Command, Multi-Williams, O'Boyles Arcade (Mame), Pac-man,  Sinistar, Star Wars, Tempest, War Gods

SirPeale

  • Green Mountain Man
  • Global Moderator
  • Trade Count: (+23)
  • Full Member
  • *****
  • Offline Offline
  • Posts: 12963
  • Last login:August 04, 2023, 09:51:57 am
  • Arcade Repair in New England
    • Arcade Game and Other Coin-Op Projects
Re: Star Wars Cockpit......SHE LIVES !!!!!
« Reply #471 on: August 07, 2009, 08:50:39 pm »

And of course, the million dollar question is: How to reproduce it ?

If you can answer that one, you can also solve the Midway coin door riddle.  Looks very similar as you stated.


That's easy; Rust-Oleum textured black paint, followed by a coat of Rust-Oleum semi-gloss black.

jwoods

  • Trade Count: (0)
  • Jr. Member
  • **
  • Offline Offline
  • Posts: 8
  • Last login:January 21, 2015, 05:55:44 pm
Re: Star Wars Cockpit......SHE LIVES !!!!!
« Reply #472 on: August 07, 2009, 08:55:46 pm »
I think this stuff might work. Rustoleum Hammertone paint. This paint has a kind of "hammered" or textured finish and covers a multitude of surface defects.

Level42

  • Wiki Contributor
  • Trade Count: (+5)
  • Full Member
  • ***
  • Offline Offline
  • Posts: 5965
  • Last login:November 13, 2018, 01:56:39 am
  • A Suzo stick is a joy forever...
Re: Star Wars Cockpit......SHE LIVES !!!!!
« Reply #473 on: August 09, 2009, 04:04:09 pm »
Thanks for the suggesions. We can't seem to find the structured version of the Rust-oleum overhere.
I don't really think this is a hammered look, but there are a lot of differences called hammered.

I did some experimenting:

First I applied a layer of Rust-oleum (How do you call the even less shinier version of satin ?). Then I figured to hit it with some high gloss metal coating from Hammerite (but not a hammered paint).
I first tried a very wide opened structured roller:


Turned out like this:


In essence it was what I was looking for, but the structure is just too coarse resulting in too big "blobs".

So next I tried a finer roller:


This resulted in a fully covered gloss layer, although structured, again not what I was looking for. It also showed tiny air bubbles inside the paint.

Here's the three compared. Original in the middle.


Apart from them not looking right, it is EXTREMELY hard to get the effects even throughout the surface of 1 piece of metal, let alone on various pieces.....

Result: FAIL


« Last Edit: August 09, 2009, 04:06:35 pm by Level42 »

Level42

  • Wiki Contributor
  • Trade Count: (+5)
  • Full Member
  • ***
  • Offline Offline
  • Posts: 5965
  • Last login:November 13, 2018, 01:56:39 am
  • A Suzo stick is a joy forever...
Re: Star Wars Cockpit......SHE LIVES !!!!!
« Reply #474 on: August 10, 2009, 01:21:36 pm »
In the meantime, I bought these:


Won't be needing those covers though  :laugh:

Now I've got to find another (matching) pair.....


 :laugh: :laugh: :laugh: :laugh:


Superully

  • Trade Count: (0)
  • Full Member
  • ***
  • Offline Offline
  • Posts: 30
  • Last login:October 06, 2016, 02:48:27 am
Re: Star Wars Cockpit......SHE LIVES !!!!!
« Reply #475 on: August 10, 2009, 05:37:17 pm »
nice effort regarding the paint job - i'm sure we europeans will get there eventually  ;) it can be damn hard to get stuff you americans can get at any home depot. sometimes arcade life  :censored:

Level42

  • Wiki Contributor
  • Trade Count: (+5)
  • Full Member
  • ***
  • Offline Offline
  • Posts: 5965
  • Last login:November 13, 2018, 01:56:39 am
  • A Suzo stick is a joy forever...
Re: Star Wars Cockpit......SHE LIVES !!!!!
« Reply #476 on: August 10, 2009, 05:52:35 pm »
nice effort regarding the paint job - i'm sure we europeans will get there eventually  ;) it can be damn hard to get stuff you americans can get at any home depot. sometimes arcade life  :censored:
I've not given up just yet Ully ;)

I really wonder how the speakers will sound :P

Hope the transistors on the AR-2 can feed them.....8 Watts only :P

Maybe I'll put a small separate amp inside.

I also thought about something like this:

under the seat but that would be a bit silly right ?
 :laugh2:
« Last Edit: August 10, 2009, 05:54:18 pm by Level42 »

Level42

  • Wiki Contributor
  • Trade Count: (+5)
  • Full Member
  • ***
  • Offline Offline
  • Posts: 5965
  • Last login:November 13, 2018, 01:56:39 am
  • A Suzo stick is a joy forever...
Re: Star Wars Cockpit......SHE LIVES !!!!!
« Reply #477 on: August 11, 2009, 12:40:07 pm »
Some more work:

Removing the speaker grills. Probably because of anti-vandal reasons Atari chose to use those pop-nails to mount these:


Of course, they're a pain for us because you can't remove them without destroying them. I used a drill slightly larger in diameter than the hole. This way, you "snap" off the top of the nail.:


This enables to remove the grill (sorry, bit out of focus):


After removing the grill, I drilled through the hole completely. The rest of the pop-nail is still in there !


Here's the left over tops and bottoms:


The bare frame of the lower speakers. As you can see the vinyl badly needs to be replaced. No wonder after all those years of heels kicking it :)


I removed the top grills in exactly the same way. Had to be careful when drilling through the holes, I removed the marquee to be safe !

What would be the best replacement vinyl for this ?:


I think we can rule out A,B,C and F which are clearly not the same. So it's D or E, what do you guys think ?
D is called Black Pica Vinyl. E is Black Hide Vinyl. I hope it's D (pica) as this is also available in 49" wide, which means you can cut it in half and still fit on (most) cabs.

« Last Edit: August 11, 2009, 12:49:23 pm by Level42 »

Spyridon

  • Trade Count: (+2)
  • Full Member
  • ***
  • Offline Offline
  • Posts: 1480
  • Last login:April 30, 2021, 02:47:05 pm
Re: Star Wars Cockpit......SHE LIVES !!!!!
« Reply #478 on: August 11, 2009, 03:28:33 pm »


I think we can rule out A,B,C and F which are clearly not the same. So it's D or E, what do you guys think ?
D is called Black Pica Vinyl. E is Black Hide Vinyl. I hope it's D (pica) as this is also available in 49" wide, which means you can cut it in half and still fit on (most) cabs.


Hard to tell in that photo, but D may be a bit closer.  You'll probably have to get a small sample of each and match it up directly.


I had to deal with those rivets on my Centipede.  I eventually decided to leave the speaker grill in place and paint it with the rest of the cab.
My current collection:  Arkanoid^3, Asteroids Deluxe, Centipede, Donkey Kong w/DIIK, Frenzy w/Berzerk multi, Galaga, Galaxian, Gyruss, Mappy,  Missile Command, Multi-Williams, O'Boyles Arcade (Mame), Pac-man,  Sinistar, Star Wars, Tempest, War Gods

SirPeale

  • Green Mountain Man
  • Global Moderator
  • Trade Count: (+23)
  • Full Member
  • *****
  • Offline Offline
  • Posts: 12963
  • Last login:August 04, 2023, 09:51:57 am
  • Arcade Repair in New England
    • Arcade Game and Other Coin-Op Projects
Re: Star Wars Cockpit......SHE LIVES !!!!!
« Reply #479 on: August 11, 2009, 05:05:03 pm »
I was thinking D myself.

What are you going to replace the rivets with?  I was thinking of using carriage bolts, but not sure if I can find them in the size I need locally.