Main Restorations Software Audio/Jukebox/MP3 Everything Else Buy/Sell/Trade
Project Announcements Monitor/Video GroovyMAME Merit/JVL Touchscreen Meet Up Retail Vendors
Driving & Racing Woodworking Software Support Forums Consoles Project Arcade Reviews
Automated Projects Artwork Frontend Support Forums Pinball Forum Discussion Old Boards
Raspberry Pi & Dev Board controls.dat Linux Miscellaneous Arcade Wiki Discussion Old Archives
Lightguns Arcade1Up Try the site in https mode Site News

Unread posts | New Replies | Recent posts | Rules | Chatroom | Wiki | File Repository | RSS | Submit news


Author Topic: *** Project Arcadeus ***  (Read 61243 times)

0 Members and 1 Guest are viewing this topic.

Jontox

  • Trade Count: (0)
  • Full Member
  • ***
  • Offline Offline
  • Posts: 45
  • Last login:March 08, 2025, 04:14:40 pm
  • I've built my own arcade cabinet!
    • See Arcadeus Project Blog!
*** Project Arcadeus ***
« on: January 04, 2006, 03:47:00 pm »
Hi all,

First post and first arcade project already started...

The arcade cabinet is already finished, Ultimate Arcade Cabinet 2 variation like GSXR's project that I do like very much:


CP will be assemblied by Knievel with backlit buttons and Cp art is currently made by Pixelhugger. I let him the honour of posting his WIP himselfs.

Find below the blog dedicated to the project:
http://arcadeus.over-blog.net/

The blog is currently only in French but it will be translated into English very soon.

See you soon and all comments are welcomed.

P.S.: Big applause to the nice arcade specialist community surfing here  :)

Taborious

  • Wiki Contributor
  • Trade Count: (0)
  • Full Member
  • ***
  • Offline Offline
  • Posts: 264
  • Last login:December 29, 2011, 04:55:45 pm
  • Win or go Home!
    • The Way Back Machine
Re: *** Project Arcadeus ***
« Reply #1 on: January 04, 2006, 05:05:54 pm »
Seriously, whos garage is that clean??? I'm lucky if I can walk through mine without falling over 10 things...

Looking good so far...
The Way Back Machine - http://www.taborious.com

Harpal

  • Trade Count: (0)
  • Full Member
  • ***
  • Offline Offline
  • Posts: 308
  • Last login:April 02, 2006, 12:02:22 pm
  • I'VE STARTED BUILDING MY FIRST MINI ARCADE!!!
    • 3D-ARCADE at MAMEWORLD
Re: *** Project Arcadeus ***
« Reply #2 on: January 04, 2006, 05:33:51 pm »
thats does look really nice cant wait to see how it will look when it is all finish....
HAPPY NEW YEAR!!!!!
---------2006-----------

Knievel

  • Trade Count: (+3)
  • Full Member
  • ***
  • Offline Offline
  • Posts: 965
  • Last login:July 10, 2016, 10:29:09 pm
  • Who's up for a game of Stunt Cycle??
    • Knievel Kustoms
Re: *** Project Arcadeus ***
« Reply #3 on: January 04, 2006, 07:07:55 pm »
Your cabinet looks great Jontox..as does the garage. :)

Looking forward to assembling your CP once the art is done.
Pixel was saying this is his first 'tri-national arcade project'.. I'm thinking maybe it's the first one EVER??


NinjaEpisode

  • Trade Count: (0)
  • Full Member
  • ***
  • Offline Offline
  • Posts: 733
  • Last login:June 16, 2019, 06:47:45 pm
Re: *** Project Arcadeus ***
« Reply #4 on: January 05, 2006, 09:07:31 am »
Seriously, whos garage is that clean??? I'm lucky if I can walk through mine without falling over 10 things...

Amen brother!

Looks great Jontox!

Jontox

  • Trade Count: (0)
  • Full Member
  • ***
  • Offline Offline
  • Posts: 45
  • Last login:March 08, 2025, 04:14:40 pm
  • I've built my own arcade cabinet!
    • See Arcadeus Project Blog!
Re: *** Project Arcadeus ***
« Reply #5 on: January 05, 2006, 04:42:23 pm »
Nice to see that everyone likes my garage (family's garage in fact, not mine personaly) as much as the cabinet  ;D ;D ;D

Thanks for you comments.
I will add some pictures showing the entire painted cabinet (Glossy Black).

Some pics of the Betson Imperial 27" screen temporarely fixed in it as well.

N.B.: Hi Knievel, CP art is quite in final status. I must resist to not posting any revision picture I already get as the honour remains to the creator...

...to be continued

Pixelhugger

  • Trade Count: (+8)
  • Full Member
  • ***
  • Offline Offline
  • Posts: 1865
  • Last login:March 24, 2025, 05:45:13 pm
Re: *** Project Arcadeus ***
« Reply #6 on: January 05, 2006, 11:02:26 pm »
OK, here is the CP as it stands right now. Translucent buttons up top for pause, and black P1 and P2 buttons if I remember correctly.

As usual open in a new window or download to see it larger. Actual dimension of this JPEG is 1200x549, much larger than the thread will display.
« Last Edit: January 05, 2006, 11:50:58 pm by Pixelhugger »
Project mega thread HERE

Pixelhugger

  • Trade Count: (+8)
  • Full Member
  • ***
  • Offline Offline
  • Posts: 1865
  • Last login:March 24, 2025, 05:45:13 pm
Re: *** Project Arcadeus ***
« Reply #7 on: January 05, 2006, 11:05:45 pm »
Up close and personal with the pause and start graphics.  :P
Project mega thread HERE

KrawDaddy

  • Trade Count: (0)
  • Full Member
  • ***
  • Offline Offline
  • Posts: 329
  • Last login:February 19, 2007, 06:37:04 pm
  • I am a LOSER
Re: *** Project Arcadeus ***
« Reply #8 on: January 05, 2006, 11:12:42 pm »
Amazing as always....Pix ;D

Kraw
All I ask is that my routers obey me as though they would the word of GOD!

Jontox

  • Trade Count: (0)
  • Full Member
  • ***
  • Offline Offline
  • Posts: 45
  • Last login:March 08, 2025, 04:14:40 pm
  • I've built my own arcade cabinet!
    • See Arcadeus Project Blog!
Re: *** Project Arcadeus ***
« Reply #9 on: March 16, 2006, 04:14:06 pm »
And here we go again... some time has passed and the project has reached next step.

First I want to tell you that Blog has been entirely translated into english. In case you want to see a lot more pictures and leave a comment here is the link
http://arcadeus.over-blog.net/

Here are the new pics I want to share with you:

Printed CP Overlay by MameMarquees (Great JOB!!!) (Pictures available by courtesy of Knievel)


Painted Arcade Cabinet (Black Gloss)


Painted Arcade Cabinet (Black Gloss) + Stools


Mounted Car Speakers + Marquee light


Marquee Close Up (With temporary piece of poster to be replaced by artwork)


Backlit Marquee Close Up (With temporary piece of poster to be replaced by artwork)


Cabinet Inside view showing Marquee lighting fixature


That's it for now... as always comments are welcomed  ;D  ;D  ;D

See you soon
« Last Edit: March 16, 2006, 04:17:54 pm by Jontox »

Knievel

  • Trade Count: (+3)
  • Full Member
  • ***
  • Offline Offline
  • Posts: 965
  • Last login:July 10, 2016, 10:29:09 pm
  • Who's up for a game of Stunt Cycle??
    • Knievel Kustoms
Re: *** Project Arcadeus ***
« Reply #10 on: March 24, 2006, 12:43:51 pm »

CP assembly is finally underway..the artwork is stunning.


Pixelhugger

  • Trade Count: (+8)
  • Full Member
  • ***
  • Offline Offline
  • Posts: 1865
  • Last login:March 24, 2025, 05:45:13 pm
Re: *** Project Arcadeus ***
« Reply #11 on: March 24, 2006, 05:16:37 pm »
*breathes sigh of relief for alignment* niiiiiiice! :applaud:
Project mega thread HERE

Jontox

  • Trade Count: (0)
  • Full Member
  • ***
  • Offline Offline
  • Posts: 45
  • Last login:March 08, 2025, 04:14:40 pm
  • I've built my own arcade cabinet!
    • See Arcadeus Project Blog!
Re: *** Project Arcadeus ***
« Reply #12 on: March 24, 2006, 05:27:37 pm »
Really really nice  ;D ;D ;D

It should be better when backlit hehe

Perfectly designed, Perfectly aligned
Thanks to both of you  :notworthy:

To be continued...

miles2912

  • Trade Count: (0)
  • Full Member
  • ***
  • Offline Offline
  • Posts: 706
  • Last login:October 31, 2019, 05:30:24 pm
  • My first Home Game. Fairchild System F.
Re: *** Project Arcadeus ***
« Reply #13 on: March 24, 2006, 08:08:18 pm »
Ces't tres bien (one year high school french)

I love the artwork.   Can't wait to see the marquee.  Any side art in the work?

Don
« Last Edit: March 24, 2006, 11:45:37 pm by miles2912 »
  Scratch built upright MAME Cab

Jontox

  • Trade Count: (0)
  • Full Member
  • ***
  • Offline Offline
  • Posts: 45
  • Last login:March 08, 2025, 04:14:40 pm
  • I've built my own arcade cabinet!
    • See Arcadeus Project Blog!
Re: *** Project Arcadeus ***
« Reply #14 on: March 25, 2006, 08:20:58 am »
Merci miles2912, your french is still valuable  ;)

Normally Side arts is planned but it will be the last thing...

Pixelhugger should start working on the marquee soon... I'm sure he will keep you posted with new pics asap.

See you soon

Jontox  8)


mccoy178

  • It's hard to work with a straight jacket on
  • Trade Count: (+9)
  • Full Member
  • ***
  • Offline Offline
  • Posts: 3127
  • Last login:September 03, 2021, 10:23:42 am
  • Go Bucks!
Re: *** Project Arcadeus ***
« Reply #15 on: March 25, 2006, 09:14:20 am »
Pulling out the big boys eh, for some dirty work?  Excellent idea!!!  You couldn't have picked two better guys to help, and the quality!  For geez sakes that looks wonderful!  Are you going to have any artwork on your bezel?

fixedpigs

  • Trade Count: (0)
  • Full Member
  • ***
  • Offline Offline
  • Posts: 627
  • Last login:Yesterday at 01:02:44 pm
  • warning: drew can't handle my avatar...
Re: *** Project Arcadeus ***
« Reply #16 on: March 25, 2006, 12:15:43 pm »

CP assembly is finally underway..the artwork is stunning.


looks good...!
what's the best way to get that nice curve along the front of the cp top...?
i marked 1" lines along mine and then connected the dots based off of measurements from my cad model...but it still has that slight freehand look to it...

SNAAKE

  • Trade Count: (+29)
  • Full Member
  • ***
  • Offline Offline
  • Posts: 3564
  • Last login:Yesterday at 02:07:33 pm
  • my joystick is bigger than your joystick !
Re: *** Project Arcadeus ***
« Reply #17 on: March 25, 2006, 02:59:20 pm »
PIIIIIIIIIIIIIIIIIMP !!  8) 8)

Lon

  • Trade Count: (0)
  • Full Member
  • ***
  • Offline Offline
  • Posts: 38
  • Last login:March 31, 2006, 04:32:00 pm
Re: *** Project Arcadeus ***
« Reply #18 on: March 25, 2006, 07:32:45 pm »
Very Nice Job!!!! :applaud:

Jontox

  • Trade Count: (0)
  • Full Member
  • ***
  • Offline Offline
  • Posts: 45
  • Last login:March 08, 2025, 04:14:40 pm
  • I've built my own arcade cabinet!
    • See Arcadeus Project Blog!
Re: *** Project Arcadeus ***
« Reply #19 on: March 26, 2006, 06:15:16 am »
Pulling out the big boys eh, for some dirty work?  Excellent idea!!!  You couldn't have picked two better guys to help, and the quality!  For geez sakes that looks wonderful!  Are you going to have any artwork on your bezel?

The Betson 27" will have a Happs 27" black bezel (which is already ordered).
At first, I didn't plan to add any plexi in front of the monitor but when I found this link http://www.oscarcontrols.com/smoked/ I changed my mind.

Monitor will be covered with smoked plexi so artwork could be planned...but after sidearts...

I've search the board for recommandations of any kind and found these:

  • RandyT suggested dark gray (Neutral color which doesn't interefer with colors from the monitor)
  • Oscarcontrols advised a plexi referred as Lucite transparent Gray
  • Light transmittance of 20%, 25% ? (Cast acrylic)
  • 1/4 inch tick?, Oscar used 1/8 inch tick and I do really like the result, I wonder if thicker peace of Pleaxi would not darken the picture too much

Do you think it should do the job ?
Any additional precise information and suggestions will help me find the correct plexi here in Belgium (Europe)

Thanks in advance

Jontox  8)


« Last Edit: March 26, 2006, 06:41:48 am by Jontox »

Wade

  • Trade Count: (0)
  • Full Member
  • ***
  • Offline Offline
  • Posts: 1639
  • Last login:June 02, 2025, 11:48:57 pm
  • 80's Child
    • Wade's Gameroom
Re: *** Project Arcadeus ***
« Reply #20 on: March 28, 2006, 03:39:28 pm »
Pulling out the big boys eh, for some dirty work?  Excellent idea!!!  You couldn't have picked two better guys to help, and the quality!  For geez sakes that looks wonderful!  Are you going to have any artwork on your bezel?

The Betson 27" will have a Happs 27" black bezel (which is already ordered).
At first, I didn't plan to add any plexi in front of the monitor but when I found this link http://www.oscarcontrols.com/smoked/ I changed my mind.

Monitor will be covered with smoked plexi so artwork could be planned...but after sidearts...

I've search the board for recommandations of any kind and found these:

  • RandyT suggested dark gray (Neutral color which doesn't interefer with colors from the monitor)
  • Oscarcontrols advised a plexi referred as Lucite transparent Gray
  • Light transmittance of 20%, 25% ? (Cast acrylic)
  • 1/4 inch tick?, Oscar used 1/8 inch tick and I do really like the result, I wonder if thicker peace of Pleaxi would not darken the picture too much

Do you think it should do the job ?
Any additional precise information and suggestions will help me find the correct plexi here in Belgium (Europe)

Thanks in advance

Jontox  8)


I highly, highly recommend AGAINST using smoked plexi over the monitor.

Older monitors have lighter colored tubes, and often have screen burn, and the smoked plexi helps to hide that.  They look BAD without a tint over them.

New monitors already HAVE a tinted coating on them.  Also, most new games don't have tint over the monitor, probably for this very reason.  Putting the plexi over a perfectly good monitor just dims the picture and you'll have to crank up the brightness to compensate.  Might as well just turn down the brightness and get the same effect!

Wade

Jontox

  • Trade Count: (0)
  • Full Member
  • ***
  • Offline Offline
  • Posts: 45
  • Last login:March 08, 2025, 04:14:40 pm
  • I've built my own arcade cabinet!
    • See Arcadeus Project Blog!
Re: *** Project Arcadeus ***
« Reply #21 on: March 28, 2006, 04:35:24 pm »
I really didn't know about that.

That seems logical so no smoked Plexi over a Betson 27"  8)
I will only go with a normal no tinted Plexi then...

Thanks for your help Wade
« Last Edit: March 29, 2006, 11:27:30 am by Jontox »

xteeejx

  • Trade Count: (0)
  • Full Member
  • ***
  • Offline Offline
  • Posts: 16
  • Last login:November 22, 2006, 12:08:19 pm
Re: *** Project Arcadeus ***
« Reply #22 on: March 28, 2006, 09:08:32 pm »
That's a beautiful cp.  From the pics it's really hard to tell where the t-moulding ends and the graphic begins.  Good Job!

RandyT

  • Trade Count: (+14)
  • Full Member
  • ***
  • Offline Offline
  • Posts: 7013
  • Last login:July 15, 2025, 12:40:35 pm
  • Friends don't let friends hack keyboards.
    • GroovyGameGear.com
Re: *** Project Arcadeus ***
« Reply #23 on: March 29, 2006, 11:49:11 am »
I highly, highly recommend AGAINST using smoked plexi over the monitor.

Older monitors have lighter colored tubes, and often have screen burn, and the smoked plexi helps to hide that.  They look BAD without a tint over them.

New monitors already HAVE a tinted coating on them.  Also, most new games don't have tint over the monitor, probably for this very reason.  Putting the plexi over a perfectly good monitor just dims the picture and you'll have to crank up the brightness to compensate.  Might as well just turn down the brightness and get the same effect!

I've been asked to give an opinion on this.  For the record, this is strictly a matter of taste.  But there are benefits to using the dark plexi.

As stated, screen burn and light colored phosphor can be hidden by dark plexi.  But even with the newer tubes, just turning down the brightness doesn't do quite the same thing.

One feature of the dark plexi that I really, really like is the fact that screen borders can be completely eliminated.  On a 27" monitor, a vertically oriented game just looks like a 19" vertical monitor is in the cab, not just a smaller screen that is pasted into the center of a larger horizontal one.  If you use artwork graphics to fill in the edges, this may not appeal to you. 

The reason this works is that a CRT can only achieve a certain level of "blackness".  The scanning of the electron gun is still happening in the black areas, and a certain level of phosphor excitation is still occurring.  The dark tinted overlay will make the black levels nearly absolute and by increasing the contrast, a bright image is still achieved.   The dark tinted glass of the newer monitors helps a lot, but they aren't designed to completely negate the background like this method does.  The result is also very comfortable for "in your face" viewing for long periods of time.

As I said, it's a matter of taste.  Those who are using this method seem to like it.  OSCAR liked it after trying it for himself based on my recommendations.  And I personally like it enough to make it part of my current setup, as well as to make it part of my plans for future units.  So if you are at all interested in what can be achieved with it, give it a shot.  It's probably the only way you'll know :)


RandyT

Jontox

  • Trade Count: (0)
  • Full Member
  • ***
  • Offline Offline
  • Posts: 45
  • Last login:March 08, 2025, 04:14:40 pm
  • I've built my own arcade cabinet!
    • See Arcadeus Project Blog!
Re: *** Project Arcadeus ***
« Reply #24 on: March 29, 2006, 12:25:54 pm »
Thanks RandyT for your comment.

This make me solved two pending issues...

  • Smoked Plexi will be used as I want to give it a try. No offense directly addressed to you Wade  ;)
    It is just that pictures behind a smoked plexi increase the nostalgia feeling that made me start this project at first
  • No artwork will be used on the bezel to maintain the illusion vertical games are running on a 19" monitor.

Thanks again for your time...

Wienerdog

  • Trade Count: (0)
  • Full Member
  • ***
  • Offline Offline
  • Posts: 569
  • Last login:December 08, 2020, 06:28:51 am
  • If it's worth doing, it's worth overdoing
Re: *** Project Arcadeus ***
« Reply #25 on: March 29, 2006, 08:32:32 pm »
What kind of balltop is that and what kind of buttons ar you using?  I think everythinig is going to look great together, and I like the smoked glass for the same reason (it hides everything behind the glass). 
« Last Edit: March 29, 2006, 08:34:14 pm by Wienerdog »
This opinion was created from 100% post consumed information.

Wade

  • Trade Count: (0)
  • Full Member
  • ***
  • Offline Offline
  • Posts: 1639
  • Last login:June 02, 2025, 11:48:57 pm
  • 80's Child
    • Wade's Gameroom
Re: *** Project Arcadeus ***
« Reply #26 on: March 30, 2006, 09:51:05 am »
I have several classic games and several newer games, both with tinted glass and without, and I can honestly say that the tint does nothing positive EXCEPT on the games with worse picture tubes.  It is also good for hiding a poor looking bezel, which I'm sure is the reason a lot of people like "the effect"...

My main MAME cabinet with a 27" monitor doesn't have tint, and in my gameroom, vertical games are just as you describe - no border, it essentially looks just like a 19" vertical monitor under the glass.

I also keep my gameroom pretty dim except for the neon lights, so someone who has their game in a brightly lit room might feel the tint has more of a benefit.  For me, the tint has just been a nuisance, and made otherwise perfect monitors look too dim (of course I had to CRANK the brightness to make it look better, which wears the monitor quicker).

Obviously it is a matter of taste, and I agree, it doesn't hurt to try it.

Wade

Timoe

  • Trade Count: (+2)
  • Full Member
  • ***
  • Offline Offline
  • Posts: 1662
  • Last login:July 14, 2009, 09:50:12 am
  • Team-Oh-tAy-Oh
    • Rattlin' Trash
Re: *** Project Arcadeus ***
« Reply #27 on: March 30, 2006, 10:09:45 am »
Control Panel Assembly questions.


1. is the artwork sandwiched between two sheets of acrylic/polycarbonate?

2. are the joysticks top mounted?

3. what thickness is the wood for the CP top?

4. what is the thickness for the t-molding on the control panel?


5.  are there anymore pics of the control panel assembly?

Jontox

  • Trade Count: (0)
  • Full Member
  • ***
  • Offline Offline
  • Posts: 45
  • Last login:March 08, 2025, 04:14:40 pm
  • I've built my own arcade cabinet!
    • See Arcadeus Project Blog!
Re: *** Project Arcadeus ***
« Reply #28 on: March 30, 2006, 02:21:12 pm »
What kind of balltop is that and what kind of buttons ar you using?  I think everythinig is going to look great together, and I like the smoked glass for the same reason (it hides everything behind the glass). 

You don't recognise them ?...

SlikStik Custom Ball Top Joysticks,
Stainless Steel, Handle Type : Optical 360


As for the buttons, I wanted the CP to be backlit so these are from FXBUTTONS, Knievel could answer you better than I on that.

Control Panel Assembly questions.

5.  are there anymore pics of the control panel assembly?

Unfortunately, I've uploaded all CP pictures I got till now on my blog and they are all showing CP assemblied and not WIP. http://arcadeus.over-blog.net/photo-128340-cp-close-up_jpg.html

Knievel could have additional pictures of WIP but I doubt so...

I hope he could help you and answer the remaining questions...


Jontox
« Last Edit: March 31, 2006, 11:43:01 am by Jontox »

Wienerdog

  • Trade Count: (0)
  • Full Member
  • ***
  • Offline Offline
  • Posts: 569
  • Last login:December 08, 2020, 06:28:51 am
  • If it's worth doing, it's worth overdoing
Re: *** Project Arcadeus ***
« Reply #29 on: March 31, 2006, 12:22:20 am »
You don't recognise them ?...

SlikStik Custom Ball Top Joysticks,
Stainless Steel, Handle Type : Optical 360


The funny thing is that I was talking about the red balltop, I can't afford anything from SlikStick  :dizzy:.  You've gone all out on everything so I'd trust your choice in stick (I was just hoping it wasn't a $60 stick and base combo from SS :).

As for the buttons, I wanted the CP to be backlit so these are from FXBUTTONS, Knievel could answer you better than I on that.
 

Thanks, they look great.  I have a blue and red FXBUTTON but they both look a little darker.
This opinion was created from 100% post consumed information.

Jontox

  • Trade Count: (0)
  • Full Member
  • ***
  • Offline Offline
  • Posts: 45
  • Last login:March 08, 2025, 04:14:40 pm
  • I've built my own arcade cabinet!
    • See Arcadeus Project Blog!
Re: *** Project Arcadeus ***
« Reply #30 on: March 31, 2006, 11:43:59 am »
The funny thing is that I was talking about the red balltop, I can't afford anything from SlikStick  :dizzy:.  You've gone all out on everything so I'd trust your choice in stick (I was just hoping it wasn't a $60 stick and base combo from SS :).

This is a new old-stock Wico 4-ways LEAF joysticks

Jontox

Knievel

  • Trade Count: (+3)
  • Full Member
  • ***
  • Offline Offline
  • Posts: 965
  • Last login:July 10, 2016, 10:29:09 pm
  • Who's up for a game of Stunt Cycle??
    • Knievel Kustoms
Re: *** Project Arcadeus ***
« Reply #31 on: April 03, 2006, 01:18:29 pm »

The CP is officially completed and will soon be on it's way to Belgium. I have taken more WIP pictures and will be sending them to Jontox for his website blog.

I've done quite a few of these now but this one really stands out.
Here are a few pics of the finished product..


Pixelhugger

  • Trade Count: (+8)
  • Full Member
  • ***
  • Offline Offline
  • Posts: 1865
  • Last login:March 24, 2025, 05:45:13 pm
Re: *** Project Arcadeus ***
« Reply #32 on: April 03, 2006, 02:18:50 pm »
 :o :o :o :o
Project mega thread HERE

escher

  • Trade Count: (0)
  • Full Member
  • ***
  • Offline Offline
  • Posts: 162
  • Last login:May 28, 2021, 12:18:21 am
  • Out of the game for way too long
Re: *** Project Arcadeus ***
« Reply #33 on: April 03, 2006, 02:37:37 pm »
The CP is officially completed and will soon be on it's way to Belgium. I have taken more WIP pictures and will be sending them to Jontox for his website blog.

I've done quite a few of these now but this one really stands out.
Here are a few pics of the finished product..

Absolutely gorgeous.

Jontox

  • Trade Count: (0)
  • Full Member
  • ***
  • Offline Offline
  • Posts: 45
  • Last login:March 08, 2025, 04:14:40 pm
  • I've built my own arcade cabinet!
    • See Arcadeus Project Blog!
Re: *** Project Arcadeus ***
« Reply #34 on: April 03, 2006, 02:38:09 pm »
 :notworthy: AMEN  :notworthy:

It is really a masterpiece.

Great work Knievel !!!, I was sure that you were the right one to contact for that ....

Jontox  8)

Jontox

  • Trade Count: (0)
  • Full Member
  • ***
  • Offline Offline
  • Posts: 45
  • Last login:March 08, 2025, 04:14:40 pm
  • I've built my own arcade cabinet!
    • See Arcadeus Project Blog!
Re: *** Project Arcadeus ***
« Reply #35 on: April 04, 2006, 03:43:38 pm »

The CP is officially completed and will soon be on it's way to Belgium. I have taken more WIP pictures and will be sending them to Jontox for his website blog.


New batch of pictures uploaded on the Blog arcadeus

Timoe

  • Trade Count: (+2)
  • Full Member
  • ***
  • Offline Offline
  • Posts: 1662
  • Last login:July 14, 2009, 09:50:12 am
  • Team-Oh-tAy-Oh
    • Rattlin' Trash
Re: *** Project Arcadeus ***
« Reply #36 on: April 04, 2006, 04:07:14 pm »
any chance we can post the new pics here also?  I can not find them on your site.

Jontox

  • Trade Count: (0)
  • Full Member
  • ***
  • Offline Offline
  • Posts: 45
  • Last login:March 08, 2025, 04:14:40 pm
  • I've built my own arcade cabinet!
    • See Arcadeus Project Blog!
Re: *** Project Arcadeus ***
« Reply #37 on: April 04, 2006, 04:33:46 pm »
Well not to overload too much this thread, you will find here below the direct link to the pictures album

http://arcadeus.over-blog.net/album-128340.html

Otherwise once on the blog, in the upper left corner you have direc links to all 3 albums available.
Arcade Cabinet, Control Panel, Painted Arcade Cabinet.

Just click the link or the "Main" picture of each album and it will open it in a  new window.

Jontox  8)

Timoe

  • Trade Count: (+2)
  • Full Member
  • ***
  • Offline Offline
  • Posts: 1662
  • Last login:July 14, 2009, 09:50:12 am
  • Team-Oh-tAy-Oh
    • Rattlin' Trash
Re: *** Project Arcadeus ***
« Reply #38 on: April 04, 2006, 05:14:02 pm »
thank you.  The wiring for the LEDS is awesome.  omg, that looks so clean.


I learn something new everyday with this hobby.


today I learned that Knievels work is FREAGIN' SWEET


Knievel if you read this, I gotta get one of your panels someday.,  The lines are so clean.

Maybe I have to go and reread your build threads.  But if you ever get a chance you should make some tutorials.  your work is ridiculous.


/rant

nullb0y

  • Trade Count: (+5)
  • Full Member
  • ***
  • Offline Offline
  • Posts: 1307
  • Last login:November 17, 2024, 04:06:05 pm
  • Slow In Fast Out
    • WAT Racing
Re: *** Project Arcadeus ***
« Reply #39 on: April 05, 2006, 01:40:24 am »
::falls over and dies:: that is beautiful..... wow.....
Slow In Fast Out

Knievel

  • Trade Count: (+3)
  • Full Member
  • ***
  • Offline Offline
  • Posts: 965
  • Last login:July 10, 2016, 10:29:09 pm
  • Who's up for a game of Stunt Cycle??
    • Knievel Kustoms
Re: *** Project Arcadeus ***
« Reply #40 on: April 05, 2006, 07:36:33 pm »
Thanks for the praise guys. Jontox and Pixel are the true creators of this CP of course.

Tim I appreciate the kind words but after looking at Dweebs CP build thread I can't understand why you're so impressed. Looks to me like your work is on the same level.

To answer your earlier questions the CP is 3/4" MDF with a single sheet of 1/8" plexiglass covering the CPO. The joysticks are all top-mounted, should be pics of that on Jontox's site. The t-mold is the standard 3/4" variety, I bevel the bottom edge of the CP to make up for the extra thickness of the plexi. Once the bottom of the CP is painted black the bevel disappears.

Sorry I haven't been more active in this thread. Taking care of my newborn full-time plus trying to finish this project and a couple of other things hasn't left me with much free time.

Timoe

  • Trade Count: (+2)
  • Full Member
  • ***
  • Offline Offline
  • Posts: 1662
  • Last login:July 14, 2009, 09:50:12 am
  • Team-Oh-tAy-Oh
    • Rattlin' Trash
Re: *** Project Arcadeus ***
« Reply #41 on: April 05, 2006, 09:38:59 pm »
Does the artwork have any adhesive on it or does it just lay flat?

If it has adhesive, does it stick to the MDF or the plexi?

its really your led work, the cleanliness of your wiring and those "european wiring mount do-dads" that really made me go wow.

that and the jig-saw cuts to for the trackball. 

Anyway, thanks for the help.  I'm always learning.  I guess thats what keeps me coming back. 

That and arcade-cabinets-as-art.

Jontox, you've got one heck of a cabinet.

Knievel

  • Trade Count: (+3)
  • Full Member
  • ***
  • Offline Offline
  • Posts: 965
  • Last login:July 10, 2016, 10:29:09 pm
  • Who's up for a game of Stunt Cycle??
    • Knievel Kustoms
Re: *** Project Arcadeus ***
« Reply #42 on: April 05, 2006, 10:01:37 pm »
It's the same type of overlay you used on Dweebs CP, the mamemarquees self-adhesive vinyl.

Havok

  • Keeper of the __Blue_Stars___
  • Trade Count: (+17)
  • Full Member
  • ***
  • Offline Offline
  • Posts: 4530
  • Last login:July 11, 2025, 01:29:48 am
  • Insufficient facts always invite danger.
Re: *** Project Arcadeus ***
« Reply #43 on: April 06, 2006, 10:52:14 am »
Nice!

The only change I would make is matching LED lit Slikstik joystick handles ( one red, one blue).

But still AWESOME!

 :notworthy:

Jeff AMN

  • Trade Count: (+3)
  • Full Member
  • ***
  • Offline Offline
  • Posts: 1213
  • Last login:July 25, 2017, 05:26:24 pm
    • Gamer Theory
Re: *** Project Arcadeus ***
« Reply #44 on: April 06, 2006, 12:41:22 pm »
Yeah, lit handles would look pretty awesome, but the aluminum handles are a really classy touch. Either way you've got a killer looking panel though.
http://www.CoinOpShippers.com - The lowest rates on pinball and arcade shipping in the USA.
.
http://GamerTheory.com - Video Game News, Reviews, Editorials, and Contests
.
http://www.thepinballpodcast.com/ - The Pinball Podcast - Two Pinheads Talking Pinball
.

Jontox

  • Trade Count: (0)
  • Full Member
  • ***
  • Offline Offline
  • Posts: 45
  • Last login:March 08, 2025, 04:14:40 pm
  • I've built my own arcade cabinet!
    • See Arcadeus Project Blog!
Re: *** Project Arcadeus ***
« Reply #45 on: April 06, 2006, 01:10:42 pm »
Thanks again for all these nice comments...


Knievel

  • Trade Count: (+3)
  • Full Member
  • ***
  • Offline Offline
  • Posts: 965
  • Last login:July 10, 2016, 10:29:09 pm
  • Who's up for a game of Stunt Cycle??
    • Knievel Kustoms
Re: *** Project Arcadeus ***
« Reply #46 on: April 09, 2006, 10:04:44 pm »
The completed CP is now on it's way to Belgium.
I look forward to seeing it mounted up on Jontox's great cabinet.  :)

A few final pic's from me, the underside of the CP...


MYX

  • Wiki Master
  • Trade Count: (0)
  • Full Member
  • *****
  • Offline Offline
  • Posts: 1527
  • Last login:September 18, 2020, 05:00:22 pm
  • Even Jesus loves Donkey Kong!
    • MYX Digital Blog
Re: *** Project Arcadeus ***
« Reply #47 on: April 09, 2006, 10:17:16 pm »
That is a totally sick wiring job. I love the strain relief loop for the ipac. Another beautiful job by Knievel!!!  :o
M    Y    X

BLACKOUT  - Finally rewritten - http://blog.myxdigital.com/
Original BLACKOUT thread - http://forum.arcadecontrols.com/index.php?topic=48239.0

Havok

  • Keeper of the __Blue_Stars___
  • Trade Count: (+17)
  • Full Member
  • ***
  • Offline Offline
  • Posts: 4530
  • Last login:July 11, 2025, 01:29:48 am
  • Insufficient facts always invite danger.
Re: *** Project Arcadeus ***
« Reply #48 on: April 09, 2006, 11:13:16 pm »
Nice wiring! What type and gauge wire are you using? The neatness with some of the bends leads me to believe that's solid core?

Timoe

  • Trade Count: (+2)
  • Full Member
  • ***
  • Offline Offline
  • Posts: 1662
  • Last login:July 14, 2009, 09:50:12 am
  • Team-Oh-tAy-Oh
    • Rattlin' Trash
Re: *** Project Arcadeus ***
« Reply #49 on: April 09, 2006, 11:54:14 pm »
I just looked at that wiring and I threw up  :notworthy:

Havok

  • Keeper of the __Blue_Stars___
  • Trade Count: (+17)
  • Full Member
  • ***
  • Offline Offline
  • Posts: 4530
  • Last login:July 11, 2025, 01:29:48 am
  • Insufficient facts always invite danger.
Re: *** Project Arcadeus ***
« Reply #50 on: April 10, 2006, 06:02:47 am »
I just looked at that wiring and I threw up  :notworthy:

That's ok - once they hook up the panel, they'll find that he forgot to connect the grounds to the I-pac, and we won't have such a complex about how we suck so bad compared to him...

 ;D

Timoe

  • Trade Count: (+2)
  • Full Member
  • ***
  • Offline Offline
  • Posts: 1662
  • Last login:July 14, 2009, 09:50:12 am
  • Team-Oh-tAy-Oh
    • Rattlin' Trash
Re: *** Project Arcadeus ***
« Reply #51 on: April 10, 2006, 08:06:18 pm »
I betchya groovygamegear.com just got a spike in orders for those euro-wire-mount-do-dads!

I dont even know what they do and I'm thinking of going over to order 3 of em.

 :o

Knievel

  • Trade Count: (+3)
  • Full Member
  • ***
  • Offline Offline
  • Posts: 965
  • Last login:July 10, 2016, 10:29:09 pm
  • Who's up for a game of Stunt Cycle??
    • Knievel Kustoms
Re: *** Project Arcadeus ***
« Reply #52 on: April 10, 2006, 09:04:08 pm »
Heheh..after you get that vomit cleaned better get over to Groovy and buy 6 of those dealies.

Yes solid-core wire for pretty bends..20 gauge I think.


NiteWalker

  • Trade Count: (0)
  • Full Member
  • ***
  • Offline Offline
  • Posts: 792
  • Last login:April 25, 2022, 07:33:24 pm
  • Routers can do anything.
    • SimpleCase Custom Arcade Stick Enclosures
Re: *** Project Arcadeus ***
« Reply #53 on: April 11, 2006, 11:55:54 am »
timoe:
I use them things in all my panels. They're awesome and make wiring a lot cleaner.

Knievel:
Very nice wiring job. The cleanest I've seen yet...
 :notworthy: :notworthy: :notworthy:


It's 9am. I'm calling it a nite.

Jeff AMN

  • Trade Count: (+3)
  • Full Member
  • ***
  • Offline Offline
  • Posts: 1213
  • Last login:July 25, 2017, 05:26:24 pm
    • Gamer Theory
Re: *** Project Arcadeus ***
« Reply #54 on: April 11, 2006, 02:28:12 pm »
Heheh..after you get that vomit cleaned better get over to Groovy and buy 6 of those dealies.

Yes solid-core wire for pretty bends..20 gauge I think.


I'd probably pay you $5-$10 for a wiring guide if I could manage to do that myself...
http://www.CoinOpShippers.com - The lowest rates on pinball and arcade shipping in the USA.
.
http://GamerTheory.com - Video Game News, Reviews, Editorials, and Contests
.
http://www.thepinballpodcast.com/ - The Pinball Podcast - Two Pinheads Talking Pinball
.

MYX

  • Wiki Master
  • Trade Count: (0)
  • Full Member
  • *****
  • Offline Offline
  • Posts: 1527
  • Last login:September 18, 2020, 05:00:22 pm
  • Even Jesus loves Donkey Kong!
    • MYX Digital Blog
Re: *** Project Arcadeus ***
« Reply #55 on: April 14, 2006, 05:04:51 pm »
Hey Is that a solder job? I am not seeing quick connects.
M    Y    X

BLACKOUT  - Finally rewritten - http://blog.myxdigital.com/
Original BLACKOUT thread - http://forum.arcadecontrols.com/index.php?topic=48239.0

Knievel

  • Trade Count: (+3)
  • Full Member
  • ***
  • Offline Offline
  • Posts: 965
  • Last login:July 10, 2016, 10:29:09 pm
  • Who's up for a game of Stunt Cycle??
    • Knievel Kustoms
Re: *** Project Arcadeus ***
« Reply #56 on: April 14, 2006, 05:21:15 pm »
Yes solder. I have had issues with connects coming loose and this one has a long, bumpy journey ahead of it.

MYX

  • Wiki Master
  • Trade Count: (0)
  • Full Member
  • *****
  • Offline Offline
  • Posts: 1527
  • Last login:September 18, 2020, 05:00:22 pm
  • Even Jesus loves Donkey Kong!
    • MYX Digital Blog
Re: *** Project Arcadeus ***
« Reply #57 on: April 14, 2006, 10:19:57 pm »
I keep going back to the pictures. A lot of what you did, you did for artistic sake. Alternating colors every other row on the strip. Wires precisly measured to fit and bent just right. Makes a momma proud. Brings a little tear to the eye, it does.
M    Y    X

BLACKOUT  - Finally rewritten - http://blog.myxdigital.com/
Original BLACKOUT thread - http://forum.arcadecontrols.com/index.php?topic=48239.0

dpz147

  • Trade Count: (0)
  • Full Member
  • ***
  • Offline Offline
  • Posts: 129
  • Last login:March 18, 2020, 11:49:34 am
Re: *** Project Arcadeus ***
« Reply #58 on: April 15, 2006, 09:27:42 am »
How are you attaching the top of the CP to the base?

Timoe

  • Trade Count: (+2)
  • Full Member
  • ***
  • Offline Offline
  • Posts: 1662
  • Last login:July 14, 2009, 09:50:12 am
  • Team-Oh-tAy-Oh
    • Rattlin' Trash
Re: *** Project Arcadeus ***
« Reply #59 on: April 15, 2006, 10:45:55 am »
A lot of what you did, you did for artistic sake. Alternating colors every other row on the strip.


Alot of that is to not mix up the ground and positive leads for the leds, I believe.  but yeah it looks cool and who uses green and yellow?   ya dont see that every day.

nullb0y

  • Trade Count: (+5)
  • Full Member
  • ***
  • Offline Offline
  • Posts: 1307
  • Last login:November 17, 2024, 04:06:05 pm
  • Slow In Fast Out
    • WAT Racing
Re: *** Project Arcadeus ***
« Reply #60 on: April 15, 2006, 11:58:49 am »
i was getting sick of quick disconnects you have made me decide to solder again my solder skills are much better now anyways ^_^

my first controller was solder and it was a terrible job lol and i had to resolder it alot but i know how to solder now lmao so i could actually do this properly
Slow In Fast Out

Knievel

  • Trade Count: (+3)
  • Full Member
  • ***
  • Offline Offline
  • Posts: 965
  • Last login:July 10, 2016, 10:29:09 pm
  • Who's up for a game of Stunt Cycle??
    • Knievel Kustoms
Re: *** Project Arcadeus ***
« Reply #61 on: April 16, 2006, 12:46:50 am »

The top is held on with 3/4" black Velcro, all the way around. I've been using it since my first CP and I wouldn't do it any other way. Simple, clean and so strong you have to break the seal with a credit card to separate it.

I recommend you use a medium thickness solder to do the switches, the tiny solder for doing pcbs is too fluid. With the thicker stuff you can go around and add a blob to all the switch terminals that your using beforehand. Then you won't have to fumble with the solder reel when you're trying to solder on the wire.


MYX

  • Wiki Master
  • Trade Count: (0)
  • Full Member
  • *****
  • Offline Offline
  • Posts: 1527
  • Last login:September 18, 2020, 05:00:22 pm
  • Even Jesus loves Donkey Kong!
    • MYX Digital Blog
Re: *** Project Arcadeus ***
« Reply #62 on: April 16, 2006, 09:21:17 am »

The top is held on with 3/4" black Velcro, all the way around. I've been using it since my first CP and I wouldn't do it any other way. Simple, clean and so strong you have to break the seal with a credit card to separate it.

I recommend you use a medium thickness solder to do the switches, the tiny solder for doing pcbs is too fluid. With the thicker stuff you can go around and add a blob to all the switch terminals that your using beforehand. Then you won't have to fumble with the solder reel when you're trying to solder on the wire.

Thanks for the tip Knievel. I am looking very seriously right now at an all solder job. Can you tell me more about the strips. You used them for a reason. What is ther benifit? I used them when I was doing a keyboard hack as there were equal numbers of x to y wires. I have an encoder, so why wouldn't you just make a couple of loops all the way around the buttons directly from the encoder? Or is this the art side of things? It is kinda like when you are at a car show and they have all the hoods poped and everything is super clean and neat and tidy. That is what I want.

I really like the velcro idea. I have been chomping on the idea of a piano hinge but the reality of that small of screw with MDF... Just seems like it would strip easily. Do you staple the velcro? I am worried about the velcro coming unstuck from the MDF.

Also, did you build out all the wires or did you take it one by one? Just wondering about your organization. It would suck to get that far then realize something is in the wrong place. You seem to enjoy doing imaculate work wiich I really respect. I went as clean as I could when I built my desktop CP several years back. I am going to try to do an even better job than my last. So far so good. Beter tools and beter materials help.
M    Y    X

BLACKOUT  - Finally rewritten - http://blog.myxdigital.com/
Original BLACKOUT thread - http://forum.arcadecontrols.com/index.php?topic=48239.0

lettuce

  • Trade Count: (0)
  • Full Member
  • ***
  • Offline Offline
  • Posts: 1900
  • Last login:December 31, 2021, 01:46:10 pm
  • Make It So!
Re: *** Project Arcadeus ***
« Reply #63 on: April 16, 2006, 02:59:21 pm »
Pixelhugger, do you make these CP art designs on request then?

lettuce

  • Trade Count: (0)
  • Full Member
  • ***
  • Offline Offline
  • Posts: 1900
  • Last login:December 31, 2021, 01:46:10 pm
  • Make It So!
Re: *** Project Arcadeus ***
« Reply #64 on: April 17, 2006, 10:49:59 am »
What prog did u use to degin that CP, and how did u get the red and blue line/chequred effect?

Pixelhugger

  • Trade Count: (+8)
  • Full Member
  • ***
  • Offline Offline
  • Posts: 1865
  • Last login:March 24, 2025, 05:45:13 pm
Re: *** Project Arcadeus ***
« Reply #65 on: April 18, 2006, 01:44:37 pm »
Yeah I do a bit of commissioned work. While I used to design this stuff for free, demands on my time have meant I now charge for the work to keep things manageable.

To answer your other question....

The shapes (trim, logo, outlines, grid etc.) were all designed in Adobe Illustrator. I brought them into Photoshop as black and white elements and applied color corrections and effects to them to create the chrome and neon. Illustrator is a much better application to design line art in than Photoshop. Photoshop however is a much better application to create raster/painterly effects in than Illustrator.

The checkered effect relies on a grid which sits on it own layer in Photoshop. That layer is given a transfer mode (ummm.... "overlay" I think) which affects light areas differently from dark areas on the layer beneath. It's a bit like doding and burning an image in a dark room. This allows the grid to "fall off" or fade across the gradient beneath it.
Project mega thread HERE

Cornchip

  • Trade Count: (+1)
  • Full Member
  • ***
  • Offline Offline
  • Posts: 228
  • Last login:December 27, 2023, 10:23:11 am
  • Thinking up more crap....
Re: *** Project Arcadeus ***
« Reply #66 on: April 18, 2006, 05:52:21 pm »
  Nice work all around. This one sets a new standard. Does Illustrator work much the same way as let's say a CAD program? (lines are drawn with X,Y co-ordinates). I have not yet tried CP artwork yet as you can geuss.


 Cornchip.

Pixelhugger

  • Trade Count: (+8)
  • Full Member
  • ***
  • Offline Offline
  • Posts: 1865
  • Last login:March 24, 2025, 05:45:13 pm
Re: *** Project Arcadeus ***
« Reply #67 on: April 18, 2006, 05:56:26 pm »
It is similar in that it is vector based. Curves are drawn with splines, lines with points.
Project mega thread HERE

Knievel

  • Trade Count: (+3)
  • Full Member
  • ***
  • Offline Offline
  • Posts: 965
  • Last login:July 10, 2016, 10:29:09 pm
  • Who's up for a game of Stunt Cycle??
    • Knievel Kustoms
Re: *** Project Arcadeus ***
« Reply #68 on: April 20, 2006, 11:43:44 am »
Thanks for the tip Knievel. I am looking very seriously right now at an all solder job. Can you tell me more about the strips. You used them for a reason. What is ther benifit? I used them when I was doing a keyboard hack as there were equal numbers of x to y wires. I have an encoder, so why wouldn't you just make a couple of loops all the way around the buttons directly from the encoder? Or is this the art side of things? It is kinda like when you are at a car show and they have all the hoods poped and everything is super clean and neat and tidy. That is what I want.

I really like the velcro idea. I have been chomping on the idea of a piano hinge but the reality of that small of screw with MDF... Just seems like it would strip easily. Do you staple the velcro? I am worried about the velcro coming unstuck from the MDF.

Also, did you build out all the wires or did you take it one by one? Just wondering about your organization. It would suck to get that far then realize something is in the wrong place. You seem to enjoy doing imaculate work wiich I really respect. I went as clean as I could when I built my desktop CP several years back. I am going to try to do an even better job than my last. So far so good. Beter tools and beter materials help.

The strips were used only for the lighting, so Jontox could easily replace a single LED if required. Not really any need for them when wiring the controls, you could use one for your grounds but it's much easier just to daisy-chain them.

I've never had the Velcro come loose, they use some serious adhesive. Sand the top of your CP box smooth and then wipe it off with a tack-cloth to insure a real tight bond.

I do the control wires one-by-one, attaching them to the encoder as I go along so there's no mistakes. If you run all the wires to the encoder and try to connect them afterwards your bound to mix up a few.


MYX

  • Wiki Master
  • Trade Count: (0)
  • Full Member
  • *****
  • Offline Offline
  • Posts: 1527
  • Last login:September 18, 2020, 05:00:22 pm
  • Even Jesus loves Donkey Kong!
    • MYX Digital Blog
Re: *** Project Arcadeus ***
« Reply #69 on: April 20, 2006, 05:21:16 pm »
Thanks Knievel.
M    Y    X

BLACKOUT  - Finally rewritten - http://blog.myxdigital.com/
Original BLACKOUT thread - http://forum.arcadecontrols.com/index.php?topic=48239.0

lettuce

  • Trade Count: (0)
  • Full Member
  • ***
  • Offline Offline
  • Posts: 1900
  • Last login:December 31, 2021, 01:46:10 pm
  • Make It So!
Re: *** Project Arcadeus ***
« Reply #70 on: April 20, 2006, 06:15:26 pm »
Knievel, are those the Happ Translucent push buttons in that CP, if so how many LEDs did you put in each button?

Knievel

  • Trade Count: (+3)
  • Full Member
  • ***
  • Offline Offline
  • Posts: 965
  • Last login:July 10, 2016, 10:29:09 pm
  • Who's up for a game of Stunt Cycle??
    • Knievel Kustoms
Re: *** Project Arcadeus ***
« Reply #71 on: April 20, 2006, 06:27:22 pm »

Yes, you can get them from Ponyboy over in the Buy/Sell forum.

1 LED per button, and 3 behind the trackball.

lettuce

  • Trade Count: (0)
  • Full Member
  • ***
  • Offline Offline
  • Posts: 1900
  • Last login:December 31, 2021, 01:46:10 pm
  • Make It So!
Re: *** Project Arcadeus ***
« Reply #72 on: April 20, 2006, 07:53:06 pm »
Are they just standard white/clear LEDs or coloured?

Nannuu

  • Trade Count: (0)
  • Full Member
  • ***
  • Offline Offline
  • Posts: 992
  • Last login:May 23, 2022, 11:55:21 pm
  • Anytime now, I'll start my cabinet
    • Will and Liliana's Projects and Family Photos
Re: *** Project Arcadeus ***
« Reply #73 on: April 20, 2006, 08:16:58 pm »
I don't see any resistors there.  Did you get LED's with resistors built in?  And if so where did you get them?

That is impressive guys, very very nice job.
Next I'll be on fries, and that's when the big money starts rolling in.

Knievel

  • Trade Count: (+3)
  • Full Member
  • ***
  • Offline Offline
  • Posts: 965
  • Last login:July 10, 2016, 10:29:09 pm
  • Who's up for a game of Stunt Cycle??
    • Knievel Kustoms
Re: *** Project Arcadeus ***
« Reply #74 on: April 20, 2006, 09:23:23 pm »

I matched the LED color to the button color.

The resistors are there, attached directly to the leg of each LED. You can't see them because I shrink-wrapped the heck out of everything.  :)

Jontox

  • Trade Count: (0)
  • Full Member
  • ***
  • Offline Offline
  • Posts: 45
  • Last login:March 08, 2025, 04:14:40 pm
  • I've built my own arcade cabinet!
    • See Arcadeus Project Blog!
Re: *** Project Arcadeus ***
« Reply #75 on: April 21, 2006, 01:26:47 pm »
Waow,

It is quite a long time I haven't cheked the thread 74 replies and 2417 views.
It seems that more people than I expected are following  the project...

Thinking about it, it is quite logical  :P due to the guys involved in it, I'm not speaking about me of course  ;)

More to come guys,

I've received a few additional parts this week.
I'll post some pictures next week but just to list them there are Coin protectors, Coin door, Bezel.
CP is on its way... I can't wait to receive it ....

See you

Jontox  8)

P.S.: Marquee first attempt by Pixelhugger should not be too long from now...

psychopanda

  • Trade Count: (0)
  • Full Member
  • ***
  • Offline Offline
  • Posts: 108
  • Last login:August 31, 2006, 01:13:17 pm
    • PsychoPanda's Secret Grotto
Re: *** Project Arcadeus ***
« Reply #76 on: April 21, 2006, 02:36:10 pm »
I keep looking and the only thing I have to say is 'Wow!' about this whole project.

I can only hope my next wiring job ends up half as good as Knievel's. He does some amazing work. :)

lettuce

  • Trade Count: (0)
  • Full Member
  • ***
  • Offline Offline
  • Posts: 1900
  • Last login:December 31, 2021, 01:46:10 pm
  • Make It So!
Re: *** Project Arcadeus ***
« Reply #77 on: May 05, 2006, 04:37:14 pm »
Jontox, how wide is the cab? Cos ive seen some examples of the same design cab, but they look kind of fat, where yours looks alot slender??


Jontox

  • Trade Count: (0)
  • Full Member
  • ***
  • Offline Offline
  • Posts: 45
  • Last login:March 08, 2025, 04:14:40 pm
  • I've built my own arcade cabinet!
    • See Arcadeus Project Blog!
Re: *** Project Arcadeus ***
« Reply #78 on: May 17, 2006, 01:31:15 pm »
Sorry for the late reply.

Actually the bottom part is 63cm (24.80 inch) wide as the internal top part (from internal side to side).
I think that the slender effect is more due to the back side modification of the bottom part itself.

See you

Jontox

Pixelhugger

  • Trade Count: (+8)
  • Full Member
  • ***
  • Offline Offline
  • Posts: 1865
  • Last login:March 24, 2025, 05:45:13 pm
Re: *** Project Arcadeus ***
« Reply #79 on: May 18, 2006, 05:35:27 pm »
Marquee sent to Jontox for feedback/approval.  :) I'm dying to post it here so lemme know man!
Project mega thread HERE

lettuce

  • Trade Count: (0)
  • Full Member
  • ***
  • Offline Offline
  • Posts: 1900
  • Last login:December 31, 2021, 01:46:10 pm
  • Make It So!
Re: *** Project Arcadeus ***
« Reply #80 on: May 18, 2006, 06:54:42 pm »
Heheh..after you get that vomit cleaned better get over to Groovy and buy 6 of those dealies.

Yes solid-core wire for pretty bends..20 gauge I think.


Is the solid-core copper by any chance?

Pixelhugger

  • Trade Count: (+8)
  • Full Member
  • ***
  • Offline Offline
  • Posts: 1865
  • Last login:March 24, 2025, 05:45:13 pm
Re: *** Project Arcadeus ***
« Reply #81 on: May 19, 2006, 11:29:07 am »
Here's the marquee so far....

« Last Edit: May 19, 2006, 11:32:31 am by Pixelhugger »
Project mega thread HERE

Pixelhugger

  • Trade Count: (+8)
  • Full Member
  • ***
  • Offline Offline
  • Posts: 1865
  • Last login:March 24, 2025, 05:45:13 pm
Re: *** Project Arcadeus ***
« Reply #82 on: May 20, 2006, 06:38:39 pm »
Requested revision...


Project mega thread HERE

Timoe

  • Trade Count: (+2)
  • Full Member
  • ***
  • Offline Offline
  • Posts: 1662
  • Last login:July 14, 2009, 09:50:12 am
  • Team-Oh-tAy-Oh
    • Rattlin' Trash
Re: *** Project Arcadeus ***
« Reply #83 on: May 21, 2006, 12:31:08 am »
This should look very nice when back lit.

Jontox

  • Trade Count: (0)
  • Full Member
  • ***
  • Offline Offline
  • Posts: 45
  • Last login:March 08, 2025, 04:14:40 pm
  • I've built my own arcade cabinet!
    • See Arcadeus Project Blog!
Re: *** Project Arcadeus ***
« Reply #84 on: May 23, 2006, 08:53:54 am »
Hi All,

Time has passed since my last update on any progress.
I'm getting married in a few weeks so lots of thing has to be done and unfortunately that means a little time left dedicated to any cabinet improvement.

First of all, I received my control panel and it rocks...
It was really well packed by Knievel and everything was as displayed on pictures, perfectly wired and assembled :-)
Really professional job!!! Thanks a million to him !
Taking back his words: "I've spent as much time on this one as if it was one of mine..." and I should say that it is effectively the case, the result speaks for itself.

In the same package I received the ArcadeVGA, Universal monitor mounting brackets, 4 cabinet handles.
I got as well my package from Happ's Suzo, that includes cabinet corner protectors, 2 player coin door, 27" monitor bezel.

I should say that I haven't got the time to test everything out yet (Control Panel included). I know it could be odd to some of you not to try out this beauty but I had other things left that I wanted to do first.

DONE LIST:
  • Drawer rails have been replaced by metal ones
  • Drawer back metal retainer has been put in place
  • Tablet has been installed as drawer bottom was to low to permit an ideal use of any mouse or keyboard.
  • Wireless Mouse and keyboard tested and set up.
  • Coin Door installed and coin mechanism tricked to allow use of BYOAC coins.
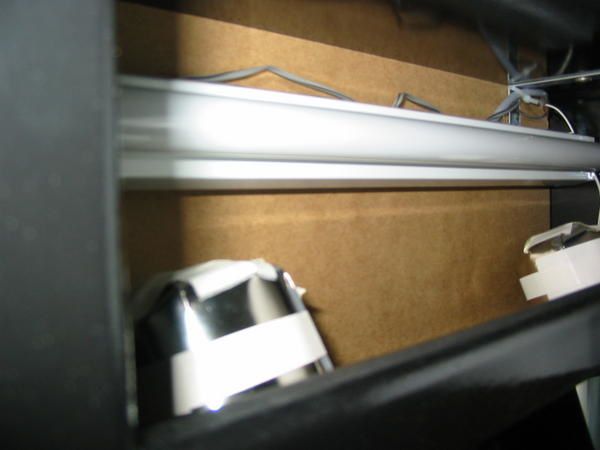
  • Back case installed for speakers, that has a dual utility (Improve sound reproduction and prevent light from marquee to light the entire inside cabinet). The speakers have been shielded to lower/avoid any effect on the monitor
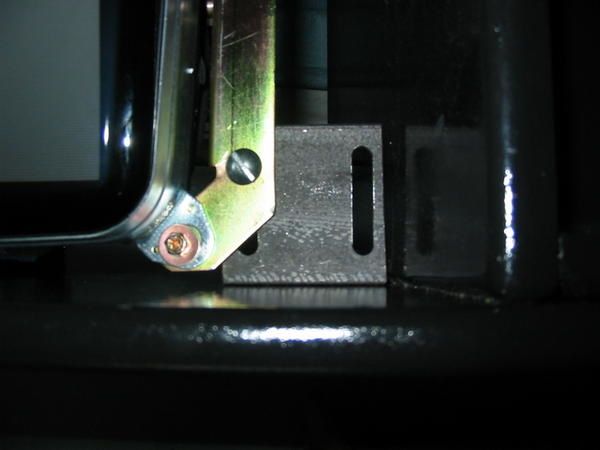
  • Monitor mounting brackets installed
  • Monitor fixed to mounting brackets

On that point I should say that fixing these mounting brackets was quite hard as I wanted to respect the same angle as the one from the top cabinet part.
The monitor weight was so huge that it was impossible to use it directly for fixing those.
Fortunately, a thread on BYOAC forum helped me to figure it out... Use of a piece of wood cut with the same dimension as the monitor frame and fix mounting brackets directly on it....Locate the angle and depth wanted and fix directly the brackets onto the cabinet. :-)

I will not fix the cabinet handles now, as I want to avoid any additional wood work for the moment. Moreover I can't figure out exactly where would be the best position for these handles.
The cabinet corner protectors from Happ's were not as expected. I haven't succeeded in fixing them correctly, there was always a slight empty space from the corner and the cabinet.
Fixing them correctly would need to scrape my cabinet corners in order to respect the corner form and slope of these Happ's protectors --> Not way, I will scrape my cabinet for these I prefer to go without them.

TO DO LIST (in priority order):
  • Cut monitor Bezel and install it
  • Order Plexi for Monitor and Marquee
  • Fix Control panel & wire coin door to it
  • Install ArcadeVGA in computer
  • Set up ArcadeVGA, Set up Control panel
  • Boot up everything and test hardware
  • Install plexi, marquee
  • Set up monitor settings when plexi is installed
  • PLAY THE HELL OUT OF IT... and enjoy pure arcade feelings :-)
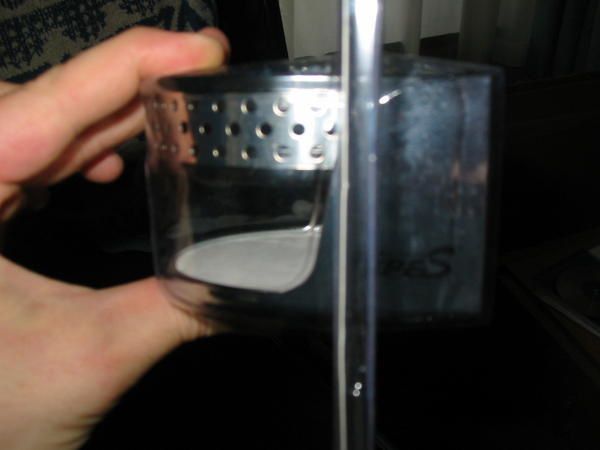
  • Fix Cup Holder...
  • Order more coins but nickel ones this time (Any new runs of nickel tokens available form Santoro's website ? Please do some more ...) Can't wait to order 2006 version :-)

In the mean time, Pixelhugger will work out the marquee...

Find below additional pictures...
The lens was not cleaned enough that why you can see some artefacts on the picutres.

Drawer (New rails, metal back drawer retainer)
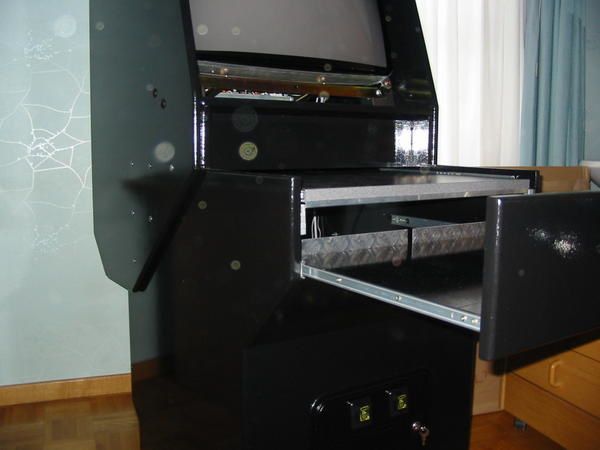
Tablet

Speakers back case


Installed coin door


Mounted monitor and mounting brackets


Cup Holder


See you soon

Jontox

DigDreams

  • Trade Count: (0)
  • Full Member
  • ***
  • Offline Offline
  • Posts: 119
  • Last login:March 07, 2007, 04:37:08 am
Re: *** Project Arcadeus ***
« Reply #85 on: May 31, 2006, 04:25:02 am »
The top is held on with 3/4" black Velcro, all the way around. I've been using it since my first CP and I wouldn't do it any other way. Simple, clean and so strong you have to break the seal with a credit card to separate it.

I'm missing something.  How is the acrylic held down with velcro?  It's clear, so it seems that you would see it from the top.  I must be missing something obvious but I just started building my cabinet and would really like to know the best method.

Are the graphics sticky from the top and applied to the acrylic?  That's the only way I could see that it is velcro. 

Sorry if this is a dumb question.

BTW: Amazing job, that is an incredible CP.  Talk about raising the bar.

mccoy178

  • It's hard to work with a straight jacket on
  • Trade Count: (+9)
  • Full Member
  • ***
  • Offline Offline
  • Posts: 3127
  • Last login:September 03, 2021, 10:23:42 am
  • Go Bucks!
Re: *** Project Arcadeus ***
« Reply #86 on: May 31, 2006, 08:11:09 am »
He meant the entire cp top, not just the acrylic.  Otherwise, instead of a hinge, he is using velcro to hold it in place.

DigDreams

  • Trade Count: (0)
  • Full Member
  • ***
  • Offline Offline
  • Posts: 119
  • Last login:March 07, 2007, 04:37:08 am
Re: *** Project Arcadeus ***
« Reply #87 on: May 31, 2006, 01:01:26 pm »
So how is the acrylic secured?  It is just held down by the buttons bolted through the panel or is something else being done as well?  I wasn't sure if it would sit flat if it were just secured buy the buttons.

Sorry - I'm new at this.

Timoe

  • Trade Count: (+2)
  • Full Member
  • ***
  • Offline Offline
  • Posts: 1662
  • Last login:July 14, 2009, 09:50:12 am
  • Team-Oh-tAy-Oh
    • Rattlin' Trash
Re: *** Project Arcadeus ***
« Reply #88 on: June 01, 2006, 07:38:02 am »
The buttons and the T-molding are all that hold the plexi down on the control panel.

theCoder

  • Trade Count: (0)
  • Full Member
  • ***
  • Offline Offline
  • Posts: 1035
  • Last login:September 20, 2010, 10:48:47 pm
  • I'll clean up my mess, Honey, when I'm done...
Re: *** Project Arcadeus ***
« Reply #89 on: June 01, 2006, 11:23:52 am »
Nice work.  What does your fiancee think of it?  Is she O.K. with marrying into this hobby?

Jontox

  • Trade Count: (0)
  • Full Member
  • ***
  • Offline Offline
  • Posts: 45
  • Last login:March 08, 2025, 04:14:40 pm
  • I've built my own arcade cabinet!
    • See Arcadeus Project Blog!
Re: *** Project Arcadeus ***
« Reply #90 on: June 01, 2006, 06:37:50 pm »
Beeppp !

I give my Joker on that one ;D

Honestly, the project was started before I asked her to become my wife.
This means she already knew what I intended to bring back to life.

But for any of you hesitating to start an arcade project I would definitely advise them to start it before getting married  ;)

Wife doesn't like cabinet that monopolises her husband ...
« Last Edit: June 02, 2006, 03:50:54 am by Jontox »

johnperkins21

  • Trade Count: (0)
  • Full Member
  • ***
  • Offline Offline
  • Posts: 288
  • Last login:December 07, 2019, 07:02:34 pm
Re: *** Project Arcadeus ***
« Reply #91 on: June 01, 2006, 07:02:16 pm »
My wife is ok with it as long as I put in original Tapper controls, and I still mow the lawn every once in a while.  ;D

And I love the design on this cab. The trackball is in a bad place for my fingers and Golden Tee, but it looks sweet.
Bob Dole likes cheese.

WaRpEd

  • Trade Count: (0)
  • Full Member
  • ***
  • Offline Offline
  • Posts: 272
  • Last login:December 03, 2022, 12:00:41 pm
  • The older I get the better it was!!
    • Warped products
Re: *** Project Arcadeus ***
« Reply #92 on: November 24, 2006, 07:42:37 pm »
Any updates or finished cab pics?
There are three kinds of people in the world those that can count and those that can't.

Jontox

  • Trade Count: (0)
  • Full Member
  • ***
  • Offline Offline
  • Posts: 45
  • Last login:March 08, 2025, 04:14:40 pm
  • I've built my own arcade cabinet!
    • See Arcadeus Project Blog!
Re: *** Project Arcadeus ***
« Reply #93 on: November 26, 2006, 03:35:40 pm »
Yeah...

So first sorry for the long run between last update and now ...

The cab is currently finished !
I had a few issue to solve with it and less time than ever with my new way of life (Married  :P):

- Joystick handles have been replaced due to manufacturing discrepancies between handles
- Spinner as well due to technical issue (Spinning time was less than 5 seconds)...

I also braked a blue led trying to align the light beam correctly...

Everything is fixed now I will take some pictures of the finished work next weekend.

Jontox

Knievel

  • Trade Count: (+3)
  • Full Member
  • ***
  • Offline Offline
  • Posts: 965
  • Last login:July 10, 2016, 10:29:09 pm
  • Who's up for a game of Stunt Cycle??
    • Knievel Kustoms
Re: *** Project Arcadeus ***
« Reply #94 on: February 05, 2007, 07:46:54 pm »

Alright Jontox, the honeymoon is over ;D...let's see some final pictures!

blueznl

  • Trade Count: (0)
  • Full Member
  • ***
  • Offline Offline
  • Posts: 290
  • Last login:June 16, 2019, 04:50:02 pm
Re: *** Project Arcadeus ***
« Reply #95 on: February 06, 2007, 07:51:03 am »
Just stumbled over this CP... wow...  :notworthy:

needlesmcgirk

  • Trade Count: (0)
  • Full Member
  • ***
  • Offline Offline
  • Posts: 154
  • Last login:September 15, 2009, 10:54:31 pm
Re: *** Project Arcadeus ***
« Reply #96 on: February 06, 2007, 10:32:54 am »
Seriously, this thing has been building up for quite sometime and I want to see this baby in action.

Kronos

  • Trade Count: (0)
  • Full Member
  • ***
  • Offline Offline
  • Posts: 94
  • Last login:January 11, 2025, 02:00:32 pm
Re: *** Project Arcadeus ***
« Reply #97 on: February 06, 2007, 01:43:35 pm »
 :applaud:   very nice!

Jontox

  • Trade Count: (0)
  • Full Member
  • ***
  • Offline Offline
  • Posts: 45
  • Last login:March 08, 2025, 04:14:40 pm
  • I've built my own arcade cabinet!
    • See Arcadeus Project Blog!
Re: *** Project Arcadeus ***
« Reply #98 on: February 07, 2007, 03:47:48 pm »
Hi All,

Sorry for the lack of updates... what happens is that the monitor encountered a really big ISSUE.
The monitor powering was wasted !!! It didn't turned on when plugged.

I had to dissemble the CP, Plexi, Bezel in order to take it out...
I take it to a TV Repair guy and everything is back in order now.
He told me that the a Direct Current cap fused due to massive usage, overheating problem... so he advised me to put some fans inside the cabinet to increase airflow.

It was quite hard for him to trace that part on the net. Betson 27'' parts are quite hard to find here in Europe, so he put in place an European part with quite the same specifications  :applaud:
I hope it will last longer than the other  :angry:

Pictures will be posted this WE... I promise  :angel:

Pictures that will be posted:
- Baby in action (as per needlesmcgirk words  :P)
- Marquee close-up
- CP Close-up
- Inside of the cabinet
- Monitor fans

I intended to post pictures of it last WE but forget my camera...
I can post pictures taken with my mobile if you want but they are crappy (in regards of the quality)

Best regards

Jontox

Knievel

  • Trade Count: (+3)
  • Full Member
  • ***
  • Offline Offline
  • Posts: 965
  • Last login:July 10, 2016, 10:29:09 pm
  • Who's up for a game of Stunt Cycle??
    • Knievel Kustoms
Re: *** Project Arcadeus ***
« Reply #99 on: February 07, 2007, 04:04:16 pm »

Unfortunate about the monitor but good that you were able to repair it.

Looking forward to the pic's.  :)

Jontox

  • Trade Count: (0)
  • Full Member
  • ***
  • Offline Offline
  • Posts: 45
  • Last login:March 08, 2025, 04:14:40 pm
  • I've built my own arcade cabinet!
    • See Arcadeus Project Blog!
Re: *** Project Arcadeus ***
« Reply #100 on: February 07, 2007, 05:04:35 pm »
Here are the crappy mobile pictures:


Jontox

  • Trade Count: (0)
  • Full Member
  • ***
  • Offline Offline
  • Posts: 45
  • Last login:March 08, 2025, 04:14:40 pm
  • I've built my own arcade cabinet!
    • See Arcadeus Project Blog!
Re: *** Project Arcadeus ***
« Reply #101 on: February 07, 2007, 05:11:49 pm »
others...

Jontox

  • Trade Count: (0)
  • Full Member
  • ***
  • Offline Offline
  • Posts: 45
  • Last login:March 08, 2025, 04:14:40 pm
  • I've built my own arcade cabinet!
    • See Arcadeus Project Blog!
Re: *** Project Arcadeus ***
« Reply #102 on: February 07, 2007, 05:13:58 pm »
...

Jontox

  • Trade Count: (0)
  • Full Member
  • ***
  • Offline Offline
  • Posts: 45
  • Last login:March 08, 2025, 04:14:40 pm
  • I've built my own arcade cabinet!
    • See Arcadeus Project Blog!
Re: *** Project Arcadeus ***
« Reply #103 on: February 07, 2007, 05:15:41 pm »
...

Jontox

  • Trade Count: (0)
  • Full Member
  • ***
  • Offline Offline
  • Posts: 45
  • Last login:March 08, 2025, 04:14:40 pm
  • I've built my own arcade cabinet!
    • See Arcadeus Project Blog!
Re: *** Project Arcadeus ***
« Reply #104 on: February 07, 2007, 05:17:27 pm »
...

Jontox

  • Trade Count: (0)
  • Full Member
  • ***
  • Offline Offline
  • Posts: 45
  • Last login:March 08, 2025, 04:14:40 pm
  • I've built my own arcade cabinet!
    • See Arcadeus Project Blog!
Re: *** Project Arcadeus ***
« Reply #105 on: February 07, 2007, 05:18:01 pm »
...

Timoe

  • Trade Count: (+2)
  • Full Member
  • ***
  • Offline Offline
  • Posts: 1662
  • Last login:July 14, 2009, 09:50:12 am
  • Team-Oh-tAy-Oh
    • Rattlin' Trash
Re: *** Project Arcadeus ***
« Reply #106 on: February 07, 2007, 06:59:34 pm »
The monitor is very well proportioned to the size of the cab.  I like Big Ol monitors on cabs.

KenToad

  • Trade Count: (0)
  • Full Member
  • ***
  • Offline Offline
  • Posts: 1509
  • Last login:Yesterday at 02:10:02 pm
  • Flap Flap Flap
Re: *** Project Arcadeus ***
« Reply #107 on: February 08, 2007, 01:19:09 pm »
Ummm, I love this project, but can't we get a better photo?  I only say that because I know this thing looks really awesome.  Also, I don't know how they are in action, but those sticks look a wee bit high.  Somehow I just don't think they fit in there.  Personally, I'd rather see some standard red balltops at a normal height.

Amazing work, though.  Bring on the better quality photos.   :cheers:

needlesmcgirk

  • Trade Count: (0)
  • Full Member
  • ***
  • Offline Offline
  • Posts: 154
  • Last login:September 15, 2009, 10:54:31 pm
Re: *** Project Arcadeus ***
« Reply #108 on: February 08, 2007, 01:51:44 pm »
man oh man that is looking hot!

Kronos

  • Trade Count: (0)
  • Full Member
  • ***
  • Offline Offline
  • Posts: 94
  • Last login:January 11, 2025, 02:00:32 pm
Re: *** Project Arcadeus ***
« Reply #109 on: February 08, 2007, 02:46:35 pm »
nice.. I hope mine turns out half that good... excellent job.

Jontox

  • Trade Count: (0)
  • Full Member
  • ***
  • Offline Offline
  • Posts: 45
  • Last login:March 08, 2025, 04:14:40 pm
  • I've built my own arcade cabinet!
    • See Arcadeus Project Blog!
Re: *** Project Arcadeus ***
« Reply #110 on: February 08, 2007, 03:52:57 pm »
Better pics are coming this WE... expect to be published on Sunday.

As per the sticks, they are Slikstik ball top replacement one and in fact on the pics they seem a little bit high, but in practice they are really comfortable and responsive...
They have been mounted correctly by Knievel (thanks again !) [I had to switch the original ones directly with Slikstik, as one of them had a loose responsive feeling] and I can confirm you height is not an issue on the contrary...  ;D
I prefer these against the small height red ball top one that you can see on the CP.

I will post a small movie as well to show the cabinet in action with that outstanding sound from LOGITECH Z-2300 200 WATT kit coupled with car speakers Pioneer's TS-A2011 350 WATT...
Boosting sound !!!  :o

I'll then install Gamex as a frontend but I've got to set up everything...

Jontox
« Last Edit: February 08, 2007, 03:57:07 pm by Jontox »

Jontox

  • Trade Count: (0)
  • Full Member
  • ***
  • Offline Offline
  • Posts: 45
  • Last login:March 08, 2025, 04:14:40 pm
  • I've built my own arcade cabinet!
    • See Arcadeus Project Blog!
Re: *** Project Arcadeus ***
« Reply #111 on: February 12, 2007, 06:03:23 pm »
One day late...  :-\


More pictures ...Follow me Follow me Follow me Follow me Follow me Follow me... More pictures

I'll post some movies, stay tuned...

Jontox

Hippie459MN

  • Trade Count: (0)
  • Full Member
  • ***
  • Offline Offline
  • Posts: 25
  • Last login:August 30, 2023, 06:15:42 pm
    • The Home of Hippie459MN
Re: *** Project Arcadeus ***
« Reply #112 on: February 13, 2007, 01:38:29 pm »
Looks good. I love that CP too.
Long live Donkey Kong Jr.!!!!

Knievel

  • Trade Count: (+3)
  • Full Member
  • ***
  • Offline Offline
  • Posts: 965
  • Last login:July 10, 2016, 10:29:09 pm
  • Who's up for a game of Stunt Cycle??
    • Knievel Kustoms
Re: *** Project Arcadeus ***
« Reply #113 on: February 16, 2007, 10:06:09 pm »

Looks amazing Jontox!

That big monitor must be fun to play on...enjoy!  :)