Main Restorations Software Audio/Jukebox/MP3 Everything Else Buy/Sell/Trade
Project Announcements Monitor/Video GroovyMAME Merit/JVL Touchscreen Meet Up Retail Vendors
Driving & Racing Woodworking Software Support Forums Consoles Project Arcade Reviews
Automated Projects Artwork Frontend Support Forums Pinball Forum Discussion Old Boards
Raspberry Pi & Dev Board controls.dat Linux Miscellaneous Arcade Wiki Discussion Old Archives
Lightguns Arcade1Up Try the site in https mode Site News

Unread posts | New Replies | Recent posts | Rules | Chatroom | Wiki | File Repository | RSS | Submit news


Author Topic: My first project: "Die Spielekiste" ... a dream come true ...  (Read 5831 times)

0 Members and 1 Guest are viewing this topic.

MicBass

  • Trade Count: (0)
  • Full Member
  • ***
  • Offline Offline
  • Posts: 13
  • Last login:June 03, 2018, 03:21:35 am
  • Have fun gaming!
My first project: "Die Spielekiste" ... a dream come true ...
« on: February 06, 2018, 06:09:22 pm »
Hi,

this is my first post on this forum so hello everybody.  :cheers: Grew up in Germany with a lot of Arcade Games in the 80s until they suddenly all disappeared. Got banned into 18+ areas I think, don't really know, but in my memory they were just gone all of a sudden. But the fascination remained. Phoenix...Galaxian...Scramble...Zaxxon...later Rampage and Double Dragon... (at that time the British 5-pence coin matched exactly the German 1 DM coin in seize and weight, but was only worth 15 Pfennig. So during the school exchange to London we went to a bank and brought hundreds of them back home. Some used them for cigarettes, we for Double Dragon. For a while we were rich...)

Years later with a little more money and my own man cave I thought about buying one of these old machines. Would that be cool... But I was shocked about the high prices on ebay and elsewhere and wasn't sure if I could keep these old things running. Don't know much about electronics. But then there was this MAME-thing I had never heard of before, and people building their own cabinets!  :o And a lot of them no professionals writing 'If I can build it everybody can...' That helped because I had never done something that big and complex before and wasn't sure if it was possible. So the idea grew, I read a lot...a LOT...about other projects and started planning. That's when I stumbled over this forum here, must be over 2 yearts ago, and found it a true treasure chest of knowledge. No matter what idea...silly question...problem...someone had written about it and shared it. Many of you have helped me a lot in this, unknowingly, so I wanted to thank you, a big thanks.

I have to admit "Die Spielekiste" (literally "Gaming Box", named by my children) is already working by now, not yet totally finished as artwork and plexiglass are still missing, but you can play on it. My children love it, I think it's the greatest thing in the world and my wife thinks I'm crazy. So it's not really a project announcement but rather a story of the building process, but I wanted to share the experience nevertheless.

The plan was to build a classic upright cabinet made from MDF with a used LCD screen, some used Mini PC with an i5, some old graphics card and a used 2.0 or 2.1 PC speaker system. For the CP I wanted a 2-Player 6 button layout with a trackball for Missile Command. (Learned about all the other great TB-controlled games only later.). For the artwork I had some ideas but nothing definitively decided...still don't have. But I knew I wanted a coin door. A real working one. Wanted to hear the sound of the falling coin again, and - for the ultimate nostalgia - wanted it to work with D-Mark.

For the screen I found a used Dell 2709W. It has 27" and was one of the few monitors still available in 16:10. So it has a relatively big vertical size of 36,3cm (14,3"), which comes close to the old vertical classics which I also wanted to play. A good compromise as I thought, not too big but still ok for the vertical games. Other ideas included a hinged openable CP and a drawer for keyboard and mouse.

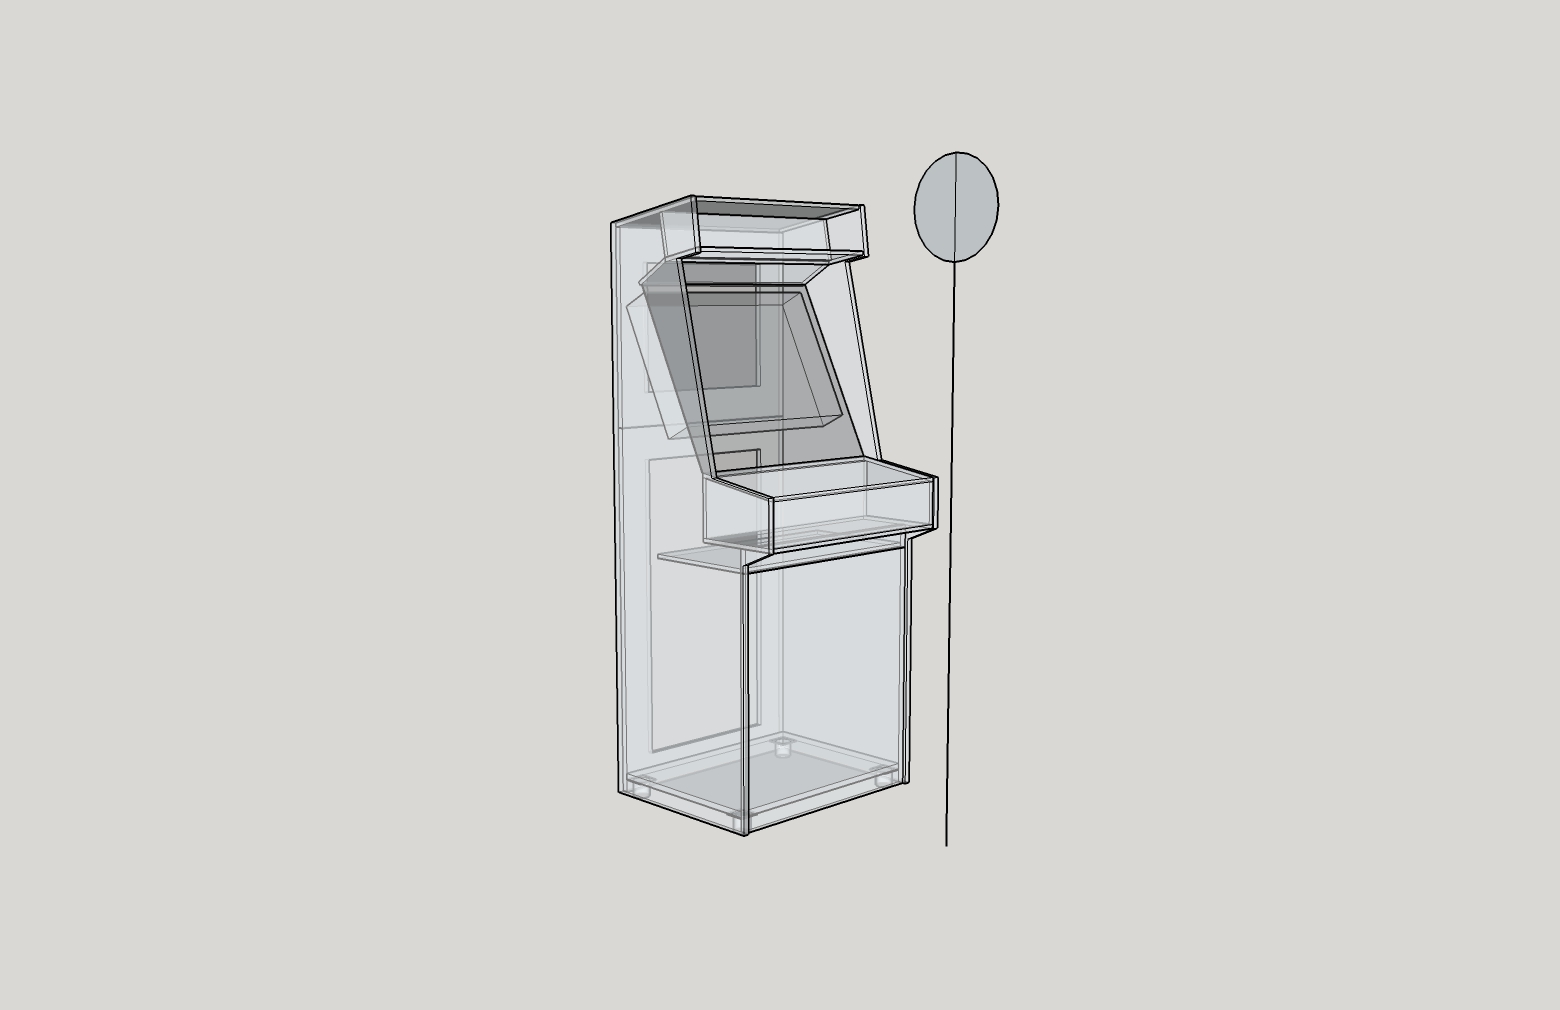
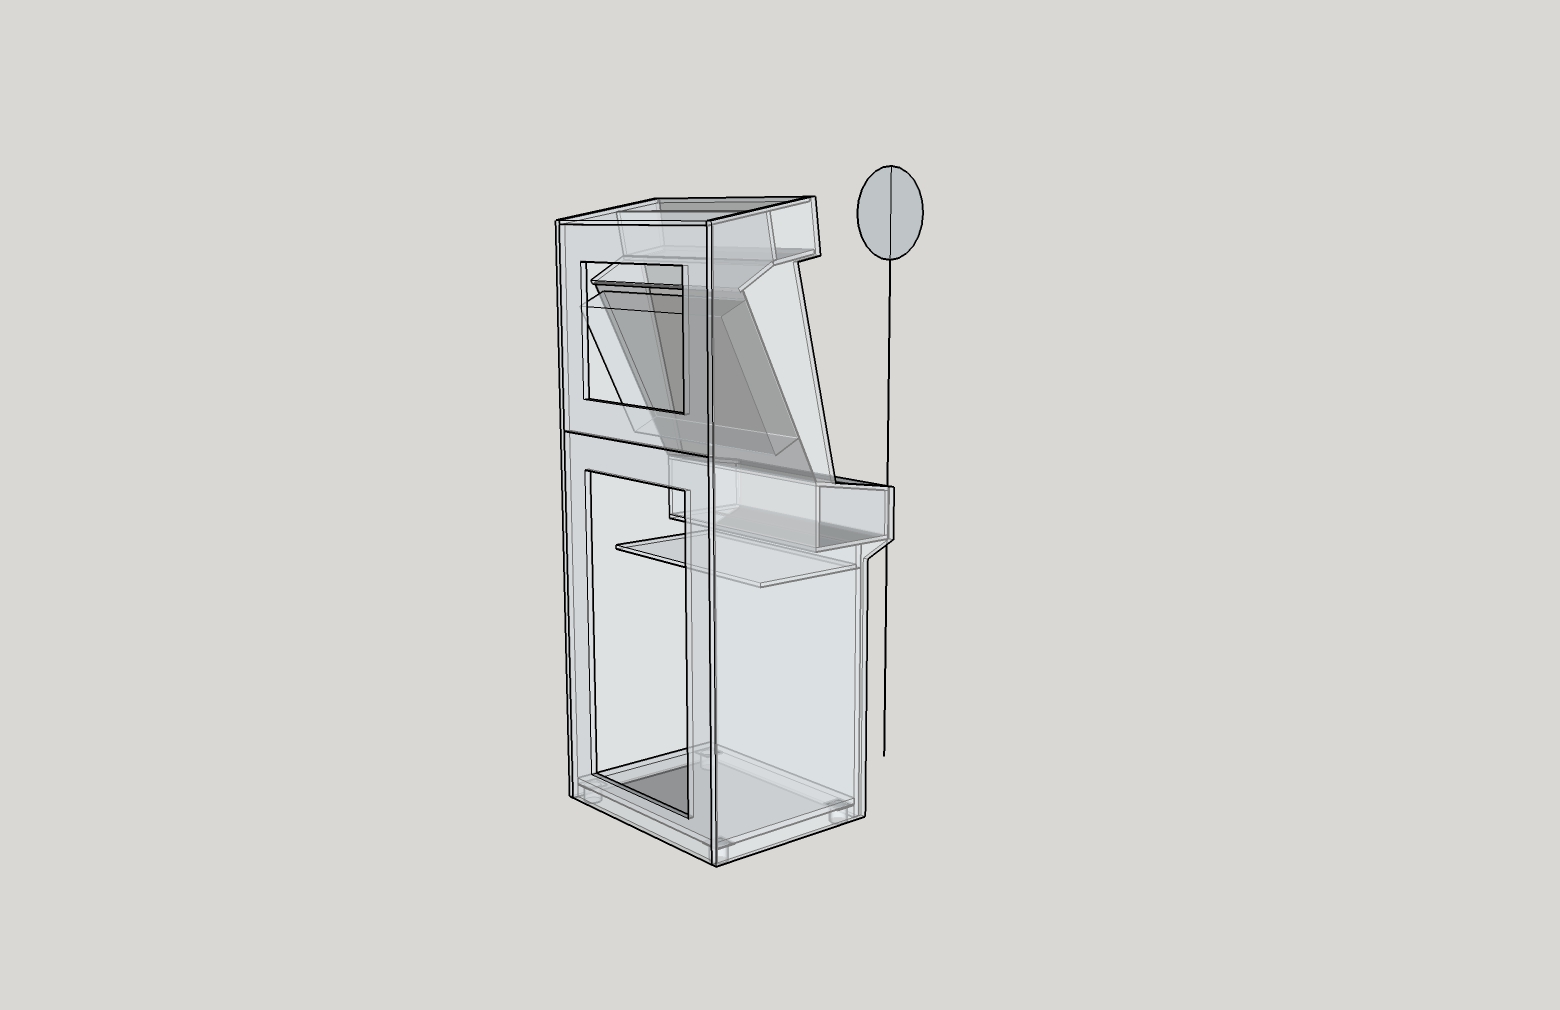
So much for the initial thoughts. The plans I did with sketchup...was a bit complicated in the beginning but after some time all the drawing and changing and experimenting became a lot of fun. The measurement of the cabinet was based on Koenigs Project MAME (http://koenigs.dk/mame/eng/stepprojectmame.htm), adapted to the size of the monitor and me.


- MicBass

MicBass

  • Trade Count: (0)
  • Full Member
  • ***
  • Offline Offline
  • Posts: 13
  • Last login:June 03, 2018, 03:21:35 am
  • Have fun gaming!
Re: My first project: "Die Spielekiste" ... a dream come true ...
« Reply #1 on: February 07, 2018, 08:51:12 am »
Next step: cutting the woodparts. Used a router for this and was very excited how it would work out.


Started last summer so could do the dusty routing outside as often as possible.


First side cut out.


Copy / paste with a flush trim bit


Yeah...great to see the twins next to each other.  :) Gives a first feeling of the size of the finished cabinet.


In the end all the routing turned out as being far more easy than I feared. Finding the right angles and distances and drawing them on the wood, that was the difficult part.
- MicBass

barrymossel

  • Trade Count: (0)
  • Full Member
  • ***
  • Offline Offline
  • Posts: 498
  • Last login:October 29, 2021, 11:25:52 am
  • Spectrum
    • forum.arcadecontrols.com/index.php/topic,157647.0.html
Re: My first project: "Die Spielekiste" ... a dream come true ...
« Reply #2 on: February 08, 2018, 05:34:25 am »
 :pics :pics :pics

MicBass

  • Trade Count: (0)
  • Full Member
  • ***
  • Offline Offline
  • Posts: 13
  • Last login:June 03, 2018, 03:21:35 am
  • Have fun gaming!
Re: My first project: "Die Spielekiste" ... a dream come true ...
« Reply #3 on: February 09, 2018, 01:43:02 pm »
Coming  ;D

The rear wall consists of 2 parts with a hole in it because I wanted accessibility but did not want to build a door. Too complicated...


Family foto with baby. It's really amazing how many parts there are needed!  :o

Cheeeese!  ;D


- MicBass

ChurchOfSolipsism

  • Trade Count: (0)
  • Full Member
  • ***
  • Offline Offline
  • Posts: 231
  • Last login:May 09, 2023, 01:43:39 pm
Re: My first project: "Die Spielekiste" ... a dream come true ...
« Reply #4 on: February 09, 2018, 07:56:29 pm »
This is shaping up to be a really cool machine (I like the curves you incorporated into the sides), keep us up to date!

Grüße aus dem Allgäu!

MicBass

  • Trade Count: (0)
  • Full Member
  • ***
  • Offline Offline
  • Posts: 13
  • Last login:June 03, 2018, 03:21:35 am
  • Have fun gaming!
Re: My first project: "Die Spielekiste" ... a dream come true ...
« Reply #5 on: February 10, 2018, 07:21:49 am »
Thank you!  :)

Grüße zurück aus Luxemburg!

---

Next  step was routing the slot for the T-Molding. Tried to measure the distance to find the exact middle...


...but that didn't work out well enough.


In the end I had to adjust the router by hand and try on a spare wood. Luckily I ordered some test strips of T Molding in different colours, so could practice a little...


..before doing the final cut:


After that being done it was the coin door's turn.


Searched for a long time to find a used one because the new ones seemed a little bit expensive with +50,-€. But all the used ones I found were even more expensive  ??? so in the end I bought a new one. It is massive metal, really heavy, and I am very happy with it.


Added holes for 1P & 2P -coin buttons for when you are too lazy or the game demands a dedicated 2P-coin etc...


Hello coin door  :)


Next: building everything together...
- MicBass

Mike A

  • Trade Count: (0)
  • Full Member
  • ***
  • Offline Offline
  • Posts: 5880
  • Last login:Yesterday at 04:21:02 pm
  • This plan is foolproof
Re: My first project: "Die Spielekiste" ... a dream come true ...
« Reply #6 on: February 10, 2018, 08:37:56 am »
Do you own a jigsaw and a circular saw?

You will wear out your router bits much more quickly when you use them as a cutting blade like you did for the coin door. Jigsaw blades are much cheaper than router bits.

When you pattern the sides, you should cut as close as you can with a jigsaw and then finish with the pattern bit.

What you did works perfectly fine, it just dulls your more expensive router bits prematurely.

Good luck with your build. I look forward to seeing it completed. :cheers:


bperkins01

  • Trade Count: (0)
  • Full Member
  • ***
  • Offline Offline
  • Posts: 895
  • Last login:September 24, 2023, 02:13:35 pm
  • Plenty of skills.. gaining experience..
Re: My first project: "Die Spielekiste" ... a dream come true ...
« Reply #7 on: February 10, 2018, 08:57:34 am »
Big fan of build threads like this - Keep the pics coming :)   :applaud:
My Arcade Cabinet Build and other projects here:
Centipede, Joust, Joust Cocktail, Asteroids, Galaga, Ms. Pacman Cabaret, Defender, Space Invaders Cocktail
https://bperkins.wordpress.com/

MicBass

  • Trade Count: (0)
  • Full Member
  • ***
  • Offline Offline
  • Posts: 13
  • Last login:June 03, 2018, 03:21:35 am
  • Have fun gaming!
Re: My first project: "Die Spielekiste" ... a dream come true ...
« Reply #8 on: February 11, 2018, 03:14:06 am »
@ Mike A: Yes you are right and I own both a jigsaw and a circular saw. Used the jigsaw for all the curves. And about the straight cuts...the thing is, they are ok tools but not the best and I do not feel very comfortable with them when it comes to precision. Cutting rough shapes with the circular saw is fine, but cutting to a mm accuracy...think I neither have the tools nor the skills to do that. With the router on the other hand I grew more and more confident and had a lot of fun, so in the end did a lot of the woodcutting with it. So the cabinet got kind of its own exclusive router treatment. ;)

Thanks for the feedback!

---

The bottom plate.


Side with the supporting...how do you call them...woods?


Here I forgot about the size of the monitor. It will not fit as it goes too deep into the cabinet, so I had to cut out somme of the supporting wood after already screwing and glewing it...


(In the end it was still not enough as I saw later...)


Mounting the floor to the sinde


Testing if it all fits together as planned, not fixed yet.


Wanted to have the sides coming 5 mm in front


Starting to screw everything together


What a great moment this was  :)


My son helped so he signed his work. Maybe still has to practice his name a bit. ;)

- MicBass

MicBass

  • Trade Count: (0)
  • Full Member
  • ***
  • Offline Offline
  • Posts: 13
  • Last login:June 03, 2018, 03:21:35 am
  • Have fun gaming!
Re: My first project: "Die Spielekiste" ... a dream come true ...
« Reply #9 on: February 18, 2018, 03:03:48 pm »
Next step: holes for the speakers. Found some used Creative A120 2.1 speakers on ebay and got them for less than 7,-€. They are great - good sound, matching size, coming with a sub and the best: a remote volume adjust. That will be put into the drawer so you can easily adjust the different volumes in MAME.


Building the template for the router:


And routing the final holes with the copy bit:


With the speaker panel installed the cabinet is ready to be sanded and filled


- MicBass

Seob

  • Trade Count: (0)
  • Full Member
  • ***
  • Offline Offline
  • Posts: 57
  • Last login:March 05, 2024, 01:40:33 am
  • I want to build my own arcade controls!
Re: My first project: "Die Spielekiste" ... a dream come true ...
« Reply #10 on: February 18, 2018, 03:26:45 pm »
Great looking cabinet. Nice work so far.

MicBass

  • Trade Count: (0)
  • Full Member
  • ***
  • Offline Offline
  • Posts: 13
  • Last login:June 03, 2018, 03:21:35 am
  • Have fun gaming!
Re: My first project: "Die Spielekiste" ... a dream come true ...
« Reply #11 on: February 20, 2018, 04:38:39 am »
Great looking cabinet. Nice work so far.

Thank you!

---

Next step was filling the screw holes and little gaps. The screws I used for the cabinet were all inox stainless steel. Don't know ift that is really necessary, but I read that they could start to rust under the wet filler and did not want to take any risk.

Cabinet with chickenpox:


The sanding was very dusty, but after its beauty-OP the cabinet got a really smooth skin.


Next comes the CP
- MicBass

MicBass

  • Trade Count: (0)
  • Full Member
  • ***
  • Offline Offline
  • Posts: 13
  • Last login:June 03, 2018, 03:21:35 am
  • Have fun gaming!
Re: My first project: "Die Spielekiste" ... a dream come true ...
« Reply #12 on: February 24, 2018, 05:27:37 am »
When I got the idea to try building a cabinet I wanted to start small and collect some experience before starting the "big project". So in order to practice woodworking, painting and wiring and also to get a feeling for the right layout I decided to test build a small 1 player control panel.

Tried some of the layouts from slagcoin and tested them on a piece of cardboard.


Built a wooden template which later could be used again for the actual cabinet.


The control panel went really well and I learned a lot by building it.


It was a lot of fun playing the old arcade games finally again with real controls...but I really missed the 2nd player so let's go on with the big one.  :)

The CP should be a box being screwed between the two side panels, slightly angled and being hinged and openable.

Roughly like this:


The angles of the front and back panel I did by hand with a file and sandpaper by the eye, so...


...well, it works.   ;D


- MicBass

MicBass

  • Trade Count: (0)
  • Full Member
  • ***
  • Offline Offline
  • Posts: 13
  • Last login:June 03, 2018, 03:21:35 am
  • Have fun gaming!
Re: My first project: "Die Spielekiste" ... a dream come true ...
« Reply #13 on: March 02, 2018, 05:18:35 am »
The top of the control panel I wanted to be hinged and considered for a long time how this could be done best. One continuous piano hinge on top of the front? Or kitchen hinges from the inside? There are a lot of great solutions to be found on video, and in the end I decided to use four little hinges screwed flush into the CP front. This seemed the most easy way to build.


The button layout was in general the same as for the practice CP. Just had to move the joystick a little bit closer to the buttons, otherwise there would not have been enough space because of the trackball.


Rounded edge


Drillholes for the holesaw


All holes drilled with a 30mm holesaw + hole for the trackball mounting


The mounting for the trackball fits smooth and flush with the CP.


The joysticks should be mounted from below with s-shaped mountings into the 18mm panel.


The final CP layout. Admin buttons will be for Esc + Pause + 1 & 2 Player. The Sticks are Seimitsu LS-32. For the trackball I went with the Happ 3". It feels very heavy and high quality and plays very well.

Bought the controls at arcadeworlduk.com. They were fast and - thanks to the weak Pound - quite cheap, even with shipping to Luxembourg. Once I messed up an order, forgot that I had already ordered some parts some time earlier and ordered them again. Wrote them a mail and it was absolutely no problem to cancel these parts.


Next: painting all the parts
- MicBass

barrymossel

  • Trade Count: (0)
  • Full Member
  • ***
  • Offline Offline
  • Posts: 498
  • Last login:October 29, 2021, 11:25:52 am
  • Spectrum
    • forum.arcadecontrols.com/index.php/topic,157647.0.html
Re: My first project: "Die Spielekiste" ... a dream come true ...
« Reply #14 on: March 02, 2018, 05:53:23 am »
You're a tease!

MicBass

  • Trade Count: (0)
  • Full Member
  • ***
  • Offline Offline
  • Posts: 13
  • Last login:June 03, 2018, 03:21:35 am
  • Have fun gaming!
Re: My first project: "Die Spielekiste" ... a dream come true ...
« Reply #15 on: March 02, 2018, 12:49:38 pm »
Yeah, sorry...had not much time the last couple days. Will post more pics so you got something to do at work.  :)

---

For the coating I used alkyd resin primer and paint...the woman from the hardware store said it would work well on the MDF and it worked really well.


After one day the primer was dry enough for the paint.


Wanted the finished cabinet to have a drawer beneath the CP for keyboard, mouse etc., so before finishing the CP I had to build the drawer first. The drawer should be opened just by pushing against it, without any handle that could be seen from the outside, so I ordered some push-to-open sliders.

For the drawer I also looked up a lot of ideas on the internet and decided to keep it as simple as possible. So just a board with a front panel and two sides, no back.


Building the drawer proved to be really difficult as all had to be very exact. The drawer was always rubbing against the cabinet or the CP somewhere. To make it even more difficult, I did not think of the little gaps between drawer and cabinet / CP when cutting all the parts. So I had to do a lot of grinding to get the correct measures. But in the end it worked and the drawer opens and closes smoothly without any rubbing. Very satisfying! :)


---

Coming next: will the control panel fit into the cabinet? Stay tuned to find out!!  ;D


- MicBass

Drnick

  • Trade Count: (+2)
  • Full Member
  • ***
  • Offline Offline
  • Posts: 1641
  • Last login:May 06, 2023, 01:19:48 pm
  • Plodding Through Life
Re: My first project: "Die Spielekiste" ... a dream come true ...
« Reply #16 on: March 02, 2018, 01:45:13 pm »
Good Job, But could be better.  You've let yourself down with the filling and sanding process.  If I can see the filler top right hand side of cabinet in a photo then even with artwork they are going to show through.  Maybe better to hit them down with an orbital sander now and repaint the area.

Ian

  • Trade Count: (0)
  • Full Member
  • ***
  • Offline Offline
  • Posts: 1060
  • Last login:September 26, 2021, 01:50:35 am
  • "A day without Laughter is a day wasted"
Re: My first project: "Die Spielekiste" ... a dream come true ...
« Reply #17 on: March 02, 2018, 04:50:21 pm »
Great lines on this build. Love it so far! Agreed with the sanding of the filler. But great start!
Every normal man must be tempted at times to spit on his hands, hoist the black flag, and begin to slit throats.

MicBass

  • Trade Count: (0)
  • Full Member
  • ***
  • Offline Offline
  • Posts: 13
  • Last login:June 03, 2018, 03:21:35 am
  • Have fun gaming!
Re: My first project: "Die Spielekiste" ... a dream come true ...
« Reply #18 on: March 03, 2018, 05:28:25 am »
Yes you got me there. Was also a littlebit annoyed when I saw the spots. Thought everything was flat and level after sanding but obviously it was not enough. I have to say though that these spots are way more noticeable on the pictures than they are on the real cabinet.

But I had to screw the CP as well as the mounting for the screen from the outside anyway later in the process, so there will be some more holes in the sides. So yes, will have to do redo the paint job on the sides I fear. Or at least some of it.

---

The CP construct


Did not trust the construction to be stable enough when screwed just from the inside so I attached it from the outside as mentioned before.

It was a bit tricky to get all the measures for the drillholes right.


Had to shorten the CP a littlebit..with the extra paint on the sides it was too wide at first and did not fit into the cabinet.

Don't know if you've already noticed, but the hinges are not perfectly symmetrical. This was caused by working too late and too tired in the evening..did the measurement for the second left one wrong at first and marked the right one and the wrong one very clearly. Grate here and DO NOT grate here! Grated the wrong one, of course..   ::)
Fortunately this hardly stands out when closed.


The drawer opens smoothly with a soft 'wooosh'. I really like my drawer. :)


Control panel not screwed yet. Painted the white stripe on top of the kickplate later, so this will be all black.


In the beginning I mentioned that I did not consider the size of the monitor correctly when screwing the supporting woods to the sides and hat to cut some recess into them. As it turned out it still was not enough, so I had to cut some more. Because of the lack of space inside the cabinet this had to be done by handsaw...really annoying. You can see the bright spots.

On the other hand this led to the monitor fitting exactly on the slant, so I just needed a board to support it.


Screwed the CP from the outside for solidity reasons, the same applies to the monitor. It is big and heavy and I did not want to take any rist of it not being stable enough so it was being screwed from the outside as well.


Monitor standing on the support panel.


Next: wiring the CP and marquee light
- MicBass

MicBass

  • Trade Count: (0)
  • Full Member
  • ***
  • Offline Offline
  • Posts: 13
  • Last login:June 03, 2018, 03:21:35 am
  • Have fun gaming!
Re: My first project: "Die Spielekiste" ... a dream come true ...
« Reply #19 on: March 08, 2018, 05:18:33 am »
The CP layout consists of two Seimitsu LS-32 with six buttons each, two player-buttons, esc & pause and a 3" Happ TB. Everything is wired to a I-PAC 2 except the trackball wich goes directly into the USB port of the PC.


For the marquee lighting I bought a self adhesive LED strip. It was very easy to install, just cut the desired lenght and stick it to where you want it to be. The aluminium foil was attached with some spray adhesive.


Cabinet with the monitor and coin door installed. The coin door fits exactly into its hole, no need of any further attachment.


First test run :)


Next: start button, LED for the coin door and attaching the CP
- MicBass

MicBass

  • Trade Count: (0)
  • Full Member
  • ***
  • Offline Offline
  • Posts: 13
  • Last login:June 03, 2018, 03:21:35 am
  • Have fun gaming!
Re: My first project: "Die Spielekiste" ... a dream come true ...
« Reply #20 on: March 11, 2018, 02:24:35 pm »
The finished control panel


I wanted the power button to start the whole cabinet, including monitor, speakers and lights, so everything is plugged into a smart power strip. The PC plug goes into master and when the PC is turned on everything else will be turned on automatically.

The power button...


...was soldered to the PC power switch.


The 12V LEDs from the power switch and the coin door got their power from a 12V adaptor


Working  :)


Some more pictures: the back


Speaker & monitor


Coin door


Oh sweet nostalgia  ;)


This will be the last series of pictures for now as the artwork & plexiglass is still missing. All in all it was a really great experience. Learned a lot, had a lot of fun building it and now have a lot of fun playing it!  :)

For the artwork I have some ideas but nothing for sure yet. The current marquee artwork is just a quickly printed provisorium. As a child I played a lot of Rabbit Punch on a summer holiday, so this brings back some sweet memories, but I'm not sure if I want it as a theme. Maybe R-Type, the first boss on the sides would be cool I guess and I really like the game. Yeah, well, have to think about it some more.  :laugh:
- MicBass

Ian

  • Trade Count: (0)
  • Full Member
  • ***
  • Offline Offline
  • Posts: 1060
  • Last login:September 26, 2021, 01:50:35 am
  • "A day without Laughter is a day wasted"
Re: My first project: "Die Spielekiste" ... a dream come true ...
« Reply #21 on: March 12, 2018, 12:42:13 pm »
Again... I love the lines of this thing. It will really come together when you get a bezel around that monitor.

As for artwork, I would try to keep it to one game that you really enjoyed growing up. Take your time and get it printed in a high quality printer.
Every normal man must be tempted at times to spit on his hands, hoist the black flag, and begin to slit throats.