Main Restorations Software Audio/Jukebox/MP3 Everything Else Buy/Sell/Trade
Project Announcements Monitor/Video GroovyMAME Merit/JVL Touchscreen Meet Up Retail Vendors
Driving & Racing Woodworking Software Support Forums Consoles Project Arcade Reviews
Automated Projects Artwork Frontend Support Forums Pinball Forum Discussion Old Boards
Raspberry Pi & Dev Board controls.dat Linux Miscellaneous Arcade Wiki Discussion Old Archives
Lightguns Arcade1Up Try the site in https mode Site News

Unread posts | New Replies | Recent posts | Rules | Chatroom | Wiki | File Repository | RSS | Submit news


Author Topic: Project Blast-Off! (Pimping a Sega New Blast City)  (Read 13124 times)

0 Members and 1 Guest are viewing this topic.

wesbrown18

  • Trade Count: (0)
  • Full Member
  • ***
  • Offline Offline
  • Posts: 73
  • Last login:October 24, 2018, 09:29:23 pm
  • I want to build my own arcade controls!
Project Blast-Off! (Pimping a Sega New Blast City)
« on: May 05, 2013, 04:02:39 pm »
Prelude
I will be dividing this up into a series of replies/posts in this topic, along different project subthreads.

  • Introduction, Delivery, Unwrapping
  • Interior Shots
  • Control Panel
  • Hardware and Software
  • Sound
  • Wiring Power
  • Pimpage

Introduction
For a long while, I'd wanted an arcade setup that was accurate and true to the real thing.  I'd gotten the parts for a bar top a while ago, including an Atom NForce-based board that is currently my Xterminal.  But life intervened, and I wandered away from this in my head for a while.

A few years later, with many life changes, including getting married, a couple moves, and running engineering for a startup company, my head wandered back into this space.  It was with alarm that I noted that the supplies of arcade CRTs were drying up -- I'd thought I'd be able to pick up a Wells Gardner 9200 or the equivalent, but they are no longer made.

I could have gotten a Makvision 29" Trisync, but I don't have the time or the tools anymore to build a cabinet from scratch at the moment.  So I began investigating options, with some fairly specific criteria:

  • Must be movable -- my house is on top of a hill!
  • Must be comfortable -- I have a 6'6" tall bio-chassis frame, so it is actually hard to find something that is comfortable for me to play at.
  • Monitor must be in CRT, of decent size, and superb quality.
  • Must not be so obnoxiously large it makes my wife scream.

After much research into the subject, I discovered the Japanese Candy Cabinets, and they seem to fit the criteria that I had outlined:
  • They typically are lighter than Western cabinets, at 200-230 pounds.
  • Some cabinets have back wheels, making it movable about the house by one person!
  • Pre-1998 cabinets are typically sit-down without a pedestal, and can be converted to stand-up with a pedestal.
  • They typically had very large CRTs for their cabinet size -- 25" to 29" -- and were typically excellent tubes.
  • A bonus is that these are 'easily' rotatable from vertical to horizontal.
  • Control panels are interchangeable within the same company's line, typically.

Only problem is -- how do I find one?  There's apparently two or three suppliers of Japanese Candy Cabinets in the US, and both are on the West Coast.  I found one on Ebay, and contacted the seller, Ken at the Game Room.  We came to an agreement, conducted our financial transaction, and it was on its way.

Delivery and Unwrapping
I got a call from the freight company, and asked for delivery in the afternoon the next day, so I could arrange for people to come help get it off the truck and up into the house.  But instead, the delivery truck arrived at 9 am in the morning!   :angry:

These drivers do not do curbside delivery; they do not get it into the house.  I had to pay him a 'consideration' to use his lift to get it up the front steps of my house on top of a hill.  But we got it into my house, and it was unwrapped.  :applaud:

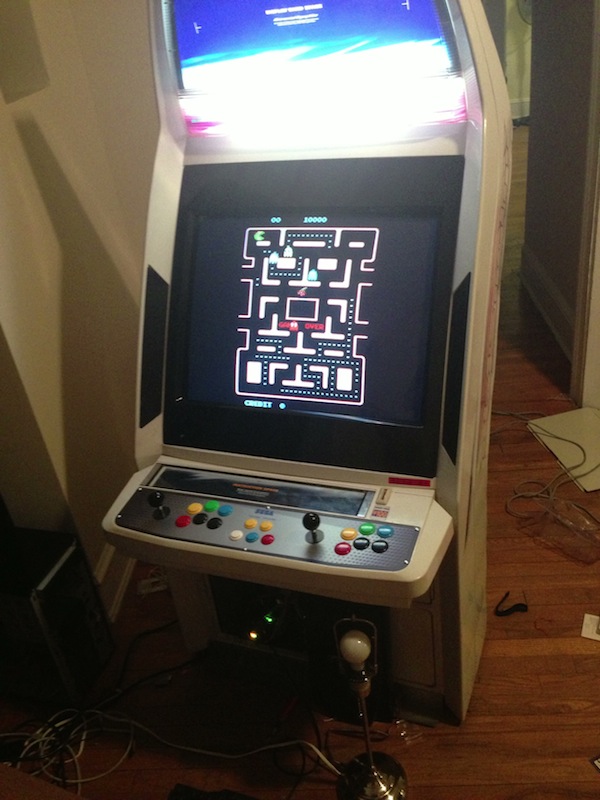
Ladies and gentlemen, behold the Sega New Blast City!


It is a gorgeous cabinet with a 29" Nanao 2931 15/24/31khz Trisync monitor -- I had asked Ken to throw in a JAMMA board so that I can get a baseline on whether the electronics and the wiring works.  It also came with a replica Sega Blast City 2P6B control panel with a few extra buttons added below P1 and P2 for control.

Here's the cabinet running Ms. Pacman, a couple days later.

« Last Edit: May 05, 2013, 10:38:36 pm by wesbrown18 »

Brian74

  • Trade Count: (0)
  • Full Member
  • ***
  • Offline Offline
  • Posts: 1089
  • Last login:April 21, 2025, 11:11:53 am
  • Yep... I built that!!
Re: Project Blast-Off! (Pimping a Sega New Blast City)
« Reply #1 on: May 05, 2013, 04:33:55 pm »
I think I have the same monitor, how do you change the hz? Can you take a picture?

Sent from my SGH-T989 using Tapatalk 2


wesbrown18

  • Trade Count: (0)
  • Full Member
  • ***
  • Offline Offline
  • Posts: 73
  • Last login:October 24, 2018, 09:29:23 pm
  • I want to build my own arcade controls!
Re: Project Blast-Off! (Pimping a Sega New Blast City)
« Reply #2 on: May 05, 2013, 04:54:34 pm »
I think I have the same monitor, how do you change the hz? Can you take a picture?

Nanao 2931's are autosync -- you don't need to change the hz.  Nanao 2930's are manual sync -- you set the hz.  If you have a Nanao 2930, I can dig for this information for you.

wesbrown18

  • Trade Count: (0)
  • Full Member
  • ***
  • Offline Offline
  • Posts: 73
  • Last login:October 24, 2018, 09:29:23 pm
  • I want to build my own arcade controls!
Re: Project Blast-Off! (Pimping a Sega New Blast City)
« Reply #3 on: May 05, 2013, 05:17:59 pm »
Interior Shots

The Blast City was designed by Sega to take their newer 3D generation games, so they came with an autosync monitor, but ultimately, no game boards were ever released for it that used the 31.5khz capabilities of the monitor.  This cabinet model launched with Virtua Fighter 3, and has an optional JAMMA 001 loom, which I had requested to be added to the cabinet.  Out of the box, there is no JVS I/O, however the power supply is JVS compatible with 3.3V and a stereo amp built in.

The wiring is a beautiful thing to work with, and the space is easily accessible via a front panel door.  To the right of the picture below, you can see the I/O board -- the control panel connects to the I/O board which then connects via interchangeable looms to the game PCB in question.  The power supply is actually a 100V power supply, which is Japan standard, but it tolerates American voltages at 110V.  It provides power to the monitor at 100V, which is actually the subunit that I would be more concerned about varying the voltages on.


Mounted on a sliding wood panel is the JAMMA game PCB -- it's a Street Smart game made by SNK in 1989 -- http://en.wikipedia.org/wiki/Street_Smart_(video_game).  It's apparently a pioneering game in that it had single-opponent style beat-em up mechanics, a transition between Fatal Fury and Street Fighter 1 -- but it's not an especially good game.  But it served its purpose in allowing me to debug and troubleshoot any wiring and monitor issues.    It's really helpful to be able to reattach the JAMMA board to see if I'd somehow ---fouled up beyond all recognition--- up the monitor, or if the controls worked, or if the sound worked.


Here's a shot of the Nanao 2931 monitor chassis -- one of the nice things about this cabinet design is that it opens up nicely, everything is accessible.  It is even possible to completely disassemble the chassis and put it back together.  Some of the folks over at Arcade Otaku have taken it apart and taken it to an auto body shop to be worked on.  The shell is complete aluminum, no polycarbonate in this one.  This was my plan (B) if I couldn't fit it through the door!  :laugh:


wesbrown18

  • Trade Count: (0)
  • Full Member
  • ***
  • Offline Offline
  • Posts: 73
  • Last login:October 24, 2018, 09:29:23 pm
  • I want to build my own arcade controls!
Re: Project Blast-Off! (Pimping a Sega New Blast City)
« Reply #4 on: May 05, 2013, 08:22:24 pm »
Control Panel
A normal Sega Blast City panel would have four or six buttons, and be either one or two players.  The buttons are generally uniform in color, one color for each player.  These configurations also have a P1 and P2 start button across the top, between the two players.  The buttons are laid out in a 'splay' pattern which is more natural for hands than the traditional American six buttons in two rows scheme.

I had asked Ken to create a repro Sega Blast City control panel; he has artwork and the dimensions for an aluminum panel.  The button color layout is NeoGeo; red, yellow, green, and blue, with the other two buttons in black.  They are black Sanwa ball-top like joysticks.


I really like how the Japanese Candy Cabinets do the control panels.  You have a lock that turns a latch, and allows you to pull the panel back, exposing the innards like so below.


Here, we can see that the control panel buttons are wired to molex connectors; this makes it trivial to disconnect the molex connectors and pull the entire control panel out and replace it with another one.  Unfortunately, the extra buttons past the four in the JAMMA standard are not wired this way.


The joysticks are Sanwa JLF type, with five pin connectors -- I will be preserving the JLF connector type when I replace the joysticks; being able to disconnect and reconnect a joystick in one go is far too useful.


Control Panel To-Do
  • Rewire the control panel extra buttons to use the molex connector seen in the middle; I do not like that some of the extra buttons are hard-wired into the cabinet.
  • Add a CPS2 molex connector inside the cabinet for the extra buttons from the Blast City I/O board
  • Add the six kick buttons as a molex connector wired to the J-PAC, so that it is easily interchangeable with a JAMMA board.

Control Panel Bling To-Do
  • Replace all the buttons with LED RGB buttons from Ultimarc, wired to a PACLED64 placed in the panel.  I'd either have it powered via USB 5V in the case of JAMMA boards, or controlled and powered via USB to the host computer.
  • Replace the Sanwa's with the two Mag-Stik Pluses that I already have, for better Pac-Man and Donkey Kong action!
  • Replace the Sanwa's with UltraStick 360's for analog control of such games as Geometry Wars.

wesbrown18

  • Trade Count: (0)
  • Full Member
  • ***
  • Offline Offline
  • Posts: 73
  • Last login:October 24, 2018, 09:29:23 pm
  • I want to build my own arcade controls!
Re: Project Blast-Off! (Pimping a Sega New Blast City)
« Reply #5 on: May 05, 2013, 09:33:03 pm »
Hardware
I had this particular set of hardware available after swapping this motherboard + CPU + RAM combo in my NAS for an Opteron-based configuration with ECC.  Fortunately, it's more than sufficient for emulation purposes.

  • Asus F1A75-M Pro
  • 16GB of DDR3 1333mhz (in a pair of 8GB DIMMs)
  • AMD Llano A8-3870K (quad core 3.0ghz, with integral Radeon 6550D)
  • Ultimarc ArcadeVGA 3000
  • 64GB Crucial M4 SSD
  • Ultimarc J-PAC
  • Corsair 400W PSU
  • Smart Power Strip

I had some issues getting this hardware working with the Nanao 2931 trisync; apparently the I/O board or the Nanao or the J-PAC does not pass on VGA signals very well, especially with non-15khz resolutions.  Fortunately, the Nanao 2931 has a 15-pin DE connector that works directly with the ArcadeVGA.  Another gotcha was that there was a stealth revision of the ArcadeVGA 3000 that had the VGA out on a DVI port electrically, which is significant when you need to specify ports to use at the bootloader!

The other issue that I had was with the EFI BIOS wanting a resolution higher than the ArcadeVGA was willing to provide via the VGA port; when the Nanao monitor chassis is powered on along with the motherboard, if there's no synch signal immediately, it doens't appear to power on at all.  I have to turn off the chassis before I power on the motherboard, and wait 30 seconds for the ArcadeVGA to send a signal that the Nanao was happy with.  I'm going to need to find a relay to put in the power circuit to the cabinet or the monitor.  Does anyone have hints as to a suitable relay with a 15s-30s delay and can do 100-120V?

Below, you can see the entire in-progress mess of wiring and circuit boards, along with the JAMMA board nearby for troubleshooting. :)


Here, the motherboard is mounted onto the standoffs and the wood panel that the JAMMA board was on.  I should note that the J-PAC was giving me a bit of trouble with Button 4 via the JAMMA edge connectors, so I had to snip button 4 for P1 and P2 and move it to the screw-down terminals on the J-PAC.  You can also see the ziptie that I had to wrap around the dead-man switch so that it'd power on while the panel was open.  Quite annoying.


Hardware To-Do
  • Mount J-PAC onto the wood panel
  • Clean up J-PAC wiring with molex connectors and CPS2 kick harness
  • Mount SSD drive onto wood panel
  • Mount PSU onto wood panel?  This would allow me to have the entire system as one removable element -- I'd just disconnect the JAMMA connector, and I'm done.
  • Measure temperatures after hard gaming and see if better ventilation is needed.

Software

The system runs Calamity and VeS' most excellent GroovyArcade, which I picked for several reasons over Windows XP:

  • GroovyArcade was 64-bit, and MAME gets a nice boost from 64-bit, which is especially useful with the later 90's 3D games.
  • Windows XP 64-bit is pretty problematic when it comes to drivers.
  • Native 15khz support from the bootloader onwards.
  • Nanao 2930/2931 dotclock and modeline profiles integrated.
  • It's Linux. I've been using Unix since 1993, and I am extremely comfortable in this environment.
  • Even better, it's Arch Linux based, which I am intimately familiar with due to my $DAYJOB.
  • SSH access to the computer over my gigabit network to tinker with things easily and remotely.
  • GroovyMame and GroovyUME integrated with support for native arcade modelines.
  • Out of the box, you can run NES, SNES, Sega Genesis and MAME games. What more can you ask for?

With the combination of GroovyArcade and the AMD A8 LLano hardware, I was able to play games such as Tekken 2 and Soul Calibur at native speeds.


We can see that Soul Calibur pegs one core, with some threads left over on another core.  One of the nice advantages of Linux is that you can ssh in and see what's going on under the hood while a game plays.


I was also experimenting with getting Cabrio working -- it's a fairly nice front end that's HyperSpin-esque but without using Flash or being massively slow.  The picture below is an early in-progress screenshot.  I've gotten marquees in there to scroll through along with screenshots and videos of the games in question.


Software To-Do
  • Adapt atari800 emulator to allow for MAME keys
  • Integrate a better rom check utility into GroovyArcade
  • Write a Cabrio ROMlister utility for GroovyArcade that produces XML files automatically
  • Finish Cabrio configuration and themeing.
  • Debug Cabrio's video support.

That's all for tonight.

BobA

  • Trade Count: (+14)
  • Full Member
  • ***
  • Offline Offline
  • Posts: 5943
  • Last login:July 11, 2018, 09:52:14 pm
  • What Me Worry?
Re: Project Blast-Off! (Pimping a Sega New Blast City)
« Reply #6 on: May 06, 2013, 10:07:49 am »
Great start.  You definitely show a solid engineering background with the detail in you post.  Love the look of your cab.   

404

  • Trade Count: (+3)
  • Full Member
  • ***
  • Offline Offline
  • Posts: 1019
  • Last login:August 04, 2015, 10:19:10 pm
Re: Project Blast-Off! (Pimping a Sega New Blast City)
« Reply #7 on: May 06, 2013, 12:08:45 pm »
oh! PC spec overkill!  ;D

Amazing cab. I was actually pretty close to buying a Blast City a few months back. That one is a keeper.


emphatic

  • Trade Count: (0)
  • Full Member
  • ***
  • Offline Offline
  • Posts: 2017
  • Last login:June 25, 2025, 05:42:59 pm
  • -"Suck it, Donny!" -"No, YOU suck it.... more".
    • Emphatic's Video Game Collection
Re: Project Blast-Off! (Pimping a Sega New Blast City)
« Reply #8 on: May 07, 2013, 01:27:47 pm »
That Blast look great! :cheers:

wesbrown18

  • Trade Count: (0)
  • Full Member
  • ***
  • Offline Offline
  • Posts: 73
  • Last login:October 24, 2018, 09:29:23 pm
  • I want to build my own arcade controls!
Re: Project Blast-Off! (Pimping a Sega New Blast City)
« Reply #9 on: May 07, 2013, 01:38:06 pm »
Great start.  You definitely show a solid engineering background with the detail in you post.  Love the look of your cab.   

However did you guess that I was an engineer of some sort or another? ;)

oh! PC spec overkill!  ;D

Amazing cab. I was actually pretty close to buying a Blast City a few months back. That one is a keeper.

PC spec overkill?  I was under the impression from the majority of the forum users that an AMD CPU is inferior to Intel.  How can I have overkill specs if I'm running an AMD?  :laugh2:

Yeah -- this cab was a bit more pricey than picking up an American cabinet, but definitely worth it to me.

That Blast look great! :cheers:

Yeah -- I still need to apply copious Magic Eraser to the shell, but it's a beautiful cabinet. :)

Paladin

  • Trade Count: (+1)
  • Full Member
  • ***
  • Offline Offline
  • Posts: 541
  • Last login:July 04, 2022, 05:13:19 pm
  • Mmmm llamaburgers!
Re: Project Blast-Off! (Pimping a Sega New Blast City)
« Reply #10 on: May 08, 2013, 08:55:38 am »
In case you haven't figured it out yet, the connectors in the control panel aren't 'molex'.  They're 'amp up' and not available from any US suppliers that I have been able to find.  This isn't a huge problem though as giz10p and AGS in England, and akihabrashop in Japan sell them and all are good folks to deal with.  I'd recommend ordering twice the number of pins for the connectors that you think you'll need.  It's very annoying when you find yourself short just a couple pins and have to wait for an overseas shipment! 


wesbrown18

  • Trade Count: (0)
  • Full Member
  • ***
  • Offline Offline
  • Posts: 73
  • Last login:October 24, 2018, 09:29:23 pm
  • I want to build my own arcade controls!
Re: Project Blast-Off! (Pimping a Sega New Blast City)
« Reply #11 on: May 08, 2013, 09:09:25 am »
In case you haven't figured it out yet, the connectors in the control panel aren't 'molex'.  They're 'amp up' and not available from any US suppliers that I have been able to find.  This isn't a huge problem though as giz10p and AGS in England, and akihabrashop in Japan sell them and all are good folks to deal with.  I'd recommend ordering twice the number of pins for the connectors that you think you'll need.  It's very annoying when you find yourself short just a couple pins and have to wait for an overseas shipment! 

I figured out that they weren't quite molex, but molex-like, and was wondering where exactly to get them.  This is a huge help, thank you.  I'll probably use molex for the CPS2 kick harness stuff from the Blast City I/O board to my J-PAC, and use amp-up connectors in the control panel itself.

Paladin

  • Trade Count: (+1)
  • Full Member
  • ***
  • Offline Offline
  • Posts: 541
  • Last login:July 04, 2022, 05:13:19 pm
  • Mmmm llamaburgers!
Re: Project Blast-Off! (Pimping a Sega New Blast City)
« Reply #12 on: May 09, 2013, 08:49:58 am »
I forgot to mention that the shops I mention usually carry the extra button wiring loom per made for buttons 4,5,6. 
Another option is Francob who posts here as well as other forums.  He does great work and has a sale thread in this forum that includes this harness:
http://forum.arcadecontrols.com/index.php/topic,117852.0.html