Main Restorations Software Audio/Jukebox/MP3 Everything Else Buy/Sell/Trade
Project Announcements Monitor/Video GroovyMAME Merit/JVL Touchscreen Meet Up Retail Vendors
Driving & Racing Woodworking Software Support Forums Consoles Project Arcade Reviews
Automated Projects Artwork Frontend Support Forums Pinball Forum Discussion Old Boards
Raspberry Pi & Dev Board controls.dat Linux Miscellaneous Arcade Wiki Discussion Old Archives
Lightguns Arcade1Up Try the site in https mode Site News

Unread posts | New Replies | Recent posts | Rules | Chatroom | Wiki | File Repository | RSS | Submit news


Author Topic: 'Project Jetsam': A bartop speed build using 100% recycled materials  (Read 2125 times)

0 Members and 4 Guests are viewing this topic.

jeremymtc

  • Trade Count: (0)
  • Full Member
  • ***
  • Offline Offline
  • Posts: 194
  • Last login:Today at 07:12:00 am
Current status: Playable, nearly complete


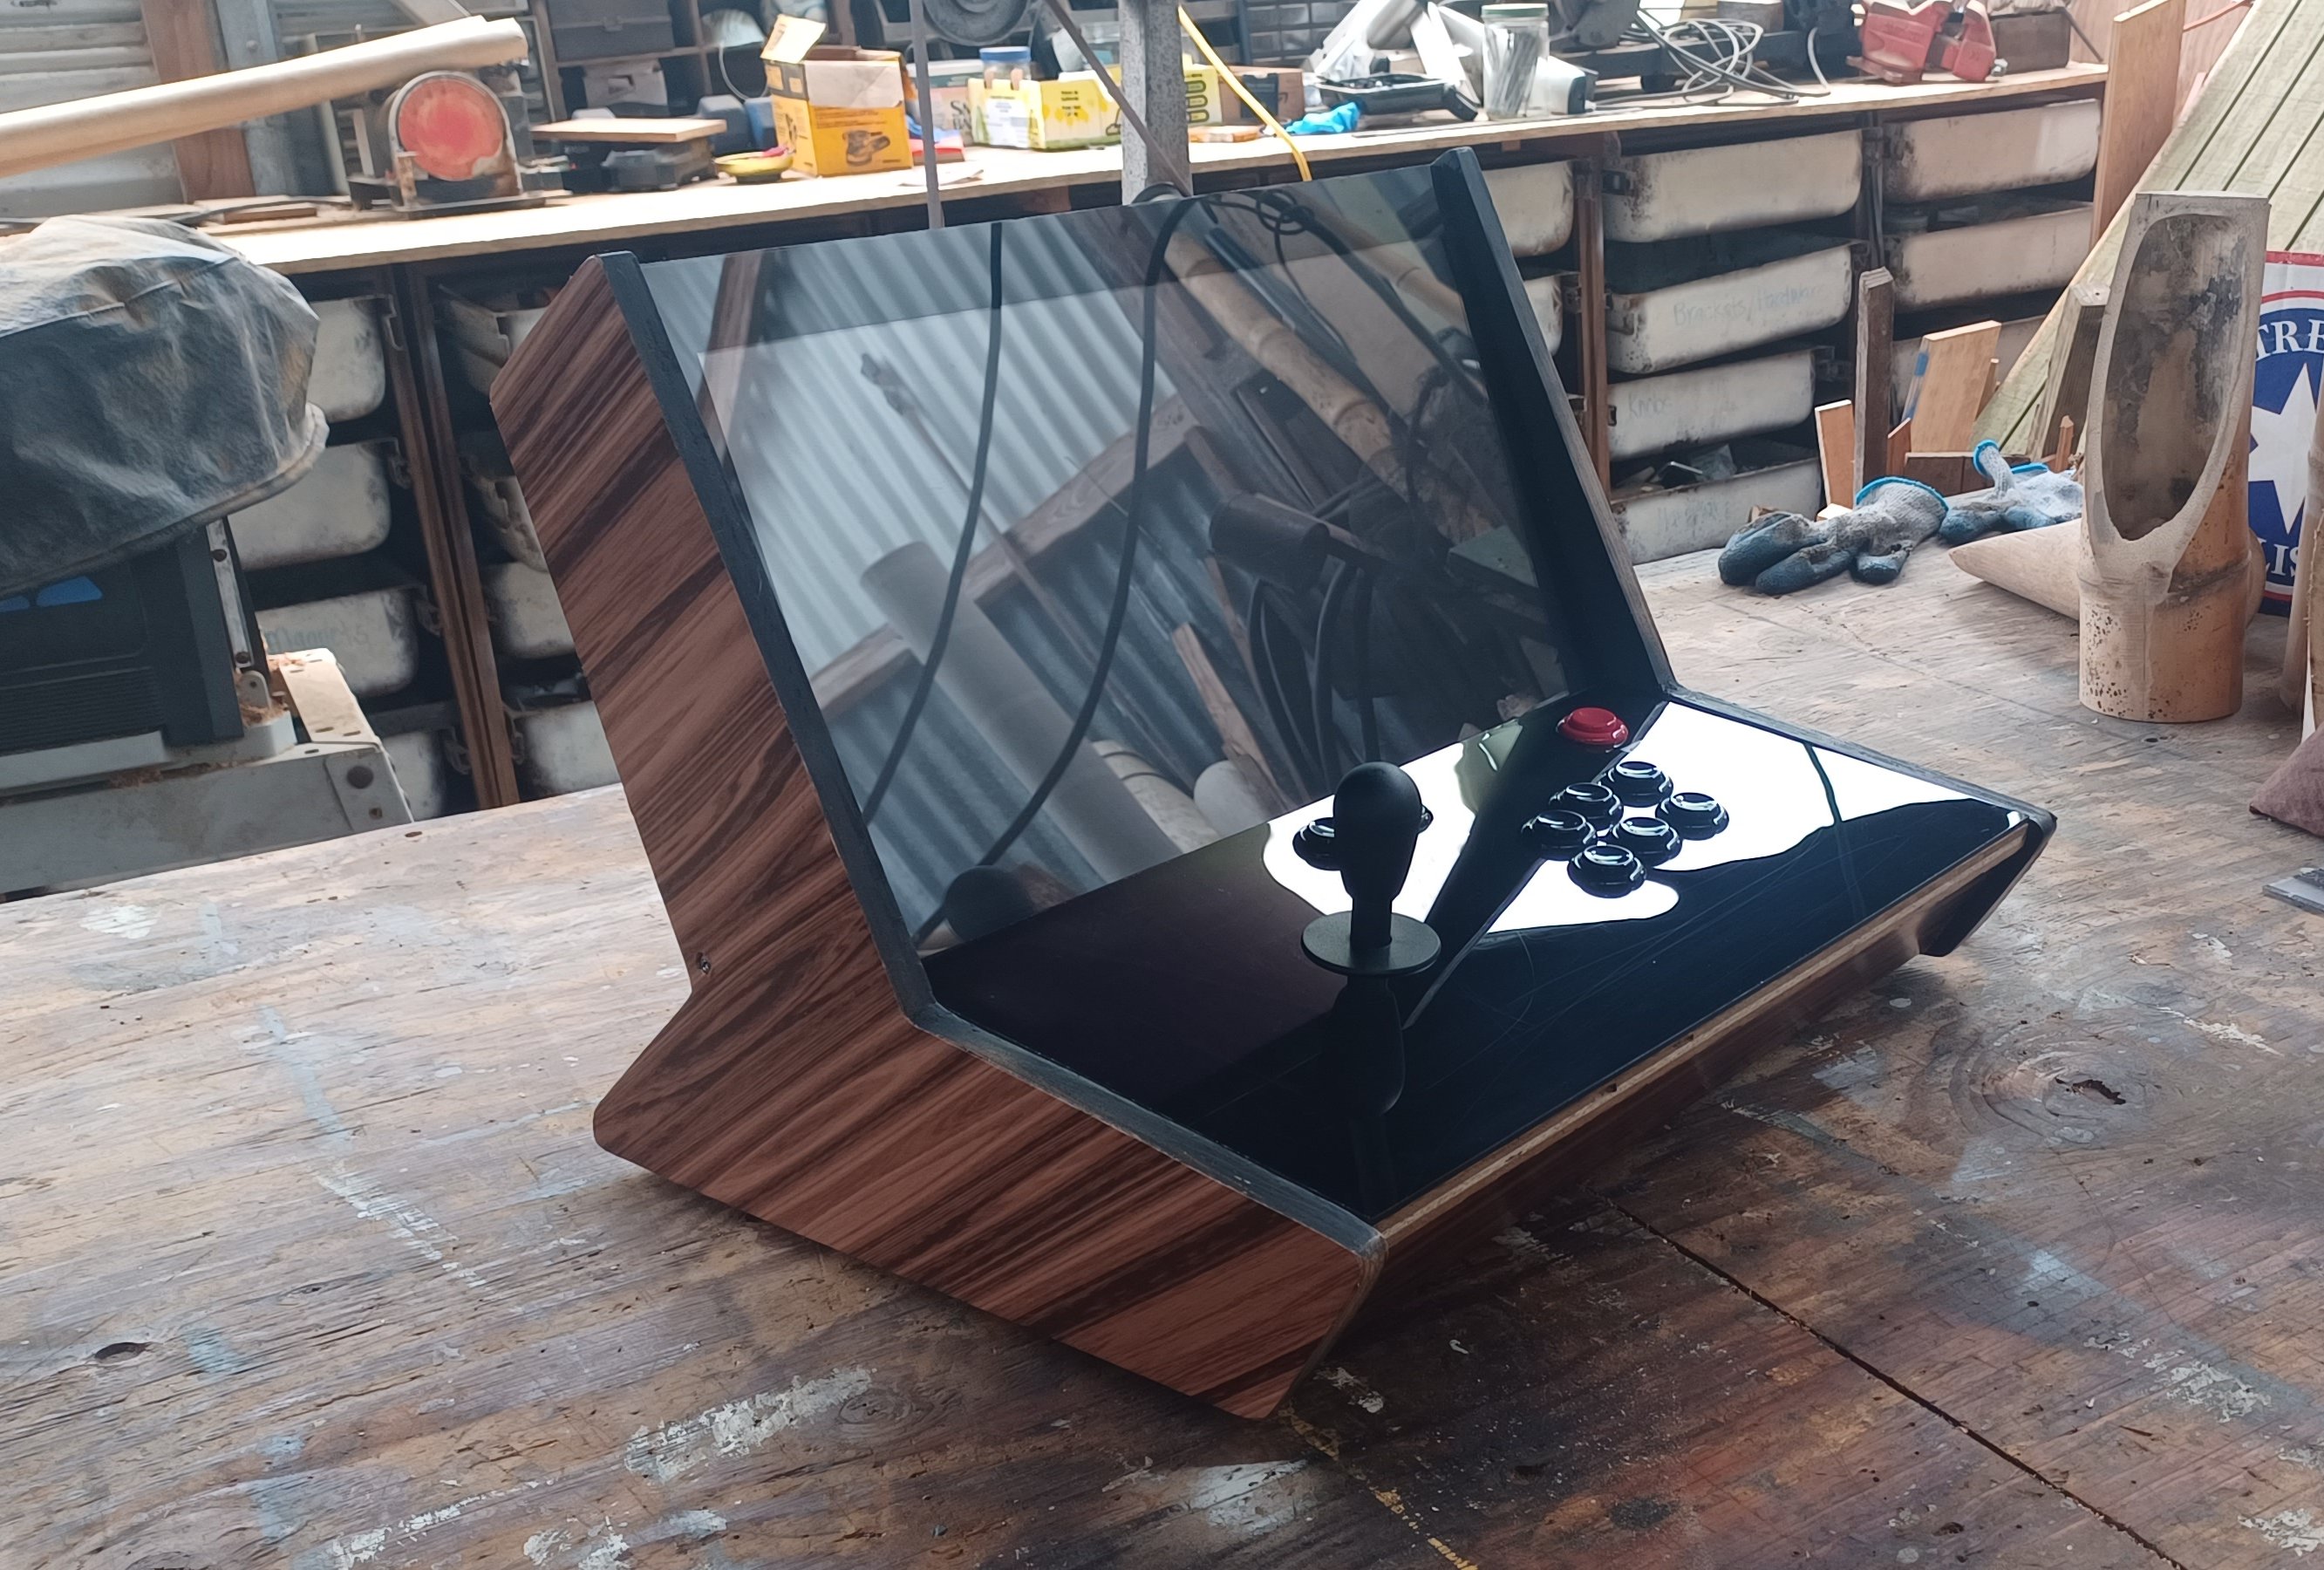
This is Project Jetsam, a bartop build using only recycled parts and scrap wood.


It's built around an old Windows 8-era Dell Inspiron All-In-One computer with a dual core Celeron, 4GB RAM, Intel HD graphics, and WD 500GB HDD.


Operating system is Linux Mint 21, with Pegasus Frontend running effectively as the shell.


Control interface is an Xbox360 gamepad hack, and audio is handled using an old set of Logitech X140 desktop speakers and amplifier board. Speakers were decased, with the faceplates and grilles reused to facilitate speaker mounting in the rear dogleg of the cabinet. Joystick and buttons, off-brand IL clones, were salvaged from a Microcenter retail control panel which had been purchased and upgraded a couple of years ago.


The audio amp, i/o ports and internals can be accessed through a service door in the rear. The door pull is one of the thumbsticks from the Xbox 360 controller used for the controls hack.


An old 4-port USB hub with one dodgy port was used for admin i/o (keyboard, mouse, USB thumbsticks, etc). The hub is not visible in above pic but is located directly below the HDD seen in the center. Audio amp board with volume controls is in the lower right.


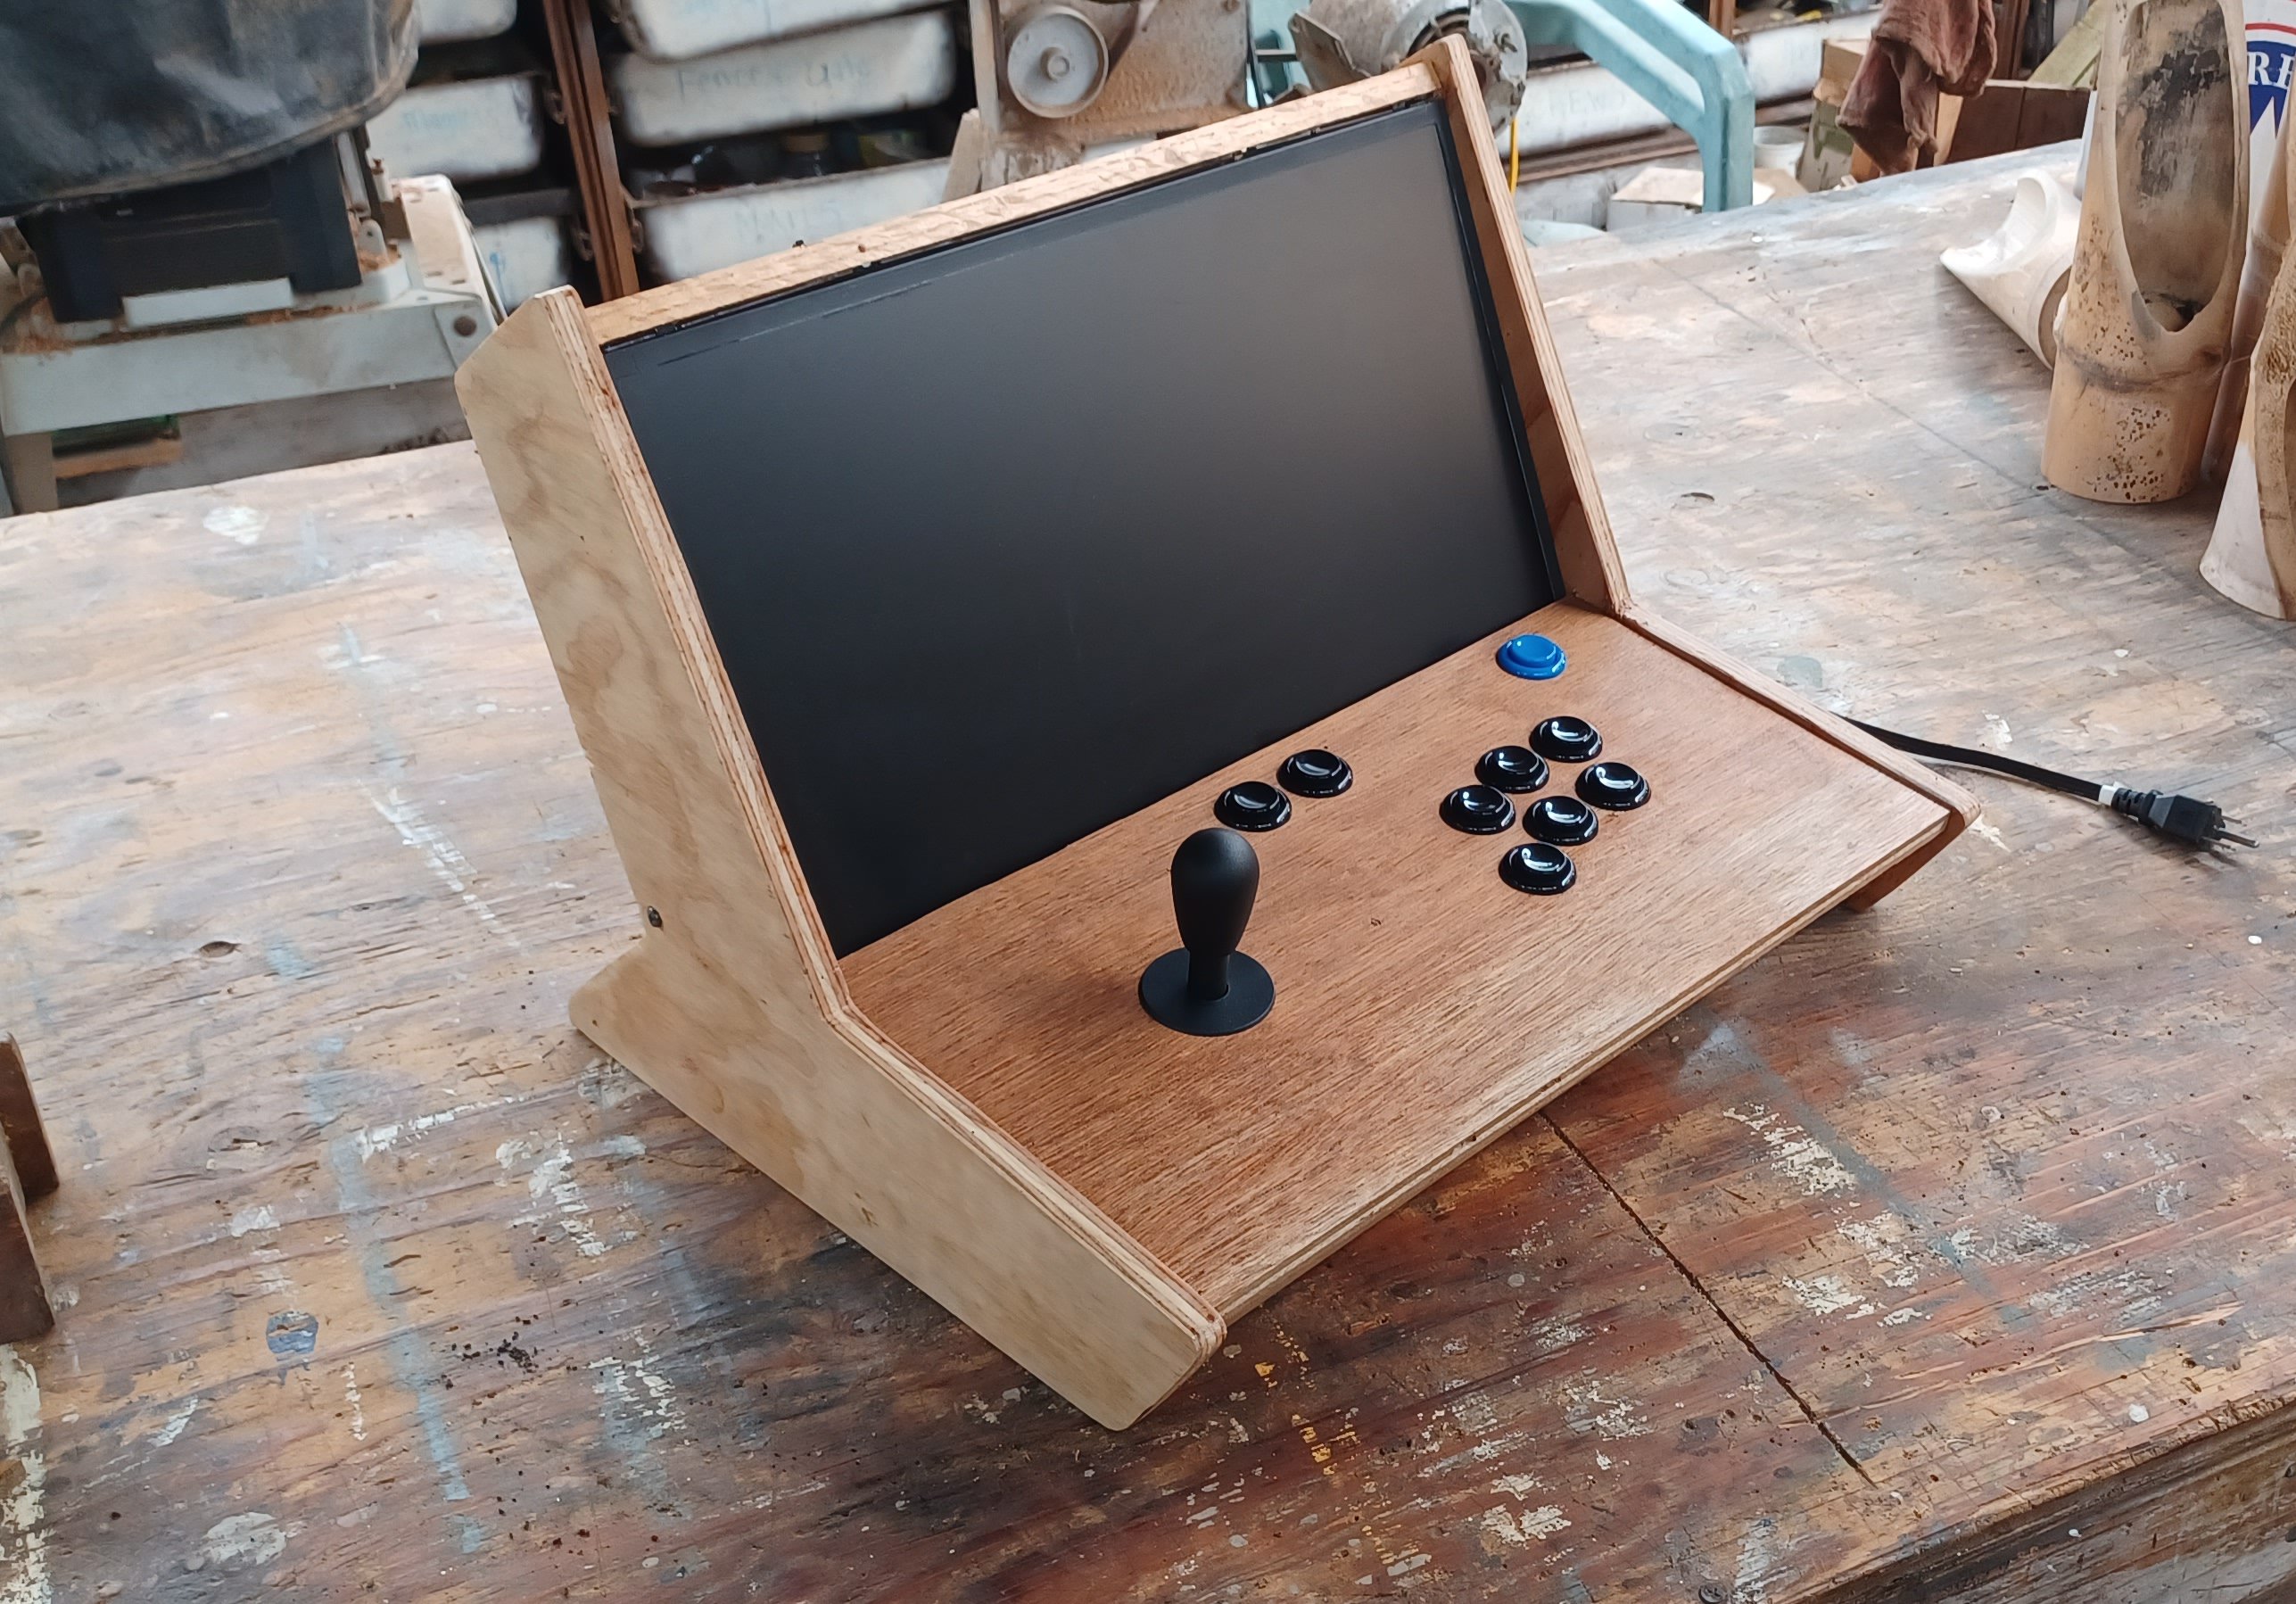
The control panel and cavity are set up to allow for modular/swappable control panels. The control panel has stanchions matching the angle of the front fascia so that it just drops into place vertically but allows no lateral or longitudinal movement during use. I had considered using locating dowels at the top edge of the panel to secure it, but that seems not to be necessary. A small "safety panel" was added in the lower left to help keep prying fingers away from the area of the cab where AC connections are made.


Xbox controller hack mounted to underside of control panel. It's ugly, but it works. I'd never bother with a pad hack again, and wouldn't have for this one except that I had decided to really lean into the 'recycled parts' nature of this build as it progressed.


This is the loading screen presented to the user as Pegasus frontend loads from boot.


...And this is the game selection interface within the frontend. All UI functions can be controlled using the player controls, including system suspend, restart and shutdown. A single external arcade button mounted to the side of the cabinet is wired to the PC power switch, and puts the system into suspend (sleep) by default.


The Dell Inspiron Model 3043 computer with 19" 16:9 LCD. The monitor is marginal with backlight bleed at the bottom edge, and the onboard usb ports were very flaky with intermittent connection. The port headers were reflowed and that seems to have improved their reliability.


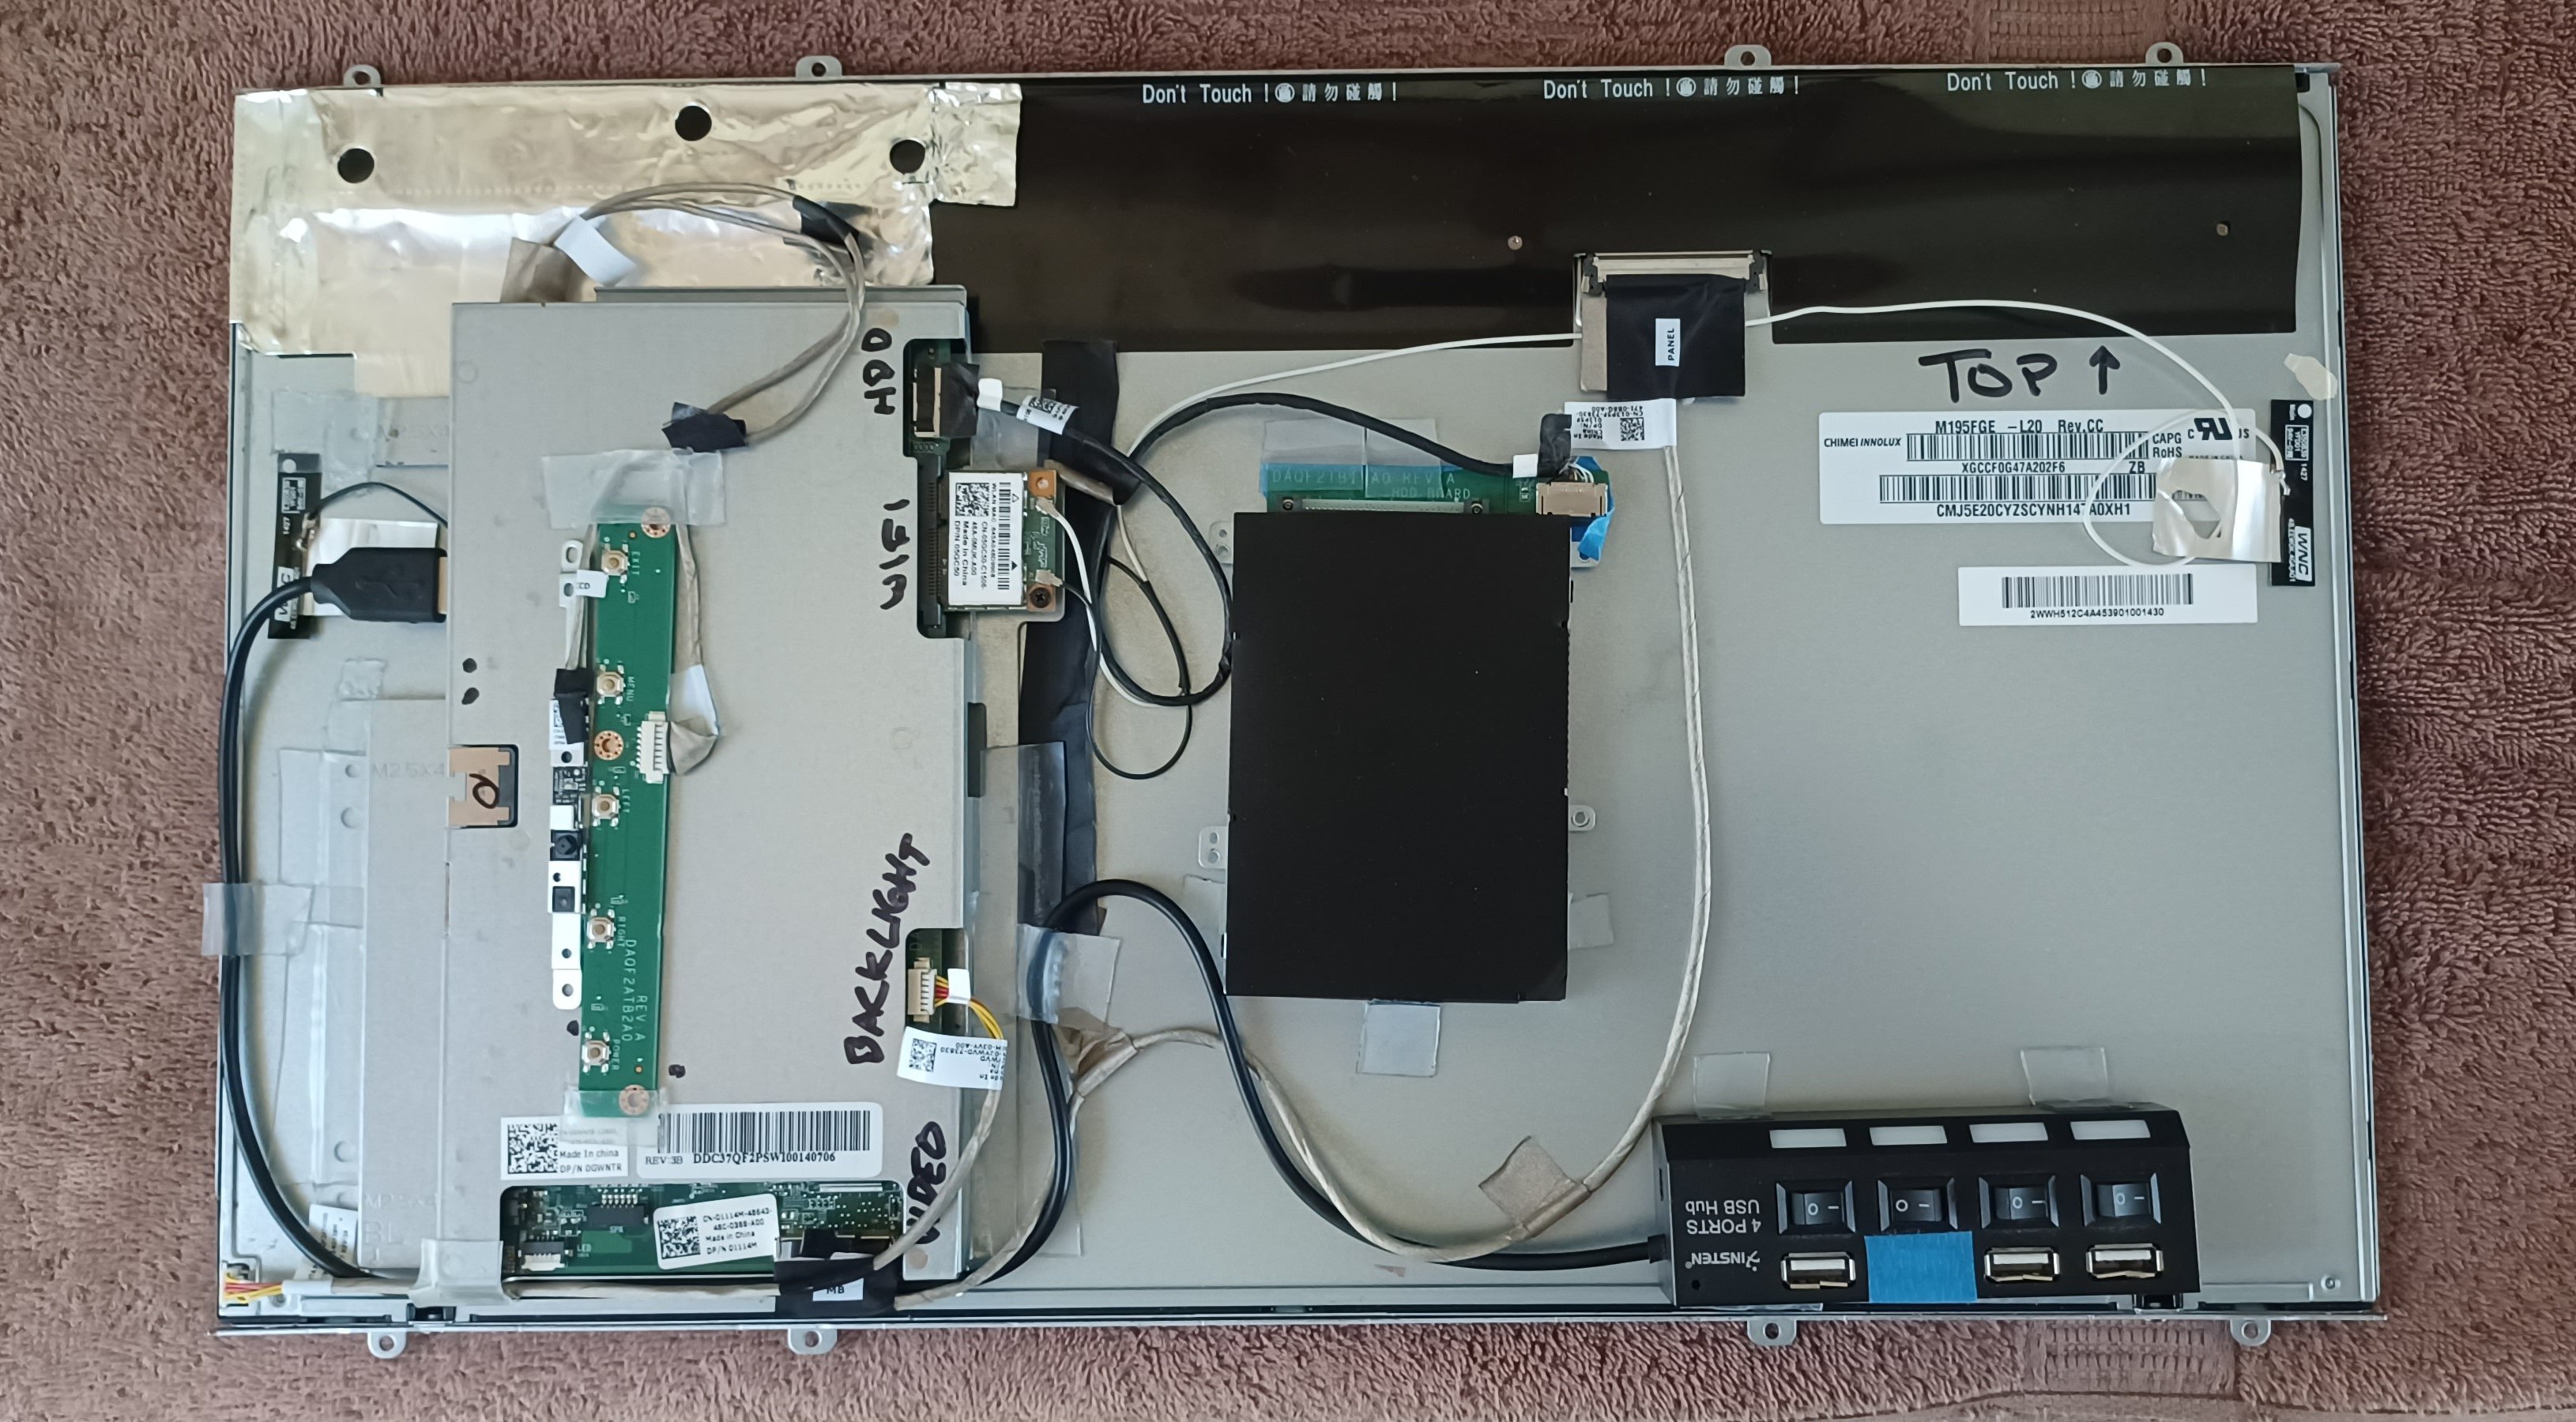
The computer was on its way to e-waste, but I decided that a bartop build might be a fun use of it on its way out. System was decased, and daughterboards + accessories remounted to the rear of the monitor case with hot glue and flex seal (lol). All (DC) electrical connections which needed to be modified are soldered and heat-shrinked.


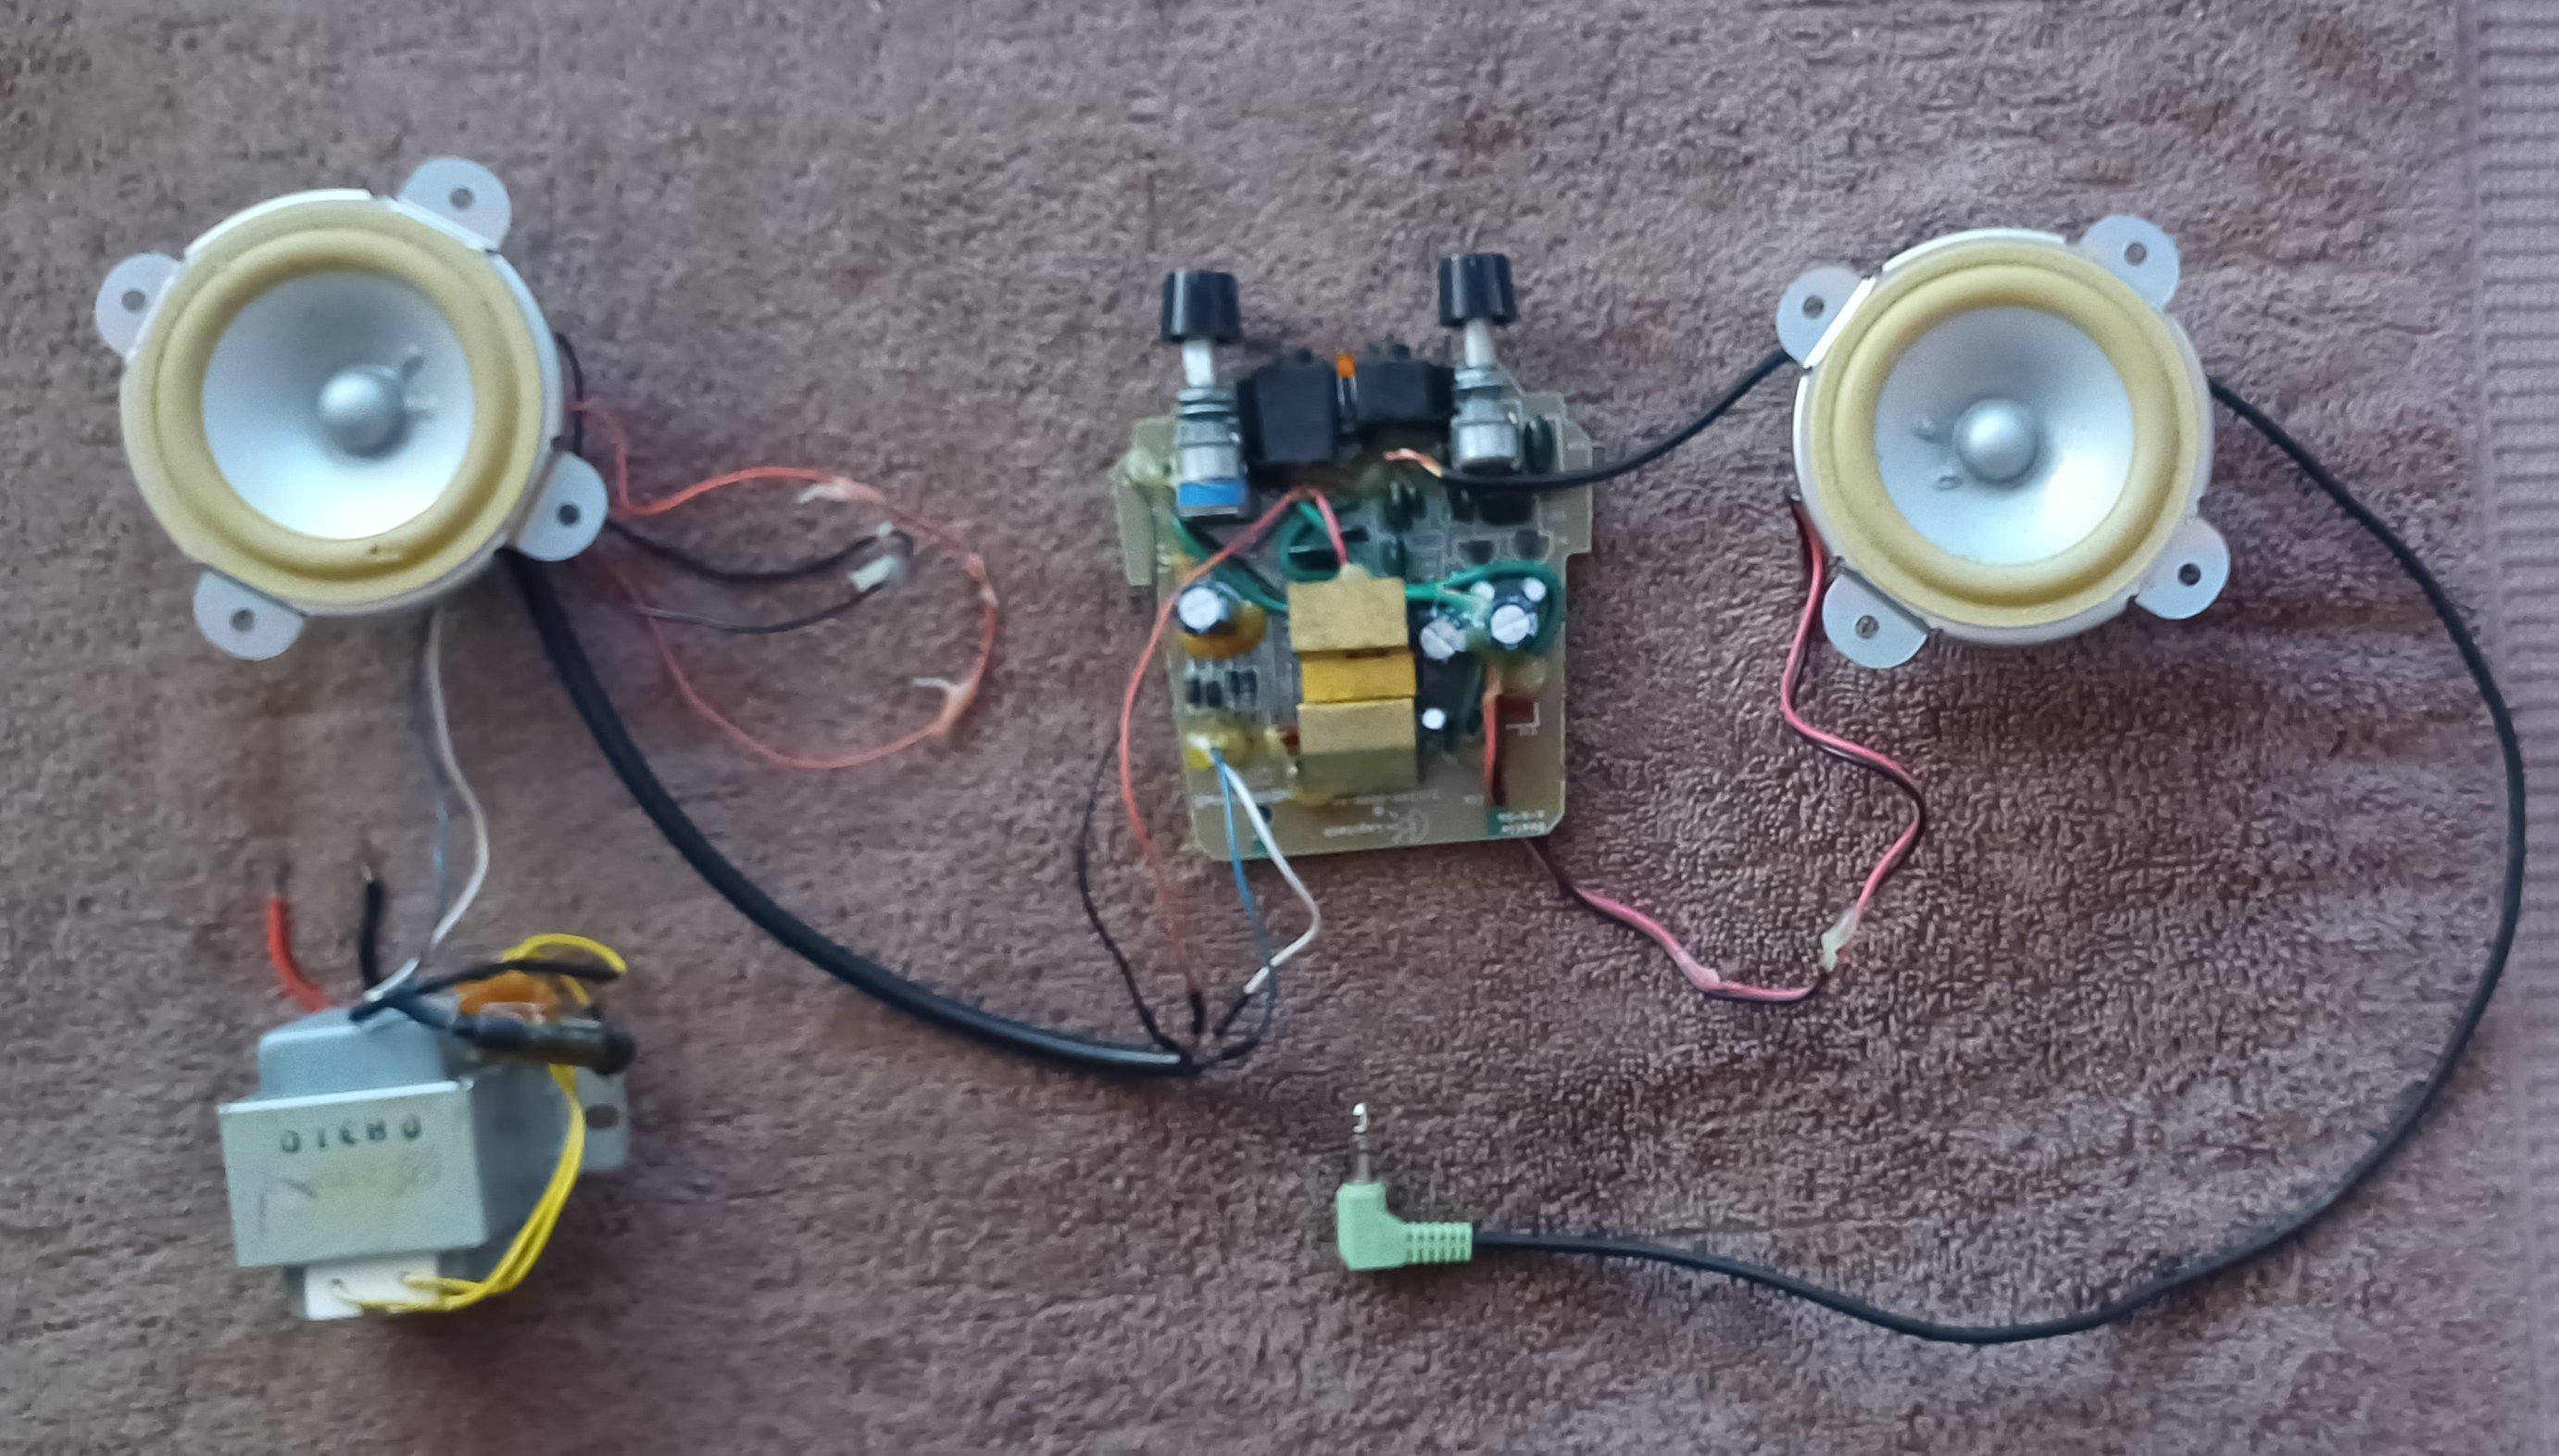
Decased Logitech speaker system. This model uses a 10.6V AC transformer which was mounted into the base of the cabinet and ganged to the AC input for the computer's small power brick. The power switch for the audio amp is part of the rotary volume control, so in combination with the computer's internal monitor shutoff circuitry no relays or smart strips are necessary to power off the machine.


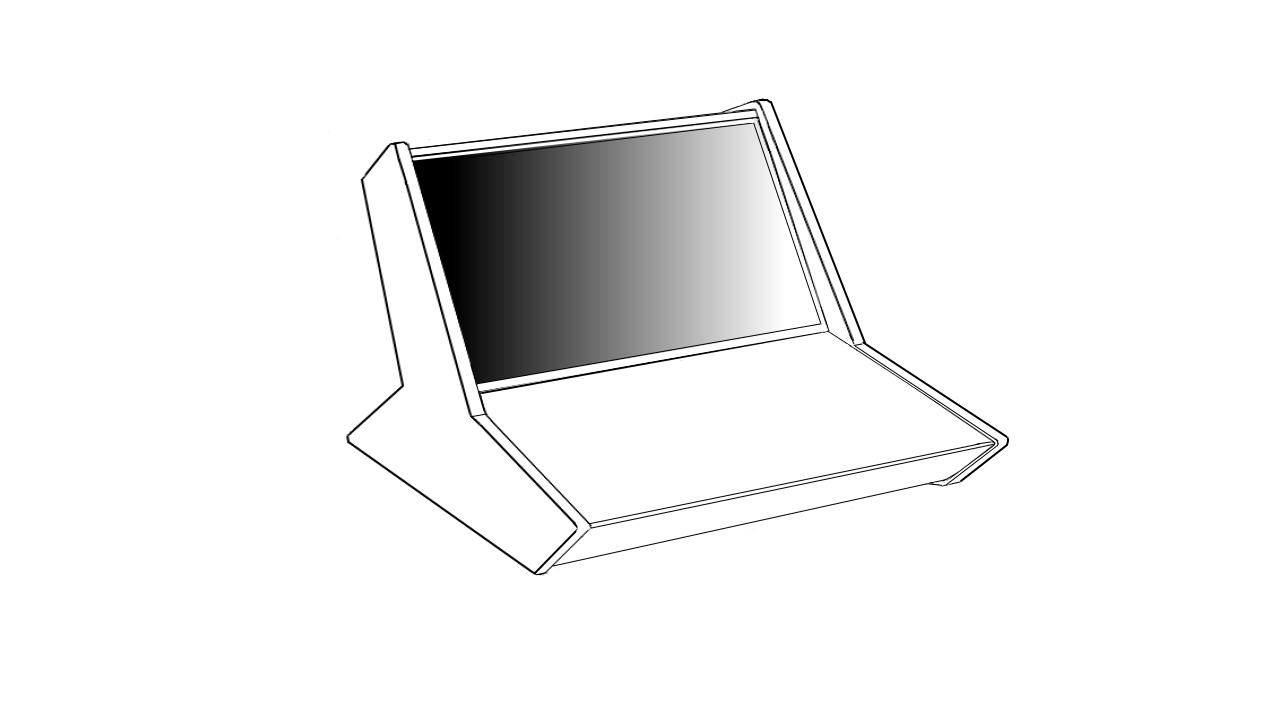
This was the design sketch I came up with to kick off the project. I didn't want to do yet another mini-Taito, mini-Atari or mini-Nintendo bartop, and wanted to make it as slim and compact as possible, 16:9 monitor notwithstanding. I elected to go with a z-back profile with the monitor raked as far back as its limited viewing angle would allow. Likewise I decided against a marquee box, as this machine is not meant to emulate the appearance of any actual arcade cabinet.


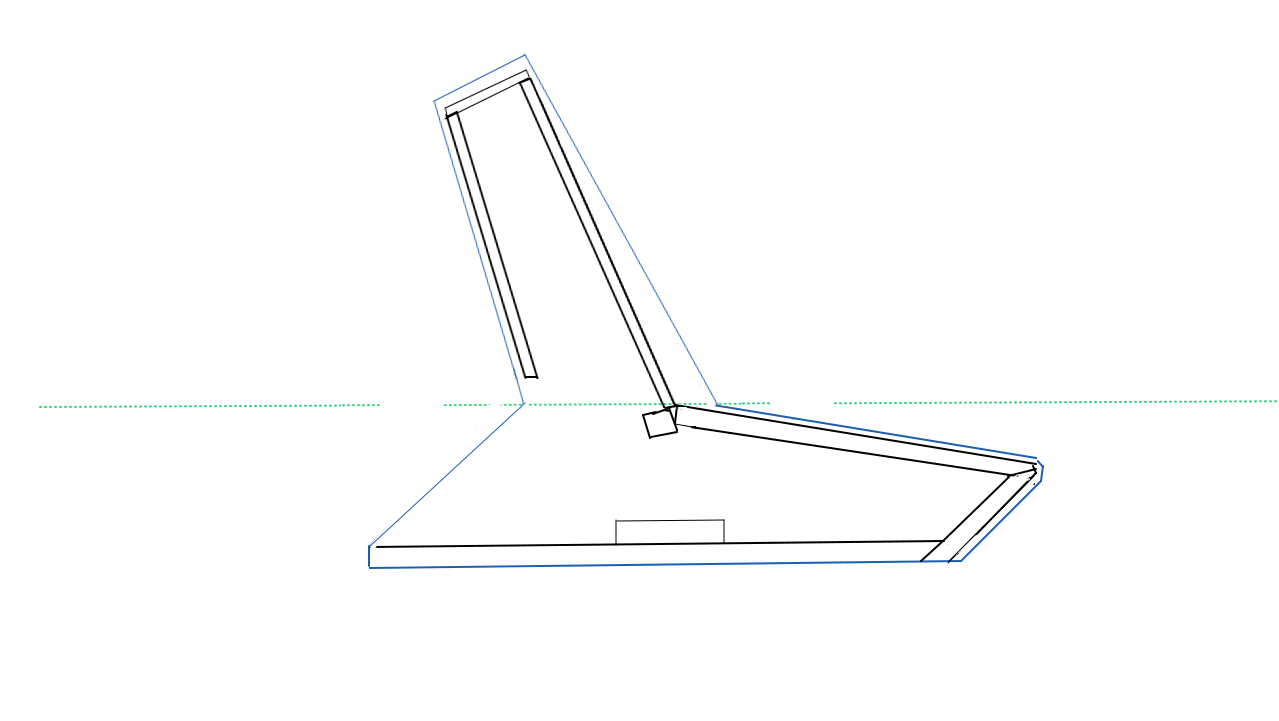
I extrapolated the profile into this rough elevation sketch to help determine the dimensions needed to accommodate the monitor and help visualize where the internal battens could be placed. I decided early on to go for a rear-firing speaker arrangement to be housed in the dogleg at the lower rear.


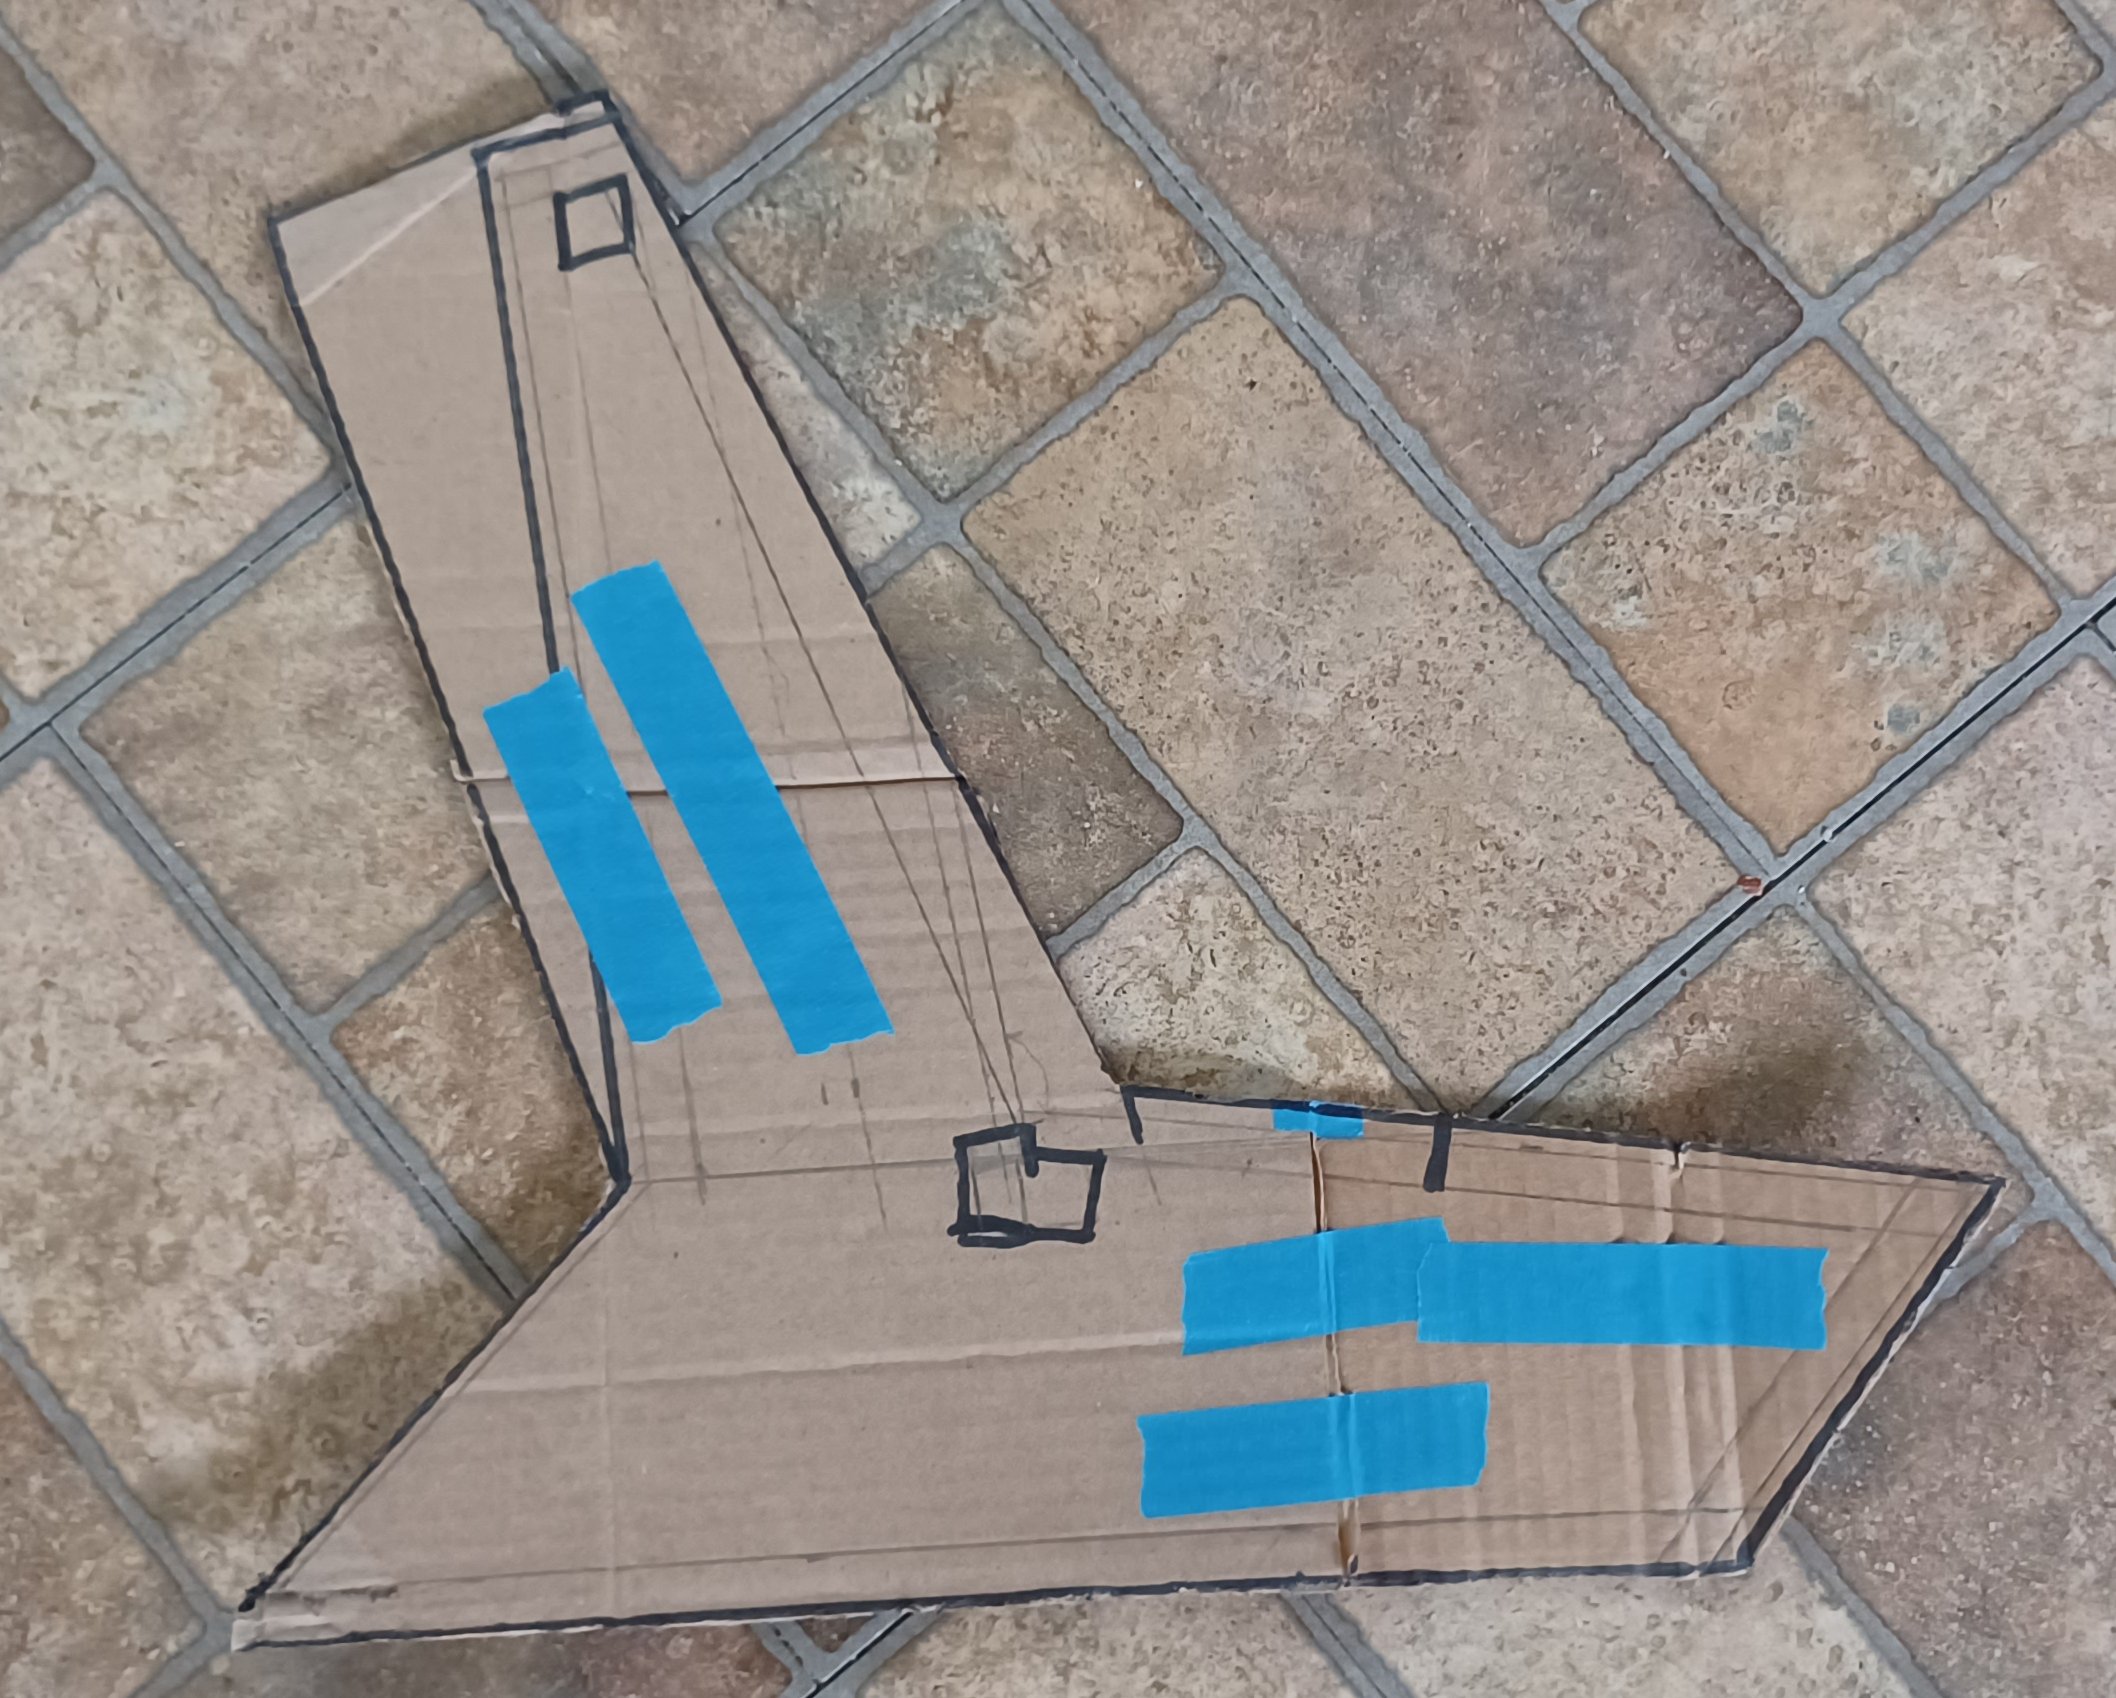
A rough cardboard template was made to establish the shape and I proceeded to make sawdust.


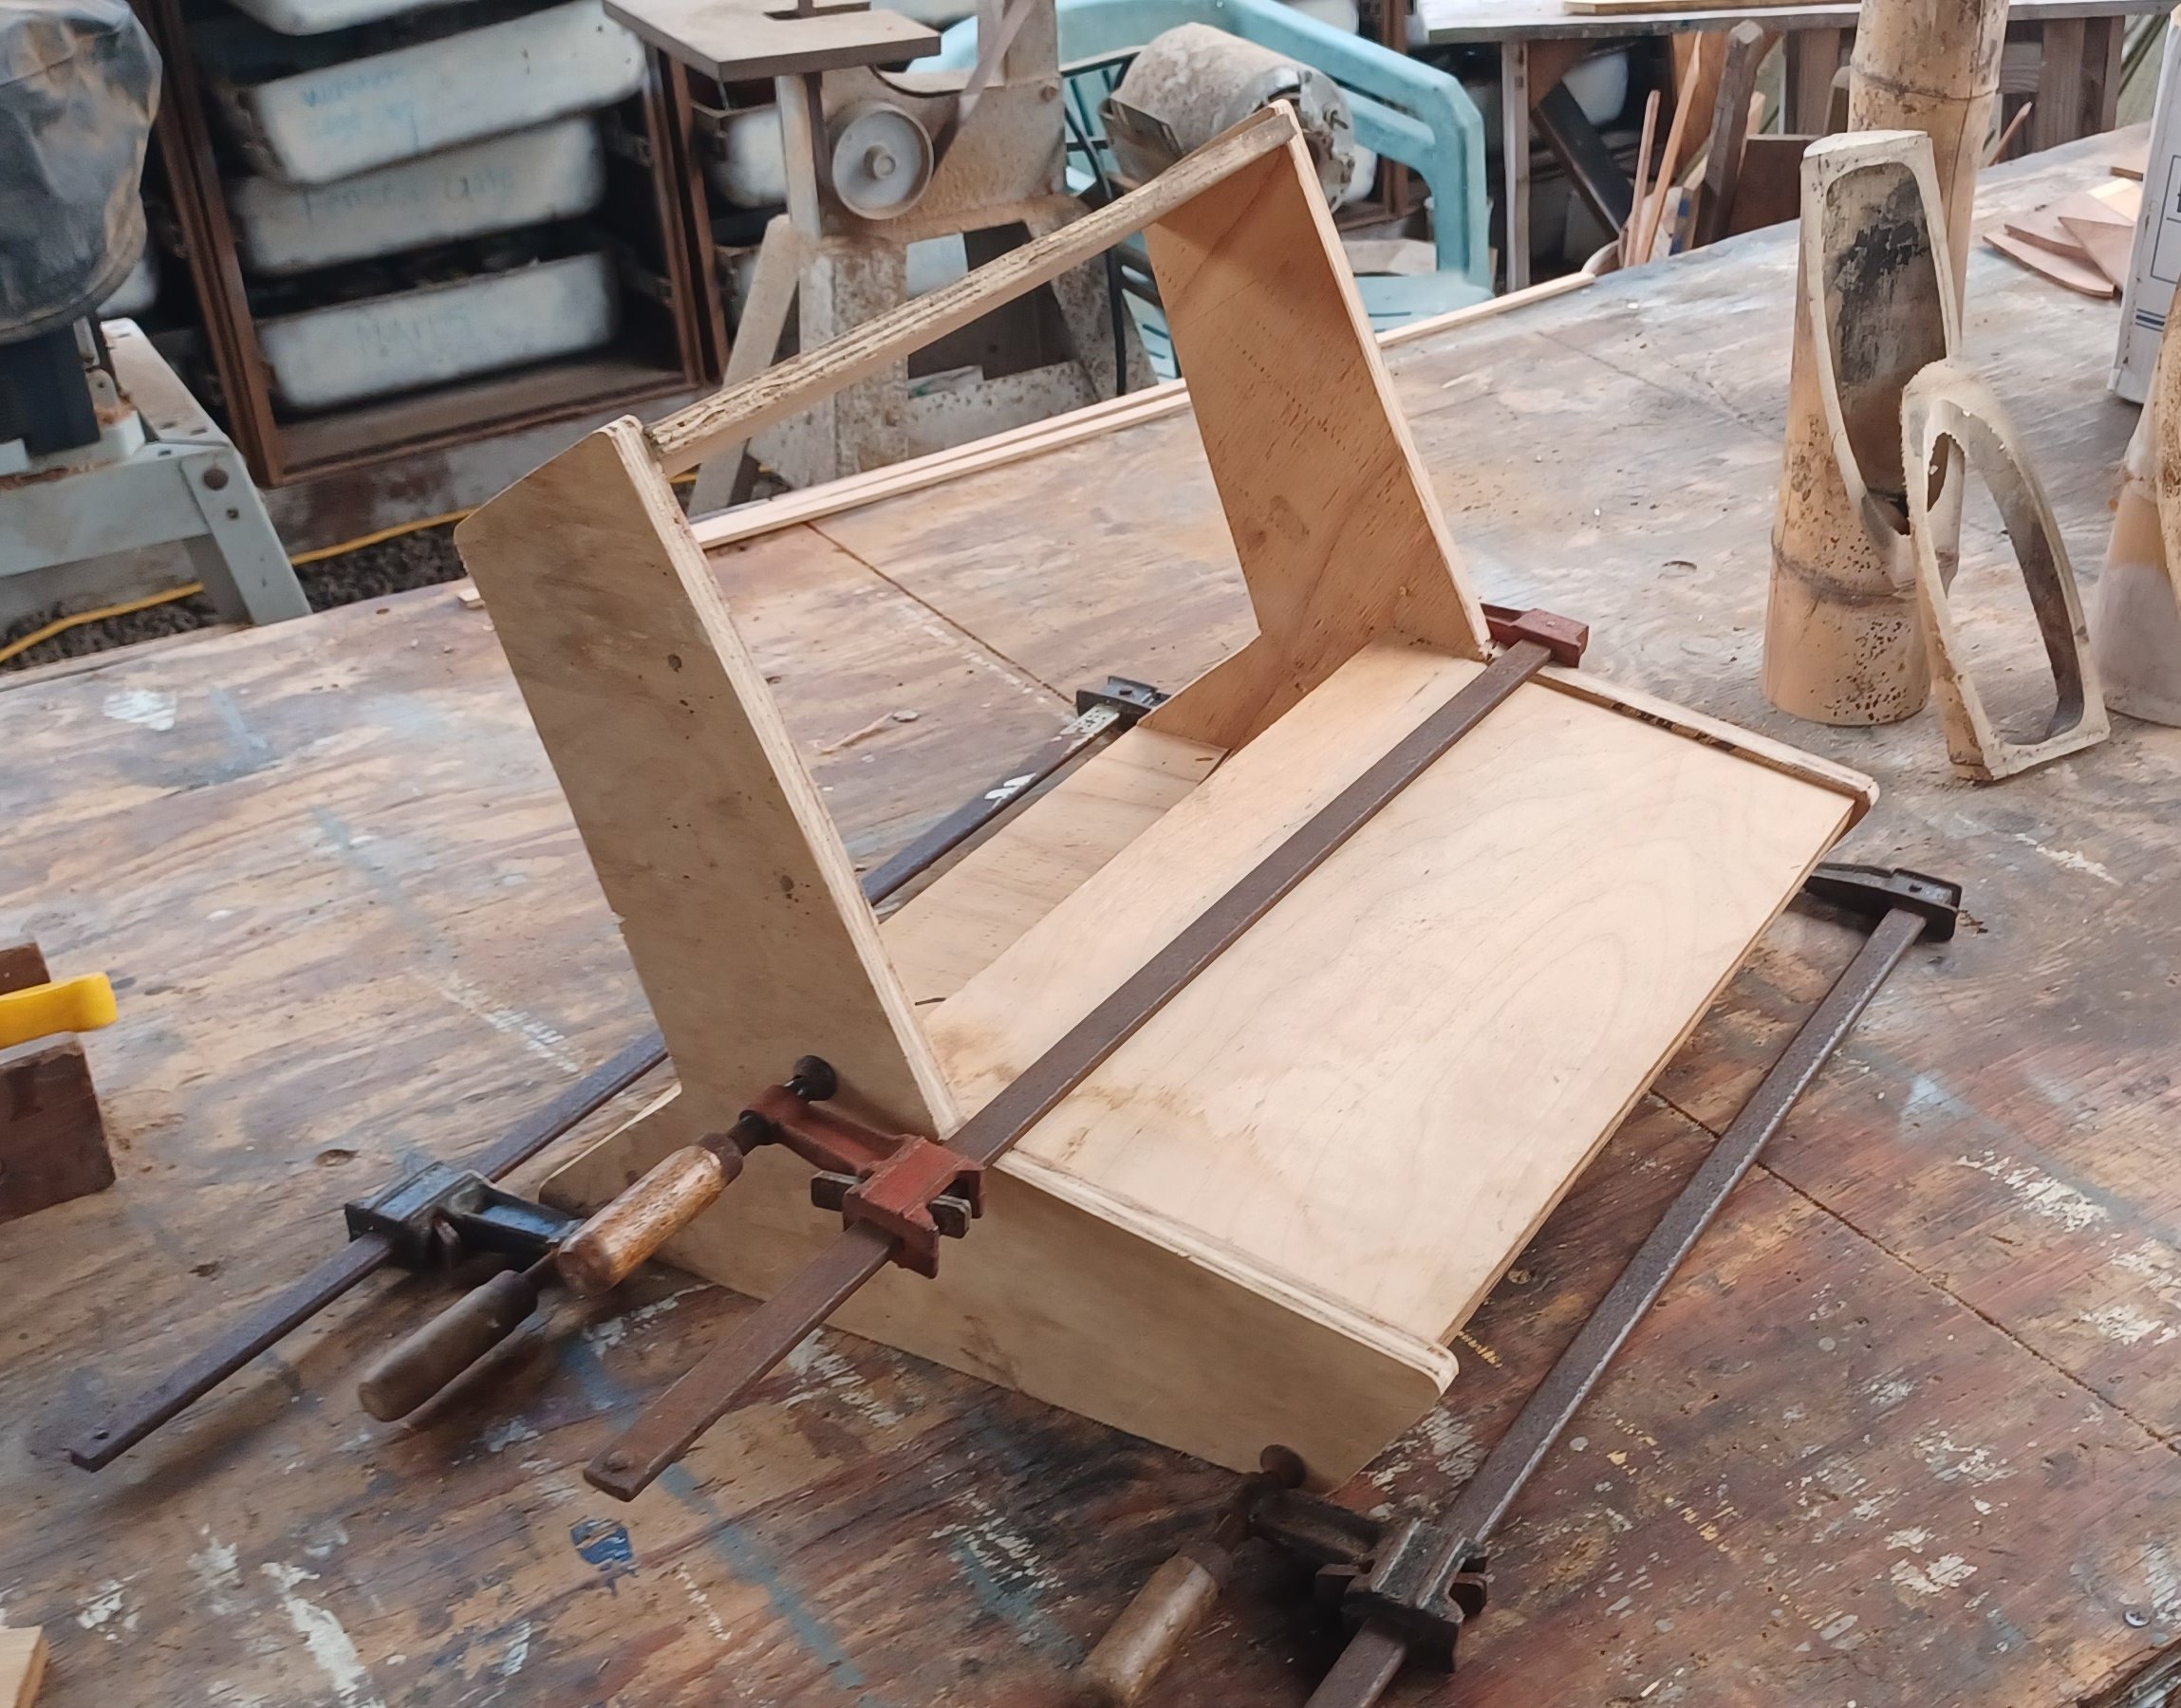
First mockup using wood cuts to check dimensional fit prior to glue up. All of the wood materials used are remnants and offcuts from other projects, but could comfortably be cut from a half sheet of plywood. For this build a variety of 1/2" and 12mm ply was used.


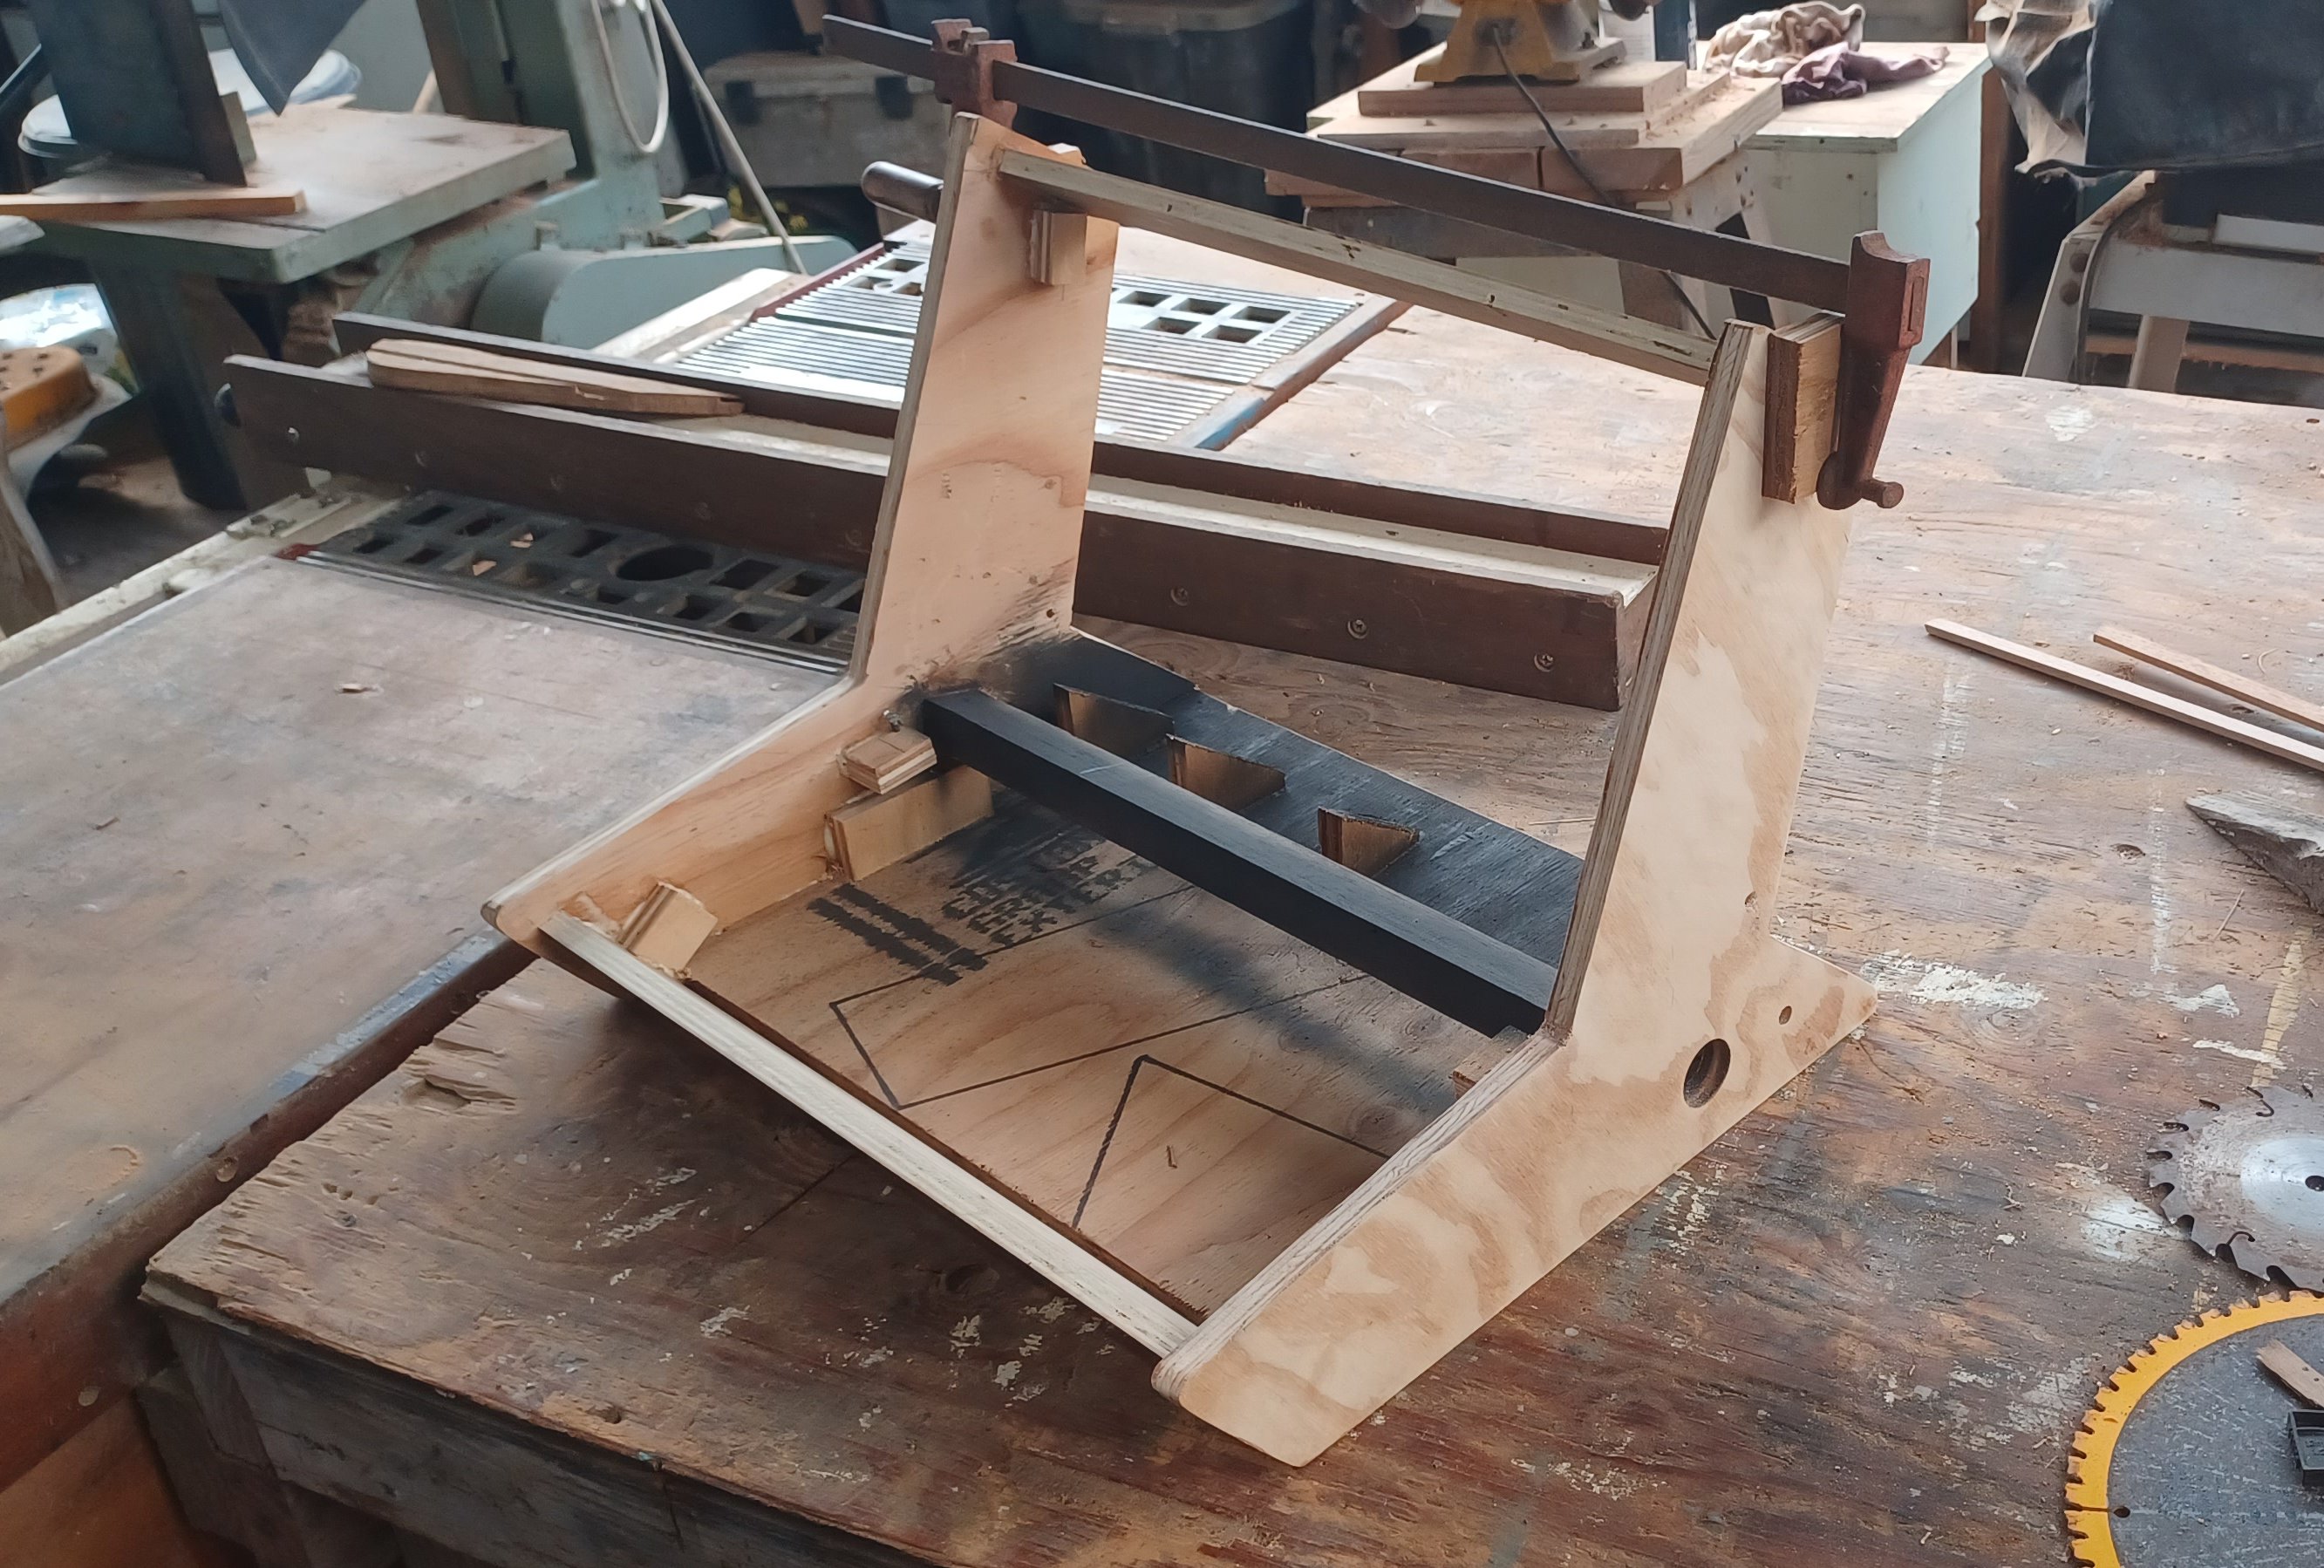
Final glue up of header bar above monitor. Minimal battens cut from ply were used to help preserve space for internal components. Crossbar in the middle is the monitor support, which also carries the audio amp, usb hub, and serves as a separator for the control panel cavity. The large hole in the exterior panel at the right is for the machine's power button, and the smaller hole behind it is the hole for the AC cord strain relief grommet.


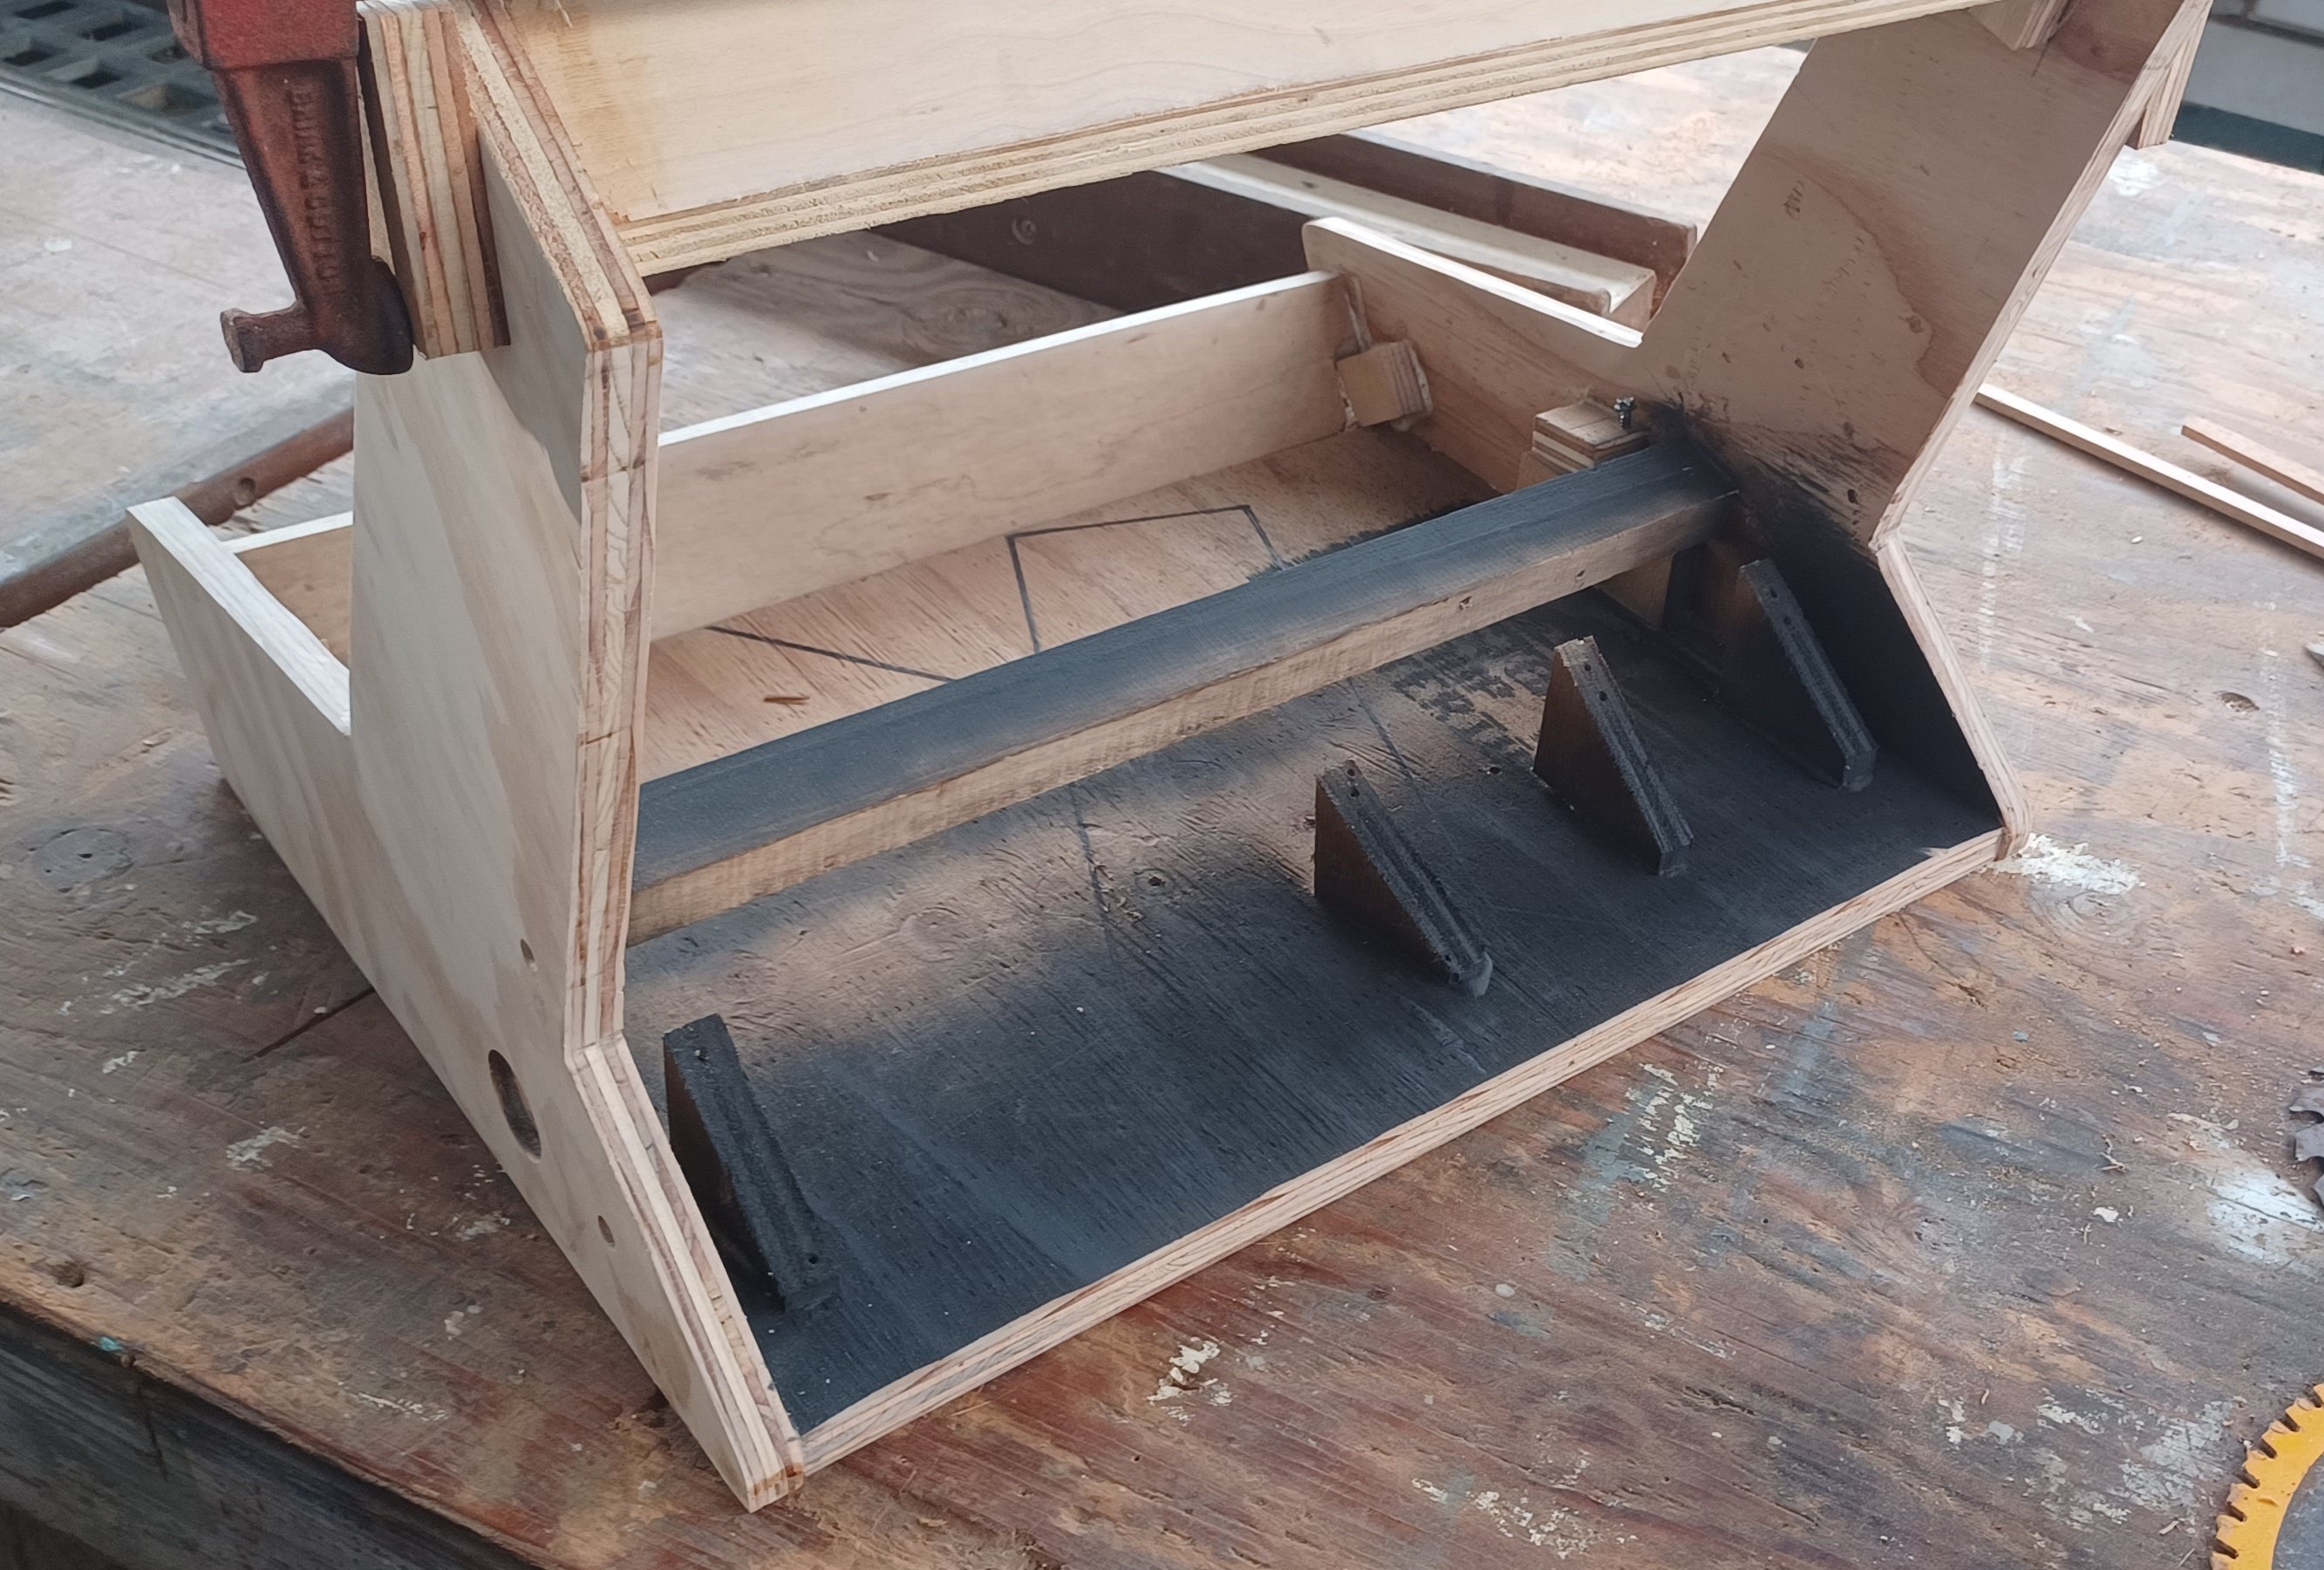
The rough plywood wedges in the dogleg area are mounts for the speaker faceplates which carry the drivers, passive radiators, and speaker grilles.

The next steps will be to determine what sort of deco/finish I want for the unit (I'm leaning toward woodgrain vinyl wrap for the sides), application of 1/2" edge moulding (will be using adhesive countertop edging rather than t-molding), addition of rubber feet to the underside, and addition of acrylic overlays for the monitor and control panel (tolerances were planned in advance to allow for overlays).

Thanks for reading this far. Finishing suggestions are welcome!


« Last Edit: Today at 05:33:36 am by jeremymtc »

firedance

  • Trade Count: (0)
  • Full Member
  • ***
  • Offline Offline
  • Posts: 317
  • Last login:Today at 01:15:27 am
Re: 'Project Jetsam': A bartop speed build using 100% recycled materials
« Reply #1 on: February 29, 2024, 03:23:41 am »
Nice bar top and a great use of hardware that was going to e-waste, not heard of the frontend before, might have to check it out at some point :)

jeremymtc

  • Trade Count: (0)
  • Full Member
  • ***
  • Offline Offline
  • Posts: 194
  • Last login:Today at 07:12:00 am
Re: 'Project Jetsam': A bartop speed build using 100% recycled materials
« Reply #2 on: February 29, 2024, 04:34:20 pm »
Thanks!

I went with Pegasus frontend for a couple of reasons. It was natively compatible with my choice of OS (installed via flatpack) so I didn't have to do a custom compile or sort out a million software dependencies. It just works. Also the UI is (or rather, can be) very simple, there's a decent set of display options available within the frontend itself, and themes are highly customizable. I didn't need any animations or media interactions, although the frontend will do those things. I ended up using a theme called BartopOS and made some minor changes to it.

The only downside is the amount of metadata script editing I had to do (probably less of an issue if you have existing data from another modern frontend which can be reused), and that different theme authors tend to handle metadata tags differently without much in the way of documentation, so there's a bit of a learning curve in figuring out what works properly within the chosen theme.   

emphatic

  • Trade Count: (0)
  • Full Member
  • ***
  • Offline Offline
  • Posts: 2009
  • Last login:Yesterday at 03:43:52 pm
  • -"Suck it, Donny!" -"No, YOU suck it.... more".
    • Emphatic's Video Game Collection
Very nice, inspiring even. Does it not get hot without vent holes?

firedance

  • Trade Count: (0)
  • Full Member
  • ***
  • Offline Offline
  • Posts: 317
  • Last login:Today at 01:15:27 am
Very nice, inspiring even. Does it not get hot without vent holes?

Good point, you'll need to install vents and/or fans or it will overheat quickly if played for a while, on my builds i used intake fans in the bottom and exhaust fans on the back, best think about them before you paint/ add artwork.

emphatic

  • Trade Count: (0)
  • Full Member
  • ***
  • Offline Offline
  • Posts: 2009
  • Last login:Yesterday at 03:43:52 pm
  • -"Suck it, Donny!" -"No, YOU suck it.... more".
    • Emphatic's Video Game Collection
I think if I would build something similar, I'd just have the monitor and the controls and use it with external hardware, like an XBox 360 or a PC. And a rotatable 4:3 screen with a bezel that makes it (the screen area) square shaped.

jeremymtc

  • Trade Count: (0)
  • Full Member
  • ***
  • Offline Offline
  • Posts: 194
  • Last login:Today at 07:12:00 am
Thanks Emphatic!

Yes, cooling is a concern and I may add a 12V fan and/or exhaust vents. The original computer case was completely unvented and had no fan - it's a very low-power (65W) all-in-one and the CPU heatsink uses the stamped steel motherboard carrier as a heatspreader. The original form-factor was basically like a [very large] tablet.

Zebidee

  • Trade Count: (+9)
  • Full Member
  • ***
  • Offline Offline
  • Posts: 3255
  • Last login:Yesterday at 06:33:53 pm
I love the circular economy aspects.

T-molding?

If you round off the 90 degree angle at the back/bottom corner, you could run some continuous T-molding around the entire outside.

Some small, slightly domed, rubber feet screwed or glued onto the bottom could both lift it slightly, and make it more secure when playing.

Also means you can have intake vent holes at the bottom.
Check out my completed projects!


jeremymtc

  • Trade Count: (0)
  • Full Member
  • ***
  • Offline Offline
  • Posts: 194
  • Last login:Today at 07:12:00 am
Thanks Zebidee.

Instead of T molding I had planned to use adhesive pvc countertop edging with a shallow 'u' shape channel profile. It should be able to handle all of the bends with some minor relief cuts on the acute outside corners, and should 'stretch' ok for the two inside corners.

Rubber feet are now on the machine, had some nice 25x13mm ones left over from an earlier project. You read my mind on the ability to utilize the lift to provide for air vents in the base.

If I add an intake fan I'll probably need to splice it from the output of the 19V power brick and use a buck converter... Those should be things I have on hand so they won't blow the $0 budget for the machine so far :D

Zebidee

  • Trade Count: (+9)
  • Full Member
  • ***
  • Offline Offline
  • Posts: 3255
  • Last login:Yesterday at 06:33:53 pm
Might be easy enough to hack into the laptop's 12v rail.

If you put in some small discrete holes at the top/back to let the warm air out, convection currents might even be sufficient.

I like to cover holes with some scrap nylon mosquito meshing to keep pests out.

I was just now thinking - I've got one of those laptop cooler bases that plugs into USB. Two big slow fans that go underneath. It came free with a laptop but I never use it, even in a tropical climate. It could be perfect for this kind of bartop.
Check out my completed projects!


jeremymtc

  • Trade Count: (0)
  • Full Member
  • ***
  • Offline Offline
  • Posts: 194
  • Last login:Today at 07:12:00 am
Re: 'Project Jetsam': A bartop speed build using 100% recycled materials
« Reply #10 on: March 03, 2024, 02:07:22 am »
Might be easy enough to hack into the laptop's 12v rail.

If you put in some small discrete holes at the top/back to let the warm air out, convection currents might even be sufficient.

I like to cover holes with some scrap nylon mosquito meshing to keep pests out.

I was just now thinking - I've got one of those laptop cooler bases that plugs into USB. Two big slow fans that go underneath. It came free with a laptop but I never use it, even in a tropical climate. It could be perfect for this kind of bartop.

Excellent points, all! Thanks.

I had realized after posting that wiring to the PC power supply would be a non-starter since a fan would be 'always on', so sourcing 12V somewhere on the mobo might be a better path forward. Likewise had thought the same about just positioning vents above and below the motherboard carrier might allow for some additional convective cooling without a fan.

I think that anything I do is basically "insurance", as there was no active or passive cooling aside from the heatspreader in the original PC product... and tangentially that might explain why the usb port headers were flaking out, and why my having reflowed them brought them back to life.

A USB laptop cooling pad is a great idea!

« Last Edit: March 03, 2024, 02:10:44 am by jeremymtc »

firedance

  • Trade Count: (0)
  • Full Member
  • ***
  • Offline Offline
  • Posts: 317
  • Last login:Today at 01:15:27 am
Re: 'Project Jetsam': A bartop speed build using 100% recycled materials
« Reply #11 on: March 04, 2024, 11:04:43 am »
Good shout on the usb cooling pad, I used some of the fans from one on one of my bartops, can't remember which one tho  ;D

Ond

  • Trade Count: (0)
  • Full Member
  • ***
  • Offline Offline
  • Posts: 2279
  • Last login:Yesterday at 05:31:22 pm
Re: 'Project Jetsam': A bartop speed build using 100% recycled materials
« Reply #12 on: March 04, 2024, 04:15:46 pm »
I love projects built from recycled parts! Cardboard template and speed built in scrap plywood. The de-cased PC speakers are useful for projects. I think I have a tub with similar parts I dig into now and then.

For fan or cooler control you can take 5V from a USB port and use a relay to switch fans off when powering down.  Some USB ports stay powered on if there is power connected to the motherboard though, and some can be toggled in bios to drop the 5V on power down.  You can power a 5V fan directly from USB, but I think its better to take 12V from somewhere else and use a relay.

Zebidee

  • Trade Count: (+9)
  • Full Member
  • ***
  • Offline Offline
  • Posts: 3255
  • Last login:Yesterday at 06:33:53 pm
Re: 'Project Jetsam': A bartop speed build using 100% recycled materials
« Reply #13 on: March 04, 2024, 05:18:53 pm »
You won't need a relay for the fan if the 12v rail is being switched on/off by the laptop mobo anyway.

12v gives you more flexibility with fan choice than 5v. Then, if desired, you can lower the voltage/fan speed by putting a resistor in series, which both limits current and reduces voltage. Exact specs for the resistor depend on your fan and desired voltage, but a little experimentation and application of Ohm's law helps. You probably want the fan voltage to be at least 8v or so. I have some 3W rated resistors I use for this kind-of thing, though 1W would probably be sufficient.

You could use a pot to control fan speed, but seems complicated and unnecessary. Maybe just until you work out the resistance value that works for you.

If you are lucky enough to be able to source the fan voltage from an unused motherboard fan header, there may be a third pin to control fan speed, which could be controlled by software. These use a microcontroller to turn the fan on/off many time each second, and are more energy efficient than a resistor (which will dissipate some current as heat).
Check out my completed projects!


Ond

  • Trade Count: (0)
  • Full Member
  • ***
  • Offline Offline
  • Posts: 2279
  • Last login:Yesterday at 05:31:22 pm
Re: 'Project Jetsam': A bartop speed build using 100% recycled materials
« Reply #14 on: March 04, 2024, 06:59:42 pm »
Sure, if you can access 12 V on the board job done, too easy.  I've used resistors on fans to bring the speed (and noise) down. No sense in running a 12V fan flat knacker if you don't need to. Specially some old dusty one you've ratted from a clunker PC  ;)

Alejo I

  • Trade Count: (0)
  • Full Member
  • ***
  • Offline Offline
  • Posts: 92
  • Last login:Yesterday at 03:13:00 am
  • Trying something new
Re: 'Project Jetsam': A bartop speed build using 100% recycled materials
« Reply #15 on: March 05, 2024, 10:36:31 am »
It's just vibes, as the kids say, but I feel like it could actually look pretty neat with some dark stain besides the already recommended t-molding/u-molding.

jeremymtc

  • Trade Count: (0)
  • Full Member
  • ***
  • Offline Offline
  • Posts: 194
  • Last login:Today at 07:12:00 am
Re: 'Project Jetsam': A bartop speed build using 100% recycled materials
« Reply #16 on: March 06, 2024, 01:12:33 am »
Thanks for the continued spitballing on power source for cooling, guys! It looks like a USB 5V solution won't be practical for this one, as all of the USB ports are continuously powered, and the BIOS is so stripped-down it's nearly comical. As Zebidee notes, taking 12V from the board still looks like the best path forward. Unfortunately there are no fan headers on the board, so I'll just need to spend a little bit of time probing it.

I have some buck converters on hand which are basically composed of a variable resistor and a coil which will make short work of regulating fan speed (with an adjustment range between 36V-3V), so that's not an issue.

mourix

  • Trade Count: (0)
  • Full Member
  • ***
  • Offline Offline
  • Posts: 303
  • Last login:April 24, 2024, 10:53:16 am
Re: 'Project Jetsam': A bartop speed build using 100% recycled materials
« Reply #17 on: March 07, 2024, 01:29:17 pm »
I really like the design of this one, not even counting the recycle cookie point :applaud:

jeremymtc

  • Trade Count: (0)
  • Full Member
  • ***
  • Offline Offline
  • Posts: 194
  • Last login:Today at 07:12:00 am
Re: 'Project Jetsam': A bartop speed build using 100% recycled materials
« Reply #18 on: March 07, 2024, 04:22:27 pm »
It's just vibes, as the kids say, but I feel like it could actually look pretty neat with some dark stain besides the already recommended t-molding/u-molding.

Thanks Alejo! Yes, the plan is to add some 'dark oak' applique to the sides, black edge molding, and masked/painted polycarbonate control panel and monitor overlays. I'm thinking that with polycarb, I can do a one-piece overlay with bends to suit the shape of the cab, such that the entire player-facing surface is one seamless '70s high tech gloss expanse. We'll see.

I really like the design of this one, not even counting the recycle cookie point :applaud:

Thank you mourix! Have a look at Ond's Xenolix Redux and Chito's Chibi Bartop for examples of similar forms designed and built at levels far surpassing my abilities. They didn't directly influence this build as I only discovered them well after the fact, but they are both much better realized than what I'm doing. Check them out!

jeremymtc

  • Trade Count: (0)
  • Full Member
  • ***
  • Offline Offline
  • Posts: 194
  • Last login:Today at 07:12:00 am
Re: 'Project Jetsam': A bartop speed build using 100% recycled materials
« Reply #19 on: March 16, 2024, 07:24:54 pm »
I got my hands on some .090" Lexan sheet for the control panel and monitor overlays. I transferred the holes for buttons and joysticks, and took the opportunity to adjust the joystick and button positions slightly - joystick was moved 1.5" closer to the center, and tightened up the spacing for the --BINGO! Either that, or I was attempting to say "before" but it was too many letters to type-- button to allow for a more comfortable Neo-Geo layout.

My original plan was to bend the polycarbonate so that I'd have a single continuous piece covering both the control panel and monitor. The only problem was that I didn't have a brake, and I didn't want to mess around with heat. In my race car fabrication days I routinely did cold bends with polycarb with fine results, so I improvised a brake mounted to the side of my saw table using some heavy duty hinges and 2x4 material. It worked great... until it didn't. I had drywall screwed a lever to the articulated part of the brake but hadn't realized that the tips of the screws were ever so slightly protruding from the brake surface, and they put a large gouge into my nice shiny lexan. I aborted on the bend process as I didn't have enough material to try again, but there was still enough material to go ahead and make two separate panels. So that's what I did.


I masked and painted the backside of the lexan to give it a nice glossy piano black fingerprint magnet finish.


I added some button labels for the 'Coin', 'Start' and 'Exit' buttons on the panel. The labels are Dymo printed and mounted to the wood control panel substrate, with tiny masked windows so that they show through the painted lexan overlay. This machine will be used by guests at community center events as well as at home, so I figured labels might be a good thing. The Dymo print is a little crude, but I figure it works fine within the context of the machine's build and the '70s industrial aesthetic I'm going for. I'll get better pictures soon.


I added some woodgrain vinyl wrap to the cabinet sides, front fascia, and monitor header, and another little Dymo label for the power button. Nothing fancy here, but it does make it slightly more attractive than the CDX plywood did. Next up will be adding the edge molding, once it's arrived (I live on the Big Island of Hawaii so pretty much everything has to be shipped in if Home Depot doesn't have it).

Regarding the earlier discussion about cooling, I did spend some time looking for suitable power traces on the motherboard to tap for power supply for a cooling fan, but I think that I may be giving that one a miss in favor of ambient/convective cooling. The motherboard was definitely designed to a cost with very marginal power traces, and I just couldn't find a position that I was comfortable with adding a take-off. I'd hate to brick the thing by lifting a trace, which seems like it might be all too easy to do. I've added some ventilation holes into the base, and going forward will be adding some exhaust vents up high on the rear door adjacent to the mobo. So far it hasn't gotten any more than slightly warm, but I do really appreciate all of the thought and suggestions that you folks have made! 

emphatic

  • Trade Count: (0)
  • Full Member
  • ***
  • Offline Offline
  • Posts: 2009
  • Last login:Yesterday at 03:43:52 pm
  • -"Suck it, Donny!" -"No, YOU suck it.... more".
    • Emphatic's Video Game Collection
Re: 'Project Jetsam': A bartop speed build using 100% recycled materials
« Reply #20 on: March 17, 2024, 06:22:55 am »
Looks classy.  :cheers:

Ond

  • Trade Count: (0)
  • Full Member
  • ***
  • Offline Offline
  • Posts: 2279
  • Last login:Yesterday at 05:31:22 pm
Re: 'Project Jetsam': A bartop speed build using 100% recycled materials
« Reply #21 on: March 17, 2024, 07:23:54 am »
Good job on the finish! I think one of my favourite things about this build is the way you've neatly fitted those speakers into that rear angle. The straight up black gloss CP looks nice too.  :cheers:

jeremymtc

  • Trade Count: (0)
  • Full Member
  • ***
  • Offline Offline
  • Posts: 194
  • Last login:Today at 07:12:00 am
Re: 'Project Jetsam': A bartop speed build using 100% recycled materials
« Reply #22 on: March 17, 2024, 05:28:25 pm »
Thanks emphatic! It turns out that 'class' is now available in stick-on form at Home Depot  :cheers:

Thank you for the kind words, Ond! Some of the most fun I had doing this build was figuring out creative reuses for the donor parts going into it, and the realization that those grilles would fit without any modification other than being cut for length was definitely among the fun 'lightbulb' moments.  :cheers:


firedance

  • Trade Count: (0)
  • Full Member
  • ***
  • Offline Offline
  • Posts: 317
  • Last login:Today at 01:15:27 am
Re: 'Project Jetsam': A bartop speed build using 100% recycled materials
« Reply #23 on: March 18, 2024, 04:27:14 am »
That turned out very nice for a "free" bartop, good work :)


jeremymtc

  • Trade Count: (0)
  • Full Member
  • ***
  • Offline Offline
  • Posts: 194
  • Last login:Today at 07:12:00 am
Re: 'Project Jetsam': A bartop speed build using 100% recycled materials
« Reply #24 on: March 18, 2024, 03:15:22 pm »
Much appreciated, firedance! I guess that it's no longer '100% recycled' since I had to buy some finishing materials, but I'm still pretty happy with it for the $40 odd budget.

firedance

  • Trade Count: (0)
  • Full Member
  • ***
  • Offline Offline
  • Posts: 317
  • Last login:Today at 01:15:27 am
Re: 'Project Jetsam': A bartop speed build using 100% recycled materials
« Reply #25 on: March 19, 2024, 10:34:20 am »
I should really update my signature, this is the bartop I did last year, which like yours waslow budget :)

https://forum.arcadecontrols.com/index.php/topic,165536.0/all.html

Zebidee

  • Trade Count: (+9)
  • Full Member
  • ***
  • Offline Offline
  • Posts: 3255
  • Last login:Yesterday at 06:33:53 pm
Re: 'Project Jetsam': A bartop speed build using 100% recycled materials
« Reply #26 on: March 22, 2024, 11:10:10 am »
I think I love everything retro in woodgrain laminate  8)
Check out my completed projects!


jeremymtc

  • Trade Count: (0)
  • Full Member
  • ***
  • Offline Offline
  • Posts: 194
  • Last login:Today at 07:12:00 am
Re: 'Project Jetsam': A bartop speed build using 100% recycled materials
« Reply #27 on: March 24, 2024, 01:45:46 am »
I think I love everything retro in woodgrain laminate  8)

It certainly seemed appropriate here :cheers:   Thanks again for all of the input and advice you'd given over the course of the build. It's been very helpful.


I should really update my signature, this is the bartop I did last year, which like yours waslow budget :)

https://forum.arcadecontrols.com/index.php/topic,165536.0/all.html

I think the link above is broken, but if that build was Shmupin I've had a look at it! Aside from the vertical vs. horizontal difference, it seems that these are both very similar in terms of hardware and overall form. Yours of course is much more nicely constructed - nice work!

firedance

  • Trade Count: (0)
  • Full Member
  • ***
  • Offline Offline
  • Posts: 317
  • Last login:Today at 01:15:27 am
Re: 'Project Jetsam': A bartop speed build using 100% recycled materials
« Reply #28 on: March 24, 2024, 02:43:59 pm »
Ah I missed the html off the link, will sort it soon.

Glad you found it and thank your for praise :)

jeremymtc

  • Trade Count: (0)
  • Full Member
  • ***
  • Offline Offline
  • Posts: 194
  • Last login:Today at 07:12:00 am
I'm still tinkering away on the bartop. It's in functional and presentable state and has been playtested extensively at a couple of parties. So far it's been totally reliable, and I'm relieved that the frontend UI has been pretty easy and intuitive for guests to pick up.

It took a long time, but the edge molding eventually arrived. In the wrong size. The seller refunded without return, so no harm, no foul from my end. I went ahead and did a "temporary" installation using the incorrect material, and it actually came out pretty nicely with some x-acto trim work. It might be good enough as-is, but I reserve the option to replace it later if I feel like it. Proper photos of this soon, but here's a preview:


The lack of an active cooling solution was still bugging me, so I decided to bite the bullet and run it off a relay.


$4 in AliExpress parts later and I have two 12V 60mm fans, fan grilles, and a 12V relay module with hi-low trigger jumper. I plan to mount one of the 60s as an exhaust (intakes are vent holes in base), but I have a second If it seems that it wants additional airflow. The blue board is a dc-dc (buck) converter, with it I can take the 19VDC from the pc power supply and regulate the relay and any load it supports down to 12V (or lower).


The screw terminals on the relay board expect heavier wiring than what's actually in use, so I soldered the "fixed" leads to pins on the the board to prevent anything from coming loose. The fan itself is still connected via the screw terminals for easy removal/replacement.


The blue wire is the trigger wire for the relay, and will connect to the common terminal of the arcade button wired to the pc power switch. The relay has a jumper to set the trigger either low (0V) or high (5V), and I've measured the current from the power switch at 3.7V. I don't recall whether it's active high or active low, but it shouldn't matter anyway with the jumper available. I've bench tested the assembly and it seemed to trigger ok from 3.7V using three AA batteries, so I think the trigger threshold should work out fine even if I'm not feeding it 5V.

I also ordered a cheap 8GB ram module to replace the original 4GB to help the old Dell live its best life in bartop retirement. When the RAM arrives I'll pull everything apart at once to do the fan installation and wiring. Should have "finished" photos to share at that time  :cheers:


« Last Edit: Today at 07:05:01 am by jeremymtc »