Main Restorations Software Audio/Jukebox/MP3 Everything Else Buy/Sell/Trade
Project Announcements Monitor/Video GroovyMAME Merit/JVL Touchscreen Meet Up Retail Vendors
Driving & Racing Woodworking Software Support Forums Consoles Project Arcade Reviews
Automated Projects Artwork Frontend Support Forums Pinball Forum Discussion Old Boards
Raspberry Pi & Dev Board controls.dat Linux Miscellaneous Arcade Wiki Discussion Old Archives
Lightguns Arcade1Up Try the site in https mode Site News

Unread posts | New Replies | Recent posts | Rules | Chatroom | Wiki | File Repository | RSS | Submit news


Author Topic: Bella's Arcade [FINISHED]  (Read 132445 times)

0 Members and 2 Guests are viewing this topic.

javeryh

  • Trade Count: (+1)
  • Full Member
  • ***
  • Offline Offline
  • Posts: 7911
  • Last login:April 26, 2024, 09:39:33 am
Re: Bella's Arcade: The Plug (09.26.07)
« Reply #400 on: September 27, 2007, 09:16:57 pm »
wow!!! i've never been more excited about this hobby than i am right now.  everything works - the cab is playable and it's awesome. still have software tweaking to do but i'm 99.9% done.  what a feeling!

spacies

  • Trade Count: (0)
  • Full Member
  • ***
  • Offline Offline
  • Posts: 934
  • Last login:February 19, 2015, 03:40:49 am
Re: Bella's Arcade: The Plug (09.26.07)
« Reply #401 on: September 28, 2007, 03:04:09 am »
wow!!! i've never been more excited about this hobby than i am right now.  everything works - the cab is playable and it's awesome. still have software tweaking to do but i'm 99.9% done.  what a feeling!

Congratulations!

I am very happy for you and the feeling of powering it up for the first time (although sometimes scary) is a great feeling when you hear fans etc power up.

You're a great Dad!


javeryh

  • Trade Count: (+1)
  • Full Member
  • ***
  • Offline Offline
  • Posts: 7911
  • Last login:April 26, 2024, 09:39:33 am
Re: Bella's Arcade: The Plug (09.26.07)
« Reply #402 on: September 28, 2007, 11:14:12 am »
wow!!! i've never been more excited about this hobby than i am right now.  everything works - the cab is playable and it's awesome. still have software tweaking to do but i'm 99.9% done.  what a feeling!

Congratulations!

I am very happy for you and the feeling of powering it up for the first time (although sometimes scary) is a great feeling when you hear fans etc power up.

You're a great Dad!

Thanks spacies!  I couldn't have done it without your help.  I was actually late for work this morning because I couldn't tear myself away from some Ms. Pac-Man and Galaga...  I really hope Bella comes to appreciate it.   :cheers:

javeryh

  • Trade Count: (+1)
  • Full Member
  • ***
  • Offline Offline
  • Posts: 7911
  • Last login:April 26, 2024, 09:39:33 am
Re: Bella's Arcade: The Plug (09.26.07)
« Reply #403 on: September 28, 2007, 12:28:03 pm »
Well, here's the "official" update, I guess:

It's installed - and more importantly, it works! Or at least it seems to work - no sparks, no smoke and the SmartStrip has power so I'm reasonably sure the installation was done properly. After much discussion about the right and wrong way to wire this thing we collectively figured out which wires from the SmartStrip should be connected to which wires on the plug recepticle (I hope). The last step to installing the plug recepticle was to cut a rectangular hole 1-1/16" x 1-13/16" out of the back panel.

Easy, right? Wrong. It took over 2 hours to cut out the hole accurately. After laying out the hole I started by drilling out as much material as possible using a large drill bit in each corner. Then using a very small keyhole saw I connected the holes to remove most of the material. That wasn't so bad - what was excruciating was trying to square everything up to the lines. I ended up using a metal file because I couldn't get one of my chisels in there to really do anything due to the small size of the hole. I thought this would take 5 minutes!

Here's the hole pre-installation:


It's probably the ugliest part of the entire cabinet - I've tried to plan each cut out and make the lines as clean as possible but this is just a mess. Thankfully there is a bezel around the plug recepticle that will hide everything.

And here's the hole post-installation - I secured the plug recepticle to the cabinet using two screws and then added some screw caps for a "finished" look:


Here's a close-up without the screws holding it in place:


And here's a super close-up of the finished installation. I still have to erase the layout lines that I made since I couldn't decide where to put the thing and still leave room on the inside to mess around:


It looks pretty nice.... or at least nicer than a round hole with a plug hanging out.

The only thing left to do was crawl inside and connect the wires. Note that I reversed the black and white wires from my previous post.

Finally, here are some shots of the inside - as you can see it's quite a mess. I mounted the Smart Strip on the inside of the cabinet - it's ready for the computer! I also used some velcro to hold the plastic box containing the wire hack against the side panel.


Maybe I'll paint the interior of the next cabinet I build to really give it a professional look but that's probably crazy talk.

I did take the time to test everything - I hooked up the computer and played a few games of Ms. Pac-Man and Galaga. I have never been more excited about this hobby than I was when I fired it up for the first time and everything worked like it should - with the press of a button, the marquee light, speakers and monitor came on and the computer booted straight to a random game on my gamelist - the cab is fully playable and it's awesome. I still have some software tweaking to do and I have to hook up the coin door but I'm 99.9% done!

Kangum

  • Trade Count: (+1)
  • Full Member
  • ***
  • Offline Offline
  • Posts: 461
  • Last login:February 25, 2018, 07:46:20 am
Re: Bella's Arcade: The Plug is Installed - and it Works!!! (09.28.07)
« Reply #404 on: September 28, 2007, 02:15:57 pm »
looks really awesome.  :applaud: :notworthy:

there is a done? why didnt someone tell me that. never feels like im done.  :cry:

leapinlew

  • Some questionable things going on in this room with cheetos
  • Trade Count: (+4)
  • Full Member
  • ***
  • Offline Offline
  • Posts: 7906
  • Last login:April 17, 2024, 07:51:43 pm
Re: Bella's Arcade: The Plug is Installed - and it Works!!! (09.28.07)
« Reply #405 on: September 28, 2007, 02:17:25 pm »
how about some overall shots. Here are some suggestions for photos -

A shot with the cabinet draped across a muscle car
A shot of this cabinet with a bikini
A photo of the cabinet in a hot tub

Either way - how about some pics?

javeryh

  • Trade Count: (+1)
  • Full Member
  • ***
  • Offline Offline
  • Posts: 7911
  • Last login:April 26, 2024, 09:39:33 am
Re: Bella's Arcade: The Plug is Installed - and it Works!!! (09.28.07)
« Reply #406 on: September 28, 2007, 02:34:51 pm »
How's this?  ;D

Stobe

  • Trade Count: (+17)
  • Full Member
  • ***
  • Offline Offline
  • Posts: 891
  • Last login:January 23, 2024, 05:08:05 pm
  • Don't make a fuss, I'll have your Spam!
Re: Bella's Arcade: The Plug is Installed - and it Works!!! (09.28.07)
« Reply #407 on: September 28, 2007, 03:45:36 pm »
One down, two to go.

theCoder

  • Trade Count: (0)
  • Full Member
  • ***
  • Offline Offline
  • Posts: 1035
  • Last login:September 20, 2010, 10:48:47 pm
  • I'll clean up my mess, Honey, when I'm done...
Re: Bella's Arcade: The Plug is Installed - and it Works!!! (09.28.07)
« Reply #408 on: September 28, 2007, 05:26:15 pm »
Some of the simplest jobs can really take forever.  I usually use masking tape for this type of work.  Put some down, draw the lines, do the work, remove tape.  It is much easier to deal with the sticky stuff than pencil marks.

I can relate to showing up a little late in the morning.  It was that way the first week after completing my driving cab. 

So will you paint your next one the same way?  That was quite an ordeal wasn't it.  The paint process from hell, yea, that was the summer of what, oh, yea, 2007.  It was good to go through that process together with you.

Now all you need is some blinky lights....

rockin_rick

  • Trade Count: (+3)
  • Full Member
  • ***
  • Offline Offline
  • Posts: 495
  • Last login:May 27, 2017, 09:20:20 am
Re: Bella's Arcade: The Plug (09.26.07)
« Reply #409 on: September 28, 2007, 05:51:44 pm »
Cool, great work!  I wish I had my project done (OK started...)

....and the computer booted straight to a random game on my gamelist

For some reason I'm intrigued on what game it was.  Did you play it?

Rick
If I do not respond to your post in a timely manner, feel free to PM me.

javeryh

  • Trade Count: (+1)
  • Full Member
  • ***
  • Offline Offline
  • Posts: 7911
  • Last login:April 26, 2024, 09:39:33 am
Re: Bella's Arcade: The Plug (09.26.07)
« Reply #410 on: October 01, 2007, 11:45:39 am »
Some of the simplest jobs can really take forever.  I usually use masking tape for this type of work.  Put some down, draw the lines, do the work, remove tape.  It is much easier to deal with the sticky stuff than pencil marks.

I can relate to showing up a little late in the morning.  It was that way the first week after completing my driving cab. 

So will you paint your next one the same way?  That was quite an ordeal wasn't it.  The paint process from hell, yea, that was the summer of what, oh, yea, 2007.  It was good to go through that process together with you.

Now all you need is some blinky lights....

That's a great tip about the masking tape... I never think of the easiest way to do something.  I'm pretty sure the next one I build is going to be out of birch plywood and I will be staining and not painting it (I'm not 100% sure though - I'm still planning out).  I'm not sure if I will ever go through that again - it was nice to have someone else trying the same thing at the same time though.  I REALLY like the way the finish came out and so far when showing the cab to two different people their first comment was "wow - where did you buy this awesome pink material from?" and that's just about the nicest thing anyone can say about it to me.  So I don't know... I'll probably give it another try some time down the road - maybe for my son's arcade cabinet I'll have to build in about 3 years.

Blinky lights would be awesome for the next one... I really want to try getting into lighting a cab but I'm afraid it's a little beyond my skill set.  I'll give it a shot eventually though - I need to think of a cool way to implement it.   :cheers:

Cool, great work!  I wish I had my project done (OK started...)

....and the computer booted straight to a random game on my gamelist

For some reason I'm intrigued on what game it was.  Did you play it?

Rick

It booted to "Arabian" and I did play the first level (but misspelled Arabian ;D).


javeryh

  • Trade Count: (+1)
  • Full Member
  • ***
  • Offline Offline
  • Posts: 7911
  • Last login:April 26, 2024, 09:39:33 am
Re: Bella's Arcade: Coin Door Wiring (10.08.07)
« Reply #411 on: October 08, 2007, 04:41:39 pm »
One of the last things I have left to do on this cabinet other than configure the software is to get the coin door working. I bought a Happs "Small Single Coin Door" which comes with two $0.25 coin mechs to accept quarters (or tokens).


The setup is pretty basic - a microswitch is tripped when a quarter is inserted into the coin slot which sends a signal just like any other button press on the cabinet would do. I decided to wire both the player 1 and player 2 coin slots to the same input on my U360 joystick wiring harness so no matter which slot the coin is put in it will register as a "credit" for player 1. This doesn't pose a problem because most of the alternating 2 player games don't care which coin slot the quarter is inserted into. If two coins are entered into the same slot you press the "Player 2 Start" button for a 2 player game. Also, since the cabinet does not have 2 player simultaneous controls all of those games will be available in 1 player mode only.

Anyway, wiring up the microswitches was a snap - I wired the NO (normally open) pin on each switch to the last wire on the U360 wiring harness (which has been set to "insert coin") and the bottom ground pin on each switch to another ground wire on the control panel completing the loop. I should note that the microswitches on my coin door had the NO and NC (normally closed) pins reversed compared to the standard white pushbutton microswitch. It took me a minute to figure out when nothing was happening when I inserted the coin. Simple!


Everything works like it should but just as I thought, after about 10 minutes of playing on the cabinet, fumbling for quarters/tokens every single time I wanted to play something was a huge pain. I think I'm going to try and rig the coin return buttons to act as "insert coin" buttons when pressed which should eliminate the need to have quarters/tokens on hand all the time.

I'm not 100% sure how I'm going to do this (add a microswitch or install a lever) but I don't think it will be too hard. Stay tuned.

mountain

  • Trade Count: (+9)
  • Full Member
  • ***
  • Offline Offline
  • Posts: 1205
  • Last login:March 26, 2024, 11:42:28 am
    • Mountain Jukeboxes
Re: Bella's Arcade: Coin Door Wiring (10.08.07)
« Reply #412 on: October 08, 2007, 06:58:21 pm »
Here is a picture of how I did mine.


I found a microswitch with a long lever and mounted it as shown. Luckily there were some existing holes that lined up perfectly.

Good luck

Tiger-Heli

  • Trade Count: (0)
  • Full Member
  • ***
  • Offline Offline
  • Posts: 5447
  • Last login:January 03, 2018, 02:19:23 pm
  • Ron Howard? . . . er, I mean . . . Run, Coward!!!
    • Tiger-Heli
It's not what you take when you leave this world behind you, it's what you leave behind you when you go. - R. Travis.
When all is said and done, generally much more is SAID than DONE.

theCoder

  • Trade Count: (0)
  • Full Member
  • ***
  • Offline Offline
  • Posts: 1035
  • Last login:September 20, 2010, 10:48:47 pm
  • I'll clean up my mess, Honey, when I'm done...
Re: Bella's Arcade: Coin Door Wiring (10.08.07)
« Reply #414 on: November 13, 2007, 07:54:13 am »
Did you end up getting the Mame hi score logic working? 

javeryh

  • Trade Count: (+1)
  • Full Member
  • ***
  • Offline Offline
  • Posts: 7911
  • Last login:April 26, 2024, 09:39:33 am
Re: Bella's Arcade: Coin Door Wiring (10.08.07)
« Reply #415 on: November 13, 2007, 10:13:01 am »
Did you end up getting the Mame hi score logic working? 

Hey Coder - I did get the high score patch working - it's awesome.  I topped 100,000 in Galaga for the first time the other night.  I still have several nagging things to do before I can call this 100% complete though:

1.  Refine the MaLa Layout.  superbigjay graciously made me a layout and it looks amazing.  I've attached a pic if anyone is interested - the big box on the left is for the list of games and the bix box on the right is where the snaps go.  I like the way things are laid out but I want to change the font to something more "girly" - the games are displayed in Arial right now and it just doesn't blend in.  I also want to increase the size of the font, if possible although right now any letter like 'g' or 'j' or something that hangs low gets cut off a bit... I also want to incorporate some of the colored flowers from the background of the marquee into the background of the layout... I don't know... I need to teach myself how to make these things.

2.  Refine my Gamelists.  I don't know how to use the "Tree" functions in MaLa yet - right now I have an "All Games" list, a "Horizontal" list and a "Vertical" list and they are still too cumbersome to sort through.  I'm thinking I need to separate them into categories like "Puzzle", "Classic", "Shooter", "Fighter", etc.  I also need to go through them and remove the duplicates and generally crappy games that no one will ever play (which there are quite a lot of).

3.  Install the microswitches behind the coin door return buttons for "insert coin" - right now I repregrammed the "Pause" button as "Coin" because it was such a pain.  This is actually a decent solution (just get rid of pause) but after playing the other day with the wife and kids talking to me every 5 minutes I realized a pause button is essential.

4.  Install the coin box.  This should take 10 minutes.

5.  Possibly relocate the power button.  Right now if I open the coin door I can reach inside and hit power on the computer itself to power on and off.  It works I guess but I'm thinking of relocating it to somewhere on the cabinet (I don't know where yet though - probably the rear of the cabinet).  I don't want my kids opening up the cabinet every time they want to play.

6.  Apply the vinyl button decals.  I had some pink vinyl button decals made to apply to the black admin buttons.  They are really cool - the Start buttons are little girl icons.  This shouldn't take too long.

7.  Make a pink dustwasher for the joystick.  I want to take a piece of 1/8" thick plexiglass and make a 2-1/2" diameter circle and paint the bottom pink and then polish the edges.  Details like this and the button decals will really make the CP stand out I think.

That's kind of a lot now that I've typed it all out.  I almost wish it wasn't playable so I'd just finish the thing!   Once I'm done I'm going to take a ton of pics and even record some footage with our new video camera.  :cheers:

superbigjay

  • Trade Count: (0)
  • Full Member
  • ***
  • Offline Offline
  • Posts: 667
  • Last login:October 22, 2023, 02:50:03 pm
  • I'll always be a kid...
    • superbigjay website
Re: Bella's Arcade: Coin Door Wiring (10.08.07)
« Reply #416 on: November 14, 2007, 07:57:58 am »
Looking good Javeryh,

good progress for a dad  :laugh2:

For your layout and adding flowers, it's really simple in illustrator or any other program...  Simply a matter of cut'n paste.
If you don't have the suitable program or can't make it, send me a PM with what you want and I'll try to do it...
It shouldn't take too long  ;)

PS:
Getting the Hi-Score to work is on my list of todo.
Is it hard to compile mame...
I saw some tutorials and it seems simple enough??

Jay  :cheers:

javeryh

  • Trade Count: (+1)
  • Full Member
  • ***
  • Offline Offline
  • Posts: 7911
  • Last login:April 26, 2024, 09:39:33 am
Re: Bella's Arcade: Coin Door (Return Button Hack) (01.26.08)
« Reply #417 on: January 27, 2008, 01:32:25 pm »
The reports of my demise have been greatly exaggerated!!

I finally got around to installing a microswitch behind the coin return buttons. When the coin return button is pressed, it trips the microswitch sending the signal to the computer. The hardest part was figuring out the placement of the microswitch and how to get it to stay in place.

Here are a couple of "before" shots of the back of the coin door. The yellow plastic is the return button and the red plastic is what presses the cherry actuator on the microswitch.


I couldn't attach the microswitch directly to the plastic on the coin mech because the cherry button on the microswitch would not be activated in this position. My lovely wife suggested using some fireplace kindling as a shim - what a great idea! I cut the shim to size and then positioned the microswitch on it so it would be activated once the coin return button was pressed - I marked everything with a sharpie and then glued everything together in one shot using some Gorilla Glue and a spring clamp. Check it out:


Finally, I ran the wires in parallel (I think that's what it's called) from the actual coin door switch to my newly positioned microswitch. The last shot really gives you a good idea how the whole thing works. The yellow coin return button is pressed which pushes the red plastic into the cherry actuator on the microswitch. Pretty cool.


Now that the coin door is set up, I can insert coins whenever I want but if I don't tell anyone, maybe I can sucker a few friends into dropping some quarters in the machine!

Xb0x3r

  • Trade Count: (0)
  • Full Member
  • ***
  • Offline Offline
  • Posts: 142
  • Last login:August 06, 2010, 07:47:33 pm
Re: Bella's Arcade: Coin Door: Return Button Hack (01.27.08)
« Reply #418 on: January 27, 2008, 07:03:17 pm »
Quick thought, you could have a switch behind both coin returns and have them go through an AND gate so that when both are pressed, the chip sends a 1 (or 0, if common anode) and there you have it, a secret way to insert coins  ;D

I'm planning on doing this on mine (when I'm at that stage  ;))
« Last Edit: January 27, 2008, 07:09:56 pm by Xb0x3r »

javeryh

  • Trade Count: (+1)
  • Full Member
  • ***
  • Offline Offline
  • Posts: 7911
  • Last login:April 26, 2024, 09:39:33 am
Re: Bella's Arcade: Coin Door: Return Button Hack (01.27.08)
« Reply #419 on: January 29, 2008, 09:12:43 am »
Quick thought, you could have a switch behind both coin returns and have them go through an AND gate so that when both are pressed, the chip sends a 1 (or 0, if common anode) and there you have it, a secret way to insert coins  ;D

I'm planning on doing this on mine (when I'm at that stage  ;))

That's a neat idea - maybe I'll try that on my next one but I think I'm going to leave it as is for this one.  It's already pretty hidden, IMO.  Plus, I don't think I have the skills for something like that!   :cheers:

Tiger-Heli

  • Trade Count: (0)
  • Full Member
  • ***
  • Offline Offline
  • Posts: 5447
  • Last login:January 03, 2018, 02:19:23 pm
  • Ron Howard? . . . er, I mean . . . Run, Coward!!!
    • Tiger-Heli
Re: Bella's Arcade: Coin Door: Return Button Hack (01.27.08)
« Reply #420 on: January 29, 2008, 10:14:56 am »
That's a neat idea - maybe I'll try that on my next one but I think I'm going to leave it as is for this one.  It's already pretty hidden, IMO.  Plus, I don't think I have the skills for something like that!   :cheers:
xbox3r didn't word it that clearly (or maybe he didn't understand).

Let's say your coin switches are in parallel now to Terminal 5 on the Ipac - So you have two wires from Terminal 5 to NO terminal on each switch, and two wires to the GND on each switch to the GND on the I-PAC.

All you do is wire it like this:
  • one wire from Terminal 5 to the NO on the left coin return switch
  • one wire from the GND on the left Coin return to the NO on the right coin return switch
  • one wire from the GND on the right Coin return switch back to the I-PAC to complete the circuit
Now when you press one coin return nothing happens but if you press both in it generates a coin input.

I like the concept but not sure it's worth the added complexity in practice.
It's not what you take when you leave this world behind you, it's what you leave behind you when you go. - R. Travis.
When all is said and done, generally much more is SAID than DONE.

javeryh

  • Trade Count: (+1)
  • Full Member
  • ***
  • Offline Offline
  • Posts: 7911
  • Last login:April 26, 2024, 09:39:33 am
Re: Bella's Arcade: Coin Door: Return Button Hack (01.27.08)
« Reply #421 on: January 29, 2008, 11:14:41 am »
That's a neat idea - maybe I'll try that on my next one but I think I'm going to leave it as is for this one.  It's already pretty hidden, IMO.  Plus, I don't think I have the skills for something like that!   :cheers:
xbox3r didn't word it that clearly (or maybe he didn't understand).

Let's say your coin switches are in parallel now to Terminal 5 on the Ipac - So you have two wires from Terminal 5 to NO terminal on each switch, and two wires to the GND on each switch to the GND on the I-PAC.

All you do is wire it like this:
  • one wire from Terminal 5 to the NO on the left coin return switch
  • one wire from the GND on the left Coin return to the NO on the right coin return switch
  • one wire from the GND on the right Coin return switch back to the I-PAC to complete the circuit
Now when you press one coin return nothing happens but if you press both in it generates a coin input.

I like the concept but not sure it's worth the added complexity in practice.

Wow - cool.  That's pretty easy to do.  I don't think I'm going to rewire or anything but that is good to know.  The problem is that the Player 2 coin return button is now inoperable because I can't press it all the way in due to the microswitch I glued in place.  I don't want both coin return buttons to not work which is why I didn't add a microswitch behind the Player 1 coin return button.  I guess I could have installed the microswitch so it activates when the coin return button is pressed all the way down (so the return would still work) but that requires too much pressure/effort when 99% of the time I will be using it to insert a coin.

Tiger-Heli

  • Trade Count: (0)
  • Full Member
  • ***
  • Offline Offline
  • Posts: 5447
  • Last login:January 03, 2018, 02:19:23 pm
  • Ron Howard? . . . er, I mean . . . Run, Coward!!!
    • Tiger-Heli
Re: Bella's Arcade: Coin Door: Return Button Hack (01.27.08)
« Reply #422 on: January 29, 2008, 12:07:12 pm »
The problem is that the Player 2 coin return button is now inoperable because I can't press it all the way in due to the microswitch I glued in place.
Maybe that's why 1Up used those roller actuator microswitches.   :timebomb:

There is a fault with xbox3r's idea, though - that works fine to press both switches to send Coin 1, but there are some games (I think) that wanted a certain coin in a specific slot (coin 2 to be the elf), I think and it won't allow for that.

Then again, I'm not sure any games used this type of function.
It's not what you take when you leave this world behind you, it's what you leave behind you when you go. - R. Travis.
When all is said and done, generally much more is SAID than DONE.

Neverending Project

  • Trade Count: (+3)
  • Full Member
  • ***
  • Offline Offline
  • Posts: 851
  • Last login:April 06, 2015, 10:07:43 pm
    • Arcade Fixer
Re: Bella's Arcade: Coin Door: Return Button Hack (01.27.08)
« Reply #423 on: January 29, 2008, 01:06:49 pm »
Then again, I'm not sure any games used this type of function.
Gauntlet comes to mind right away. I am sure there are others too... "Valkarie needs food. Badly."

And there are dual-pushbuttons that would overcome the 1P/2P limitation mentioned above. Each side would have their own "secret switch". But now we are getting way complex, and javeryh already said he is good to go on this coin door, so I digress...

But as long as I'm digressing, I would use the dual illuminated pushbutton as the insert coin button, and have the coin return push be the secret switch. Then again, I am never going to finish my cabinet, so what do I know?

javeryh

  • Trade Count: (+1)
  • Full Member
  • ***
  • Offline Offline
  • Posts: 7911
  • Last login:April 26, 2024, 09:39:33 am
Re: Bella's Arcade: Coin Door: Return Button Hack (01.27.08)
« Reply #424 on: January 29, 2008, 01:27:09 pm »
Another update!  OK, this one is minor but still... I'm getting oh so close...

This past weekend sure was productive.  After completing the coin return button hack I turned my attention to labeling the admin buttons on the control panel. This thing has to be user-friendly so everything needs to be clearly marked. Four unlabeled black pushbuttons isn't going to cut it.

There's not much to say here other than to show before and after shots and maybe a brief explanation of what I did. It's really as easy as applying a sticker. Here goes:

   1. Clean each button with some rubbing alcohol and a q-tip. Blow it dry. A super-clean surface is essential.
   2. Cut out each decal as oversized as possible. The decals are small and if you have giant hands like me you want to be able to be precise with the placement.
   3. Peel the paper backing off the vinyl decals leaving a clear plastic film and the vinyl decal (it's sticky on the bottom, duh)
   4. Line it up and apply the decal to the button - be careful - you only get one shot!
   5. Using something like your fingernail, rub over the vinyl decal to make sure it is securely in place.
   6. Remove the clear plastic film leaving the vinyl decal on the button!

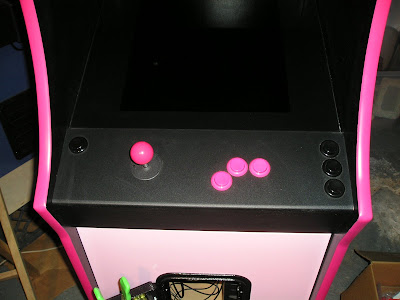
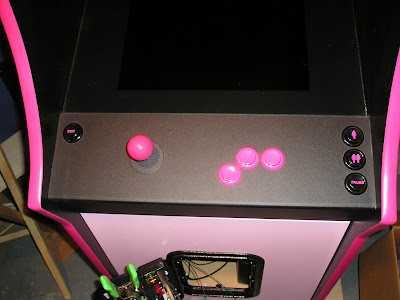
Here are the before and after shots:
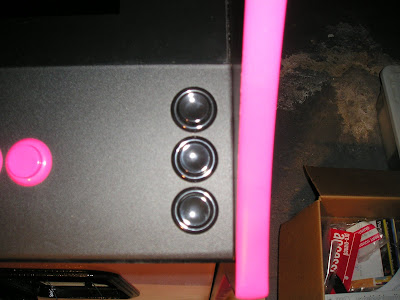


Close up:


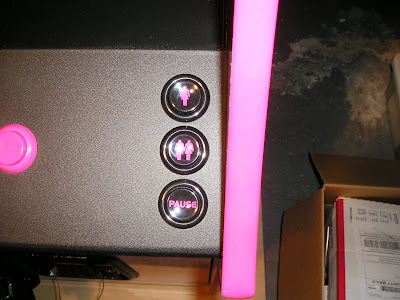
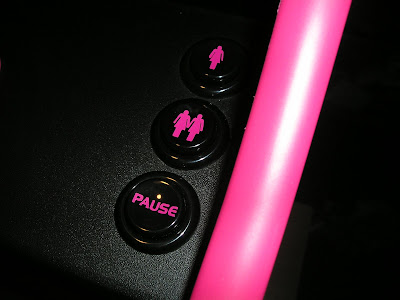
The decals are "Exit" to the far left for exiting out of the current game you are playing and back to the list, the single female icon for the "Player 1 Start" button, the double female icon for the "Player 2 Start" button and "Pause" for, um... pausing the game.

I have an additional decal that says "Launch Game" which is in the shape of a semi-circle which was made to go directly on the control panel above the "Player 1 Start" button. The reason for this is that when you are browsing the game list from the front end, the "Player 1 Start" button doubles as the "Launch Game" button. I'm not sure if I need it though which is why I haven't put it on yet. Start is start, right? Are people honestly not going to be able to figure it out?

Big thanks to Pongo for making the vinyl decals for me!

Remaining items:
- Make Pink Plexiglass Dustwasher
- Relocate Power Button from front of computer case to rear of cabinet
- Make a Coin Box
- Software Configuration Tweaks (organize gamelists, tweak MaLa layout and possibly add more emulators)

 :cheers:

Tiger-Heli

  • Trade Count: (0)
  • Full Member
  • ***
  • Offline Offline
  • Posts: 5447
  • Last login:January 03, 2018, 02:19:23 pm
  • Ron Howard? . . . er, I mean . . . Run, Coward!!!
    • Tiger-Heli
Re: Bella's Arcade: Coin Door: Return Button Hack (01.27.08)
« Reply #425 on: January 29, 2008, 04:36:50 pm »
I'm not sure if I need it though which is why I haven't put it on yet. Start is start, right? Are people honestly not going to be able to figure it out?
If you don't add it people will randomly mash buttons until something happens anyway, so I think you're good.  :cheers:

If you wanted to make it super easy (too easy?) you could probably configure your FE so either 1, 2, L Ctrl, L Alt, or Space launched a game.
It's not what you take when you leave this world behind you, it's what you leave behind you when you go. - R. Travis.
When all is said and done, generally much more is SAID than DONE.

Xb0x3r

  • Trade Count: (0)
  • Full Member
  • ***
  • Offline Offline
  • Posts: 142
  • Last login:August 06, 2010, 07:47:33 pm
Re: Bella's Arcade: Vinyl Decals for Buttons (01.30.08)
« Reply #426 on: January 29, 2008, 10:11:20 pm »
I'm glad you guys improved upon my idea! Thanks!

Xb0x3r

pkellum

  • Trade Count: (0)
  • Full Member
  • ***
  • Offline Offline
  • Posts: 13
  • Last login:July 24, 2009, 12:53:04 am
  • I want to build my own arcade controls!
Re: Bella's Arcade: Vinyl Decals for Buttons (01.30.08)
« Reply #427 on: January 30, 2008, 06:17:33 am »
This is a very nice cabinet! Thanks to this project, I'm already putting together ideas for a cabinet for my son, 3 years old next week :)  The Player 1/2 buttons are just too cute, I love them  :cheers:

One suggestion, while reading through this thread and the blog I began to realize how much of the story about the cabinet has played out in them and I thought it would be a wonderful keepsake for your daughter when she's older.  Have you considered printing out the blog and perhaps the thread and having them bound into a booklet once you finish the cabinet?  You could place them in an envelop inside the cabinet for her to discover when she's older.

Having them bound would be just a few dollars at someplace like Staples or Kinko's, not as expensive as it was in the old days.

Just an idea :)

janey6152

  • Trade Count: (0)
  • Full Member
  • ***
  • Offline Offline
  • Posts: 64
  • Last login:July 31, 2016, 03:39:36 pm
Re: Bella's Arcade: Vinyl Decals for Buttons (01.30.08)
« Reply #428 on: January 30, 2008, 04:56:19 pm »
 Pongo

i want some of they  the vinyl decals

How did u make them ?? Or how can i make them ?

Franco B

  • Trade Count: (+10)
  • Full Member
  • ***
  • Offline Offline
  • Posts: 3766
  • Last login:February 15, 2024, 09:14:06 am
Re: Bella's Arcade: Vinyl Decals for Buttons (01.30.08)
« Reply #429 on: January 30, 2008, 05:33:43 pm »
Awesome fella, the decals really set it off nicely  8)

Pongo

  • Trade Count: (+34)
  • Full Member
  • ***
  • Offline Offline
  • Posts: 222
  • Last login:July 01, 2015, 10:19:54 am
Re: Bella's Arcade: Vinyl Decals for Buttons (01.30.08)
« Reply #430 on: January 31, 2008, 08:58:01 pm »
Glad you like them,... looks like the color matches pretty well too.


To answer the questions about where to get the vinyl stickers, I will offer this shameless plug.
http://forum.arcadecontrols.com/index.php?topic=64645.0


javeryh

  • Trade Count: (+1)
  • Full Member
  • ***
  • Offline Offline
  • Posts: 7911
  • Last login:April 26, 2024, 09:39:33 am
Re: Bella's Arcade: Vinyl Decals for Buttons (01.30.08)
« Reply #431 on: February 01, 2008, 01:55:00 pm »
This is a very nice cabinet! Thanks to this project, I'm already putting together ideas for a cabinet for my son, 3 years old next week :)  The Player 1/2 buttons are just too cute, I love them  :cheers:

One suggestion, while reading through this thread and the blog I began to realize how much of the story about the cabinet has played out in them and I thought it would be a wonderful keepsake for your daughter when she's older.  Have you considered printing out the blog and perhaps the thread and having them bound into a booklet once you finish the cabinet?  You could place them in an envelop inside the cabinet for her to discover when she's older.

Having them bound would be just a few dollars at someplace like Staples or Kinko's, not as expensive as it was in the old days.

Just an idea :)


Thanks!  That's actually a pretty cool idea.  I'm just hoping she comes to appreciate it eventually. 

Also, I'd be happy to answer any questions you might have when you start building the cabinet for your son.

Awesome fella, the decals really set it off nicely  8)

Thanks.  They look even better in person and really add a finishing touch.  The more details the more it looks like it came from a factory or something.

Glad you like them,... looks like the color matches pretty well too.

Yup.  It's almost a perfect match to the t-molding!  You really can't tell any difference unless you are looking for one.  Thanks again!


javeryh

  • Trade Count: (+1)
  • Full Member
  • ***
  • Offline Offline
  • Posts: 7911
  • Last login:April 26, 2024, 09:39:33 am
Re: Bella's Arcade: The POWER Button (02.05.08)
« Reply #432 on: February 04, 2008, 02:59:14 pm »
This is it! The final actual physical construction on the cabinet. It's about time.

One last thing that had been bothering me was the fact that I had to open the coin door to hit the power switch on the computer in order to turn everything on and off. I decided to relocate the power button from the front of my computer to the rear panel on the outside. It's out of sight but easy enough to press before and after a play session.

One consideration was that I wanted the button to be recessed in the panel - I think it looks nicer and whatever small chance there is that it will get pressed accidentally is greatly reduced. I had to come to terms with drilling through my awesome finish on the rear panel - oh well, it was necessary I guess.

Anyway, I wasn't sure about the placement of the button so I actually thought about it for quite some time. I wanted it to be out of the way, easily accessible and aesthetically pleasing in it's ultimate location. I think I achieved all three of these things. I decided to place the button towards the top of the cabinet because it would be easiest to press in that location.

The first thing I did was lay out the center for the button hole using some painter's tape (so as not to mark up the actual cabinet. I measured in from the right to the exact center of the power plug to line up the button hole (for aesthetics) and then measured down from the top the same distance and made a mark and tapped out the center with an awl:


Next, I drilled out the hole in two steps using forstner bits. The first one - 7/8" - was just larger than the overall diameter of the button at it's widest point and the second one - 1/2" - was the exact size you would drill if you were installing the button normally. Here is the resulting hole:


You can see the two different diameter holes here quite easily. Once installed, the button will be flush with the back panel. Next came the tricky part - wiring it up. I had to cut the two wires from the button on the computer case and splice in the two wires from the new button. Easier said than done due to the location of the button - I had to remove the marquee and feed the wires through the same narrow hole that the power cord from the marquee light was in. This took me almost an hour of trial and error until I finally got them in there. Check it out (also notice that I painted the inside of the hole because I'm super anal):


...and here's the button all wired up but not installed:


Here's the finished installation:


I am VERY happy with the way this worked out. The button is very easy to reach and it looks great - everything is tied into it. You press it once and the computer powers on, the marquee light comes on, the speakers power on and the LED coin door lights light up. The computer boots straight to whatever the last game played was. Press it again and everything shuts down. This definitely beats opening up the coin door and contorting my hand to reach the power button on the computer! 

Only 3 or 4 more posts and I swear I'm done!!  :cheers:

Anubis_au

  • Trade Count: (0)
  • Full Member
  • ***
  • Offline Offline
  • Posts: 415
  • Last login:January 15, 2023, 10:12:32 pm
  • Ever danced with the Devil in the pale moonlight?
Re: Bella's Arcade: The POWER Button!! (02.05.08)
« Reply #433 on: February 04, 2008, 07:54:58 pm »
Even the connector clips are pink...

One super build. And probably the most thoroughly documented build ever!

 :cheers:

Avrus

  • Trade Count: (0)
  • Full Member
  • ***
  • Offline Offline
  • Posts: 400
  • Last login:September 07, 2011, 09:17:25 pm
  • Canada
    • The Avrus Arcade Project 'Conquest'
Re: Bella's Arcade: The POWER Button!! (02.05.08)
« Reply #434 on: February 04, 2008, 09:32:13 pm »
I would have thought for SURE you would have gone for one of these:

http://www.performance-pcs.com/catalog/index.php?main_page=product_info&products_id=22361

______________________________
'Conquest' upright 4 player arcade project log:
http://avrus.blogspot.com/

DaOld Man

  • Trade Count: (+4)
  • Full Member
  • ***
  • Offline Offline
  • Posts: 5139
  • Last login:December 13, 2023, 12:03:14 am
  • Wheres my coffee?
    • Skenny's Outpost
Re: Bella's Arcade: The POWER Button!! (02.05.08)
« Reply #435 on: February 05, 2008, 12:11:04 pm »
Thats a pretty slick button. Kinda steep price though...

waveryder

  • Trade Count: (+1)
  • Full Member
  • ***
  • Offline Offline
  • Posts: 585
  • Last login:July 14, 2011, 04:26:17 am
  • I Troop, therefore I am
    • BubbleGum Custom Art
Re: Bella's Arcade: The POWER Button!! (02.05.08)
« Reply #436 on: February 06, 2008, 03:24:13 am »
javeryh
This is an amazing project. The attention to detail  is just great. Makes me want to build one for my son, or daughter if the wife has her way!  :o

Are you having any luck with the dust washers for your sticks?
When pixelated clipart just wont do, just call for Betty

javeryh

  • Trade Count: (+1)
  • Full Member
  • ***
  • Offline Offline
  • Posts: 7911
  • Last login:April 26, 2024, 09:39:33 am
Re: Bella's Arcade: The POWER Button!! (02.05.08)
« Reply #437 on: February 06, 2008, 08:59:08 am »
javeryh
This is an amazing project. The attention to detail  is just great. Makes me want to build one for my son, or daughter if the wife has her way!  :o

Are you having any luck with the dust washers for your sticks?

Thanks - coming from you that means a lot since BGB blows this out of the water, IMO.   It is a neat little cabinet though - perfect for an adult to sit at and play or a kid to stand.  My daughter actually has to use a footstool or something because she's not tall enough yet. 

As for the dustwasher, I am not having any luck.  I have all the supplies I need to make it (well, the plexiglass and leftover pink paint) but I do not have a circle cutting jig for my router so I can't make the cut.  I'm pretty sure a holesaw is designed to leave a clean hole and not a clean circle cut out although I suppose I could just give it a shot and find out.  I'm thinking of posting in the B/S/T forum and just having someone else make it for me at this point...

:cheers:

Dudeman

  • Trade Count: (0)
  • Full Member
  • ***
  • Offline Offline
  • Posts: 229
  • Last login:December 30, 2023, 06:30:25 pm
  • Ecky ecky ecky ecky P'Tang! Zoop-boing mmmzoesm...
Re: Bella's Arcade: The POWER Button!! (02.05.08)
« Reply #438 on: February 06, 2008, 09:47:19 am »
Dude, just buy this: http://www.woodcraft.com/family.aspx?familyid=3582

It's not too expensive, and it works great. Once you have it, you'll find all kinds of times to use it.

ErikRuud

  • Trade Count: (+1)
  • Full Member
  • ***
  • Offline Offline
  • Posts: 1709
  • Last login:March 05, 2021, 10:20:27 am
  • I'll build a cab for only 99.99.99!!!
    • Erik's humble video game page
Re: Bella's Arcade: The POWER Button!! (02.05.08)
« Reply #439 on: February 06, 2008, 11:33:18 am »
Do you have a drill press?

Is your hole saw adjustable?

Try this:

Attach a piece of scrap plexi to a piece of wood with some screws.  Clamp the wood to drill press.  Drill the inner hole.  Do not move the wood.  Drill the outer perimeter.
Real Life.  Still a poor substitute for video games!       
American Laser Games Wrapper
O2em Rom Utility