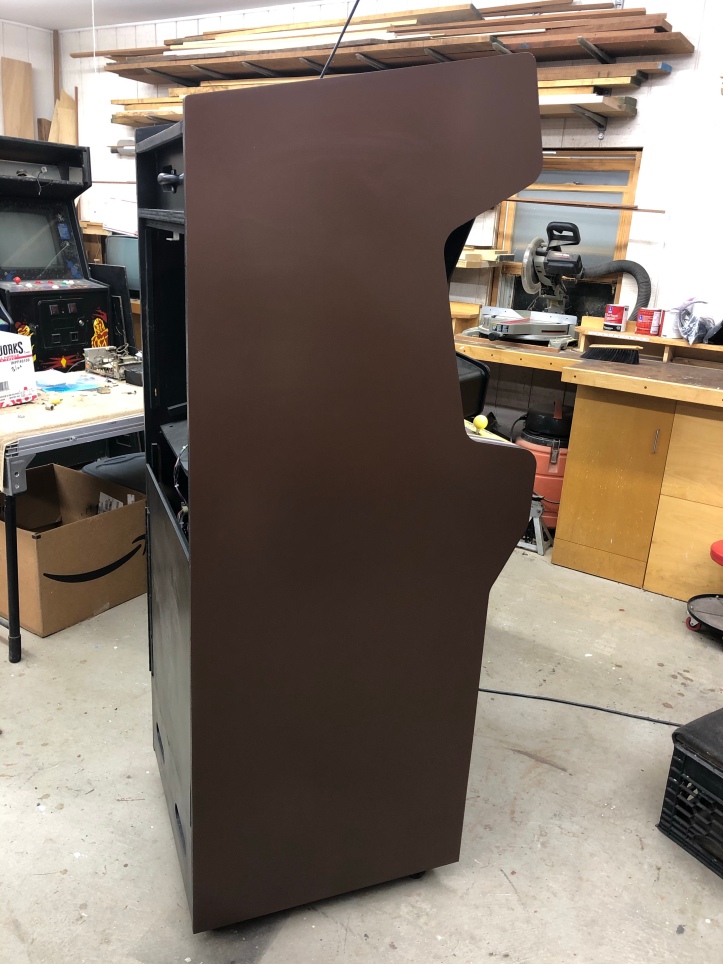
Main Restorations Software Audio/Jukebox/MP3 Everything Else Buy/Sell/Trade
Project Announcements Monitor/Video GroovyMAME Merit/JVL Touchscreen Meet Up Retail Vendors
Driving & Racing Woodworking Software Support Forums Consoles Project Arcade Reviews
Automated Projects Artwork Frontend Support Forums Pinball Forum Discussion Old Boards
Raspberry Pi & Dev Board controls.dat Linux Miscellaneous Arcade Wiki Discussion Old Archives
Lightguns Arcade1Up Try the site in https mode Site News

Unread posts | New Replies | Recent posts | Rules | Chatroom | Wiki | File Repository | RSS | Submit news


Author Topic: A Joust restoration.. this is going to take a while  (Read 24225 times)

0 Members and 1 Guest are viewing this topic.

bperkins01

  • Trade Count: (0)
  • Full Member
  • ***
  • Offline Offline
  • Posts: 895
  • Last login:September 24, 2023, 02:13:35 pm
  • Plenty of skills.. gaining experience..
A Joust restoration.. this is going to take a while
« on: May 10, 2020, 08:46:00 am »
Well ....  Got another one..

I've always loved Joust and even while I was restoring my favorite machine, Centipede, I kept an eye out for an original Joust project/restoration.  What I learned is that they are not easy to come by..  Working / restored machines are selling for a considerable amount.

Buried in a Facebook Marketplace ad for a bunch of machines was a reference to a Joust cabinet that had been converted to a Silkworm.  The Joust boards were in some other cabinet that had some crazy setup to switch back and forth between it and some other game.   After getting a few pictures and going back and forth with the seller  - I was determined to make this poor machine back into a Joust again!

Beneath the brown paint and TECMO sticker - an original Joust will be back!


My Arcade Cabinet Build and other projects here:
Centipede, Joust, Joust Cocktail, Asteroids, Galaga, Ms. Pacman Cabaret, Defender, Space Invaders Cocktail
https://bperkins.wordpress.com/

bperkins01

  • Trade Count: (0)
  • Full Member
  • ***
  • Offline Offline
  • Posts: 895
  • Last login:September 24, 2023, 02:13:35 pm
  • Plenty of skills.. gaining experience..
Re: A Joust restoration.. this is going to take a while
« Reply #1 on: May 10, 2020, 08:51:50 am »
Here is the ugly duckling..


It's up on a dolly so I can move it around.

The cabinet is really beat up at the bottom.


I can repair the sides pretty easily.  I was going to replace the front - except it has the cabinet serial# imprinted on it.  I'd like to retain it..  but we will see how easily I can get the panels apart.

The board set on the other hand is in excellent condition.  A to A+ just looking at it.  I'm told it works perfectly - but I haven't tried it yet.   The boards were mounted in a Sinistar cabinet up under the monitor board face down.   The entire original wiring harness was also in the Sinistar cabinet - door interlock switches, all of it!  The owner made a clamp-on removable control panel with the Joust controls.  When he wanted to use Joust - he clamped on the control panel, connected it to the Joust harness through the coin door and swapped the video cable at the monitor.  It was two complete games in a single cabinet.


First Observations:

  • Cabinet, Monitor and power supply are all the same serial number
  • All of the system boards are the same serial number too..  Just a different one
  • Monitor works - but has Silkworm burn in and the colors are pretty flabby..  I'll recap it first and look for a potential tube swap
  • Control panel is the original joust panel - but with many extra holes
  • Control panel wiring harness is a bit of a mess
  • Coin door can be restored to look new
  • Marquee and bezel missing
  • Did Williams really solder all of their connections vs. using wire connectors?

First step is to strip down the cabinet and repair the shattered plywood....
My Arcade Cabinet Build and other projects here:
Centipede, Joust, Joust Cocktail, Asteroids, Galaga, Ms. Pacman Cabaret, Defender, Space Invaders Cocktail
https://bperkins.wordpress.com/

bperkins01

  • Trade Count: (0)
  • Full Member
  • ***
  • Offline Offline
  • Posts: 895
  • Last login:September 24, 2023, 02:13:35 pm
  • Plenty of skills.. gaining experience..
Re: A Joust restoration.. this is going to take a while
« Reply #2 on: May 10, 2020, 08:59:42 am »
It does have the original control panel..

But it was converted to a Silkworm panel (or something)..  there are many many holes.


Here is the backside of the clip-on Joust control panel that was used with the Sinistar cabinet.  A hunk of wood with odd buttons, etc.  At least the joysticks and leaf switches seem to be original  as well as a chopped up original wiring harness.


Back to the control panel....  The overlay must have been put on many years ago..  it is extremely tough and would not peel off.  When I could get some of it - it started taking the grain of the wood with it...


So I used a standard heat gun and putty knife to get it off.  I'm not 100% sure I'm going to reuse this panel - but I needed to get it uncovered so that I could measure it to manufacture a replacement.


Joust's panel has a 16G steel plate that is rabbeted into the top of the plywood.  Four of these holes are original Joust holes - the rest are an abomination!


The good news is that all of the info I need to make a replacement panel I can get from this one.  If I decide to repair this one - the 2 way joystick mounts are still in place.  I'd have to plug and re-drill the 6 button holes to make them usable for the original style buttons.

At minimum - I'll get an exact model of this CP designed in Sketchup.  I've completed the hole pattern for the steel plate.


I went ahead and generated a full set of plans for the Joust CP.


Downloadable here: Joust Control Panel  I've also ordered a steel replacement plate for the panel.  Depending on  how things go - I may make a few of these.


My Arcade Cabinet Build and other projects here:
Centipede, Joust, Joust Cocktail, Asteroids, Galaga, Ms. Pacman Cabaret, Defender, Space Invaders Cocktail
https://bperkins.wordpress.com/

bperkins01

  • Trade Count: (0)
  • Full Member
  • ***
  • Offline Offline
  • Posts: 895
  • Last login:September 24, 2023, 02:13:35 pm
  • Plenty of skills.. gaining experience..
Re: A Joust restoration.. this is going to take a while
« Reply #3 on: May 10, 2020, 09:09:38 am »
Of the few cabinets I've been inside - this one is pretty well constructed..

Williams used plywood and actual dado joinery on Joust.  Centipede is particle board, butt joints and staples.  Galaga is MDF.


What makes it nice is what is going to also make it difficult to get apart.  They used actual joinery with glue.  Hopefully I can knock the sides apart and get the front off.    One really nice feature of this cabinet is the monitor is on a plywood shelf.  Unplug the power and video and slide it out. Super simple.

It has this fun feature.. A built in mirror behind the marquee that is angled down toward the screen.


You can slide the monitor backward by unbolting it from the forward hole and putting the bolt in the rear hole so it doesn't slide onto the floor.  That distance gives you a little separation so the mirror can see the screen - very clever!


Coin door is all there - but in need of some straightening out and a fresh coat of paint.


Merry Christmas Joust cabinet - 1982.


Here is the power brick - need to clean it up and test it..  Its really just a transformer with a cable..  The Atari power brick has much more to it..  Maybe I'll check the resistance on the winding's before adding power.  It doesn't look trustworthy.  At minimum I'm replacing the power cord and the EMI filter.


Patient up on the operating table.  The guys in the waiting room just need monitor work - no major surgery like Joust.

Here's the plan:


  • Remove the front coin door panel
  • Remove the botton
  • Cut 12" off each side and replace with new plywood
  • Cut 6"-8" off the front and replace with new plywood
  • Sand everything, prime, paint, stencil in Joust sideart


I might have replaced this back panel and the front coin panel, except if you look close here - the cabinet serial number is stamped on the part.  Same for the front coin panel.  Notice the staple too...


This type of repair isn't for everyone.  It took me a while to figure out the best way to get this cabinet apart and not completely destroy it.  Williams made a solid cabinet.  The material is plywood, they used dado joinery, glue, staples and corner blocking.

After messing with it a bit - here is what works best to get this apart.  The inside corner blocking needs to come off first. You can use an oscillating multi-tool saw and a pry bar to get them out.  Best to work slow and try not to shred the plywood - but you are going to in some places..


My clamps have reversible heads so that they can push the sides apart.  Use a bunch of them to spread the load evenly and work slow.  As it crunches, cracks and pops  - use the saw, putty knife or blade to help things work apart.  Try to locate the staples and cut through them as you see them.  The front and bottom will have to come off as one section because of the way the coin box is designed.


Well - the top is loose - but the bottom is still on - more clamp spreading from inside the coin door panel.  Had to do this across the bottom as well.   As soon as you see a staple - cut it inside the joint.  Next time I'll try a magnet or stud finder to see if I can locate them to dig them out first.


It's apart - I'll focus on the sides first while I formulate a plan for the front..


The bottom edge is trash.  I'm using the straight edge to create a square reference point for cutting.  Now I'm going to sleep on it and make sure when I wake up I still like this idea..


My Arcade Cabinet Build and other projects here:
Centipede, Joust, Joust Cocktail, Asteroids, Galaga, Ms. Pacman Cabaret, Defender, Space Invaders Cocktail
https://bperkins.wordpress.com/

Mike A

  • Trade Count: (0)
  • Full Member
  • ***
  • Offline Offline
  • Posts: 5885
  • Last login:Yesterday at 01:39:09 pm
  • This plan is foolproof
Re: A Joust restoration.. this is going to take a while
« Reply #4 on: May 10, 2020, 09:26:54 am »
This is going to look great next to your other cabs. I like the pissed off looking ostrich head poking out.

bperkins01

  • Trade Count: (0)
  • Full Member
  • ***
  • Offline Offline
  • Posts: 895
  • Last login:September 24, 2023, 02:13:35 pm
  • Plenty of skills.. gaining experience..
Re: A Joust restoration.. this is going to take a while
« Reply #5 on: May 10, 2020, 06:11:39 pm »
Decided to go with the plan


I started by trying to sand off the brown paint that was on top of the side art.  It instantly gummed up the pad - sanding wasn't going to work. 
Next I tried a paint stripper that I had laying around for 20+ years - you know - the smelly stuff you can't buy anymore..  that worked..  it took a few coats of paint some on ... scrape a layer .. paint more on..  scrape a layer..


The original plywood was a good quality maple - its actually pretty smooth here even though it may not look it.  It only took a few minutes to smooth it out with the sander after the stripper work was done.  Williams used a primer under the original brown paint too.


The track saw will make parts of this easy - 12" off the bottom..


One thing I strongly recommend - if the original T-molding is there - leave it on as long as possible.  It's a great guide to keep you from sanding the corners round or dinging them up.   While sanding the sides - once you start digging too far into the T-molding - you can see it.


Joust a foot shorter - is it a cabaret now?


My Arcade Cabinet Build and other projects here:
Centipede, Joust, Joust Cocktail, Asteroids, Galaga, Ms. Pacman Cabaret, Defender, Space Invaders Cocktail
https://bperkins.wordpress.com/

bperkins01

  • Trade Count: (0)
  • Full Member
  • ***
  • Offline Offline
  • Posts: 895
  • Last login:September 24, 2023, 02:13:35 pm
  • Plenty of skills.. gaining experience..
Re: A Joust restoration.. this is going to take a while
« Reply #6 on: May 15, 2020, 04:49:50 pm »
My machine is still coming apart - but some parts can start going back together..

First up is the power brick:


Not the best looking power supply I've ever seen.  Its mounted on MDF - and I'm pretty sure its original.  Normally I try to keep everything original as I can, but not this.  After washing it up, the utility outlet is fine, not crazy about the fuse holder.  Next order to Arcadeshop I may add a new one in.


The nuts and bolts are the typical rusty pile you normally find.  I have a Harbor Freight vibratory polisher.  I'll toss them in over night and see if they clean up.  The line filter likely is fine - but for $11 - I'm replacing it.  Power cord was junk. (as expected)


Gave the wires a bath and wire brushed the transformer.  I did avoid getting the paper wet as much as possible.  Paint is still wet here - but they look great cleaned up.  Put the meter on the connections to check ohms - the are all pretty low as they should be.  No shorts.


Polisher does a decent job removing rust.  These don't cost anything to replace - but they are still original!


Jumping ahead I mounted the transformer and related to a new block of plywood.  I used the original MDF as a guide, drilled the holes and located all of the parts in the same places.  Painted it white to match.  Williams soldered all of their connections.  I'm not a fan.  I added ring connectors to all of the wires on the EMI and new power cord.

Last part is making a jumper block for the 12 pin Molex that normally would select 120/240v and manage the interlock switches.  After powering it on - all the voltages checked at the transformer output.


And because I could - I connected it to the power distribution board and checked the output voltages on this one to.  So far - power is all good and clean!
My Arcade Cabinet Build and other projects here:
Centipede, Joust, Joust Cocktail, Asteroids, Galaga, Ms. Pacman Cabaret, Defender, Space Invaders Cocktail
https://bperkins.wordpress.com/

Mike A

  • Trade Count: (0)
  • Full Member
  • ***
  • Offline Offline
  • Posts: 5885
  • Last login:Yesterday at 01:39:09 pm
  • This plan is foolproof
Re: A Joust restoration.. this is going to take a while
« Reply #7 on: May 15, 2020, 04:57:49 pm »
That sure is purdy.

J_K_M_A_N

  • Trade Count: (0)
  • Full Member
  • ***
  • Offline Offline
  • Posts: 983
  • Last login:Yesterday at 10:43:54 pm
Re: A Joust restoration.. this is going to take a while
« Reply #8 on: May 15, 2020, 05:53:02 pm »
Damn it I love watching stuff like this when guys with crazy talent (and that are kinda anal) do work like this. So nice looking. Can't wait for more progress.

J_K_M_A_N

bperkins01

  • Trade Count: (0)
  • Full Member
  • ***
  • Offline Offline
  • Posts: 895
  • Last login:September 24, 2023, 02:13:35 pm
  • Plenty of skills.. gaining experience..
Re: A Joust restoration.. this is going to take a while
« Reply #9 on: May 15, 2020, 09:34:38 pm »
Thanks guys - next week is the pandemic furlough unpaid vacation I get to spend my time in the shop week.....
My plan is to have the cabinet all back together with new plywood added and all primed up. 
We'll see how far I can get!
My Arcade Cabinet Build and other projects here:
Centipede, Joust, Joust Cocktail, Asteroids, Galaga, Ms. Pacman Cabaret, Defender, Space Invaders Cocktail
https://bperkins.wordpress.com/

Arroyo

  • Trade Count: (0)
  • Full Member
  • ***
  • Offline Offline
  • Posts: 1558
  • Last login:April 22, 2024, 04:24:05 pm
  • Budgets are boring
    • newforum.arcadecontrols.com/index.php/topic,156267.0.html
Re: A Joust restoration.. this is going to take a while
« Reply #10 on: May 15, 2020, 09:38:15 pm »
This will be an interesting one to follow (well all your work is), as there is a lot of restore work here.  I’ll be taking notes in the background .  That power supply is pretty.

bperkins01

  • Trade Count: (0)
  • Full Member
  • ***
  • Offline Offline
  • Posts: 895
  • Last login:September 24, 2023, 02:13:35 pm
  • Plenty of skills.. gaining experience..
Re: A Joust restoration.. this is going to take a while
« Reply #11 on: May 19, 2020, 08:19:26 am »
Working on the coin door panel


I decided to remove the lower 6" of this panel. Simplest way to do it is raise the saw blade just above the thickness of the plywood.


and saw a clean line right across the front.


It knocked off pretty easily with a mallet..  Clean up the bits and pieces, etc..


The old part - this wasn't repairable - if you wanted it to last.


 I missed some pictures at the router table - but I cut in the dados on the back of the replacement part to match the original.    I used thickened epoxy to glue this in place.  It fills gaps and won't come apart.  Which pretty much means this is permanent.  The important part on this repair is to know that plywood 40 years ago was actually 3/4" thick.  Today's plywood is 1/32" thinner..  If you look close - I'm clamping the thinner one from the bottom to push it up so that the face is flush.  The part you see is the important part.


From the top - the face is flush with the new part AND its perfectly flat.  A quick sand and repaint of the front and it will all be invisible.  I still need to cut the rabbets on the sides.  One other thing I did is I left it a little long.  Once I determine the actual overhang relative to the floor panel, I can cut it to length.  Its easier to have it a little bit too big and cut it down than to have it too small and try to add material. 

Blanks for the side panels. 


Originally I thought Joust was maple plywood - its actually birch.  Doesn't matter really - but its good information.


Here is how I'm adding the 12" back to the sides.  I've cut a couple biscuit slots for alignment.  After putting it all together, I didn't really need them.  But they are in there.  My bench is large and flat.  I put down a few rows of packing tape (clear and shiny just under the plywood edge) to prevent gluing it all to my bench.  Because the plywood needs to be perfectly flat - the board with the spacers is clamping it all down tight to the bench.


Add some thickened epoxy, a couple of biscuits and another long clamp to bring them together.  This is the same situation as the front where the new wood is 1/32" thinner than the old..  but it will be on the inside and the only part that will matter is near the bottom and it blend with the T-molding.


Everything held in place flat for epoxy to set up. 


Pulled the clamps off - the face is perfectly flat and flush. Exactly what I was shooting for.  I still need to cut the rabbets, fill some dings on the original black part, finish sand and it will be ready for a final paint job.


This one will be a little trickier because I need to cut dado's on the inside to match the original parts for the bottom and coin panel to fit back into place.  I purposely left the front edge over sized.  This eliminates any possibility of getting that front edge out of line.  I can cut it in place.

If for some reason I messed my cut across the bottom of the original side panel and it wasn't square -  I could have left this panel over sized on the front and the back and used the original sides for reference making it nearly impossible to mess up.  Its actually easier that way.

Now to do the second side..
My Arcade Cabinet Build and other projects here:
Centipede, Joust, Joust Cocktail, Asteroids, Galaga, Ms. Pacman Cabaret, Defender, Space Invaders Cocktail
https://bperkins.wordpress.com/

Mike A

  • Trade Count: (0)
  • Full Member
  • ***
  • Offline Offline
  • Posts: 5885
  • Last login:Yesterday at 01:39:09 pm
  • This plan is foolproof
Re: A Joust restoration.. this is going to take a while
« Reply #12 on: May 19, 2020, 08:36:54 am »
Nice write up.

The differences in plywood thickness threw me off the first time I tried to match stuff up. :cheers:

bperkins01

  • Trade Count: (0)
  • Full Member
  • ***
  • Offline Offline
  • Posts: 895
  • Last login:September 24, 2023, 02:13:35 pm
  • Plenty of skills.. gaining experience..
Re: A Joust restoration.. this is going to take a while
« Reply #13 on: May 19, 2020, 09:02:49 am »
Nice write up.

The differences in plywood thickness threw me off the first time I tried to match stuff up. :cheers:
Thank you kind sir :) 
My Arcade Cabinet Build and other projects here:
Centipede, Joust, Joust Cocktail, Asteroids, Galaga, Ms. Pacman Cabaret, Defender, Space Invaders Cocktail
https://bperkins.wordpress.com/

bperkins01

  • Trade Count: (0)
  • Full Member
  • ***
  • Offline Offline
  • Posts: 895
  • Last login:September 24, 2023, 02:13:35 pm
  • Plenty of skills.. gaining experience..
Re: A Joust restoration.. this is going to take a while
« Reply #14 on: May 20, 2020, 07:39:24 am »


This is the lower rear panel  The edge shown is the part that is next to the floor.  Considering how bad the sides and front were - this is in relatively decent shape.  The plywood is a little chewed up - but this part has a serial# stamped on it..  So..  I'll preserve it.


Skipping ahead - I used two boards that I covered in packing tape and cut some scrap for end stops.  Clamp it up tight and filled the edge with epoxy.  If you warm the epoxy with a torch (lightly brush by with the heat) the air bubbles will all pop and create a clear fill. 


A little sanding, primer and paint - it will be better than new.
My Arcade Cabinet Build and other projects here:
Centipede, Joust, Joust Cocktail, Asteroids, Galaga, Ms. Pacman Cabaret, Defender, Space Invaders Cocktail
https://bperkins.wordpress.com/

Mike A

  • Trade Count: (0)
  • Full Member
  • ***
  • Offline Offline
  • Posts: 5885
  • Last login:Yesterday at 01:39:09 pm
  • This plan is foolproof
Re: A Joust restoration.. this is going to take a while
« Reply #15 on: May 20, 2020, 07:43:11 am »
Quote
but this part has a serial# stamped on it..  So..  I'll preserve it.
:applaud:

Thank you.

Arroyo

  • Trade Count: (0)
  • Full Member
  • ***
  • Offline Offline
  • Posts: 1558
  • Last login:April 22, 2024, 04:24:05 pm
  • Budgets are boring
    • newforum.arcadecontrols.com/index.php/topic,156267.0.html
Re: A Joust restoration.. this is going to take a while
« Reply #16 on: May 20, 2020, 08:30:05 am »
I want to setup a tent in your shop and play.  Excellent work.

bperkins01

  • Trade Count: (0)
  • Full Member
  • ***
  • Offline Offline
  • Posts: 895
  • Last login:September 24, 2023, 02:13:35 pm
  • Plenty of skills.. gaining experience..
Re: A Joust restoration.. this is going to take a while
« Reply #17 on: May 20, 2020, 08:35:17 am »
(thanks Arroyo - the shop is open...  I bet you've always wanted a shot at a wood lathe.)

(rant on)
If anyone gets ONE takeaway from that last picture  - it should be this:

Bondo is for filling surface defects - 1/8" or less.  Epoxy is structural and strong.  They make boats, ski's, airplanes and corvettes with epoxy.. 
No one makes anything structural out of Bondo!

Learn to use epoxy.
(rant off)
My Arcade Cabinet Build and other projects here:
Centipede, Joust, Joust Cocktail, Asteroids, Galaga, Ms. Pacman Cabaret, Defender, Space Invaders Cocktail
https://bperkins.wordpress.com/

bperkins01

  • Trade Count: (0)
  • Full Member
  • ***
  • Offline Offline
  • Posts: 895
  • Last login:September 24, 2023, 02:13:35 pm
  • Plenty of skills.. gaining experience..
Re: A Joust restoration.. this is going to take a while
« Reply #18 on: May 21, 2020, 08:54:26 am »
My original plan was to just rebuild the control panel.  After spending time drawing it in Sketchup and re-looking at the original and trying to keep the original panel since it had a factory date stamp on the inside...  I'm going to repair it.

From my panel designs - I was able to create a DXF file that I send to an online laser cutter.  The steel replacement panel that came back is nearly perfect!  I have to tweak a couple of items and I can reproduce the steel plate at will for reasonable cost.


But what to do with the Swiss cheese I already had.  I've seen some hacked up repairs to this style of panel - but came up with something that will be pretty nice.   


The holes are all 1 3/16" - I see people trying to match the existing ones - which just means when you redrill for the buttons, you are compromising the plug you just made.  Drill it oversize - here is a 1 1/2" Forstner bit creating a clean hole for the plug.


Then head out to your local hardware store and get a 1 1/2" dowel.  Here it is with a stop block set to the thickness of the panel.


Clamp it down to some plastic and epoxy them in place.  The joystick openings are supposed to be square.  However the mounting plate and blind nuts make the round part not relevant.  This will get sanded smooth and cleaned up. 

The hard part is getting the adhesive off from the old overlay.  I've gone through every solvent I have and the best I can do is get it kinda gummy..  Paint stripper and a putty knife have worked the best - I give it a "C-"  But nothing else has worked. 


My Arcade Cabinet Build and other projects here:
Centipede, Joust, Joust Cocktail, Asteroids, Galaga, Ms. Pacman Cabaret, Defender, Space Invaders Cocktail
https://bperkins.wordpress.com/

Mike A

  • Trade Count: (0)
  • Full Member
  • ***
  • Offline Offline
  • Posts: 5885
  • Last login:Yesterday at 01:39:09 pm
  • This plan is foolproof
Re: A Joust restoration.. this is going to take a while
« Reply #19 on: May 21, 2020, 09:24:01 am »
Very nice. I like watching you save what you can of the original cab.

Arroyo

  • Trade Count: (0)
  • Full Member
  • ***
  • Offline Offline
  • Posts: 1558
  • Last login:April 22, 2024, 04:24:05 pm
  • Budgets are boring
    • newforum.arcadecontrols.com/index.php/topic,156267.0.html
Re: A Joust restoration.. this is going to take a while
« Reply #20 on: May 21, 2020, 09:32:50 am »
Good idea over drilling the hole size for a standard dowel :applaud:

For the adhesive, I take it an orbital sand with a high grit paper wouldn’t work?

bperkins01

  • Trade Count: (0)
  • Full Member
  • ***
  • Offline Offline
  • Posts: 895
  • Last login:September 24, 2023, 02:13:35 pm
  • Plenty of skills.. gaining experience..
Re: A Joust restoration.. this is going to take a while
« Reply #21 on: May 21, 2020, 09:53:22 am »
For the adhesive, I take it an orbital sand with a high grit paper wouldn’t work?

Gums it up immediately..  I got about 90% of it off the front face.  I need to paint strip the bottom face and scrape and then sand..  if I gum up 2-3 sheets vs 10.  that works :)
My Arcade Cabinet Build and other projects here:
Centipede, Joust, Joust Cocktail, Asteroids, Galaga, Ms. Pacman Cabaret, Defender, Space Invaders Cocktail
https://bperkins.wordpress.com/

bperkins01

  • Trade Count: (0)
  • Full Member
  • ***
  • Offline Offline
  • Posts: 895
  • Last login:September 24, 2023, 02:13:35 pm
  • Plenty of skills.. gaining experience..
Re: A Joust restoration.. this is going to take a while
« Reply #22 on: May 21, 2020, 10:06:20 am »
One more because I can:

I purposely over sized the panels replacing the shattered plywood at the bottoms of the side panels.   It's possible to pre-cut them to exact size, glue them in place w/o shifting and have them perfect. But its REALLY HARD to do!  If it's off a little - what do you do?  cut it off and try again?  Add more wood?  Its a pain..


One reason to have a track saw (or equivalent) is that you can cut the panel in place - to the exact size.  No thinking or planning.  In fact - if you are measuring - your working too hard.  Here the track is lined up on the front edge.  Clamp and cut!  No mistakes possible. (ok - none probable)


Perfect straight line - it will not have even the slightest hump in the T-molding.. I cut the front and back sides this way..  When I'm ready - the bottom will be cut to length too..  Almost no thinking involved.


No gaps!!


Here is a different issue:  The bottom is the outside face of the cabinet side.  Its perfectly flat/flush to take the side art.  However - because 40 year old plywood is 3/4" thick and modern plywood is 23/32" - the new stuff is too thin on the INSIDE face.  To fix this - I added two pieces of veneer to shim it up to the proper thickness.


Normally I would not care because its inside the cabinet and no one will see it..  Except...The coin door panel meets this area in the front.  If I didn't shim it to the same thickness, there would be a gap where the coin door panel meets the sides.  I only need to shim the front edge where the panel meets.


Two sheets of veneer, some yellow glue, plastic sheet to prevent gluing the clamping block in place and clamps.  When it comes apart it just needs to be sanded to shape and filled a bit.  Then I can finish the 3/8" dado's all around and prime everything for reassembly.
My Arcade Cabinet Build and other projects here:
Centipede, Joust, Joust Cocktail, Asteroids, Galaga, Ms. Pacman Cabaret, Defender, Space Invaders Cocktail
https://bperkins.wordpress.com/

Mike A

  • Trade Count: (0)
  • Full Member
  • ***
  • Offline Offline
  • Posts: 5885
  • Last login:Yesterday at 01:39:09 pm
  • This plan is foolproof
Re: A Joust restoration.. this is going to take a while
« Reply #23 on: May 21, 2020, 10:12:54 am »
Quote
No thinking or planning.

That is my specialty.

bperkins01

  • Trade Count: (0)
  • Full Member
  • ***
  • Offline Offline
  • Posts: 895
  • Last login:September 24, 2023, 02:13:35 pm
  • Plenty of skills.. gaining experience..
Re: A Joust restoration.. this is going to take a while
« Reply #24 on: June 18, 2020, 10:07:14 am »
Got sidetracked for a while... back at the Joust Cabinet..


Here is something I've never seen on an arcade cabinet restoration forum - So let me show you the old school way...  Once the veneer was in place - there was still a hump between the old front edge and the new veneer.

Now your thinking - why not just sand it?  You could.. but what happens is you end up rounding it all over and taking away too much material.  The end result usually is a concave surface right at the seam.

Above is a #4 hand plane - The shavings are set to thinner than paper.  The way it works is you are shaving just the high spot without cutting into the low areas.  This is how boards were flattened 100 years ago before all of the modern machinery..  Flattening this transition area took about 60-90 seconds..  A hand tool is much more effective than a power tool in this instance and does a better job..


The original veneer got damaged in the old area..  You would be inclined to fill with Bondo..  I would not..  It has zero strength.  Epoxy with wood filler is a much better way to repair this problem.  Epoxy is stronger than the wood it is holding together.  This area needed to be repaired because it would show where the coin panel meets the inside face.


A little out of sequence - Router with edge guide cutting the dado's.


Williams cabinets were pretty well constructed - here are replacement corner gussets.  The original's got destroyed during removal (as they should have)..


Not a huge fan of staples - but this is the appropriate use of them - gussets, glue and staples. 


Joust cabinet all glued up and clamped up... Need to cut the T-molding slots and add blocking for the feet.  One thing will change from the original:  The blocking/feet will protrude from the bottom at least the thickness of the foot - there is no way I'm letting the bottom of this cabinet get destroyed again.  Williams originally made is so the cabinet feet recessed - which destroyed the bottom of this in the first place.

My Arcade Cabinet Build and other projects here:
Centipede, Joust, Joust Cocktail, Asteroids, Galaga, Ms. Pacman Cabaret, Defender, Space Invaders Cocktail
https://bperkins.wordpress.com/

wp34

  • Trade Count: (+3)
  • Full Member
  • ***
  • Offline Offline
  • Posts: 4794
  • Last login:April 10, 2022, 09:48:19 pm
Re: A Joust restoration.. this is going to take a while
« Reply #25 on: June 18, 2020, 10:37:27 am »
Nice use--and explanation of the hand plane.   :cheers:

Arroyo

  • Trade Count: (0)
  • Full Member
  • ***
  • Offline Offline
  • Posts: 1558
  • Last login:April 22, 2024, 04:24:05 pm
  • Budgets are boring
    • newforum.arcadecontrols.com/index.php/topic,156267.0.html
Re: A Joust restoration.. this is going to take a while
« Reply #26 on: June 18, 2020, 10:40:12 am »
A hand tool is much more effective than a power tool in this instance and does a better job..

And next your gonna tell us that the horse and buggy was severely under appreciated

bperkins01

  • Trade Count: (0)
  • Full Member
  • ***
  • Offline Offline
  • Posts: 895
  • Last login:September 24, 2023, 02:13:35 pm
  • Plenty of skills.. gaining experience..
Re: A Joust restoration.. this is going to take a while
« Reply #27 on: June 18, 2020, 10:45:39 am »
A hand tool is much more effective than a power tool in this instance and does a better job..

And next your gonna tell us that the horse and buggy was severely under appreciated

Nooo.. it was fantastic compared to walking 10 miles into town... 

But in this hand plane example - I can't think of a power tool that I could do the same work in the same amount of time and have a better result (or the same result for that matter - a sander would be worse..)
My Arcade Cabinet Build and other projects here:
Centipede, Joust, Joust Cocktail, Asteroids, Galaga, Ms. Pacman Cabaret, Defender, Space Invaders Cocktail
https://bperkins.wordpress.com/

Arroyo

  • Trade Count: (0)
  • Full Member
  • ***
  • Offline Offline
  • Posts: 1558
  • Last login:April 22, 2024, 04:24:05 pm
  • Budgets are boring
    • newforum.arcadecontrols.com/index.php/topic,156267.0.html
Re: A Joust restoration.. this is going to take a while
« Reply #28 on: June 18, 2020, 10:48:40 am »
Just jealous I don’t know how to use those things.  Instead I would take 40min to setup some power tool cut and then get pissed when the guide slipped and I ate into the piece.  Happened more than once

bperkins01

  • Trade Count: (0)
  • Full Member
  • ***
  • Offline Offline
  • Posts: 895
  • Last login:September 24, 2023, 02:13:35 pm
  • Plenty of skills.. gaining experience..
Re: A Joust restoration.. this is going to take a while
« Reply #29 on: June 18, 2020, 10:59:17 am »
Just jealous I don’t know how to use those things.  Instead I would take 40min to setup some power tool cut and then get pissed when the guide slipped and I ate into the piece.  Happened more than once
The hardest part of using them is knowing how to sharpen the blade..  getting see-through shavings is not a given...  I'll show you :)
My Arcade Cabinet Build and other projects here:
Centipede, Joust, Joust Cocktail, Asteroids, Galaga, Ms. Pacman Cabaret, Defender, Space Invaders Cocktail
https://bperkins.wordpress.com/

jennifer

  • Trade Count: (0)
  • Full Member
  • ***
  • Offline Offline
  • Posts: 2895
  • Last login:August 11, 2023, 06:24:58 am
Re: A Joust restoration.. this is going to take a while
« Reply #30 on: June 18, 2020, 11:45:05 am »
A hand tool is much more effective than a power tool in this instance and does a better job..

And next your gonna tell us that the horse and buggy was severely under appreciated

Nooo.. it was fantastic compared to walking 10 miles into town... 

But in this hand plane example - I can't think of a power tool that I could do the same work in the same amount of time and have a better result (or the same result for that matter - a sander would be worse..)
Well a jointer, However they are incredibly dangerous in the wrong hands, and have sliced the fingers off most shop teachers...But get what you are saying, Nice work.

bperkins01

  • Trade Count: (0)
  • Full Member
  • ***
  • Offline Offline
  • Posts: 895
  • Last login:September 24, 2023, 02:13:35 pm
  • Plenty of skills.. gaining experience..
Re: A Joust restoration.. this is going to take a while
« Reply #31 on: June 18, 2020, 12:04:00 pm »
Well a jointer, However they are incredibly dangerous in the wrong hands, and have sliced the fingers off most shop teachers...But get what you are saying, Nice work.

Well - can't exactly pick up the entire cabinet and put this edge through a jointer.. 

A sander (or preferably sand paper on a hard sanding block) would have been my second choice BTW...
However - the hand plane is faster and cleaner than sanding.
My Arcade Cabinet Build and other projects here:
Centipede, Joust, Joust Cocktail, Asteroids, Galaga, Ms. Pacman Cabaret, Defender, Space Invaders Cocktail
https://bperkins.wordpress.com/

jennifer

  • Trade Count: (0)
  • Full Member
  • ***
  • Offline Offline
  • Posts: 2895
  • Last login:August 11, 2023, 06:24:58 am
Re: A Joust restoration.. this is going to take a while
« Reply #32 on: June 18, 2020, 05:32:28 pm »
Oh yes I see...For some reason I thought that was taken apart, yes the hand plane would be quite awesome for that then. 8)

bperkins01

  • Trade Count: (0)
  • Full Member
  • ***
  • Offline Offline
  • Posts: 895
  • Last login:September 24, 2023, 02:13:35 pm
  • Plenty of skills.. gaining experience..
Re: A Joust restoration.. this is going to take a while
« Reply #33 on: June 26, 2020, 08:39:21 am »
Small update today - but at least its a milestone..


I made the leg leveler blocking about 1/2" thicker than the original.  The screws in the blind nut go through pre-drilled holes into the bottom and there is a little glue to hold it.  Once the feet are in place - they will not be able to retract to the point where the plywood can hit the floor and get ruined.. again..


To line up the hole - hold the blocking in place from the inside with the leg leveler.  This made it easy to screw in too...


Here are the old shattered edges of the plywood.  They are actually worse than this looks...


Cabinet back on its feet for now - I have a few more dings to fill and then I can prime/paint.
My Arcade Cabinet Build and other projects here:
Centipede, Joust, Joust Cocktail, Asteroids, Galaga, Ms. Pacman Cabaret, Defender, Space Invaders Cocktail
https://bperkins.wordpress.com/

J_K_M_A_N

  • Trade Count: (0)
  • Full Member
  • ***
  • Offline Offline
  • Posts: 983
  • Last login:Yesterday at 10:43:54 pm
Re: A Joust restoration.. this is going to take a while
« Reply #34 on: June 26, 2020, 05:46:55 pm »
Wow! VERY good work. That looks amazing. I did not know something like that could be done.

J_K_M_A_N

Arroyo

  • Trade Count: (0)
  • Full Member
  • ***
  • Offline Offline
  • Posts: 1558
  • Last login:April 22, 2024, 04:24:05 pm
  • Budgets are boring
    • newforum.arcadecontrols.com/index.php/topic,156267.0.html
Re: A Joust restoration.. this is going to take a while
« Reply #35 on: June 26, 2020, 07:20:48 pm »
Well done Bobby.  There seems to be a majority consensus that arcade manufactures really screwed up by not putting more emphasis on the leg levelers to prevent cabs from ever touching the ground.  I know there are purists that would disagree, but that’s one place I would certainly call an upgrade from the original.

bperkins01

  • Trade Count: (0)
  • Full Member
  • ***
  • Offline Offline
  • Posts: 895
  • Last login:September 24, 2023, 02:13:35 pm
  • Plenty of skills.. gaining experience..
Re: A Joust restoration.. this is going to take a while
« Reply #36 on: June 26, 2020, 08:46:57 pm »
Thanks guys - it someone ever wants to put this on the ground - they can pull the levelers out..
But while I own it.....  no ruining the cabinet dammit!
My Arcade Cabinet Build and other projects here:
Centipede, Joust, Joust Cocktail, Asteroids, Galaga, Ms. Pacman Cabaret, Defender, Space Invaders Cocktail
https://bperkins.wordpress.com/

bperkins01

  • Trade Count: (0)
  • Full Member
  • ***
  • Offline Offline
  • Posts: 895
  • Last login:September 24, 2023, 02:13:35 pm
  • Plenty of skills.. gaining experience..
Re: A Joust restoration.. this is going to take a while
« Reply #37 on: July 12, 2020, 09:59:30 am »


I've showed this little trick in other posts, but it's worth repeating.  The rear edge of the plywood is banged up from 38 years of existence (brown patches at rear edge).  Many would leave it and the rest would use Bondo to fill in the voids.  I'll use Bondo under very limited circumstances - and this isn't one of them.  Bondo has no strength and this area will get hit again or it will flake off.  It is not an adhesive.

That said - I have a piece of wood which has packing tape on it (clear in this case) clamped flush and tight to the rear edge.  Epoxy will not stick to packing tape and it leaves a smooth surface.


Next I skimmed in 2-part epoxy thickened with wood flour (very fine saw dust).  All of the low areas get filled in with glue that is stronger that the wood.  Once it cures, pop off the form and finish sand.  Its a good way to clean up dinged edges.


Reached a milestone today - cabinet got its first coat of paint.  Here is the Kobalt HVLP spray guy I use.  I picked it up at Lowes years ago and it does a decent job. 

I used Rustoleum satin black oil-based paint reduced with a little mineral spirits.  The back doors got painted and my temporary spray booth is set up near the front of the shop.  HVLP is nice because there is very little over-spray.


Before...


And after...  Its still wet here.  The satin black tones down once it dries. The coin door panel needs a sand and second coat of paint to finish it off.

The top is made of MDF and has that pebble texture from years of humidity and absorption.  I'm not crazy about how it painted up.  There is a little too much texture for my liking.   I'm considering re-sanding, sealing and repainting.  A wood hardener/epoxy sealer will firm up the MDF so it will provide a more uniform surface.   Having to spray another coat of black makes this an easy decision.  Using the spray gun takes a little practice - but cleaning it is a real pain.  If I'm going to spray more black - I'll maximize the effort and get the top a bit nicer. Even though you will almost never see it..  I'll post some before and afters on the top once its done.

The sides will get a coat of primer, sanded and then a color coat of "Joust Brown". 

Stay tuned..
My Arcade Cabinet Build and other projects here:
Centipede, Joust, Joust Cocktail, Asteroids, Galaga, Ms. Pacman Cabaret, Defender, Space Invaders Cocktail
https://bperkins.wordpress.com/

Arroyo

  • Trade Count: (0)
  • Full Member
  • ***
  • Offline Offline
  • Posts: 1558
  • Last login:April 22, 2024, 04:24:05 pm
  • Budgets are boring
    • newforum.arcadecontrols.com/index.php/topic,156267.0.html
Re: A Joust restoration.. this is going to take a while
« Reply #38 on: July 12, 2020, 11:38:35 am »
Nice write up, very informative.  Curious how the HVLP helps prevent overspray?  I figured that had to do with how good of a taping job one did.

bperkins01

  • Trade Count: (0)
  • Full Member
  • ***
  • Offline Offline
  • Posts: 895
  • Last login:September 24, 2023, 02:13:35 pm
  • Plenty of skills.. gaining experience..
Re: A Joust restoration.. this is going to take a while
« Reply #39 on: July 12, 2020, 11:55:07 am »
Nice write up, very informative.  Curious how the HVLP helps prevent overspray?  I figured that had to do with how good of a taping job one did.
It doesn't really "prevent" as much as it doesn't create a cloud like high pressure guns.  I don't know all of the science behind it..
It somehow creates a high 'volume' of air under low pressure which atomizes the paint vs. using high pressure air to atomize it (which creates the cloud)

The pressure at the gun is ~29 psi..  it shoots the paint slower is the best way to describe it..
There is a lot of art to spraying and I'm a C+ spray painter at best..  getting the air, paint, pressure, viscosity all right is not that easy..  The guys who do it all the time  have a good feel for it.  When you need a color that's not in a can - then it can't be beat.  Black is obviously in a can..  But Joust Brown isn't...  So this is a bit of practice  ;)


My Arcade Cabinet Build and other projects here:
Centipede, Joust, Joust Cocktail, Asteroids, Galaga, Ms. Pacman Cabaret, Defender, Space Invaders Cocktail
https://bperkins.wordpress.com/

Gilrock

  • Trade Count: (0)
  • Full Member
  • ***
  • Offline Offline
  • Posts: 1049
  • Last login:March 30, 2024, 05:15:46 pm
Re: A Joust restoration.. this is going to take a while
« Reply #40 on: July 13, 2020, 10:46:29 am »
Nice.  I've been following along with your progress.  I've got a Joust scratch build going myself.  I'm just waiting on stuff I ordered from This Old Game back in February.  So I've got the sides painted the Chocolate Chip brown and its just wrapped in plastic sitting in the house waiting for the bezel and stencil before I can proceed.  The way I build it I need to rotate the cab face down and lay the bezel in there so I can use it as a guide to glue the supports behind it.  Just got notified the guy that makes the speaker grills for Joust is back at it so got that on order.

bperkins01

  • Trade Count: (0)
  • Full Member
  • ***
  • Offline Offline
  • Posts: 895
  • Last login:September 24, 2023, 02:13:35 pm
  • Plenty of skills.. gaining experience..
Re: A Joust restoration.. this is going to take a while
« Reply #41 on: July 13, 2020, 10:52:06 am »
Nice.  I've been following along with your progress.  I've got a Joust scratch build going myself.  I'm just waiting on stuff I ordered from This Old Game back in February.  So I've got the sides painted the Chocolate Chip brown and its just wrapped in plastic sitting in the house waiting for the bezel and stencil before I can proceed.  The way I build it I need to rotate the cab face down and lay the bezel in there so I can use it as a guide to glue the supports behind it.  Just got notified the guy that makes the speaker grills for Joust is back at it so got that on order.

Thanks - I'm waiting on T.O.G. too for Marquee, CPO, Stencils and Bezel.  They told me flat out Bezel will take forever since the industry has no glass availability.  The other stuff is in process I guess.  My order for the grill is already in (and for a Defender restore which is on deck for me).
At least I know for a fact there are two stencil orders!

My Arcade Cabinet Build and other projects here:
Centipede, Joust, Joust Cocktail, Asteroids, Galaga, Ms. Pacman Cabaret, Defender, Space Invaders Cocktail
https://bperkins.wordpress.com/

Gilrock

  • Trade Count: (0)
  • Full Member
  • ***
  • Offline Offline
  • Posts: 1049
  • Last login:March 30, 2024, 05:15:46 pm
Re: A Joust restoration.. this is going to take a while
« Reply #42 on: July 13, 2020, 05:11:52 pm »
Yes T.O.G. did ship my Marquee a few weeks ago.  I guess I'll end up paying for the Bezel 3 times.  I bought one from ArcadeShop back in January and I broke it trying to cut a 1/16" off of it with a wet saw.  I guess it was tempered glass and a bad idea...lol.  I made the mistake of designing the cab for the same dimension that worked for my Robotron bezel ( 24 5/16") but it turns out there is variation in the bezel width dimension and my Joust was 24 7/16".  Luckily I hadn't finished assembling the cab and only had to throw away the lower coin door piece I had cut and re-designed it to be 3/16" wider.

So any idea if the T.O.G. bezel is better quality than from ArcadeShop?  I'm tired of waiting so I just ordered another bezel from ArcadeShop this morning and I've already gotten the shipping notice.

bperkins01

  • Trade Count: (0)
  • Full Member
  • ***
  • Offline Offline
  • Posts: 895
  • Last login:September 24, 2023, 02:13:35 pm
  • Plenty of skills.. gaining experience..
Re: A Joust restoration.. this is going to take a while
« Reply #43 on: July 13, 2020, 05:22:46 pm »
hmm..  Your lucky.  I figured it they were making one marquee they would make all the open orders..  :(

My understanding with T.O.G is the only thing there is to complain about is the wait..  But I have no first hand experience (except for the wait) yet..
Stencil and CPO are the big holdups..  I can finish the restore w/o the Marquee and Bezel.

T.O.G. wouldn't take my Bezel order..

My Arcade Cabinet Build and other projects here:
Centipede, Joust, Joust Cocktail, Asteroids, Galaga, Ms. Pacman Cabaret, Defender, Space Invaders Cocktail
https://bperkins.wordpress.com/

bperkins01

  • Trade Count: (0)
  • Full Member
  • ***
  • Offline Offline
  • Posts: 895
  • Last login:September 24, 2023, 02:13:35 pm
  • Plenty of skills.. gaining experience..
Re: A Joust restoration.. this is going to take a while
« Reply #44 on: July 14, 2020, 07:51:35 am »


First coat of primer on - I'm using Kilz oil based primer.  The color coats are oil based and compatible.  It is also sandable.  For the stencils to work right - I need the surface as smooth as possible.  A sandable primer gets me there.


Kilz goes on pretty thick and leaves a fair amount of texture.  I sanded to 180 grit with the power sander to knock it down and finished by hand with a soft sanding block at 220 grit.  Power sanding is great - but you can't feel anything.  Hand sanding will let you know how smooth the surface is - you can feel it and hear it.  There were still some surface imperfections on the sides - a couple of scratches and dings.  Very very small - but just enough to skim on a little spackling compound. (yes the same Spackle used in drywall repairs)  For filling a scratch you could make with a thumbnail, on a flat surface then needs no structural strength over primer..  its good stuff.  It's not the same as drywall mud.  Its more dense but just as easily sandable.

I'll resand and reprime to make sure the surface has a consistent texture.


My next part is something I've wanted for a while - a media blaster.  This one cost less than $70.  But you need a big compressor.  One that can push 7+ CFM at 90 psi.  Mine is a 60 gallon, 11 cfm at 90 psi.  If you have a big compressor - then this is worth the money.  There is a less expensive version that does not include the siphon hose attachment.  Do NOT get that one.  I filled the little tank twice in about 10 minutes.. The siphon is a metal tube you stick into the media and it sucks it up a rubber hose. Surprisingly it works great.


My plan was to try to contain the blast media like a cabinet - but this really just made a sandstorm as it blew back up at me.  That said - it still worked reasonably well.  The media I'm using (coal slag) is single use so there is no reason to save it.  Next session will be freehand behind the shop where the coal dust can be raked into the grass.


The coin doors were pretty beat up and had some paint blistering with rust.  I could have kept going and got every last spec of paint off.  A small amount of hand sanding to make sure its all smooth is all that is really needed here.  This door has a little shape issue where it was likely kicked at some point..  I'm planning to press it out and fix any dings with Bondo (yes - using Bondo for its intended use - metal surface imperfection repair)


Same for the coin box door.  It cleaned up pretty nice.


Even carriage bolt heads were simple.  A quick shot and the rust was gone.

Stay tuned..
« Last Edit: July 14, 2020, 10:22:50 pm by bperkins01 »
My Arcade Cabinet Build and other projects here:
Centipede, Joust, Joust Cocktail, Asteroids, Galaga, Ms. Pacman Cabaret, Defender, Space Invaders Cocktail
https://bperkins.wordpress.com/

Mike A

  • Trade Count: (0)
  • Full Member
  • ***
  • Offline Offline
  • Posts: 5885
  • Last login:Yesterday at 01:39:09 pm
  • This plan is foolproof
Re: A Joust restoration.. this is going to take a while
« Reply #45 on: July 14, 2020, 07:56:33 am »
Quote
Power sanding is great - but you can't feel anything.  Hand sanding will let you know how smooth the surface is - you can feel it and hear it.

Yes.

I have a few blocks of wood of various sizes with a rubber mat glued to them. I think I used a kitchen drawer or tool drawer liner. It is amazing what you can hear and feel when you are not sanding with a hornet's nest.

Adios

  • Trade Count: (0)
  • Jr. Member
  • **
  • Offline Offline
  • Posts: 2
  • Last login:July 17, 2020, 02:56:55 am
Re: A Joust restoration.. this is going to take a while
« Reply #46 on: July 17, 2020, 02:03:52 am »
Nice Job! I ran across the restore looking for info on the Joust cocktail I'm restoring. Don't know if you ever got the glue off the control panel. I had the same problem with Robotron CP. I bought a (drill) spinning wheel gum eraser from Amazon it works wonders getting the glue residue off. I sanded it smooth after that.-FYI

bperkins01

  • Trade Count: (0)
  • Full Member
  • ***
  • Offline Offline
  • Posts: 895
  • Last login:September 24, 2023, 02:13:35 pm
  • Plenty of skills.. gaining experience..
Re: A Joust restoration.. this is going to take a while
« Reply #47 on: August 04, 2020, 09:01:45 am »
Progress being made during a vacation week..


Thankfully I was mistaken and the top panel was made of particle board and not MDF. (The edge looked like MDF..)  This looks terrible.  This technique should work on MDF too..  But all things being equal - particle board is better than MDF.


I used 80 grit paper and re-sanded it to as smooth as I could get.  The surface texture varies considerably, but at least it is flat.  I personally use a product called CPES that is an epoxy based wood stabilizer.  Two coats got brushed on to lock down the wood fibers.  There are many wood stabilizers available.  Very necessary to fix this up!  Once its set - sand again to smooth things up.


After that - 2 coats of Kilz oil based primer.  It's sandable, has some filler properties and evens out the texture.  I'm not trying to make a mirror - just an even texture like it was originally.


I knew the coin door panel was going to need a second coat based on how the first one went on.  Sand down the high spots and generally smooth out the surface.


After repainting, this is much better..  


Coin door panel ready to go as well..  Next up is sanding down the primed sides.  The original Joust had a very smooth base color coat for the side art stencil work. 

During all of this I've been working on the metal bits..


These are Joust upright and Joust cocktail parts mixed together.  They were pretty ratty.  Sandblasting and paint and they are good as new.


These cleaned up quite nicely.


And then this horrible thing happened..  Researched showed the hammered finish paint worked well for coin doors - it doesn't.  (I should have done a test piece - I know better)  Also - the can says black paint and it came out charcoal colored - its no where near black.  I can see this type of paint being useful for some stuff..  But not for this..

I'll be re-blasting these and repainting.  Digging a little deeper I found a video that shows a great way to get back the original textured finish.

More to come...


My Arcade Cabinet Build and other projects here:
Centipede, Joust, Joust Cocktail, Asteroids, Galaga, Ms. Pacman Cabaret, Defender, Space Invaders Cocktail
https://bperkins.wordpress.com/

Arroyo

  • Trade Count: (0)
  • Full Member
  • ***
  • Offline Offline
  • Posts: 1558
  • Last login:April 22, 2024, 04:24:05 pm
  • Budgets are boring
    • newforum.arcadecontrols.com/index.php/topic,156267.0.html
Re: A Joust restoration.. this is going to take a while
« Reply #48 on: August 04, 2020, 09:07:07 am »
Lookin good buddy.  Thanks for posting the details, it’ll be valuable for future me.

J_K_M_A_N

  • Trade Count: (0)
  • Full Member
  • ***
  • Offline Offline
  • Posts: 983
  • Last login:Yesterday at 10:43:54 pm
Re: A Joust restoration.. this is going to take a while
« Reply #49 on: August 04, 2020, 10:46:31 am »
I love this one. Joust is an awesome game. This thing is going to look phenomenal the way you are taking care of it.

J_K_M_A_N

bperkins01

  • Trade Count: (0)
  • Full Member
  • ***
  • Offline Offline
  • Posts: 895
  • Last login:September 24, 2023, 02:13:35 pm
  • Plenty of skills.. gaining experience..
Re: A Joust restoration.. this is going to take a while
« Reply #50 on: August 04, 2020, 11:47:16 am »
Lookin good buddy.  Thanks for posting the details, it’ll be valuable for future me.
I love this one. Joust is an awesome game. This thing is going to look phenomenal the way you are taking care of it.

J_K_M_A_N
Thanks guys - I'll keep them coming ;)
My Arcade Cabinet Build and other projects here:
Centipede, Joust, Joust Cocktail, Asteroids, Galaga, Ms. Pacman Cabaret, Defender, Space Invaders Cocktail
https://bperkins.wordpress.com/

bperkins01

  • Trade Count: (0)
  • Full Member
  • ***
  • Offline Offline
  • Posts: 895
  • Last login:September 24, 2023, 02:13:35 pm
  • Plenty of skills.. gaining experience..
Re: A Joust restoration.. this is going to take a while
« Reply #51 on: August 04, 2020, 05:08:40 pm »
Quick update:


Sandblasting fresh paint is WAY easier than sand blasting 40 year old paint.  It took me longer to drag the air hose and sand blasting stuff outside/inside than to remove that crappy hammered finish paint.  Maybe 10 minutes for 4 pieces.


Here is the completed door - its still wet so the gloss still has to tone down a bit.  I used Rustoleum Satin Black paint.  Spray in the base coat smooth as you normally would and wait 30 min or so for it to set up..  To get the texture - you have to spray a second coat - but EVER SO LIGHTLY press the button so the can barely spits out paint.  The little spitting gives the exact texture. Holding it just right requires a little practice.

I got the info from this video:  Bryan Kelly Coin Door Restoration

He did it with two different paints.  I just used Satin Black and it looks great.  All my surface metals that were textured get this going forward. 

Well worth the rework.
My Arcade Cabinet Build and other projects here:
Centipede, Joust, Joust Cocktail, Asteroids, Galaga, Ms. Pacman Cabaret, Defender, Space Invaders Cocktail
https://bperkins.wordpress.com/

Mike A

  • Trade Count: (0)
  • Full Member
  • ***
  • Offline Offline
  • Posts: 5885
  • Last login:Yesterday at 01:39:09 pm
  • This plan is foolproof
Re: A Joust restoration.. this is going to take a while
« Reply #52 on: August 04, 2020, 05:20:28 pm »
 :applaud:

bperkins01

  • Trade Count: (0)
  • Full Member
  • ***
  • Offline Offline
  • Posts: 895
  • Last login:September 24, 2023, 02:13:35 pm
  • Plenty of skills.. gaining experience..
Re: A Joust restoration.. this is going to take a while
« Reply #53 on: August 07, 2020, 09:45:18 am »


 :banghead: 4th times a charm if you include the crappy hammer finish paint.

Because no build thread is complete without sharing mistakes..  this cash box door put up a fight.  It was the first part I painted with the spatter/texture technique.  When you are barely pressing the nozzle and its spitting paint dots, a little puddle of paint builds up just below the nozzle on the rim of the can..  and then a big blob of paint falls on the part. 

I waited for it to dry and re-sand blasted it..

Then made the same exact mistake.. again..

Re-sand blasted it..

Have to make sure the paint can is never OVER the part..  spray from around the perimeter..


Since everything else was getting some touch-up.  These coin slot bezels got a quick hit of paint too..


The primer took some work to get smooth - this is before sanding. I used 80g with the power sander to knock down the high spots, then 120g to smooth it a bit more.  Finished with a soft sanding block and 180g by hand to make a perfectly smooth surface.  In total it took about 3 hours for both sides.  Best to sand in 'layers' to sneak up on the final finish vs. trying to get there all at once.


Here are the paint codes that I used.  The base color I was able to take from the original (which was under some other paint) and from someone else who did a restore.  It should be accurate.


First coat went on nice.  The HVLP gun worked well.  However I've done finish work for years and it still puts up a fight sometimes..  There were some thin spots, but there should have been since its supposed to go on thin and I planned on at least two coats.  I'm pretty sure the originals had a very smooth base coat so that the stencils would lay flat for the additional artwork.


The second coat.. not so much..  it orange-peeled on me.  I'll be hand sanding both sides with 120g to re-smooth it and likely 180g to remove the scratches.  I probably needed a little more mineral spirits in the paint.  Thought I had the mix right..   The upside is 3 coats of paint. 


« Last Edit: August 07, 2020, 09:48:38 am by bperkins01 »
My Arcade Cabinet Build and other projects here:
Centipede, Joust, Joust Cocktail, Asteroids, Galaga, Ms. Pacman Cabaret, Defender, Space Invaders Cocktail
https://bperkins.wordpress.com/

Arroyo

  • Trade Count: (0)
  • Full Member
  • ***
  • Offline Offline
  • Posts: 1558
  • Last login:April 22, 2024, 04:24:05 pm
  • Budgets are boring
    • newforum.arcadecontrols.com/index.php/topic,156267.0.html
Re: A Joust restoration.. this is going to take a while
« Reply #54 on: August 07, 2020, 10:30:29 am »
From the pictures all that paint work looks fantastic! Nice work.

Gilrock

  • Trade Count: (0)
  • Full Member
  • ***
  • Offline Offline
  • Posts: 1049
  • Last login:March 30, 2024, 05:15:46 pm
Re: A Joust restoration.. this is going to take a while
« Reply #55 on: August 07, 2020, 10:58:12 am »
...  It was the first part I painted with the spatter/texture technique.  When you are barely pressing the nozzle and its spitting paint dots,...

When I read the technique you use to recreate the old paint jobs it makes it sound like they were just rushing back then to get units out the door and now we try to duplicate the sloppy work...lol.

bperkins01

  • Trade Count: (0)
  • Full Member
  • ***
  • Offline Offline
  • Posts: 895
  • Last login:September 24, 2023, 02:13:35 pm
  • Plenty of skills.. gaining experience..
Re: A Joust restoration.. this is going to take a while
« Reply #56 on: August 07, 2020, 11:10:36 am »
...  It was the first part I painted with the spatter/texture technique.  When you are barely pressing the nozzle and its spitting paint dots,...

When I read the technique you use to recreate the old paint jobs it makes it sound like they were just rushing back then to get units out the door and now we try to duplicate the sloppy work...lol.
My bet is they went with the textured surface so the operators didn't have to clean sticky kid fingerprints off them all the time.  It would be simpler to just spray it once I think..  The other thing it covers up is if the first coat gets dust in it, the spatter coat hides all sins..   I like it actually.
My Arcade Cabinet Build and other projects here:
Centipede, Joust, Joust Cocktail, Asteroids, Galaga, Ms. Pacman Cabaret, Defender, Space Invaders Cocktail
https://bperkins.wordpress.com/

bperkins01

  • Trade Count: (0)
  • Full Member
  • ***
  • Offline Offline
  • Posts: 895
  • Last login:September 24, 2023, 02:13:35 pm
  • Plenty of skills.. gaining experience..
Re: A Joust restoration.. this is going to take a while
« Reply #57 on: August 26, 2020, 03:40:34 pm »
Small update - major milestone


At long last - the cabinet tear down and restore is complete.  Spraying paint after a long layoff is not like riding a bike, it doesn't come right back.  Its like playing your favorite game from when you were a kid..  after a few years you are just rusty but eventually it comes back.  5th coat was a charm.  The 4th one went on fine - there were just a couple of thin spots and some of the fine sanding scratches were visible through the paint.  I was going to leave it alone and the OCD in me said do it again..  Glad I did..  The feel for laying down a coat of just the right viscosity paint coupled with the right flow and coverage finally came together.

Black and brown are boring to look at..  But I can now start putting this cabinet back together while I wait on the stencils, CPO, etc..  Compared to the plywood shattered mess this once was - I'm pretty pleased with the outcome.
My Arcade Cabinet Build and other projects here:
Centipede, Joust, Joust Cocktail, Asteroids, Galaga, Ms. Pacman Cabaret, Defender, Space Invaders Cocktail
https://bperkins.wordpress.com/

Arroyo

  • Trade Count: (0)
  • Full Member
  • ***
  • Offline Offline
  • Posts: 1558
  • Last login:April 22, 2024, 04:24:05 pm
  • Budgets are boring
    • newforum.arcadecontrols.com/index.php/topic,156267.0.html
Re: A Joust restoration.. this is going to take a while
« Reply #58 on: August 26, 2020, 04:40:07 pm »
Sure looks purdy in the pics.  Guess I’ll know for sure soon enough

bperkins01

  • Trade Count: (0)
  • Full Member
  • ***
  • Offline Offline
  • Posts: 895
  • Last login:September 24, 2023, 02:13:35 pm
  • Plenty of skills.. gaining experience..
Re: A Joust restoration.. this is going to take a while
« Reply #59 on: August 26, 2020, 10:42:16 pm »
Sure looks purdy in the pics.  Guess I’ll know for sure soon enough
Thanks Arroyo - single digit days   :cheers:
My Arcade Cabinet Build and other projects here:
Centipede, Joust, Joust Cocktail, Asteroids, Galaga, Ms. Pacman Cabaret, Defender, Space Invaders Cocktail
https://bperkins.wordpress.com/

Arroyo

  • Trade Count: (0)
  • Full Member
  • ***
  • Offline Offline
  • Posts: 1558
  • Last login:April 22, 2024, 04:24:05 pm
  • Budgets are boring
    • newforum.arcadecontrols.com/index.php/topic,156267.0.html
Re: A Joust restoration.. this is going to take a while
« Reply #60 on: August 26, 2020, 11:18:16 pm »

HannibalAnthrope

  • Trade Count: (0)
  • Jr. Member
  • **
  • Offline Offline
  • Posts: 3
  • Last login:August 27, 2020, 10:00:25 am
  • I want to build my own arcade controls!
Re: A Joust restoration.. this is going to take a while
« Reply #61 on: August 27, 2020, 09:45:12 am »
Finding this thread has inspired me.... to abandon my dreams of building or restoring one myself someday! LOL  Sweet jeebus but that looks like a lotta work!  And you are obviously not skipping any details!

I can't help but wonder about the last owner.... what kinda person covers up a Joust ostrich with a picture of Jar-Jar Binks?!!?!?!! 
(yes, I know, but my first reaction was the above because in my memory it looked a bit more realistic back then lol)

bperkins01

  • Trade Count: (0)
  • Full Member
  • ***
  • Offline Offline
  • Posts: 895
  • Last login:September 24, 2023, 02:13:35 pm
  • Plenty of skills.. gaining experience..
Re: A Joust restoration.. this is going to take a while
« Reply #62 on: August 27, 2020, 11:25:45 am »
Finding this thread has inspired me.... to abandon my dreams of building or restoring one myself someday! LOL  Sweet jeebus but that looks like a lotta work!  And you are obviously not skipping any details!

I can't help but wonder about the last owner.... what kinda person covers up a Joust ostrich with a picture of Jar-Jar Binks?!!?!?!! 
(yes, I know, but my first reaction was the above because in my memory it looked a bit more realistic back then lol)

Thanks - if this was some crappy game like GoldenTee - it would have stayed dead..  But this Joust should be restored.  At least I have (almost) all the parts.
If I was restoring it for a living..  It wouldn't be viable..  too many hours.. 
My Arcade Cabinet Build and other projects here:
Centipede, Joust, Joust Cocktail, Asteroids, Galaga, Ms. Pacman Cabaret, Defender, Space Invaders Cocktail
https://bperkins.wordpress.com/

Howard_Casto

  • Idiot Police
  • Trade Count: (+1)
  • Full Member
  • ***
  • Offline Offline
  • Posts: 19400
  • Last login:April 21, 2024, 11:59:54 pm
  • Your Post's Soul is MINE!!! .......Again??
    • The Dragon King
Re: A Joust restoration.. this is going to take a while
« Reply #63 on: August 29, 2020, 03:16:42 pm »
Looking good man.  Remember, we don't do it for the money. 

bperkins01

  • Trade Count: (0)
  • Full Member
  • ***
  • Offline Offline
  • Posts: 895
  • Last login:September 24, 2023, 02:13:35 pm
  • Plenty of skills.. gaining experience..
Re: A Joust restoration.. this is going to take a while
« Reply #64 on: September 11, 2020, 09:46:03 am »


While sitting on endless Zoom sessions - I decided I'd polish up the coin eject buttons.  I found a good wet sandpaper selection on Amazon.  I started with 1000G to get a uniform scratch pattern.  Once you do that, sand through all the grits (1000, 1200, 1500, 2000, 2500, 3000, 5000).   I finished with some Novus compound.  It took 15-20 minutes to do both of them.  Before/after pic above.


Coin door back together.  Looks exacly like a 40 year old door again.  Except not all bent and hacked up.


The wiring harness had lots of black electrical tape on it.  There was no reason for it that I could see and online photos of the harness have no tape - as well as the cocktail had no tape..  So off with all the sticky tape.  The prior owner had put two full arcade systems in a single cabinet (what a hack job)..  Two harnesses, two power supplies, PCB's, swap-able control panels and he moved the video and speaker cables back and forth.  I'm guessing all the tape had something to do with that...


Joust upright - horizontal on the bench.  When I picked it up - I was told it worked..  It does.  I'll change the IDC connectors that carry the power to Molex connectors as a start.  The really do not stand the test of time.


Williams has a braided ground strap that is stapled around the entire inside of the cabinet.  I had removed all of it to replace the bottom sections.  It sat as a ball of braid for the past few months.  Pictures of the inside before I took it apart gave me enough information to restring it around the cab and get it stapled back in place as it was.  It was a bit of a puzzle at first.

Joust has two wiring harnesses - the power harness and the 'data' harness' as I call it.  The transformer and power harness are put back in place here.  Got all of the clips and screws back in their original spots. 


Got the cashbox door in place and the marquee lighting set up.  However - it didn't work.  I checked connections, used the meter to test voltages, blew a couple of (new) bulbs before learning all about florescent lighting. 


Here is the ballast - looks like a transformer - but its an inductor.  It limits current to the tube (as I understand it)  Turns out they die - my Defender cabinet has the exact same one and it had failed also - making diagnostics tricky since they were both reading 14 ohms ..  Not a dead short.. but enough to fry tubes.

Found the exact replacement on Amazon.  The replacement reads 32 ohms.  Problem solved.  Picked up a second one for Defender since I know its dead too.


Fast forward a few hours - got the power regulator, sound board and system board in place with the wiring harness back in its original spot.  Look close - LED reads '0'  a joy in any Williams owners eyes.  I'm using lithium AA batteries on the board.  They are designed not to leak.  So no board damage in this machines future.


Coin door and coin door switches going into position.  These are not traditional interlock switches that power down the cabinet - they are part of the "Service Switch" circuits.  One is on the door and one you get to from the cash box.  Normally there is a 3 button panel to do this stuff - but this setup is different.  It appears Joust didn't have the service panel buttons - even though the manual shows them. 


The speaker panel is a disaster.  The original plastic mesh was busted up so they added a metal speaker grill.  It also has an oval 8 ohm 10w speaker.  Glad I checked, the original has a 4 ohm (round) speaker.  Replacement on order.


Staples and bolts hacked up the opening.  I'm filling with epoxy filler here.  If I leave the bolt holes - the marquee lighting will show through.  Have to wait for the new speaker anyway..  I also noticed they used a black stain on this board.  It shows black under the marquee bracket, its long since faded to brown.  Once this is all smoothed out I'll re-stain it black.


Cabinet is cabled up, marquee working and I'm using the LCD temporarily until I get the CRT that it came with straightened out.  I'll post an update on that once I get to it.  Next will be getting the control panel back together as much as I can.  Eventually I'll be waiting on the CPO and side art stencils before I can make further progress. 

« Last Edit: September 11, 2020, 10:06:10 am by bperkins01 »
My Arcade Cabinet Build and other projects here:
Centipede, Joust, Joust Cocktail, Asteroids, Galaga, Ms. Pacman Cabaret, Defender, Space Invaders Cocktail
https://bperkins.wordpress.com/

Arroyo

  • Trade Count: (0)
  • Full Member
  • ***
  • Offline Offline
  • Posts: 1558
  • Last login:April 22, 2024, 04:24:05 pm
  • Budgets are boring
    • newforum.arcadecontrols.com/index.php/topic,156267.0.html
Re: A Joust restoration.. this is going to take a while
« Reply #65 on: September 11, 2020, 10:04:33 am »
:applaud:  looks fantastic.

J_K_M_A_N

  • Trade Count: (0)
  • Full Member
  • ***
  • Offline Offline
  • Posts: 983
  • Last login:Yesterday at 10:43:54 pm
Re: A Joust restoration.. this is going to take a while
« Reply #66 on: September 11, 2020, 12:37:56 pm »
What a great Friday update! I really like what you are doing to this cab. It is looking awesome. I can't wait to see the final product. It will look like it is fresh off the assembly line, I'm sure (more likely, better).

J_K_M_A_N

bperkins01

  • Trade Count: (0)
  • Full Member
  • ***
  • Offline Offline
  • Posts: 895
  • Last login:September 24, 2023, 02:13:35 pm
  • Plenty of skills.. gaining experience..
Re: A Joust restoration.. this is going to take a while
« Reply #67 on: September 11, 2020, 12:45:24 pm »
What a great Friday update! I really like what you are doing to this cab. It is looking awesome. I can't wait to see the final product. It will look like it is fresh off the assembly line, I'm sure (more likely, better).

J_K_M_A_N
:applaud:  looks fantastic.

Thanks guys - they are way easier to put together than take apart.  I'm happy with it so far. :)
My Arcade Cabinet Build and other projects here:
Centipede, Joust, Joust Cocktail, Asteroids, Galaga, Ms. Pacman Cabaret, Defender, Space Invaders Cocktail
https://bperkins.wordpress.com/

Howard_Casto

  • Idiot Police
  • Trade Count: (+1)
  • Full Member
  • ***
  • Offline Offline
  • Posts: 19400
  • Last login:April 21, 2024, 11:59:54 pm
  • Your Post's Soul is MINE!!! .......Again??
    • The Dragon King
Re: A Joust restoration.. this is going to take a while
« Reply #68 on: September 14, 2020, 12:48:03 am »
Looks like it's made out of chocolate.  Is it made out of chocolate?  If so I'm gonna eat your cabinet.

bperkins01

  • Trade Count: (0)
  • Full Member
  • ***
  • Offline Offline
  • Posts: 895
  • Last login:September 24, 2023, 02:13:35 pm
  • Plenty of skills.. gaining experience..
Re: A Joust restoration.. this is going to take a while
« Reply #69 on: September 18, 2020, 01:34:52 pm »


Under the marquee bracket - the original stain was black.  They used cheap oil stain back in 1983.  Updated it to better oil stain here in 2020.  Its never seen anyway.


That oval speaker was all wrong.  I got the current replacement for the original part.  Added a new speaker wire since the original was hacked, put everything back the way it was and put on a Joust replacement speaker grill from a guy on KLOV who has been reproducing them.   Nice metal grill will last a long time.


Speaker back in place. 

I connected it all up - very faint sound.   Tested the sound board and was getting confusing info from it.  But it was certainly in the amplifier circuit since all the sounds worked, etc.  Replaced the TDA2002 amp.  Same thing.  Pulled a cap that could have been the issue.  Same thing.  Looked and the schematic for connections - knew I had them right.  Looked at my Defender cabinet... had them wrong.

Twice on this restore I've been bitten by the same mistake - If a connector is supposed to be keyed and its missing the key - ADD THE KEY TO IT! The speaker and potentiometer for volume are side by side with 4 pin Molex connectors.  The volume control should have been keyed and it wasn't.  So I looked right at them a number of times and had them backwards.

Oath:  I hear-by promise to always add keys to Molex connectors under any circumstances so that they can never be transposed again..

Sound works great - all sounds present and accounted for.


Turns out my Joust is completely missing the service switches and the bracket.  Whoever removed the original also removed the wiring on the coin door including the pins in the Molex connector, so no loose wires as a clue.  My Defender has the exact switch / bracket.  I looked around and realized there may be a market for these - they are not all that easy to come by.  I have 30 brackets showing up in a week or two. Once I figure out how to get the sticker reproduced - I can get the actual replacement service switches and sell a few of these things.  It's going to be a perfect match.


Which brings me back to the control panel.  I set this aside a while back - but its the last part standing.  First I cleaned up and flattened the area that's below the metal plate now that the swiss cheese has been removed.  I also removed the last of the CPO adhesive that is incredibly difficult to get off.  But its off.


Another test fit of the plate to make sure it sits flat.


I broke out my longboard from my boatbuilding days.  Its just a long flat sanding block.  Its useful in that you can't sand humps into your work.  It cuts the high spots while leaving the low spots alone.  You can't do that by hand or with a small sander over a large area.  Its most important around the front curves since any high/low areas along that part will result in the CPO having puckers and hollows that may show.


There were a few spots I wasn't quite sure I liked - so I skimmed on a thin filler coat of thickened epoxy to run over with using the longboard one more time.  After this is finished I can attach the sheet metal face, drill holes and wait for the CPO to show up.  I may put all of the controls/hardware in place  and test it since the CP harness is a mess and needs some repair.  It will be easy to remove if needed.

« Last Edit: September 19, 2020, 08:28:02 am by bperkins01 »
My Arcade Cabinet Build and other projects here:
Centipede, Joust, Joust Cocktail, Asteroids, Galaga, Ms. Pacman Cabaret, Defender, Space Invaders Cocktail
https://bperkins.wordpress.com/

J_K_M_A_N

  • Trade Count: (0)
  • Full Member
  • ***
  • Offline Offline
  • Posts: 983
  • Last login:Yesterday at 10:43:54 pm
Re: A Joust restoration.. this is going to take a while
« Reply #70 on: September 18, 2020, 02:51:40 pm »
I have exactly one bookmark and this is it. I love this thread. It is looking awesome. Great job on the speaker.

J_K_M_A_N

bperkins01

  • Trade Count: (0)
  • Full Member
  • ***
  • Offline Offline
  • Posts: 895
  • Last login:September 24, 2023, 02:13:35 pm
  • Plenty of skills.. gaining experience..
Re: A Joust restoration.. this is going to take a while
« Reply #71 on: September 18, 2020, 05:51:00 pm »
Looks like it's made out of chocolate.  Is it made out of chocolate?  If so I'm gonna eat your cabinet.

hmmmmm... chocolate..  ahhgggg..
The pics seem to come out with a different shade every time.  I hope its close to the real thing.. Should be.

I have exactly one bookmark and this is it. I love this thread. It is looking awesome. Great job on the speaker.

J_K_M_A_N

Thanks - I hope you are getting some good info from it. :)
My Arcade Cabinet Build and other projects here:
Centipede, Joust, Joust Cocktail, Asteroids, Galaga, Ms. Pacman Cabaret, Defender, Space Invaders Cocktail
https://bperkins.wordpress.com/

bperkins01

  • Trade Count: (0)
  • Full Member
  • ***
  • Offline Offline
  • Posts: 895
  • Last login:September 24, 2023, 02:13:35 pm
  • Plenty of skills.. gaining experience..
Re: A Joust restoration.. this is going to take a while
« Reply #72 on: September 22, 2020, 10:42:31 pm »


I long boarded the filler one last time with the faceplate in place.  The result is a perfectly fair finish with no humps and no possibility of imprinting at the seam.  The CPO material is pretty thick, I don't expect it to show the screws.  If I'm even slightly worried they will imprint, they will get a quick skim of Bondo.  But they were not filled originally.


 This next step will take a little explanation.  But essentially I need to drill a 5/8" hole, centered inside a 1 1/8" hole, which is delineated by a 1 3/16" hole - got that?  I'm certain there are a dozen ways to do this - but I decided to make a tool to make it stupid simple, no measuring, no thinking, no tools needed other that a drill press. Because I have a lathe - this is simple. 

Step 1 - I mounted a 1" dowel in the lathe and drilled a hole in its center using the tail stock and a drill bit (not shown)


Here is a small square of 1/2" thick acrylic.  I have double stick tape on the back holding it to the dowel and a screw through the front to hold the block to the dowel.  It needs to be held tight to turn the square into a circle.


Here is the drill centering tool turned down to 1 1/8".  All those shavings are the square part that is now gone.  Now it safe to remove the screw (in fact - its necessary)  I have the double stick tape there to hold on this disk.


Here is a 5/8" Forstner bit mounted on the tailstock.  The lathe spins the blank and the bit is stationary.  I slowly crank it in to drill the hole - perfectly centered in the blank.


All to make this little acrylic donut.  All in this took under 20 minutes - but why?


Here is the control panel - steel plate in place.  The holes in the steel are exactly where the originals were.  All I need to do is drill 1 1/8" holes with a centered 5/8" hole for the buttons - right?  If you miss by a little on the small hole - the button won't go in..  or.. you can drill bigger (sloppy) center holes..  or measure and find a center point for each button hole, drill a chaser hole.. There are many ways..  But this way provides (for me) a fast, simple, no measure way to do it. 

Clamp the CP to the drill press and drill all of the large holes centered in the metal cutouts 1/4" deep.


The metal hole is used for alignment and is just slightly larger than the drill bit. Repeat for all the holes.


After all the large holes are done - go back with the centering tool - use the small bit and drill all the way through the panel. 


Perfect every time.


Buttons are getting a test fit.  The new ones have a little flashing left over under the rim.  They need to be trimmed with a razor blade to sit flush to the surface.


My harness was a disaster.  More crappy black tape, Player 2 start is a micro switch and all around ratty wiring from the original panel hackery.  The diagram was helpful - but it was more difficult that I thought to get a picture of a real CP inside of a Joust.  I finally found a restoration video that had a clear view that I screen captured and printed as a reference.


Got all of the wire resorted.  Had to add a few wires that are not color matched to the original (unfortunately).  Waiting on a Player 2 - Start leaf switch that I didn't realize I needed.  I also need to get some of the braided ground strap that goes all over Williams cabinets for the CP.  There is supposed to be some in there.


The good news is it works great!  The sticks have a little play in them - but its not unreasonable.  My CPO from This Old Game will be here this week so I can finish the Control Panel.  May need to wipe it down though..  I'm already getting my greasy hands all over it.


My Arcade Cabinet Build and other projects here:
Centipede, Joust, Joust Cocktail, Asteroids, Galaga, Ms. Pacman Cabaret, Defender, Space Invaders Cocktail
https://bperkins.wordpress.com/

Arroyo

  • Trade Count: (0)
  • Full Member
  • ***
  • Offline Offline
  • Posts: 1558
  • Last login:April 22, 2024, 04:24:05 pm
  • Budgets are boring
    • newforum.arcadecontrols.com/index.php/topic,156267.0.html
Re: A Joust restoration.. this is going to take a while
« Reply #73 on: September 22, 2020, 10:51:43 pm »
Love the curves on that panel.  You are restoring nearly every piece on this machine, and it’s very fun to watch :applaud:

Mike A

  • Trade Count: (0)
  • Full Member
  • ***
  • Offline Offline
  • Posts: 5885
  • Last login:Yesterday at 01:39:09 pm
  • This plan is foolproof
Re: A Joust restoration.. this is going to take a while
« Reply #74 on: September 23, 2020, 05:44:20 am »
I'm such a hack.

Nice work on this.

bperkins01

  • Trade Count: (0)
  • Full Member
  • ***
  • Offline Offline
  • Posts: 895
  • Last login:September 24, 2023, 02:13:35 pm
  • Plenty of skills.. gaining experience..
Re: A Joust restoration.. this is going to take a while
« Reply #75 on: September 23, 2020, 07:42:31 am »
I'm such a hack.

Nice work on this.
Love the curves on that panel.  You are restoring nearly every piece on this machine, and it’s very fun to watch :applaud:

Thanks guys :)  I learn something new on every part I work on.
My Arcade Cabinet Build and other projects here:
Centipede, Joust, Joust Cocktail, Asteroids, Galaga, Ms. Pacman Cabaret, Defender, Space Invaders Cocktail
https://bperkins.wordpress.com/

Laythe

  • Trade Count: (0)
  • Full Member
  • ***
  • Offline Offline
  • Posts: 724
  • Last login:March 31, 2024, 02:52:10 am
  • "-smurfing- delivers." - Yots
    • forum.arcadecontrols.com/index.php/topic,149109.0.html
Re: A Joust restoration.. this is going to take a while
« Reply #76 on: September 28, 2020, 03:50:12 am »
I love to see a dedicated Joust being treated right. 

I like your approaches to things and your execution.  Seriously, I would let you fab parts for Shapeshifter.   :cheers:   (Not that it needs any that I need to farm out - just, as a statement of my approval.)


bperkins01

  • Trade Count: (0)
  • Full Member
  • ***
  • Offline Offline
  • Posts: 895
  • Last login:September 24, 2023, 02:13:35 pm
  • Plenty of skills.. gaining experience..
Re: A Joust restoration.. this is going to take a while
« Reply #77 on: September 28, 2020, 08:33:38 am »
I love to see a dedicated Joust being treated right. 

I like your approaches to things and your execution.  Seriously, I would let you fab parts for Shapeshifter.   :cheers:   (Not that it needs any that I need to farm out - just, as a statement of my approval.)

Thanks Laythe - Watching your work - high praise :)  Much appreciated..  and timely!  Some metal work.  If there is a way to get a tighter bend - let me know.

Back to the service switch:


Metal parts came in – perfect match in every way. Laser cutting is ridiculously clean and accurate.


I picked up a bench vice finger brake to put the bends in the metal.  For the price it works great.  The original's corners are very tight - I'm certain they had production machinery to produce these. Mine are as tight as I can get them with the tools I have.


The test that let me know these are identical – just stack the old and new. For something that is never seen inside the machine – no one will never know its not original. The Williams Service Switch restoration design team (Arroyo and MikeA) have been working with me for the replacement decal.


Here is an original Defender decal and an early revision of the replacement.  Once its done - I'll have replacement Williams coin door service switches available for sale for anyone doing restorations.  They were not easy to find which is what started this sub-project in the first place. 

« Last Edit: September 28, 2020, 08:36:59 am by bperkins01 »
My Arcade Cabinet Build and other projects here:
Centipede, Joust, Joust Cocktail, Asteroids, Galaga, Ms. Pacman Cabaret, Defender, Space Invaders Cocktail
https://bperkins.wordpress.com/

bperkins01

  • Trade Count: (0)
  • Full Member
  • ***
  • Offline Offline
  • Posts: 895
  • Last login:September 24, 2023, 02:13:35 pm
  • Plenty of skills.. gaining experience..
Re: A Joust restoration.. this is going to take a while
« Reply #78 on: November 01, 2020, 09:57:25 pm »
Been a while since my last update.  Got sidetracked on some other stuff.

These Williams service switch replacements are done.


Exact replacement for the originals and indistinguishable from them.  The last steps were getting the stickers reproduced and cut.  I was also able to source the exact replacement switches.  If you have a restoration and need this switch/bracket/sticker assemble.  Let me know.  $40 shipping included.

 
My Arcade Cabinet Build and other projects here:
Centipede, Joust, Joust Cocktail, Asteroids, Galaga, Ms. Pacman Cabaret, Defender, Space Invaders Cocktail
https://bperkins.wordpress.com/

bperkins01

  • Trade Count: (0)
  • Full Member
  • ***
  • Offline Offline
  • Posts: 895
  • Last login:September 24, 2023, 02:13:35 pm
  • Plenty of skills.. gaining experience..
Re: A Joust restoration.. this is going to take a while
« Reply #79 on: November 01, 2020, 10:06:28 pm »


I’ve been working on another restore for the past few weeks but got to a point where I could get back on my Joust. The CPO from This Old Game is absolute top quality. I’ve watched videos and have seen people struggle to put these on. You can make it easy on yourself if you try this way.

First – clean the control panel with naptha or acetone. Something to get any residual oils off the surface.

As seen above – line up the CPO to the exact spot along the top edge and backlight any button holes to make sure they are in the correct spot. Use some wide tape and hold it in place. Double and triple check to make sure you have it in the right spot because you are not likely to get a second chance. I then use spring clamps to make sure nothing shifts. You want to make sure that it wraps all the way around without wandering off course. It should be centered and square all the way around from top to bottom.


With the tape and spring clamps in place, roll back the top edge and peel off the backing material. Cut off the top 1-2 inches of the backing. I use gloves for these ‘sticky’ steps for a couple of reasons. First – you will not leave fingerprints / skin oil on the adhesive backing! It will stick better. Second – you won’t be afraid to grab the CPO where you need to because the gloves won’t cause any issues.


Use a plastic spreader and stick the CPO down working from the center to the edges. You want to make sure there are no bubbles and it lays flat. Try to keep the CPO sides off the control panel so that it is rolling down into position from center to edge. If you work from the center out you have the best chance of not having issues.


Once the top part is done, roll the CPO back and peel down a comfortable amount of backing and cut it off (I do 4-6 inches). Pictured here is the CPO rolled back before sticking it to the lower section of the control panel. You want to slowly use the spreader and press from the center out and continue down the overlay making sure there are no wrinkles or bubbles.


Using the heat gun to warm the CPO will assist in making it pliable for bending around the corner. Set the temp on the gun and test the temperature on your forearm. If its too hot – turn it down! You want hot hair drier temps – not melt your CPO temps.. At this point you can pull and press the CPO with your gloved hand. Center to edge, top to bottom. Follow up with the spreader to make sure it all gets pressed into place.


Last section – peel it off and more of the same. You can pre-warm the CPO while it has the backing on if you find its helping.


Once its on, backlighting each hole will help you to trim out the buttons. Use a brand new blade in the Exacto.


Buttons and trim strip in place.


Nice control panel overlay. Colors are fantastic.


My Arcade Cabinet Build and other projects here:
Centipede, Joust, Joust Cocktail, Asteroids, Galaga, Ms. Pacman Cabaret, Defender, Space Invaders Cocktail
https://bperkins.wordpress.com/

Arroyo

  • Trade Count: (0)
  • Full Member
  • ***
  • Offline Offline
  • Posts: 1558
  • Last login:April 22, 2024, 04:24:05 pm
  • Budgets are boring
    • newforum.arcadecontrols.com/index.php/topic,156267.0.html
Re: A Joust restoration.. this is going to take a while
« Reply #80 on: November 02, 2020, 08:08:52 am »
Beautiful work.   But man that service switch  ;D

bperkins01

  • Trade Count: (0)
  • Full Member
  • ***
  • Offline Offline
  • Posts: 895
  • Last login:September 24, 2023, 02:13:35 pm
  • Plenty of skills.. gaining experience..
Re: A Joust restoration.. this is going to take a while
« Reply #81 on: November 02, 2020, 09:15:26 am »
Beautiful work.   But man that service switch  ;D

Yes - full 100% credit to Mr. Arroyo for a fantastic reproduction of the original sticker.  Without it.. this is an ordinary non-authentic looking replica.
 :applaud: :applaud: :applaud:
My Arcade Cabinet Build and other projects here:
Centipede, Joust, Joust Cocktail, Asteroids, Galaga, Ms. Pacman Cabaret, Defender, Space Invaders Cocktail
https://bperkins.wordpress.com/

Arroyo

  • Trade Count: (0)
  • Full Member
  • ***
  • Offline Offline
  • Posts: 1558
  • Last login:April 22, 2024, 04:24:05 pm
  • Budgets are boring
    • newforum.arcadecontrols.com/index.php/topic,156267.0.html
Re: A Joust restoration.. this is going to take a while
« Reply #82 on: November 02, 2020, 09:21:32 am »
Ha, couple of hours of my time.  You’ve done (and continue to do) all the hard work.  Looks fantastic.


Sent from my iPhone using Tapatalk

bperkins01

  • Trade Count: (0)
  • Full Member
  • ***
  • Offline Offline
  • Posts: 895
  • Last login:September 24, 2023, 02:13:35 pm
  • Plenty of skills.. gaining experience..
Re: A Joust restoration.. this is going to take a while
« Reply #83 on: November 20, 2020, 11:49:01 am »
Side Art Stenciling


I’m starting with a very smooth base coat for the stencils. This base coat has been on for over a month because I have been working on a few other projects. Its quite hard/cured at this point.

My stencils from This Old Game are very high quality. I let them lay flat on the bench a few days to relax from being rolled up. Before starting I wiped the sides with alcohol to clean the surface and used compressed air to eliminate any bits of dust as much as possible.


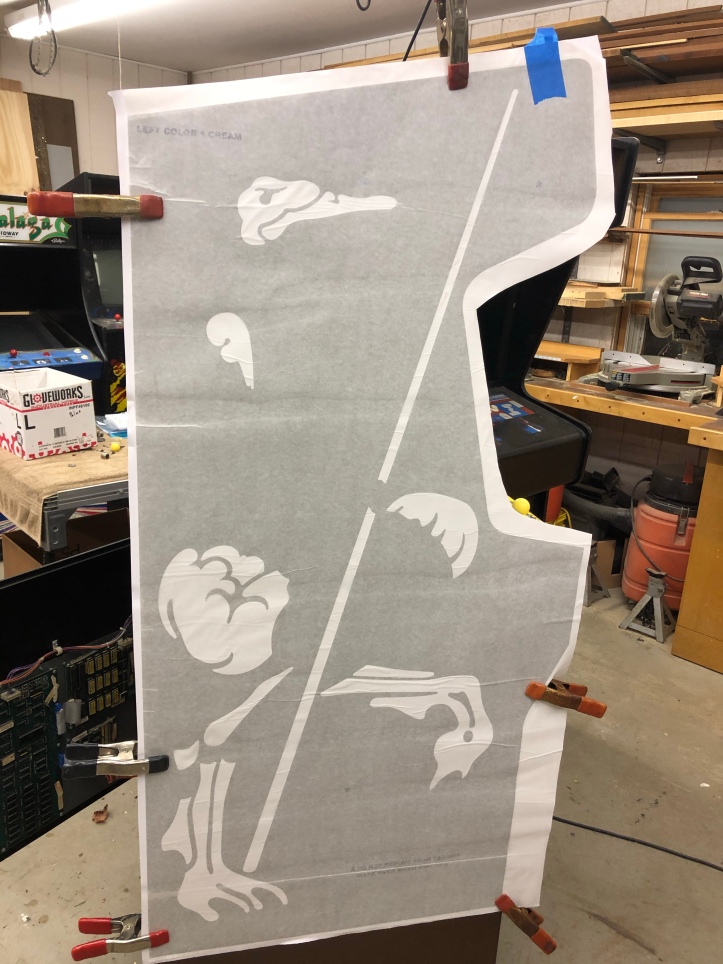
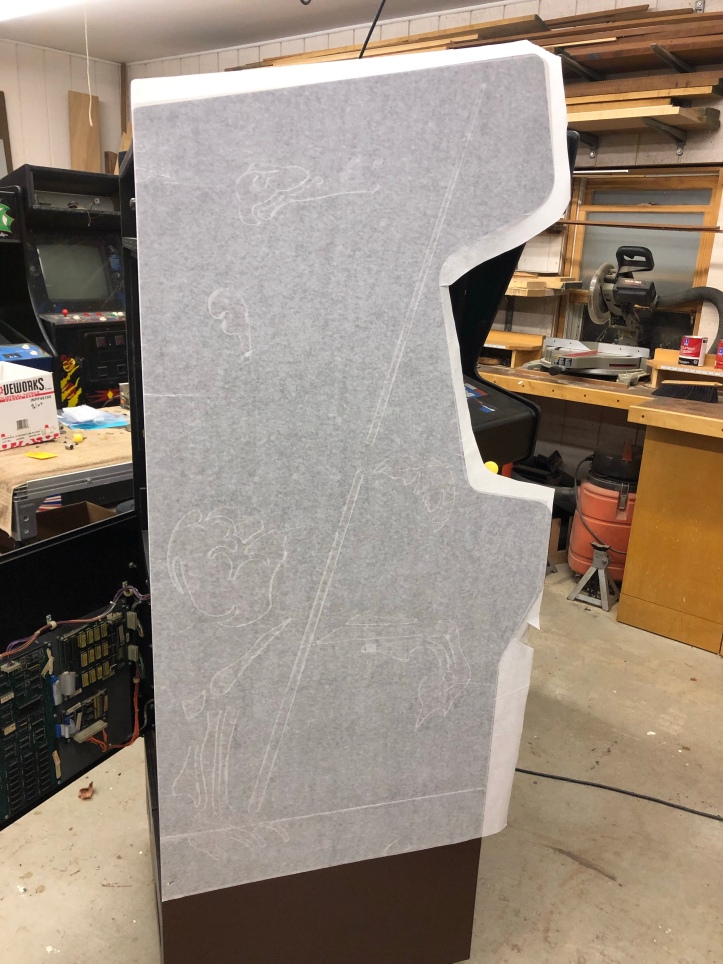
Getting the stencil lined up takes a little messing around. I tried tape, but the stencil itself is too heavy for everyday painters tape and it kept shifting and falling. Spring clamps did the best job holding it in place while I stretched and positioned the first side. On this one – I found the best way to align the stencil was to get the back edge even with the back of the cabinet and find a sweet spot for the top of the cabinet. The stencil doesn’t exactly match the top – but I’m certain these cabinets have plenty of variation in them. The important part is the back edge being in line with the back of the cabinet. The lower front will line up perfectly as a result and everything else will fall into place. Backlighting around the edge with a flashlight will help determine how close you are. Keep pulling the stencil tight and re-clamping until you find the right spot.


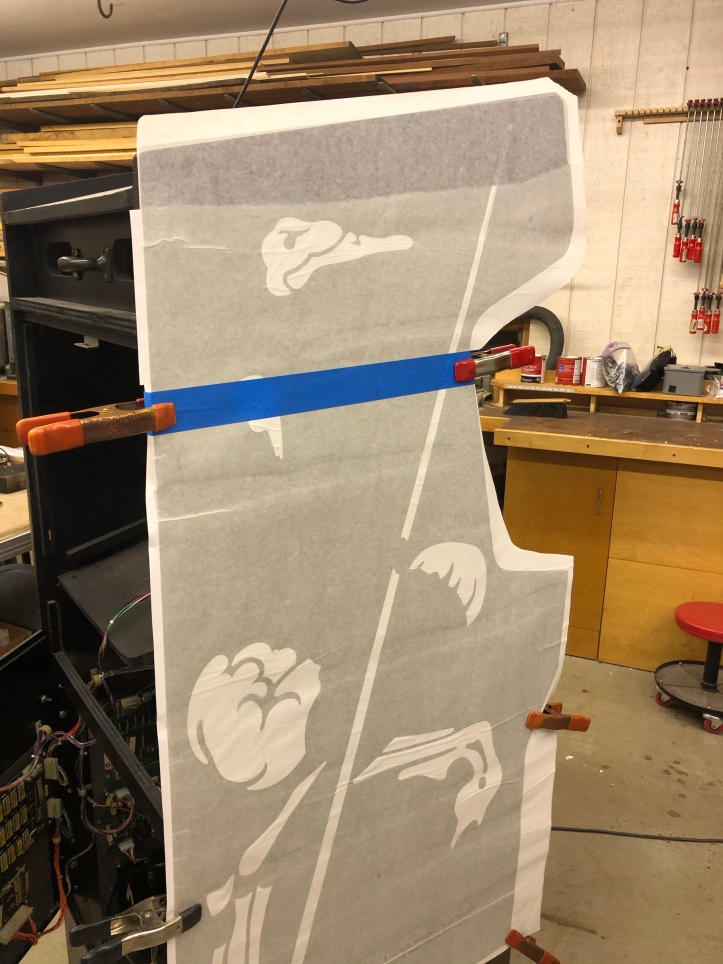
Here I did use a wide strip of painters tape and wrapped it around the narrow section at the monitor to assist in keeping the stencil in place. I let the top roll down and I cut off about 3 inches of the backer and using a plastic spreader, pressed the stencil in place working upward and from the center to the edges. You are not going to get every tiny bubble out at this point, and you won’t need to. You do want to eliminate all the wrinkles and get the sheet stuck down evenly. Careful with the scissors – I left little bits of paper on the sticky part of the stencil. It had no effect on the cutouts, but I’m using a razor the next time.


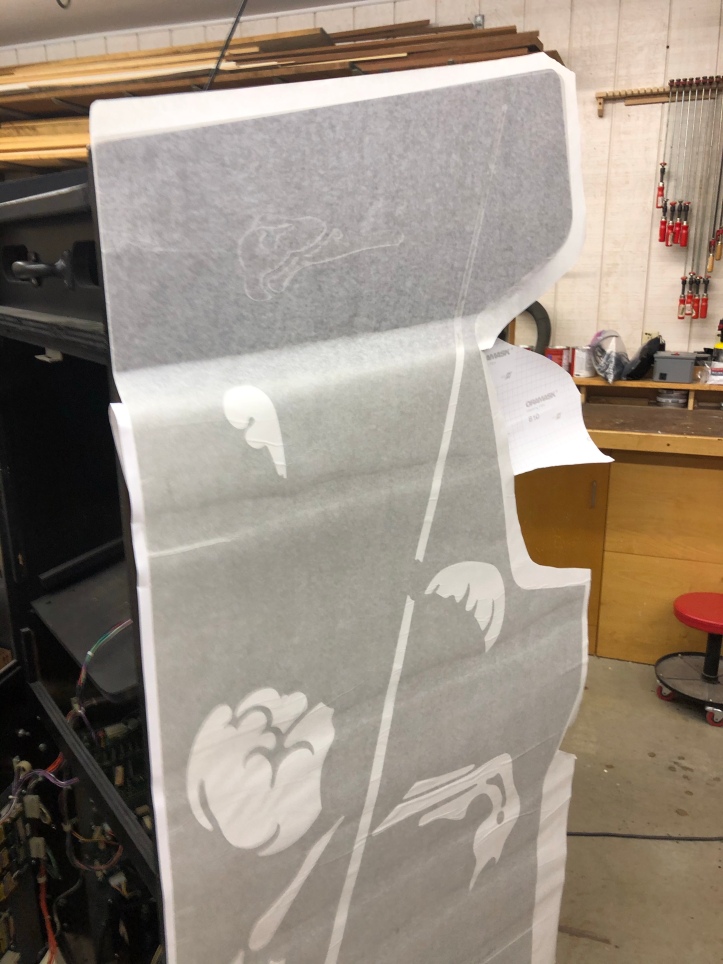
You should end up with the top section looking like this. One reason to start with a narrow strip is if for some reason you need to reposition it – you at least have a chance with so little being exposed. If you removed much more – you would likely compromise the cutouts and have a disaster on your hands. Now it becomes much easier… Remove the tape and all your clamps, slide your hand down the entire length of the stencil to verify it will lay flat and in place as you intended. There is no going back once you stick more on…


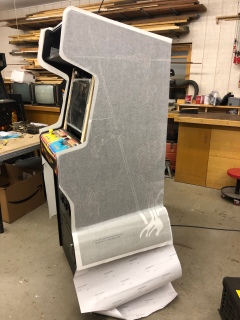
Peel the backer from underneath and roll it down a few more inches – then use the spreader/squeegee again to press downward and from the center out. Eliminate wrinkles and large bubbles and evenly continue down the side pulling the backer off as needed. Keep peeling and rolling down and spreading down.


Backer completely removed with no hassle and very little chance of getting debris trapped inside.


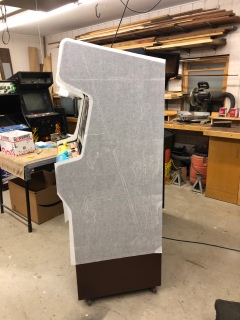
Same for the second side. It went faster. Its pretty easy to make sure the stencil is in the same alignment as the first side.


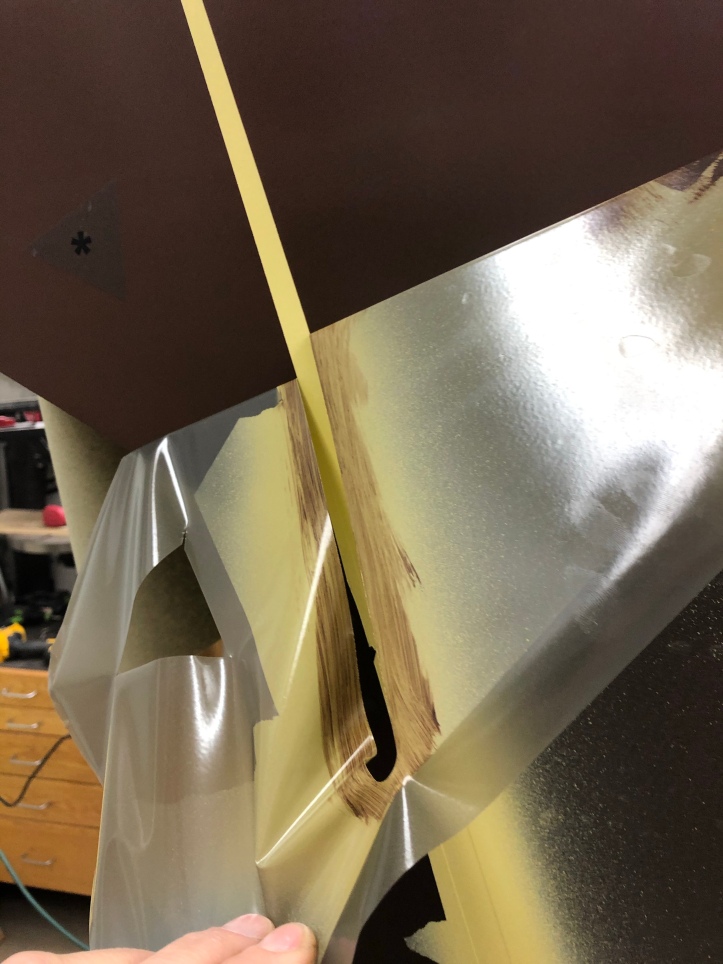
Now you can peel off the face of the stencil (not sure what you call it really, the front backer?) revealing the actual artwork. Here the ostrich head is emerging. There will be large bubbles here and there – they are not really relevant. The only important part is where the cut edges are for the image. Bubbles along those edges need to be pressed out with the plastic squeegee. Just slide the air bubble toward the opening to get the air out. You need to be careful as you peel it away to make sure the stencil stays stuck to the paint and not to the backer. Move slow and deliberately. Joust is not very intricate, but others such as Ms. Pacman have lots of little bits that will peel away easily.


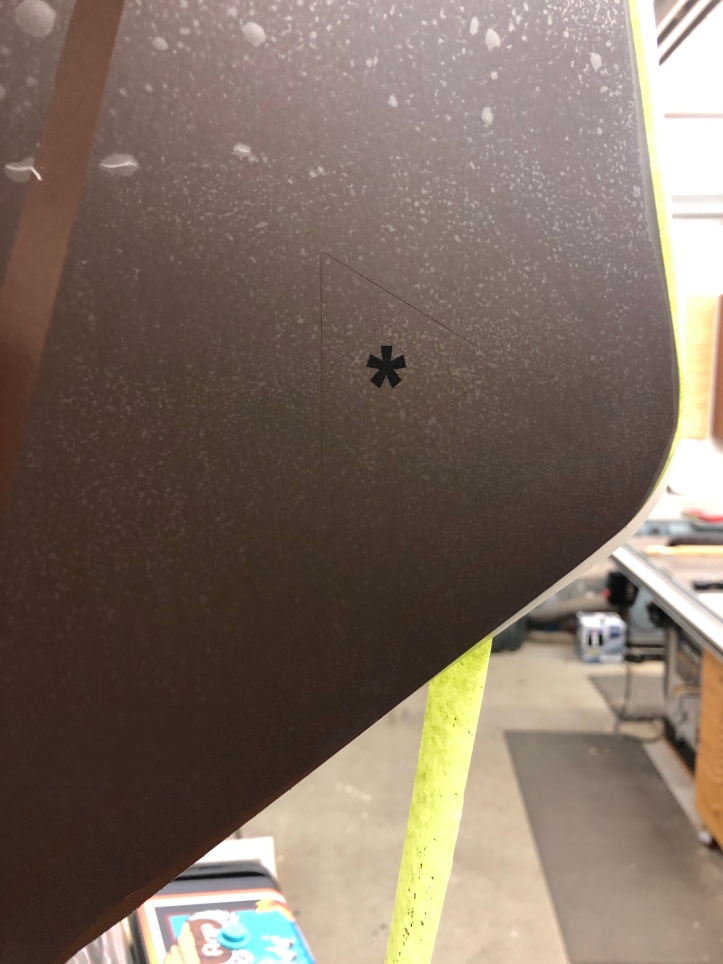
On the upper and lower part of the stencil are these * inside of a triangle. Use some painters tape and cover these. They are used to align the second and third layers. You can also see where a shred of paper backer got into the cutout. I had to lift that with an Exacto and pull it out with tweezers. Thankfully I didn’t stretch anything and it stuck back in place.
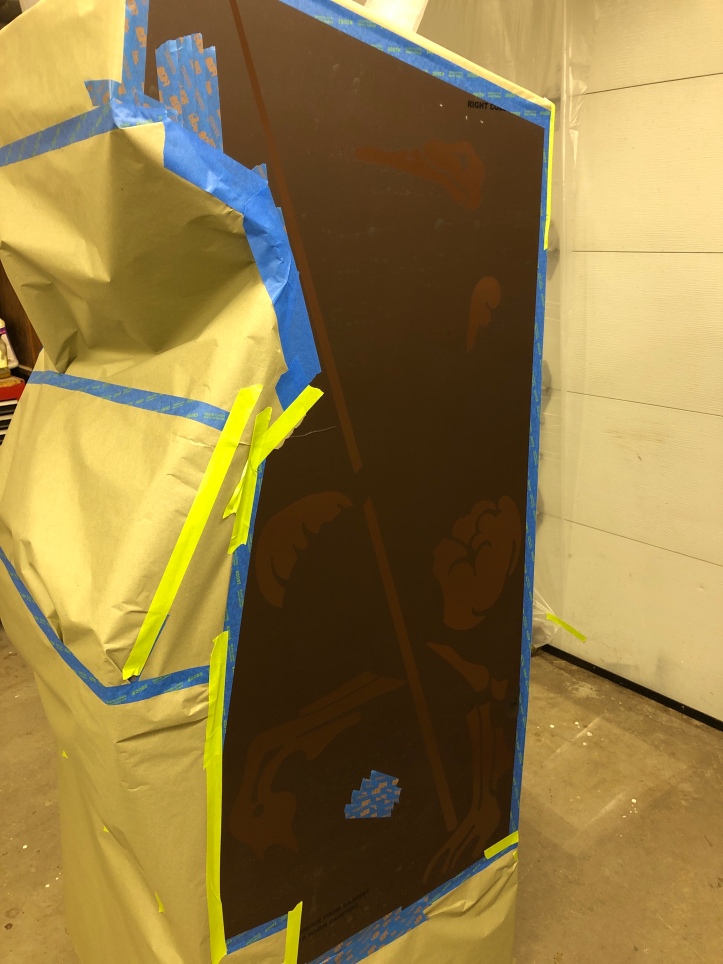


I couldn’t decide if I wanted to mask the cabinet first, then put the stencil or not. I stenciled first and masked second. Most likely I will have to re-mask the entire thing two more times. Otherwise using the spring clamps would be really difficult.. We’ll see… I re-wiped the cutouts with alcohol and used compressed air to blow any tiny dust & lint balls, etc. that were at the cutouts. Clean counts at that little seam where the stencil meets the base coat of paint.


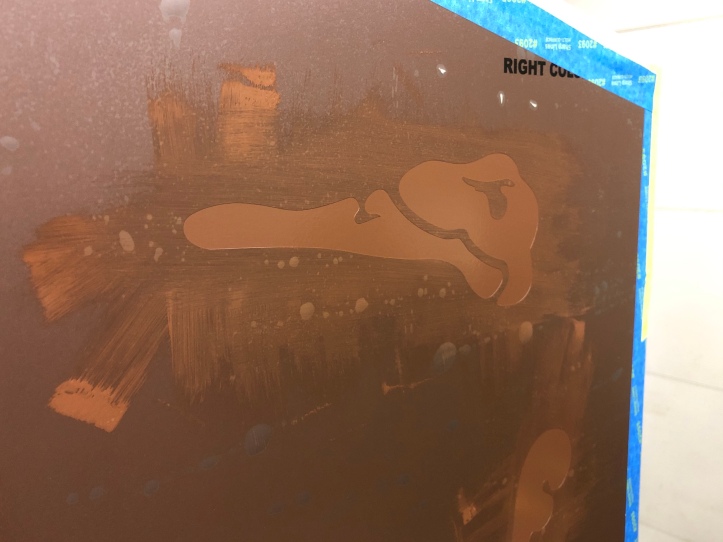
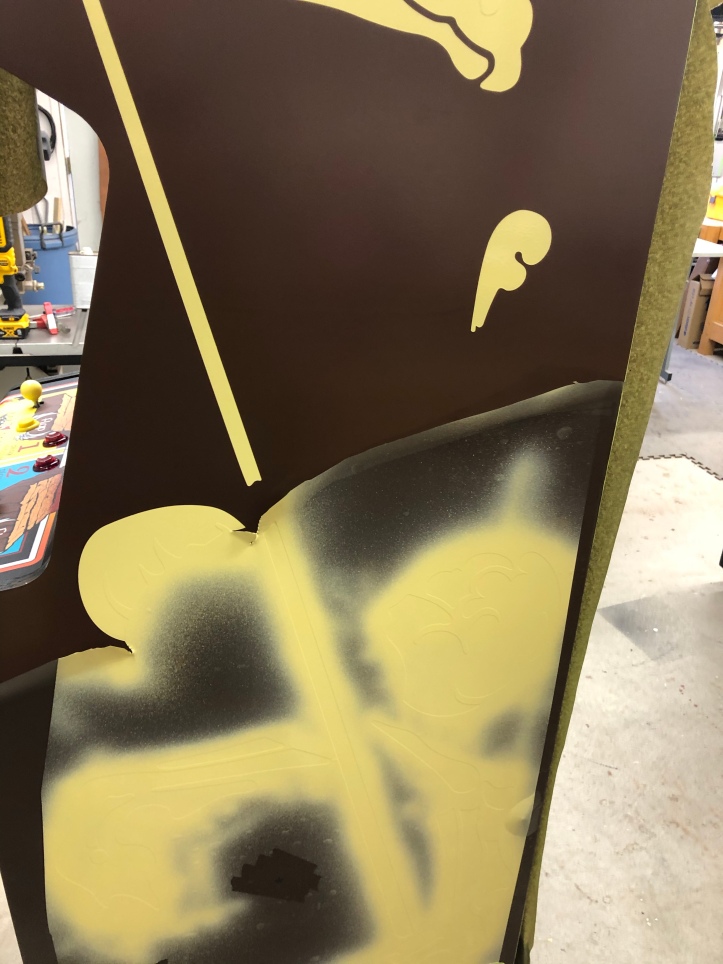
A little trick I picked up from the sign painters. Using some of the original brown base coat, I reduced it with mineral spirits to make a very thin wash coat of paint. I used a foam brush and painted into the seam, but kept the paint thin as you can see.

The goal is very simple: Seal the joint. If there is going to be any paint bleed at all, it will bleed the exact color of the base coat. When the color coat goes on, it will not be able to get under the stencil because you sealed it in brown. We will see how good that works very soon!
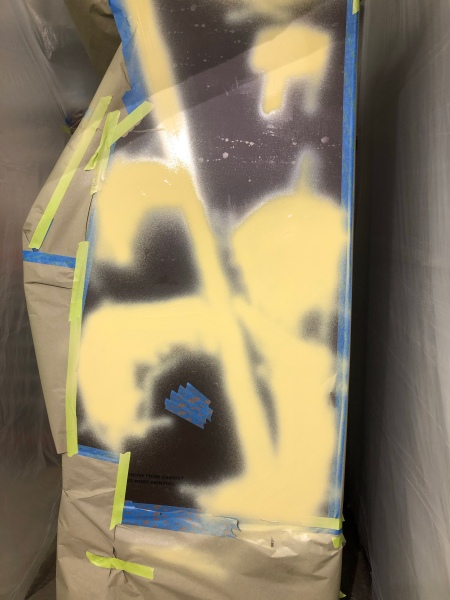


Man – that looks terrible huh? I did a close inspection a couple hours after this and the color coat leveled out great. There are a couple schools of thought on stencil removal – some pull it right away – others wait until its dry. I would normally go right away – but this time I decided to wait. Some little voice in my head said to leave it alone!
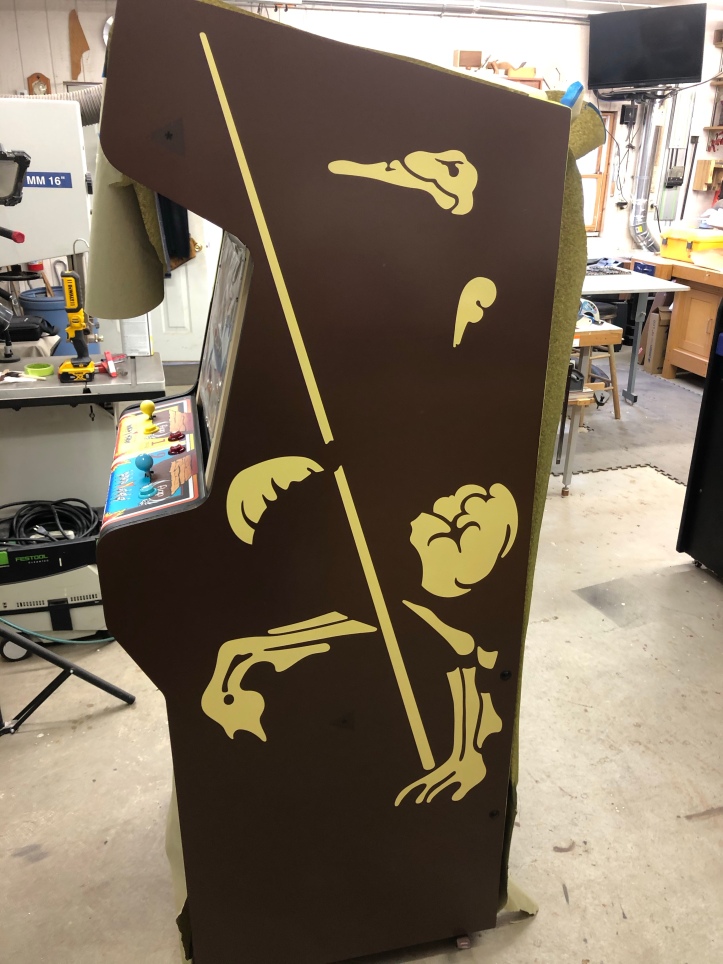


I couldn’t wait any longer. The paint 12 hours later still has just a little bit of tack to it.. But its firm enough to remove. I tested it on some of the masked areas that got painted and it was leaving a nice crisp edge. Whenever possible – peel the masking material so that its cutting back across the paint line like this above. You can’t always avoid areas that lift sorta straight up, but peeling back across itself is best for getting clean lines.


Keep a razor blade very handy (I keep the single edge one in my mouth) You want to trim and cut the masking so that it doesn’t fall back down and it provides the ability to peel back sections easily allowing you to pull back over itself as I mentioned. I little cut here and there can free up large areas of the masking so you can work deliberately.


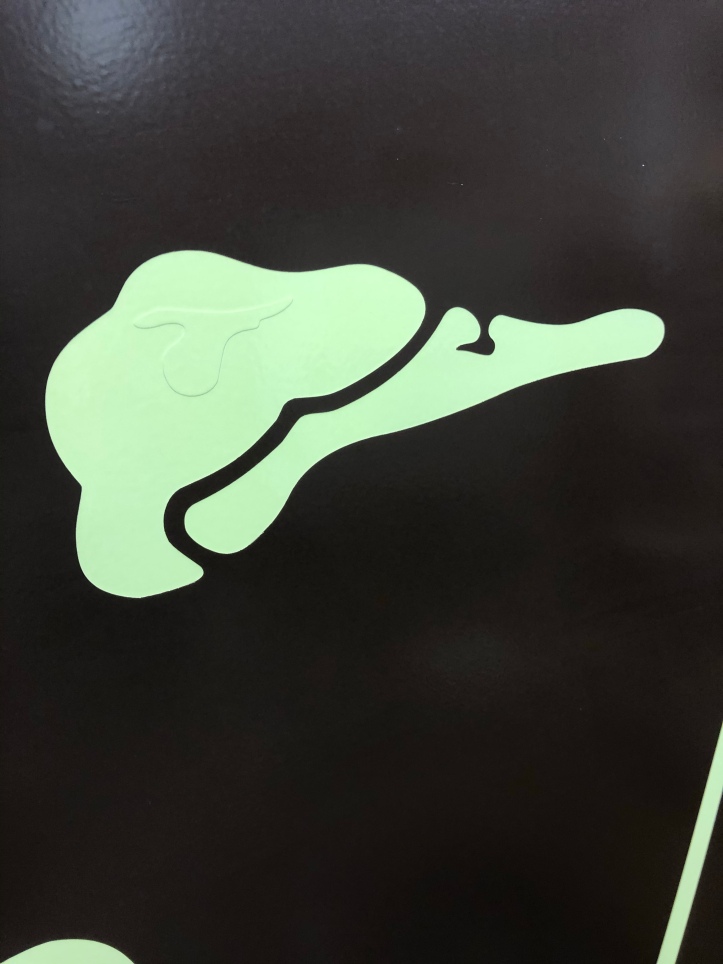
The lighting is causing the color to be off, its not green like this – but captive areas like the eye this can be delicately lifted with an Exacto to start and tweezers to peel it off.


The step where I pre-bleed the brown to prevent the color coat from bleeding under the mask paid off. All of the lines are very very crisp! I’ll have to let this cure for at least a week and maybe more. The second stencil layer will go over the top of this color and I don’t want any chance of lifting the paint if it’s not ready to go.
« Last Edit: November 26, 2020, 09:12:39 am by bperkins01 »
My Arcade Cabinet Build and other projects here:
Centipede, Joust, Joust Cocktail, Asteroids, Galaga, Ms. Pacman Cabaret, Defender, Space Invaders Cocktail
https://bperkins.wordpress.com/

Mike A

  • Trade Count: (0)
  • Full Member
  • ***
  • Offline Offline
  • Posts: 5885
  • Last login:Yesterday at 01:39:09 pm
  • This plan is foolproof
Re: A Joust restoration.. this is going to take a while
« Reply #84 on: November 20, 2020, 11:51:08 am »
You do know that is ridiculously good...right?

bperkins01

  • Trade Count: (0)
  • Full Member
  • ***
  • Offline Offline
  • Posts: 895
  • Last login:September 24, 2023, 02:13:35 pm
  • Plenty of skills.. gaining experience..
Re: A Joust restoration.. this is going to take a while
« Reply #85 on: November 20, 2020, 11:55:36 am »
You do know that is ridiculously good...right?

Yes - on this one I agree - its really ridiculously good.   :) 

two colors to go...   ::)
My Arcade Cabinet Build and other projects here:
Centipede, Joust, Joust Cocktail, Asteroids, Galaga, Ms. Pacman Cabaret, Defender, Space Invaders Cocktail
https://bperkins.wordpress.com/

Arroyo

  • Trade Count: (0)
  • Full Member
  • ***
  • Offline Offline
  • Posts: 1558
  • Last login:April 22, 2024, 04:24:05 pm
  • Budgets are boring
    • newforum.arcadecontrols.com/index.php/topic,156267.0.html
Re: A Joust restoration.. this is going to take a while
« Reply #86 on: November 20, 2020, 12:12:44 pm »
 :notworthy: :notworthy: :notworthy: :notworthy:

Off. The. Charts.

nexusmtz

  • Trade Count: (0)
  • Full Member
  • ***
  • Offline Offline
  • Posts: 489
  • Last login:June 01, 2022, 03:14:22 am
Re: A Joust restoration.. this is going to take a while
« Reply #87 on: November 20, 2020, 05:36:44 pm »
Took a detour to the source images to take in all the detail. Excellent job and process documentation!

bperkins01

  • Trade Count: (0)
  • Full Member
  • ***
  • Offline Offline
  • Posts: 895
  • Last login:September 24, 2023, 02:13:35 pm
  • Plenty of skills.. gaining experience..
Re: A Joust restoration.. this is going to take a while
« Reply #88 on: November 21, 2020, 09:13:55 am »
Thanks guys - the hard part is being patient..
My Arcade Cabinet Build and other projects here:
Centipede, Joust, Joust Cocktail, Asteroids, Galaga, Ms. Pacman Cabaret, Defender, Space Invaders Cocktail
https://bperkins.wordpress.com/

bperkins01

  • Trade Count: (0)
  • Full Member
  • ***
  • Offline Offline
  • Posts: 895
  • Last login:September 24, 2023, 02:13:35 pm
  • Plenty of skills.. gaining experience..
Re: A Joust restoration.. this is going to take a while
« Reply #89 on: November 23, 2020, 04:55:07 pm »


The paint was rock solid in 2 days, I waited 4. Lining up the second color stencil is simple and tricky at the same time. We left the little triangles behind previously to line up the next stencils. They are easy to locate on color 2 stencil . The way I did this was to cut away the back and the front VERY CAREFULLY with the Exacto to reveal just the triangle part. Its easy to cut through all of it – you need to go with the most delicate of touch. When you reveal the ‘sticky side’, use a piece of scrap backing to stick to it until you are ready to hang it..


Backlight and a marker makes it easy to locate the area to cut.


Stick it right to the existing triangle and line it up.


Get the lower one lined up as best you can. Here it will be ok to unstick and restick the stencil to get it as close as possible. I had to stretch it a bit because it never really lays 100% flat. You can get them both very accurate however. Clamp the sides in place near the top – Then roll back the first few inches – trim – stick and spread exactly like the first stencil. You will need to unstick the bottom again to roll the backer off – of course..


Stencil#2 has more intricate detail. When removing the face sheet, follow closely behind with the spreader and stick down the stencil material. I also used my fingers for parts of this – I’ll be re-cleaning it with alcohol right before painting to remove any oils.


Once its off, make sure all the openings are as tight as you can get them with a spreader or your finger – wipe with a lint free rag, alcohol, and clean the areas around the openings. I used compressed air to clean out any little dust and lint right at the seam.
One more IMPORTANT detail: Double check the stencil for any areas that were missed in the ‘weeding’ process. Weeding is where the peel off all of the parts that will get painted. A couple of these little tiny dots were not ‘weeded’. I would have been ‘missing’ the color in the final result. Use a photo of the finished art and check to be sure every little spot has been weeded. You will see the tiny cut line and be able to pluck it right out. I can see this being a big issue on more complicated designs and I get how they can be missed. Everything is really hard to see with white on white and a nearly clear stencil layer.


Its very clear where the yellow layer is going!


Thin wash coat of the base color to seal the stencil and prevent bleeding of the yellow.


I’ve been using my HVLP sprayer and Sherwin Williams oil based paint. The yellow was much thinner than the cream or brown so I only used a small amount of mineral spirits to reduce it a bit. Always strain paint before spraying – one little clot and it spits all over your work. A strainer costs about $.25 – worth it..


Yellow on – it’s much more nerve wracking than the base coat. I could sand and try again on the base and only lose time. These color coats I have to get right SIX TIMES! on the first try. Make sure you cover the alignment triangles again – going to need them one more time.


« Last Edit: November 26, 2020, 09:13:17 am by bperkins01 »
My Arcade Cabinet Build and other projects here:
Centipede, Joust, Joust Cocktail, Asteroids, Galaga, Ms. Pacman Cabaret, Defender, Space Invaders Cocktail
https://bperkins.wordpress.com/

jennifer

  • Trade Count: (0)
  • Full Member
  • ***
  • Offline Offline
  • Posts: 2895
  • Last login:August 11, 2023, 06:24:58 am
Re: A Joust restoration.. this is going to take a while
« Reply #90 on: November 23, 2020, 05:02:25 pm »
Nice job man, that is going to be a little cuttie...😜...I would only add if you didn't already, is pull that off while the paint is still wet or the will glue down and it would not only be horrible to remove, but it will leave a nasty paint ridge.
« Last Edit: November 23, 2020, 05:15:42 pm by jennifer »

bperkins01

  • Trade Count: (0)
  • Full Member
  • ***
  • Offline Offline
  • Posts: 895
  • Last login:September 24, 2023, 02:13:35 pm
  • Plenty of skills.. gaining experience..
Re: A Joust restoration.. this is going to take a while
« Reply #91 on: November 23, 2020, 10:11:12 pm »
@Jennifer - the stencil pulled clean - but you are right.  24 hours is too long..  I'm going back to 12 hours..  and now the update...


Yellow coat on. This side came out perfect. That said, 24 hours of dry time is a little too long for this paint. It had just a bit too much tug releasing from some of the painted areas and I had one small block start to lift on me. I’ll keep it to 12 hours or less for the final coat.

However – I did make a small mistake….


No matter how much I checked when painting, this little part was a bit thin.. I almost left it and chalked it up to allowing the machine to have a little ‘character’. But the best of the best figure out a way to fix these things.. I want to be one of those guys..

I used some of the clean masking material that was removed and cut a piece to go over the area in need of repair. Then I used the Exacto, a small straight edge and a relatively steady hand and re-cut a mini stencil in place on the yellow triangle. Brushed some brown paint into the seam to prevent bleed (again).


After a couple hours dry time, added fresh paint thinned with a couple drops of mineral spirits to help it level. It already looks good – I think it will make a full recovery. We’ll know in the AM..
My Arcade Cabinet Build and other projects here:
Centipede, Joust, Joust Cocktail, Asteroids, Galaga, Ms. Pacman Cabaret, Defender, Space Invaders Cocktail
https://bperkins.wordpress.com/

Arroyo

  • Trade Count: (0)
  • Full Member
  • ***
  • Offline Offline
  • Posts: 1558
  • Last login:April 22, 2024, 04:24:05 pm
  • Budgets are boring
    • newforum.arcadecontrols.com/index.php/topic,156267.0.html
Re: A Joust restoration.. this is going to take a while
« Reply #92 on: November 23, 2020, 10:17:02 pm »
« Last Edit: November 23, 2020, 10:24:51 pm by Arroyo »

jennifer

  • Trade Count: (0)
  • Full Member
  • ***
  • Offline Offline
  • Posts: 2895
  • Last login:August 11, 2023, 06:24:58 am
Re: A Joust restoration.. this is going to take a while
« Reply #93 on: November 23, 2020, 10:37:31 pm »
You can do 12 minutes after your last coat, just be careful not to let it hit the workpiece as you pull it off, Slowly pull back and away kinda rolling the wet stencil as you go to keep it from getting out of hand...Wet paint strings pulling off around the edges is what you are avoiding, go slow and even...But...Since you pulled it off wet like that, the edges will continue to mellow as the paint cures and creates nice soft transition lines...Painters tape is the same thing, pull it off slow wet, back and away from itself...Your hands will be wet with paint, don't touch anything, clean them with thinner when done.
« Last Edit: November 23, 2020, 10:40:33 pm by jennifer »

bperkins01

  • Trade Count: (0)
  • Full Member
  • ***
  • Offline Offline
  • Posts: 895
  • Last login:September 24, 2023, 02:13:35 pm
  • Plenty of skills.. gaining experience..
Re: A Joust restoration.. this is going to take a while
« Reply #94 on: November 23, 2020, 10:42:00 pm »
Maybe I time it a bit closer on the last stencil set..  This paint takes a bit to set up..  But I see where you are going  ;)
I have to let this stuff cure 4 days or so...
My Arcade Cabinet Build and other projects here:
Centipede, Joust, Joust Cocktail, Asteroids, Galaga, Ms. Pacman Cabaret, Defender, Space Invaders Cocktail
https://bperkins.wordpress.com/

jennifer

  • Trade Count: (0)
  • Full Member
  • ***
  • Offline Offline
  • Posts: 2895
  • Last login:August 11, 2023, 06:24:58 am
Re: A Joust restoration.. this is going to take a while
« Reply #95 on: November 23, 2020, 10:50:55 pm »
Well with that patch fix...leaving that tape on there will bite into that uncured paint...You should pull it off as soon as you are done fixing or it will leave an adhesive wrinkle...Put it off wet...Nice job though, that is turning out nice😉
« Last Edit: November 23, 2020, 10:52:36 pm by jennifer »

bperkins01

  • Trade Count: (0)
  • Full Member
  • ***
  • Offline Offline
  • Posts: 895
  • Last login:September 24, 2023, 02:13:35 pm
  • Plenty of skills.. gaining experience..
Re: A Joust restoration.. this is going to take a while
« Reply #96 on: November 23, 2020, 10:51:31 pm »
ok - I gave it a shot..


97% good. There’s a little corner or two I may slice off when this is dry. But this is a super close up. Pulled the stencil after 1 hour..
The wife says it looks like decals..  She meant it as a compliment..
« Last Edit: November 23, 2020, 10:53:36 pm by bperkins01 »
My Arcade Cabinet Build and other projects here:
Centipede, Joust, Joust Cocktail, Asteroids, Galaga, Ms. Pacman Cabaret, Defender, Space Invaders Cocktail
https://bperkins.wordpress.com/

jennifer

  • Trade Count: (0)
  • Full Member
  • ***
  • Offline Offline
  • Posts: 2895
  • Last login:August 11, 2023, 06:24:58 am
Re: A Joust restoration.. this is going to take a while
« Reply #97 on: November 23, 2020, 10:53:57 pm »
Little jellious...Just saying🙄

bperkins01

  • Trade Count: (0)
  • Full Member
  • ***
  • Offline Offline
  • Posts: 895
  • Last login:September 24, 2023, 02:13:35 pm
  • Plenty of skills.. gaining experience..
Re: A Joust restoration.. this is going to take a while
« Reply #98 on: November 23, 2020, 11:23:00 pm »
Well with that patch fix...leaving that tape on there will bite into that uncured paint...You should pull it off as soon as you are done fixing or it will leave an adhesive wrinkle...Put it off wet...Nice job though, that is turning out nice😉

I just got what you were saying here..  The paper and painters tape were below the actual stencil material..  I put it there just in case there was any paint drool - which there was.  The stencil material was used on the entire perimeter of the yellow area under repair..  ;)
My Arcade Cabinet Build and other projects here:
Centipede, Joust, Joust Cocktail, Asteroids, Galaga, Ms. Pacman Cabaret, Defender, Space Invaders Cocktail
https://bperkins.wordpress.com/

jennifer

  • Trade Count: (0)
  • Full Member
  • ***
  • Offline Offline
  • Posts: 2895
  • Last login:August 11, 2023, 06:24:58 am
Re: A Joust restoration.. this is going to take a while
« Reply #99 on: November 24, 2020, 02:35:13 am »
I diddnt mean to get involved, just got a little excited, Painting is scary fun...All I was saying is 10 min after your last coat if you pull the tape the thinner in the paint makes the tape soft and it peels really easy, even after a hour it is set up and becomes more difficult to the point of potentially ripping the paint...But...Your use of thinners, and the paint gun should be noted, very well done and if I had to guess very minimal orange peel, and level paint surface flow, nice coverage, and from here the colors look right.
« Last Edit: November 24, 2020, 02:37:34 am by jennifer »

bperkins01

  • Trade Count: (0)
  • Full Member
  • ***
  • Offline Offline
  • Posts: 895
  • Last login:September 24, 2023, 02:13:35 pm
  • Plenty of skills.. gaining experience..
Re: A Joust restoration.. this is going to take a while
« Reply #100 on: November 24, 2020, 07:26:40 am »
@Jennifer - No worries.  Good call on pulling the stencil a little sooner.  24 hours was too long.  The paint had a little too much tug.  I went with a single coat.  This paint has really good pigment and with a little reducing, self levels perfect.  No orange peel at all.

One color to go.. w/o screwups  :P
My Arcade Cabinet Build and other projects here:
Centipede, Joust, Joust Cocktail, Asteroids, Galaga, Ms. Pacman Cabaret, Defender, Space Invaders Cocktail
https://bperkins.wordpress.com/

bperkins01

  • Trade Count: (0)
  • Full Member
  • ***
  • Offline Offline
  • Posts: 895
  • Last login:September 24, 2023, 02:13:35 pm
  • Plenty of skills.. gaining experience..
Re: A Joust restoration.. this is going to take a while
« Reply #101 on: November 28, 2020, 03:31:39 pm »


Well the red layer stencils put up a fight. I got one side done correctly, with a minor hiccup. Applied the stencil, did the seal coat of yellow and brown. Sprayed red.. This went fine.


I peeled the stencil after about 30 minutes, but got a little yellow drag though the red.. Ughh. I waited a day and brushed a little fresh red on top. Same as the fix before for the yellow area.

The big issue is on the second side, I somehow got the stencil improperly aligned to the point were it will not look right if I shoot the red paint. Need to wait until Monday to see if I can buy a replacement for the one I have on wrong.. Nothing lost except a little time. I can’t peel and reposition it. It will shred. So I wait. I can 100% finish the rest of the cabinet without the red on the second side. The last color coat will be very simple to mask and paint.


Shop lighting vs. daylight
My Arcade Cabinet Build and other projects here:
Centipede, Joust, Joust Cocktail, Asteroids, Galaga, Ms. Pacman Cabaret, Defender, Space Invaders Cocktail
https://bperkins.wordpress.com/

J_K_M_A_N

  • Trade Count: (0)
  • Full Member
  • ***
  • Offline Offline
  • Posts: 983
  • Last login:Yesterday at 10:43:54 pm
Re: A Joust restoration.. this is going to take a while
« Reply #102 on: November 29, 2020, 10:05:26 am »
That looks amazing! Major bummer on the misalignment.  :hissy: Hopefully you can get just the one to fix it.

J_K_M_A_N

bperkins01

  • Trade Count: (0)
  • Full Member
  • ***
  • Offline Offline
  • Posts: 895
  • Last login:September 24, 2023, 02:13:35 pm
  • Plenty of skills.. gaining experience..
Re: A Joust restoration.. this is going to take a while
« Reply #103 on: November 29, 2020, 10:27:42 am »
That looks amazing! Major bummer on the misalignment.  :hissy: Hopefully you can get just the one to fix it.

J_K_M_A_N

Thanks - its my own fault.  I wanted to 'fit it in' while cooking for Thanksgiving..   I 'may' expose my gaff once I get it fixed up.  :P
Oh well..  I'm sure it will work out fine and only us people here will ever know...  shhhhhhh...
My Arcade Cabinet Build and other projects here:
Centipede, Joust, Joust Cocktail, Asteroids, Galaga, Ms. Pacman Cabaret, Defender, Space Invaders Cocktail
https://bperkins.wordpress.com/

bperkins01

  • Trade Count: (0)
  • Full Member
  • ***
  • Offline Offline
  • Posts: 895
  • Last login:September 24, 2023, 02:13:35 pm
  • Plenty of skills.. gaining experience..
Re: A Joust restoration.. this is going to take a while
« Reply #104 on: December 14, 2020, 10:03:54 am »
Now for the learning experience..


It’s easier than you would think to get off course applying the stencil. The last one I just lost track of it until it was too late. Here you can see the lower alignment triangle is off by about 1/8″-3/16″. Which caused the rider to just about touch the jousting lance. There is way too much margin behind his foot and almost none in front of it..

Big takeaway from this is once the top section is stuck on and you are working your way down, make sure the back edge of the stencil stays aligned with the back of the cabinet. Its the reference point that keeps everything on track. You can peel the top section off while there is only a few inches attached and reposition it. But there is a point of no return where you will shred the stencil – which is what happened to me.

The people at This Old Game helped me out and sent a replacement stencil within a few days.


New stencil staying aligned with the back edge of the cabinet. Feet, knees and lance are all within the proper spacing now.


Full cabinet masked off except the red area, quick thin sealer coats of brown and yellow to prevent bleed and the final coat of red.


Came out great. Glad I waited to get a replacement stencil. I pulled it off after about 30 minutes and that really is the way to go. The paint is soft and levels off to a nice rounded edge. Just need to be exceptionally careful that the wet stencil doesn’t touch anything while taking it off. Keep a single edge razor in your hand (I keep it in my mouth) to cut away stencil material before it gets too big to handle during removal.
My Arcade Cabinet Build and other projects here:
Centipede, Joust, Joust Cocktail, Asteroids, Galaga, Ms. Pacman Cabaret, Defender, Space Invaders Cocktail
https://bperkins.wordpress.com/

Arroyo

  • Trade Count: (0)
  • Full Member
  • ***
  • Offline Offline
  • Posts: 1558
  • Last login:April 22, 2024, 04:24:05 pm
  • Budgets are boring
    • newforum.arcadecontrols.com/index.php/topic,156267.0.html
Re: A Joust restoration.. this is going to take a while
« Reply #105 on: December 14, 2020, 11:18:33 am »


Beautiful

Mike A

  • Trade Count: (0)
  • Full Member
  • ***
  • Offline Offline
  • Posts: 5885
  • Last login:Yesterday at 01:39:09 pm
  • This plan is foolproof
Re: A Joust restoration.. this is going to take a while
« Reply #106 on: December 14, 2020, 11:35:48 am »
I think I might cry.

 :applaud:

javeryh

  • Trade Count: (+1)
  • Full Member
  • ***
  • Offline Offline
  • Posts: 7911
  • Last login:Yesterday at 03:38:31 pm
Re: A Joust restoration.. this is going to take a while
« Reply #107 on: December 17, 2020, 04:54:06 pm »
I think I might cry.

 :applaud:

Same.  I just read through this entire thread and it's incredible work.   :applaud:

bperkins01

  • Trade Count: (0)
  • Full Member
  • ***
  • Offline Offline
  • Posts: 895
  • Last login:September 24, 2023, 02:13:35 pm
  • Plenty of skills.. gaining experience..
Re: A Joust restoration.. this is going to take a while
« Reply #108 on: December 17, 2020, 05:56:24 pm »
Thanks guys :)
My Arcade Cabinet Build and other projects here:
Centipede, Joust, Joust Cocktail, Asteroids, Galaga, Ms. Pacman Cabaret, Defender, Space Invaders Cocktail
https://bperkins.wordpress.com/

bperkins01

  • Trade Count: (0)
  • Full Member
  • ***
  • Offline Offline
  • Posts: 895
  • Last login:September 24, 2023, 02:13:35 pm
  • Plenty of skills.. gaining experience..
Re: A Joust restoration.. this is going to take a while
« Reply #109 on: January 01, 2021, 09:26:05 am »
Joust Upright – Finishing up.. maybe..
Down to the last steps now that the stencils are complete. Installing the T-molding was uneventful. Last part was this horrible Silkworm burn on the CRT.


It’s very noticeable during the game and just looks terrible.


First I recapped the chassis and tested it with the Silkworm tube – didn’t make anything worse. I found a free Craigslist TV. The Silkworm tube is the left one – and the TV tube on the right. One letter difference? Could I get lucky?


Chassis all washed, cleaned, recapped. New tube installed. I spent a couple hours working on convergence which is really a mystic art form. I’m not 100% crazy about the tube – but its up and running. I may mess with it again in the future.

Skipping ahead..


Restoration complete. This Old Game produces fantastic artwork. The marquee, bezel, CPO and stencils are all T.O.G. Pretty much every part of this cabinet needed something. It was a total disaster when I picked it up. The only thing that did work was the actual game board.

Shop cleaned – ready for the next project.
My Arcade Cabinet Build and other projects here:
Centipede, Joust, Joust Cocktail, Asteroids, Galaga, Ms. Pacman Cabaret, Defender, Space Invaders Cocktail
https://bperkins.wordpress.com/

Arroyo

  • Trade Count: (0)
  • Full Member
  • ***
  • Offline Offline
  • Posts: 1558
  • Last login:April 22, 2024, 04:24:05 pm
  • Budgets are boring
    • newforum.arcadecontrols.com/index.php/topic,156267.0.html
Re: A Joust restoration.. this is going to take a while
« Reply #110 on: January 01, 2021, 10:56:26 am »


Seriously one of my favorite looking cabs. You might own the nicest in the world now.
« Last Edit: January 01, 2021, 12:00:19 pm by Arroyo »

J_K_M_A_N

  • Trade Count: (0)
  • Full Member
  • ***
  • Offline Offline
  • Posts: 983
  • Last login:Yesterday at 10:43:54 pm
Re: A Joust restoration.. this is going to take a while
« Reply #111 on: January 01, 2021, 11:52:59 am »
That looks absolutely incredible! Beautiful work. I agree that you probably own the nicest existing Joust out there now. I can't wait to come over and play it.  ;)  :cheers:

J_K_M_A_N

Gilrock

  • Trade Count: (0)
  • Full Member
  • ***
  • Offline Offline
  • Posts: 1049
  • Last login:March 30, 2024, 05:15:46 pm
Re: A Joust restoration.. this is going to take a while
« Reply #112 on: January 04, 2021, 02:40:14 pm »
Nice job.  When did you order the stencils?  I ordered from This Old Game February 16th and then asked for an update in August and never got a reply.  Just tried again this morning and no reply yet.

Update:  right after I posted they replied my stencils will ship this week and they refunded the bezel cost since I found another source.  I'll probably have mine running soon I spent time on it over holiday break.
« Last Edit: January 04, 2021, 02:44:53 pm by Gilrock »

wp34

  • Trade Count: (+3)
  • Full Member
  • ***
  • Offline Offline
  • Posts: 4794
  • Last login:April 10, 2022, 09:48:19 pm
Re: A Joust restoration.. this is going to take a while
« Reply #113 on: January 04, 2021, 03:23:23 pm »
That's really impressive work.  You make it look easy and we know it is not.   :cheers:

That also might be the most nonchalant tube swap I've ever seen.  Nice job.

bperkins01

  • Trade Count: (0)
  • Full Member
  • ***
  • Offline Offline
  • Posts: 895
  • Last login:September 24, 2023, 02:13:35 pm
  • Plenty of skills.. gaining experience..
Re: A Joust restoration.. this is going to take a while
« Reply #114 on: January 04, 2021, 03:31:46 pm »
The TOG people are much better at answering the phone than emails for the most part.
Glad you got yours.  They *seem* to be catching up.

Their supply chain got screwed up by Covid last Nov/Dec.  The suppliers of raw materials (China I'm assuming) closed up, which messed up their actual suppliers.. which messed them up.. and then they moved the business across the country..

That said - the product is fantastic and worth it it IMHO..

Hopefully they are working through the backlog and the lead times get better.
Good luck on the Stencils!
My Arcade Cabinet Build and other projects here:
Centipede, Joust, Joust Cocktail, Asteroids, Galaga, Ms. Pacman Cabaret, Defender, Space Invaders Cocktail
https://bperkins.wordpress.com/

bperkins01

  • Trade Count: (0)
  • Full Member
  • ***
  • Offline Offline
  • Posts: 895
  • Last login:September 24, 2023, 02:13:35 pm
  • Plenty of skills.. gaining experience..
Re: A Joust restoration.. this is going to take a while
« Reply #115 on: January 04, 2021, 03:36:38 pm »
That's really impressive work.  You make it look easy and we know it is not.   :cheers:

That also might be the most nonchalant tube swap I've ever seen.  Nice job.

Thanks wp34 - The tube swap was a good 4-6 hours of messing around.  I'm not all that crazy about it.
One thing I'm going to try is replace the width capacitor.  I've learned the width coil does pretty much nothing (which I agree with - I've never had a width coil do much more than break on me)
But the less well know - replace the width capacitor option is on the table.  I picked up an assortment of caps and I'm going to try the next size up to see if I can get the picture on the screen.  It may help with the sides/corner convergence that I don't care for..

We'll see ..  But the rest of it is really nice  ;)
My Arcade Cabinet Build and other projects here:
Centipede, Joust, Joust Cocktail, Asteroids, Galaga, Ms. Pacman Cabaret, Defender, Space Invaders Cocktail
https://bperkins.wordpress.com/

javeryh

  • Trade Count: (+1)
  • Full Member
  • ***
  • Offline Offline
  • Posts: 7911
  • Last login:Yesterday at 03:38:31 pm
Re: A Joust restoration.. this is going to take a while
« Reply #116 on: January 06, 2021, 01:54:49 pm »
Stunning job.  Looks like it came off the assembly line yesterday.  I mean, it couldn't look any more perfect. 

 :notworthy: :notworthy: :notworthy:

ChanceKJ

  • Trade Count: (0)
  • Full Member
  • ***
  • Offline Offline
  • Posts: 3229
  • Last login:August 07, 2021, 02:52:06 pm
.
« Reply #117 on: January 06, 2021, 05:54:22 pm »
.
« Last Edit: March 19, 2021, 02:05:33 am by ChanceKJ »

bperkins01

  • Trade Count: (0)
  • Full Member
  • ***
  • Offline Offline
  • Posts: 895
  • Last login:September 24, 2023, 02:13:35 pm
  • Plenty of skills.. gaining experience..
Re: A Joust restoration.. this is going to take a while
« Reply #118 on: January 06, 2021, 07:39:42 pm »
Thanks guys  :)
Appreciate it.
 :cheers:
My Arcade Cabinet Build and other projects here:
Centipede, Joust, Joust Cocktail, Asteroids, Galaga, Ms. Pacman Cabaret, Defender, Space Invaders Cocktail
https://bperkins.wordpress.com/