Main Restorations Software Audio/Jukebox/MP3 Everything Else Buy/Sell/Trade
Project Announcements Monitor/Video GroovyMAME Merit/JVL Touchscreen Meet Up Retail Vendors
Driving & Racing Woodworking Software Support Forums Consoles Project Arcade Reviews
Automated Projects Artwork Frontend Support Forums Pinball Forum Discussion Old Boards
Raspberry Pi & Dev Board controls.dat Linux Miscellaneous Arcade Wiki Discussion Old Archives
Lightguns Arcade1Up Try the site in https mode Site News

Unread posts | New Replies | Recent posts | Rules | Chatroom | Wiki | File Repository | RSS | Submit news


Author Topic: A New Beginning: The story of my first MAME cabinet  (Read 8425 times)

0 Members and 1 Guest are viewing this topic.

1337atreyu

  • Trade Count: (0)
  • Jr. Member
  • **
  • Offline Offline
  • Posts: 6
  • Last login:August 21, 2012, 04:33:06 pm
A New Beginning: The story of my first MAME cabinet
« on: July 04, 2012, 05:24:41 pm »
Hello all! I just joined the site about a week ago, but I have been looking into starting a MAME cabinet for quite a while now. After much contemplation and many lost hours of research, I finally pulled the trigger. I called up a relatively local arcade business (www.dreamhomearcades.com) and asked if they had any empty cabinets in which I could start my first MAME machine. They set me up with an NFL Blitz machine that was completely gutted for $75.00 (sounds like a good deal to me). The cabinet had actually been converted into a MAME machine already, but it was now just taking up space in the guy's garage. I was told it was in good condition and it came with an almost finished control panel (4 player but just missing two joysticks and the trackball). I couldn't pass that up. Yesterday I went to pick it up and they actually threw in an Intrepid machine as well. He picked it up at an auction, but has never bothered to plug it in, so he had no idea that status of the internals. Everything was included in the Intrepid machine, but there was no back door and the cab and CP had been pretty beaten up. Either way, it was a free addition, so who was I to say no? I will be building my first machine from the Blitz machine and I need suggestions for what to do with the Intrepid machine. Now, on to the pictures.


Here is the Blitz cabinet. It should prove to be a relatively simple build for a newbie like myself.


This is the control panel it came with. I am not going to use this for the build, but at the very least I can part it out and sell some stuff or keep it in my parts bin.


Here is the gutted control panel. It looks like I have plenty of buttons, two 4-way joysticks, a plethora of switches, and a trackball mount. Most of this will not be in my first build as I'd like an LED button setup and 8 way joysticks.


Here is the Intrepid machine. It's quite dusty, but that's something I know how to take care of right away.


I booted up the intrepid machine and this is what I got. At least I know the monitor works!


This is the gutted back of the Intrepid machine. Being new to the arcade machine world, I thought I'd rip it apart and see what made it tick.


And finally, these are the gutted parts from the Intrepid machine


I am considering something like this as a potential CP layout. It seems simple enough, but I should get the functionality I want as well. What do you think?

I just wanted to make the announcement right off the bat. I plan to make a 2 player CP for the Blitz machine with a trackball. I already have a PC made (Athlon 62 x2 4400+, 2gb ram, 400GB HDD) and I'm waiting for new speakers to arrive as I write this. I'm going to start by restoring the cabinet (I'll be sanding it down and probably repainting it black). The cabinet is in pretty good condition, so the repair should be minor. I will probably add casters and edge/corner guards to the bottom. I'm pretty excited to get started with this. My question lies with what I should do with the Intrepid cabinet. It looks like the monitor works but my guess is that the game board is shot. I might be completely wrong though! A friend suggested putting a multiboard in and selling it. I'd just like a second (or third or fourth) opinion before I pull the trigger. I might actually initially use that as a restoration project just so that I can get the feel of what I will need to do with my own cabinet. I think that if I spiffed it up a bit and got a working board in there I could sell it for a bit more. I dunno. Like I said, I'm a newbie. :dunno

So that's my story and what I've been working on since yesterday. Any suggestions, let me know. I'll keep this post updated as I progress.

Well Fed Games

  • Trade Count: (+6)
  • Full Member
  • ***
  • Offline Offline
  • Posts: 1884
  • Last login:March 06, 2022, 07:30:46 pm
  • Delicious!
Re: A New Beginning: The story of my first MAME cabinet
« Reply #1 on: July 04, 2012, 05:59:20 pm »
My thoughts:

A. You got a great deal

B. For the Intrepid, I would do nothing with it for now and focus on your 2 player cab... after finishing it you will have a better sense if you want to make a vertical 1 player MAME to compliment your other, put a 60-in-1 in it and keep/sell it, or restore it back to an Intrepid (you may catch the bug for owning a dedicated cab, it happens to the best of us).

C. Keep in mind that Intrepid is listed as being fairly rare based on info from KLOV, so a restore might be the best bet if the board works.
Completed projects: Pac bartop (Plug & Play), 30th Anniversary Pac cab (MAME), Point Blank (PS1), Centipede (arcade hardware- light restore), VS. Super Mario Bros (arcade hardware- light restore) Tetris Cocktail (SNES), Arcade Classics upright (60-in-1, then MAME), Multi-Raiden (arcade hardware). Pac Man vs.(Gamecube),

Working on: Pinball Re-theme, Homebrew arcade arena shooter

drventure

  • Trade Count: (+2)
  • Full Member
  • ***
  • Offline Offline
  • Posts: 4152
  • Last login:April 23, 2024, 06:53:06 pm
  • Laser Death Ray Bargain Bin! Make me an offer!
Re: A New Beginning: The story of my first MAME cabinet
« Reply #2 on: July 04, 2012, 07:52:21 pm »
My thoughts:

A. You got a great deal

+1 on that. 75$ for 2 cabinets, a monitor, sticks, buttons, 2 decent looking coin doors., and who knows what else? Heck, that's close to 75$ in parts right there, not counting the cabinets.

Dang, just google coin doors. I'm sure better prices could be had but I'm seeing 36$ for one.

Congrats! Great deal. and a nice head start on a cabinet.

PL1

  • Global Moderator
  • Trade Count: (+1)
  • Full Member
  • *****
  • Offline Offline
  • Posts: 9408
  • Last login:Today at 11:48:00 am
  • Designated spam hunter
Re: A New Beginning: The story of my first MAME cabinet
« Reply #3 on: July 04, 2012, 08:15:50 pm »
Welcome aboard, 1337atreyu.

Here is the gutted control panel. It looks like I have plenty of buttons, two 4-way joysticks, a plethora of switches, and a trackball mount.

Are you sure those are 4-ways?  They look like Happ Competitions which are 8-way sticks with a square actuator like this.


I am considering something like this as a potential CP layout. It seems simple enough, but I should get the functionality I want as well. What do you think?

Change "Reset" and "Config" to "Enter" and "Menu" (Tab) and you have all the basic admin buttons.  You might want your admin buttons in one horizontal line and grouped functionally.  

I used Paradise Arcade's LED buttons and printed my own inserts for this layout.


Depending on how you set up your front end software, you may not need the mouse buttons and some people don't have a Menu button to keep curious kids or friends from messing up their configuration.

Slagcoin has some great player button layout templates.  You can print and tape them to a cardboard box test panel to evaluate the feel of the various layouts before you commit to one.


Scott

P.S. Hope nothing was damaged by taking apart the Intrepid.  :scared
« Last Edit: July 04, 2012, 08:32:41 pm by PL1 »

1337atreyu

  • Trade Count: (0)
  • Jr. Member
  • **
  • Offline Offline
  • Posts: 6
  • Last login:August 21, 2012, 04:33:06 pm
Re: A New Beginning: The story of my first MAME cabinet
« Reply #4 on: July 04, 2012, 09:25:40 pm »
P.S. Hope nothing was damaged by taking apart the Intrepid.  :scared

Everything came apart quite well. I just want to clean up the inside of the cab and restore it without having to work around all of the innards. The only thing I had to sever was the connection to the light behind the marquee, but that can be easily fixed with a quick solder or some electrical tape.

Also, in terms of the layout you suggested for the admin buttons, a friend of mine (who also came up with the CP layout I posted) tried putting the escape button right in the center like yours, but he found that until he got used to it, he would accidentally press that if he had an exaggerated trackball throw in Golden Tee. That's the main reason I'd like to put the escape button elsewhere.

I think you are right, they actually are 8-way joysticks. I guess I just didn't realize!

Also, in terms of the mouse buttons, I was hoping to actually get a switch that will swap my trackball to act as a mouse and my coin/start buttons as left/right mouse buttons. It cleans up the CP layout a bit and it worked out for the aforementioned friend.

Thanks for the responses, you're already quite helpful  ;D

mgb

  • Trade Count: (0)
  • Full Member
  • ***
  • Offline Offline
  • Posts: 3499
  • Last login:February 21, 2024, 06:18:13 pm
  • North East, US
Re: A New Beginning: The story of my first MAME cabinet
« Reply #5 on: July 04, 2012, 09:38:33 pm »
Hey 1337atreyu,
  welcome to the forums. Good luck with your projects.

PL1

  • Global Moderator
  • Trade Count: (+1)
  • Full Member
  • *****
  • Offline Offline
  • Posts: 9408
  • Last login:Today at 11:48:00 am
  • Designated spam hunter
Re: A New Beginning: The story of my first MAME cabinet
« Reply #6 on: July 05, 2012, 01:07:14 am »
Also, in terms of the layout you suggested for the admin buttons, a friend of mine (who also came up with the CP layout I posted) tried putting the escape button right in the center like yours, but he found that until he got used to it, he would accidentally press that if he had an exaggerated trackball throw in Golden Tee. That's the main reason I'd like to put the escape button elsewhere.
Sorry I wasn't clear in my earlier post, but I'm using a portable modular panel.  My trackball usually sits directly below P2 Start.  If you swap the mouse buttons to the right of the other admin buttons, the escape button will be far enough out of the way.

I figured from the amount of real estate on the upper area of your panel that you might be thinking of Golden Tee type games.


Also, in terms of the mouse buttons, I was hoping to actually get a switch that will swap my trackball to act as a mouse and my coin/start buttons as left/right mouse buttons. It cleans up the CP layout a bit and it worked out for the aforementioned friend.
"swap my trackball to act as a mouse" - What does it act like normally? :duckhunt  I keed, I keed.

As far as the switch goes, a DPDT toggle switch will do that but I'm not sure if it is worth the effort to change from four buttons to two buttons and one switch that may or may not clash visually with the rest of the panel.   :dunno


Before you finalize your panel design, you might want to consider:
- What games do you definitely want?
- What controls do they require? (Playing Donkey Kong with an 8-way stick can cause serious frustration.  :banghead:)
- Do you want it to look/act like a dedicated arcade machine or a computer?
- What front end do you want to use? Many have you navigating via joystick, selecting the game by player button, and exiting by pressing P1 Start+ P2 Start at the same time.  With this setup, you never use the mouse buttons or some of the other admin buttons.  Just remember to print an instruction card for guests.
- Do you want a specific fixed list of games, or do you want to quickly or constantly change them?
- Do you want a spinner? (Arkanoid, Tempest, Omega Race, Puzz Loop, etc.)
- Which encoder do you want to use? (Mini-Pac Opti, I-Pac, KeyWiz, Xin Mo, etc.)


Scott

1337atreyu

  • Trade Count: (0)
  • Jr. Member
  • **
  • Offline Offline
  • Posts: 6
  • Last login:August 21, 2012, 04:33:06 pm
Re: A New Beginning: The story of my first MAME cabinet
« Reply #7 on: July 05, 2012, 01:41:19 am »
Quote
Before you finalize your panel design, you might want to consider:
- What games do you definitely want?
- What controls do they require? (Playing Donkey Kong with an 8-way stick can cause serious frustration.  )
- Do you want it to look/act like a dedicated arcade machine or a computer?
- What front end do you want to use? Many have you navigating via joystick, selecting the game by player button, and exiting by pressing P1 Start+ P2 Start at the same time.  With this setup, you never use the mouse buttons or some of the other admin buttons.  Just remember to print an instruction card for guests.
- Do you want a specific fixed list of games, or do you want to quickly or constantly change them?
- Do you want a spinner? (Arkanoid, Tempest, Omega Race, Puzz Loop, etc.)
- Which encoder do you want to use? (Mini-Pac Opti, I-Pac, KeyWiz, Xin Mo, etc.)

I'm actually using software that a friend has already compiled. It runs the gamut of different games. I realize that I will not be able to play all of them (I will not have a light gun with my first build or a spinner), but most of them can be covered by a 6 button array and a joystick. Speaking of joysticks, I'm planning on using the Ultimarc Mag Stick Plus so that I can swap from 4 to 8 way on the fly. My second build (lol I'm already planning my second build) will be using the U360 for automatic changes based on games. My look and feel of this first build is going to be more of a computer feel than a classic arcade feel. I think that between working on the Blitz machine and eventually restoring the Intrepid machine, I will get a good feel for what it's like to build a more modern arcade and what it's like to retain the "retro" feel of the 1983 machine. I don't know what front end I am getting. I know that it navigates using the joystick. The encoder is probably going to be an I-Pac 2. It seems pretty user friendly in terms of labeling and troubleshooting.

I think that covers everything. I just have to say, besides working personally with the people I know who have completed a couple of machines, the response from the forum is already exceeding my expectations. Just have to throw it out there, arcadecontrols.com has a fantastic community. Thanks guys!

PL1

  • Global Moderator
  • Trade Count: (+1)
  • Full Member
  • *****
  • Offline Offline
  • Posts: 9408
  • Last login:Today at 11:48:00 am
  • Designated spam hunter
Re: A New Beginning: The story of my first MAME cabinet
« Reply #8 on: July 05, 2012, 03:51:18 am »
The encoder is probably going to be an I-Pac 2. It seems pretty user friendly in terms of labeling and troubleshooting.

I-Pac is a popular choice, but two related questions before you order one:

1. Do you already have an encoder for your trackball?

2. Are you comfortable with wiring/crimping quick disconnects?

The reason I ask is that if you don't have a trackball encoder and/or if you aren't comfortable with wiring/crimping QDs, the Mini-Pac Opti has the trackball/spinner encoder built in and you can get prefab wiring harness for buttons (shown below) and another for trackball/spinner.


I'm just suggesting you consider the cost of the QDs + wire + crimp tool + your time to strip/crimp everything + finished quality when you make your choice.


Scott

1337atreyu

  • Trade Count: (0)
  • Jr. Member
  • **
  • Offline Offline
  • Posts: 6
  • Last login:August 21, 2012, 04:33:06 pm
Re: A New Beginning: The story of my first MAME cabinet
« Reply #9 on: July 08, 2012, 01:43:11 am »

1. Do you already have an encoder for your trackball?

2. Are you comfortable with wiring/crimping quick disconnects?

To answer your questions, no, I do not currently have an encoder for the trackball, but I will order that with the I-Pac. And yes, I am comfortable with the quick disconnects. In this project, the wiring and tedium of making the CP is actually what I am looking forward to the most. I pride myself in finding ways to efficiently organize jumbles of cords. For me, it's almost like crocheting for my wife. It's a somewhat mindless thing I can do while having a conversation or listening to an audible book. For that reason, I'll probably still use the I-Pac, but thanks for the suggestion of the Mini-Pac Opti.

Just a quick update. I now have the cabinet painted. I started using a glossy black spray paint, but I realized that my spray can skills were not up to snuff. I had two issues with the glossy. First off, and probably the most obvious, I didn't like the sheen. It reflected too much light and just made it look too fake. Second, the because of my ineptitude with a can of spray paint, the glossy paint dripped quite a bit. I know that if I had continued down that route, it would have taken way too long and I would probably have passed out from the fumes. I tried a second time with a flat black (still spray paint) and it turned out quite well if I do say so myself. I definitely like it better than the gray/silver that it was before I painted it.


Here is the glossy black paint up close. It dripped quite a bit and shone far too much


This shows the difference of the black to the silver. I like it way more, but the glossy finish wasn't quite doing it for me.


And here is the finished matte black paint. I much prefer this to the glossy. It covered evenly without dripping and gives it a cool look. I covered this up with a flat clear coat as well for protection and cleaning purposes.

I took out the rear panel completely and will be replacing it with a full height door. I should be picking up the panel tomorrow, spraying it, and mounting it. It'll clean up the back quite a bit since the existing wood back there was chipped away. I also bought the wood I needed to make the CP housing, but I haven't been able to get in touch with anyone who has a table saw that I can use quite yet. The previous CP that was on the machine was made of plywood, but I am actually going to use MDF for this. I like the finish on the exterior better and it will probably be better construction so that the player can put more weight on it. I have actually adjusted my thoughts on the button layouts to include eight buttons for each player. I figure that the machine is big enough that adding the extra row of buttons will not make the CP too cramped. I will still be using the original size of the CP as a template for my new housing (about 36 inches wide by 13 inches deep) It was originally used for a 4 player setup, so I don't think things will get too cramped.

Speakers should be showing up on Monday, so I will mount those in the top. I also have a couple of SATA cables on the way for the hard drive in the PC, so I'll be able to get the software up and running in due time.

I think that my main question now is about the monitor. I was originally hoping to get a CRT monitor, but it became clear that I wasn't finding anything remotely large enough to fit into that enclosure. A CRT TV would have been my next option, but I don't want to run everything in 480P. I think I have stumbled upon the conclusion that an LCD is the way to go. I'll probably have to go to a 16:9 aspect ratio, but it will probably be easier to mount and fits my needs better than my other options. I'll probably end up just building a panel that mounts to the brackets in the cabinet and just bolting it in there. I am assuming that the brackets in there were to mount an LCD, but I'm not sure. You can see them in the last picture I posted. I'm also concerned about how to black out the margins around the monitor. What do I do to make the screen look neatly surrounded by blackness?

In summary, here are my questions:

1. Given the cabinet I have and my goals, would an LCD TV or monitor be my best bet?
2. What do I do to black out the margins around the screen?

Thanks in advance,

Jordan

PL1

  • Global Moderator
  • Trade Count: (+1)
  • Full Member
  • *****
  • Offline Offline
  • Posts: 9408
  • Last login:Today at 11:48:00 am
  • Designated spam hunter
Re: A New Beginning: The story of my first MAME cabinet
« Reply #10 on: July 08, 2012, 06:24:14 am »
What do I do to black out the margins around the screen?

For flat tube CRTs and LCDs many people use a painted bezel on the inside of their monitor glass.

DrChek's Spike before:


And after:


Vigo used art board for both of his Vigolix builds, but wasn't very happy with the results. YMMV.

If you end up using a curved CRT, check out this thread.


Scott

alfonzotan

  • Trade Count: (0)
  • Full Member
  • ***
  • Offline Offline
  • Posts: 534
  • Last login:November 28, 2023, 08:39:45 am
    • The Cab With No Name
Re: A New Beginning: The story of my first MAME cabinet
« Reply #11 on: July 09, 2012, 08:51:03 am »

1. Do you already have an encoder for your trackball?

2. Are you comfortable with wiring/crimping quick disconnects?

To answer your questions, no, I do not currently have an encoder for the trackball, but I will order that with the I-Pac.

Don't spend a bunch of money on a trackball encoder, just get an old ball mouse and hack its board.  Works great.

1337atreyu

  • Trade Count: (0)
  • Jr. Member
  • **
  • Offline Offline
  • Posts: 6
  • Last login:August 21, 2012, 04:33:06 pm
Re: A New Beginning: The story of my first MAME cabinet
« Reply #12 on: July 24, 2012, 10:00:05 pm »
Hello all!

Sorry it's been a while since my last update, but I've been quite busy (both with the project and some other things). I think I have amassed enough new stuff to make an update worth it.

I will start with the boring stuff. I have added casters to the bottom of the cabinet (far better for moving it away from the wall, especially on my landlord's floor) and I have the back door installed. I think I might add another support between the walls because there is an almost imperceptible wiggle if pushed at the top. I'm convinced now that the reason there was a panel back there was to prevent the wobbling.

My second project was the monitor. I took the advice of plenty of people and opted for an LCD. It was easier to fit in given the space that I had to work with and I frankly didn't want to spend the money on an authentic arcade monitor. I bought a Vizio 1080P 26" TV from a local pawn shop. I didn't do my research in terms of the width I had available to me with the cabinet. When I got the TV home, I pulled the TV out and realized it was just about 1" too wide for the cabinet. Darn  :angry:. Keep in mind, this is a pretty ugly TV. The bezel extended about two inches from the sides of the screen on each side and it was about 2.5" thick. This called for some surgery. I removed the bezel and the speakers from the TV and gave it one more try. I put it in through the back of the cabinet and it fit with only about a centimeter on each side to spare. The screen is absolutely perfect for the cabinet.

The next step was actually mounting the monitor. Because the case was off of the TV, there was no more VESA mount for an easy install. I had to get creative. The screen was attached to the case of the TV using four screws that came through the corners of it. Because of the main board and the VGA connections protruding so far out of the back of the screen, I had to jerry rig this using a piece of 1x2. I cut three inch pieces and screwed them into the monitor. These were tick enough that I could mount them to my faux wall without the monitor resting on any of the electronics behind it. After it was mounted to the wood, I slid the entire contraption into the cabinet. Unfortunately, it was ever so slightly too thick to work with the existing brackets in the cabinet. These brackets were bolted on to the cabinet to the point that they were visible from the walls of the cabinet. Removing these would mean moving these bolts to a different location and filling the holes in. This was far too much work for me, so I simply took the monitor and mount out and shaved a couple of centimeters off of the four blocks of wood. The monitor still attached to the wood, but the electronics are pressed up against it to the point that it almost bent the monitor. I proceeded anyway and slid the monitor in for a second attempt. Perfect. The metal casing for the screen is actually touching the rest for the glass… at least on the bottom.

My next dilemma was finding out that the braces on the top of the cabinet were not parallel with the glass. This was fixed by sliding the remainders of the 1x2 between the bracket and the wood that the monitor was mounted on. That brought the screen about ˝ of an inch from the glass after it is put on.

My biggest dilemma was the control panel. When it comes to woodworking, I have no experience (unless you count the third grade woodworking projects I did at camp). I recreated the control panel that I got with the cabinet originally. I figure that since it was already made to match up perfectly with the bottom of the monitor glass, it'd be the best bet. This was originally made with plywood, but numerous people suggested MDF for this project. I blindly followed their lead. I was also under the impression that I would use a table saw to cut the basic shapes of the wood and the only need for a jigsaw to cut holes for the wires to pass through. My father-in-law told me otherwise. We used a jigsaw for the entire thing. We methodically ripped apart the old CP box traced each piece. My lack of experience drew this out into a 5 hour long woodworking project. For a freaking BOX!! I assembled the four sides and then had to throw some serious elbow grease into sanding the bottom piece down so it would fit in, but after waaaay too long, it finally paid off. It’s all assembled and the only remaining piece is the top (which I have cut to size, I just need to paint it and round the corners)

My final project since my last update lies in the monitor glass. I taped off the glass as best as I could over the visible area of the monitor and simply sprayed the back of the glass with the flat black spray paint that I used for the rest of the cabinet. My only issue is the small sliver of monitor bezel still visible in the top right.

My question now lies in the mounting of the trackball. I just need to know how to flush mount it without using the super high mount system sold on GGG. I ordered the Electric Ice-T system V2.5, which is not supported by the high mount system. Any suggestions? I am also wondering where I can get a monitor surround to black out the bezel perfectly.

Btw, Flickr doesn't want to accept my uploads right now and I'm at work. I'll edit this and post the pictures right away when I get home.

*EDIT*

Here are the promised pictures...
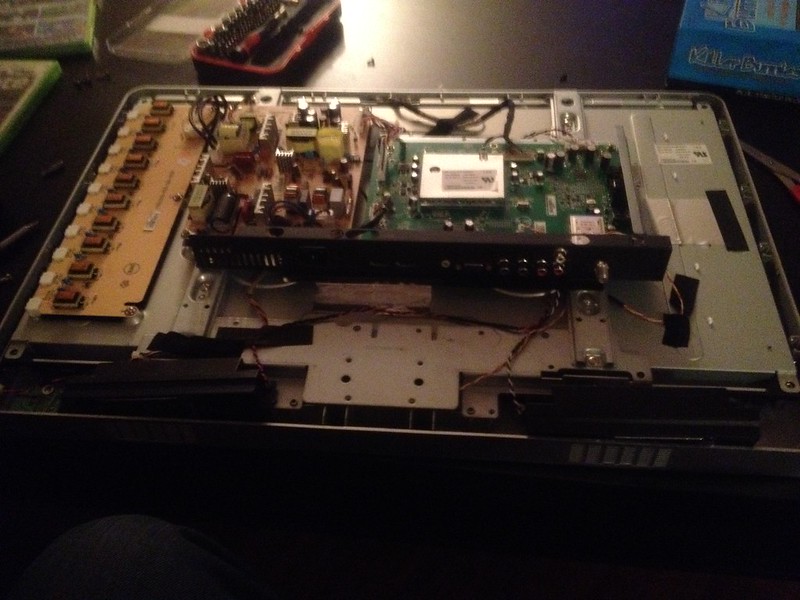

The gutted monitor from the back. It doesn't show the bezel very well, but trust me, the thing was fugly
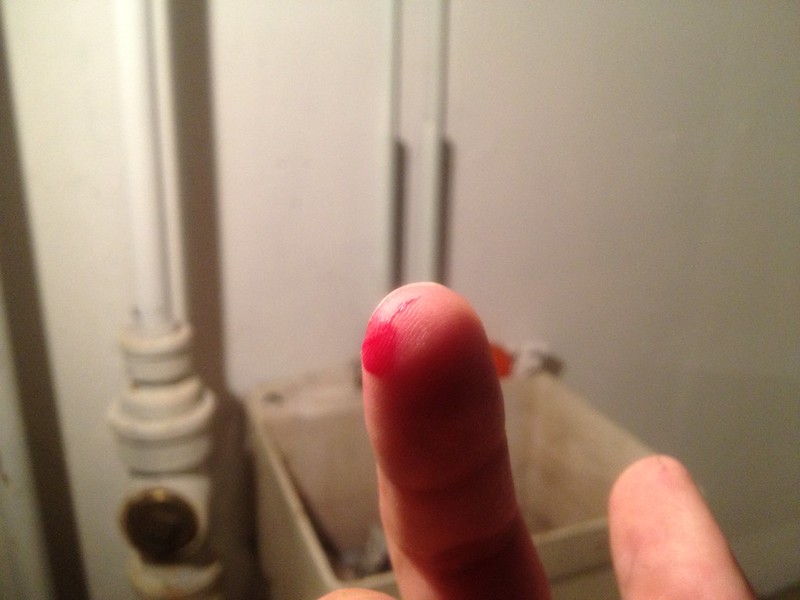

The result of a horrific accident involving a drill bit.
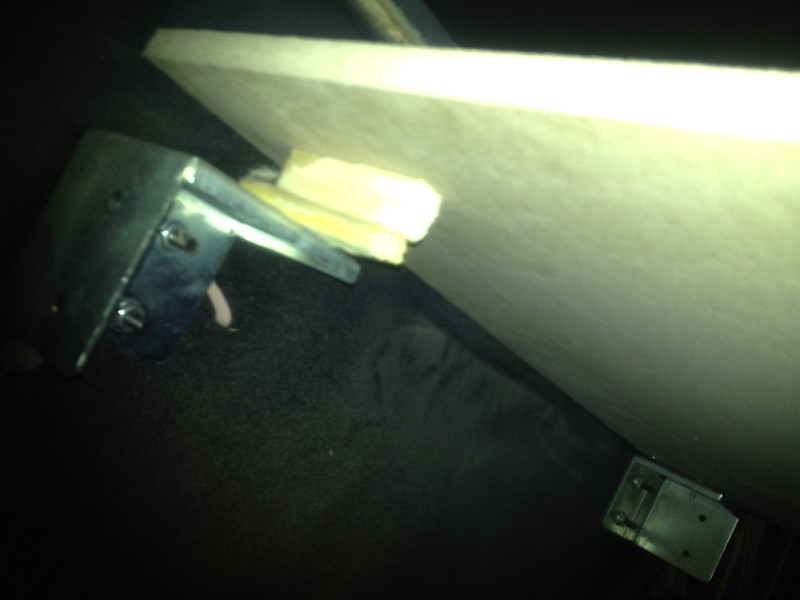

A bad photo of my rudimentary and temporary fix for the monitor leaning back on the top brackets.


A picture of the monitor mounted. The control panel is still the old one at this point (obviously)


Showing the sliver of monitor bezel still visible after painting.
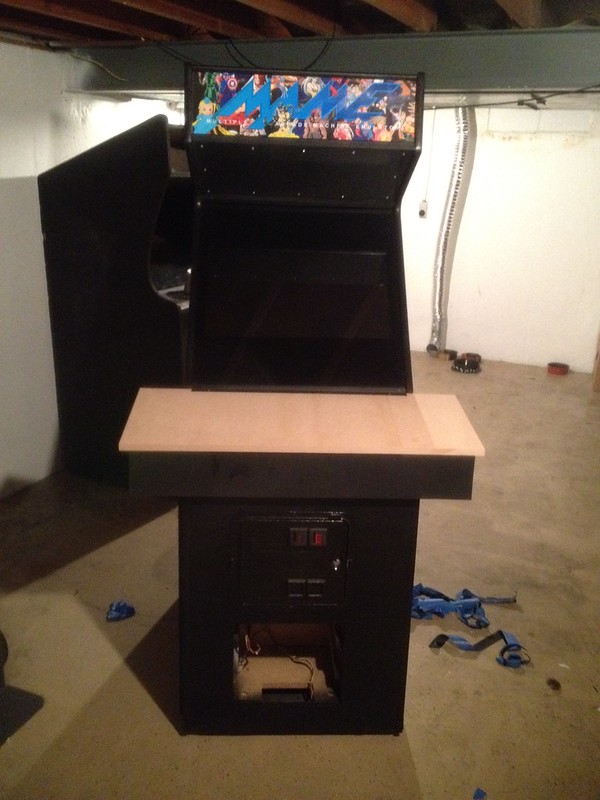

And finally, the arcade cabinet as of 7/23/2012. It's finally starting to look like a cabinet I want to play!
« Last Edit: July 25, 2012, 01:07:35 am by 1337atreyu »