Main Restorations Software Audio/Jukebox/MP3 Everything Else Buy/Sell/Trade
Project Announcements Monitor/Video GroovyMAME Merit/JVL Touchscreen Meet Up Retail Vendors
Driving & Racing Woodworking Software Support Forums Consoles Project Arcade Reviews
Automated Projects Artwork Frontend Support Forums Pinball Forum Discussion Old Boards
Raspberry Pi & Dev Board controls.dat Linux Miscellaneous Arcade Wiki Discussion Old Archives
Lightguns Arcade1Up Try the site in https mode Site News

Unread posts | New Replies | Recent posts | Rules | Chatroom | Wiki | File Repository | RSS | Submit news


Author Topic: 2nd Project - Metacab  (Read 4175 times)

0 Members and 1 Guest are viewing this topic.

metaHipster

  • Trade Count: (0)
  • Full Member
  • ***
  • Offline Offline
  • Posts: 80
  • Last login:January 10, 2010, 06:09:19 pm
  • Taking the next level to the next level
    • MetaHipster's Arcade Blog
2nd Project - Metacab
« on: February 21, 2008, 01:15:01 am »
A scant few may dimly remember MetaCab Jr -- a (Taito's Elevator Action-inspired) retro styled vert cab I made by rebuilding a found discarded hull of a crappy Big Electronic Games cab....  This is still in need of a few minor details (funny how that happens once you can actually play on a cab before it's 100% done).

I am at long last ready to work on its more full-featured companion, a 2-player horizontal cab I'm going to call MetaCab.  Don't ask me how Junior came before Sr. In retrospect it would have been way easier to tackle these the other way 'round.  At any rate, having fully stripped down & rebuilt/reinforced/upgraded the cabinet for MetaCab Jr., I knew that this time around I wanted to start with a mostly assembled empty cabinet and focus primarily on frontend, control panel, and marquee. 

I plan to include most emulators (or at least those systems I've owned ;) plus MAME.  I'm going to be using Maximus Arcade this time since Mamewah proved to be such a right bastard to configure by hand.  I may drop this on Metacab Jr. once I get some free time.  It's a very nice FE and easy to use/skin/customize.

I started by finding this old black/white Taito cab (no monitor, gutted) for cheap thanks to some guy named Marty on Craig's List.  Sorry for crappy phone pic.

I then touched up the black with a big stinky marker and cleaned up the white with a Magic Eraser.  Looking good with just under 1 hr of time put into it (compared to the 30+ hrs I put into the other cab to get it this far and still not looking this cool side-panel-wise.


Tonight, I've just put the finishing touches on my first draft of a CP Overlay design.  I went with an inverse stripe motif which should jive well and not be too distracting hopefully.  My goal was to make use of lots of empty space but not make a big surfboard. So it felt not cramped and not imposing. More blathering about it at my blog post

I'm interested to hear what CP modifications folks recommend though i can't promise I'll put them into effect :)  Also whether anyone thinks it's at all worth trying to fit two spinners and/or two trackballs (marble madness, rampart, some arkanoids, not  many games that would use them from what I can think).


Click To Enlarge

« Last Edit: February 21, 2008, 10:18:25 am by metaHipster »

surface tension

  • Trade Count: (0)
  • Full Member
  • ***
  • Offline Offline
  • Posts: 323
  • Last login:July 01, 2018, 08:45:48 am
  • feel the tension...
    • surface tension tables
Re: 2nd Project - Metacab
« Reply #1 on: February 21, 2008, 04:22:35 am »
Man, I love that side art. Great work on keeping the theme with the control panel.

metaHipster

  • Trade Count: (0)
  • Full Member
  • ***
  • Offline Offline
  • Posts: 80
  • Last login:January 10, 2010, 06:09:19 pm
  • Taking the next level to the next level
    • MetaHipster's Arcade Blog
Re: 2nd Project - Metacab
« Reply #2 on: February 21, 2008, 03:17:15 pm »
hey thanks, yeah I love the side art too.  I think the general vibe of the CP art won't need to change much but upon mocking up what the CP would look like on the cabinet, I don't think it looks very elegant (see more blathering on this topic at my metacab blog)


Click to enlarge


Assuming I go instead with a T-shape like Ubercade's, anyone have any suggestions on where to put P1/P2/Pause/Quit/Coin1/Coin2 buttons?  I'm thinking maybe put the Coin buttons on front face of cp box (left of the red pinball button).  I did that on Metacab Jr and it's nice as you're reaching down center reminiscent of putting coins in the slot. 

I see there's some room up by the trackball but I've had issues in the past with people rolling their hand off the ball & accidentally hitting QUIT to exit the game so want to be sure I'm taking that into account...

leapinlew

  • Some questionable things going on in this room with cheetos
  • Trade Count: (+4)
  • Full Member
  • ***
  • Offline Offline
  • Posts: 7919
  • Last login:June 29, 2025, 08:37:44 pm
Re: 2nd Project - Metacab
« Reply #3 on: February 21, 2008, 03:39:18 pm »
You ever see Knievels Taito cabs?

http://forum.arcadecontrols.com/index.php?topic=65678.0

Maybe you can get some ideas...

somunny

  • Trade Count: (+8)
  • Full Member
  • ***
  • Offline Offline
  • Posts: 1618
  • Last login:June 17, 2025, 02:49:55 pm
  • Is it hot in here?
Re: 2nd Project - Metacab
« Reply #4 on: February 21, 2008, 09:19:07 pm »
I really dig how you've tied in the existing sideart with the new control panel.  Great job!

surface tension

  • Trade Count: (0)
  • Full Member
  • ***
  • Offline Offline
  • Posts: 323
  • Last login:July 01, 2018, 08:45:48 am
  • feel the tension...
    • surface tension tables
Re: 2nd Project - Metacab
« Reply #5 on: February 22, 2008, 05:40:27 am »
It's the over-size that's making it look not-so elegant. The link from lew for knievel's cab might work for you. I have to say that the way the cp and admin buttons are layed out on his cab is really nice.

I've now been checking UK sites for a Taito cab like this (even though I don't have the room :blah:) with side art... but I reckon I'm dreamin there. I've been looking to build an upright and I feel like I now have some direction.


Franco B

  • Trade Count: (+10)
  • Full Member
  • ***
  • Offline Offline
  • Posts: 3766
  • Last login:February 15, 2024, 09:14:06 am
Re: 2nd Project - Metacab
« Reply #6 on: February 22, 2008, 09:05:07 am »
Loving it, that CP art blends in really nicely. As st said it does look a little oversize for the cab. I know its tricky to get enough room for the controls etc as well as keeping the size down but I think it would look better with a smaller CP, just my £0.01.

Apart from that, keep it up!

metaHipster

  • Trade Count: (0)
  • Full Member
  • ***
  • Offline Offline
  • Posts: 80
  • Last login:January 10, 2010, 06:09:19 pm
  • Taking the next level to the next level
    • MetaHipster's Arcade Blog
Re: 2nd Project - Metacab
« Reply #7 on: February 22, 2008, 04:38:33 pm »
It's the over-size that's making it look not-so elegant. The link from lew for knievel's cab might work for you. I have to say that the way the cp and admin buttons are layed out on his cab is really nice.

I'll try a mockup without the utility/start btns left/right of the side panels to see if a T-Shape such as was used on Ubercade looks better.  I can hardly aspire to the godlike skills Knievel has but in looking at his taito cab, he had the luxury of not trying to fit 6-btn 2player setup and also that he is only using trackball (no Spinner).  This will probably be the last cab I can fit in my basement for a while so I'm trying to at least somewhat in the swiss-army-CP direction while trying to keep as tasteful as possible. I know that multiple detachable CP's that can be quickly switched out would be the best way to keep the small form factor but, well, meh.

I've now been checking UK sites for a Taito cab like this (even though I don't have the room :blah:) with side art... but I reckon I'm dreamin there. I've been looking to build an upright and I feel like I now have some direction.

Wouldn't hurt to get up to speed on all the games Taito made cuz you're more likely to find cabs by game than by searches for Taito (maybe that's what you're already doing).   I totally lucked out in that I was about to buy some empty crappy golf game cab (neon blue with chrome trim? ugh.) and then I saw the taito cab lurking in the back of this guy's overcrowded storage area.  Good luck!

RetroBorg

  • Trade Count: (0)
  • Full Member
  • ***
  • Offline Offline
  • Posts: 818
  • Last login:July 06, 2022, 09:22:13 am
  • Your arcade games will be assimilated!
Re: 2nd Project - Metacab
« Reply #8 on: February 24, 2008, 03:02:43 am »
I love that control panel art and how it fits in with the sideart.  :applaud:

metaHipster

  • Trade Count: (0)
  • Full Member
  • ***
  • Offline Offline
  • Posts: 80
  • Last login:January 10, 2010, 06:09:19 pm
  • Taking the next level to the next level
    • MetaHipster's Arcade Blog
Re: 2nd Project - Metacab
« Reply #9 on: February 24, 2008, 04:51:58 am »
Always the perfectionist, I ignored everyone's comments and redid the control panel after all. I think this new version is even better and just feels more integrated in both style and form.  For further blather, as per usual, there's a blog post.

for the lazy among you, here's the highlight pics so you don't have to click in if you don't want to.

Click to Enlarge
.  The grey areas are what I'll cut out, as can be seen in this updated cabinet mockup:


Click to Enlarge


After looking at this more closely, I think already I may nix the red t-molding in favor of white... I'll just have to see how intense the red is as I don't want it to overpower the whole layout.

Here's a closeup of the first draft of the Marquee (quite likely to change):

Click to Enlarge
  As you can see, I'm really trying to go all out with the 70's futuristic look...  As mentioned in blog, I think I'll design a bezel too.

metaHipster

  • Trade Count: (0)
  • Full Member
  • ***
  • Offline Offline
  • Posts: 80
  • Last login:January 10, 2010, 06:09:19 pm
  • Taking the next level to the next level
    • MetaHipster's Arcade Blog
Re: 2nd Project - Metacab
« Reply #10 on: March 18, 2008, 09:36:55 pm »
Just a note that I finally stopped messing with the art (Yes, i claimed I was done once already).  I've gone ahead & ordered the marquee and CPO from mamemarquees.  As you can see, I spiced up the CPO considerably from the version above.  Also still waffling on whether to use red T-Molding.


Also changed the font to Intellivision.  While the pic shows red text, I actually opted for all-white.

i'll post some more pics once I've got some actual process assembling this thing now that all the pieces seem to be falling into place prep-wise and purchase-wise....
Until then, here's a link to the blog post with closeups of everything and more rambling as per usual.


BASS!

  • Just have fun.
  • Trade Count: (+1)
  • Full Member
  • ***
  • Offline Offline
  • Posts: 837
  • Last login:August 10, 2013, 03:12:33 am
Re: 2nd Project - Metacab
« Reply #11 on: March 21, 2008, 04:00:52 am »
I love the design, the lines on that cab just bring back memories. Ahh sweat beer and cigarette smoke. Also I can't help but get the 2001 reference on your cp.


metaHipster

  • Trade Count: (0)
  • Full Member
  • ***
  • Offline Offline
  • Posts: 80
  • Last login:January 10, 2010, 06:09:19 pm
  • Taking the next level to the next level
    • MetaHipster's Arcade Blog
Re: 2nd Project - Metacab
« Reply #12 on: November 08, 2008, 05:14:08 pm »
"Warning: this topic has not been posted in for at least 120 days.
Unless you're sure you want to reply, please consider starting a new topic."
haha.  Yes it's been a long freaking time in coming.  the few minor advances I made went unreported but as I'm hovering now around the 90% completion stage (playable & nearly all art/controls applied), I figured I'd post an update here... 

***All the pics below were snagged from my arcade blog... if any aren't loading or you want larger versions, please visit the Metacab blog directly.

I got a nice big box full of buttons, magsticks, a spinner, etc. from Ultimarc.  Plus bonus was that a coworker found a discarded golden tee CP from which I was able to harvest a sweet 3" Happ Trackball for FREE! 


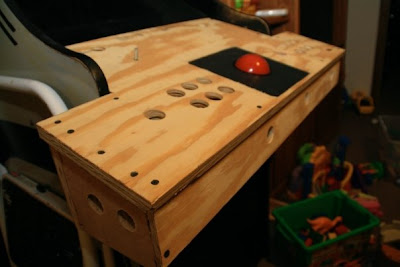
Then about 8 months went by during which nothing got done and eventually a coworker's new asteroids cab inspired me back into action.  I made a rough CP top

Click to Enlarge


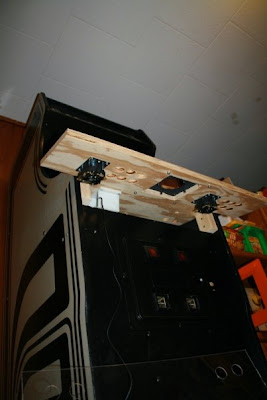
and got my 19" LCD monitor installed easily enough thanks to the VESA mounts, though in this pic the angle of the monitor caused color issues for shorter people so I later had to adjust the pitch.


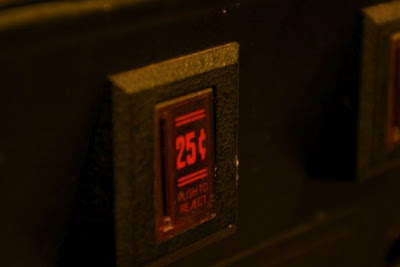
The coin door appears like it could work though I haven't tried yet.  Some minor damage around coin returns but nothing major. 

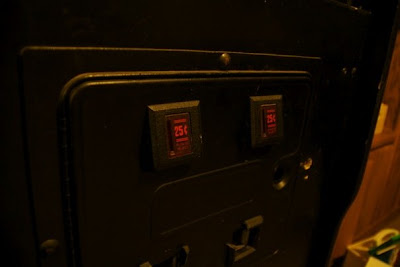
Slots seem in good order


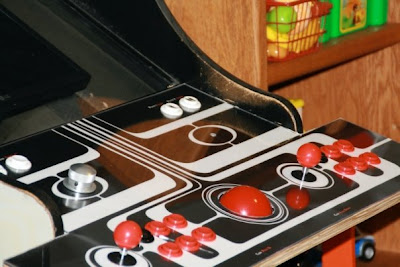
I finally found the time to add the front/sides/back to the CP


It still has no bottom to it but as wires are tucked up beneath via staples I'm hoping this won't be a big deal.  I put some grooves around the lower edges but it remains to be seen whether that will actually work without sagging due to thinnness of 1/8" board required to fit.

Next it was just a matter of adjusting the pitch of the monitor with a couple triangle chunks of 2x4".  As well as slot-cutting the top for the 7/8" T-Molding and painting it all up with some satin black.

Click to Enlarge


Click to Enlarge


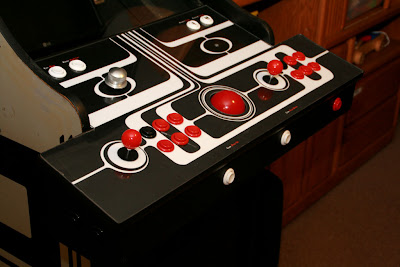
There were a few "accidents" during the final hole cutting and edge trimming of plexi as well as the edges are a bit less than perfect; however given my lack of a real wood shop, I'm super psyched with how this turned out and the shine the plexi provides makes it pretty sweet.  Definitely better than the vinyl-only overlay i did for Metacab Jr. 

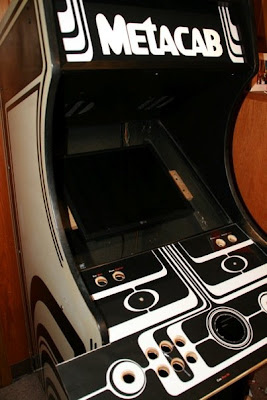
Here's a more full view:
Click to Enlarge


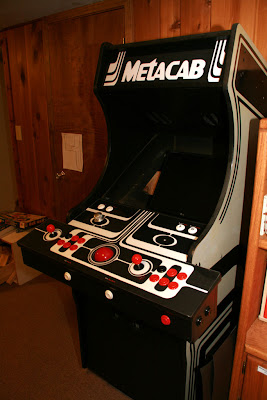
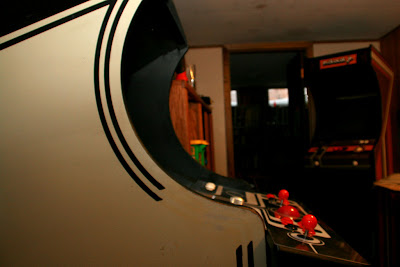
And here's a closeup with Metacab Jr. in the back.
Click to Enlarge


WHAT'S LEFT...

I still need to build some manner of bezel around the monitor which will be tricky due to the inset angles/etc.  I'm hoping to build some manner of interlocking tag-board mockup for now.

As seen above, there's a little striping missing near the control panel - I will need to make some sort of stencil to get it sharp enough, i fear.

I have the pinball buttons wired up to L/R mouse for now - once I get into trying out Visual Pinball or the like, I may need to rewire/remap a few buttons here or there.

Analog controls drive the mouse just fine but Mame doesn't seem to jive with them yet for some reason - I'll be posting elsewhere on the 'board to try to figure that one out.
« Last Edit: November 08, 2008, 05:19:56 pm by metaHipster »