Main Restorations Software Audio/Jukebox/MP3 Everything Else Buy/Sell/Trade
Project Announcements Monitor/Video GroovyMAME Merit/JVL Touchscreen Meet Up Retail Vendors
Driving & Racing Woodworking Software Support Forums Consoles Project Arcade Reviews
Automated Projects Artwork Frontend Support Forums Pinball Forum Discussion Old Boards
Raspberry Pi & Dev Board controls.dat Linux Miscellaneous Arcade Wiki Discussion Old Archives
Lightguns Arcade1Up Try the site in https mode Site News

Unread posts | New Replies | Recent posts | Rules | Chatroom | Wiki | File Repository | RSS | Submit news


Author Topic: The Ghost in the Machine Mark II - New, Cleaner Sketchup Available  (Read 5409 times)

0 Members and 1 Guest are viewing this topic.

weisshaupt

  • Trade Count: (0)
  • Full Member
  • ***
  • Offline Offline
  • Posts: 128
  • Last login:April 12, 2024, 05:54:45 pm
    • The Ghost in the Machine Project Thread
Warning: This project will take as long or longer for me to build than PixelHugger's Mission control..


Unfortunately I am forbidden to ever build a cabinet ever again by my wife, so instead I did a bit of virtual building..
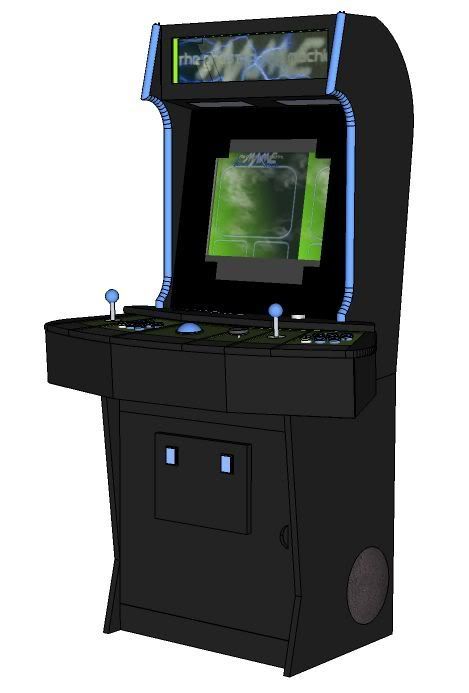
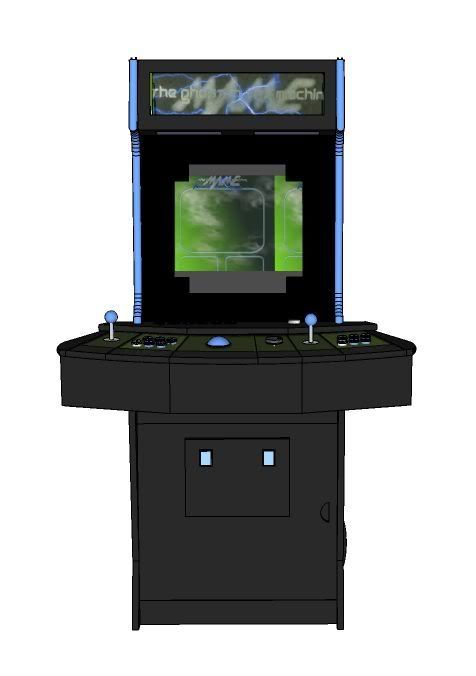
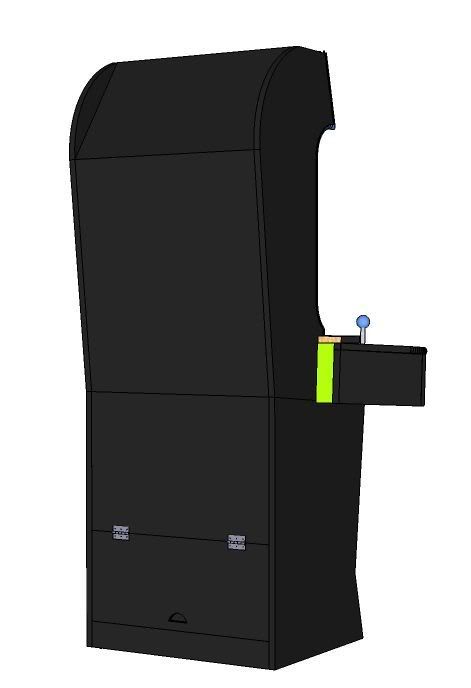
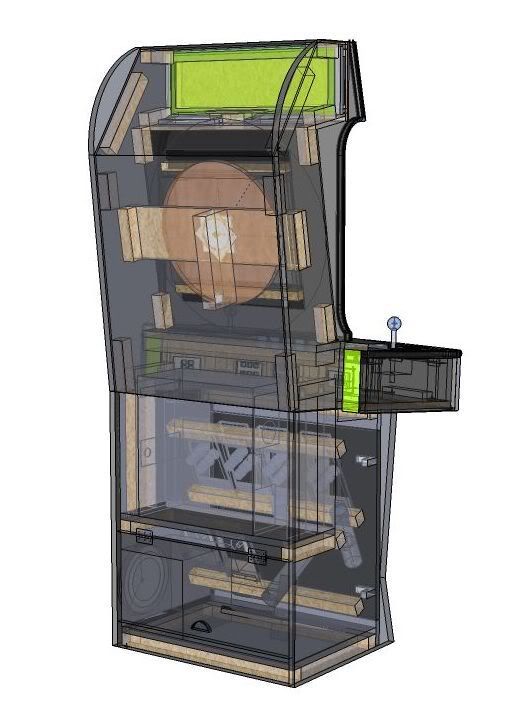
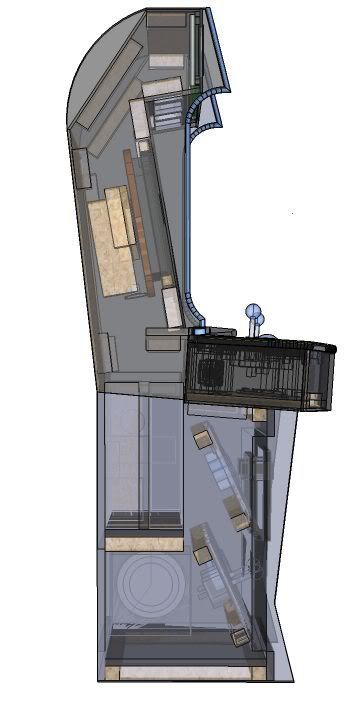
This has most of the design features of Ghost in the machine with the following improvements:

1. Concentric Circle Panels allowing the CP to support 4 players without being stupidly large
2. An angled place for the "top" to sit, to further ensure it can't tip backward (on the current machine I had to install a bracket to ensure this wouldn't happen)
3. A Lazy Susan for rotating the monitor (and possibly moving to the chain and sprocket on outside edge)
4. 24 inch CCFLs for more even  etched marquee illumination
5. Bottom lighting for front of panels allowing the deletion of the big bulky doors (I tried this with 1/4 inch plexi, and it works great- scuff up the bottom of the acrylic over the CCFL, and put silver duct tape on the top, cover with vinyl. - This design uses 1/8 in plexi - so there is an experiment left to perform)
6. Door that opens below panel doors to allow easier access to panel storage (The current machine requires you open the storage drawer and then open the panel door or one gets in the way of the other)
7. Compact, more "woody" and "evolution" like design
8. Improved storage with vertical racks and enough room for a twisty grip.
9. Lighter top section

Cons:
1) Much more complex panel and rail design, with more surfaces that have to be kept perfectly clean during assembly (or the light will show that they are not)
2) Going to 4 player mode requires removal and insertion of panels

I welcome any comments that any of you might offer. I've already had my share of DOH! moments because I waited to unveil the Ghost till I was done. In particular I welcome CP art ideas. I want to do everything etched again, but this time I will probably pay to have the panels lazer cut and etched if I ever execute this. On Ghost, I tried to theme the panels with Asteroids, but in the end, each panel was its own theme and I think it hurt the overall look. If someone can come up with something really clever that can be spread across multiple panels and placed in any order and still look really cool, please let me know. Right know I am contemplating a "armor attack" vehicles driving in a "Maze" of buildings (which of course do NOT span panels) , where the buildings are more spread out, and vehicles from various other games are used as well as the original Armor Attack vehicles.

I want to build this, but I have to convince my wife to let me build again.. in the meantime, I would love some feedback on this design. What should be removed, what should be added etc. I would like to have this pretty well mapped out by the time my wife lets me implement again so it won't take the 1.5 years that Ghost took.
 If however, anyone has the inclination to build this, or something similar, long before I do , the full sketchup file for the cabinet can be downloaded here:

http://myfreefilehosting.com/f/3bee78ead7_4.64MB

or from the Google 3D warehouse
http://sketchup.google.com:80/3dwarehouse/download?mid=f4c4aeca3b62a9003249765cb22f9604&rtyp=s6&fn=GhostintheMachineMarkII&ctyp=sm

and Sketchup (the free Google CAD program) can be downloaded here:
http://sketchup.google.com/


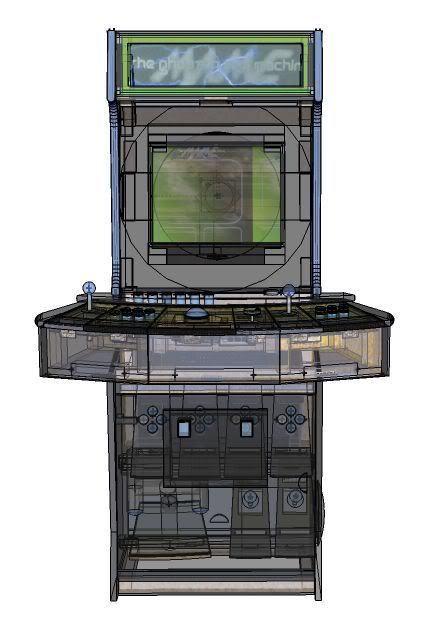
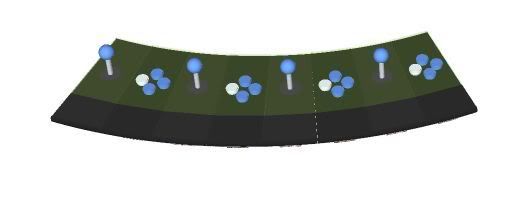
Here is what the 4 player layout will look like:


« Last Edit: February 20, 2008, 06:26:47 pm by weisshaupt »
“A government ... cannot have the right of altering itself. If it had, it would be arbitrary. It might make itself what it pleased; and wherever such a right is set up, it shews there is no constitution” - Thomas Paine, Rights of Man

WaRpEd

  • Trade Count: (0)
  • Full Member
  • ***
  • Offline Offline
  • Posts: 272
  • Last login:December 03, 2022, 12:00:41 pm
  • The older I get the better it was!!
    • Warped products
Re: The Ghost in the Machine Mark II
« Reply #1 on: February 19, 2008, 10:26:06 pm »
I like the overall design.
2 things come to mind more room in the toe kick area on the front.
Also either a fan or good ventilation for the monitor area to move air away from the front.
Is the back of the cabinet angled or straight?
There are three kinds of people in the world those that can count and those that can't.

weisshaupt

  • Trade Count: (0)
  • Full Member
  • ***
  • Offline Offline
  • Posts: 128
  • Last login:April 12, 2024, 05:54:45 pm
    • The Ghost in the Machine Project Thread
Re: The Ghost in the Machine Mark II
« Reply #2 on: February 20, 2008, 12:12:07 am »
I like the overall design.
2 things come to mind more room in the toe kick area on the front.
Also either a fan or good ventilation for the monitor area to move air away from the front.
Is the back of the cabinet angled or straight?

Hi WaRpEd,

Thanks for the feedback. However, I don't understand the toekick comment. Do you mean making more of a panel overhang? Or just making the base deeper? Its an LCD based cab, so  the base is only 18 inches deep or so. The Back is angled...


I didn't place Fans into the model yet, as I was unsure where to put them. The PC sits high up on a shelf, still in its case, right behind the CP (its there in the picture on the shelf above the sub).  I figure the Top of the unit will act as a chimney funneling heat up.  I don't know if I will need active cooling, or just a vent near the PC shelf and another on top to start a convection flow..  Thoughts?


Is your main concern heat from the LCD monitor (which I would think would be small) or from the PC?
“A government ... cannot have the right of altering itself. If it had, it would be arbitrary. It might make itself what it pleased; and wherever such a right is set up, it shews there is no constitution” - Thomas Paine, Rights of Man

Bender

  • Trade Count: (+1)
  • Full Member
  • ***
  • Offline Offline
  • Posts: 1919
  • Last login:November 28, 2016, 08:12:21 pm
    • Happ to Tron Conversion tutorial
Re: The Ghost in the Machine Mark II - New, Cleaner Sketchup Available
« Reply #3 on: February 20, 2008, 06:41:14 pm »
Man That is some impressive sketch up work!!  :applaud:
Nice Design too!

Hope You get to build it
I'd love to see the finished product

WaRpEd

  • Trade Count: (0)
  • Full Member
  • ***
  • Offline Offline
  • Posts: 272
  • Last login:December 03, 2022, 12:00:41 pm
  • The older I get the better it was!!
    • Warped products
Re: The Ghost in the Machine Mark II - New, Cleaner Sketchup Available
« Reply #4 on: February 20, 2008, 07:50:29 pm »
Hey weiss
The first render was a 3/4 view and didn't show the side profile well.
My concern was the wear and tear on the bottom of the cabinet people tend to shift around during a game and possibly scratch the paint.
There are three kinds of people in the world those that can count and those that can't.

csa3d

  • Trade Count: (+2)
  • Full Member
  • ***
  • Offline Offline
  • Posts: 872
  • Last login:March 07, 2011, 08:16:35 am
  • Will game for food
    • Galaxian Mame Conversion
Re: The Ghost in the Machine Mark II - New, Cleaner Sketchup Available
« Reply #5 on: February 22, 2008, 08:17:40 am »
Like the design so far.  I'm never really a fan of the "plus" window blackout design in rotating monitor setups.  I'd personally try to find a way to make that  a single square front opening, and conver the monitor with a circular bezel that overlaps underneath.  This will clean up those edges and simplify it.  Behind dark tinted glass, I think you'd hide the fact that it is meant to rotate better.

-csa

weisshaupt

  • Trade Count: (0)
  • Full Member
  • ***
  • Offline Offline
  • Posts: 128
  • Last login:April 12, 2024, 05:54:45 pm
    • The Ghost in the Machine Project Thread
Re: The Ghost in the Machine Mark II - New, Cleaner Sketchup Available
« Reply #6 on: February 22, 2008, 10:25:20 am »
Like the design so far.  I'm never really a fan of the "plus" window blackout design in rotating monitor setups.  I'd personally try to find a way to make that  a single square front opening, and conver the monitor with a circular bezel that overlaps underneath.  This will clean up those edges and simplify it.  Behind dark tinted glass, I think you'd hide the fact that it is meant to rotate better.

-csa

Huh, hadn't really noticed a problem with that on Ghost. Most folks are surprised when the thing starts moving. I used PLexi painted on the back for both the inner and outer bezels, and its really not obvious looking at the screen that there is something funky.
 However,  The simple square design is certainly easier to mask.. I think it took me 3 tries to get it right on Ghost. The trick is cutting a piece of plexi with a hole in the middle.
Others seem to have an easy time with the plexi, but I just have a difficult time cutting, routing or really doing anything with it. Wish I knew what I was doing wrong
“A government ... cannot have the right of altering itself. If it had, it would be arbitrary. It might make itself what it pleased; and wherever such a right is set up, it shews there is no constitution” - Thomas Paine, Rights of Man

Cornchip

  • Trade Count: (+1)
  • Full Member
  • ***
  • Offline Offline
  • Posts: 228
  • Last login:December 27, 2023, 10:23:11 am
  • Thinking up more crap....
Re: The Ghost in the Machine Mark II - New, Cleaner Sketchup Available
« Reply #7 on: February 22, 2008, 01:43:01 pm »
   I went with round for my front mask. It seemed logical at the time. With a rotating screen setup you end up with two masks. The monitor wheel behind provides the second rectangular mask we are so accustomed to seeing.

 Cornchip.
 

psychotech

  • Trade Count: (0)
  • Full Member
  • ***
  • Offline Offline
  • Posts: 525
  • Last login:October 27, 2011, 11:01:50 pm
    • psychotech
Re: The Ghost in the Machine Mark II - New, Cleaner Sketchup Available
« Reply #8 on: March 02, 2008, 07:59:11 pm »
Awesome stuff!

Mark I is great, and MKII ... :notworthy:

You've gotta build it, soon!!!

More pictures?  ;D

weisshaupt

  • Trade Count: (0)
  • Full Member
  • ***
  • Offline Offline
  • Posts: 128
  • Last login:April 12, 2024, 05:54:45 pm
    • The Ghost in the Machine Project Thread
Re: The Ghost in the Machine Mark II - New, Cleaner Sketchup Available
« Reply #9 on: March 02, 2008, 10:55:33 pm »
More pictures?  ;D
Pictures what exactly? I can take as many shots of the Mark II as you want.. but then you could also download sketchup, the model and just rotate around it at what ever angles you want, pull pieces off and look inside, pretty much do aything you want-- including build it before I get the chance! :cry:

  I have tenative permission form the wife to start building the Mark II in the fall, if I am a good boy all summer and spend lots of time with my Kids. (A duty she feels I neglected, despite my daughter always wanted to help and that we play the Mark I together ... )
“A government ... cannot have the right of altering itself. If it had, it would be arbitrary. It might make itself what it pleased; and wherever such a right is set up, it shews there is no constitution” - Thomas Paine, Rights of Man

psychotech

  • Trade Count: (0)
  • Full Member
  • ***
  • Offline Offline
  • Posts: 525
  • Last login:October 27, 2011, 11:01:50 pm
    • psychotech
Re: The Ghost in the Machine Mark II - New, Cleaner Sketchup Available
« Reply #10 on: March 03, 2008, 03:42:17 am »
Yeah, have sketchup installed etc. ...maybe you missed this  ;D after the text ..  ::)

That is an awesome model you've created ...
but maybe I'll just build me something a bit different.

 :cheers:

DaOld Man

  • Trade Count: (+4)
  • Full Member
  • ***
  • Offline Offline
  • Posts: 5139
  • Last login:December 13, 2023, 12:03:14 am
  • Wheres my coffee?
    • Skenny's Outpost
Re: The Ghost in the Machine Mark II - New, Cleaner Sketchup Available
« Reply #11 on: March 03, 2008, 08:44:02 am »
Others seem to have an easy time with the plexi, but I just have a difficult time cutting, routing or really doing anything with it. Wish I knew what I was doing wrong

Im not sure about others, but I found the best way to cut the plexi is to sandwich it between two pieces of wood. Clamp the sandwich together tightly (C Clamps work good). I used a skill saw for the straight cut, then smoothed it up with a router. At first I used a jigsaw, but it left a very crooked cut.
I used a router to cut out square holes for trackball.
I used paddle bits to bore the button holes, still plexi sandwiched between two scraps of wood.
It seems to work good for me, but beware that a lot of small pieces of plexi are thrown out by the skill saw. They are sharp and will cut. You need gloves, sleeves, safety glasses and a face shield while cutting. One errant piece could claim an eye. Also I would do it outside if possible.

djplasmid

  • Trade Count: (0)
  • Jr. Member
  • **
  • Offline Offline
  • Posts: 2
  • Last login:August 02, 2009, 09:04:26 am
Re: The Ghost in the Machine Mark II - New, Cleaner Sketchup Available
« Reply #12 on: March 06, 2008, 10:52:07 am »
Dude.  This looks awesome.  How long did it take you to design this?  I'm downloading Google SketchUp as we speak.  It looks great.  How would the modular panels connect to the encoder once you dropped them in?

weisshaupt

  • Trade Count: (0)
  • Full Member
  • ***
  • Offline Offline
  • Posts: 128
  • Last login:April 12, 2024, 05:54:45 pm
    • The Ghost in the Machine Project Thread
Re: The Ghost in the Machine Mark II - New, Cleaner Sketchup Available
« Reply #13 on: March 06, 2008, 12:26:02 pm »
Dude.  This looks awesome.  How long did it take you to design this?  I'm downloading Google SketchUp as we speak.  It looks great.  How would the modular panels connect to the encoder once you dropped them in?

It took me about 10 days to get everything into Sketchup the way I wanted it, and some of that was learningcurve, as I had never used it before.  Another Fourm member asked me to sketchup some Bartop cabs for him, an now that I know what I am doing, that took about 90 minutes for the first cab (I owe him others but my employer and my wife keep making demands on my time.. Its hard to get anythingdone while travelling)

The Design is Heavily based on Ghost. I used the same mounting techniques for Marquee, Illuminated Molding, and Panels as I did on Ghost.  The Panels plug into standard Quickports just like they do on DOC's .. Its quick and easy. They also sell USB quickport inserts now (at $10 a Piece!)  so those with USB devices, its still as easy. Or you can just slap a hub or 2 in there..  The Quickports let you spread out a bit more so you can plug in under the panel rather than reaching over to the side.. and under a different one..

As I said before, If you like the deisng feel free to steal and augment.. It will be a long time before I can build it, and I would rather learn from other people's mistakes than my own :>)

“A government ... cannot have the right of altering itself. If it had, it would be arbitrary. It might make itself what it pleased; and wherever such a right is set up, it shews there is no constitution” - Thomas Paine, Rights of Man

weisshaupt

  • Trade Count: (0)
  • Full Member
  • ***
  • Offline Offline
  • Posts: 128
  • Last login:April 12, 2024, 05:54:45 pm
    • The Ghost in the Machine Project Thread
Re: The Ghost in the Machine Mark II - New, Cleaner Sketchup Available
« Reply #14 on: October 03, 2009, 10:14:59 pm »
Okay a Year and a Job loss later, the Wife has given me permission to start on the Mark II.
Of course that means I have had nearly two years to live with the Mark I and find its faults

For the most part the Mark II design will stand unaltered. (Comments/Criticisms are still wanted)  For  Now I believe I will:

1) include the many improvments that I have seen to my original Pizza-Pie Plate Motor design (Skate Bearings- why didn't I think of that!) . If I can find a off-the-shelf high current Motor driver compatible with TTL inputs ( what the Parallel port has)  I will upgrade to a 12V motor  (like a power window motor) (Yes I could build my own H-Bridge, But I am still trying to find something everyone can do- the secret motor driver still requires some assembly)

2) I will use LED Ribbons like those found at http://www.environmentallights.com/ - Several of the inverters driving the CCFLs on the Mark I have died and I just wnat something I can install and forget.   Ironically, the cost isn't that much more. This also allows me to use LEDs for  the lighted molding.

3) I will be using GGG Trackball and Buttons, and Ultimarc Spinners,  U-HID, and Ultrastick 360 Joys.  Only the button panels will use RJ-45 connnections ( I briefly considered using a Mini-Pac per board, so everything would be usb -- but then the cost got stupid)  Instead of illumnated Ball tops on the 360s, I will just illuminate the base cover.  I will be making them and the   spnner knob from UHMW Polyethyene plastic - since that is the closest thing I can find commercially to Randys super cool TB plastic.

4)  All of the panel Parts will be laser cut and laser engraved. I am going with a Panel Wide Tempest Theme, where each panel becomes part of a Tempest Board. The Board lines and Vector Graphics will be etched on the plastic. I will augment this with art under the etched plexi (probably a simple vector gradient and star field)  Leaser cutting and etching should take about 3 months off of the project. (I will post my templates in case anyone wants to do something similar. )

5) I am going to pony up for two additional Coin Buttons from Randy - I used to have them rigged so players 1 & 3 and 2&4 got coins when one or the other was pressed. My son however has proven it to me that with 3 players you really need to have separates.. (because games will start accidentally with the 4th player and then you have to keep moving him till his tokens run out)

6) I am keeping the Ghost in the Machine Marquee - just changing it so the words have a raster image of a circuit board in them. The Mame Image in the back ground I will also keep, but It will just be an outline of the words and it will be as faded as I can make it while still leaving it legible for someone interested in trying to read it

7) Adding a Office Ultrasonic "occupancy" sensor to I can switch the Lights on and off, bring the PC in/out of Standby (via UHID and a relay?) when someone passes by ( I recently got Solar, and the Mach I was drawing something like 10% of my homes power usage!!)

8) Adding a "Smart strip" as I sometimes have problems with the USB hub when everything is powered on at the same time.

I am kinda hoping as this is my second cabinet, I can get through building this one a little faster..
I have a parts/Price list already going - I am up to $2300 and counting - expect total cost to be right around $3000 with the PC and everything. (Hey this time I don't have to buy tools I didn't have - that means I can spend more right?  )

« Last Edit: October 03, 2009, 11:08:29 pm by weisshaupt »
“A government ... cannot have the right of altering itself. If it had, it would be arbitrary. It might make itself what it pleased; and wherever such a right is set up, it shews there is no constitution” - Thomas Paine, Rights of Man