Main Restorations Software Audio/Jukebox/MP3 Everything Else Buy/Sell/Trade
Project Announcements Monitor/Video GroovyMAME Merit/JVL Touchscreen Meet Up Retail Vendors
Driving & Racing Woodworking Software Support Forums Consoles Project Arcade Reviews
Automated Projects Artwork Frontend Support Forums Pinball Forum Discussion Old Boards
Raspberry Pi & Dev Board controls.dat Linux Miscellaneous Arcade Wiki Discussion Old Archives
Lightguns Arcade1Up Try the site in https mode Site News

Unread posts | New Replies | Recent posts | Rules | Chatroom | Wiki | File Repository | RSS | Submit news


Author Topic: Vewlix Slim cab - still stuff to do ...  (Read 110480 times)

0 Members and 1 Guest are viewing this topic.

SpaceHedgehog

  • Trade Count: (0)
  • Full Member
  • ***
  • Offline Offline
  • Posts: 937
  • Last login:February 06, 2023, 12:10:24 pm
  • Almost done ...
Vewlix Slim cab - still stuff to do ...
« on: September 02, 2009, 06:30:59 am »
Edit:

Cab as of Feb 2017. This cabinet has undergone many changes over the years and now looks quite different from the original build.


[URL=http://s218.photobucket.com/user/SpaceHedgehog/media/Vewlix%20Sunlight%202_zpsdoha5vas.jpg.html]


Respect for all the excellent projects on this site! I particularly like the originals.

Ok, so I,ve built a MAME lowboy style cab and was looking for something newer to make for fighting games. I found the Lindbergh style cab that someone had made fo VF5 and thought that it would be my next project. After looking into this for what was probably about a year or so, I came across the Vewlix cab and found that someone had made one (respect to Donovan Myers).


The only problem was that the original housed a 32 inch screen and I wanted to use the cab for PC and XBOX purposes so I decided to build one based around a 24 inch screen. Work started around 3 weeks ago so here's the progress to date:

Base unit:


Side templates cut:


Sides completed


Top section cut:


Top attached, Sides trimmed, legs and feet on:


Control panel started:


Front section fitted:


Control panel bolted on:


I'm currently in the process of filling, and sanding before I start painting.


« Last Edit: February 04, 2017, 08:57:24 am by SpaceHedgehog »
Click a pic for a video tour 

Franco B

  • Trade Count: (+10)
  • Full Member
  • ***
  • Offline Offline
  • Posts: 3766
  • Last login:February 15, 2024, 09:14:06 am
Re: Vewlix style cab. Slim version!
« Reply #1 on: September 02, 2009, 07:10:18 am »
Welcome to the boards and wow, what an extrance!  :)

It looks fantastic so far. The woodworking looks great. Keep it up and keep us updated  :applaud:

emphatic

  • Trade Count: (0)
  • Full Member
  • ***
  • Offline Offline
  • Posts: 2009
  • Last login:Today at 02:12:48 pm
  • -"Suck it, Donny!" -"No, YOU suck it.... more".
    • Emphatic's Video Game Collection
Re: Vewlix style cab. Slim version!
« Reply #2 on: September 02, 2009, 07:37:25 am »
Yes, very awesome.  :applaud:

SpaceHedgehog

  • Trade Count: (0)
  • Full Member
  • ***
  • Offline Offline
  • Posts: 937
  • Last login:February 06, 2023, 12:10:24 pm
  • Almost done ...
Re: Vewlix style cab. Slim version!
« Reply #3 on: September 02, 2009, 08:11:53 am »
Thanks for the welcome and the comments! Doing the prep work and painting is probably the hardest part in many ways. I'm looking to get this thing primed up by the end of next weekend.

If anyone would like to see any more pictures of the progress up to this point, let me know; I've taken a fair few already.
« Last Edit: September 02, 2009, 08:43:22 am by SpaceHedgehog »
Click a pic for a video tour 

XeviouS

  • Trade Count: (0)
  • Full Member
  • ***
  • Offline Offline
  • Posts: 132
  • Last login:March 11, 2016, 08:38:20 am
    • Noah's Arkade
Re: Vewlix style cab. Slim version!
« Reply #4 on: September 02, 2009, 08:28:54 am »

That is pretty impresive stuff indeed! :notworthy:

javeryh

  • Trade Count: (+1)
  • Full Member
  • ***
  • Offline Offline
  • Posts: 7904
  • Last login:Today at 03:22:36 pm
Re: Vewlix style cab. Slim version!
« Reply #5 on: September 02, 2009, 10:17:36 am »
If anyone would like to see any more pictures of the progress up to this point, let me know; I've taken a fair few already.

Yes!  The more pictures the better.  You are doing a great job so far!   :cheers:

Epyx

  • Trade Count: (+1)
  • Full Member
  • ***
  • Offline Offline
  • Posts: 1961
  • Last login:December 25, 2023, 07:56:36 pm
  • "You're an oddity"
Re: Vewlix style cab. Slim version!
« Reply #6 on: September 02, 2009, 10:48:54 am »
Agreed, nice clean cuts and imo the wood looks so much better than the plastic. This will look better than the original when complete, im sure.
Last Project


Epyx Tutorials:
Tutorials

SpaceHedgehog

  • Trade Count: (0)
  • Full Member
  • ***
  • Offline Offline
  • Posts: 937
  • Last login:February 06, 2023, 12:10:24 pm
  • Almost done ...
Re: Vewlix style cab. Slim version!
« Reply #7 on: September 02, 2009, 10:50:01 am »
If anyone would like to see any more pictures of the progress up to this point, let me know; I've taken a fair few already.

Yes!  The more pictures the better.  You are doing a great job so far!   :cheers:

Ok!

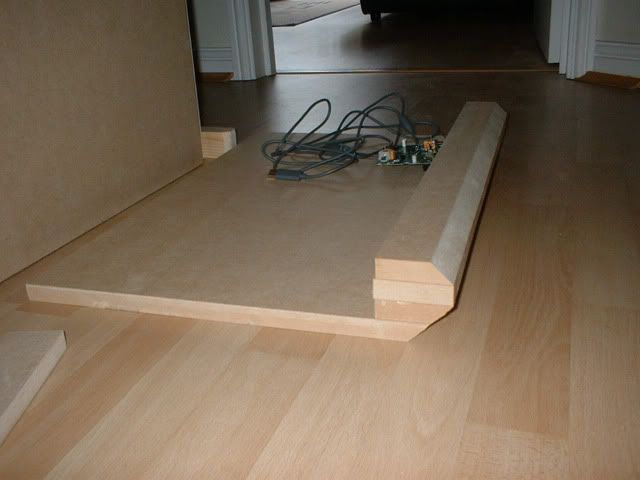
Here's the template used to cut all the top pieces. I used a router to cut the remaining 3 to get an acurate fit:


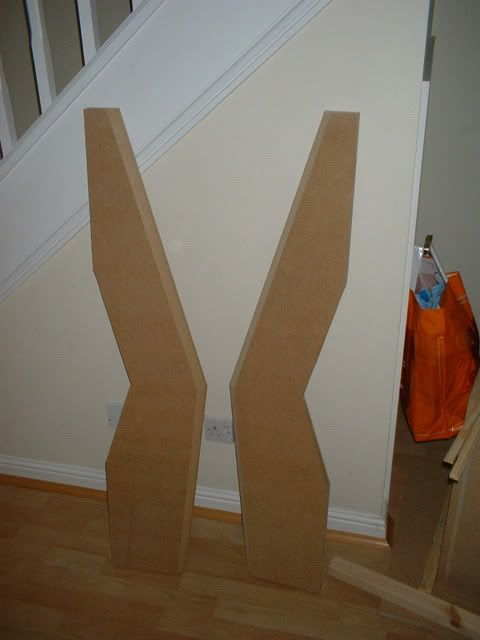
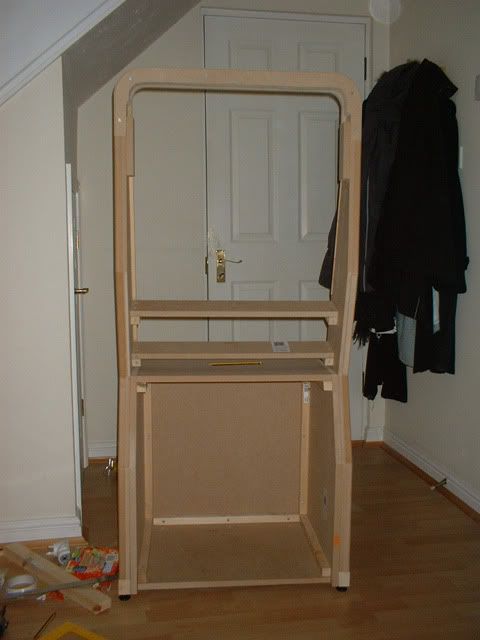
A picture of the completed sides. Each has 2 parts made from 12mm and 18mm MDF glued together. The outside edges were routed with a large 45 degree chamfer bit:


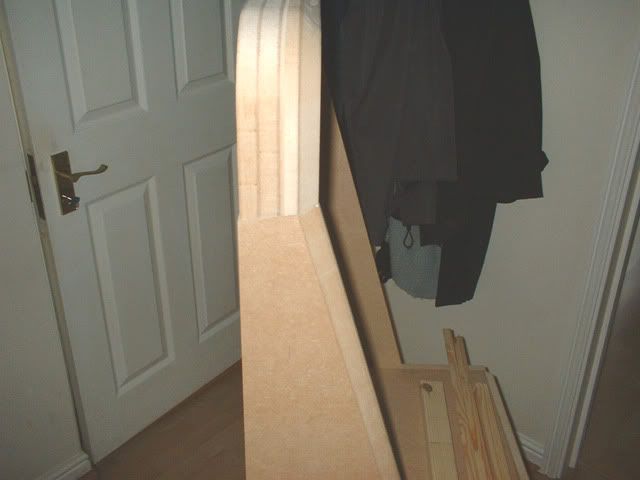
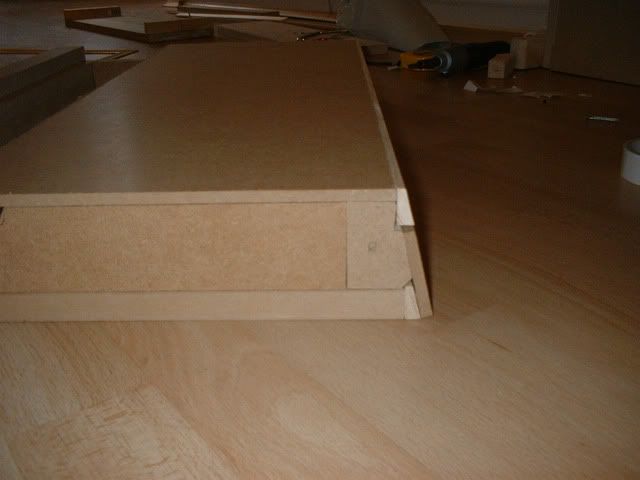
Here's a closeup of the top attached to the sides. It needed to be an anged cut to get the bevelled edges to line up correctly:


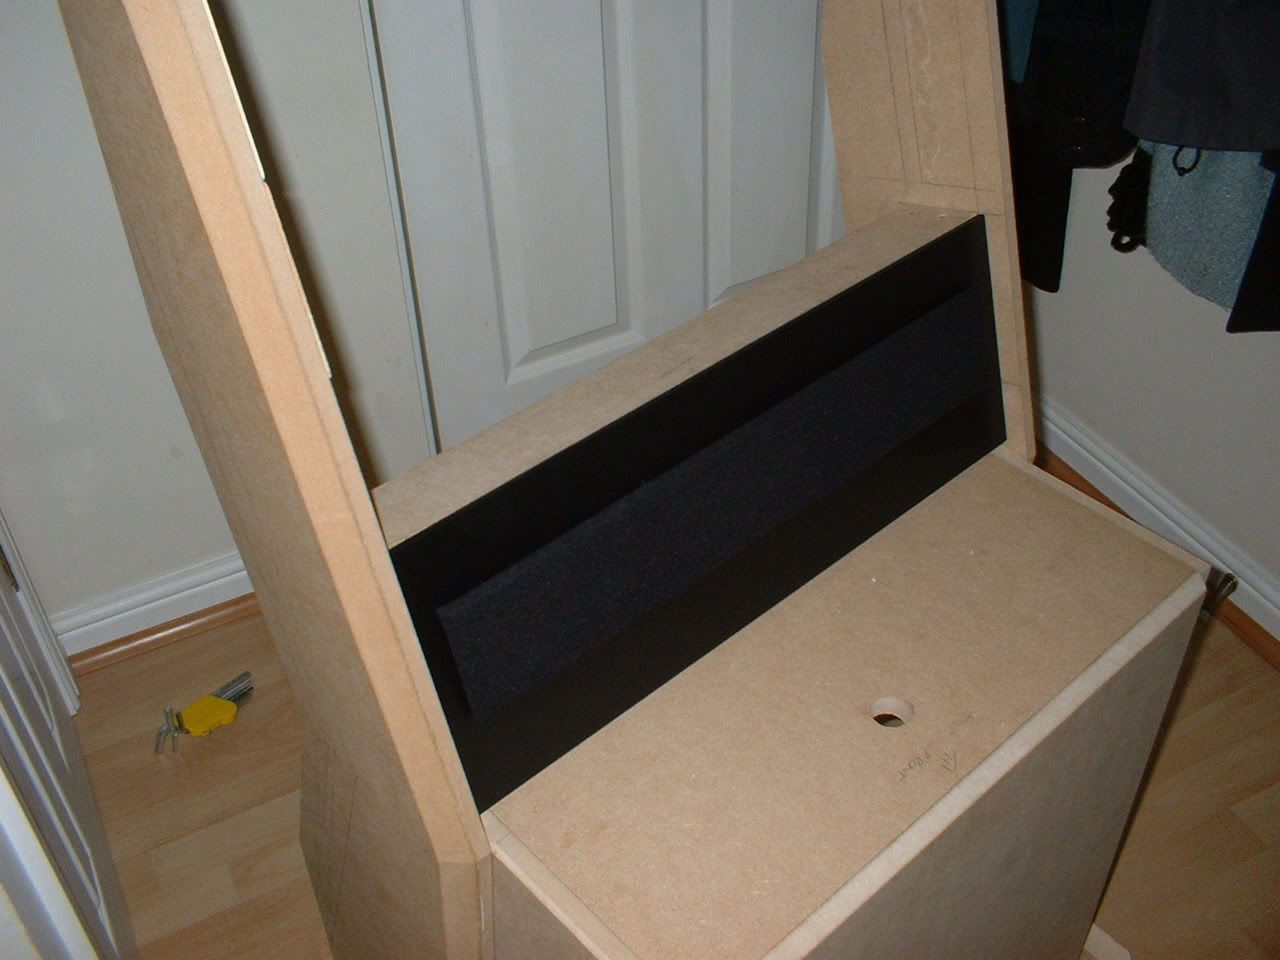
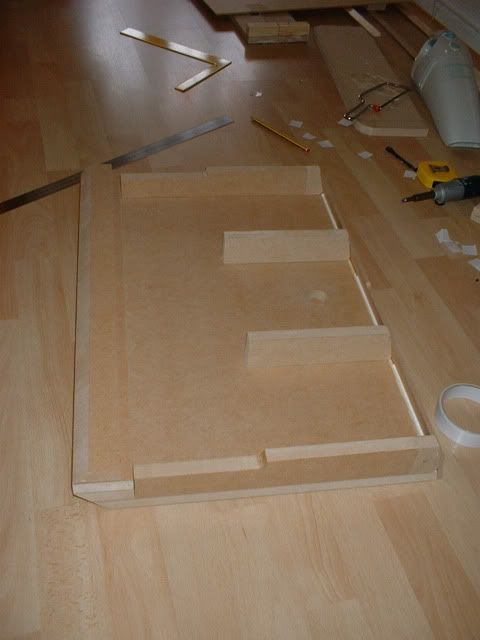
Not the neates of finishes but purely functional, here's a picture of the inside of the top where the acrylic and marquee will slide in. The back 3 panels are cut to be flush with the insides of the side pieces:


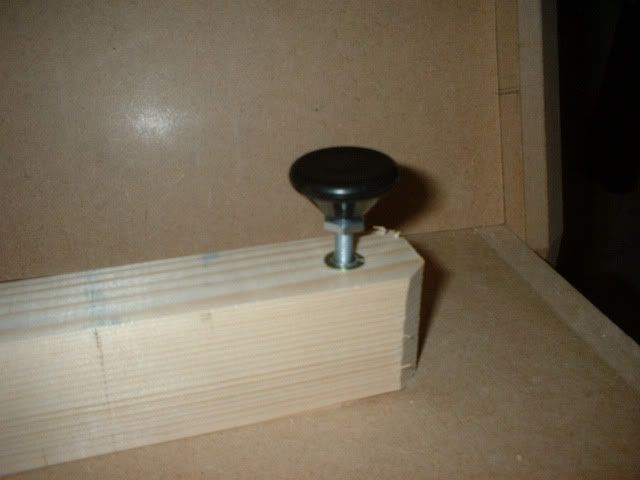
A test fit of the adjustable feet on a bit of scrap. I had to order some more as I didn't realise they wouldn't come out once in. Maybe I'll make a tripod cab with the remaining 3:


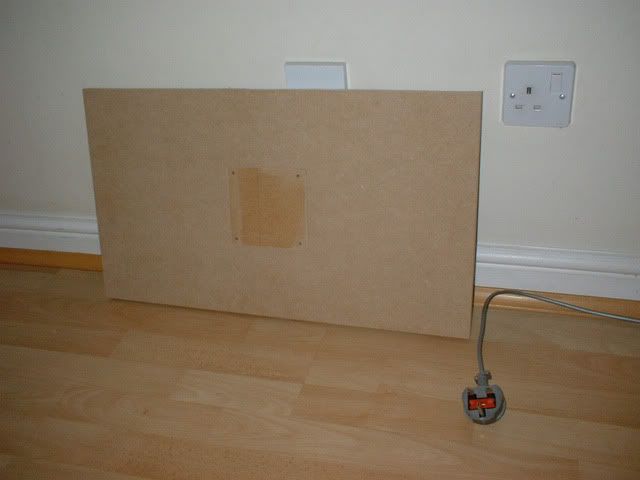
A VESA mounting board for my monitor:


Closeup of the speaker frame. It has bevelled outside edges and stands proud by about 6mm from the main panel. It's covered in standard speaker cloth. Vinyl was used to cover the main board area. I had tested the fit and wasn't happy with the height of the monitor so I had to take out the monitor and speaker shelves, reposition them and recut the bottom panel:


The back of the cab with the original speaker and monitor shelves. It's going to house a 5.1 system. The monitor is a16:9 ratio LG with HDMI, DVI and VGA.


The bevelled front pieces of the control panel:


Closeup of the side of the control panel. It has a lid to allow access to the insides so the controls an be changed:


The inside of the control panel:


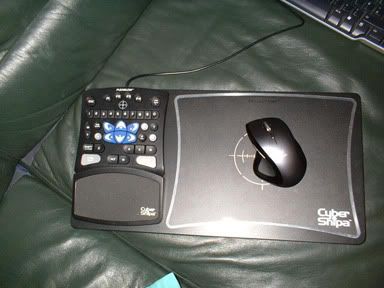
For the pc, I'll be making another control panel to fit inside which will be something like this:


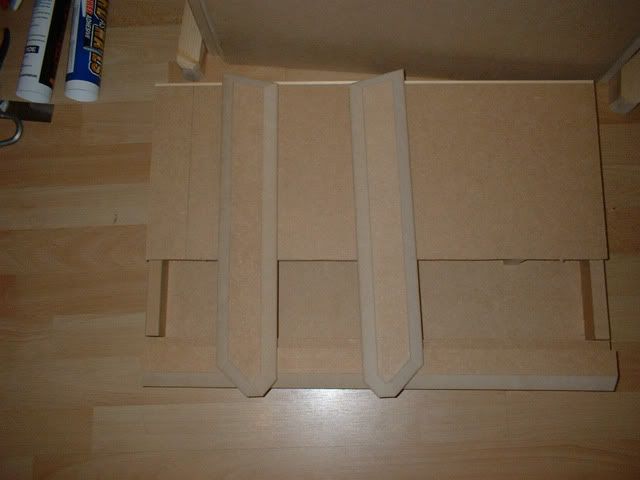
The two side pieces made for the control panel:


... and finally, the control panel bolted into place (ran out of washers for the final bolt)


« Last Edit: September 02, 2009, 10:52:37 am by SpaceHedgehog »
Click a pic for a video tour 

javeryh

  • Trade Count: (+1)
  • Full Member
  • ***
  • Offline Offline
  • Posts: 7904
  • Last login:Today at 03:22:36 pm
Re: Vewlix style cab. Slim version!
« Reply #8 on: September 02, 2009, 10:53:17 am »
Damn dude - you've got some skills.  Are there any plans of this cabinet you are working off of?  Any chance of posting them?  I really like the shape of these things.

vrf

  • Trade Count: (0)
  • Full Member
  • ***
  • Offline Offline
  • Posts: 355
  • Last login:October 13, 2017, 10:11:54 pm
    • Pixelbox
Re: Vewlix style cab. Slim version!
« Reply #9 on: September 02, 2009, 11:01:37 am »
This is one of those threads where I'm furiously saving the pictures to my hard drive in case something happens to BYOAC...

Awesome work. I love how you're putting it together in the house. Hopefully the router work was outside.

SpaceHedgehog

  • Trade Count: (0)
  • Full Member
  • ***
  • Offline Offline
  • Posts: 937
  • Last login:February 06, 2023, 12:10:24 pm
  • Almost done ...
Re: Vewlix style cab. Slim version!
« Reply #10 on: September 02, 2009, 11:04:19 am »
Hi javeryh, thanks! I've mainly used the diagram found in the Vewlix users manual but I've had to adjust it for the smaller monitor. The height to the top of the Control panel is the same as the real Vewlix which is the most important one. Most of the other dimensions have been altered to keep the proportions sensible. Its's about 8-9 cm shorter than the real one and the control panel protrudes about 4cm less.

I'll be putting some plans together once I've completed the cab (hopfully in SketchUp or something similar).
Click a pic for a video tour 

SpaceHedgehog

  • Trade Count: (0)
  • Full Member
  • ***
  • Offline Offline
  • Posts: 937
  • Last login:February 06, 2023, 12:10:24 pm
  • Almost done ...
Re: Vewlix style cab. Slim version!
« Reply #11 on: September 02, 2009, 11:06:33 am »
This is one of those threads where I'm furiously saving the pictures to my hard drive in case something happens to BYOAC...

Awesome work. I love how you're putting it together in the house. Hopefully the router work was outside.

Thanks! The router work was done in my garage which will need a damn good clean when it's done!
Click a pic for a video tour 

Franco B

  • Trade Count: (+10)
  • Full Member
  • ***
  • Offline Offline
  • Posts: 3766
  • Last login:February 15, 2024, 09:14:06 am
Re: Vewlix style cab. Slim version!
« Reply #12 on: September 02, 2009, 11:12:07 am »
Great work :)

Do you have a router table? I figure that would have been useful for the template routing the top section.

What controls are you using?

I see you are in the UK, where abouts are you? It's nice to see some talent on this side of the pond :)

SpaceHedgehog

  • Trade Count: (0)
  • Full Member
  • ***
  • Offline Offline
  • Posts: 937
  • Last login:February 06, 2023, 12:10:24 pm
  • Almost done ...
Re: Vewlix style cab. Slim version!
« Reply #13 on: September 02, 2009, 11:26:59 am »
Thanks Franco B! I do have a router table, I invested in one specifically for this and other upcoming projects (racing cockpit rebuild and another MAME cab). The idea with the control panel design is to have controls which are easy to change otherwise they won't get used. The first one will be a hacked common ground Madcatz Arcade stick for the 360, closely followed by one for the PC. I've ordered the Sanwa parts for it (JLF and a mixture of snapins / screwins in white) and the opal cast acrylic for the moveslist inlay. I'm waiting for an ebay seller to get back to me about the clear acrylic. I still have to get the artwork sorted out which will probably be based around the Vewlix one.

I'm currently making a mess in Sutton,Surrey.
Click a pic for a video tour 

Franco B

  • Trade Count: (+10)
  • Full Member
  • ***
  • Offline Offline
  • Posts: 3766
  • Last login:February 15, 2024, 09:14:06 am
Re: Vewlix style cab. Slim version!
« Reply #14 on: September 02, 2009, 11:33:29 am »
Nice choice of joystick :)

Yeah they are messy things! I'm just stripping one of my routers from my table down at the moment as I can no longer get to full cutting depth. I think I must have a build up of MDF in the legs.

I get most of my acrylic and polycarb from http://www.plasticonline.co.uk/ if thats of any use to you.

emphatic

  • Trade Count: (0)
  • Full Member
  • ***
  • Offline Offline
  • Posts: 2009
  • Last login:Today at 02:12:48 pm
  • -"Suck it, Donny!" -"No, YOU suck it.... more".
    • Emphatic's Video Game Collection
Re: Vewlix style cab. Slim version!
« Reply #15 on: September 02, 2009, 11:40:09 am »
Thanks Franco B! I do have a router table, I invested in one specifically for this and other upcoming projects (racing cockpit rebuild and another MAME cab). The idea with the control panel design is to have controls which are easy to change otherwise they won't get used. The first one will be a hacked common ground Madcatz Arcade stick for the 360, closely followed by one for the PC. I've ordered the Sanwa parts for it (JLF and a mixture of snapins / screwins in white) and the opal cast acrylic for the moveslist inlay. I'm waiting for an ebay seller to get back to me about the clear acrylic. I still have to get the artwork sorted out which will probably be based around the Vewlix one.

I'm currently making a mess in Sutton,Surrey.

You're aware that you can use the MadKatz controller for the PC as well, right? Then only thing inferior to the original Vewlix IMO is the ability to rotate the monitor. But I figure you only play fighters, and not any shmups? Yours is really a quality build for sure.  :notworthy:

SpaceHedgehog

  • Trade Count: (0)
  • Full Member
  • ***
  • Offline Offline
  • Posts: 937
  • Last login:February 06, 2023, 12:10:24 pm
  • Almost done ...
Re: Vewlix style cab. Slim version!
« Reply #16 on: September 02, 2009, 11:48:17 am »
I get most of my acrylic and polycarb from http://www.plasticonline.co.uk/ if thats of any use to you.

It is useful! Thanks for the info, I'll check them out.
Click a pic for a video tour 

drventure

  • Trade Count: (+2)
  • Full Member
  • ***
  • Offline Offline
  • Posts: 4152
  • Last login:June 25, 2023, 02:23:57 pm
  • Laser Death Ray Bargain Bin! Make me an offer!
Re: Vewlix style cab. Slim version!
« Reply #17 on: September 02, 2009, 11:51:37 am »
I don't care for the lines of that particular style cab, but the work you're doing is awesome! All those curves and bevels look like a nice challenge

 :applaud:

SpaceHedgehog

  • Trade Count: (0)
  • Full Member
  • ***
  • Offline Offline
  • Posts: 937
  • Last login:February 06, 2023, 12:10:24 pm
  • Almost done ...
Re: Vewlix style cab. Slim version!
« Reply #18 on: September 02, 2009, 11:55:51 am »
You're aware that you can use the MadKatz controller for the PC as well, right? Then only thing inferior to the original Vewlix IMO is the ability to rotate the monitor. But I figure you only play fighters, and not any shmups? Yours is really a quality build for sure.  :notworthy:

It's a shame I wont be able to rotate the monitor as I do like shmups. I do have a dedicated MAME cab for that (vertical monitor) which is going to be rebuilt. I made it about 4 years ago and I still enjoy it. My wife has let me take control of a whole room now so I'll be making another one when she gets over the disruption that this one's currently causing (she's pretty damned cool about it really).


While I'm here, current MAME cab (has a round button in the middle now and legends on the buttons as well):


Racing Pod:


« Last Edit: September 02, 2009, 12:01:28 pm by SpaceHedgehog »
Click a pic for a video tour 

SpaceHedgehog

  • Trade Count: (0)
  • Full Member
  • ***
  • Offline Offline
  • Posts: 937
  • Last login:February 06, 2023, 12:10:24 pm
  • Almost done ...
Re: Vewlix style cab. Slim version!
« Reply #19 on: September 02, 2009, 12:09:33 pm »
I don't care for the lines of that particular style cab, but the work you're doing is awesome! All those curves and bevels look like a nice challenge

 :applaud:

I know what you mean about different cabs, it's very much a personal taste thing. I'm not keen on most modern ones but this is an exception to that and I have a real soft spot for the classics and am envious of many of the cabs on here. Maybe I'll restore a cab as a project next time rather than scratch build one.

You're right about the curves and bevels, it's a lot of work to get everything to line up properly!
Click a pic for a video tour 

Gatsu

  • Trade Count: (+3)
  • Full Member
  • ***
  • Offline Offline
  • Posts: 943
  • Last login:November 04, 2017, 08:23:43 am
  • I'm not prejudice. I hate everyone equally.
Re: Vewlix style cab. Slim version!
« Reply #20 on: September 02, 2009, 12:16:21 pm »
damn...I dunno if I can even finish my vewlix now. thats just damn pretty and looks a whole lot better than mine.

Epyx

  • Trade Count: (+1)
  • Full Member
  • ***
  • Offline Offline
  • Posts: 1961
  • Last login:December 25, 2023, 07:56:36 pm
  • "You're an oddity"
Re: Vewlix style cab. Slim version!
« Reply #21 on: September 02, 2009, 12:32:11 pm »
@Gatsu

Yours looks great as well...no excuses and sorry this doesn't buy you an out! :)

Get cracking!
Last Project


Epyx Tutorials:
Tutorials

javeryh

  • Trade Count: (+1)
  • Full Member
  • ***
  • Offline Offline
  • Posts: 7904
  • Last login:Today at 03:22:36 pm
Re: Vewlix style cab. Slim version!
« Reply #22 on: September 02, 2009, 01:00:58 pm »
Wow - I love that MAME cab!

Gatsu

  • Trade Count: (+3)
  • Full Member
  • ***
  • Offline Offline
  • Posts: 943
  • Last login:November 04, 2017, 08:23:43 am
  • I'm not prejudice. I hate everyone equally.
Re: Vewlix style cab. Slim version!
« Reply #23 on: September 02, 2009, 01:06:11 pm »
damn. lol

SpaceHedgehog

  • Trade Count: (0)
  • Full Member
  • ***
  • Offline Offline
  • Posts: 937
  • Last login:February 06, 2023, 12:10:24 pm
  • Almost done ...
Re: Vewlix style cab. Slim version!
« Reply #24 on: September 02, 2009, 01:08:27 pm »
damn...I dunno if I can even finish my vewlix now. thats just damn pretty and looks a whole lot better than mine.

What will your mates say Gatsu? It sounds like they've been waiting for you to finish it.

It looks great btw AND you have a 32 inch screen.
Click a pic for a video tour 

SpaceHedgehog

  • Trade Count: (0)
  • Full Member
  • ***
  • Offline Offline
  • Posts: 937
  • Last login:February 06, 2023, 12:10:24 pm
  • Almost done ...
Re: Vewlix style cab. Slim version!
« Reply #25 on: September 02, 2009, 01:09:28 pm »
Wow - I love that MAME cab!

It has glowing balls too ...

Click a pic for a video tour 

drventure

  • Trade Count: (+2)
  • Full Member
  • ***
  • Offline Offline
  • Posts: 4152
  • Last login:June 25, 2023, 02:23:57 pm
  • Laser Death Ray Bargain Bin! Make me an offer!
Re: Vewlix style cab. Slim version!
« Reply #26 on: September 02, 2009, 01:16:12 pm »
That racing pod is fantastic. I'm a real fan of racing games, but you really gotta have a setup like that to properly enjoy them.

If I had a full on proper gameroom, that'd have to me my next project. It'd be tough to justify the space in any of our current rooms (the WAF on that wouldn't be too high  :)


SpaceHedgehog

  • Trade Count: (0)
  • Full Member
  • ***
  • Offline Offline
  • Posts: 937
  • Last login:February 06, 2023, 12:10:24 pm
  • Almost done ...
Re: Vewlix style cab. Slim version!
« Reply #27 on: September 02, 2009, 01:29:50 pm »
I feel like a bit of a pimp now, selling my wares! If you're ever interested in building one, you can find the plans I made here:

http://www.thewayiplay.com/mainforum/index.php?topic=443.0

It's a really great site and mine pales in comparison with some of them.

It also has a working shift light/gear indicator as well which I mounted in a custom box:


Click a pic for a video tour 

Vebbo

  • Trade Count: (0)
  • Full Member
  • ***
  • Offline Offline
  • Posts: 145
  • Last login:September 22, 2015, 01:35:18 pm
    • Overaged Lucky Drivers
Re: Vewlix style cab. Slim version!
« Reply #28 on: September 02, 2009, 02:15:30 pm »
Superb SpaceHedgehog! Love that skinny look. Keep those pics and how to commin.  :notworthy:
Vebbo
I was elected to lead, not to read!

Vebbo turning x-men cab to custom 1942 cab

HaRuMaN

  • Supreme Solder King
  • Global Moderator
  • Trade Count: (+45)
  • Full Member
  • *****
  • Offline Offline
  • Posts: 10324
  • Last login:Yesterday at 08:02:44 pm
  • boom
    • Arcade Madness
Re: Vewlix style cab. Slim version!
« Reply #29 on: September 02, 2009, 02:30:22 pm »
Hawtness...

wow...

I feel completely unskilled when looking at work like this...

Epyx

  • Trade Count: (+1)
  • Full Member
  • ***
  • Offline Offline
  • Posts: 1961
  • Last login:December 25, 2023, 07:56:36 pm
  • "You're an oddity"
Re: Vewlix style cab. Slim version!
« Reply #30 on: September 02, 2009, 02:31:37 pm »
Wow...I had never heard of that website...fantastic plans on the racer btw!  :cheers:
Last Project


Epyx Tutorials:
Tutorials

drventure

  • Trade Count: (+2)
  • Full Member
  • ***
  • Offline Offline
  • Posts: 4152
  • Last login:June 25, 2023, 02:23:57 pm
  • Laser Death Ray Bargain Bin! Make me an offer!
Re: Vewlix style cab. Slim version!
« Reply #31 on: September 02, 2009, 02:37:03 pm »
Really nice. That's the proper way to do a racing game!

I'll definitely be coming back to those plans.

Ond

  • Trade Count: (0)
  • Full Member
  • ***
  • Offline Offline
  • Posts: 2267
  • Last login:April 03, 2024, 05:08:11 pm
Re: Vewlix style cab. Slim version!
« Reply #32 on: September 02, 2009, 07:49:57 pm »
Very very nice (thats two verys! wtf?  :) ). There's a ton of talent and craftsman ship oozing from your pics thus far, I love seeing MDF being worked skillfully.

 :cheers:

Ond
« Last Edit: September 02, 2009, 07:52:21 pm by Ond »

ivwshane

  • Trade Count: (0)
  • Full Member
  • ***
  • Offline Offline
  • Posts: 1036
  • Last login:December 24, 2022, 09:35:21 pm
    • My first mame cab! (WIP)
Re: Vewlix style cab. Slim version!
« Reply #33 on: September 03, 2009, 12:36:54 am »
Damn!! Too many people on this site have skills that are just amazing!

SpaceHedgehog

  • Trade Count: (0)
  • Full Member
  • ***
  • Offline Offline
  • Posts: 937
  • Last login:February 06, 2023, 12:10:24 pm
  • Almost done ...
Re: Vewlix style cab. Slim version!
« Reply #34 on: September 03, 2009, 04:31:01 pm »
Thank you all or your comments. I wouldn't consider myself a skilled woodworker at all, particularly after looking at some of the work that others have done (Franco's, custom cocktail cabinet is amazing!). It's probably more about having the right tools for the job than anything else. In fact, what you see here is pretty much all I've made (apart from the odd joystick or two) and have just taken my time with it; I am pleased with the results though. I'm sure most people could get the same sort of results if they had the tools.

My joystick and buttons arrived in the post today so I'll be able to start wiring up the pad soon. My next main objective is to get the thing primed up. I spent a lot of yesterday filling and sanding. Looking forward to the weekend so I can get going with the spray gun. It's only a budget one but hopefully I'll get some good results with it and am looking forward to trying something new. I'll be using the same water based paint and water based polyurethane varnish I've used previously and will need to get the viscosity right. Obviously I'll be practising on some scrap first. If anyone has any tips for newbies on using a spray gun I'm all ears.
Click a pic for a video tour 

SpaceHedgehog

  • Trade Count: (0)
  • Full Member
  • ***
  • Offline Offline
  • Posts: 937
  • Last login:February 06, 2023, 12:10:24 pm
  • Almost done ...
Re: Vewlix style cab. Slim version!
« Reply #35 on: September 06, 2009, 03:19:29 pm »
Making slow but steady progress. I tried out my spray gun yesterday on the base and it was a complete disaster :angry: Nevermind! I stripped it back down again and started again using a roller. The base has now been primed, sanded, primed, sanded, painted, wet sanded and painted again. To be honest, I'm really pleased with it and doubt a spray gun would be that much better. I still have to give it one more coat and then I'll start on the polyurethane varnish. The top section is mostly prepped and primed but I still have a few little gaps to fill before I prime and sand it again. I'll post some more pics once there's something decent to show.

Edit:

Here's a piture of the base pre-poly:


« Last Edit: September 06, 2009, 03:43:38 pm by SpaceHedgehog »
Click a pic for a video tour 

emphatic

  • Trade Count: (0)
  • Full Member
  • ***
  • Offline Offline
  • Posts: 2009
  • Last login:Today at 02:12:48 pm
  • -"Suck it, Donny!" -"No, YOU suck it.... more".
    • Emphatic's Video Game Collection
Re: Vewlix style cab. Slim version!
« Reply #36 on: September 06, 2009, 05:47:34 pm »
Looking nice. Will you go all black on it, or use the same colors as the Vewlix?

SpaceHedgehog

  • Trade Count: (0)
  • Full Member
  • ***
  • Offline Offline
  • Posts: 937
  • Last login:February 06, 2023, 12:10:24 pm
  • Almost done ...
Re: Vewlix style cab. Slim version!
« Reply #37 on: September 07, 2009, 03:15:04 am »
I'm going to go for the original Viewlix colours. They make white sides for the control panel so I'll do these in white as well. If I dont like it, I can strip it back and redo in black instead! I may get the artwork at the sides printed at some point as well.
Click a pic for a video tour 

SpaceHedgehog

  • Trade Count: (0)
  • Full Member
  • ***
  • Offline Offline
  • Posts: 937
  • Last login:February 06, 2023, 12:10:24 pm
  • Almost done ...
Re: Vewlix style cab. Slim version!
« Reply #38 on: September 07, 2009, 05:14:15 am »
The side/top piece is going to take a little more work. After priming, all the little inconsistencies are showing up so there is still an amount of prep work to do particularly on the wood grain on the inside of the side pieces. Time to get out the P38 body filler again

Primed Top:


Two coats of primer so far ...

Click a pic for a video tour 

SpaceHedgehog

  • Trade Count: (0)
  • Full Member
  • ***
  • Offline Offline
  • Posts: 937
  • Last login:February 06, 2023, 12:10:24 pm
  • Almost done ...
Re: Vewlix style cab. Slim version!
« Reply #39 on: September 07, 2009, 04:03:11 pm »
The base now has 3 coats of poly and the top section is almost ready to varnish. Hopefully I'll be able to get that done during the week so I can concentrate on the control panel at the weekend.

Click a pic for a video tour 

vrf

  • Trade Count: (0)
  • Full Member
  • ***
  • Offline Offline
  • Posts: 355
  • Last login:October 13, 2017, 10:11:54 pm
    • Pixelbox
Re: Vewlix style cab. Slim version!
« Reply #40 on: September 07, 2009, 05:26:39 pm »
Looks hawt! Great work.

bgspot

  • Trade Count: (+1)
  • Full Member
  • ***
  • Offline Offline
  • Posts: 63
  • Last login:January 10, 2020, 12:37:52 pm
Re: Vewlix style cab. Slim version!
« Reply #41 on: September 07, 2009, 10:35:54 pm »
damn...I dunno if I can even finish my vewlix now. thats just damn pretty and looks a whole lot better than mine.

WHAT?! You're the one who inspired me to go thru with my plans to build another fighter cab. It would be a shame if you didn't complete yours.

SpaceHedgehog your cab is a great piece of art. I also see that you noticed that the base of the original vewlix is beveled in the front and like that you included that in your design. I too plan to build one 2 weeks from now. Keep those pics comin.
« Last Edit: September 07, 2009, 10:43:50 pm by bgspot »

clickhea

  • Trade Count: (0)
  • Full Member
  • ***
  • Offline Offline
  • Posts: 418
  • Last login:August 09, 2019, 07:33:40 am
Re: Vewlix style cab. Slim version!
« Reply #42 on: September 08, 2009, 01:25:50 pm »
are there vewlix plans somewhere on the net?

SpaceHedgehog

  • Trade Count: (0)
  • Full Member
  • ***
  • Offline Offline
  • Posts: 937
  • Last login:February 06, 2023, 12:10:24 pm
  • Almost done ...
Re: Vewlix style cab. Slim version!
« Reply #43 on: September 08, 2009, 03:43:14 pm »
SpaceHedgehog your cab is a great piece of art. I also see that you noticed that the base of the original vewlix is beveled in the front and like that you included that in your design. I too plan to build one 2 weeks from now. Keep those pics comin.

Thanks! I've tried to keep with the original feel of the design as much as possble especially where there are more interesting features. The front of the base is an opportunity to make it look less like a box and more asthetically pleasing.

I'll be sure to post more pics as things progress.

Good luck with building yours!
Click a pic for a video tour 

SpaceHedgehog

  • Trade Count: (0)
  • Full Member
  • ***
  • Offline Offline
  • Posts: 937
  • Last login:February 06, 2023, 12:10:24 pm
  • Almost done ...
Re: Vewlix style cab. Slim version!
« Reply #44 on: September 08, 2009, 03:47:54 pm »
are there vewlix plans somewhere on the net?

There are. Donovan Myers has it in Google Sketchup:

http://www.donovanmyers.com/2009/04/new-google-sketchup-file-with-bevels/

I went with the general dimensions found in the Viewlix users manuals found here:

http://forum.arcadeotaku.com/viewtopic.php?f=3&t=862
Click a pic for a video tour 

SpaceHedgehog

  • Trade Count: (0)
  • Full Member
  • ***
  • Offline Offline
  • Posts: 937
  • Last login:February 06, 2023, 12:10:24 pm
  • Almost done ...
Re: Vewlix style cab. Slim version!
« Reply #45 on: September 08, 2009, 03:48:55 pm »
Looks hawt! Great work.

Thank you!
Click a pic for a video tour 

blueznl

  • Trade Count: (0)
  • Full Member
  • ***
  • Offline Offline
  • Posts: 290
  • Last login:June 16, 2019, 04:50:02 pm
Re: Vewlix style cab. Slim version!
« Reply #46 on: September 09, 2009, 02:01:35 pm »
I have a new hero.

blackwatchplad

  • Trade Count: (0)
  • Full Member
  • ***
  • Offline Offline
  • Posts: 46
  • Last login:July 18, 2022, 10:39:50 pm
Re: Vewlix style cab. Slim version!
« Reply #47 on: September 09, 2009, 05:18:40 pm »
That looks like a really good paint job.... i can only hope that i can as good results on my soon-too-be-painted-in-the-not-too-distant-future cab project.

SpaceHedgehog

  • Trade Count: (0)
  • Full Member
  • ***
  • Offline Offline
  • Posts: 937
  • Last login:February 06, 2023, 12:10:24 pm
  • Almost done ...
Re: Vewlix style cab. Slim version!
« Reply #48 on: September 10, 2009, 04:06:56 pm »
I have a new hero.


Not sure what I've done to deserve that but thanks!!!
Click a pic for a video tour 

SpaceHedgehog

  • Trade Count: (0)
  • Full Member
  • ***
  • Offline Offline
  • Posts: 937
  • Last login:February 06, 2023, 12:10:24 pm
  • Almost done ...
Re: Vewlix style cab. Slim version!
« Reply #49 on: September 10, 2009, 04:13:22 pm »
That looks like a really good paint job.... i can only hope that i can as good results on my soon-too-be-painted-in-the-not-too-distant-future cab project.

Thank you. I've take my time as much as is sensible with this. You can go on endlessly trying to remove all the tiny flaws but at some point you've got to move onto the next stage. I remember endlessly sanding down and repainting/varnishing my home built joystick and probably spent more time on that than I have on this.

Anyway, not much of an update but a picture to show the reason I've used water based rather than oil based (which I've had bad experience with) polyurethane varnish. No discolouring of the white paint. This is after two coats. I still have another coat to apply.


My acrylic should be here soon and I can get craking with the control panel and marquee. Still have to complete the artwork and send it to the printers though.
« Last Edit: September 10, 2009, 04:15:47 pm by SpaceHedgehog »
Click a pic for a video tour 

SpaceHedgehog

  • Trade Count: (0)
  • Full Member
  • ***
  • Offline Offline
  • Posts: 937
  • Last login:February 06, 2023, 12:10:24 pm
  • Almost done ...
Re: Vewlix style cab. Slim version!
« Reply #50 on: September 12, 2009, 04:52:49 am »
I'll need to complete as much of the CP as I can this weekend. Here's what I have so far...


Click a pic for a video tour 

emphatic

  • Trade Count: (0)
  • Full Member
  • ***
  • Offline Offline
  • Posts: 2009
  • Last login:Today at 02:12:48 pm
  • -"Suck it, Donny!" -"No, YOU suck it.... more".
    • Emphatic's Video Game Collection
Re: Vewlix style cab. Slim version!
« Reply #51 on: September 12, 2009, 05:20:29 am »
Wow, that looks cute almost.  :applaud:

bgspot

  • Trade Count: (+1)
  • Full Member
  • ***
  • Offline Offline
  • Posts: 63
  • Last login:January 10, 2020, 12:37:52 pm
Re: Vewlix style cab. Slim version!
« Reply #52 on: September 12, 2009, 10:22:44 am »
SUPERB! Can't wait to see it with the control panel.

SpaceHedgehog

  • Trade Count: (0)
  • Full Member
  • ***
  • Offline Offline
  • Posts: 937
  • Last login:February 06, 2023, 12:10:24 pm
  • Almost done ...
Re: Vewlix style cab. Slim version!
« Reply #53 on: September 13, 2009, 05:20:48 am »
Thanks for the comments people. It really helps with the motivation factor. I wasn't completely happy with the smoothness of the white top section; I'd been using a foam roller and it had left a slightly stippled effect. I've read that other people have used mohair or similar to get a flatter finish. I'm not too concerned about a mirror finish but I would like to get a flatter fininsh and more consistency. Any tips on the roller front?
Click a pic for a video tour 

Shortbus

  • Trade Count: (0)
  • Full Member
  • ***
  • Offline Offline
  • Posts: 194
  • Last login:August 26, 2023, 03:20:00 pm
Re: Vewlix style cab. Slim version!
« Reply #54 on: September 13, 2009, 08:51:06 am »
I've said it before and I'll say it again....I should pawn my tools, projects like this make me want to. Outstanding work, great info, I learned alot. I think my problem is I rush to the finish, and thats what you get, poor results.

I appreciate your contribution and ALL the pictures, I'm watching this one and anything else you build....your mame and driving cab are also awesome.....

I just looked at my mame cab in my garage....... :laugh2: 

Nice Project......

SpaceHedgehog

  • Trade Count: (0)
  • Full Member
  • ***
  • Offline Offline
  • Posts: 937
  • Last login:February 06, 2023, 12:10:24 pm
  • Almost done ...
Re: Vewlix style cab. Slim version!
« Reply #55 on: September 13, 2009, 11:16:37 am »
Thanks Shortbus. I wish I could help!

Still workin on the CP. The middle section is filled and sanded down but needs to be primed and sanded before applying the vinyl. The CP sides have been prepped and have 2 coats of primer. They'll still need some more work before painting begins. They were wet when I took the pics but here are the sides of the CP:


Click a pic for a video tour 

clickhea

  • Trade Count: (0)
  • Full Member
  • ***
  • Offline Offline
  • Posts: 418
  • Last login:August 09, 2019, 07:33:40 am
Re: Vewlix style cab. Slim version!
« Reply #56 on: September 16, 2009, 05:43:24 pm »
those black front pieces, what are those? did u order them? or are they laminated pieces of wood?

SpaceHedgehog

  • Trade Count: (0)
  • Full Member
  • ***
  • Offline Offline
  • Posts: 937
  • Last login:February 06, 2023, 12:10:24 pm
  • Almost done ...
Re: Vewlix style cab. Slim version!
« Reply #57 on: September 16, 2009, 06:06:04 pm »
They're pre-cut pieces of wood I found in the dado rail section of the hardware store. I was going to make some out of metal or plastic strips so I couldn't believe my luck when I spotted these. They're covered in black self adhesive vinyl like the panels on the front so they match up nicely. They have nice rounded edges on the top surface which gives them a nice finish too. I made sure I pulled the vinyl taut when applying it to get a good finish. They only took about half an hour to make.

« Last Edit: September 16, 2009, 06:09:11 pm by SpaceHedgehog »
Click a pic for a video tour 

clickhea

  • Trade Count: (0)
  • Full Member
  • ***
  • Offline Offline
  • Posts: 418
  • Last login:August 09, 2019, 07:33:40 am
Re: Vewlix style cab. Slim version!
« Reply #58 on: September 16, 2009, 06:21:10 pm »
very nice, i really want to build one of these machines

iam following your build closely

SpaceHedgehog

  • Trade Count: (0)
  • Full Member
  • ***
  • Offline Offline
  • Posts: 937
  • Last login:February 06, 2023, 12:10:24 pm
  • Almost done ...
Re: Vewlix style cab. Slim version!
« Reply #59 on: September 17, 2009, 10:25:40 am »
Still going as fast as I can to get this complete. This is the current state of the CP. It has a cutout for the opal acrylic moves list inlay and has been trimmed to size. I'll need to prime the lid and then apply the vinyl to the lid and the main section. The sides of the CP are progressing nicely.


I may upgrade to cast rather than XT acrylic at some point ....
Click a pic for a video tour 

emphatic

  • Trade Count: (0)
  • Full Member
  • ***
  • Offline Offline
  • Posts: 2009
  • Last login:Today at 02:12:48 pm
  • -"Suck it, Donny!" -"No, YOU suck it.... more".
    • Emphatic's Video Game Collection
Re: Vewlix style cab. Slim version!
« Reply #60 on: September 17, 2009, 11:38:48 am »
Nice going. Will you go for an easily switchable 1P/2P panel like the real Vewlix?

SpaceHedgehog

  • Trade Count: (0)
  • Full Member
  • ***
  • Offline Offline
  • Posts: 937
  • Last login:February 06, 2023, 12:10:24 pm
  • Almost done ...
Re: Vewlix style cab. Slim version!
« Reply #61 on: September 17, 2009, 12:47:29 pm »
I may do but it may be too slim. I have thought about making another complete 2 player CP for it which would be about 15cm wider
Click a pic for a video tour 

SpaceHedgehog

  • Trade Count: (0)
  • Full Member
  • ***
  • Offline Offline
  • Posts: 937
  • Last login:February 06, 2023, 12:10:24 pm
  • Almost done ...
Re: Vewlix style cab. Slim version!
« Reply #62 on: September 19, 2009, 07:40:04 am »
Trying to take my mind of my daughter who is currently in the middle of her entrance exam .... Some more pictures of the painting progress for the CP. After 2 coats of primer on the lid, It will now need to be sanded back to get it smooth again followed maybe by another coat of primer and some more sanding before the vinyl. I hope to get this done today. The side pieces have 2 coats of paint and willl need to be wetsanded. I may add some enamel like I did with the top piece and wet sand for a smooth hard finish.

Sorry the progress seems to be slow but the purpose of the log is to show as many of the steps as possible.


Click a pic for a video tour 

bgspot

  • Trade Count: (+1)
  • Full Member
  • ***
  • Offline Offline
  • Posts: 63
  • Last login:January 10, 2020, 12:37:52 pm
Re: Vewlix style cab. Slim version!
« Reply #63 on: September 19, 2009, 11:56:08 am »
Nice! I'm beginning the cutting for mine today

SpaceHedgehog

  • Trade Count: (0)
  • Full Member
  • ***
  • Offline Offline
  • Posts: 937
  • Last login:February 06, 2023, 12:10:24 pm
  • Almost done ...
Re: Vewlix style cab. Slim version!
« Reply #64 on: September 19, 2009, 01:10:31 pm »
Make sure you post lots of pics. Good luck with it and have fun making it!

I've got the vinyl on the CP. The lower bevel on the front of the CP is not as smooth as I'd like it but it would be a lot of work to remove it and prepare everything again. You can't really see it so nevermind. The acrylic for the joystick section will be raised by another 3mm to keep it flush (or about 1mm below) the rest of the panel.


Click a pic for a video tour 

emphatic

  • Trade Count: (0)
  • Full Member
  • ***
  • Offline Offline
  • Posts: 2009
  • Last login:Today at 02:12:48 pm
  • -"Suck it, Donny!" -"No, YOU suck it.... more".
    • Emphatic's Video Game Collection
Re: Vewlix style cab. Slim version!
« Reply #65 on: September 20, 2009, 06:38:20 am »
Wow, that looks awesome.

SpaceHedgehog

  • Trade Count: (0)
  • Full Member
  • ***
  • Offline Offline
  • Posts: 937
  • Last login:February 06, 2023, 12:10:24 pm
  • Almost done ...
Re: Vewlix style cab. Slim version!
« Reply #66 on: September 20, 2009, 04:58:43 pm »
Thanks emphatic!

I've stripped off the polyurethane redone the top section in enamel, waited a few days and labouriously wet sanded it down. It now looks like more like  plastic and is much smoother than before. I may buff this up further but I'm not sure yet. I've also put together the first pass of the marquee which is based off the original. Sorry about the size of the second image.


Click a pic for a video tour 

emphatic

  • Trade Count: (0)
  • Full Member
  • ***
  • Offline Offline
  • Posts: 2009
  • Last login:Today at 02:12:48 pm
  • -"Suck it, Donny!" -"No, YOU suck it.... more".
    • Emphatic's Video Game Collection
Re: Vewlix style cab. Slim version!
« Reply #67 on: September 20, 2009, 05:04:36 pm »
 :applaud:

I wish I had your skills and patience. This is going to be an awesome cabinet. It's really refreshing to see people going for the plastic/metal look of the sleek Japanese built cabinets, and not only go for the revamped classic look that's frankly a bit tiresome. :P

SpaceHedgehog

  • Trade Count: (0)
  • Full Member
  • ***
  • Offline Offline
  • Posts: 937
  • Last login:February 06, 2023, 12:10:24 pm
  • Almost done ...
Re: Vewlix style cab. Slim version!
« Reply #68 on: September 21, 2009, 05:52:48 am »
Thanks! I have had to be patient with this one, it has been like watching paint dry at times .. I have to sy, this oe has been uite challenging because of the unusual shape/pieces but hopefully the effort will be worth it.

I've trimmed the acrylic for the marquee. I'm glad I allowed a lot of 'give' in the design as my curves aren't great but the fit is good. It will look perfect from the front so that's what matters.


Click a pic for a video tour 

SpaceHedgehog

  • Trade Count: (0)
  • Full Member
  • ***
  • Offline Offline
  • Posts: 937
  • Last login:February 06, 2023, 12:10:24 pm
  • Almost done ...
Re: Vewlix style cab. Slim version!
« Reply #69 on: September 21, 2009, 12:42:28 pm »
Starting to look like a complete machine now:


Click a pic for a video tour 

emphatic

  • Trade Count: (0)
  • Full Member
  • ***
  • Offline Offline
  • Posts: 2009
  • Last login:Today at 02:12:48 pm
  • -"Suck it, Donny!" -"No, YOU suck it.... more".
    • Emphatic's Video Game Collection
Re: Vewlix style cab. Slim version!
« Reply #70 on: September 21, 2009, 12:49:16 pm »
Awesome. The front beneath the control panel, does that open up, or is is rear access only?

SpaceHedgehog

  • Trade Count: (0)
  • Full Member
  • ***
  • Offline Offline
  • Posts: 937
  • Last login:February 06, 2023, 12:10:24 pm
  • Almost done ...
Re: Vewlix style cab. Slim version!
« Reply #71 on: September 21, 2009, 01:00:03 pm »
The back of the top section on the CP is a lid that comes off for easy access to the insides.
Click a pic for a video tour 

emphatic

  • Trade Count: (0)
  • Full Member
  • ***
  • Offline Offline
  • Posts: 2009
  • Last login:Today at 02:12:48 pm
  • -"Suck it, Donny!" -"No, YOU suck it.... more".
    • Emphatic's Video Game Collection
Re: Vewlix style cab. Slim version!
« Reply #72 on: September 21, 2009, 02:00:08 pm »
Okay. The control panel, does it have the same "depth" as the original, or do you (with your somewhat compressed redesign) have less legroom than the original? I figured you'd considered this already as you've kept the height of the original design.

Epyx

  • Trade Count: (+1)
  • Full Member
  • ***
  • Offline Offline
  • Posts: 1961
  • Last login:December 25, 2023, 07:56:36 pm
  • "You're an oddity"
Re: Vewlix style cab. Slim version!
« Reply #73 on: September 21, 2009, 02:15:09 pm »
Im really developing a liking for the sit in front of height with both this and projects like No 18...im imagining a regular chair height would suffice?

This thing looks so damn good this near completion...leave power OFF ;)
Last Project


Epyx Tutorials:
Tutorials

SpaceHedgehog

  • Trade Count: (0)
  • Full Member
  • ***
  • Offline Offline
  • Posts: 937
  • Last login:February 06, 2023, 12:10:24 pm
  • Almost done ...
Re: Vewlix style cab. Slim version!
« Reply #74 on: September 21, 2009, 02:22:01 pm »
It's an important question. I had to balance the depth with stability so I went for a compromise of what I reckon to be about 4cm less depth than the original (from my calculations from the plan in the Vewlix owner's manual). It's still comfortable to sit at it.
« Last Edit: September 21, 2009, 02:43:01 pm by SpaceHedgehog »
Click a pic for a video tour 

SpaceHedgehog

  • Trade Count: (0)
  • Full Member
  • ***
  • Offline Offline
  • Posts: 937
  • Last login:February 06, 2023, 12:10:24 pm
  • Almost done ...
Re: Vewlix style cab. Slim version!
« Reply #75 on: September 21, 2009, 02:32:53 pm »
Im really developing a liking for the sit in front of height with both this and projects like No 18...im imagining a regular chair height would suffice?

This thing looks so damn good this near completion...leave power OFF ;)

Hopefully this will give a better idea on the dimensions. It's a standard size dining chair.

Click a pic for a video tour 

SpaceHedgehog

  • Trade Count: (0)
  • Full Member
  • ***
  • Offline Offline
  • Posts: 937
  • Last login:February 06, 2023, 12:10:24 pm
  • Almost done ...
Re: Vewlix style cab. Slim version!
« Reply #76 on: September 21, 2009, 05:13:43 pm »
Awesome. The front beneath the control panel, does that open up, or is is rear access only?

I just got what you said! It doesn't open. It's rear access only.
Click a pic for a video tour 

emphatic

  • Trade Count: (0)
  • Full Member
  • ***
  • Offline Offline
  • Posts: 2009
  • Last login:Today at 02:12:48 pm
  • -"Suck it, Donny!" -"No, YOU suck it.... more".
    • Emphatic's Video Game Collection
Re: Vewlix style cab. Slim version!
« Reply #77 on: September 21, 2009, 05:29:37 pm »
Im really developing a liking for the sit in front of height with both this and projects like No 18...im imagining a regular chair height would suffice?

This thing looks so damn good this near completion...leave power OFF ;)

Hopefully this will give a better idea on the dimensions. It's a standard size dining chair.


Yeah, that looks about right. Me, I have pretty "muscular" legs, so I have raised my Candy cabinets about an inch to sit comfortably at them.  ;) Make sure you use a chair with back support when you're playing longer sessions, as your bound to lean towards your cabinet, straining your back a bit too much otherwise. I have leather clad stools for mine, that does look very nice, but the back can only take so much strain...

Epyx

  • Trade Count: (+1)
  • Full Member
  • ***
  • Offline Offline
  • Posts: 1961
  • Last login:December 25, 2023, 07:56:36 pm
  • "You're an oddity"
Re: Vewlix style cab. Slim version!
« Reply #78 on: September 21, 2009, 05:32:12 pm »
Quote
Hopefully this will give a better idea on the dimensions. It's a standard size dining chair.

/Drool...very nice.

That is my one gripe on having an upright...Ill get sick of standing...or my old back will act up and then ill sit on the barstool which really isn't that comfortable of an alternative. Sitting on a normal chair would just be...nice.
Last Project


Epyx Tutorials:
Tutorials

clickhea

  • Trade Count: (0)
  • Full Member
  • ***
  • Offline Offline
  • Posts: 418
  • Last login:August 09, 2019, 07:33:40 am
Re: Vewlix style cab. Slim version!
« Reply #79 on: September 21, 2009, 10:29:13 pm »
can u take a handfull of closeup pics on diff angles

SpaceHedgehog

  • Trade Count: (0)
  • Full Member
  • ***
  • Offline Offline
  • Posts: 937
  • Last login:February 06, 2023, 12:10:24 pm
  • Almost done ...
Re: Vewlix style cab. Slim version!
« Reply #80 on: September 22, 2009, 04:50:47 pm »
can u take a handfull of closeup pics on diff angles

I'm still finishing off the paintwork on the CP sides. Once I've done this I'll be sure to take some more pics. Is there anything specific?
Click a pic for a video tour 

clickhea

  • Trade Count: (0)
  • Full Member
  • ***
  • Offline Offline
  • Posts: 418
  • Last login:August 09, 2019, 07:33:40 am
Re: Vewlix style cab. Slim version!
« Reply #81 on: September 26, 2009, 07:16:02 pm »
na not really, just hard to see all the work you put into it from that far away

Lord Hiryu

  • Trade Count: (0)
  • Full Member
  • ***
  • Offline Offline
  • Posts: 72
  • Last login:September 29, 2020, 12:05:39 pm
    • Lord Hiryu's Artwork
Re: Vewlix style cab. Slim version!
« Reply #82 on: September 28, 2009, 12:58:49 pm »
Incredible Job.
Nice cab, beautiful shape and outstanding finished touches!!!
I expect you finish it to see the final Cab.
Kudos for you!!!!

Cheers.
Que tiempos aquellos, en el que las vidas se llamaban tanques !

SpaceHedgehog

  • Trade Count: (0)
  • Full Member
  • ***
  • Offline Offline
  • Posts: 937
  • Last login:February 06, 2023, 12:10:24 pm
  • Almost done ...
Re: Vewlix style cab. Slim version!
« Reply #83 on: September 28, 2009, 06:01:01 pm »
Thanks! I've been wrestling with a tempremental PC so have only just completed the CP artwork to match the marquee. Next I'll print it out to make sure everything's ok before I send it to the printers:


I noticed that there's a line missing from the bottom which has been added now.
« Last Edit: September 28, 2009, 06:02:48 pm by SpaceHedgehog »
Click a pic for a video tour 

SpaceHedgehog

  • Trade Count: (0)
  • Full Member
  • ***
  • Offline Offline
  • Posts: 937
  • Last login:February 06, 2023, 12:10:24 pm
  • Almost done ...
Re: Vewlix style cab. Slim version!
« Reply #84 on: October 01, 2009, 05:46:59 pm »
I've sent off the artwork so I should be able to complete the CP when it comes back. I've also included some prints for the side art to test which I may have laminated or turn into stickers if it looks ok:

« Last Edit: October 01, 2009, 06:08:10 pm by SpaceHedgehog »
Click a pic for a video tour 

SpaceHedgehog

  • Trade Count: (0)
  • Full Member
  • ***
  • Offline Offline
  • Posts: 937
  • Last login:February 06, 2023, 12:10:24 pm
  • Almost done ...
Re: Vewlix style cab. Slim version!
« Reply #85 on: October 02, 2009, 11:53:46 am »
I am starting a build guide for this project. It can be accessed at the following link:

http://forums.shoryuken.com/showthread.php?p=7599285#post7599285

If there's an alternative which I can use on this site, please let me know! I don't want to needlessly create another thread.
« Last Edit: October 02, 2009, 11:55:57 am by SpaceHedgehog »
Click a pic for a video tour 

Epyx

  • Trade Count: (+1)
  • Full Member
  • ***
  • Offline Offline
  • Posts: 1961
  • Last login:December 25, 2023, 07:56:36 pm
  • "You're an oddity"
Re: Vewlix style cab. Slim version!
« Reply #86 on: October 02, 2009, 12:51:36 pm »
Fantastic guide!  :applaud:

Here in Canada we need to take the final leap and become truly metric...so frustrating being caught in metric limbo here.
Last Project


Epyx Tutorials:
Tutorials

SpaceHedgehog

  • Trade Count: (0)
  • Full Member
  • ***
  • Offline Offline
  • Posts: 937
  • Last login:February 06, 2023, 12:10:24 pm
  • Almost done ...
Re: Vewlix style cab. Slim version!
« Reply #87 on: October 05, 2009, 05:15:39 am »
Thanks Epyx!

I've recieved the artwork but am not completely happy with the print. I thought it was going to be glossy but it's not. Nevermind, here's the marquee which I have fitted for now:


I'm happy with the artwork though.

I'll get on with the CP next.
« Last Edit: October 05, 2009, 05:25:21 am by SpaceHedgehog »
Click a pic for a video tour 

SpaceHedgehog

  • Trade Count: (0)
  • Full Member
  • ***
  • Offline Offline
  • Posts: 937
  • Last login:February 06, 2023, 12:10:24 pm
  • Almost done ...
Re: Vewlix style cab. Slim version!
« Reply #88 on: October 05, 2009, 05:42:26 am »
na not really, just hard to see all the work you put into it from that far away

Here are a couple of detail pics for you:

Closeup of the front of the cabinet (leg/bevelled front):


The inside of the front frame:


Click a pic for a video tour 

emphatic

  • Trade Count: (0)
  • Full Member
  • ***
  • Offline Offline
  • Posts: 2009
  • Last login:Today at 02:12:48 pm
  • -"Suck it, Donny!" -"No, YOU suck it.... more".
    • Emphatic's Video Game Collection
Re: Vewlix style cab. Slim version (marquee fitted)
« Reply #89 on: October 05, 2009, 07:40:57 am »
Is the original art glossy? I think that looks awesome, but hey, it's your cab man.  :applaud: On the other hand, I prefer having non-glossy artwork as it'll reflect light and you are supposed to look at the screen underneath and all...

Gatsu

  • Trade Count: (+3)
  • Full Member
  • ***
  • Offline Offline
  • Posts: 943
  • Last login:November 04, 2017, 08:23:43 am
  • I'm not prejudice. I hate everyone equally.
Re: Vewlix style cab. Slim version (marquee fitted)
« Reply #90 on: October 05, 2009, 10:28:50 am »
how did you get those top pieces so smooth?

SpaceHedgehog

  • Trade Count: (0)
  • Full Member
  • ***
  • Offline Offline
  • Posts: 937
  • Last login:February 06, 2023, 12:10:24 pm
  • Almost done ...
Re: Vewlix style cab. Slim version (marquee fitted and CP nearly done)
« Reply #91 on: October 05, 2009, 12:43:52 pm »
how did you get those top pieces so smooth?

I spent a lot of time on the template to get the curves right. I then spent even longer filling, sanding and painting to get the finish smooth.

Here's the CP. I still have some finishing off and cleaning up to do....

Click a pic for a video tour 

SpaceHedgehog

  • Trade Count: (0)
  • Full Member
  • ***
  • Offline Offline
  • Posts: 937
  • Last login:February 06, 2023, 12:10:24 pm
  • Almost done ...
Re: Vewlix style cab. Slim version (marquee fitted/ CP nearly complete)
« Reply #92 on: October 05, 2009, 01:04:38 pm »
Here are some pics of the CP in the main unit. A couple of the buttons are slightly off so I will adjust these.


I need to get the moveslist inlay sorted next.
Click a pic for a video tour 

emphatic

  • Trade Count: (0)
  • Full Member
  • ***
  • Offline Offline
  • Posts: 2009
  • Last login:Today at 02:12:48 pm
  • -"Suck it, Donny!" -"No, YOU suck it.... more".
    • Emphatic's Video Game Collection
Re: Vewlix style cab. Slim version (marquee fitted/ CP nearly complete)
« Reply #93 on: October 05, 2009, 01:34:17 pm »
 :applaud: Awesome.

Do you plan on a mask for the LG logo on your TV as well?

SpaceHedgehog

  • Trade Count: (0)
  • Full Member
  • ***
  • Offline Offline
  • Posts: 937
  • Last login:February 06, 2023, 12:10:24 pm
  • Almost done ...
Re: Vewlix style cab. Slim version (marquee fitted/ CP nearly complete)
« Reply #94 on: October 05, 2009, 01:45:17 pm »
Oh yes!

Here's a couple of pics:


Click a pic for a video tour 

Kman-Sweden

  • Trade Count: (+1)
  • Full Member
  • ***
  • Offline Offline
  • Posts: 526
  • Last login:October 23, 2015, 07:29:00 am
  • Up the Irons!
Re: Vewlix style cab. Slim version (marquee fitted/ CP nearly complete)
« Reply #95 on: October 05, 2009, 01:54:23 pm »
TURN IT ON! :bat

SpaceHedgehog

  • Trade Count: (0)
  • Full Member
  • ***
  • Offline Offline
  • Posts: 937
  • Last login:February 06, 2023, 12:10:24 pm
  • Almost done ...
Re: Vewlix style cab. Slim version (marquee/CP fitted - wiring to do)
« Reply #96 on: October 05, 2009, 02:33:44 pm »
Going to wait until the CP is wired up!
Click a pic for a video tour 

Kman-Sweden

  • Trade Count: (+1)
  • Full Member
  • ***
  • Offline Offline
  • Posts: 526
  • Last login:October 23, 2015, 07:29:00 am
  • Up the Irons!
Re: Vewlix style cab. Slim version (marquee/CP fitted - wiring to do)
« Reply #97 on: October 05, 2009, 04:06:42 pm »
Fair enough. But you deserve a  :whap in the head for making me think the CP was completed.
Keep the pics coming and congrats on a excellent build.

emphatic

  • Trade Count: (0)
  • Full Member
  • ***
  • Offline Offline
  • Posts: 2009
  • Last login:Today at 02:12:48 pm
  • -"Suck it, Donny!" -"No, YOU suck it.... more".
    • Emphatic's Video Game Collection
Re: Vewlix style cab. Slim version (marquee/CP fitted - wiring to do)
« Reply #98 on: October 05, 2009, 04:48:19 pm »
It looks odd, but in a cool way. Had I not see the originals, I wouldn't say so though. Turned out much taller than I thought it would. You didn't take any of the height off when you "shrank" it?

SpaceHedgehog

  • Trade Count: (0)
  • Full Member
  • ***
  • Offline Offline
  • Posts: 937
  • Last login:February 06, 2023, 12:10:24 pm
  • Almost done ...
Re: Vewlix style cab. Slim version (marquee/CP fitted - wiring to do)
« Reply #99 on: October 05, 2009, 05:28:09 pm »
It looks odd, but in a cool way. Had I not see the originals, I wouldn't say so though. Turned out much taller than I thought it would. You didn't take any of the height off when you "shrank" it?

I know what you mean. It's really difficult to get the pictures to give a real life sense of proportion. The top section has been reduced by around 9 cm in height and the first picture in the previous post gives the best overall idea. Agreed, the second picture does look tall but this is because I have a small room and the picture is taken quite close up!
Click a pic for a video tour 

BurgerKingDiamond

  • Trade Count: (+4)
  • Full Member
  • ***
  • Offline Offline
  • Posts: 690
  • Last login:July 01, 2021, 11:12:14 am
Re: Vewlix style cab. Slim version (marquee/CP fitted - wiring to do)
« Reply #100 on: October 05, 2009, 05:53:55 pm »
Sweet Jesus this thing is sexual! So f.....g cool. Nice job.
-Welcome to the Fantasy Zone.

SpaceHedgehog

  • Trade Count: (0)
  • Full Member
  • ***
  • Offline Offline
  • Posts: 937
  • Last login:February 06, 2023, 12:10:24 pm
  • Almost done ...
Re: Vewlix style cab. Slim version (marquee/CP fitted - wiring to do)
« Reply #101 on: October 05, 2009, 06:14:12 pm »
Thanks! I've looked at your cab as well, gotta love Raiden!
Click a pic for a video tour 

BurgerKingDiamond

  • Trade Count: (+4)
  • Full Member
  • ***
  • Offline Offline
  • Posts: 690
  • Last login:July 01, 2021, 11:12:14 am
Re: Vewlix style cab. Slim version (marquee/CP fitted - wiring to do)
« Reply #102 on: October 05, 2009, 06:44:45 pm »
thanks to you as well. BTW, I've never seen a viewlix in real life, but I looked at the picture you posted of the original. I actually think yours is better. The slim down makes it look sleeker. Do you have some kind of background in woodworking? This can't have been your first cab. I'm trying to figure out how you got those angled white edges.
-Welcome to the Fantasy Zone.

SpaceHedgehog

  • Trade Count: (0)
  • Full Member
  • ***
  • Offline Offline
  • Posts: 937
  • Last login:February 06, 2023, 12:10:24 pm
  • Almost done ...
Re: Vewlix style cab. Slim version (marquee/CP fitted - wiring to do)
« Reply #103 on: October 06, 2009, 04:07:10 pm »
No background in woodwork for me but this is my third main project (original lowboy style cab and racing pod being the first 2). Also, are you referring to the routed edges?
Click a pic for a video tour 

clickhea

  • Trade Count: (0)
  • Full Member
  • ***
  • Offline Offline
  • Posts: 418
  • Last login:August 09, 2019, 07:33:40 am
Re: Vewlix style cab. Slim version (marquee/CP fitted - wiring to do)
« Reply #104 on: October 06, 2009, 11:55:54 pm »
amazing bro

blackwatchplad

  • Trade Count: (0)
  • Full Member
  • ***
  • Offline Offline
  • Posts: 46
  • Last login:July 18, 2022, 10:39:50 pm
Re: Vewlix style cab. Slim version (marquee/CP fitted - wiring to do)
« Reply #105 on: October 07, 2009, 02:37:08 pm »
you sir, did an outstanding job.  un-freakin-believable.
had i not know any better from the looks of some of those pic i would of thought i was looking at a factory made mini vewlix cab.  I cant wait to see it fired up and running!

BurgerKingDiamond

  • Trade Count: (+4)
  • Full Member
  • ***
  • Offline Offline
  • Posts: 690
  • Last login:July 01, 2021, 11:12:14 am
Re: Vewlix style cab. Slim version (marquee/CP fitted - wiring to do)
« Reply #106 on: October 07, 2009, 03:44:05 pm »
I'm talking about the white edges with the angles. You did those with a router? I don't have a router or know all the things you can do with one.
-Welcome to the Fantasy Zone.

SpaceHedgehog

  • Trade Count: (0)
  • Full Member
  • ***
  • Offline Offline
  • Posts: 937
  • Last login:February 06, 2023, 12:10:24 pm
  • Almost done ...
Re: Vewlix style cab. Slim version (marquee/CP fitted - wiring to do)
« Reply #107 on: October 07, 2009, 04:39:24 pm »
Thanks for the positive feedback!

About the router, it's probably the most versatile woodworking tool you can buy. I borrowed one for my first cab for the T molding but bought one specifically for this project.

I succumbed to the lure of turning it on. My XBOX is dead again so I ran it with the SFIV demo. Not great pics but here goes:


The sound system is installed. Now I just need to plug it into the PC.
Click a pic for a video tour 

emphatic

  • Trade Count: (0)
  • Full Member
  • ***
  • Offline Offline
  • Posts: 2009
  • Last login:Today at 02:12:48 pm
  • -"Suck it, Donny!" -"No, YOU suck it.... more".
    • Emphatic's Video Game Collection
Re: Vewlix style cab. Slim version (marquee/CP fitted - wiring to do)
« Reply #108 on: October 07, 2009, 05:59:18 pm »
So, you finished the control panel wiring already?

SpaceHedgehog

  • Trade Count: (0)
  • Full Member
  • ***
  • Offline Offline
  • Posts: 937
  • Last login:February 06, 2023, 12:10:24 pm
  • Almost done ...
Re: Vewlix style cab. Slim version (marquee/CP fitted - wiring to do)
« Reply #109 on: October 09, 2009, 03:56:31 pm »
Not quite there yet. I've soldered u the pad and wired it to the connector blocks. I just need to do the quick disconnects now. Soon I'll be using it at last!

Here's a picture of the speakers in the back of the cab:

Click a pic for a video tour 

VewlixKid

  • Trade Count: (0)
  • Jr. Member
  • **
  • Offline Offline
  • Posts: 9
  • Last login:May 11, 2013, 01:40:09 am
Re: Vewlix style cab. Slim version (marquee/CP fitted - wiring to do)
« Reply #110 on: October 09, 2009, 04:04:01 pm »
Very nice work.  :cheers:
Two questions though:
1. Where did you get the adjustable legs?
2. Also, how did you paint the 2x2s?

Epyx

  • Trade Count: (+1)
  • Full Member
  • ***
  • Offline Offline
  • Posts: 1961
  • Last login:December 25, 2023, 07:56:36 pm
  • "You're an oddity"
Re: Vewlix style cab. Slim version (marquee/CP fitted - wiring to do)
« Reply #111 on: October 09, 2009, 04:15:49 pm »
Wow SpaceHedgehog,

My comments:

Awesome, fantastic. I don't think I could physically walk by this without wanting to sit in front of it and play a game.  Damn good job!  :cheers:
Last Project


Epyx Tutorials:
Tutorials

SpaceHedgehog

  • Trade Count: (0)
  • Full Member
  • ***
  • Offline Offline
  • Posts: 937
  • Last login:February 06, 2023, 12:10:24 pm
  • Almost done ...
Re: Vewlix style cab. Slim version (marquee/CP fitted - wiring to do)
« Reply #112 on: October 10, 2009, 08:02:12 am »
Very nice work.  :cheers:
Two questions though:
1. Where did you get the adjustable legs?
2. Also, how did you paint the 2x2s?

Thanks!

1. http://cgi.ebay.co.uk/Adjustable-Feet-for-Baseboard-Legs-M6-Pack-of-4_W0QQitemZ160359757933QQcmdZViewItemQQptZUK_Trains_Railway_Models?hash=item25562fb86d&_trksid=p3286.c0.m14
2. Not sure what you mean by 2x2's!
Click a pic for a video tour 

SpaceHedgehog

  • Trade Count: (0)
  • Full Member
  • ***
  • Offline Offline
  • Posts: 937
  • Last login:February 06, 2023, 12:10:24 pm
  • Almost done ...
Re: Vewlix style cab. Slim version (marquee/CP fitted - wiring to do)
« Reply #113 on: October 10, 2009, 08:03:59 am »
Wow SpaceHedgehog,

My comments:

Awesome, fantastic. I don't think I could physically walk by this without wanting to sit in front of it and play a game.  Damn good job!  :cheers:

Thanks Epyx!

The wiring for the CP is now complete:


I'll be able to start using it very soon :)
Click a pic for a video tour 

Epyx

  • Trade Count: (+1)
  • Full Member
  • ***
  • Offline Offline
  • Posts: 1961
  • Last login:December 25, 2023, 07:56:36 pm
  • "You're an oddity"
Re: Vewlix style cab. Slim version (wiring complete but no XBOX :( )
« Reply #114 on: October 10, 2009, 11:18:13 am »
Quote
I'll be able to start using it very soon :)

Hopefully you can queue up a video of it in action when you do. That should be one rewarding moment!
Last Project


Epyx Tutorials:
Tutorials

Franco B

  • Trade Count: (+10)
  • Full Member
  • ***
  • Offline Offline
  • Posts: 3766
  • Last login:February 15, 2024, 09:14:06 am
Re: Vewlix style cab. Slim version (wiring complete but no XBOX :( )
« Reply #115 on: October 10, 2009, 12:01:32 pm »
I've not been able  to see the pics at home due to my uber crap connection but I'm just having a look at my parents place now and WOW! Awesome work all the way though.

You must be very proud  :applaud:

VewlixKid

  • Trade Count: (0)
  • Jr. Member
  • **
  • Offline Offline
  • Posts: 9
  • Last login:May 11, 2013, 01:40:09 am
Re: Vewlix style cab. Slim version (marquee/CP fitted - wiring to do)
« Reply #116 on: October 10, 2009, 01:14:33 pm »
Very nice work.  :cheers:
Two questions though:
1. Where did you get the adjustable legs?
2. Also, how did you paint the 2x2s?

Thanks!

1. http://cgi.ebay.co.uk/Adjustable-Feet-for-Baseboard-Legs-M6-Pack-of-4_W0QQitemZ160359757933QQcmdZViewItemQQptZUK_Trains_Railway_Models?hash=item25562fb86d&_trksid=p3286.c0.m14
2. Not sure what you mean by 2x2's!

Thank you. Sorry, I meant the wood that the adjustable legs are connected to. I have circled it in the pic below.

SpaceHedgehog

  • Trade Count: (0)
  • Full Member
  • ***
  • Offline Offline
  • Posts: 937
  • Last login:February 06, 2023, 12:10:24 pm
  • Almost done ...
Re: Vewlix style cab. Slim version (marquee/CP fitted - wiring to do)
« Reply #117 on: October 10, 2009, 01:34:44 pm »
I'll be sure to take a video at some point soon Epyx.


Thanks for the feedback Franco B. It's consumed most of my spare time of late but now it's functional, I'm really happy. Just working on a mechanism to secure the swapable CP when it's slotted in. I don't have my XBOX working atm so I'm going to copy my MAME install from my other PC for some gaming action for now.

Thank you. Sorry, I meant the wood that the adjustable legs are connected to. I have circled it in the pic below.

Ah, the legs! These are actually 30mmx40mm strips, The 30mm matches the width of the mdf sides (12mm+18mm). I primed it, sanded it smooth, used some filler to hide any inconsistencies, primed and sanded again andthen painted them at the same time as the base. I used a flat black paint and water based polyurethane.
Click a pic for a video tour 

opt2not

  • Trade Count: (+15)
  • Full Member
  • ***
  • Offline Offline
  • Posts: 6173
  • Last login:April 02, 2024, 07:42:30 pm
Re: Vewlix style cab. Slim version (wiring complete but no XBOX :( )
« Reply #118 on: October 10, 2009, 03:22:25 pm »
Fine craftsmanship!  This cabinet is so clean looking!  A+!
I'm glad to see you using good fighting-game control parts and your wiring is nice and organized. You're going to love playing this thing online on the xbox 360, I'll have to PM you my Gamertag and give you a little Blanka-schoolin' to break it in!  ;D

Good to see you're using the Madcatz arcade stick as the interface, it's funny, I think that stick is only good for this purpose.

btw, I'm assuming your "menu" button is your xbox guide button?

SpaceHedgehog

  • Trade Count: (0)
  • Full Member
  • ***
  • Offline Offline
  • Posts: 937
  • Last login:February 06, 2023, 12:10:24 pm
  • Almost done ...
Re: Vewlix style cab. Slim version (wiring complete but no XBOX :( )
« Reply #119 on: October 10, 2009, 04:51:37 pm »
Thanks opt2not! I didn't want to skimp on the parts so I went for a JLF this time rather than a JLW which I have in my two custom sticks. I bought the madcatz specifically to hack as it's common ground and relatively easy to solder. The menu button is hooked up to the guide.

Once I get my broken XBOX back I'll let you beat me as I'm pretty average with fighters, I just really enjoy playing them. Having thisis going to give me a good excuse to put in some serious practice time.
« Last Edit: October 10, 2009, 05:24:01 pm by SpaceHedgehog »
Click a pic for a video tour 

Gatsu

  • Trade Count: (+3)
  • Full Member
  • ***
  • Offline Offline
  • Posts: 943
  • Last login:November 04, 2017, 08:23:43 am
  • I'm not prejudice. I hate everyone equally.
Re: Vewlix style cab. Slim version (wiring complete but no XBOX :( )
« Reply #120 on: October 11, 2009, 01:12:48 am »
yeah when I get my vewlix done we'll have to throw down online in some SFIV as well.

opt2not

  • Trade Count: (+15)
  • Full Member
  • ***
  • Offline Offline
  • Posts: 6173
  • Last login:April 02, 2024, 07:42:30 pm
Re: Vewlix style cab. Slim version (wiring complete but no XBOX :( )
« Reply #121 on: October 11, 2009, 04:22:56 am »
yeah when I get my vewlix done we'll have to throw down online in some SFIV as well.

Oh you know it's so on! Both of yous are goin' down!

VewlixKid

  • Trade Count: (0)
  • Jr. Member
  • **
  • Offline Offline
  • Posts: 9
  • Last login:May 11, 2013, 01:40:09 am
Re: Vewlix style cab. Slim version (marquee/CP fitted - wiring to do)
« Reply #122 on: October 11, 2009, 11:46:42 pm »
I'll be sure to take a video at some point soon Epyx.


Thanks for the feedback Franco B. It's consumed most of my spare time of late but now it's functional, I'm really happy. Just working on a mechanism to secure the swapable CP when it's slotted in. I don't have my XBOX working atm so I'm going to copy my MAME install from my other PC for some gaming action for now.

Thank you. Sorry, I meant the wood that the adjustable legs are connected to. I have circled it in the pic below.

Ah, the legs! These are actually 30mmx40mm strips, The 30mm matches the width of the mdf sides (12mm+18mm). I primed it, sanded it smooth, used some filler to hide any inconsistencies, primed and sanded again andthen painted them at the same time as the base. I used a flat black paint and water based polyurethane.

Thank you for the detailed reply and the link to the legs.  :cheers:

mustafab1

  • Trade Count: (0)
  • Full Member
  • ***
  • Offline Offline
  • Posts: 20
  • Last login:March 22, 2018, 05:32:38 am
Re: Vewlix style cab. Slim version (wiring complete but no XBOX :( )
« Reply #123 on: October 13, 2009, 10:55:54 am »
Nice cab!!! :applaud:

Gatsu

  • Trade Count: (+3)
  • Full Member
  • ***
  • Offline Offline
  • Posts: 943
  • Last login:November 04, 2017, 08:23:43 am
  • I'm not prejudice. I hate everyone equally.
Re: Vewlix style cab. Slim version (wiring complete but no XBOX :( )
« Reply #124 on: October 13, 2009, 01:52:55 pm »
yes. this is a very sexy cab. Let me know if you ever entertain the idea of selling it. hehe.

SpaceHedgehog

  • Trade Count: (0)
  • Full Member
  • ***
  • Offline Offline
  • Posts: 937
  • Last login:February 06, 2023, 12:10:24 pm
  • Almost done ...
Re: Vewlix style cab. Slim version (wiring complete but no XBOX :( )
« Reply #125 on: October 13, 2009, 05:24:31 pm »
Thank you people! I've ordered my led's so the moveslist should be illuminated soon. I've also order a PC copy of SFIV whilst the XBOX is waiting to be replaced. I still have the back of the cab to consider and also the swapable panel so I can use if for PC purposes as well. I'm on holiday next week so hope to get all of this done by the end of it.
Click a pic for a video tour 

Kaytrim

  • I'm too nice a guy
  • Trade Count: (+4)
  • Full Member
  • ***
  • Offline Offline
  • Posts: 2095
  • Last login:September 22, 2015, 04:11:30 pm
Re: Vewlix style cab. Slim version (wiring complete but no XBOX :( )
« Reply #126 on: October 13, 2009, 05:33:24 pm »
There are drivers that will allow you to use a 360 pad on a Windows PC.  Why waste your money on a second panel when the one will work for both systems?

Michael

SpaceHedgehog

  • Trade Count: (0)
  • Full Member
  • ***
  • Offline Offline
  • Posts: 937
  • Last login:February 06, 2023, 12:10:24 pm
  • Almost done ...
Re: Vewlix style cab. Slim version (wiring complete but no XBOX :( )
« Reply #127 on: October 13, 2009, 05:53:01 pm »
Hi Michael, it will be for a keyboard and mouse arrangement rather than another stick. I just want to get maximum return from the effort invested! I'm actually typing this in from the comfort of the Vewlix.
Click a pic for a video tour 

Gatsu

  • Trade Count: (+3)
  • Full Member
  • ***
  • Offline Offline
  • Posts: 943
  • Last login:November 04, 2017, 08:23:43 am
  • I'm not prejudice. I hate everyone equally.
Re: Vewlix style cab. Slim version (wiring complete but no XBOX :( )
« Reply #128 on: October 13, 2009, 06:08:41 pm »
you know....thats not a bad idea man. I might have to include that in my vewlix design. Thankfully not done with the CP yet so I still have some room to add features.

I still need to figure out what kind of headphone jacks I need so I can play on Xbox Live and actually hear people.

SpaceHedgehog

  • Trade Count: (0)
  • Full Member
  • ***
  • Offline Offline
  • Posts: 937
  • Last login:February 06, 2023, 12:10:24 pm
  • Almost done ...
Re: Vewlix style cab. Slim version (wiring complete but no XBOX :( )
« Reply #129 on: October 17, 2009, 05:00:21 pm »
I still need to adjust this as I'm not completely happy with it but here's some crappy pictures of the LED's behind the moveslist:


Click a pic for a video tour 

opt2not

  • Trade Count: (+15)
  • Full Member
  • ***
  • Offline Offline
  • Posts: 6173
  • Last login:April 02, 2024, 07:42:30 pm
Re: Vewlix style cab. Slim version (wiring complete but no XBOX :( )
« Reply #130 on: October 17, 2009, 10:35:04 pm »
Very classy. I  think it'll look beautiful when it's completely tweaked to your liking. Great idea, for some reason I can't help but think of a night club when I see table top lit surfaces. :D

KissMyWookie

  • Trade Count: (0)
  • Full Member
  • ***
  • Offline Offline
  • Posts: 94
  • Last login:September 18, 2014, 04:57:34 pm
Re: Vewlix style cab. Slim version (wiring complete but no XBOX :( )
« Reply #131 on: October 18, 2009, 01:00:16 am »
I love your cab ... makes a good argument for having an LCD screen instead of a CRT. (Though finding 4:3 screens is becoming harder and harder). :applaud:

malelanct

  • Trade Count: (0)
  • Full Member
  • ***
  • Offline Offline
  • Posts: 64
  • Last login:May 25, 2012, 10:05:59 am
Re: Vewlix style cab. Slim version (wiring complete but no XBOX :( )
« Reply #132 on: October 19, 2009, 04:56:45 pm »
Great job,  i have a few questions

can you post any pictures or explain how the plexi for your moves list is held in place?  also where/how the LEDS are mounted under it?

SpaceHedgehog

  • Trade Count: (0)
  • Full Member
  • ***
  • Offline Offline
  • Posts: 937
  • Last login:February 06, 2023, 12:10:24 pm
  • Almost done ...
Re: Vewlix style cab. Slim version (wiring complete but no XBOX :( )
« Reply #133 on: October 19, 2009, 07:20:08 pm »
Thanks for the comments.

@KissMyWookie  I know what you mean about the 4:3. I've not been able to fined anything bigger than 19" that isn't rediculously expensive.

@malelanct  I cut 'V' shapes into the supports, cut 2 strips of 3mm board and attached them to the sides. I then mounted the LED strip to a piece of wood and glued it to the bottom of the 'V':


To support the opal acrylic, I attached pieces of thin plastic card underneath the cutout on the panel and then cut thin strips of white craft foam and stuck this to the top of the plastic card:


It just rests on these supports. I still have to find some thin silver strip to go around the edges to finish it off.
« Last Edit: October 19, 2009, 07:27:26 pm by SpaceHedgehog »
Click a pic for a video tour 

malelanct

  • Trade Count: (0)
  • Full Member
  • ***
  • Offline Offline
  • Posts: 64
  • Last login:May 25, 2012, 10:05:59 am
Re: Vewlix style cab. Slim version (LEDs mounted under moveslist)
« Reply #134 on: October 20, 2009, 04:50:16 pm »
Thanks, that helps alot

The move list is sandwiched between the opal and clear plexi? 

Can you provide a place where you found the movelist? or did you create it?  do you know the ratio or size of the actual movelist area on a fullsize vewlix?

SpaceHedgehog

  • Trade Count: (0)
  • Full Member
  • ***
  • Offline Offline
  • Posts: 937
  • Last login:February 06, 2023, 12:10:24 pm
  • Almost done ...
Re: Vewlix style cab. Slim version (LEDs mounted under moveslist)
« Reply #135 on: October 20, 2009, 05:11:21 pm »
That's right. I still have to cut my clear plexi but I'm holding back on that until I get the silver trim sorted out. Someone very kindly loaded the movelist onto Rapidshare for me. Here's the link.

http://rapidshare.com/files/292182864/Vewlix_Artwork.zip

It includes Blazblue as well and a few other pieces of artwork. Because my cab is slimmer than a standard size, I need to scale the artwork to fit.

Click a pic for a video tour 

Vini_SM

  • Trade Count: (0)
  • Newbie
  • *
  • Offline Offline
  • Posts: 1
  • Last login:November 28, 2009, 04:22:31 pm
Re: Vewlix style cab. Slim version (LEDs mounted under moveslist)
« Reply #136 on: October 20, 2009, 05:36:32 pm »
Hi! I've been following this thread since the beginning and, well... outstanding  job! :notworthy: congratulations!
one doubt...and forgive me if you already answer that... How you did to hold down the plexi on the CP? using the buttons?

thanks in advance. and again, great work! :applaud:

SpaceHedgehog

  • Trade Count: (0)
  • Full Member
  • ***
  • Offline Offline
  • Posts: 937
  • Last login:February 06, 2023, 12:10:24 pm
  • Almost done ...
Re: Vewlix style cab. Slim version (LEDs mounted under moveslist)
« Reply #137 on: October 21, 2009, 05:33:44 am »
The CP has several sections to it, a 12mm base, 3mm board, artwork and the acrylic on top. Here's some pictures taken pre clean-up which will hopefully show things a little better:

12mm MDF base: Cutouts for the button section and the stick with holes drilled for the small buttons:


3mm board showing with a cutout for the stick and holes drilled for all the buttons:


Panel assembled with the buttons in-place:


Once all the pieces were cut, the stick was attached to the 12mm MDF from the top using bolts. The 3mm board was then glued in place onto the 12mm MDF(the stick can still be removed by unscrewing the mounting plate). The artwor and acrylic were then placed on the top. The buttons are a mixture of screw-ins and snap-ins. You should be able to see the larger screw-ins in the picture as they have an orange ring and are the outermost buttons on the main 6 button cluster. The remaining 3 smaller snap-ins fit very snugly into the holes but I elected to use a small amount of hot glue to secure them to the 12mm MDF board. This can be removed fairly easily and also makes the acrylic secure.
« Last Edit: October 21, 2009, 05:35:53 am by SpaceHedgehog »
Click a pic for a video tour 

Franco B

  • Trade Count: (+10)
  • Full Member
  • ***
  • Offline Offline
  • Posts: 3766
  • Last login:February 15, 2024, 09:14:06 am
Re: Vewlix style cab. Slim version (LEDs mounted under moveslist)
« Reply #138 on: October 21, 2009, 05:50:56 am »
Looking good  8)

I dont know how fussed you are but if you want your CP uber nice I could make you some drilling/routing templates.

Button drilling/routing templates in [this] thread. (Accurate to within 0.1mm of the Sega layout)

JLF routing templates [here].

Maybe you would like a nice mirrored,black or white dustwasher too  :D


SpaceHedgehog

  • Trade Count: (0)
  • Full Member
  • ***
  • Offline Offline
  • Posts: 937
  • Last login:February 06, 2023, 12:10:24 pm
  • Almost done ...
Re: Vewlix style cab. Slim version (LEDs mounted under moveslist)
« Reply #139 on: October 21, 2009, 06:04:58 am »
Those look great Franco, you always seem to do such a pro job. My cab looks great from the outside but less so round the back and under the panel. Everything is fitted for now so I'm going to leave it (plus my wife wants the car back in the garage) but rest assured I'll be back if I make another machine, those templates look really useful and very clean.
Click a pic for a video tour 

SpaceHedgehog

  • Trade Count: (0)
  • Full Member
  • ***
  • Offline Offline
  • Posts: 937
  • Last login:February 06, 2023, 12:10:24 pm
  • Almost done ...
Re: Vewlix style cab. Slim version (LEDs mounted under moveslist)
« Reply #140 on: March 03, 2010, 06:10:27 am »
I've never been completely happy with the profile of the cab I built and I've finally got myself set up to complete the damn thing after waiting for the cold weather to go. The next set of updates will turn it from this:


Into this:


Side art will also be applied from the templates I made previously but I need to get some better ones printed out.

Click a pic for a video tour 

emphatic

  • Trade Count: (0)
  • Full Member
  • ***
  • Offline Offline
  • Posts: 2009
  • Last login:Today at 02:12:48 pm
  • -"Suck it, Donny!" -"No, YOU suck it.... more".
    • Emphatic's Video Game Collection
Re: Vewlix style cab. Slim version (Working on side trim)
« Reply #141 on: March 03, 2010, 12:07:57 pm »
It's exciting to see an update to this. I really enjoy people cloning modern cabs.  :applaud:

SpaceHedgehog

  • Trade Count: (0)
  • Full Member
  • ***
  • Offline Offline
  • Posts: 937
  • Last login:February 06, 2023, 12:10:24 pm
  • Almost done ...
Re: Vewlix style cab. Slim version (Working on side trim)
« Reply #142 on: March 03, 2010, 12:26:01 pm »
Thanks Emphatic! I've been putting this off for ages and with Super Street Fighter 4 just around he corner it's high time I completed it.

Here's my first attempt at making one of the bands to go around the side of the top section.

Click a pic for a video tour 

apfelanni

  • Trade Count: (0)
  • Full Member
  • ***
  • Offline Offline
  • Posts: 362
  • Last login:February 18, 2019, 01:55:28 pm
Re: Vewlix style cab. Slim version (Working on side trim)
« Reply #143 on: March 03, 2010, 12:48:06 pm »
ure doin a wonderful job my dear.  its looking phantastic for a selfbuild. but i will never see the reason why people are rebuilding cabinets that u can easy buy on the market.  with the countless hours of working and the money u spend on this thing i dont think u spare any cash compared buying a real vewlix or a chinaclone .


i would only consider building something that complex when :

- u cant get ur hands on anything like that or only in worse shape ( like 30 year old cocktail tables oder rare dedicated )    
- or im not satisfied with the quality of a generic cabinet . if ist made of crappy woodparticle board for example.
- or i m goin with a very unique design like omds or pixelhuggers.

but maybe all u wanted is 2 improve ur woodworking and painting skills or have some fun during the building process.


« Last Edit: March 03, 2010, 12:53:15 pm by apfelanni »

Epyx

  • Trade Count: (+1)
  • Full Member
  • ***
  • Offline Offline
  • Posts: 1961
  • Last login:December 25, 2023, 07:56:36 pm
  • "You're an oddity"
Re: Vewlix style cab. Slim version (Working on side trim)
« Reply #144 on: March 03, 2010, 01:15:58 pm »
Quote
i would only consider building something that complex when

Some people love building. I personally can't understand why some people do conversions when scratch builds are a clean slate...but that is just me. Power to them! ;)

@SpaceHedgehog

The bands will definitely add to the already awesome cab!
« Last Edit: March 03, 2010, 05:53:02 pm by Epyx »
Last Project


Epyx Tutorials:
Tutorials

javeryh

  • Trade Count: (+1)
  • Full Member
  • ***
  • Offline Offline
  • Posts: 7904
  • Last login:Today at 03:22:36 pm
Re: Vewlix style cab. Slim version (Working on side trim)
« Reply #145 on: March 03, 2010, 02:45:26 pm »
Quote
i would only consider building something that complex when

Some people love building. I personally can't understand why some people do conversions which scratch builds are a clean slate...but that is just me. Power to them! ;)

@SpaceHedgehog

The bands will definitely add to the already awesome cab!

Gotta agree with Epyx - building is 51% of the fun!

SpaceHedgehog

  • Trade Count: (0)
  • Full Member
  • ***
  • Offline Offline
  • Posts: 937
  • Last login:February 06, 2023, 12:10:24 pm
  • Almost done ...
Re: Vewlix style cab. Slim version (Working on side trim)
« Reply #146 on: March 03, 2010, 05:19:42 pm »
There's definitely something about seeing something you like, or having an idea and bringing it to life. I produce nothing of any real significance at work so this is really fun to do. It's also a hell of a lot cheaper than spendin about $4000 (plus shipping) on a cab!

@javeryh ... Gotta disagree with you man, it's at least 57%!
Click a pic for a video tour 

opt2not

  • Trade Count: (+15)
  • Full Member
  • ***
  • Offline Offline
  • Posts: 6173
  • Last login:April 02, 2024, 07:42:30 pm
Re: Vewlix style cab. Slim version (Working on side trim)
« Reply #147 on: March 03, 2010, 06:18:02 pm »
Personally, I like conversions and renovations. It's like, I feel that I'm retaining the history of the cabinet, but breathing life back into it.  Retaining the glory of the usage that was put into it way back when, and holding it's heritage of it's youth for the future. A make-over. It really depends on the cabinet of course...I wouldn't renovate a classic Pacman cabinet per say, but a standard dynamo cabinet, for sure.  Perhaps I'm being too sentimental... or just too lazy to figure out dimensions and such.

Anyways, love the concepts for the side colouring and artwork!

Kurt

  • Trade Count: (0)
  • Full Member
  • ***
  • Offline Offline
  • Posts: 104
  • Last login:September 13, 2010, 10:53:22 pm
Re: Vewlix style cab. Slim version (Working on side trim)
« Reply #148 on: March 03, 2010, 08:32:28 pm »
Looks awesome, what material are you using to make the bands??

I take my hat off to many of the builds on here knowing you made something from the ground up it's something you can be proud of and one of a kind. I get great enjoyment looking though peoples builds id be pretty disappointed if they were all restorations.

Keep the pics comming, i can't wait for ssf4 would be something else playing it on a cab like that rather then a 360 controller  :P

SpaceHedgehog

  • Trade Count: (0)
  • Full Member
  • ***
  • Offline Offline
  • Posts: 937
  • Last login:February 06, 2023, 12:10:24 pm
  • Almost done ...
Re: Vewlix style cab. Slim version (Working on side trim)
« Reply #149 on: March 04, 2010, 03:21:28 pm »
It's got a covering of black vinyl but it's actually made out of high impact polystyrene (plastic card). I tried to ordersome of this stuff a while back but it never got delivered. I tried a different company and it turned up a couple of days ago. I ordered a few sheets to do the black trim. It's effectively like laminate but that stuff is really hard to get hold of in the UK, plus it's expensive. Always on the lookout for new materias to use! I reckon that this is going to be really useful stuff for construction.

Sheet:


Band cut out of plasticard:

Click a pic for a video tour 

SpaceHedgehog

  • Trade Count: (0)
  • Full Member
  • ***
  • Offline Offline
  • Posts: 937
  • Last login:February 06, 2023, 12:10:24 pm
  • Almost done ...
Re: Vewlix style cab. Slim version (Working on side trim)
« Reply #150 on: March 13, 2010, 10:56:03 am »
Finding some time to make some progress. I'm NOT decorating this weekend.

Lower band:


Mid Side Piece


This bit is going to be difficult to cut but I'll take my time. It gives a better idea of the full profile:

Click a pic for a video tour 

SpaceHedgehog

  • Trade Count: (0)
  • Full Member
  • ***
  • Offline Offline
  • Posts: 937
  • Last login:February 06, 2023, 12:10:24 pm
  • Almost done ...
Re: Vewlix style cab. Slim version (Working on side trim)
« Reply #151 on: March 13, 2010, 11:43:06 am »
Well it didn't take too long to cut that piece. Here's the fit:


Edit:

Side art test. Yes/no??

« Last Edit: March 13, 2010, 01:39:34 pm by SpaceHedgehog »
Click a pic for a video tour 

SNAAKE

  • Trade Count: (+29)
  • Full Member
  • ***
  • Offline Offline
  • Posts: 3546
  • Last login:January 11, 2024, 12:21:50 pm
  • my joystick is bigger than your joystick !
Re: Vewlix style cab. Slim version (Working on side trim)
« Reply #152 on: March 13, 2010, 02:04:36 pm »
looks good I say go for it. maybe make the vewlix logo little bigger.

opt2not

  • Trade Count: (+15)
  • Full Member
  • ***
  • Offline Offline
  • Posts: 6173
  • Last login:April 02, 2024, 07:42:30 pm
Re: Vewlix style cab. Slim version (Working on side trim)
« Reply #153 on: March 13, 2010, 03:26:21 pm »
Definitely yes. I think it makes it look so much more professional...and, daaaaaamn! I'm really lovin' this build!

Jp19

  • Trade Count: (0)
  • Full Member
  • ***
  • Offline Offline
  • Posts: 58
  • Last login:January 17, 2016, 09:23:15 pm
Re: Vewlix style cab. Slim version (Working on side trim)
« Reply #154 on: March 13, 2010, 06:10:36 pm »
It's got a covering of black vinyl but it's actually made out of high impact polystyrene (plastic card).

Any chance of a supplier link or info please dude ?

Kurt

  • Trade Count: (0)
  • Full Member
  • ***
  • Offline Offline
  • Posts: 104
  • Last login:September 13, 2010, 10:53:22 pm
Re: Vewlix style cab. Slim version (Working on side trim)
« Reply #155 on: March 13, 2010, 10:23:59 pm »
Man that is looking sweet. Very professional workmanship.

Are you happy with the 1 player cp or if given the chance would you rather 2 player?

SpaceHedgehog

  • Trade Count: (0)
  • Full Member
  • ***
  • Offline Offline
  • Posts: 937
  • Last login:February 06, 2023, 12:10:24 pm
  • Almost done ...
Re: Vewlix style cab. Slim version (Working on side trim)
« Reply #156 on: March 14, 2010, 03:54:47 am »
Thanks for the feedbck on the side art, I'm going to go with it.

@JP19, here's the link:

http://www.plasticstockist.com/index.cfm?Page=cHJvZHVjdHM=&sector=MTE=&group=NzA=

It comes in lots of colours and is very easy to work with. The .5 and .25mm is very flexible although the former doesn't bend round sharp angles. I wish the thought had come to me sooner to use this as it would have saved a lot of time prepping the wood on the front sections and control panel pieces to get them completely smooth before applying the vinyl. Glueing this on top of the wood and then applying the vinyl would make a very smooth and clean looking surface. It's possibe to use vinyl dye on it as well so there are lots of options for its use.

@Kurt, I'd rather have both! Given that I mainly play solo, the single player panel is more than good enough. If I had used a 32" rather than a 24" moniror I'd definitely have gone with a 2 player. I was struggling for wall space (that all important commodity) when I built this but have since managed to liberate some more so am figuring out what to build next. I may convert this into a cab for vertical shooters and build a dual for other games (mainly fighters). Then again I may build another 2 like this and link 2 of them together for head to head action!

Here's what the vertical looks like:


Click a pic for a video tour 

SpaceHedgehog

  • Trade Count: (0)
  • Full Member
  • ***
  • Offline Offline
  • Posts: 937
  • Last login:February 06, 2023, 12:10:24 pm
  • Almost done ...
Re: Vewlix style cab. Slim version (Working on side trim)
« Reply #157 on: March 14, 2010, 03:37:21 pm »
The side pieces are all complete and in place. Tried a loose fit piece to get an idea for how it'll look. I'm glad I decided to do this as I'm really pleased with the results.

Temporary top piece.


Click a pic for a video tour 

BurgerKingDiamond

  • Trade Count: (+4)
  • Full Member
  • ***
  • Offline Offline
  • Posts: 690
  • Last login:July 01, 2021, 11:12:14 am
Re: Vewlix style cab. Slim version (Working on side trim)
« Reply #158 on: March 17, 2010, 01:30:29 pm »
Dude, I would love to see you turn it into a dedicated vertical cab. I'm a big shmup fan and playing DDP on something that big would be sweet. For someone reason I can't bring myself to mount my 32" Flat TV vertical though....
-Welcome to the Fantasy Zone.

Kangum

  • Trade Count: (+1)
  • Full Member
  • ***
  • Offline Offline
  • Posts: 461
  • Last login:February 25, 2018, 07:46:20 am
Re: Vewlix style cab. Slim version (Working on side trim)
« Reply #159 on: March 17, 2010, 06:36:28 pm »
i soo want one of these. woodworking required for the project is way way way over my head.

SpaceHedgehog

  • Trade Count: (0)
  • Full Member
  • ***
  • Offline Offline
  • Posts: 937
  • Last login:February 06, 2023, 12:10:24 pm
  • Almost done ...
Re: Vewlix style cab. Slim version (Working on side trim)
« Reply #160 on: March 20, 2010, 05:11:08 am »
@BurgerKingDiamond If I make another, I'll convert this into a vertcal shooter. I'd really like to build 3 of these and have them in a row in my games room.

@Kangum, I'm not a skilled woodworker by any means. I did invest in some good tools though, so that helped a lot.

Hopefully I'll have the top strip on by the end of the weekend. I need to build the back out a little as well as the black panels protrude in certain places.
Click a pic for a video tour 

emphatic

  • Trade Count: (0)
  • Full Member
  • ***
  • Offline Offline
  • Posts: 2009
  • Last login:Today at 02:12:48 pm
  • -"Suck it, Donny!" -"No, YOU suck it.... more".
    • Emphatic's Video Game Collection
Re: Vewlix style cab. Slim version (Working on side trim)
« Reply #161 on: March 20, 2010, 09:07:18 am »
If you build more cabinets, have you considered making variations, such as the L or the one that has pink/red marquee?


It would indeed be a very nice shmup cabinet, especially with nice Japanese 360 games now available in the west such as Mushihimesama Futari and ESPGALUDA II. I I were to build one of these though, I'l prefer having the rotation mechanism made, especially since the LCD screen is pretty lightweight.

SpaceHedgehog

  • Trade Count: (0)
  • Full Member
  • ***
  • Offline Offline
  • Posts: 937
  • Last login:February 06, 2023, 12:10:24 pm
  • Almost done ...
Re: Vewlix style cab. Slim version (Working on side trim)
« Reply #162 on: March 20, 2010, 10:35:56 am »
Yes! The blue one looks great but I'm not that keen on the red. Finished the side and top pieces and built the back out.


A few minor things to finish off, the art to apply and the back panels to do.
Click a pic for a video tour 

SpaceHedgehog

  • Trade Count: (0)
  • Full Member
  • ***
  • Offline Offline
  • Posts: 937
  • Last login:February 06, 2023, 12:10:24 pm
  • Almost done ...
Re: Vewlix style cab. Slim version (Working on side trim)
« Reply #163 on: March 21, 2010, 07:59:04 am »
Already thinking about some additional enhancements. As I play SFIV on the PC a lot, I was thinking about how to integrate a trackball without it ruining the appearance. I've decided to get a mini version.


I'm going to hide it when not in use by making some of the 'enclosures' like to original. I may even try and mount a keyboard and a couple of USB ports in one of them.


Just ordered an acrylic A4 poster holder for the top as well.
Click a pic for a video tour 

SpaceHedgehog

  • Trade Count: (0)
  • Full Member
  • ***
  • Offline Offline
  • Posts: 937
  • Last login:February 06, 2023, 12:10:24 pm
  • Almost done ...
Re: Vewlix style cab. Slim version Working on SideArt and CP
« Reply #164 on: March 26, 2010, 02:25:32 pm »
Added the artwork holder to the top of the cab:


Sideart vinyl should be back from the printers soon.
Click a pic for a video tour 

SpaceHedgehog

  • Trade Count: (0)
  • Full Member
  • ***
  • Offline Offline
  • Posts: 937
  • Last login:February 06, 2023, 12:10:24 pm
  • Almost done ...
Re: Vewlix style cab. Slim version. Artwork Holder Added.
« Reply #165 on: March 27, 2010, 05:10:52 am »
Vinyl arrived this morning. First piece applied:


It was tricky to get the angles lined up and to apply it.

Here's a "Tournament Edition" logo I made for the front section. It's a 24" monitor so has a bit more space underneath the monitor so I needed to get a better balance. The logo helps to break up the black section below the monitor:

« Last Edit: March 27, 2010, 05:12:26 am by SpaceHedgehog »
Click a pic for a video tour 

SpaceHedgehog

  • Trade Count: (0)
  • Full Member
  • ***
  • Offline Offline
  • Posts: 937
  • Last login:February 06, 2023, 12:10:24 pm
  • Almost done ...
Re: Vewlix Slim cab: Side Art/TE Logo/Artwork Holder complete
« Reply #166 on: August 23, 2010, 06:40:59 am »
Too busy using this to finish it off properly but managed to get some photo paper and print out the artwork for the top. May make the images slightly bigger to fill the space more.


Click a pic for a video tour 

XNIF

  • Trade Count: (0)
  • Full Member
  • ***
  • Offline Offline
  • Posts: 133
  • Last login:January 18, 2017, 04:40:32 pm
Re: Vewlix Slim cab: Top artwork added - finally.
« Reply #167 on: August 23, 2010, 11:10:08 am »
Man this thing look so nice.... i am going to build one of these when i finished mine !

DCsegaDH

  • Trade Count: (0)
  • Full Member
  • ***
  • Offline Offline
  • Posts: 298
  • Last login:September 18, 2013, 04:14:10 pm
Re: Vewlix Slim cab: Top artwork added - finally.
« Reply #168 on: August 25, 2010, 05:42:44 pm »
 :cheers: Great job on the cabinet. I can't wait for some new pictures  :applaud: 

R1V3R5

  • Trade Count: (0)
  • Jr. Member
  • **
  • Offline Offline
  • Posts: 7
  • Last login:February 19, 2012, 03:10:25 pm
Re: Vewlix Slim cab: Top artwork added - finally.
« Reply #169 on: September 07, 2010, 02:50:56 pm »
You may have mentioned it and I may have overlooked it, but what are you using for the bottom and top of the monitor for trim?

jikkjack

  • Trade Count: (0)
  • Full Member
  • ***
  • Offline Offline
  • Posts: 56
  • Last login:May 06, 2014, 03:02:58 pm
Re: Vewlix Slim cab: Top artwork added - finally.
« Reply #170 on: September 07, 2010, 07:13:29 pm »
Space - that cab looks sweet!  Excellent work. :cheers:
Jason

SpaceHedgehog

  • Trade Count: (0)
  • Full Member
  • ***
  • Offline Offline
  • Posts: 937
  • Last login:February 06, 2023, 12:10:24 pm
  • Almost done ...
Re: Vewlix Slim cab: Top artwork added - finally.
« Reply #171 on: September 08, 2010, 01:31:22 pm »
Thanks jikkjack.

@R1V3R5, the trim is a piece of shaped wood (flat on the back and rounded edges on the front) that I got from the hardware store that's covered in vinyl. I was originally going to look for a metal or plastic piece but saw the wood and knew it was exactly the shape I was looking for. I am still thinking about skinning all the vinyl sections in metal but will need to invest in a metal sheet bender first ... something for later.
Click a pic for a video tour 

thatitalian

  • Don't worry about the chicken, I feed my friends human all the time...
  • Trade Count: (0)
  • Full Member
  • ***
  • Offline Offline
  • Posts: 887
  • Last login:March 27, 2018, 10:52:37 am
  • The Revolution Is Coming...
Re: Vewlix Slim cab: Top artwork added - finally.
« Reply #172 on: September 09, 2010, 10:51:41 am »
 :o

SpaceHedgehog

  • Trade Count: (0)
  • Full Member
  • ***
  • Offline Offline
  • Posts: 937
  • Last login:February 06, 2023, 12:10:24 pm
  • Almost done ...
Re: Vewlix Slim cab: Top artwork added - finally.
« Reply #173 on: June 24, 2012, 04:50:39 pm »
Hope you're all welll. Been a while since I did anything with the cab. Just re-covered it this weekend and made it more vewlix-like by changing the speakers.


Will redo the artwork to make it darker, at some point .....

« Last Edit: June 24, 2012, 05:21:41 pm by SpaceHedgehog »
Click a pic for a video tour 

emphatic

  • Trade Count: (0)
  • Full Member
  • ***
  • Offline Offline
  • Posts: 2009
  • Last login:Today at 02:12:48 pm
  • -"Suck it, Donny!" -"No, YOU suck it.... more".
    • Emphatic's Video Game Collection
Re: Vewlix Slim cab: Updated
« Reply #174 on: June 25, 2012, 03:20:29 am »
 :applaud: Welcome back!

SpaceHedgehog

  • Trade Count: (0)
  • Full Member
  • ***
  • Offline Offline
  • Posts: 937
  • Last login:February 06, 2023, 12:10:24 pm
  • Almost done ...
Re: Vewlix Slim cab: Vewlix Desk mod
« Reply #175 on: September 16, 2012, 10:49:23 am »
Not a cab I know but it may give someone some ideas if nothing else.

I'm updating my games room to Vewlix everything. The desk was my next project.

It started life as one of these .... pretty uninspiring but, importantly, sturdy and compact.


The first things done were to cover it in blackboard vinyl, make an angled front piece and a monitor shelf.


I wanted to retain the original height adjusting pole from the monitor, so I embedded it in the shelf.


Then I made some side pieces.


Next was to wrap the frontpiece in vinyl and attach it:


Then a lot of spraying and sanding over a 6 week period to give a decent finish.


Then I gave it some wings.


I made some corner pieces to fit with the style...


... and then added some LED lighting powered by an RF remote.


I also made an accessory tidy using some coat hangers (still adding things to this ...).


Hopefully it may give someone some ideas.


« Last Edit: September 16, 2012, 10:53:15 am by SpaceHedgehog »
Click a pic for a video tour 

Saicho

  • Trade Count: (0)
  • Full Member
  • ***
  • Offline Offline
  • Posts: 29
  • Last login:February 27, 2014, 03:20:24 pm
Re: Vewlix Slim cab: Desk update
« Reply #176 on: September 16, 2012, 01:23:10 pm »
Wow! That looks totally awesome! :D

Azure

  • Trade Count: (0)
  • Full Member
  • ***
  • Offline Offline
  • Posts: 18
  • Last login:November 12, 2013, 08:27:35 pm
  • I want a candy cab:p
Re: Vewlix Slim cab: Desk update
« Reply #177 on: September 16, 2012, 03:14:55 pm »
Been following your thread on SRK:) I'm enjoying your build, as I've gone in the same direction (Vewlix-type, choice of materials).  :burgerking:  Gets even better that you're tying things into it:) Suscribed/faved/waiting for more!!
Wishlist: Sega Swing (really want), Sanwa/Seimitsu sticks and buttons, MVS carts, IREM PCBs

SpaceHedgehog

  • Trade Count: (0)
  • Full Member
  • ***
  • Offline Offline
  • Posts: 937
  • Last login:February 06, 2023, 12:10:24 pm
  • Almost done ...
Re: Vewlix Slim cab: Desk update
« Reply #178 on: September 17, 2012, 04:46:32 am »
Thanks for the comments  ;D

I have a few plans in my head atm. I'm planning to build the XBOX/console unit next, update my r-pod racing rig, make a stand for my games and consoles and am thinking about building a video pinball machine - just waiting for ZEN studios to release their fantastic Pinball FX2 on PC. That should keep me busy for at least a year I think.
Click a pic for a video tour 

SpaceHedgehog

  • Trade Count: (0)
  • Full Member
  • ***
  • Offline Offline
  • Posts: 937
  • Last login:February 06, 2023, 12:10:24 pm
  • Almost done ...
Re: Vewlix Slim cab: Desk update
« Reply #179 on: April 13, 2013, 05:07:26 am »
Having gone through the convoluted process of getting a new job and now having my new fitness regime established, I'm finding I have some time on my hands again .... and I also appear to be suffering from 'forum posting withdrawal'. I'll be getting the remaining aspects of the Vewlix cab which I'm not happy with redone Mainly artwork related), endeavoring to complete my pedestal Cab and generally sorting out my games room. I will still need to rebuild my racing cabinet as well. I can't let this thread go without posting a picture so here's a pic of my new Audioengine A2 speakers in place on my Vewlix inspired gaming desk.


As a reminder, this is the current state of affairs of my Console arcade cabinet (part 1 of a showcase/pedestal cab)


... and my r-pod which will be completely re-styled.


I also need to build a console cabinet rack but will wait for the new PS4 / XBOX to appear before starting that.

 
Click a pic for a video tour 

mgb

  • Trade Count: (0)
  • Full Member
  • ***
  • Offline Offline
  • Posts: 3499
  • Last login:February 21, 2024, 06:18:13 pm
  • North East, US
Re: Vewlix Slim cab: Desk update
« Reply #180 on: December 04, 2013, 09:18:14 pm »
Well, I'm in a "comment on an old thread" kinda mood tonight.

Somehow I think I missed this build, probably because I didn't have much fondness for vewlixes then.
But I gotta say, Great job.
This may be the nicest vewlix I've seen. Great lines and the colors are perfect.

SpaceHedgehog

  • Trade Count: (0)
  • Full Member
  • ***
  • Offline Offline
  • Posts: 937
  • Last login:February 06, 2023, 12:10:24 pm
  • Almost done ...
Re: Vewlix Slim cab: Desk update
« Reply #181 on: December 05, 2013, 03:28:56 pm »
Thanks mgb. Now there's a few decent fighting games for the PC, I'm thinking about putting one in it ... it's fed from an XBOX at the moment. As with all these ideas, it's no good unless the work's actually done.

My 'room with a Vewlix' will be complete once I've Vewlix'ed my racing pit.
Click a pic for a video tour 

SpaceHedgehog

  • Trade Count: (0)
  • Full Member
  • ***
  • Offline Offline
  • Posts: 937
  • Last login:February 06, 2023, 12:10:24 pm
  • Almost done ...
Re: Vewlix Slim cab
« Reply #182 on: August 09, 2014, 04:17:05 pm »
See that statement under my avatar? It's true; It's still not finished yet ... Well, I've neglected this for far too long. Now the R-Pod MkII is out of the way and Ultra Street Fighter IV has arrived, I'm going to get this thing finished off. There's a few things to do before I can finally call it complete:

Add coin slot:


Have the following printed on Vinyl:


Re-do the control panel / marquee artwork using good quality gloss / satin photo paper. It's not black enough tbh. You can see here:


Update the topper - the artwork is singularly uninspiring:


I also want to try and improve the sound a little. I have some rockwool left over from some acoustic panels I made - I'll use some of that behind the front speakers. Not sure it'll make too much difference but I'll give it a go. I've already used some isolation blocks under the subwoofer in the base and it has made a significant difference.

I'll be printing and laminating instruction strips for the front panel and the illuminated strip on the CP.


I'll update the lighting and add some behind the marquee.

I also need to make a proper back for it. I only started this project in 2009...

Edit: and one more small thing, I want to make some metal retainers for the moves list strips which will sit either side of the opal acrylic on the CP.
« Last Edit: August 09, 2014, 04:19:34 pm by SpaceHedgehog »
Click a pic for a video tour 

SpaceHedgehog

  • Trade Count: (0)
  • Full Member
  • ***
  • Offline Offline
  • Posts: 937
  • Last login:February 06, 2023, 12:10:24 pm
  • Almost done ...
Re: Vewlix Slim cab
« Reply #183 on: April 16, 2015, 04:29:29 pm »
After a really terrible launch day, MK X is now up and running nicely. Tremendous fun with plenty to do ... if you like blood, guts and fighting games, that is:


Installed and running in the cabinet:


Must get around to updating the panel to include 2 extra buttons and redo the artwork.
Click a pic for a video tour 

Electronuclear

  • Trade Count: (0)
  • Full Member
  • ***
  • Offline Offline
  • Posts: 26
  • Last login:May 25, 2017, 10:32:29 pm
Re: Vewlix Slim cab
« Reply #184 on: April 27, 2015, 10:12:12 pm »
This is basically the reason, I am also building a vewlix.

 :cheers:

SpaceHedgehog

  • Trade Count: (0)
  • Full Member
  • ***
  • Offline Offline
  • Posts: 937
  • Last login:February 06, 2023, 12:10:24 pm
  • Almost done ...
Re: Vewlix Slim cab
« Reply #185 on: May 10, 2015, 03:21:11 am »
Yes, it's a great game Electronuclear  :cheers:

Finally got off my behind to get this updated.

I've done the artwork for the topper to replace the sad and bland SF4 artwork:


Dull ...


I have also sent the control panel, marquee and insert coin artwork off to the printers - glossy print this time with a lighter gray colour:


... and a Madcatz fightpad to hack so I can include an 8 button layout:


Acrylic sheet for the CP also ordered:

Click a pic for a video tour 

SpaceHedgehog

  • Trade Count: (0)
  • Full Member
  • ***
  • Offline Offline
  • Posts: 937
  • Last login:February 06, 2023, 12:10:24 pm
  • Almost done ...
Re: Vewlix Slim cab
« Reply #186 on: May 12, 2015, 02:58:39 pm »
The artwork has arrived so I made the 'Insert Coin' sticker. This was cut out, covered with a matte tablet screen protector, backed with thin double  sided tape, corners rounded and stuck on to the CP:


I'll be adding a coin slot next to it.

I also cut out the new artwork for the topper - I'll need to find some thick card to use as backing as it's not laying completely flat:

Click a pic for a video tour 

SpaceHedgehog

  • Trade Count: (0)
  • Full Member
  • ***
  • Offline Offline
  • Posts: 937
  • Last login:February 06, 2023, 12:10:24 pm
  • Almost done ...
Re: Vewlix Slim cab
« Reply #187 on: May 16, 2015, 07:24:52 am »
New marquee artwork cut and fitted:


The black and grey are much better.
Click a pic for a video tour 

SpaceHedgehog

  • Trade Count: (0)
  • Full Member
  • ***
  • Offline Offline
  • Posts: 937
  • Last login:February 06, 2023, 12:10:24 pm
  • Almost done ...
Re: Vewlix Slim cab
« Reply #188 on: May 16, 2015, 01:12:38 pm »
Cut the acrylic with the base panel still in progress. New 8 button layout:


Made a complete shambles of the first one but that's why I ordered 2 pieces of acrylic ....
« Last Edit: May 16, 2015, 01:26:33 pm by SpaceHedgehog »
Click a pic for a video tour 

SpaceHedgehog

  • Trade Count: (0)
  • Full Member
  • ***
  • Offline Offline
  • Posts: 937
  • Last login:February 06, 2023, 12:10:24 pm
  • Almost done ...
Re: Vewlix Slim cab
« Reply #189 on: May 17, 2015, 06:41:27 am »
The base for the CP has been cut apart from the joystick section. I will be attaching 1mm aluminium strip to the front and back sections to provide a little more interest and hopefully professional looking finish. This is anodised, I may polish this up:


I still need to tidy the acrylic up a little and obviously it needs dusting ...
Click a pic for a video tour 

SpaceHedgehog

  • Trade Count: (0)
  • Full Member
  • ***
  • Offline Offline
  • Posts: 937
  • Last login:February 06, 2023, 12:10:24 pm
  • Almost done ...
Re: Vewlix Slim cab
« Reply #190 on: May 17, 2015, 08:01:22 am »
Trim cut to size with a test fit on the CP:


MAy not seem much but I like extra detailing.
Click a pic for a video tour 

SpaceHedgehog

  • Trade Count: (0)
  • Full Member
  • ***
  • Offline Offline
  • Posts: 937
  • Last login:February 06, 2023, 12:10:24 pm
  • Almost done ...
Re: Vewlix Slim cab
« Reply #191 on: May 17, 2015, 09:36:34 am »
I've been meaning to make these for a while. Retainers for the light bar:


Gunk needs cleaning off them. May also polish them up  ...
Click a pic for a video tour 

SpaceHedgehog

  • Trade Count: (0)
  • Full Member
  • ***
  • Offline Offline
  • Posts: 937
  • Last login:February 06, 2023, 12:10:24 pm
  • Almost done ...
Re: Vewlix Slim cab
« Reply #192 on: May 17, 2015, 12:44:18 pm »
Completed most of the panel. I still need to hack the fight pad but it's getting there now. I will also replace the right 2 buttons with black ones - they've been re-used from an old stick and are yellower than the others:


Done for the weekend and until the new buttons arrive ...
« Last Edit: May 17, 2015, 01:45:27 pm by SpaceHedgehog »
Click a pic for a video tour 

emphatic

  • Trade Count: (0)
  • Full Member
  • ***
  • Offline Offline
  • Posts: 2009
  • Last login:Today at 02:12:48 pm
  • -"Suck it, Donny!" -"No, YOU suck it.... more".
    • Emphatic's Video Game Collection
Re: Vewlix Slim cab
« Reply #193 on: May 17, 2015, 05:51:11 pm »
Nice retainers. Nice everything. :cheers:

SpaceHedgehog

  • Trade Count: (0)
  • Full Member
  • ***
  • Offline Offline
  • Posts: 937
  • Last login:February 06, 2023, 12:10:24 pm
  • Almost done ...
Re: Vewlix Slim cab
« Reply #194 on: May 18, 2015, 05:12:26 am »
Cheers emphatic  :cheers:

What you said some time ago (read years) concerning the choice of paper for the artwork really stuck in my mind. That and looking at the awesome Blip machine (my favourite cab here - simple black and white colour scheme superbly executed) made me realise the importance of a good print.
« Last Edit: May 18, 2015, 05:29:38 am by SpaceHedgehog »
Click a pic for a video tour 

two40

  • Trade Count: (0)
  • Full Member
  • ***
  • Offline Offline
  • Posts: 39
  • Last login:December 28, 2020, 01:33:38 am
  • What does this button do?
Re: Vewlix Slim cab
« Reply #195 on: May 18, 2015, 07:57:55 am »
The base for the CP has been cut apart from the joystick section. I will be attaching 1mm aluminium strip to the front and back sections to provide a little more interest and hopefully professional looking finish.


It's little things like this that makes the result special. Nice one.

SpaceHedgehog

  • Trade Count: (0)
  • Full Member
  • ***
  • Offline Offline
  • Posts: 937
  • Last login:February 06, 2023, 12:10:24 pm
  • Almost done ...
Re: Vewlix Slim cab
« Reply #196 on: May 18, 2015, 09:12:31 am »
Cheers for that two40  :cheers: I'm always striving for improvements to the designs of my builds.

Putting together a design for the Arcade Frontend. Here's the opening screen:


I want something simple, plain and modern looking.

Edit: Picture updated

« Last Edit: May 19, 2015, 11:44:55 am by SpaceHedgehog »
Click a pic for a video tour 

SpaceHedgehog

  • Trade Count: (0)
  • Full Member
  • ***
  • Offline Offline
  • Posts: 937
  • Last login:February 06, 2023, 12:10:24 pm
  • Almost done ...
Re: Vewlix Slim cab
« Reply #197 on: May 19, 2015, 06:49:36 am »
Game selection design for Maximus Arcade:


Just a few minor tweaks needed. Some games need renaming.

Edit: Picture updated.
« Last Edit: May 19, 2015, 11:45:51 am by SpaceHedgehog »
Click a pic for a video tour 

firedance

  • Trade Count: (0)
  • Full Member
  • ***
  • Offline Offline
  • Posts: 317
  • Last login:Today at 07:44:00 am
Re: Vewlix Slim cab
« Reply #198 on: May 19, 2015, 12:46:45 pm »
Very smart, should fit in well with the rest of the design  8) ;D

SpaceHedgehog

  • Trade Count: (0)
  • Full Member
  • ***
  • Offline Offline
  • Posts: 937
  • Last login:February 06, 2023, 12:10:24 pm
  • Almost done ...
Re: Vewlix Slim cab
« Reply #199 on: May 19, 2015, 03:55:00 pm »
Thanks very much firedance.

I'm quite pleased with it considering my extremely basic Photoshop skills.
Click a pic for a video tour 

SpaceHedgehog

  • Trade Count: (0)
  • Full Member
  • ***
  • Offline Offline
  • Posts: 937
  • Last login:February 06, 2023, 12:10:24 pm
  • Almost done ...
Re: Vewlix Slim cab
« Reply #200 on: May 20, 2015, 07:33:14 am »
Hurrah, 6th page ... I didn't like all the non-cabinet related stuff on the 5th.

Some bits arrived in the post.

100 Yen Coin Slot:


'Tournament Edition' badge with chrome surround:


I'll adjust the position a bit so it's slightly lower.

Also some buttons. I ordered a couple more white ones just in case I didn't like the black ones. I'm glad I did.

Black buttons:


White buttons:


I'm going to stick with the white.

Click a pic for a video tour 

Superfrog

  • Trade Count: (0)
  • Full Member
  • ***
  • Offline Offline
  • Posts: 393
  • Last login:June 28, 2022, 10:39:08 am
    • My YouTube Channel
Re: Vewlix Slim cab
« Reply #201 on: May 20, 2015, 12:56:37 pm »
Now I want a Vewlix  :banghead: :banghead:

Great masterpiece  :cheers:

SpaceHedgehog

  • Trade Count: (0)
  • Full Member
  • ***
  • Offline Offline
  • Posts: 937
  • Last login:February 06, 2023, 12:10:24 pm
  • Almost done ...
Re: Vewlix Slim cab
« Reply #202 on: May 20, 2015, 02:30:05 pm »
Cheers Superfrog  :cheers:

It's going to look very different from the original build when finished. Just goes to show that a project can always be updated provided the basics are ok.
Click a pic for a video tour 

SpaceHedgehog

  • Trade Count: (0)
  • Full Member
  • ***
  • Offline Offline
  • Posts: 937
  • Last login:February 06, 2023, 12:10:24 pm
  • Almost done ...
Re: Vewlix Slim cab
« Reply #203 on: May 21, 2015, 06:08:49 pm »
Well I'm not the world's worst solderer, but pretty close to it. Glad I got this out of the way. All tested and working. I may put this in a project box of some description.

Click a pic for a video tour 

SpaceHedgehog

  • Trade Count: (0)
  • Full Member
  • ***
  • Offline Offline
  • Posts: 937
  • Last login:February 06, 2023, 12:10:24 pm
  • Almost done ...
Re: Vewlix Slim cab
« Reply #204 on: May 23, 2015, 11:48:28 am »
Wired up and working with the new FrontEnd:


« Last Edit: May 23, 2015, 04:02:53 pm by SpaceHedgehog »
Click a pic for a video tour 

firedance

  • Trade Count: (0)
  • Full Member
  • ***
  • Offline Offline
  • Posts: 317
  • Last login:Today at 07:44:00 am
Re: Vewlix Slim cab
« Reply #205 on: May 23, 2015, 02:22:35 pm »
 8)

Superfrog

  • Trade Count: (0)
  • Full Member
  • ***
  • Offline Offline
  • Posts: 393
  • Last login:June 28, 2022, 10:39:08 am
    • My YouTube Channel
Re: Vewlix Slim cab
« Reply #206 on: May 23, 2015, 02:50:24 pm »
Super clean.. what can I say more  :censored: :censored:  :cheers:

And now going on with the flight sim  :cheers: :laugh2:


SpaceHedgehog

  • Trade Count: (0)
  • Full Member
  • ***
  • Offline Offline
  • Posts: 937
  • Last login:February 06, 2023, 12:10:24 pm
  • Almost done ...
Re: Vewlix Slim cab
« Reply #207 on: May 23, 2015, 04:20:04 pm »
Cheers firedance and Superfrog.

Command seat build will start up again soon.
Click a pic for a video tour 

SpaceHedgehog

  • Trade Count: (0)
  • Full Member
  • ***
  • Offline Offline
  • Posts: 937
  • Last login:February 06, 2023, 12:10:24 pm
  • Almost done ...
Re: Vewlix Slim cab
« Reply #208 on: May 25, 2015, 10:58:43 am »
I added a video of the build. Best viewed in 1080p 60fps (still some stutter  :banghead: ):


« Last Edit: May 25, 2015, 11:32:48 am by SpaceHedgehog »
Click a pic for a video tour 

SpaceHedgehog

  • Trade Count: (0)
  • Full Member
  • ***
  • Offline Offline
  • Posts: 937
  • Last login:February 06, 2023, 12:10:24 pm
  • Almost done ...
Re: Vewlix Slim cab - Video added
« Reply #209 on: February 04, 2017, 07:22:32 am »
Things still to do:

1. Fit some rockwool behind the speakers to improve the sound
2. Replace 1080p monitor with a 4k monitor
3. Rebuild the back
4. Fit some LED lighting
5. Design some alternative artwork toppers (laminated) so I can swap them out periodically (new Mortal Kombat X, Street Fighter V, Tekken 7, Injustice 2 etc)

... well, I started on the LED lighting. I'll be adding a dimmer tomorrow as it'll arrive then. I will also be fitting some to the back.


Some bigger pictures:


It's amazing how projects are never done ...
« Last Edit: June 06, 2017, 06:40:11 pm by SpaceHedgehog »
Click a pic for a video tour 

Vidiot

  • Trade Count: (0)
  • Full Member
  • ***
  • Offline Offline
  • Posts: 303
  • Last login:February 15, 2024, 10:00:17 am
  • John 3:16
Re: Vewlix Slim cab - still stuff to do ...
« Reply #210 on: February 04, 2017, 08:22:12 am »
Nicest Vewlix ever. The clean look and quality of fit and finish on your builds always amazes me.  :notworthy: I've been lurking in this thread but I had to say something. Such awesome work man. Looking forward to your updates.  :cheers:


wallmachine

  • Trade Count: (0)
  • Full Member
  • ***
  • Offline Offline
  • Posts: 12
  • Last login:February 10, 2024, 11:44:00 pm
Re: Vewlix Slim cab - still stuff to do ...
« Reply #211 on: April 22, 2017, 07:46:34 am »
I am starting a build guide for this project. It can be accessed at the following link:

http://forums.shoryuken.com/showthread.php?p=7599285#post7599285

If there's an alternative which I can use on this site, please let me know! I don't want to needlessly create another thread.

Hi SpaceHedgehog/Jeremy me again gotta say it again beautiful cabinet!

The link  for your guide is down do you have another one? Also just quickly how did you solve the problems for the speakers getting caught when rotating the monitor vertically? I'm assuming you need to remove the side panels to rotate it?
« Last Edit: April 22, 2017, 08:19:42 am by wallmachine »

SpaceHedgehog

  • Trade Count: (0)
  • Full Member
  • ***
  • Offline Offline
  • Posts: 937
  • Last login:February 06, 2023, 12:10:24 pm
  • Almost done ...
Re: Vewlix Slim cab - still stuff to do ...
« Reply #212 on: April 22, 2017, 03:12:12 pm »
I am starting a build guide for this project. It can be accessed at the following link:

http://forums.shoryuken.com/showthread.php?p=7599285#post7599285

If there's an alternative which I can use on this site, please let me know! I don't want to needlessly create another thread.

Hi SpaceHedgehog/Jeremy me again gotta say it again beautiful cabinet!

The link  for your guide is down do you have another one? Also just quickly how did you solve the problems for the speakers getting caught when rotating the monitor vertically? I'm assuming you need to remove the side panels to rotate it?

Thanks you sir! As much as I would have liked a monitor which rotated, this one is fixed into position.

Nicest Vewlix ever. The clean look and quality of fit and finish on your builds always amazes me.  :notworthy: I've been lurking in this thread but I had to say something. Such awesome work man. Looking forward to your updates.  :cheers:

Thanks very much for the kind comment - it's appreciated  :cheers:
Click a pic for a video tour 

NIVO

  • Global Moderator
  • Trade Count: (+1)
  • Full Member
  • *****
  • Offline Offline
  • Posts: 1256
  • Last login:August 08, 2022, 12:32:13 pm
  • danny_galaga is my mail man.
    • N.A.M.E. - arcade cabinet project
Re: Vewlix Slim cab - still stuff to do ...
« Reply #213 on: April 22, 2017, 05:16:44 pm »
im sensing a theme here  :lol i totally dig it!

wallmachine

  • Trade Count: (0)
  • Full Member
  • ***
  • Offline Offline
  • Posts: 12
  • Last login:February 10, 2024, 11:44:00 pm
Re: Vewlix Slim cab - still stuff to do ...
« Reply #214 on: April 23, 2017, 04:46:24 am »
Hey, have you ever thought about putting glass/acrylic over the monitor? I wonder what it would look like. Sorry I might have missed it but is this cab built for standing or sitting? would you mind giving me the dimensions from the bottom of the cab the wood to the bottom of the control panel? Also what are those things called you used under the monitor and top of the monitor and near the marquee?
« Last Edit: April 23, 2017, 11:20:51 am by wallmachine »

SpaceHedgehog

  • Trade Count: (0)
  • Full Member
  • ***
  • Offline Offline
  • Posts: 937
  • Last login:February 06, 2023, 12:10:24 pm
  • Almost done ...
Re: Vewlix Slim cab - still stuff to do ...
« Reply #215 on: June 06, 2017, 06:38:12 pm »
Hey, have you ever thought about putting glass/acrylic over the monitor? I wonder what it would look like. Sorry I might have missed it but is this cab built for standing or sitting? would you mind giving me the dimensions from the bottom of the cab the wood to the bottom of the control panel? Also what are those things called you used under the monitor and top of the monitor and near the marquee?

Sorry for the delayed response - yes, I had thought about putting acrylic over the screen but it would be too reflective given where it's situated (near a window).
The cab is for sitting at.
The distance from the floor to the bottom of the control panel is 63cm - I'm pretty sure I tried to get that from the original Vewlix cabinet.
The bars are rounded wood strips - I saw them in the DIY store and they were exactly what I was looking for - I just covered them in blackboard vinyl

im sensing a theme here  :lol i totally dig it!

Thanks  :cheers: I'm a bit of a one trick pony when it comes to designs  :cheers:

Whilst I'm here, Tekken ready (minus the topper) ...


Click a pic for a video tour 

ZopenkoX

  • Trade Count: (0)
  • Jr. Member
  • **
  • Offline Offline
  • Posts: 8
  • Last login:July 17, 2018, 06:48:15 pm
  • I want to build my own arcade controls!
Re: Vewlix Slim cab - still stuff to do ...
« Reply #216 on: June 10, 2017, 02:04:16 am »
Hi SpaceHedgehog
can you share the PSD file for the artwork?
the old kinks are dead
thank you

SpaceHedgehog

  • Trade Count: (0)
  • Full Member
  • ***
  • Offline Offline
  • Posts: 937
  • Last login:February 06, 2023, 12:10:24 pm
  • Almost done ...
Re: Vewlix Slim cab - still stuff to do ...
« Reply #217 on: June 10, 2017, 04:04:09 am »
Hi SpaceHedgehog
can you share the PSD file for the artwork?
the old kinks are dead
thank you

I don't have the psd anymore unfortunately. I do have a jpeg of the marquee, control panel, MK topper and 100 yen sticker in Dropbox, here:

https://www.dropbox.com/s/2cypbr2n8ki4n0n/PrintersFinal.jpg?dl=0

Hope that helps.
Click a pic for a video tour 

bgspot

  • Trade Count: (+1)
  • Full Member
  • ***
  • Offline Offline
  • Posts: 63
  • Last login:January 10, 2020, 12:37:52 pm
Re: Vewlix Slim cab - still stuff to do ...
« Reply #218 on: June 17, 2017, 10:43:21 pm »
Wow i ain't been on this site in YEARS. I remember way back when you first started this project and thought it was one of the best cabs on the forum. Clean and simple. Added Tekken 7 to my cab as well.