Main Restorations Software Audio/Jukebox/MP3 Everything Else Buy/Sell/Trade
Project Announcements Monitor/Video GroovyMAME Merit/JVL Touchscreen Meet Up Retail Vendors
Driving & Racing Woodworking Software Support Forums Consoles Project Arcade Reviews
Automated Projects Artwork Frontend Support Forums Pinball Forum Discussion Old Boards
Raspberry Pi & Dev Board controls.dat Linux Miscellaneous Arcade Wiki Discussion Old Archives
Lightguns Arcade1Up Try the site in https mode Site News

Unread posts | New Replies | Recent posts | Rules | Chatroom | Wiki | File Repository | RSS | Submit news


Author Topic: The Shmup! Arcade (Final Move 4-26-13)  (Read 127822 times)

0 Members and 1 Guest are viewing this topic.

Hewskie

  • Trade Count: (0)
  • Full Member
  • ***
  • Offline Offline
  • Posts: 155
  • Last login:July 27, 2018, 02:45:42 am
Re: The Shmup! Arcade (Building the Custom Sticks: COMPLETE! 11-2)
« Reply #360 on: November 02, 2009, 10:42:13 pm »
wow! those look fantastic!

Everything's coming together, I hope you finish soon so we can all OOO and AAAAHHH at your handywork

Keep up the good work

Hewskie

Ryglore

  • Trade Count: (+1)
  • Full Member
  • ***
  • Offline Offline
  • Posts: 779
  • Last login:November 16, 2021, 05:49:39 pm
  • Likes to make things difficult.
    • The Brush Wizard
Re: The Shmup! Arcade (Building the Custom Sticks: COMPLETE! 11-2)
« Reply #361 on: November 02, 2009, 10:55:53 pm »
Soon! I should have the CPO by the end of the week. I have the marquee retainer made, but I need to trim the bottom piece since it's a hair too long.

I'm excited and sad at the same time. Because while it means I'll be gaming for hours on end on it, it also means that the project is winding down and will soon come to an end.... I guess that just means I have to start something else!  :laugh:

Epyx

  • Trade Count: (+1)
  • Full Member
  • ***
  • Offline Offline
  • Posts: 1961
  • Last login:December 25, 2023, 07:56:36 pm
  • "You're an oddity"
Re: The Shmup! Arcade (Building the Custom Sticks: COMPLETE! 11-2)
« Reply #362 on: November 02, 2009, 11:02:33 pm »
Ryglore those look friggin fantastic, great job!  :cheers:

Not sure if you mentioned previously but what is the length of the shaft from top plate to bottom of ball?
Last Project


Epyx Tutorials:
Tutorials

Ryglore

  • Trade Count: (+1)
  • Full Member
  • ***
  • Offline Offline
  • Posts: 779
  • Last login:November 16, 2021, 05:49:39 pm
  • Likes to make things difficult.
    • The Brush Wizard
Re: The Shmup! Arcade (Building the Custom Sticks: COMPLETE! 11-2)
« Reply #363 on: November 02, 2009, 11:11:43 pm »
Ryglore those look friggin fantastic, great job!  :cheers:

Not sure if you mentioned previously but what is the length of the shaft from top plate to bottom of ball?
Thanks! I am really happy with the way they turned out!  ;D

I think I mentioned some of the measurements, but I may not have gone into detail.... ha... whoops! I started out w/ a piece of 1/2" aluminum round bar cut to 6" lengths. The standard Happ Super joystick is just over 6" long from the top of the Bat to the bottom of the shaft.

I cut the threaded end to 1/4" thickness and then threaded it, the length of the threads is 3/8". The 1/2" section from the bottom of the ball is 2 3/8" long and then the thinner 10mm wide section is 2 1/2" long. I cut the remaining 3/4 of an inch off of the bottom which makes the finished stick 5 1/4" long.

Also, I cut two different angled bevels into the threaded end. and when I sanded them it made a nice rounded top to the shaft.

opt2not

  • Trade Count: (+15)
  • Full Member
  • ***
  • Offline Offline
  • Posts: 6173
  • Last login:April 02, 2024, 07:42:30 pm
Re: The Shmup! Arcade (Building the Custom Sticks: COMPLETE! 11-2)
« Reply #364 on: November 02, 2009, 11:13:37 pm »
Nice shaft.   ;D

Ryglore

  • Trade Count: (+1)
  • Full Member
  • ***
  • Offline Offline
  • Posts: 779
  • Last login:November 16, 2021, 05:49:39 pm
  • Likes to make things difficult.
    • The Brush Wizard

Ryglore

  • Trade Count: (+1)
  • Full Member
  • ***
  • Offline Offline
  • Posts: 779
  • Last login:November 16, 2021, 05:49:39 pm
  • Likes to make things difficult.
    • The Brush Wizard
Re: The Shmup! Arcade (Building the Custom Sticks: COMPLETE! 11-2)
« Reply #366 on: November 02, 2009, 11:36:09 pm »
Ryglore those look friggin fantastic, great job!  :cheers:

Not sure if you mentioned previously but what is the length of the shaft from top plate to bottom of ball?
Thanks! I am really happy with the way they turned out!  ;D

I think I mentioned some of the measurements, but I may not have gone into detail.... ha... whoops! I started out w/ a piece of 1/2" aluminum round bar cut to 6" lengths. The standard Happ Super joystick is just over 6" long from the top of the Bat to the bottom of the shaft.

I cut the threaded end to 1/4" thickness and then threaded it, the length of the threads is 3/8". The 1/2" section from the bottom of the ball is 2 3/8" long and then the thinner 10mm wide section is 2 1/2" long. I cut the remaining 3/4 of an inch off of the bottom which makes the finished stick 5 1/4" long.

Also, I cut two different angled bevels into the threaded end. and when I sanded them it made a nice rounded top to the shaft.

Oh and when mounted the joystick is roughly the same height as the original Happ Super stick.

Ryglore

  • Trade Count: (+1)
  • Full Member
  • ***
  • Offline Offline
  • Posts: 779
  • Last login:November 16, 2021, 05:49:39 pm
  • Likes to make things difficult.
    • The Brush Wizard
Re: The Shmup! Arcade (Minor Touch: Custom Dust Washers! 11-3)
« Reply #367 on: November 03, 2009, 05:55:50 pm »
This is actually something I started after I was done working on the joysticks last night. Originally I wasn't going to use them, but I decided after mounting the P1 joystick, that I didn't like the look of the original dust washers, since the hole in it is too big.

I took the old blue plexi window that was in my PC case and using a 1/2" Forstner bit I drilled the center hole for the shaft to run through. After that was drilled I changed over to a holesaw and cut the disc. Since I wanted to cover the 1 1/8" hole for the joystick and the plexi is transparent. I sanded the crap out of both sides with the 100 and 400 grit sandpaper I was using for the joysticks.

This made the discs translucent and while you can still see the shadow of the hole, it's not as noticeable. Plus, it helps finish off the joysticks and look much better than the stock dust washer did.

The PC case, revisited.


Prepping the window.


Cutting the new discs


The Original Dust Washer and the new one.


The CP w/ Both sticks and new dustwashers.


Close up of the P1 Joystick with the new washer.


I received a notice in my email today that the Control Panel Overlay has been shipped! So tomorrow I'll be installing the CPO and Marquee! I've been holding off on installing the marquee, mainly because I had to trim the aluminum I bent for the bottom retainer. Also I need to predrill the retainer pieces so I can do everything one handed. I really don't want to try drilling through the aluminum while also trying to hold the marquee, plexi and the retainer in place.

opt2not

  • Trade Count: (+15)
  • Full Member
  • ***
  • Offline Offline
  • Posts: 6173
  • Last login:April 02, 2024, 07:42:30 pm
Re: The Shmup! Arcade (Minor Touch: Custom Dust Washers! 11-3)
« Reply #368 on: November 03, 2009, 06:54:06 pm »
Dude. That's awesome. :applaud:
Good recycling on the blue plexi! It's too bad the colour isn't exactly the same as the balltop, but it's close enough. It probably won't even matter when you have your balltops all lit up.
Dang, I think I'm going to have to copy this idea off you! :)

*edit: in fact, if you have some spare clear plexi material, how about making me some?  ::)
« Last Edit: November 03, 2009, 07:01:05 pm by opt2not »

emphatic

  • Trade Count: (0)
  • Full Member
  • ***
  • Offline Offline
  • Posts: 2009
  • Last login:Yesterday at 03:17:23 pm
  • -"Suck it, Donny!" -"No, YOU suck it.... more".
    • Emphatic's Video Game Collection
Re: The Shmup! Arcade (Minor Touch: Custom Dust Washers! 11-3)
« Reply #369 on: November 03, 2009, 07:21:10 pm »
This made the discs translucent and while you can still see the shadow of the hole, it's not as noticeable. Plus, it helps finish off the joysticks and look much better than the stock dust washer did.

How about you make some white ones that sit right under the hole (in addition to the transparent ones on top). Perhaps lining the hole as well with some white paint?

I really like how far you take your customizing.  :applaud:

Ryglore

  • Trade Count: (+1)
  • Full Member
  • ***
  • Offline Offline
  • Posts: 779
  • Last login:November 16, 2021, 05:49:39 pm
  • Likes to make things difficult.
    • The Brush Wizard
Re: The Shmup! Arcade (Minor Touch: Custom Dust Washers! 11-3)
« Reply #370 on: November 03, 2009, 07:32:26 pm »
Dude. That's awesome. :applaud:
Good recycling on the blue plexi! It's too bad the colour isn't exactly the same as the balltop, but it's close enough. It probably won't even matter when you have your balltops all lit up.
Dang, I think I'm going to have to copy this idea off you! :)

*edit: in fact, if you have some spare clear plexi material, how about making me some?  ::)

Thanks! Actually these balltops don't light up. But I think the color will be a bit closer once the CPO is on and its on top of a white background, rather than the wood. Unfortunately I don't have anything laying around that is close to the same thickness as the blue stuff that was on my case. Not too hard to make though, as long as you have access to a drill press.


How about you make some white ones that sit right under the hole (in addition to the transparent ones on top). Perhaps lining the hole as well with some white paint?

I really like how far you take your customizing.  :applaud:

Thanks! I was thinking about putting white in the sides of the holes. I'll wait and see what it looks like when I get it all in place. As for the white disc, do you mean putting one right under the other disc? Or under the CP between it and the joystick body? That could look pretty neat actually. I'll have to look into that.

 :cheers:
« Last Edit: November 03, 2009, 07:45:35 pm by Ryglore »

emphatic

  • Trade Count: (0)
  • Full Member
  • ***
  • Offline Offline
  • Posts: 2009
  • Last login:Yesterday at 03:17:23 pm
  • -"Suck it, Donny!" -"No, YOU suck it.... more".
    • Emphatic's Video Game Collection
Re: The Shmup! Arcade (Minor Touch: Custom Dust Washers! 11-3)
« Reply #371 on: November 03, 2009, 07:57:41 pm »

Thanks! I was thinking about putting white in the sides of the holes. I'll wait and see what it looks like when I get it all in place. As for the white disc, do you mean putting one right under the other disc? Or under the CP between it and the joystick body? That could look pretty neat actually. I'll have to look into that.

 :cheers:

I meant like this:

Ryglore

  • Trade Count: (+1)
  • Full Member
  • ***
  • Offline Offline
  • Posts: 779
  • Last login:November 16, 2021, 05:49:39 pm
  • Likes to make things difficult.
    • The Brush Wizard
Re: The Shmup! Arcade (Minor Touch: Custom Dust Washers! 11-3)
« Reply #372 on: November 03, 2009, 08:06:18 pm »

Thanks! I was thinking about putting white in the sides of the holes. I'll wait and see what it looks like when I get it all in place. As for the white disc, do you mean putting one right under the other disc? Or under the CP between it and the joystick body? That could look pretty neat actually. I'll have to look into that.

 :cheers:

I meant like this:


Ha, ya that's what I thought you meant. Perhaps I can try something using laminated paper.... hhhm

Ryglore

  • Trade Count: (+1)
  • Full Member
  • ***
  • Offline Offline
  • Posts: 779
  • Last login:November 16, 2021, 05:49:39 pm
  • Likes to make things difficult.
    • The Brush Wizard
Re: The Shmup! Arcade (100% Complete! 11-4)
« Reply #373 on: November 04, 2009, 09:33:09 pm »
Today is an exciting day, as it is the final day of construction on the SHMUP. Actually, I'm both happy and a little sad about it, which I think is kinda funny. I'm happy that it's done and that I can play any old arcade game I want to now and can officially relive my childhood while discovering games I've never even heard of. But at the same time, I'm a little sad because now the project is done and it was super fun working on it for the last 3-4 months. Before I get to the recap of today's work and the "unveil", I just wanna shout out to everyone on the boards for all the insight and help I've gotten while working on this. As well as creative suggestions that really pushed my work from just throwing something together, to working to make everything the best I could.  :cheers:  :cheers:

And now, the final construction update!

While I was at work today, I sanded the marquee retainers and painted them with black Rustoleum Satin finish spray paint. The screws that held the window in the side of my PC case have built in washers on them. So I recycled them and painted them black as well. These work nicely and give the retain a nicer finished look rather than just using plain wood screws. I also cut a few different types of paper to see how extra thickness would help on the brightness of the marquee. But after looking everything over, I decided that I like the look of the marquee without anything extra to diffuse the light more.

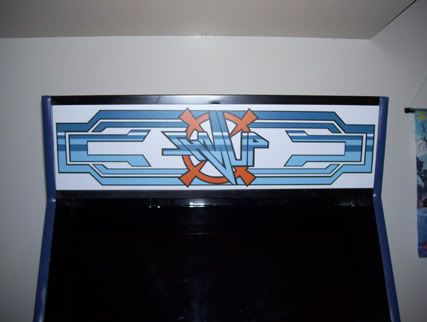
Here is a shot of the marquee mounted, without the light on and the camera flash.


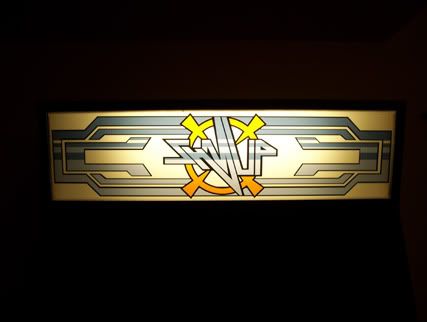
And another with the overhead light off and no flash.


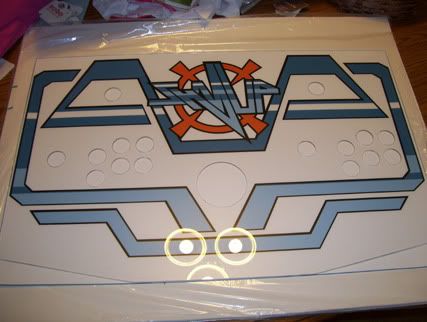
When I got home, I picked up the CPO and began prepping it for the plexiglass. I used my X-acto knife to cut all of the holes for it, rather than attempting to use a drill bit. I had to trim a little around the edges of the plexi as well, but everything lines up! Yay! I'm so glad I decided to go with Mame Marquees for my CPO as well. The finish turned out amazing! Oddly enough, I couldn't find my cutting mat anywhere... so I used a stack of posterboard as a makeshift cutting mat.

Prepping the CPO.


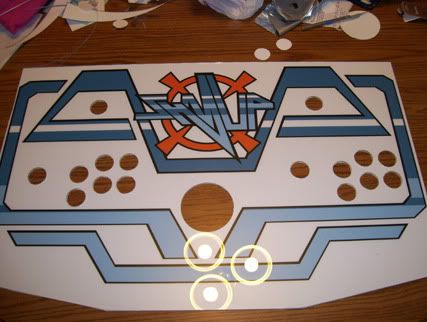
All holes cut and ready for installing!


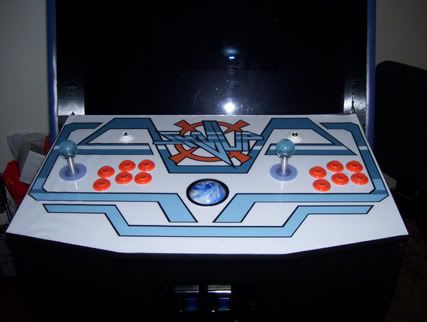
Completed control panel! I'm so glad I went with the marble trackball, it looks awesome!


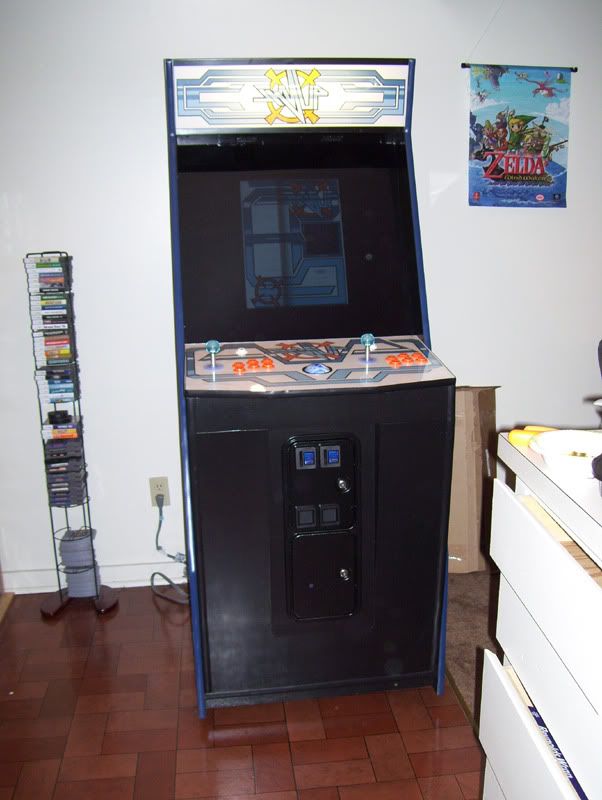
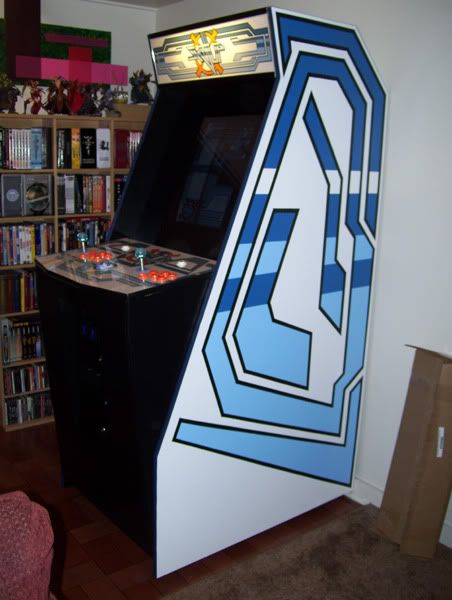
And now the moment of truth! The completed SHMUP arcade cabinet! Again, I don't think it would have turned out as nicely without everyone's input and motivation, thanks guys!

Front view.


3/4 Side view.


Now if you'll excuse me. I have a high score to beat in Centipede....  :applaud:


Hewskie

  • Trade Count: (0)
  • Full Member
  • ***
  • Offline Offline
  • Posts: 155
  • Last login:July 27, 2018, 02:45:42 am
Re: The Shmup! Arcade (100% Complete! 11-4)
« Reply #374 on: November 04, 2009, 10:19:28 pm »
Control panel looks great! Congrats on a fantastic build, you should have a ton of fun with this!

And don't be too sad, there's always the horizontal cab, cocktail, jukebox, dedicated light gun, racing, flight sim and ddr pad projects to keep you busy  :laugh2:

but seriously, I'm sure this is just the start of your collection, you've got the build bug my friend!

Again, your cab looks great and I've really enjoyed following your work!

Hewskie

Sledgehammer

  • Trade Count: (0)
  • Full Member
  • ***
  • Offline Offline
  • Posts: 50
  • Last login:March 30, 2017, 04:48:08 pm
  • "Trust me, I know what I'm doing..."
Re: The Shmup! Arcade (100% Complete! 11-4)
« Reply #375 on: November 04, 2009, 10:43:01 pm »
I love the side art and CP. This thing looks great!

Looking forward to seeing your next project thread...my guess is it won't be too long before the next cab!

J

drventure

  • Trade Count: (+2)
  • Full Member
  • ***
  • Offline Offline
  • Posts: 4152
  • Last login:Yesterday at 06:53:06 pm
  • Laser Death Ray Bargain Bin! Make me an offer!
Re: The Shmup! Arcade (100% Complete! 11-4)
« Reply #376 on: November 04, 2009, 10:47:39 pm »
Nice job!  :applaud:

That CP and marquee really turned out nice!

Ryglore

  • Trade Count: (+1)
  • Full Member
  • ***
  • Offline Offline
  • Posts: 779
  • Last login:November 16, 2021, 05:49:39 pm
  • Likes to make things difficult.
    • The Brush Wizard
Re: The Shmup! Arcade (100% Complete! 11-4)
« Reply #377 on: November 04, 2009, 10:54:13 pm »
Control panel looks great! Congrats on a fantastic build, you should have a ton of fun with this!

And don't be too sad, there's always the horizontal cab, cocktail, jukebox, dedicated light gun, racing, flight sim and ddr pad projects to keep you busy  :laugh2:

but seriously, I'm sure this is just the start of your collection, you've got the build bug my friend!

Again, your cab looks great and I've really enjoyed following your work!

Hewskie

Hahaha, thanks! I do have another project in mind. But... I don't have anymore space in my apartment for another cabinet.... Maybe I'll take a stab at a mini next!

I love the side art and CP. This thing looks great!

Looking forward to seeing your next project thread...my guess is it won't be too long before the next cab!

J

Thanks! What I need is a house with room for a real Game Room. Then I can start making dedicated units!

Nice job!  :applaud:

That CP and marquee really turned out nice!

Oh I was super impressed when I unrolled the CP from the shipping tube. I think I know who has any future business I may need for new projects.


 :cheers: guys!

Gamester

  • Trade Count: (0)
  • Full Member
  • ***
  • Offline Offline
  • Posts: 483
  • Last login:March 01, 2019, 03:00:10 pm
Re: The Shmup! Arcade (100% Complete! 11-4)
« Reply #378 on: November 04, 2009, 11:00:07 pm »
Sweet!  Nice work Ryglore!  You must have really been burning the midnight oil lately to get it finished.  ;)

Okay, now back out to the garage I go...  more... sanding... to... do...  *ugh*

Play a round of Galaga for me.   :cheers:
Current Project:                                                       First Project:
  

Ryglore

  • Trade Count: (+1)
  • Full Member
  • ***
  • Offline Offline
  • Posts: 779
  • Last login:November 16, 2021, 05:49:39 pm
  • Likes to make things difficult.
    • The Brush Wizard
Re: The Shmup! Arcade (100% Complete! 11-4)
« Reply #379 on: November 04, 2009, 11:02:04 pm »
Play a round of Galaga for me.   :cheers:

Ha, thanks! Will do!

opt2not

  • Trade Count: (+15)
  • Full Member
  • ***
  • Offline Offline
  • Posts: 6173
  • Last login:April 02, 2024, 07:42:30 pm
Re: The Shmup! Arcade (100% Complete! 11-4)
« Reply #380 on: November 04, 2009, 11:13:14 pm »
Congrats Ryglore!  The Shmup looks great! Looks like a bunch of late nights coming up in you future. :)

Have fun! You deserve it!
 :applaud: :applaud: :applaud: :applaud: :applaud: :applaud:

Ryglore

  • Trade Count: (+1)
  • Full Member
  • ***
  • Offline Offline
  • Posts: 779
  • Last login:November 16, 2021, 05:49:39 pm
  • Likes to make things difficult.
    • The Brush Wizard
Re: The Shmup! Arcade (100% Complete! 11-4)
« Reply #381 on: November 04, 2009, 11:18:24 pm »
Congrats Ryglore!  The Shmup looks great! Looks like a bunch of late nights coming up in you future. :)

Have fun! You deserve it!
 :applaud: :applaud: :applaud: :applaud: :applaud: :applaud:

Thanks! We really need a bow emoticon. haha

just for grins... here is my mock up and the finished project side by side.


Epyx

  • Trade Count: (+1)
  • Full Member
  • ***
  • Offline Offline
  • Posts: 1961
  • Last login:December 25, 2023, 07:56:36 pm
  • "You're an oddity"
Re: The Shmup! Arcade (100% Complete! 11-4)
« Reply #382 on: November 04, 2009, 11:36:42 pm »
 :cheers: :cheers: :cheers:

Woot!  Amazing, finish and probably so much fun to finally be standing in front of it complete! Congrats!  I love how the CP turned out, and ya that marble trackball looks sick.

Now only one question...100%? You still putting the target/bullseyes on the side?
« Last Edit: November 04, 2009, 11:41:24 pm by Epyx »
Last Project


Epyx Tutorials:
Tutorials

Ond

  • Trade Count: (0)
  • Full Member
  • ***
  • Offline Offline
  • Posts: 2274
  • Last login:Yesterday at 08:13:27 pm
Re: The Shmup! Arcade (100% Complete! 11-4)
« Reply #383 on: November 04, 2009, 11:41:30 pm »
Well done seeing your design through to completion!  Looks great too.

 :cheers:

Ond

Yvan256

  • Trade Count: (0)
  • Full Member
  • ***
  • Offline Offline
  • Posts: 1039
  • Last login:June 20, 2017, 08:35:41 am
    • Yvan256
Re: The Shmup! Arcade (100% Complete! 11-4)
« Reply #384 on: November 05, 2009, 12:05:48 am »
Very nice work! Nice to see the progress from a Sketchup animation to the real thing!  :cheers:

Now... get working on that other project of yours!  ;D

drventure

  • Trade Count: (+2)
  • Full Member
  • ***
  • Offline Offline
  • Posts: 4152
  • Last login:Yesterday at 06:53:06 pm
  • Laser Death Ray Bargain Bin! Make me an offer!
Re: The Shmup! Arcade (100% Complete! 11-4)
« Reply #385 on: November 05, 2009, 12:07:21 am »
Oh, see, that's what you missed

Your mockup had all those cool, retro jaggies on the edges.

The real thing is way too smooth

 ;D

emphatic

  • Trade Count: (0)
  • Full Member
  • ***
  • Offline Offline
  • Posts: 2009
  • Last login:Yesterday at 03:17:23 pm
  • -"Suck it, Donny!" -"No, YOU suck it.... more".
    • Emphatic's Video Game Collection
Re: The Shmup! Arcade (100% Complete! 11-4)
« Reply #386 on: November 05, 2009, 04:50:35 am »
 :applaud:

I guess you will have a very nice weekend! When looking at this picture:


I feel that your could totally "get away" with installing some car pimping lights under it without it looking at all cheesy. A light blue glow perhaps?

Ryglore

  • Trade Count: (+1)
  • Full Member
  • ***
  • Offline Offline
  • Posts: 779
  • Last login:November 16, 2021, 05:49:39 pm
  • Likes to make things difficult.
    • The Brush Wizard
Re: The Shmup! Arcade (100% Complete! 11-4)
« Reply #387 on: November 05, 2009, 08:22:19 am »
Now only one question...100%? You still putting the target/bullseyes on the side?

Nope, I decided that I liked the look of that art on the sides without the crosshairs. I was going to put the logo on the side, but I decided that with the logo on the CP and the marquee, it might be overkill.

Well done seeing your design through to completion!  Looks great too.

Thanks Ond!  :cheers:

Now... get working on that other project of yours!  ;D

:cheers: Oh the ball is already rolling. ;)

I feel that you could totally "get away" with installing some car pimping lights under it without it looking at all cheesy. A light blue glow perhaps?

It's possible. But I think I'll hold off on lighting effects for another project. I'd still like to borrow Ond's lighted button idea and work that into a design. And seeing Epyx's glowing balltops, I'm sure I can come up with something!  :applaud:

Chicken McNobody

  • Trade Count: (+4)
  • Full Member
  • ***
  • Offline Offline
  • Posts: 171
  • Last login:April 30, 2021, 01:01:06 pm
  • I poop too much. . .
Re: The Shmup! Arcade (100% Complete! 11-4)
« Reply #388 on: November 05, 2009, 10:52:36 am »
Great job, this looks hot.  That CP really came out perfect, and yes MameMarquees is the only place I go.  Scott does top notch work, and with the problems I have had, he has fixed without issue. 

It's nice to see that the finished product came out just as you had planned (minus the bullseyes.) 

Now sit back and enjoy this beauty, you deserve the break. . .

Epyx

  • Trade Count: (+1)
  • Full Member
  • ***
  • Offline Offline
  • Posts: 1961
  • Last login:December 25, 2023, 07:56:36 pm
  • "You're an oddity"
Re: The Shmup! Arcade (100% Complete! 11-4)
« Reply #389 on: November 05, 2009, 10:59:11 am »
Quote
Nope, I decided that I liked the look of that art on the sides without the crosshairs. I was going to put the logo on the side, but I decided that with the logo on the CP and the marquee, it might be overkill.

Ah, in that case 100% indeed, Enjoy! Not like you can't add them on if you change your mind.
 
:cheers:
Last Project


Epyx Tutorials:
Tutorials

Honkyharris

  • Trade Count: (0)
  • Full Member
  • ***
  • Offline Offline
  • Posts: 52
  • Last login:September 04, 2010, 11:28:06 am
Re: The Shmup! Arcade (100% Complete! 11-4)
« Reply #390 on: November 05, 2009, 01:09:36 pm »
Great job Ryglore! This is certainly something that any person could strive to build. Great design and well executed.

Honkyharris

Ryglore

  • Trade Count: (+1)
  • Full Member
  • ***
  • Offline Offline
  • Posts: 779
  • Last login:November 16, 2021, 05:49:39 pm
  • Likes to make things difficult.
    • The Brush Wizard
Re: The Shmup! Arcade (100% Complete! 11-4)
« Reply #391 on: November 05, 2009, 10:36:53 pm »
Great job Ryglore! This is certainly something that any person could strive to build. Great design and well executed.

Thanks!  :cheers:

jeef

  • Trade Count: (0)
  • Full Member
  • ***
  • Offline Offline
  • Posts: 185
  • Last login:May 13, 2012, 03:45:21 pm
Re: The Shmup! Arcade (100% Complete! 11-4)
« Reply #392 on: November 10, 2009, 04:23:40 am »
congrats on the finish!
Current Project: Mortal Arcade

Ryglore

  • Trade Count: (+1)
  • Full Member
  • ***
  • Offline Offline
  • Posts: 779
  • Last login:November 16, 2021, 05:49:39 pm
  • Likes to make things difficult.
    • The Brush Wizard
Re: The Shmup! Arcade (100% Complete! 11-4)
« Reply #393 on: November 10, 2009, 08:52:31 am »
congrats on the finish!

Thanks man!

Kman-Sweden

  • Trade Count: (+1)
  • Full Member
  • ***
  • Offline Offline
  • Posts: 526
  • Last login:October 23, 2015, 07:29:00 am
  • Up the Irons!
Re: The Shmup! Arcade (100% Complete! 11-4)
« Reply #394 on: November 10, 2009, 12:23:29 pm »
Nice! Feel like building another one?  ;D

Ryglore

  • Trade Count: (+1)
  • Full Member
  • ***
  • Offline Offline
  • Posts: 779
  • Last login:November 16, 2021, 05:49:39 pm
  • Likes to make things difficult.
    • The Brush Wizard
Re: The Shmup! Arcade (100% Complete! 11-4)
« Reply #395 on: November 10, 2009, 12:49:37 pm »
Nice! Feel like building another one?  ;D

Sadly no, and even worse... I don't actually have real schematics to give out if people wanted to build one like it, since I built a lot of it on the fly from rough sketches.  :(

mwong168

  • Trade Count: (0)
  • Full Member
  • ***
  • Offline Offline
  • Posts: 375
  • Last login:May 28, 2019, 11:38:54 am
Re: The Shmup! Arcade (100% Complete! 11-4)
« Reply #396 on: November 10, 2009, 01:18:34 pm »
Congrats on completing this project  :applaud:  It looks great and I'm sure you are going to get lots of compliments and envy when people come over.
Showcase Project [Work in Progress]
http://forum.arcadecontrols.com/index.php?topic=93701.0
Bartop Project [100% Complete]
http://forum.arcadecontrols.com/index.php?topic=98410.0
Custom Wireless 360/PC HAPP Fight Sticks [100% Complete]
http://forum.arcadecontrols.com/index.php?topic=100809.0
Visual Pinball Cabinet [Work in Progress]
http://forum.arcadecontrols.com/index.php?topic=102628.0

Malenko

  • KNEEL BEFORE ZODlenko!
  • Trade Count: (+58)
  • Full Member
  • ***
  • Offline Offline
  • Posts: 13999
  • Last login:April 09, 2024, 07:27:18 pm
  • Have you played with my GingerBalls?
    • forum.arcadecontrols.com/index.php/topic,142404.msg1475162.html
Re: The Shmup! Arcade (100% Complete! 11-4)
« Reply #397 on: November 10, 2009, 01:35:21 pm »
I'd say the horns you threw up earlier were most appropriate :)

looks really good!
If you're replying to a troll you are part of the problem.
I also need to follow this advice. Ignore or report, don't reply.

Ryglore

  • Trade Count: (+1)
  • Full Member
  • ***
  • Offline Offline
  • Posts: 779
  • Last login:November 16, 2021, 05:49:39 pm
  • Likes to make things difficult.
    • The Brush Wizard
Re: The Shmup! Arcade (100% Complete! 11-4)
« Reply #398 on: November 10, 2009, 01:44:01 pm »
Congrats on completing this project  :applaud:  It looks great and I'm sure you are going to get lots of compliments and envy when people come over.

Thanks! I'm actually having some friends over on this Saturday to check it out and give it a run through.  ;D

I'd say the horns you threw up earlier were most appropriate :)

looks really good!

Ha thanks! I guess so!  :cheers:

Franco B

  • Trade Count: (+10)
  • Full Member
  • ***
  • Offline Offline
  • Posts: 3766
  • Last login:February 15, 2024, 09:14:06 am
Re: The Shmup! Arcade (100% Complete! 11-4)
« Reply #399 on: November 11, 2009, 10:03:57 am »
Fantasic job Ryglore.  :applaud:

I love to see a cab with full side art, it really does set it apart from the rest.

Everything else is damn sexy too  :afro: