Main Restorations Software Audio/Jukebox/MP3 Everything Else Buy/Sell/Trade
Project Announcements Monitor/Video GroovyMAME Merit/JVL Touchscreen Meet Up Retail Vendors
Driving & Racing Woodworking Software Support Forums Consoles Project Arcade Reviews
Automated Projects Artwork Frontend Support Forums Pinball Forum Discussion Old Boards
Raspberry Pi & Dev Board controls.dat Linux Miscellaneous Arcade Wiki Discussion Old Archives
Lightguns Arcade1Up Try the site in https mode Site News

Unread posts | New Replies | Recent posts | Rules | Chatroom | Wiki | File Repository | RSS | Submit news


Author Topic: Sanwa JLF/JLW/Ultimarc U360 top mounting guide  (Read 54902 times)

0 Members and 1 Guest are viewing this topic.

Franco B

  • Trade Count: (+10)
  • Full Member
  • ***
  • Offline Offline
  • Posts: 3766
  • Last login:February 15, 2024, 09:14:06 am
Sanwa JLF/JLW/Ultimarc U360 top mounting guide
« on: March 13, 2009, 04:11:51 am »
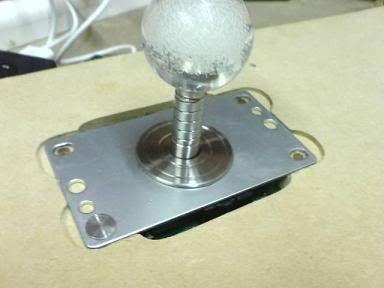
I started work on my Xbox 360 arcade sticks last night and I thought I would do a top mount guide for anyone wanting to top mount there joysticks.

Japanese joysticks such as the JLF and JLW amongst others are traditionally mounted to a thin metal CP. If you bottom mount them you reduce the shaft length between the CP and ball top and you end up with a stick height that is unsuitable. This guide will show you how to top mount them so that you retain the full shaft length. The U360 is a modified Sanwa JLW so this guide will also work for that.

I'm not saying this is the best way to top mount sticks but its what works for me.

I'm top mounting a Sanwa JLF in this guide but you can apply the techniques to other sticks.

The tools I used were:

Drill (hand or bench/pillar)
Jigsaw
Router
Router bits - 1/2" flush trim, 3/4" pattern bit
Router table (not necessary but it does make things easier IMO)
Pencil for marking out
Scrap pieces of MDF for making templates.

I'm making some templates in this guide to keep everything nice and neat. Making templates is also handy as once you have them made you can quickly churn out multiple CPs. You don't have to make the templates but I think its much easier in the long run.

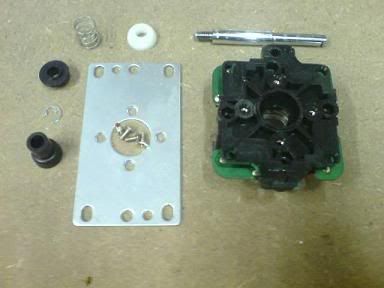
1) Disassemble the shaft from the joystick by removing the e-clip. Remove the other components from the assembly and put them to one side. Remove the four screws that hold the mounting plate to the joystick base and remove the mounting plate.


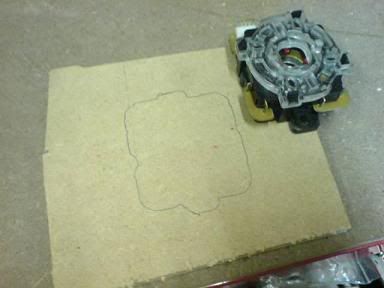
2) You need to make a though hole in the CP for the base to fit through. This is where I made the first template. Trace round the joystick base on a scrap piece of MDF.


3) Remove the bulk of the material from the inside of your traced line. I drilled four 10mm holes close to the corners and then used a jigsaw to remove the center section. You then need to remove enough material so that the joystick base slides through the hole. You can use any method to remove the excess but I free hand routed mine using a 1/4" bit on my router table. You could jigsaw, scroll saw, file etc - whatever works for you.
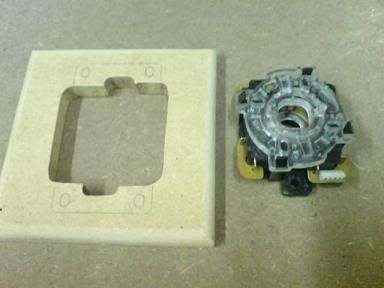


The joystick base should fit nicely through the hole. I left about 1-2mm for clearance but it doesn't really matter as long as it fits in. You don't want to remove too much material though as you will be reducing the amount of material that the mounting plate will eventually sit on.
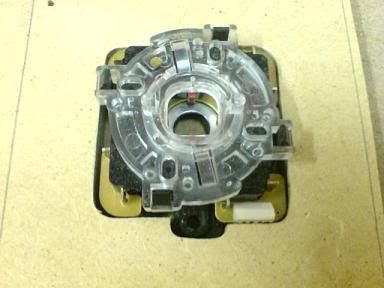


4) That's the first template complete. I then made a second to use to counterbore the recess for the mounting plate to sit in. Trace round the mounting plate on another piece of scrap MDF.
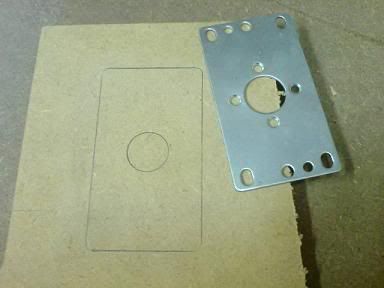


5) Cut out the excess again and remove the last of the material leaving a mm or two for clearance.
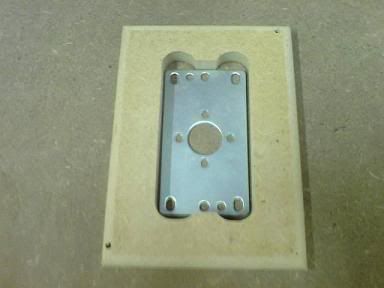


You can see I extended the corners slightly. This is because the pattern bit I am using has a much larger diameter (3/4"-19mm) than the radius on the corners of the mounting plate (~5mm). The extended corners will allow the mounting plate corners to fit inside the profile.

6) That's the templates complete. You can now use them to template route your CP. Mark out your joystick position on your CP.
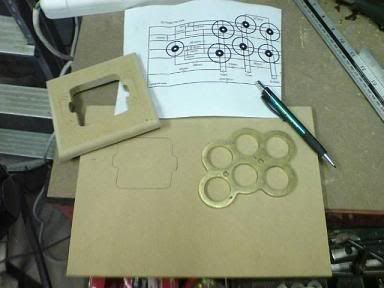


7) Fix your 1st template to the CP and use a flush trim bit to template route the profile after removing the excess. I used my DIY router table but you could do the same using a router normally.
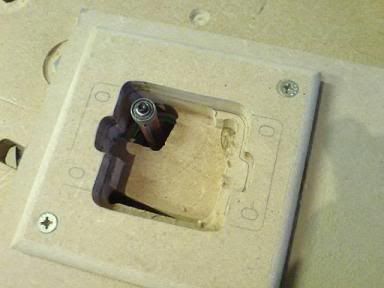


8.) Attach the mounting plate to the joystick base and slide the base through the hole you just routed. You can then trace round the mounting plate to find the recess position.
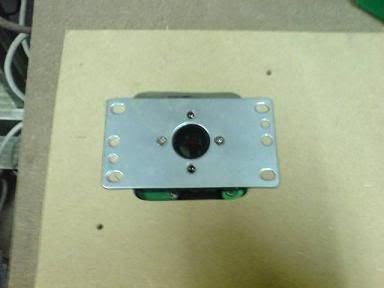


9) Put your second template over the marked out position and fix it to the CP.
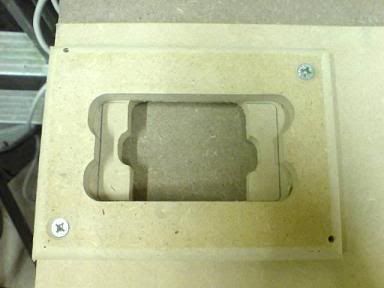


10) You can then use a pattern bit with your router to route out the recess. You need to remove the height of the mounting plate plus the height of the mounting plate you are using. I'm using some M5 machine screws that I faced off to leave a 1mm thick head so my recess depth was ~3mm
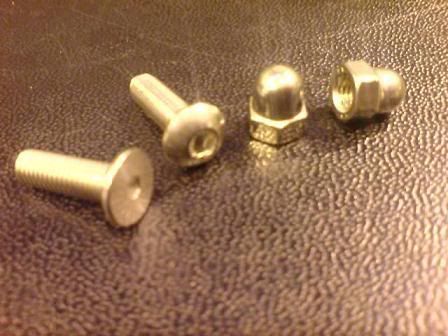


These are the pattern bits I have. I used the shorter 3/4" bit so that the bearing runs along the templates profile.
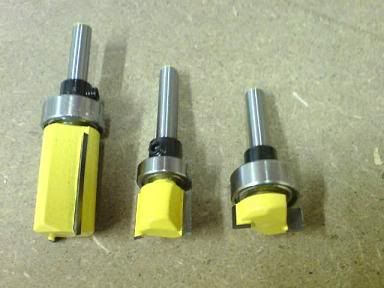
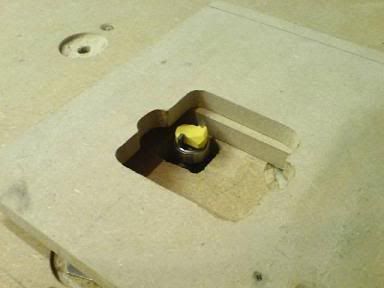


11) Unscrew the template from your CP and you should be left with something like this:
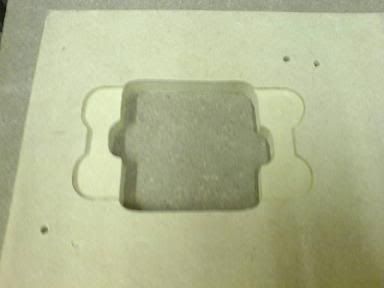


12) Insert your mounting plate and joystick base into the hole and recess. Check that the recess is deep enough. If its not the adjust the router height and go round the profile again. Once you are happy with the depth you can trace the mounting hole positions.
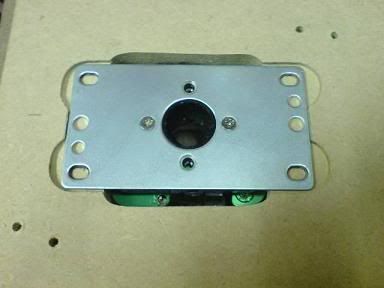


13) I'm using M5 machine screws and bolting the mounting plate to the CP with some M5 dome nuts so I drilled 5.5mm holes.
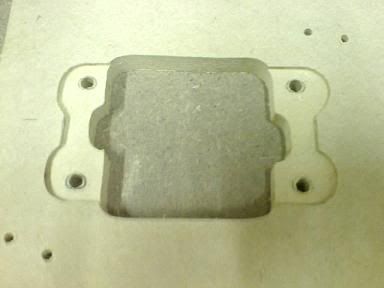


14) Finally reassemble everything. Job done :)


Keep the templates as they will come in handy if you need to mount any more joysticks.

Hope this helps  :cheers:

markronz's recommended mounting plate modification:

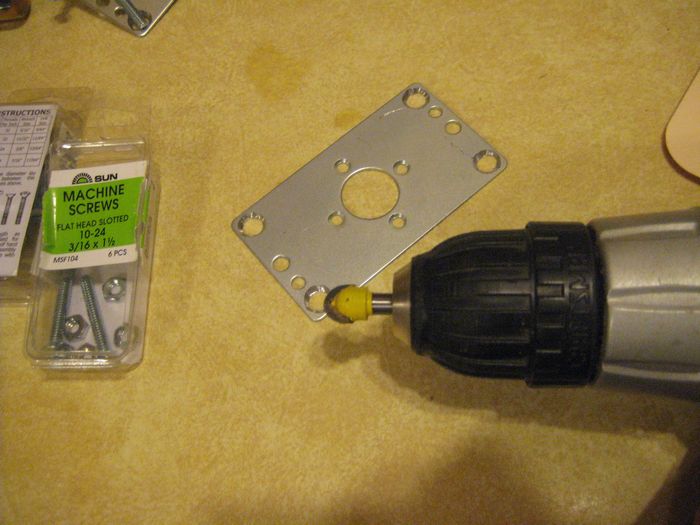
I can explain to you what I ended up doing with mine.  I used a bit to customize the mounting plate a bit.    I basically made the mounting holes recessed so that the screws would sit level with the rest of the mounting plate. See below:

Here is a picture with the screws in place.   As you can see, the whole top of the mounting plate is now level.
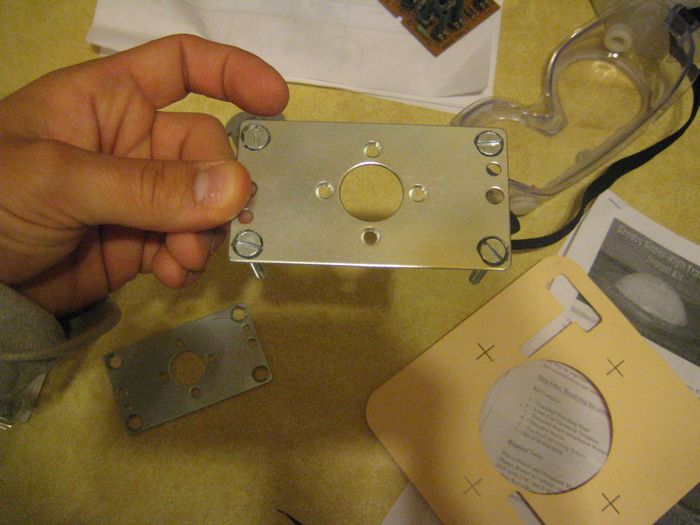

When recessing the mounting holes, you just have to make sure to use a V shaped tool to recess the holes.  Then of course don't go too far.  The screws still need to catch the metal, but yet need to sit even with the top of it.   If you route in too deep, the screws would just fall through the holes.   So that was the only touchy part for me.

And yes, my dust washer is on top of the artwork.   For me, that's how I'd prefer it anyway.
« Last Edit: November 04, 2011, 04:15:43 am by Franco B »

thatitalian

  • Don't worry about the chicken, I feed my friends human all the time...
  • Trade Count: (0)
  • Full Member
  • ***
  • Offline Offline
  • Posts: 887
  • Last login:March 27, 2018, 10:52:37 am
  • The Revolution Is Coming...
Re: Sanwa JLF/JLW/Ultimarc U360 top mounting guide
« Reply #1 on: March 13, 2009, 06:59:08 am »
One word: NIIIICE! :afro:

Where did you get the short pattern bits from?

Also, where did you get the flat screws (metal circles) for the Joy plates? Those are perfect for flat top mounting!

Franco B

  • Trade Count: (+10)
  • Full Member
  • ***
  • Offline Offline
  • Posts: 3766
  • Last login:February 15, 2024, 09:14:06 am
Re: Sanwa JLF/JLW/Ultimarc U360 top mounting guide
« Reply #2 on: March 13, 2009, 07:25:34 am »
I bought [this] set from the US. They also sell the smaller one on its own [here].

I bought the set as they come in handy, especially at that price! :)

The 'flat screws' you see in the picture were actually the rounded hex head screws you see in the picture with the dome nuts. I just machined them to give a 1mm thick head. I bought a box of 100 from screwfix so if you want a few for your CP just let me know and I'll machine some and post them over with your other bits.  :cheers:

You could just use the un-machined screws or similar other screws but the 1mm thick head allows you to retain as much of the shaft length (oo-er!) as possible.

thatitalian

  • Don't worry about the chicken, I feed my friends human all the time...
  • Trade Count: (0)
  • Full Member
  • ***
  • Offline Offline
  • Posts: 887
  • Last login:March 27, 2018, 10:52:37 am
  • The Revolution Is Coming...
Re: Sanwa JLF/JLW/Ultimarc U360 top mounting guide
« Reply #3 on: March 13, 2009, 07:36:33 am »
Just bought my set!!! ;)

For the money you can't argue! Shame about the USD though! :(

If you can do me some bits to extend my shaft I would appreciate it! (not that I need my shaft extending, but every little helps :P)

MrMojoZ

  • Trade Count: (0)
  • Full Member
  • ***
  • Offline Offline
  • Posts: 291
  • Last login:June 25, 2009, 11:34:56 pm
Re: Sanwa JLF/JLW/Ultimarc U360 top mounting guide
« Reply #4 on: March 13, 2009, 09:34:24 am »
Question, the most common number I see used for mounting depth taken from the top of your control panel is 9mm deep. So with 3mm plexi, 6mm would be ideal for the recessed depth but I'm not sure how thick your top layer is going to be. Were you targeting the 9mm overall depth as well?

Franco B

  • Trade Count: (+10)
  • Full Member
  • ***
  • Offline Offline
  • Posts: 3766
  • Last login:February 15, 2024, 09:14:06 am
Re: Sanwa JLF/JLW/Ultimarc U360 top mounting guide
« Reply #5 on: March 13, 2009, 09:48:50 am »
I'm using 12mm MDF with 3mm acrylic and 5/8" t-moulding.

The recess is aprox 3mm deep which will give 9mm of material to bolt through.

Does that answer your question?

cmoses

  • Trade Count: (0)
  • Full Member
  • ***
  • Offline Offline
  • Posts: 718
  • Last login:July 27, 2023, 05:19:00 pm
Re: Sanwa JLF/JLW/Ultimarc U360 top mounting guide
« Reply #6 on: March 13, 2009, 10:32:32 am »
Franco B,

Very nice write up.  Can you give some more information on your mounting hardware, nuts and bolts?  You mention using some M5 machine screws that you faced off (meaning your sanded down?).  In the picture it still shows the hex pattern, but in the final picture it looks as though the screw head is completely smooth? 

I got some machine screws yesterday at Home Depot that had a low profile head (flattest ones I could find).  That I think will work pretty well.  I think I will have to route out a little more than 1/8" maybe 3/16" which will leave 7/16" or a little less than a 1/2".  But these were the flattest bolts that I could find. 

javeryh

  • Trade Count: (+1)
  • Full Member
  • ***
  • Offline Offline
  • Posts: 7906
  • Last login:Today at 12:52:34 pm
Re: Sanwa JLF/JLW/Ultimarc U360 top mounting guide
« Reply #7 on: March 13, 2009, 10:49:41 am »
Very nice Franco!  What are you going to do about the voids left around the mounting plate?  Are you going to use some spackle or filler and then sand it flat (permanently encasing the mounting plate)?  If not, how are you going to handle the wrinkles in the artwork that will show though in that area?  Is this even a concern?   :cheers:

MrMojoZ

  • Trade Count: (0)
  • Full Member
  • ***
  • Offline Offline
  • Posts: 291
  • Last login:June 25, 2009, 11:34:56 pm
Re: Sanwa JLF/JLW/Ultimarc U360 top mounting guide
« Reply #8 on: March 13, 2009, 12:07:06 pm »
I'm using 12mm MDF with 3mm acrylic and 5/8" t-moulding.

The recess is aprox 3mm deep which will give 9mm of material to bolt through.

Does that answer your question?

Yes, but if this is the case your mounting depth is 3mm short of the officially recommend depth of 9mms. Your plexi would need to be 6mm thick to use a 3mm recess. I doubt it really matters but if someone was anal about the stick height they would proably notice. Also, I need a router table.  :-\

massive88

  • Trade Count: (+2)
  • Full Member
  • ***
  • Offline Offline
  • Posts: 938
  • Last login:February 26, 2024, 02:21:01 pm
Re: Sanwa JLF/JLW/Ultimarc U360 top mounting guide
« Reply #9 on: March 13, 2009, 12:38:06 pm »
Yes, but if this is the case your mounting depth is 3mm short of the officially recommend depth of 9mms. Your plexi would need to be 6mm thick to use a 3mm recess. I doubt it really matters but if someone was anal about the stick height they would proably notice. Also, I need a router table.  :-\

Bottom mounting into a 1/4" left recess using 1/8" plexi gets you almost exactly to the 9mm recommended, which is why I have always bottom mounted my JLFs in 1/4" material.

Nice guide Franco.  Final product looks great!

Franco B

  • Trade Count: (+10)
  • Full Member
  • ***
  • Offline Offline
  • Posts: 3766
  • Last login:February 15, 2024, 09:14:06 am
Re: Sanwa JLF/JLW/Ultimarc U360 top mounting guide
« Reply #10 on: March 14, 2009, 06:07:47 am »
Franco B,

Very nice write up.  Can you give some more information on your mounting hardware, nuts and bolts?  You mention using some M5 machine screws that you faced off (meaning your sanded down?).  In the picture it still shows the hex pattern, but in the final picture it looks as though the screw head is completely smooth? 

I got some machine screws yesterday at Home Depot that had a low profile head (flattest ones I could find).  That I think will work pretty well.  I think I will have to route out a little more than 1/8" maybe 3/16" which will leave 7/16" or a little less than a 1/2".  But these were the flattest bolts that I could find. 

The machine screw in the final pic isn't actually the type I will be using, it's just one I had to hand from experimenting with different bolts. The ones I will be using will be the first one in the black picture with the two bolts and nuts. The bolts I got came as the second one in that picture. I put them on a lathe and faced the excess off with a turning tool to leave a 1mm thick head. The hex cannot be used anymore as the material has been removed but the nuts will still be able to be tightened sufficiently from the back.

Any bolt should do really with a relatively thin head and it sounds like you found some suitable ones. If the recommended mounting depth is 9mm then you have plenty of material to play with and you can increase the recess to over 1/8" so that your bolts sit below the MDF CP top.

Very nice Franco!  What are you going to do about the voids left around the mounting plate?  Are you going to use some spackle or filler and then sand it flat (permanently encasing the mounting plate)?  If not, how are you going to handle the wrinkles in the artwork that will show though in that area?  Is this even a concern?   :cheers:

Cheers bud. The voids shouldn't really be a problem as the top of the bolts sit flush with the MDF CP top and they will support the art etc. I would be more concerned about the artwork sagging in the area between the bolts where the dustwasher is. In the worst case scenario I would make a ring to sit in between the bolts to support that area. The first stick I'm making is going to be covered in 0.3mm (0.012") thick carbon fibre which is fairly stiff so it shouldn't sag:


My second stick is going to have printed artwork. I'm going to try and get it printed on some heavier gauge paper or use some thin card to support the artwork.

I'm using 12mm MDF with 3mm acrylic and 5/8" t-moulding.

The recess is aprox 3mm deep which will give 9mm of material to bolt through.

Does that answer your question?

Yes, but if this is the case your mounting depth is 3mm short of the officially recommend depth of 9mms. Your plexi would need to be 6mm thick to use a 3mm recess. I doubt it really matters but if someone was anal about the stick height they would proably notice. Also, I need a router table.  :-\

Thanks for the info. I didn't realise there was an officially recommended height. I would have thought that the depth would have been less but I don't know the thickness of the metal CPs. I guess there must be some ~3mm bosses on the back of the CPs where the mounting plate as attached.

The stick feels comfortable at the height I have mounted it. If I do change my mind about it it will be easy to reattach the mounting plate template and remove some extra material.


Blanka

  • Trade Count: (+1)
  • Full Member
  • ***
  • Offline Offline
  • Posts: 2248
  • Last login:January 25, 2018, 03:19:28 pm
Re: Sanwa JLF/JLW/Ultimarc U360 top mounting guide
« Reply #11 on: March 14, 2009, 06:43:57 am »
The idea is good, but leave out the disassembly of the joystick. There is absolutely no need to do that. Difficult to route: just make the hole in the MDF with a fret-saw, and only use the router for the recess. Don't have a router: make the panel of 2 sheets of mdf. one 4mm thick for the recess, and the other 9mm for the mounting. Then you can add 4mm of plexi and artwork to get to the 18mm in total.

Franco B

  • Trade Count: (+10)
  • Full Member
  • ***
  • Offline Offline
  • Posts: 3766
  • Last login:February 15, 2024, 09:14:06 am
Re: Sanwa JLF/JLW/Ultimarc U360 top mounting guide
« Reply #12 on: March 14, 2009, 07:06:16 am »
Like I said, its not a definitive guide, its what works for me.

You do need disassemble the joystick with this method to trace around the various parts and line up the templates etc. Is it really that hard to remove an e-clip and four screws?

Its not difficult to route. Its takes a little time to make the templates and then you can mount the joystick very fast. I can easily knock out four identical panels in less than an hour, something which would take much longer with a fret saw etc.

Blanka

  • Trade Count: (+1)
  • Full Member
  • ***
  • Offline Offline
  • Posts: 2248
  • Last login:January 25, 2018, 03:19:28 pm
Re: Sanwa JLF/JLW/Ultimarc U360 top mounting guide
« Reply #13 on: March 14, 2009, 07:39:25 am »
But can you mount a fresh joystick without disassembly in those holes? How about the pins on the switches?
It's OK to disassemble one to get the measurements if you can't do that by just using a ruler on it, but it would be too much work to disassemble every stick if that is needed for mounting.
And with a decent true-man-wanking-arm you can fret saw 8 joystick holes within the hour too with no problem  :laugh:

Franco B

  • Trade Count: (+10)
  • Full Member
  • ***
  • Offline Offline
  • Posts: 3766
  • Last login:February 15, 2024, 09:14:06 am
Re: Sanwa JLF/JLW/Ultimarc U360 top mounting guide
« Reply #14 on: March 14, 2009, 07:50:44 am »
Complete disassembly is only necessary for making the templates for the 1st one. After that you don't need to disassemble the joysticks for subsequent CPs.

Lol @ true-man-wanking-arm  :D

Okay, ill race ya ;)

ViciousXUSMC

  • Trade Count: (0)
  • Full Member
  • ***
  • Offline Offline
  • Posts: 213
  • Last login:July 28, 2009, 10:25:53 am
Re: Sanwa JLF/JLW/Ultimarc U360 top mounting guide
« Reply #15 on: March 16, 2009, 03:41:19 am »
Tag, Nice Guide

I want to use a Sanwa or a Seimitsu in my next build just so I can say that I tried both sides of the joystick world (JP vs US) and this will come in handy probably.  I wish I had a router table, or even a table lol.  I do most of my work on the ground....

I have to know where did that button layout thing come from?  Not the printout, thats like what I used from slagcoin but it looks like a metal 6 ring object that could be used to route the buttons perfectly.  I absolutely must get that for my next project.

Franco B

  • Trade Count: (+10)
  • Full Member
  • ***
  • Offline Offline
  • Posts: 3766
  • Last login:February 15, 2024, 09:14:06 am
Re: Sanwa JLF/JLW/Ultimarc U360 top mounting guide
« Reply #16 on: July 11, 2009, 01:48:27 pm »
I have to know where did that button layout thing come from?  Not the printout, thats like what I used from slagcoin but it looks like a metal 6 ring object that could be used to route the buttons perfectly.  I absolutely must get that for my next project.

Apologies, I've only just seen your reply after searching for this thread for someone. I do sell internal copies of that drilling/routing guide. They are currently MDF but will soon be made from HDPE or similar. You can see them [here] in my BST thread.

GaryMcT

  • Trade Count: (+2)
  • Full Member
  • ***
  • Offline Offline
  • Posts: 745
  • Last login:September 24, 2014, 11:19:27 am
    • GaryMcT's arcade blog
Re: Sanwa JLF/JLW/Ultimarc U360 top mounting guide
« Reply #17 on: July 26, 2009, 03:48:09 am »
I bought [this] set from the US. They also sell the smaller one on its own [here].

I bought the set as they come in handy, especially at that price! :)

The 'flat screws' you see in the picture were actually the rounded hex head screws you see in the picture with the dome nuts. I just machined them to give a 1mm thick head. I bought a box of 100 from screwfix so if you want a few for your CP just let me know and I'll machine some and post them over with your other bits.  :cheers:

You could just use the un-machined screws or similar other screws but the 1mm thick head allows you to retain as much of the shaft length (oo-er!) as possible.

Any newer links to the router bit set that you bought?  The link is stale now. :(
My blog on learning how to develop FPGA versions of arcade boards: http://garymct.blogspot.com


Franco B

  • Trade Count: (+10)
  • Full Member
  • ***
  • Offline Offline
  • Posts: 3766
  • Last login:February 15, 2024, 09:14:06 am
Re: Sanwa JLF/JLW/Ultimarc U360 top mounting guide
« Reply #18 on: July 26, 2009, 01:06:00 pm »
[Here] ya go. I'll also include a link to the seller [here]. If the item link expires again in the future you should be able to find the set amongst his items. Look/search for '3 pc 1/4" SH Top Bearing Trim Pattern Router Bit Set'.

GaryMcT

  • Trade Count: (+2)
  • Full Member
  • ***
  • Offline Offline
  • Posts: 745
  • Last login:September 24, 2014, 11:19:27 am
    • GaryMcT's arcade blog
Re: Sanwa JLF/JLW/Ultimarc U360 top mounting guide
« Reply #19 on: July 28, 2009, 07:01:44 pm »
Would you consider using something like that Joystick "Blind Hole" Mounting kits on this page with this sort of routing to avoid having to muck with the mounting screws?

http://www.ultimarc.com/controls.html#mountingkits
My blog on learning how to develop FPGA versions of arcade boards: http://garymct.blogspot.com


Franco B

  • Trade Count: (+10)
  • Full Member
  • ***
  • Offline Offline
  • Posts: 3766
  • Last login:February 15, 2024, 09:14:06 am
Re: Sanwa JLF/JLW/Ultimarc U360 top mounting guide
« Reply #20 on: July 29, 2009, 01:24:52 am »
As MrMojoZ etc said the 'official' mounting height (which I didn't know about) from the top of the mounting plate is 9mm. If you are using 3mm (1/8") acrylic you will still have 6mm (1/4") to play with so if you make the recess ~7mm deep (6mm difference + 1mm mounting plate thickness) you will have a 6mm (1/4") void for your screw heads to sit in so there is no need to bother with low profile bolts like I did. I would just use some M4 bolts and nuts (or 6-32 UNC or whatever you guys use).

GaryMcT

  • Trade Count: (+2)
  • Full Member
  • ***
  • Offline Offline
  • Posts: 745
  • Last login:September 24, 2014, 11:19:27 am
    • GaryMcT's arcade blog
Re: Sanwa JLF/JLW/Ultimarc U360 top mounting guide
« Reply #21 on: July 29, 2009, 04:36:44 am »
Thanks.  That makes life easy.  I haven't fully absorbed this whole thread yet. :)
My blog on learning how to develop FPGA versions of arcade boards: http://garymct.blogspot.com


4nubis

  • Trade Count: (0)
  • Newbie
  • *
  • Offline Offline
  • Posts: 1
  • Last login:September 24, 2009, 09:28:08 am
Re: Sanwa JLF/JLW/Ultimarc U360 top mounting guide
« Reply #22 on: September 20, 2009, 01:20:09 pm »
Now, this topic was helpful (for a woodworking noob like me).
Thanks for visualising this  :applaud:

Stickify !

Donpatchi

  • Trade Count: (0)
  • Full Member
  • ***
  • Offline Offline
  • Posts: 39
  • Last login:May 17, 2015, 04:09:28 pm
Re: Sanwa JLF/JLW/Ultimarc U360 top mounting guide
« Reply #23 on: October 09, 2009, 11:09:10 am »
That has been a usefull guid indeed.

Thanks for putting it under my attention.

Franco B

  • Trade Count: (+10)
  • Full Member
  • ***
  • Offline Offline
  • Posts: 3766
  • Last login:February 15, 2024, 09:14:06 am
Re: Sanwa JLF/JLW/Ultimarc U360 top mounting guide
« Reply #24 on: October 09, 2009, 12:13:57 pm »
Your more than welcome :)

ammitz

  • Trade Count: (0)
  • Full Member
  • ***
  • Offline Offline
  • Posts: 186
  • Last login:April 25, 2017, 07:22:09 am
Re: Sanwa JLF/JLW/Ultimarc U360 top mounting guide
« Reply #25 on: October 15, 2009, 02:59:27 am »

Bottom mounting into a 1/4" left recess using 1/8" plexi gets you almost exactly to the 9mm recommended, which is why I have always bottom mounted my JLFs in 1/4" material.

These imperial measurements are killing me...

I'l find the calculator and translate it to mm's
Building my first bartop CAB

Epyx

  • Trade Count: (+1)
  • Full Member
  • ***
  • Offline Offline
  • Posts: 1961
  • Last login:December 25, 2023, 07:56:36 pm
  • "You're an oddity"
Re: Sanwa JLF/JLW/Ultimarc U360 top mounting guide
« Reply #26 on: October 15, 2009, 12:26:05 pm »
Agreed, great guide Franco. I will be doing this with my next CP.
Last Project


Epyx Tutorials:
Tutorials

Epyx

  • Trade Count: (+1)
  • Full Member
  • ***
  • Offline Offline
  • Posts: 1961
  • Last login:December 25, 2023, 07:56:36 pm
  • "You're an oddity"
Re: Sanwa JLF/JLW/Ultimarc U360 top mounting guide
« Reply #27 on: April 02, 2010, 03:02:46 pm »
Thanks again FrancoB!  :cheers:

Fantastic guide and method!
Last Project


Epyx Tutorials:
Tutorials

Franco B

  • Trade Count: (+10)
  • Full Member
  • ***
  • Offline Offline
  • Posts: 3766
  • Last login:February 15, 2024, 09:14:06 am
Re: Sanwa JLF/JLW/Ultimarc U360 top mounting guide
« Reply #28 on: April 02, 2010, 03:28:58 pm »
Thanks and thanks again :)

markronz

  • We traced the call, and it came from....INSIDE YOUR ARCADE MACHINE!
  • Trade Count: (+1)
  • Full Member
  • ***
  • Offline Offline
  • Posts: 821
  • Last login:April 12, 2019, 12:03:08 am
  • Game on!
Re: Sanwa JLF/JLW/Ultimarc U360 top mounting guide
« Reply #29 on: October 11, 2010, 03:14:31 pm »
This is a great guide.   Seems very easy to follow.  I do have a question about it though.  Is this guide assuming that plexi glass will be on top of the artwork then?   I am just confused about the bolts sticking out.   I read in there, that you can recess the whole thing further, and then the bolts attached to the mounting plate will be level with the rest of the CP.   But it would seem the problem with that, is then that the rest of the mounting plate would be too low.   

I plan to order artwork from GameOnGrafix.   I know the laminate stuff they use is pretty thick, but you'd think that if the mounting plate was so low in there, it would likely wrinkle or get messed up.   That is, unless you had plexi on top to prevent the player from pushing it in?   Am I wrong here?  Or what am I missing?

Franco B

  • Trade Count: (+10)
  • Full Member
  • ***
  • Offline Offline
  • Posts: 3766
  • Last login:February 15, 2024, 09:14:06 am
Re: Sanwa JLF/JLW/Ultimarc U360 top mounting guide
« Reply #30 on: October 11, 2010, 04:06:21 pm »
Yeah I was going to use an acrylic top sheet. The CF sheet I was using is stuiff so it wouldn't sag.

If I was using conventional artwork I would probably sandwich the artwork between two 2mm acrylic sheets.

lord-jaffa

  • Trade Count: (0)
  • Full Member
  • ***
  • Offline Offline
  • Posts: 15
  • Last login:April 05, 2012, 11:12:12 pm
Re: Sanwa JLF/JLW/Ultimarc U360 top mounting guide
« Reply #31 on: October 15, 2011, 06:39:10 pm »
I'm using 12mm MDF with 3mm acrylic and 5/8" t-moulding.

The recess is aprox 3mm deep which will give 9mm of material to bolt through.

Does that answer your question?

Yes, but if this is the case your mounting depth is 3mm short of the officially recommend depth of 9mms. Your plexi would need to be 6mm thick to use a 3mm recess. I doubt it really matters but if someone was anal about the stick height they would proably notice. Also, I need a router table.  :-\

If this is the case, would it not be better to recess 9mm out from the bottom instead of top mounting them? (if 3/4 boad is used that is) I would this this would be way easier, and probably stronger too.

Turambar

  • And I don't watch Fox news or use Happ joysticks.
  • Trade Count: (0)
  • Full Member
  • ***
  • Offline Offline
  • Posts: 122
  • Last login:October 03, 2021, 11:10:13 pm
  • Owner of Wayback's Arcade
    • Wayback's Arcade
Re: Sanwa JLF/JLW/Ultimarc U360 top mounting guide
« Reply #32 on: October 24, 2011, 09:51:30 am »
This is a great guide.   Seems very easy to follow.  I do have a question about it though.  Is this guide assuming that plexi glass will be on top of the artwork then?   I am just confused about the bolts sticking out.   I read in there, that you can recess the whole thing further, and then the bolts attached to the mounting plate will be level with the rest of the CP.   But it would seem the problem with that, is then that the rest of the mounting plate would be too low.   

I plan to order artwork from GameOnGrafix.   I know the laminate stuff they use is pretty thick, but you'd think that if the mounting plate was so low in there, it would likely wrinkle or get messed up.   That is, unless you had plexi on top to prevent the player from pushing it in?   Am I wrong here?  Or what am I missing?

Thank you for the guide.  There was no response to Markronz's questions, and those are the very answers I need.  If you used this guide, would not the top of the machined screws be even with the top of the CP?  If that is the case, the top of the joystick plate would be just a few millimeters from the top of the CP.  This would cause there to be a good bit of surface area that was just lower than the top of the CP.  If you used a printed CP from gameongrafix and wanted to get the one with the adhesive backing and forgo the plexi top.  If I did that... what would happen where the adhesive printing encountered that lower spot on the joystick plate?  Secondly, I would assume the dust washer would have to be on top of the artwork if you went with the adhesive backed printing?  Can anyone comment on this?

markronz

  • We traced the call, and it came from....INSIDE YOUR ARCADE MACHINE!
  • Trade Count: (+1)
  • Full Member
  • ***
  • Offline Offline
  • Posts: 821
  • Last login:April 12, 2019, 12:03:08 am
  • Game on!
Re: Sanwa JLF/JLW/Ultimarc U360 top mounting guide
« Reply #33 on: October 24, 2011, 10:26:13 am »
I can explain to you what I ended up doing with mine.  I used a bit to customize the mounting plate a bit.    I basically made the mounting holes recessed so that the screws would sit level with the rest of the mounting plate. See below:


Here is a picture with the screws in place.   As you can see, the whole top of the mounting plate is now level.


When recessing the mounting holes, you just have to make sure to use a V shaped tool to recess the holes.  Then of course don't go too far.  The screws still need to catch the metal, but yet need to sit even with the top of it.   If you route in too deep, the screws would just fall through the holes.   So that was the only touchy part for me.

And yes, my dust washer is on top of the artwork.   For me, that's how I'd prefer it anyway.

Turambar

  • And I don't watch Fox news or use Happ joysticks.
  • Trade Count: (0)
  • Full Member
  • ***
  • Offline Offline
  • Posts: 122
  • Last login:October 03, 2021, 11:10:13 pm
  • Owner of Wayback's Arcade
    • Wayback's Arcade
Re: Sanwa JLF/JLW/Ultimarc U360 top mounting guide
« Reply #34 on: October 24, 2011, 11:52:35 am »
Thanks for the post, Markronz.  That does look like it would solve the issue.  I am seriously thinking about bottom mounting and going with longer sticks at this point.  I am just not certain about my ability to do your mod, and I still like the idea of having a completely smooth surface to mount the adhesive backing of the CP art to. I am at the point on my project where my artwork is being made, and I currently am second guessing a lot of things before building my panel.

1st, my original intention was just to use some Happ competition sticks.  I have now hung out around this community enough to get the feel that the happs would almost be the last choice of everyone here.  So now what?  Do I invest in 2 u360s (a cost I hadn't really counted on) or should I just get some sanwas... too many choices on things is making me indecisive. 

markronz

  • We traced the call, and it came from....INSIDE YOUR ARCADE MACHINE!
  • Trade Count: (+1)
  • Full Member
  • ***
  • Offline Offline
  • Posts: 821
  • Last login:April 12, 2019, 12:03:08 am
  • Game on!
Re: Sanwa JLF/JLW/Ultimarc U360 top mounting guide
« Reply #35 on: October 24, 2011, 12:42:23 pm »
Yeah, you know it's a difficult decision.    For myself, I have one arcade that has Happ Comp's on it. It was my first arcade. And I actually don't mind them at all.  They get a somewhat bad rap around here, but I really don't mind them.   I guess it depends on your preferences.  Some people just have set idea of what things should feel like.    They were affordable and they worked decently well for what I use them for.   So I don't regret using them.   Now having said that, on my second arcade I made, I used the Sanwa JLF's with octagonal restrictor plates.    I LOVED these joysticks.   I just love the ball top feel, and they just moved so much smoother than the Happ Comp's.   I can still go back to my first cabinet, and it's still playable.  I don't hate the joysticks, but I did enjoy the Sanwa's a lot more.   

So I guess it's really up to you.   If you don't have a lot of money, I don't feel that theres any shame in going with something more affordable like the Happ Comps.   From what I hear, it's fairly easy to upgrade later too.   But if you just want to get it right the first time, and not have to think about upgrading something in the future, then you will want to consider the alternatives.

If I had the money, I would easily get some u360's, and be done with it.   Seems like it's bar none the most preferred choice around the forum.   I personally have only used the two joystick types I've mentioned, so I can't give any real opinions on any other models.   But good luck in your decision!

Turambar

  • And I don't watch Fox news or use Happ joysticks.
  • Trade Count: (0)
  • Full Member
  • ***
  • Offline Offline
  • Posts: 122
  • Last login:October 03, 2021, 11:10:13 pm
  • Owner of Wayback's Arcade
    • Wayback's Arcade
Re: Sanwa JLF/JLW/Ultimarc U360 top mounting guide
« Reply #36 on: October 24, 2011, 01:13:26 pm »
What was the full model number of the Sanwas you went with?  For me, knowing that I am going to shell out a lot for the art, I want to get the CP right on the first time and not have to upgrade later.  I have read more about doing the countersinking you did.  I think I might get brave and try it :)  I hope I don't have to buy an extra plate.

markronz

  • We traced the call, and it came from....INSIDE YOUR ARCADE MACHINE!
  • Trade Count: (+1)
  • Full Member
  • ***
  • Offline Offline
  • Posts: 821
  • Last login:April 12, 2019, 12:03:08 am
  • Game on!
Re: Sanwa JLF/JLW/Ultimarc U360 top mounting guide
« Reply #37 on: October 24, 2011, 01:56:47 pm »
I personally used the Sanwa JLF.  I believe it was a JLF-TP-8YT  to be exact.   I purchased an old Tekken 4 machine, and it had two of these joysticks in it, and they looked to be barely used.   So I decided to reuse them in my machine.  That's my main reason I went with that model, although I know the Sanwa JLFs are popular.

You can read more about the joysticks here:
http://slagcoin.com/joystick/attributes_brands.html#SANWA

Also, you can read more about mounting them here.  This is where I got the idea to modify my mounting plate:
http://slagcoin.com/joystick/mounting_layering.html

The main thing you want to think about though, is how many 4 way games you plan on playing.   If you are a classic arcade game fan, you will want to think about a 4 way joystick, or getting the u360s.  As with all 8 way joysticks, playing 4 way games on them can be challenging.   For me, I found I was able to play the 4 way games just fine, but it depends on the person.   I think when using an 8 way joystick, you just need to be more conscious of how you move the joystick, to make distinct up/down, left/right motions.

Anyway, I personally purchased my parts from Lizard Lick
http://www.lizardlick.com/Sanwa_c_146.html
But I know other sites, such as Paradise Arcade offer some parts as well
http://www.paradisearcadeshop.com/en/17-sanwa-joysticks

I personally went with Lizard Lick at the time because I had the joysticks, but did not have mounting plates for them.  When you purchase them new from a vendor, however, they will come with a mounting plate.   But I went with Lizard Lick because PE does not appear to offer the mounting plate on it's own.   Looks like the plates are about $6.  So if you were to mess them up, it wouldn't be the end of the world.  :)

Turambar

  • And I don't watch Fox news or use Happ joysticks.
  • Trade Count: (0)
  • Full Member
  • ***
  • Offline Offline
  • Posts: 122
  • Last login:October 03, 2021, 11:10:13 pm
  • Owner of Wayback's Arcade
    • Wayback's Arcade
Re: Sanwa JLF/JLW/Ultimarc U360 top mounting guide
« Reply #38 on: October 24, 2011, 03:30:32 pm »
You have been incredibly helpful!  Last question... do you remember what screws you used or where you got them?

markronz

  • We traced the call, and it came from....INSIDE YOUR ARCADE MACHINE!
  • Trade Count: (+1)
  • Full Member
  • ***
  • Offline Offline
  • Posts: 821
  • Last login:April 12, 2019, 12:03:08 am
  • Game on!
Re: Sanwa JLF/JLW/Ultimarc U360 top mounting guide
« Reply #39 on: October 24, 2011, 03:58:57 pm »
No problem at all, glad to help.

I would have to say that I don't off hand remember, however, as luck would have it, I believe that is the box in the background of the first photo.
Machine Screws - Flathead slotted 10-24 , 3/16 x 1.5

Pretty sure any hardware store would have them.  Not sure where you're from but any Home Depot, Lowe's, Menards, etc should have them.


Turambar

  • And I don't watch Fox news or use Happ joysticks.
  • Trade Count: (0)
  • Full Member
  • ***
  • Offline Offline
  • Posts: 122
  • Last login:October 03, 2021, 11:10:13 pm
  • Owner of Wayback's Arcade
    • Wayback's Arcade
Re: Sanwa JLF/JLW/Ultimarc U360 top mounting guide
« Reply #40 on: October 26, 2011, 03:39:18 pm »
I just wanted to hop on and say thanks again.  I just ordered a bunch of stuff from Lizard Lick, and I am ready to man up and make my CP. 

Turambar

  • And I don't watch Fox news or use Happ joysticks.
  • Trade Count: (0)
  • Full Member
  • ***
  • Offline Offline
  • Posts: 122
  • Last login:October 03, 2021, 11:10:13 pm
  • Owner of Wayback's Arcade
    • Wayback's Arcade
Re: Sanwa JLF/JLW/Ultimarc U360 top mounting guide
« Reply #41 on: November 02, 2011, 12:32:24 am »
I ordered a couple of JLF-TM-8T-SK's from lizardlick.  I am following the guide, but I may have run into a slight problem.  I am top mounting these sticks into 3/4 inch mdf.  If I cut a tight hole for the base to go through and route the top of the panel so the mounting plate is flush with the top of the CP, the posts on the switches don't extend down past the bottom of the CP to attach to easily attach quick disconnects to.  I went with the JLF-TM-8T-SK's because I thought it would be easier to do a nicer wiring job cutting wire to length for individual switches than being stuck with working with just the length of the wiring harness coming from the pcb of the JLF-TP-8YT's.  Am I missing something or just making a noob mistake?

Franco B

  • Trade Count: (+10)
  • Full Member
  • ***
  • Offline Offline
  • Posts: 3766
  • Last login:February 15, 2024, 09:14:06 am
Re: Sanwa JLF/JLW/Ultimarc U360 top mounting guide
« Reply #42 on: November 02, 2011, 04:04:50 am »
I see what your problem is.

I made this panel with JLWs in a while back. The panel was made from 12mm (1/2") MDF and the switches only just cleared the underside of the CP.


I think what you are going to need to is recess the underside of the CP to give clearance for the switches. You could do it by relieving the whole joystick area of just the area around the switches.


If it was me I would just relive the area near the microswitches. I would make a template like this:


And then use a pattern bit to recess 1/4" or so of the panel to give something like this:


Turambar

  • And I don't watch Fox news or use Happ joysticks.
  • Trade Count: (0)
  • Full Member
  • ***
  • Offline Offline
  • Posts: 122
  • Last login:October 03, 2021, 11:10:13 pm
  • Owner of Wayback's Arcade
    • Wayback's Arcade
Re: Sanwa JLF/JLW/Ultimarc U360 top mounting guide
« Reply #43 on: November 02, 2011, 11:32:21 am »
Thanks, Franco.  That makes perfect sense.  I should be able to do this.

Franco B

  • Trade Count: (+10)
  • Full Member
  • ***
  • Offline Offline
  • Posts: 3766
  • Last login:February 15, 2024, 09:14:06 am
Re: Sanwa JLF/JLW/Ultimarc U360 top mounting guide
« Reply #44 on: November 04, 2011, 07:44:53 am »
No problem, good luck with it  :)

markronz, I hope you don't mind but I copied your method for flush mounting the screws and pasted it into the original post.  :cheers:

markronz

  • We traced the call, and it came from....INSIDE YOUR ARCADE MACHINE!
  • Trade Count: (+1)
  • Full Member
  • ***
  • Offline Offline
  • Posts: 821
  • Last login:April 12, 2019, 12:03:08 am
  • Game on!
Re: Sanwa JLF/JLW/Ultimarc U360 top mounting guide
« Reply #45 on: November 04, 2011, 10:16:39 am »
Fine by me.   Always glad to help.   ;D

Turambar

  • And I don't watch Fox news or use Happ joysticks.
  • Trade Count: (0)
  • Full Member
  • ***
  • Offline Offline
  • Posts: 122
  • Last login:October 03, 2021, 11:10:13 pm
  • Owner of Wayback's Arcade
    • Wayback's Arcade
Re: Sanwa JLF/JLW/Ultimarc U360 top mounting guide
« Reply #46 on: November 12, 2011, 10:19:10 pm »
I can explain to you what I ended up doing with mine.  I used a bit to customize the mounting plate a bit.    I basically made the mounting holes recessed so that the screws would sit level with the rest of the mounting plate.

I did some prep work for my control panel today.  Hopefully I will be doing some updating to my project thread soon.  I just wanted to post what I found to do what Markronz demonstrated.  I used this to create a chamfer in my joystick mounting plates:


It is a Hitachi 3/8" Countersink Bit.  The package says that it is for pvc and wood, but I was able to use it on the metal mounting plates with ease.  I was incredibly paranoid about going down to far, but it is actually incredibly hard to mess this up.  The top of the screws are now flush with the mounting plate, and it is incredibly sturdy.  I did 12 holes on 3 mounting plates total, and the bit did not wear down.  The best part:  the price.  This bit cost $3.69 at my local Lowe's.  Thanks to Makronz for the tutorial.

I also want to give a shout out to Franco for this jig making tutorial.  I made my jigs and did a trial mount.  I am incredibly pleased with the sturdiness and the aesthetic result.  I did want to share about one thing I purchased for this.  To make the recesses for the mounting plates, I purchased this 1/2'' Pattern Router bit from rockler:  


This bit is incredible!
« Last Edit: November 12, 2011, 10:20:57 pm by Turambar »

markronz

  • We traced the call, and it came from....INSIDE YOUR ARCADE MACHINE!
  • Trade Count: (+1)
  • Full Member
  • ***
  • Offline Offline
  • Posts: 821
  • Last login:April 12, 2019, 12:03:08 am
  • Game on!
Re: Sanwa JLF/JLW/Ultimarc U360 top mounting guide
« Reply #47 on: November 13, 2011, 10:11:23 am »
Awesome! Glad to hear its going well so far!

Turambar

  • And I don't watch Fox news or use Happ joysticks.
  • Trade Count: (0)
  • Full Member
  • ***
  • Offline Offline
  • Posts: 122
  • Last login:October 03, 2021, 11:10:13 pm
  • Owner of Wayback's Arcade
    • Wayback's Arcade
Re: Sanwa JLF/JLW/Ultimarc U360 top mounting guide
« Reply #48 on: March 14, 2012, 05:41:02 pm »
I am finally assembling my CP, and I think I have finished all of the woodworking that was necessary.  This tutorial was incredibly helpful.  I wanted to show pics of my design and ask a couple of questions.  Thanks to Markronz and Franco for their help!

This is the recess for my trackball mounting plate:


Here are the recesses for two of my joysticks...


Here is a closeup of a joystick mounting plate sitting in the recess.  I don't know if you can tell from the pic, but it is perfectly flush with the top of the CP.  I gave myself a little wiggle room with the width and the length of the mounting plate.

What is best to fill in those small gaps between the edge of a mounting plate and the edge of the recess?  Wood filler?  Bondo?  What would you use?


The next two shots are of the recess Franco recommended that I make for my joystick switches.  These are the pics of the bottom of the CP.


Tonight I hope to get the all of the mounting plates bolted in.  Should I prime the surface before I put the adhesive artwork down?

EvilGreenDevil

  • Trade Count: (0)
  • Full Member
  • ***
  • Offline Offline
  • Posts: 67
  • Last login:June 10, 2016, 01:50:45 pm
    • press start to continue
Re: Sanwa JLF/JLW/Ultimarc U360 top mounting guide
« Reply #49 on: March 18, 2012, 10:28:01 pm »
this is EXACTLY the tutorial I am looking for. I might bit the bullet and attempt this for my CP which will hold two Seimitsu LS-32s. My artwork will be printed on adhesive back paper so the measurements need to be right the first time as another poster mentioned.

Also, I'm surprised that some are using 12mm MDF. I was originally going to do this but thought 18mm MDF would be more sturdy. Not sure which to use and I'm going to have to start experimenting and see what works best.
Xbox360 GT - EvilGreenDevil | twitter - dcmyers
My First Bartop Build

markronz

  • We traced the call, and it came from....INSIDE YOUR ARCADE MACHINE!
  • Trade Count: (+1)
  • Full Member
  • ***
  • Offline Offline
  • Posts: 821
  • Last login:April 12, 2019, 12:03:08 am
  • Game on!
Re: Sanwa JLF/JLW/Ultimarc U360 top mounting guide
« Reply #50 on: March 18, 2012, 10:49:58 pm »
Turambar, I just happened to see your other thread, so I know that you've already got past the part you've asked questions about, but for the sake of the thread, I thought I'd answer here anyway.  Sorry I did not get back to you sooner.   For myself, my gaps were very minimal, so I didn't fill them in with anything.   Also, I had a plexiglass cover, so the small gaps would not really present a problem then.   If I were not going with plexiglass, then I would recommend filling in those gaps.  And yes, I would use bondo personally.

Also, for my other control panel, where I used the self adhesive artwork, I did prime it first.   I primed and sanded it a few times to give it a super smooth, even surface to stick to.   But depending on what material you're using, you may not need to.  But I would prime it, yes.

EvilGreenDevil

  • Trade Count: (0)
  • Full Member
  • ***
  • Offline Offline
  • Posts: 67
  • Last login:June 10, 2016, 01:50:45 pm
    • press start to continue
Re: Sanwa JLF/JLW/Ultimarc U360 top mounting guide
« Reply #51 on: March 20, 2012, 10:39:59 am »
Can anyone advise me on whether to go with 3/4" (18mm) MDF or 1/2" (12mm) for this? My CPO is going to be small at 19" x 7.5" and will include two joysticks with 6 buttons each. My first thought was to use 3/4" since it' would provide more stability but everyone seems to be fine with 1/2".

Definitely going to top mount so will 1/2" be strong enough? Will 3/4" take up too much space?

Thanks!
Xbox360 GT - EvilGreenDevil | twitter - dcmyers
My First Bartop Build

Turambar

  • And I don't watch Fox news or use Happ joysticks.
  • Trade Count: (0)
  • Full Member
  • ***
  • Offline Offline
  • Posts: 122
  • Last login:October 03, 2021, 11:10:13 pm
  • Owner of Wayback's Arcade
    • Wayback's Arcade
Re: Sanwa JLF/JLW/Ultimarc U360 top mounting guide
« Reply #52 on: March 20, 2012, 01:20:51 pm »
DC,

A lot of it depends on the type of joysticks you will use.  If you read the whole thread, I had no trouble at all top mounting a Sanwa JLW-TM-8 in 3/4 inch MDF.  The switches cleared the mdf, and they are easily accessible. 

My other Sanwa sticks did not go as deep, however.  Because of this, I had to additionally route out on the bottom of my CP for room for the switches.  That is what this pic is:


I have been told by others that 1/2 is strong enough.  If that is the case, you will save yourself from having to route out the additional space if you have joysticks with shallower bases. 

The best thing you can do is purchase the sticks you plan on using and put them up right beside the wood.  Check the depth.  If you decide you are going to bottom mount, you may want to purchase longer shafts. 

EvilGreenDevil

  • Trade Count: (0)
  • Full Member
  • ***
  • Offline Offline
  • Posts: 67
  • Last login:June 10, 2016, 01:50:45 pm
    • press start to continue
Re: Sanwa JLF/JLW/Ultimarc U360 top mounting guide
« Reply #53 on: March 20, 2012, 02:39:10 pm »
Thanks for the reply. I did read the whole thread and was looking more for an opinion/suggestion from those who have used either of the two thicknesses.

I have extended shafts that were given to me and will fit my LS-32s. I am just looking for the most sturdy set up because once I get them in, they are not going anywhere meaning I wont swap them. The last thing I'm hoping to have happen is my joysticks moving or the mdf cracking if I go with 1/2"

Sorry to be a novice about the concept.


Xbox360 GT - EvilGreenDevil | twitter - dcmyers
My First Bartop Build

Turambar

  • And I don't watch Fox news or use Happ joysticks.
  • Trade Count: (0)
  • Full Member
  • ***
  • Offline Offline
  • Posts: 122
  • Last login:October 03, 2021, 11:10:13 pm
  • Owner of Wayback's Arcade
    • Wayback's Arcade
Re: Sanwa JLF/JLW/Ultimarc U360 top mounting guide
« Reply #54 on: March 20, 2012, 03:48:48 pm »
Bro, we all start out as novices lol.  What you aren't seeing in this thread is Markronz patience with me as I bombard him with questions in PMs.  If you top mount, you won't have to go with longer shafts no matter what you use.  If you bottom mount, you most likely will have to use the shafts.  It is 6 in one and a half dozen in the other.  As far as sturdiness goes, 3/4 inch will be sturdier over longer distances, but if I recall from another thread, your CP is only going to be 19-20 inches wide... I would think that 1/2 would be more than strong enough.  My CP is 34 inches wide, so I went with something stronger.

EvilGreenDevil

  • Trade Count: (0)
  • Full Member
  • ***
  • Offline Offline
  • Posts: 67
  • Last login:June 10, 2016, 01:50:45 pm
    • press start to continue
Re: Sanwa JLF/JLW/Ultimarc U360 top mounting guide
« Reply #55 on: March 20, 2012, 08:04:38 pm »
Thanks BRO ;) I think I'm set on scrapping my 3/4" and trying the 1/2". Since I have so much left over from the rest of the cabinet, I will try top and bottom mount on some scrap just to learn and see which one I like better.


---
I am here: http://tapatalk.com/map.php?yv0oqo
Xbox360 GT - EvilGreenDevil | twitter - dcmyers
My First Bartop Build

Tzakiel

  • Trade Count: (0)
  • Full Member
  • ***
  • Offline Offline
  • Posts: 272
  • Last login:March 02, 2019, 12:59:01 pm
  • I want to build my own arcade controls!
Re: Sanwa JLF/JLW/Ultimarc U360 top mounting guide
« Reply #56 on: September 30, 2013, 04:50:20 pm »
Edit - answered my own question... looks like 1/4" is about right for OBSN.

Sorry if I missed it somewhere, but what is the correct thickness for MDF to mount sanwa OBSN screw buttons? Is it really 7mm? (or a recess to 7mm)? Seems thin.
« Last Edit: October 01, 2013, 11:34:42 am by Tzakiel »
My Fighter CRT Cabinet Thread: Tzakiel's 2P Cabinet

spratkobasa

  • Trade Count: (0)
  • Full Member
  • ***
  • Offline Offline
  • Posts: 92
  • Last login:January 23, 2019, 09:10:43 am
  • I want to build my own arcade controls!
Re: Sanwa JLF/JLW/Ultimarc U360 top mounting guide
« Reply #57 on: October 03, 2013, 12:27:45 am »
First off, thank you guys for all the information in this thread, it has helped me a ton on making my jigs for top mounting my u360 sticks.  I am using stove bolt screws which are the same size as the green screws mentioned either in this thread.  I was planning of thining the heads down to 1mm as was also done in this thread.  On my control panel I plan on layering plexi then paper control panel art (non-sticky) then the top mounted joystick.  I am a total noob so if possible I want to avoid making the holes in my mounting plate bigger if it creates more work.  Would it be fine to just shove the dust washer underneath the control panel art to flatten the void between bolts and avoid snagging?  I was also considering putting old playing cards in the space to fill the game as well.  Or should I just go the way of counter sinking the plate? What do you guys recommend?

lordoxide

  • Trade Count: (0)
  • Full Member
  • ***
  • Offline Offline
  • Posts: 42
  • Last login:September 07, 2017, 11:53:19 pm
  • I want to build my own arcade controls!
Re: Sanwa JLF/JLW/Ultimarc U360 top mounting guide
« Reply #58 on: March 11, 2017, 01:42:57 pm »
I am going to purposefully resurrect a 8 year old thread, since all of my research on mounting my Sanwa JLF's keeps leading me here, and I've pretty much planned my control panel around this thread.

The question I have is this, for anyone that can answer...I understand that top mounting this way is one of the strongest method for mounting a joystick, but I keep thinking that if the controller ever breaks, I need to destroy the vinyl cover to change it out. Since I am using 3/4" MDF and between 1/16 - 1/8 lexan/plexi, is there a better way to mount that allows removal of the joystick from the bottom of the panel if there is ever an issue?

Thanks,
Tom

gumby510

  • Trade Count: (0)
  • Full Member
  • ***
  • Offline Offline
  • Posts: 121
  • Last login:November 17, 2022, 09:19:44 pm
  • SR-20 NX 2000
Re: Sanwa JLF/JLW/Ultimarc U360 top mounting guide
« Reply #59 on: March 11, 2017, 01:55:49 pm »
Can't you just route out the bottom 1/4 and then mount? You could also get a longer shaft to.


Sent from my iPhone using Tapatalk

lordoxide

  • Trade Count: (0)
  • Full Member
  • ***
  • Offline Offline
  • Posts: 42
  • Last login:September 07, 2017, 11:53:19 pm
  • I want to build my own arcade controls!
Re: Sanwa JLF/JLW/Ultimarc U360 top mounting guide
« Reply #60 on: March 11, 2017, 04:08:50 pm »
How would I secure them?

1.) Screws from the bottom seem to be a bad idea, due to MDF
2.) Blind nuts might work, but I still haven't found anyone who has used them long term
3.) I could counter sink nuts in the top of the panel, so that the bolts can be unscrewed from the bottom.

#3 seems like it would be the best option, but has anybody accomplished this using #3 or another way.

Thanks,
Tom

gumby510

  • Trade Count: (0)
  • Full Member
  • ***
  • Offline Offline
  • Posts: 121
  • Last login:November 17, 2022, 09:19:44 pm
  • SR-20 NX 2000
Re: Sanwa JLF/JLW/Ultimarc U360 top mounting guide
« Reply #61 on: March 11, 2017, 04:33:06 pm »
http://www.ultimarc.com/controls.html#mountingkits


Sent from my iPhone using Tapatalk

PL1

  • Global Moderator
  • Trade Count: (+1)
  • Full Member
  • *****
  • Offline Offline
  • Posts: 9401
  • Last login:Today at 04:19:05 pm
  • Designated spam hunter
Re: Sanwa JLF/JLW/Ultimarc U360 top mounting guide
« Reply #62 on: March 12, 2017, 12:54:15 am »
is there a better way to mount that allows removal of the joystick from the bottom of the panel if there is ever an issue?
Check out the "Under mount (support blocks)" option and read more here about the threaded inserts that gumby510 mentioned.

https://web.archive.org/web/20160809113045/http://newwiki.arcadecontrols.com/index.php?title=FAQ#Joysticks


Scott

lordoxide

  • Trade Count: (0)
  • Full Member
  • ***
  • Offline Offline
  • Posts: 42
  • Last login:September 07, 2017, 11:53:19 pm
  • I want to build my own arcade controls!
Re: Sanwa JLF/JLW/Ultimarc U360 top mounting guide
« Reply #63 on: March 12, 2017, 04:57:47 pm »
Thanks!

So my plan is to route the panel underside (the full size of the mounting plate) to about 5/16, and drill a 24mm joystick hole through. Then use the blind hole nuts, and secure from the bottom. With 1/8 lexan, that means the joystick will be 7/16 (~13.5 mm) below the panel, I know the suggested depth is 9mm, will this work? Or should I route down to 1/4? I'm not sure if 1/4 is deep enough to sink the blind nuts without coming through.

Thanks,
Tom
« Last Edit: March 12, 2017, 05:11:45 pm by lordoxide »

lordoxide

  • Trade Count: (0)
  • Full Member
  • ***
  • Offline Offline
  • Posts: 42
  • Last login:September 07, 2017, 11:53:19 pm
  • I want to build my own arcade controls!
Re: Sanwa JLF/JLW/Ultimarc U360 top mounting guide
« Reply #64 on: March 12, 2017, 07:05:51 pm »
So all things considered,

I think I will grab 4x of these:
https://www.focusattack.com/sanwa-jlf-p1-s-mounting-plate/

And 1x of these for 4 joysticks:
http://groovygamegear.com/webstore/index.php?main_page=product_info&products_id=317:99036b4a4026720400c1be17552e2635

I will route the dimensions of the controller 65mm x 65mm, down to 1/4" from the bottom. Then ontop of that I will route the dimensions of S-plate (21.5 mm on opposite facing sides) down about 9 mm. This should give me 15mm depth to sink the blind nuts, and just over 9 mm joystick clearance.

See my horribly sketched image attached.

What do you guys think?

Thanks,
Tom

equlizer

  • Trade Count: (+1)
  • Full Member
  • ***
  • Offline Offline
  • Posts: 363
  • Last login:November 17, 2019, 02:56:48 am
  • All your base are belong to us
Re: Sanwa JLF/JLW/Ultimarc U360 top mounting guide
« Reply #65 on: March 13, 2017, 12:16:02 am »
My JLF's are mounted underneath and recessed.  No bolts showing here  :afro:  Also the use of a CNC machine helps