Main Restorations Software Audio/Jukebox/MP3 Everything Else Buy/Sell/Trade
Project Announcements Monitor/Video GroovyMAME Merit/JVL Touchscreen Meet Up Retail Vendors
Driving & Racing Woodworking Software Support Forums Consoles Project Arcade Reviews
Automated Projects Artwork Frontend Support Forums Pinball Forum Discussion Old Boards
Raspberry Pi & Dev Board controls.dat Linux Miscellaneous Arcade Wiki Discussion Old Archives
Lightguns Arcade1Up Try the site in https mode Site News

Unread posts | New Replies | Recent posts | Rules | Chatroom | Wiki | File Repository | RSS | Submit news


Author Topic: Cowboy Arcade - Updated 6/25/2017  (Read 38733 times)

0 Members and 1 Guest are viewing this topic.

saleem

  • Trade Count: (0)
  • Full Member
  • ***
  • Offline Offline
  • Posts: 437
  • Last login:February 07, 2012, 08:03:39 am
Re: Cowboy Arcade - Back in the Saddle Again!
« Reply #40 on: March 11, 2010, 08:08:20 pm »
i like all those with the diffuser installed.
 :)

Ginsu Victim

  • Yeah, owning a MAME cab only leads to owning real ones. MAME just isn't good enough. It's a gateway drug.
  • Trade Count: (+10)
  • Full Member
  • ***
  • Offline Offline
  • Posts: 10093
  • Last login:May 08, 2023, 02:40:58 pm
  • Comanche, OK -- USA
Re: Cowboy Arcade - Back in the Saddle Again!
« Reply #41 on: March 11, 2010, 08:10:10 pm »
Really hard to tell how lighted pushbuttons look when viewing a photo of them. Just go with what you like best.

rablack97

  • Trade Count: (+3)
  • Full Member
  • ***
  • Offline Offline
  • Posts: 2215
  • Last login:May 11, 2022, 06:50:10 pm
  • If you don't try, you have no chance at innovation
Re: Cowboy Arcade - Back in the Saddle Again!
« Reply #42 on: March 11, 2010, 10:15:48 pm »
First of all excellent work so far.  This is gonna be one of the Hall of Famers, just on technique alone.

I like the non-diffused, the others look like headlights, the non-diffused look more natural from the photo.

Seriously its gonna be whats pleasing to your eye though, pics arent the same as the real thing......

TEKNYNE

  • Guest
  • Trade Count: (0)
Re: Cowboy Arcade - Back in the Saddle Again!
« Reply #43 on: March 11, 2010, 10:49:43 pm »
I like the wide angle diffuser. light the whole button not just the center, Awesome cab by the way!

drventure

  • Trade Count: (+2)
  • Full Member
  • ***
  • Offline Offline
  • Posts: 4152
  • Last login:June 25, 2023, 02:23:57 pm
  • Laser Death Ray Bargain Bin! Make me an offer!
Re: Cowboy Arcade - Back in the Saddle Again!
« Reply #44 on: March 11, 2010, 11:46:44 pm »
I guess I'm not a huge fan of those all lit up buttons (I'm a tad partial to Ond, or was it Francos? ring lit buttons) , but I'd say with the diffuser looks best between those, definitely.

rablack97

  • Trade Count: (+3)
  • Full Member
  • ***
  • Offline Offline
  • Posts: 2215
  • Last login:May 11, 2022, 06:50:10 pm
  • If you don't try, you have no chance at innovation
Re: Cowboy Arcade - Back in the Saddle Again!
« Reply #45 on: March 12, 2010, 06:31:57 am »
It was Ond's, but he put some time into making those puppies.  Although the finished output was nice.  I guess it depends on if he wants a bold look or a warm glow (ie. Ond).

t3design

  • Trade Count: (+1)
  • Full Member
  • ***
  • Offline Offline
  • Posts: 219
  • Last login:January 13, 2024, 07:19:01 pm
  • Orange Power! Go Pokes!
    • Cowboy Arcade Project
Re: Cowboy Arcade - Back in the Saddle Again!
« Reply #46 on: March 12, 2010, 07:36:00 am »
I went and look at Ond's and Franco's various ring lighting techniques. Wow.

So I am thinking, I may have to change some things.....
Cowboy Arcade Project Thread • Cowboy Arcade Project Website
If you are an obsessive/compulsive pyromaniac, you better make sure you wear flame retardant pajamas.

Santoro

  • Purveyor of Shiny Arcade Goodness
  • Santoro
  • Trade Count: (+32)
  • Full Member
  • *
  • Offline Offline
  • Posts: 3051
  • Last login:December 23, 2023, 07:05:04 pm
  • Boycott Quarters!!!
    • ArcadeReplay!
Re: Cowboy Arcade - Back in the Saddle Again!
« Reply #47 on: March 23, 2010, 05:54:15 pm »
Looks good!

You need better tokens though :)

t3design

  • Trade Count: (+1)
  • Full Member
  • ***
  • Offline Offline
  • Posts: 219
  • Last login:January 13, 2024, 07:19:01 pm
  • Orange Power! Go Pokes!
    • Cowboy Arcade Project
Cowboy Arcade - .055555555555556
« Reply #48 on: April 02, 2010, 04:07:39 pm »
That would be 1/18th Which happens to be the scale of the model I just got of the Cowboy Cab!

Justin Whitlock makes scale models of classic arcade cabs and when I contacted him about a custom he was very happy to oblige. So, I sent him drawings and art and more drawings (all to 1/18th scale already) and this was his reply:

     "OK, that's the best info I've gotten for a custom request yet, thanks!"

It took him a little while to complete the model and apparently he had some basement flooding problems which sidetracked his whole operation for awhile, but today he sent me this pic and my model cab is in the mail!


Now if I could just make some progress on the real thing  :-[
Cowboy Arcade Project Thread • Cowboy Arcade Project Website
If you are an obsessive/compulsive pyromaniac, you better make sure you wear flame retardant pajamas.

t3design

  • Trade Count: (+1)
  • Full Member
  • ***
  • Offline Offline
  • Posts: 219
  • Last login:January 13, 2024, 07:19:01 pm
  • Orange Power! Go Pokes!
    • Cowboy Arcade Project
Updated! Project back on track!
« Reply #49 on: September 03, 2011, 02:32:38 pm »
This project has taken way too long (though not nearly as long as Mission Control...) but I am finally back on track and making good progress. I'm going to play catch-up by copying my blog entries into one long post and then keep updating as we go.

COIN DOOR REVISION (Aug 14)

I managed to get a coin door from an original Atari Tempest cab. Actually, I now have several of the same model of coin door, but one of them I know for a fact came out of a Tempest machine. I took that door, cleaned it up and had it powder coated to look original. Then I cleaned up the backplate and coin mech parts and put it all back together. One of the other doors I found had orange coin return buttons, so I cleaned those up and installed my own graphics. Apply 12V and:
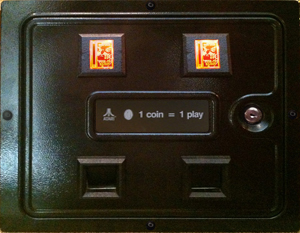


I'm very happy with it! I do not want to alter the wiring or hardware (love that I will be able to say it is an original Tempest coin door) so I needed to figure out the pinouts on the 24 pin Molex (4x6) connector. Using a multimeter I was able to pretty quickly determine:

1. Center Coin Switch
3. Right Coin Switch
3. Left Coin Switch
4. Reset ON & Momentary Switch
5. “Tilt” Switch
6. Switch Common (All Coin, Reset, Tilt)
7. Solenoid Common
8. Center Solenoid
9. Right Solenoid
10. Left Solenoid
11. Extra Counter A1
12. Extra Counter A2
13. Top Counter 1 (apply 6VDC either way to increment)
14. Top Counter 2
15. Bottom Counter 1 (apply 6VDC either way to increment)
16. Bottom Couter 2
17. Extra Counter B1
18. Extra Counter B2
19. Coin Return Lights Power (12VDC)
20. Coin Return Lights GND
21. Not Used
22. Not Used
23. Chassis GND
24. Chassis GND
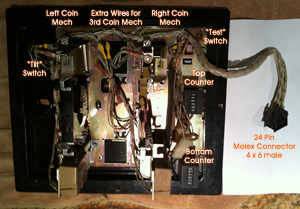


Currently I am using 12VDC incandescent bulbs that I bought at the auto parts store.
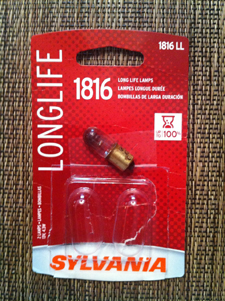


I have ordered LED bulbs that are packaged in a T3.25 Bayonet base. Both are orange, one is a dome covered package and the other is open. I will try them both and post the results of the comparison.

I will be using the "Test" switch as my free-play switch.

LONG TIME COMIN' (Aug 15)

After too long. Way too long. We are finally back on track. Let me recap...

February 2009: For my 45th birthday BFG offers to buy me a Tempest cab or pay for the components to build my own. I choose the "build your own" option and start on the journey.

January 2010: After almost a year of planning and acquiring parts we found out that a friend of mine had a full size CNC router table. I updated the plans to take advantage of this and have everything dado'd into the sides. Unfortunately, after another year plus we still hadn't been able to get aforementioned 'friend' to cut a single piece of wood.

August 2011: The cabinet guy that does work for my company turns out to have a full size CNC router table! Not wanting to get my hopes up, I sent him the plans and crossed my fingers.

Today I met with him for an hour to discuss details. He called this morning to tell me he had cut the sides and CP out of scrap material to test and wanted me to come see them! I almost wet myself.
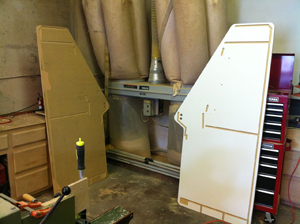
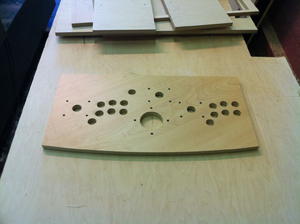


In addition to being able (and willing and ready) to cut the big pieces that I designed to be CNC routed, Bryce (that's his name) is also going to cut the rest of the parts and has offered several helpful ideas to make the assembly go smoother.

We are going to get this thing built!!!!

SOMETHING OLD, SOMETHING NEW... (Aug 26)

I got a hold of an original Tempest Control Panel with all the original controls in it. That's right, an original Tempest spinner and two Atari "volcano" buttons. Sweet! I already have a TurboTwist 2 from GGG, but I started thinking that it would be really cool to have the Tempest spinner in my cab. My first question was if the Tempest spinner would be a good controller for a MAME application. I posted on the BYOAC board and got a reply from RandyT (owner/operator of GGG):
Quote
For Tempest, the original control will be great.  But, if you plan to  play games which used a dial (potentiometer) based control, or games  which require high resolution, like Arkanoid, you will no longer have  the optimal resolution for accurate gameplay.
Of course, I would expect him to be biased toward his spinner, but I already bought one of his so it isn't like he is losing a sale if I go with the Tempest spinner. I still haven't decided, and in fact would like to be able to test both, so.....

First I took the spinner apart and Steve made a longer shaft so it would mount under my 3/4" CP instead of the thin metal CP of the Tempest cab.
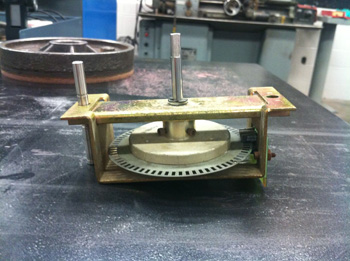


The old shaft is resting in the left mounting hole. The new shaft is assembled in the spinner. A little lube and she spins like new!

Second, I redesigned the CP to accommodate the Tempest spinner. This meant moving some things, which meant redesigning the CP Overlay, which if I was going to do meant I could fix whatever, so....

I added the volcano buttons as P1 and P2 button onto the CP. Worried that some day they might break and not be replaceable, I designed an insert for a standard button hole to mount the smaller volcano buttons in. If they ever go bad and can't be fixed or replaced I can pull out the insert and replace with a standard button.
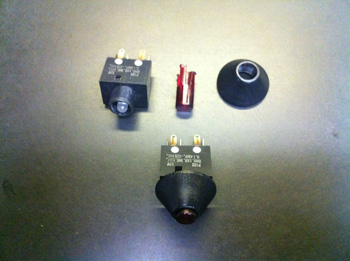


Additionally, since my cab is orange and black, I didn't really want red lens in the buttons. This is a problem as they have not been made for a long time and they were never made clear or orange, just black and red. A lot of searching and reading on the BYOAC board led me to <a href="http://www.flickr.com/photos/sky-lab/sets/72157603642874378/">this guy</a> who was casting his own replacement lens for the same buttons. I contacted him and he is making me a set of lens for my buttons!

Finally I had to adjust my CP Overlay to accommodate the parts movement and additions. During that process I dropped the numbers for P1 and P2 and created neon Atari player people like were on the early Atari games (including Tempest!) and the result is:
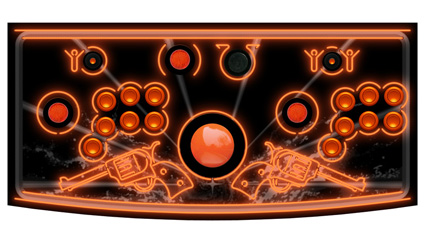


I like this version a LOT! Now I can mount either the TurboTwist 2 or the Tempest spinner and see how I like them in real game play. I get the original Atari cone buttons and P1 and P2 and I get the little Atari guys and all it cost me was about $90 for the original control panel, a few hours in the shop to make a new shaft and mounts for the volcano buttons, several hours redoing the CP Overlay art and the $ to reprint it. I'd say that's a bargain at twice the price :)

9 LIGHTS (Aug 26)

Actually the correct term is lamp. Some people call them bulbs, but that actually only refers to the glass globe that protects the filament from the rapid oxidation of the air. Of course, LEDs don't oxidize and so are often packaged very differently.

I ordered and tested 9 different lamps to light the coin return button in the coin door.
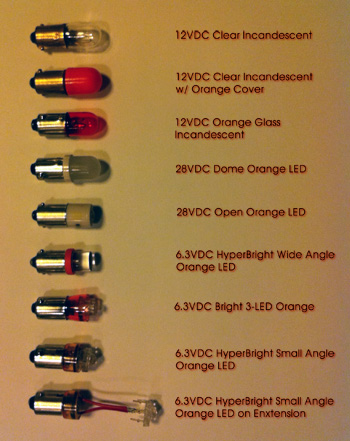


Frankly, the one I like best is the 12VDC Orange Glass Incandescent. The LEDs are not as bright and don't really create as much color as the "standard" lamp. I can see how the reduction of heat output and the longer life would be tempting, but I am going for look and feel here and I like the way the old school lamps look and feel.

Anybody need 2 each of 6 different LED lamps?

ORANGE BUTTONY GOODNESS (Sep 1)

Sean, the guy I told you about, sent me a pic of the test casting of my new Atari 'volcano' button lenses.
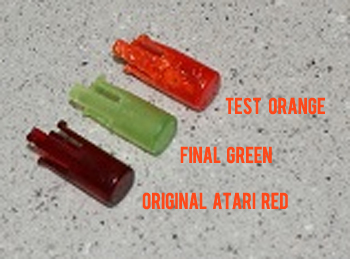


The bottom button is an original Atari red lens. The middle one is a finished lens in green that he had already made, and the top one is a test cast in orange. The final cast will be done in his pressure chamber to remove the bubbles so it looks like the green one (only orange)!

Thought it might be a good idea to test the switches I have, so I had Ky, one of our electrical engineers, put them on a meter and verify that the contacts work (I'm a mechanical engineer and electricity scares me...). Then Ky hooked up 5VDC to test the LEDs and surprise, surprise, surprise...they are RED.
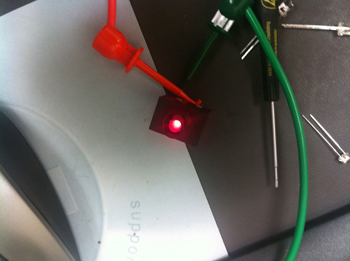


I don't know why I didn't think about that. Red lenses means they could have used white LEDs, however, Ky reminded me that white LEDs were not available in the late 1970's. So, a red LED is going to make my orange lens look red. No good.

So, Ky swapped out the LEDs for new ORANGE ones! Not an easy task as the switch is held together with brads and we didn't want to try to take it apart. Ky ended up chopping up the old LED from the top until he could clip out the remaining leads. Then it was fairly simple (for him!) to solder in new orange LED goodness.
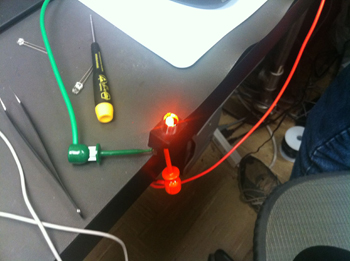


They are brighter at a lower current draw too. If I want them dimmer I can always increase the value of the resistor.

Meanwhile, Steve is machining the holders for these buttons. Here is the drawing in the shop of the part:
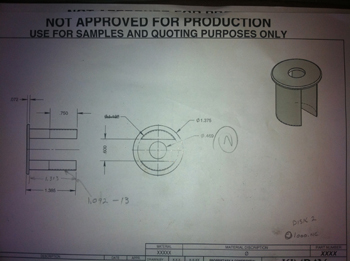


and here it is on the lathe being machined:
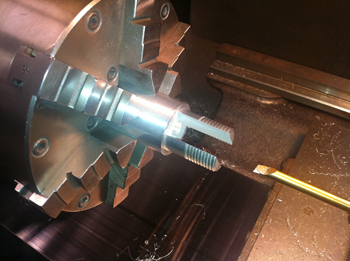


Steve machined the threads onto both ends of a piece of aluminum stock, then put it in the EDM machine and cut out the large slot for the switch housing to go into, then back into the lathe to bore the hole for the switch to stick through and then part it off. After it is cleaned up and polished it will go to the platers to be hard anodized black.

Also, tomorrow I go to Reid Cabinetry to cut the cabinet parts out!!!

Woot!

SHINY = GOOD (Sep 2)

Button mounts are finished and ready to go to the platers:

Mounts without switches in them....
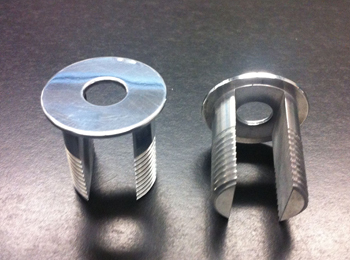


Mounts with switches installed...
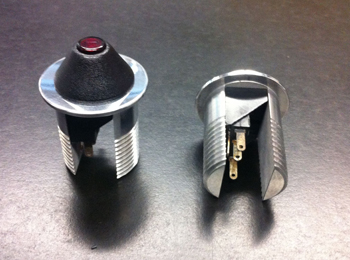


They will be hard anodized black before they are completely finished.

THE FIRST CUT IS THE DEEPEST (Sep 1)

Went to Reid Cabinetry today and cut some wood! We were a little short on time so we only cut one side and some of the internal pieces, but it was a blast getting things going.

All my drawings are in PowerCADD, so I export DXF files and send them to one of my engineers. Dustin opens the files in AutoCADD and removes all the elements that are not related to a cutting path and makes sure all the lines connect and the path is continuous. He then saves the cleaned up drawing as a DXF. We send that file to Bryce and he imports it into his software to generate cutting paths and tool id info for the router table.

First we verified that we were cutting the right parts from the right material in the right orientation:
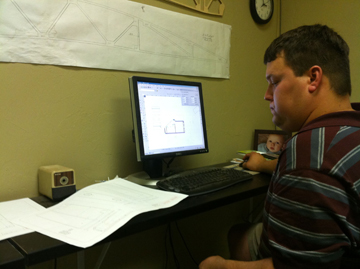


Then with the program sent to the router table we placed the material (5/8 birch ply laminated on the inside with black formica) on the table:
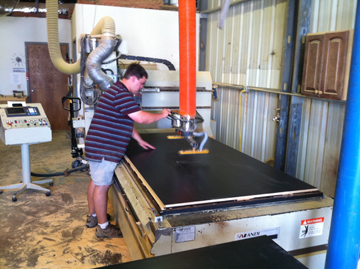


After Bryce set the tool depth and rechecked everything he pushed the button and the cutting started:
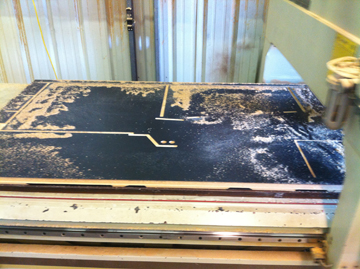


Once all the cutting was done you could see the various pieces still held in place by the vacuum:
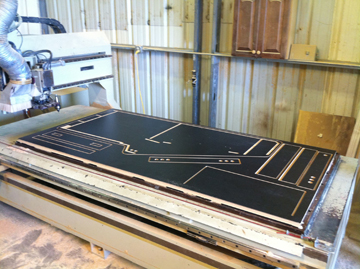


Then we separated everything and we could look at one side finished and ready to be assembled:
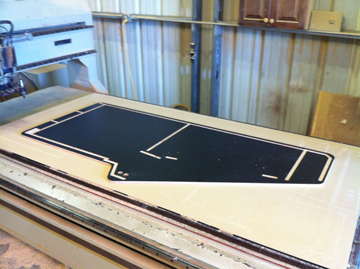


We are using angled cutters to cut the beveled edges of the pieces for below the CP and for the marquee light box. The edge is perfect and once we join the pieces together the finish and fit should be fantastic.

It was a great day for yummy arcade goodness! Stay tuned....

« Last Edit: September 03, 2011, 03:12:56 pm by t3design »
Cowboy Arcade Project Thread • Cowboy Arcade Project Website
If you are an obsessive/compulsive pyromaniac, you better make sure you wear flame retardant pajamas.

mgb

  • Trade Count: (0)
  • Full Member
  • ***
  • Offline Offline
  • Posts: 3499
  • Last login:February 21, 2024, 06:18:13 pm
  • North East, US
Re: Cowboy Arcade - Brand new updates!
« Reply #50 on: September 03, 2011, 06:32:56 pm »
I like that panel layout. the buttons have a real nice flow to them.
progress is looking great.

t3design

  • Trade Count: (+1)
  • Full Member
  • ***
  • Offline Offline
  • Posts: 219
  • Last login:January 13, 2024, 07:19:01 pm
  • Orange Power! Go Pokes!
    • Cowboy Arcade Project
Re: Cowboy Arcade - Brand new updates!
« Reply #51 on: September 03, 2011, 09:04:29 pm »
Thanks mgb. I have followed your Vertical Retrace project. That's a great look you have going there too.
Cowboy Arcade Project Thread • Cowboy Arcade Project Website
If you are an obsessive/compulsive pyromaniac, you better make sure you wear flame retardant pajamas.

mgb

  • Trade Count: (0)
  • Full Member
  • ***
  • Offline Offline
  • Posts: 3499
  • Last login:February 21, 2024, 06:18:13 pm
  • North East, US
Re: Cowboy Arcade - Brand new updates!
« Reply #52 on: September 03, 2011, 10:08:18 pm »
thanks, projects like yours have definitely been very influential.

t3design

  • Trade Count: (+1)
  • Full Member
  • ***
  • Offline Offline
  • Posts: 219
  • Last login:January 13, 2024, 07:19:01 pm
  • Orange Power! Go Pokes!
    • Cowboy Arcade Project
Re: Cowboy Arcade - Go Pokes!
« Reply #53 on: September 10, 2011, 02:05:32 pm »
Today is the start of football season. While I am not a really big sports fan per se, I am a HUGE Oklahoma State Cowboy's fan. So, in celebration of tonight's kickoff (I'll be there of course) I'm giving you a sneak peak at a possible front end skin for the Cowboy Arcade...


The large area in the lower left will be the list you can scroll through and the small area in the lower right will be game specific instructions.
« Last Edit: September 10, 2011, 02:07:03 pm by t3design »
Cowboy Arcade Project Thread • Cowboy Arcade Project Website
If you are an obsessive/compulsive pyromaniac, you better make sure you wear flame retardant pajamas.

t3design

  • Trade Count: (+1)
  • Full Member
  • ***
  • Offline Offline
  • Posts: 219
  • Last login:January 13, 2024, 07:19:01 pm
  • Orange Power! Go Pokes!
    • Cowboy Arcade Project
Re: Cowboy Arcade - Spinning and Winning
« Reply #54 on: September 10, 2011, 02:10:43 pm »
I have to admit that I have as much fun doing the detailed planning and making the parts for this MAME cab as anything.

Finished up the spinner today. The frame is powder coated black. The aluminum flywheel and flywheel cap are anodized orange. All the cap screws have been replaced with stainless steel. The copper encoder wheel is polished. The bushings have been replaced with new ones from Arcade Shop and I was pleasantly surprised when they came in and were dark grey instead of baby blue like they showed on the web site! We machined a new shaft (longer) to accomodate the wood control panel. The circuit board was cleaned, checked for operation and coated, and finally we drilled and tapped holes to mount the Opti-Wiz. All that is left to do is solder the wires from the spinner output to the Opti-Wiz and plug it in...


I also got the P1 and P2 button housings back from the platers...


Also, we are cutting more parts for the cabinet today!

Finally, my OSU Cowboys are 2-0 after a complete blowout against Arizona last night. My wife and I were honored to be invited to sit in President Burns Hargis' suite for the game...


That's my wife enjoying the game. I have to admit that is does not suck to sit in a suite on the 50 yd line! GO POKES!
Cowboy Arcade Project Thread • Cowboy Arcade Project Website
If you are an obsessive/compulsive pyromaniac, you better make sure you wear flame retardant pajamas.

t3design

  • Trade Count: (+1)
  • Full Member
  • ***
  • Offline Offline
  • Posts: 219
  • Last login:January 13, 2024, 07:19:01 pm
  • Orange Power! Go Pokes!
    • Cowboy Arcade Project
Re: Cowboy Arcade - Cuts like a knife
« Reply #55 on: September 10, 2011, 02:12:46 pm »
Got some more work done at Reid's this afternoon. Cut the second side and the top of the cab...


We also cut the control panel. This required cutting the through holes and routing out for the T-nuts from the top side and at the same time cutting out a hole in the material the exact same size as the control panel. Then we flipped the control panel over and put it in the other hole and routed out the spaces for the joysticks and the trackball on the underside. This ensures that the routing on both side matches up.


So I get the CP home and start fitting things into it and low and behold the joysticks will not fit into the recesses on the underside. I'm not really sure where I messed up. I thought I had measured the actual joystick bases, and I probably did, but I do not remember if I used those measurements on the CP layout. They are not off by much, but it is enough they won't go in. So we will have to cut another CP.
Cowboy Arcade Project Thread • Cowboy Arcade Project Website
If you are an obsessive/compulsive pyromaniac, you better make sure you wear flame retardant pajamas.

t3design

  • Trade Count: (+1)
  • Full Member
  • ***
  • Offline Offline
  • Posts: 219
  • Last login:January 13, 2024, 07:19:01 pm
  • Orange Power! Go Pokes!
    • Cowboy Arcade Project
Re: Cowboy Arcade - Salvation is at Hand!
« Reply #56 on: September 10, 2011, 02:14:24 pm »
I woke up this morning thinking, "I know how to fix this." And by "this" I mean the problem of the joystick bases not fitting in the recesses that we cut in the control panel.

About an hour later and after some creative use of a box knife, a wood chisel and a straight edge....we are good to go.

Here is the Control Panel before the T-Nuts were installed:


Then I went ahead and installed everything to make sure it all fits and nothing interferes with anything else....


I am really happy with the way it looks and feels. I think it will be very playable.


Here it is with the overlay photoshopped in...


Next step is to laminate the CP and install the overlay then start wiring everything up. Oh Boy! This is going to be great!
« Last Edit: September 10, 2011, 04:27:43 pm by t3design »
Cowboy Arcade Project Thread • Cowboy Arcade Project Website
If you are an obsessive/compulsive pyromaniac, you better make sure you wear flame retardant pajamas.

yotsuya

  • Trade Count: (+21)
  • Full Member
  • ***
  • Offline Offline
  • Posts: 19955
  • Last login:Today at 12:03:57 am
  • 2014 UCA Winner, 2014, 2015, 2016 ZapCon Winner
    • forum.arcadecontrols.com/index.php/topic,137636.msg1420628.html
Re: Cowboy Arcade - Brand new updates!
« Reply #57 on: September 10, 2011, 02:19:20 pm »
A) Congrats on beating the crap out of Arizona. As an Arizona State grad, nothing makes me happier.

B) I LOVE the volcano button holders! I would absolutely buy something like that if they were available!

Edit: Inspired by your button holders, I'm going to try and fashion the same thing out of those button plugs you can buy to cover up holes in your control panel. It's pretty much the same concept, just not as nice materials.  :cheers:
« Last Edit: September 10, 2011, 02:43:14 pm by yotsuya »
***Build what you dig, bro. Build what you dig.***

swaffar

  • Trade Count: (0)
  • Full Member
  • ***
  • Offline Offline
  • Posts: 216
  • Last login:February 21, 2016, 03:34:15 pm
Re: Cowboy Arcade - Brand new updates!
« Reply #58 on: September 10, 2011, 05:54:06 pm »
Great work!  Can you please post a higher res pic of that control panel with the art?  I love it!
My projects:
 

t3design

  • Trade Count: (+1)
  • Full Member
  • ***
  • Offline Offline
  • Posts: 219
  • Last login:January 13, 2024, 07:19:01 pm
  • Orange Power! Go Pokes!
    • Cowboy Arcade Project
Re: Cowboy Arcade - Higher Res Pic
« Reply #59 on: September 10, 2011, 05:57:54 pm »
Great work!  Can you please post a higher res pic of that control panel with the art?  I love it!

Here ya go....
« Last Edit: September 10, 2011, 06:01:40 pm by t3design »
Cowboy Arcade Project Thread • Cowboy Arcade Project Website
If you are an obsessive/compulsive pyromaniac, you better make sure you wear flame retardant pajamas.

drventure

  • Trade Count: (+2)
  • Full Member
  • ***
  • Offline Offline
  • Posts: 4152
  • Last login:June 25, 2023, 02:23:57 pm
  • Laser Death Ray Bargain Bin! Make me an offer!
Re: Cowboy Arcade - Brand new updates!
« Reply #60 on: September 10, 2011, 08:49:58 pm »
Damn, that spinner needs to be on the OUTSIDE of the cab, not hidden away inside.

Nice work!

t3design

  • Trade Count: (+1)
  • Full Member
  • ***
  • Offline Offline
  • Posts: 219
  • Last login:January 13, 2024, 07:19:01 pm
  • Orange Power! Go Pokes!
    • Cowboy Arcade Project
Re: Cowboy Arcade - Brand new updates!
« Reply #61 on: September 11, 2011, 12:06:58 am »
Damn, that spinner needs to be on the OUTSIDE of the cab, not hidden away inside.

Nice work!

Right. Yes.

So I am willing to admit that I am OCD about this. (ok, about everything). However, I have to say I have always felt very much at home around this group...

I will know it is in there. I will know what it looks like and what I did to make it that way. I will love playing Tempest on a Tempest spinner. By posting here a few others will know and, like you, actually appreciate it. That is enough for me.

Thanks

T3
Cowboy Arcade Project Thread • Cowboy Arcade Project Website
If you are an obsessive/compulsive pyromaniac, you better make sure you wear flame retardant pajamas.

t3design

  • Trade Count: (+1)
  • Full Member
  • ***
  • Offline Offline
  • Posts: 219
  • Last login:January 13, 2024, 07:19:01 pm
  • Orange Power! Go Pokes!
    • Cowboy Arcade Project
Re: Cowboy Arcade - Brand new updates!
« Reply #62 on: October 14, 2011, 10:34:38 pm »
A little more progress has been made. We had a little set back in terms of time to work on the cabinet, but got back to it this past week. Got the rest of the internal parts cut out and are almost ready to glue the thing up.


Here is the base fitted together (upside down of course)


And...

Today I got the custom vinyl letters I had Troy Robinson make for me.


Since I can't get AimTrak guns in orange I decided I would accent my guns. They will go nicely with my cabinet theme.
« Last Edit: October 14, 2011, 10:36:24 pm by t3design »
Cowboy Arcade Project Thread • Cowboy Arcade Project Website
If you are an obsessive/compulsive pyromaniac, you better make sure you wear flame retardant pajamas.

fallacy

  • Trade Count: (0)
  • Full Member
  • ***
  • Offline Offline
  • Posts: 966
  • Last login:March 23, 2024, 12:27:45 am
Re: Cowboy Arcade - Brand new updates!
« Reply #63 on: October 15, 2011, 01:24:45 pm »
t3design Do you releaize you started this thread\project 2 and a half years ago?

t3design

  • Trade Count: (+1)
  • Full Member
  • ***
  • Offline Offline
  • Posts: 219
  • Last login:January 13, 2024, 07:19:01 pm
  • Orange Power! Go Pokes!
    • Cowboy Arcade Project
Re: Cowboy Arcade - Brand new updates!
« Reply #64 on: October 15, 2011, 02:08:10 pm »
t3design Do you releaize you started this thread\project 2 and a half years ago?

Unfortunately, I do.

I have had a lot of fun so far, in spite of the apparent lack of real progress. Behind the scenes have been countless hours of planning, designing, drawing and manufacturing parts and pieces. The decision to design for manufacture on a CNC table router threw a real kink in things as the guy who was supposed to do the routing strung me along for almost a year and a half. That was not time totally wasted as I did a lot of planning and got many things ready during that time.

We should get the cabinet built very soon and then things will move faster after that.

I'm sure that I am not the only one on this forum that has more to do most days than could be done in several. I've got six kids at home, a full time job as president of a medium-large manufacturing company (750 employees), sit on several boards and am very active in my kid's school's. Not complaining mind you, I have just had to acknowledge that this hobby gets a small portion of my time each month and I have to be happy with that. However, the cool thing is that my kids have participated in the design and construction and we have had a lot of fun together on this project.

I am forever grateful to those on this forum who have gone down this road before me. I read about a million posts in other's project threads and learned a lot of things to do and not do before I ever put pencil to paper (figuratively of course). I am sure that the information I got here saved me from mistakes that would have cost me many hours.

I still plan to finish is less time than pixelhugger....

 
Cowboy Arcade Project Thread • Cowboy Arcade Project Website
If you are an obsessive/compulsive pyromaniac, you better make sure you wear flame retardant pajamas.

Nephasth

  • Guest
  • Trade Count: (0)
Re: Cowboy Arcade - Brand new updates!
« Reply #65 on: October 15, 2011, 02:21:50 pm »
I still plan to finish is less time than pixelhugger....

So did pixelhugger. :lol

Looking good! Designing and planning are probably my favorite parts of a build. Looking forward to seeing yours come together! :cheers:

martoon x

  • Trade Count: (0)
  • Full Member
  • ***
  • Offline Offline
  • Posts: 52
  • Last login:December 05, 2011, 09:01:49 pm
    • Defender Project
Re: Cowboy Arcade - Brand new updates!
« Reply #66 on: October 15, 2011, 02:41:05 pm »
can't get to your site or see your pictures. so I googled cowboyarcadeproject to see some cached images. From what i can se, your project looks epic!

t3design

  • Trade Count: (+1)
  • Full Member
  • ***
  • Offline Offline
  • Posts: 219
  • Last login:January 13, 2024, 07:19:01 pm
  • Orange Power! Go Pokes!
    • Cowboy Arcade Project
Re: Cowboy Arcade - Brand new updates!
« Reply #67 on: October 15, 2011, 02:45:16 pm »
I host all my personal sites and storage on secondary servers and my company and for some reason we can't get any of the DNS services to work today (or yesterday for that matter) so we are down right now.

Thanks!
Cowboy Arcade Project Thread • Cowboy Arcade Project Website
If you are an obsessive/compulsive pyromaniac, you better make sure you wear flame retardant pajamas.

drventure

  • Trade Count: (+2)
  • Full Member
  • ***
  • Offline Offline
  • Posts: 4152
  • Last login:June 25, 2023, 02:23:57 pm
  • Laser Death Ray Bargain Bin! Make me an offer!
Re: Cowboy Arcade - Brand new updates!
« Reply #68 on: October 15, 2011, 03:20:23 pm »
2.5 year old incomplete build thread?

Bah, back in +MY+ day, we worked on a cab for 20 years with a whittlin' knife and a hot stick to solder with, and we liked it!

Seriously, though, glad to see it's still progressing!


t3design

  • Trade Count: (+1)
  • Full Member
  • ***
  • Offline Offline
  • Posts: 219
  • Last login:January 13, 2024, 07:19:01 pm
  • Orange Power! Go Pokes!
    • Cowboy Arcade Project
Re: Cowboy Arcade - Brand new updates!
« Reply #69 on: October 15, 2011, 04:52:15 pm »
can't get to your site or see your pictures. so I googled cowboyarcadeproject to see some cached images. From what i can se, your project looks epic!

My servers are back up. Pics should load now.
Cowboy Arcade Project Thread • Cowboy Arcade Project Website
If you are an obsessive/compulsive pyromaniac, you better make sure you wear flame retardant pajamas.

t3design

  • Trade Count: (+1)
  • Full Member
  • ***
  • Offline Offline
  • Posts: 219
  • Last login:January 13, 2024, 07:19:01 pm
  • Orange Power! Go Pokes!
    • Cowboy Arcade Project
Re: Cowboy Arcade - Brand new updates!
« Reply #70 on: November 16, 2011, 12:56:09 am »
Worked for about 4 hours on the cabinet at Bryce's shop today! We are getting very close.

Here is the back of the marquee box glued up:


Then the whole marquee box together and fitted into a side:


Since the router bit used to cut the dado grooves won't cut a sharp corner we have to round off the corners of the parts going into the side dados. We used a laminate trimming router with a plunge bit set exactly as deep as the dados and then rounded off the corners where necessary. Once the part is fitted the sharp corners are flush against the inside surface of the side and look very neat.

Here is the base being glued up:


We used biscuits to make sure the pieces lined up exactly and are using an epoxy glue that takes a few hours to set. It is a void filling glue and has several times the strength of carpenters glue.

Here is the base with the joists ready to go in:


And here is the completed base with the cement for the laminate on it:


Here is the front panel (the part under the CP) glue together:


Here are the door and the "monitor shelf" (the monitor doesn't sit there...)


And here are a couple pics of the parts fitted into one or the other side:


Tomorrow we are going to glue the thing together! Stay tuned for pics of the complete cabinet.
Cowboy Arcade Project Thread • Cowboy Arcade Project Website
If you are an obsessive/compulsive pyromaniac, you better make sure you wear flame retardant pajamas.

t3design

  • Trade Count: (+1)
  • Full Member
  • ***
  • Offline Offline
  • Posts: 219
  • Last login:January 13, 2024, 07:19:01 pm
  • Orange Power! Go Pokes!
    • Cowboy Arcade Project
Re: Cowboy Arcade - Brand new updates!
« Reply #71 on: November 17, 2011, 01:54:11 pm »
Well, last night we glued up the Cowboy Arcade cabinet! It went really well and all the planning and care taken to this point paid off in a great final assembly.

We had already test fit each part in each side, so we knew the thing could go together. With a side laying on the table of the router (flat, sturdy, big surface) we put epoxy glue in all the dado grooves that would be receiving parts. Then we put the parts in that side making sure each part was completely seated and correctly positioned. Then we put glue into the same slots on the other side and lifted it onto the assembly. Starting at the top of the cabinet we worked each component into place (sometime with a little help from a rubber mallet) until the whole side was seated over the ends of the components. We then used an air nailer and clamps to secure the side while the glue dried.


For the door, we used Bryce's edge bander to put a black PVC edging on the door before laminating the front.


Then we test fitted the CP and admin panel to get an idea of what everything will look like!


We got the CP laminated and the hinges on the door before we quit last night but I didn't get any pictures.

Tomorrow we will glue in the side pieces for the the back to attach to and make sure everything is complete and then it comes home!
« Last Edit: November 17, 2011, 01:56:32 pm by t3design »
Cowboy Arcade Project Thread • Cowboy Arcade Project Website
If you are an obsessive/compulsive pyromaniac, you better make sure you wear flame retardant pajamas.

Le Chuck

  • Saint, make a poll!
  • Wiki Contributor
  • Trade Count: (+6)
  • Full Member
  • ***
  • Offline Offline
  • Posts: 5509
  • Last login:April 14, 2024, 06:01:28 pm
  • <insert personal text here>
Re: Cowboy Arcade - Brand new updates!
« Reply #72 on: November 17, 2011, 03:14:18 pm »
It is amazing what you can do with the right tools.  You're able to take the idea and make a professional reality.  I will be glued to this thread as you complete.  Awesome job. 

t3design

  • Trade Count: (+1)
  • Full Member
  • ***
  • Offline Offline
  • Posts: 219
  • Last login:January 13, 2024, 07:19:01 pm
  • Orange Power! Go Pokes!
    • Cowboy Arcade Project
Re: Cowboy Arcade - Brand new updates!
« Reply #73 on: November 20, 2011, 06:44:13 pm »
You Can Judge A Cab by It's Cover

The box is finished. Just 3 months shy of 3 years from inception and we finally have a cabinet to start putting things on and in!


Woot!

It's Not An Arcade Machine Without a Coin Door…

Even though it is getting ahead of what needs to be done I couldn't resist putting in the coin door.


My Arcade Name Up In Lights!

Got the lights and marquee installed! The upper part of the cabinet forms a box (which I call the marquee box...) that houses the lights, reflector, diffuser and marquee. The reflector is fabricated from a florescent light fixture reflector that I hacked into pieces and then pop riveted together to make a cut-down reflector. The reflector fits into grooves routed from side to side in the top and bottom of the marquee box:


Originally I had planned on mounting the led light bars on mounts attached to the box and then sliding the reflector into the box, turns out there is not a lot of room to work in there. So, I mounted the lights on the reflector itself.  Worked great...


During the design phase I was worried about the LED lights being to direct and being able to see bright spots. So, I cut a diffuser panel out of the diffuser from a florescent fixture and it slips into the same groove as the reflector and makes sure the light is even...


Then the marquee holders simply screw into the underside and top of the box, bent to match the angle of the marquee and powder coated black. Once the bottom holder is in place the marquee slips in and the top holder traps it.


I'm concerned about two things:

First, I ordered the marquee from MameMarquees and they did a great job, but the plexi they sent to sandwich it is too thin for my liking and I'm worried about it getting scratched. I think I'm going to get a piece of 0.25 tempered glass for the outside piece so I can clean it with glass cleaner and keep it nice and shiny.

Second, when I designed the art I did not really know how backlit film would handle the effect I was going for. Turns out that the B&W original Tempest art in the background "allows" light to pass through and washes out the orange. I am going to have to reduce the level of the background and saturate the orange neon to get it right.

Other than that I couldn't be happier!
Cowboy Arcade Project Thread • Cowboy Arcade Project Website
If you are an obsessive/compulsive pyromaniac, you better make sure you wear flame retardant pajamas.

GingerTroll

  • Trade Count: (0)
  • Jr. Member
  • **
  • Offline Offline
  • Posts: 5
  • Last login:June 17, 2012, 02:26:45 am
Re: Cowboy Arcade - Brand new updates!
« Reply #74 on: November 22, 2011, 04:43:27 pm »
 Could you use a flourescent light cover to filter orange?  That would enhance your existing color and step down the brightness of a naked bulb.  http://www.wikihow.com/Add-Color-to-a-Fluorescent-Light

Vigo

  • the Scourage of Carpathia
  • Global Moderator
  • Trade Count: (+24)
  • Full Member
  • *****
  • Offline Offline
  • Posts: 6417
  • Last login:March 21, 2024, 08:20:28 am
Re: Cowboy Arcade - Brand new updates!
« Reply #75 on: November 22, 2011, 05:02:20 pm »
Nice!  :applaud: Your custom kickplate looks amazing on the cabinet. Wow!  :cheers:

t3design

  • Trade Count: (+1)
  • Full Member
  • ***
  • Offline Offline
  • Posts: 219
  • Last login:January 13, 2024, 07:19:01 pm
  • Orange Power! Go Pokes!
    • Cowboy Arcade Project
Re: Cowboy Arcade - Back Panels on
« Reply #76 on: November 22, 2011, 11:31:42 pm »
Well, from a picture standpoint, this is not much of an update. But from a work standpoint a lot has happened.

We are working hard to get all the drilling and painting and dust creating stuff done so we can move the Cowboy Arcade into the game room. As of this post, all the painting is done, the various mounts and misc things that had to be drilled, screwed in or glued are done. Also, the exterior plug has been wired to the interior outlet and the main power supply is in the cabinet.

Tonight we fitted the back pieces and then attached the lights to the power supply. We still need a strip of wood 3/4" wide and 1/8" thick to fit between the top and bottom backs. I left this off until now to make sure we had wiggle room. With the backs screwed in and the lights hooked up it looks like this:


Pushed against a wall with the room lights out:


So far I am very happy with the way things are coming together!
Cowboy Arcade Project Thread • Cowboy Arcade Project Website
If you are an obsessive/compulsive pyromaniac, you better make sure you wear flame retardant pajamas.

t3design

  • Trade Count: (+1)
  • Full Member
  • ***
  • Offline Offline
  • Posts: 219
  • Last login:January 13, 2024, 07:19:01 pm
  • Orange Power! Go Pokes!
    • Cowboy Arcade Project
Re: Cowboy Arcade - Updated 12/1/2011
« Reply #77 on: December 01, 2011, 05:29:26 pm »
Well, as I told you in the last post, I was not too happy with the color of the marquee once everything was installed. I knew it needed darkened up, so I adjusted the art and resent it to GameOnGrafix. They got it done and sent to me in record time and I put the new version in and turned on the lights...

Still too washed out. Better, but not what I was looking for. Then it occurred to me that in all the button lighting tests I did, the white led's never looked very good (they washed out the orange too much), but orange led's looked great! So how to get orange led's in the marquee...or maybe, the led's don't need to be orange, just the light coming from them. I called a friend of mind who is in the sound and light business and asked if he had any orange film that they use to color stage lights. He did...


So I cut a piece of the film and taped it to the diffuser in the marquee box and installed everything back (including glass this time) and flipped the switch...


Beautiful!!!


And it looks good with room lights on too...


Onward and upward...
Cowboy Arcade Project Thread • Cowboy Arcade Project Website
If you are an obsessive/compulsive pyromaniac, you better make sure you wear flame retardant pajamas.

t3design

  • Trade Count: (+1)
  • Full Member
  • ***
  • Offline Offline
  • Posts: 219
  • Last login:January 13, 2024, 07:19:01 pm
  • Orange Power! Go Pokes!
    • Cowboy Arcade Project
Re: Cowboy Arcade - Updated 12/1/2011
« Reply #78 on: December 01, 2011, 09:55:22 pm »
Well, no project gets done without some adjustments to the plan...

THE BAD NEWS:

Got the monitor out of storage to install in the cabinet (a Nieman Video 27″ Flat Tri-Mode CRT Display) and it will not fit in the mounting frame. I designed and built the frame from measurements I got off the specs for the monitor, but they are slightly off and there is no room for error.

THE GOOD NEWS:

After measuring several times (just to be sure) and overlaying the new dimensions on the drawing it appears that we can mill out some material and make everything work!


So, into the shop we go tomorrow to fix things and then back on track.
Cowboy Arcade Project Thread • Cowboy Arcade Project Website
If you are an obsessive/compulsive pyromaniac, you better make sure you wear flame retardant pajamas.

t3design

  • Trade Count: (+1)
  • Full Member
  • ***
  • Offline Offline
  • Posts: 219
  • Last login:January 13, 2024, 07:19:01 pm
  • Orange Power! Go Pokes!
    • Cowboy Arcade Project
Re: Cowboy Arcade - Updated 12/1/2011
« Reply #79 on: December 07, 2011, 07:55:59 am »
Well, after several minor setbacks the monitor is installed and working! We milled the frame out to the dimensions necessary for the monitor and made some special nuts for the mounting bolts since the slots for the bolts were no longer slots but more like notches.

With the frame bolted into the cabinet we picked up the monitor and slid it into place. It fit perfectly and once bolted in is solid as a rock.


Of course, we had to go ahead and hook up the computer and get something up on the display. So we cobbled the pieces together and switched everything on and...

The monitor made a series of clicking noises accompanied by flashes on the screen and then nothing. Then it would repeat. Not what we were expecting. So I emailed Rick Nieman and described the problem I was having. (Remember that I bought this monitor almost two years ago.) I sent the email at 6:09 and he responded before 6:30. That my friends is customer service!

Turns out I just needed to set the display resolution of the computer correctly and all was well.


We have a LONG way to go, but it is so cool to see Donkey Kong (and Dig Dug, and Centipede, and Joust, and Tempest - the kids played games using the keyboard until I made them go to bed) on the monitor in MY arcade machine!
Cowboy Arcade Project Thread • Cowboy Arcade Project Website
If you are an obsessive/compulsive pyromaniac, you better make sure you wear flame retardant pajamas.