Main Restorations Software Audio/Jukebox/MP3 Everything Else Buy/Sell/Trade
Project Announcements Monitor/Video GroovyMAME Merit/JVL Touchscreen Meet Up Retail Vendors
Driving & Racing Woodworking Software Support Forums Consoles Project Arcade Reviews
Automated Projects Artwork Frontend Support Forums Pinball Forum Discussion Old Boards
Raspberry Pi & Dev Board controls.dat Linux Miscellaneous Arcade Wiki Discussion Old Archives
Lightguns Arcade1Up Try the site in https mode Site News

Unread posts | New Replies | Recent posts | Rules | Chatroom | Wiki | File Repository | RSS | Submit news


Author Topic: Cowboy Arcade - Updated 6/25/2017  (Read 38717 times)

0 Members and 1 Guest are viewing this topic.

t3design

  • Trade Count: (+1)
  • Full Member
  • ***
  • Offline Offline
  • Posts: 219
  • Last login:January 13, 2024, 07:19:01 pm
  • Orange Power! Go Pokes!
    • Cowboy Arcade Project
Cowboy Arcade - Updated 6/25/2017
« on: March 12, 2009, 12:45:12 am »


We started this project in 2009. Eight years later, we are just about to wrap it up.

Our website:

http://www.cowboyarcadeproject.com

We owe a lot to everyone here on the forum. Hope some of the things we come up with work for others too!

We are continuing to post at the bottom of this thread as well as update the website.

Thanks

t3 and bfg (and Preston)

(modified to include artwork so you don't have to scroll down.)
« Last Edit: June 25, 2017, 10:56:40 pm by t3design »
Cowboy Arcade Project ThreadCowboy Arcade Project Website
If you are an obsessive/compulsive pyromaniac, you better make sure you wear flame retardant pajamas.

thatitalian

  • Don't worry about the chicken, I feed my friends human all the time...
  • Trade Count: (0)
  • Full Member
  • ***
  • Offline Offline
  • Posts: 887
  • Last login:March 27, 2018, 10:52:37 am
  • The Revolution Is Coming...
Re: New MAME Arcade Cab Project: "Cowboy Arcade"
« Reply #1 on: March 12, 2009, 12:32:41 pm »
Nice artwork there! :applaud:

blkdog7

  • Trade Count: (0)
  • Full Member
  • ***
  • Offline Offline
  • Posts: 119
  • Last login:October 07, 2015, 04:43:38 pm
  • Mushroom Kingdom, MA
    • John's Arcade
Re: New MAME Arcade Cab Project: "Cowboy Arcade"
« Reply #2 on: March 13, 2009, 02:48:55 pm »
Poor, poor Tempest. :(

TelcoLou

  • Four score and seven years ago our fathers brought forth on this continent, a new nation
  • Trade Count: (+2)
  • Full Member
  • ***
  • Offline Offline
  • Posts: 436
  • Last login:October 14, 2010, 01:28:19 am
  • Playing video games since 1977
Re: New MAME Arcade Cab Project: "Cowboy Arcade"
« Reply #3 on: March 13, 2009, 07:45:02 pm »
Poor, poor Tempest. :(

From their web site:

Quote
design and build our own custom cab, patterned off the classic shape of the Tempest cab.

... looks like no Tempest cabs were harmed in this project  8)
So a leper walks into a bar and as he gets his beer, a finger falls off. The bartender who is serving him turns and pukes all over the place. The leper, feeling bad, says, "Was it my finger falling off?" The bartender turns to him and says, "No, it's the guy dipping chips into your back."

t3design

  • Trade Count: (+1)
  • Full Member
  • ***
  • Offline Offline
  • Posts: 219
  • Last login:January 13, 2024, 07:19:01 pm
  • Orange Power! Go Pokes!
    • Cowboy Arcade Project
Re: New MAME Arcade Cab Project: "Cowboy Arcade"
« Reply #4 on: March 14, 2009, 10:44:42 am »
Sorry for the confusion. TelcoLou is correct, this is a ground up scratch build. No genuine vintage arcade parts are being used and I would certainly NEVER destroy a Tempest Cab. My love for Tempest and the memories I have of playing that wonderful game for hours as a teenager and a young adult are what have prompted me to want to build this MAME cab and so I decided to honor that wonderful game by including the shape of the Tempest cab and the Tempest graphics in my design.

We have ordered most of our "parts" and are finishing the wood cut plan and build plans, so we should "break ground" within a week or two.

Thanks

t3
Cowboy Arcade Project ThreadCowboy Arcade Project Website
If you are an obsessive/compulsive pyromaniac, you better make sure you wear flame retardant pajamas.

t3design

  • Trade Count: (+1)
  • Full Member
  • ***
  • Offline Offline
  • Posts: 219
  • Last login:January 13, 2024, 07:19:01 pm
  • Orange Power! Go Pokes!
    • Cowboy Arcade Project
Re: New MAME Arcade Cab Project: "Cowboy Arcade"
« Reply #5 on: March 18, 2009, 10:40:02 am »
We would like to post actual plans here and on web site ( http://www.cowboyarcadeproject.com). What file formats are most useful? We can create anything from PDF to drafting program export files. Thoughts?

T3
Cowboy Arcade Project ThreadCowboy Arcade Project Website
If you are an obsessive/compulsive pyromaniac, you better make sure you wear flame retardant pajamas.

thatitalian

  • Don't worry about the chicken, I feed my friends human all the time...
  • Trade Count: (0)
  • Full Member
  • ***
  • Offline Offline
  • Posts: 887
  • Last login:March 27, 2018, 10:52:37 am
  • The Revolution Is Coming...
Re: New MAME Arcade Cab Project: "Cowboy Arcade"
« Reply #6 on: March 18, 2009, 10:59:48 am »
PDF is probably the most used format simply because it can be read by all.

t3design

  • Trade Count: (+1)
  • Full Member
  • ***
  • Offline Offline
  • Posts: 219
  • Last login:January 13, 2024, 07:19:01 pm
  • Orange Power! Go Pokes!
    • Cowboy Arcade Project
Cowboy Arcade Plans are up
« Reply #7 on: March 21, 2009, 03:34:34 pm »
Long story short....I changed the plans yet again.

I was not happy with the way the sides were. I wanted to more closely match the outline of the original Tempest cab (scaled up) so I did that and then worked to make everything else fit. Turns out that I didn't have to move much. When I simply scaled the Tempest outline up to the depth (front to back) I needed to accomodate a larger monitor and bigger 2 person control panel all I had to do was cut off some of the top and bottom. You don't really notice either.

Anyway, check out the drawings and tell me what you think. I would really appreciate any feedback if you see something you think is a problem. We are new to this and it is easier to make changes on paper than to rework the wood once it is cut and put together!

Thanks,

t3
« Last Edit: March 27, 2009, 04:44:24 pm by t3design »
Cowboy Arcade Project ThreadCowboy Arcade Project Website
If you are an obsessive/compulsive pyromaniac, you better make sure you wear flame retardant pajamas.

t3design

  • Trade Count: (+1)
  • Full Member
  • ***
  • Offline Offline
  • Posts: 219
  • Last login:January 13, 2024, 07:19:01 pm
  • Orange Power! Go Pokes!
    • Cowboy Arcade Project
Re: New MAME Arcade Cab Project: "Cowboy Arcade"
« Reply #8 on: March 27, 2009, 04:16:23 pm »
We decided some ambient lighting would be cool. A little research brought us to www.ledunderbody.com. We selected the expandable orange 4 pc. interior kit and got 2 sets. Each set comes with 4 - 15" tubes with 30 LEDs in each tube. The reason we chose the expandable kit is that the individual light tubes plug into a receptacle instead of being hard wired into the controller, this is important later.

The lights came in and we couldn't wait to hook them to the TripLite12V power supply we got and try them out.


They are very bright and the controller allows you to choose from 7 different settings including a music setting complete with a sensitivity adjustment. The plan is to put the lights up both sides of the back of the cab and place the controllers where they can 'hear' the speakers so the ambient light pulses with the game sounds. The back of the cab will be slightly recessed, so the lights themselves will not be visible from the front or side, but the glow will. The cab back is in two sections, so there will be 4 light tubes (2 per side) mounted on each section of the back. The wires will run together and then plug into the receptacle mounted inside. This way, the back can be removed and the lights unplugged to get to the inside of the cab without unwiring the lights.

Maybe we should look into hydraulics next.....
Cowboy Arcade Project ThreadCowboy Arcade Project Website
If you are an obsessive/compulsive pyromaniac, you better make sure you wear flame retardant pajamas.

t3design

  • Trade Count: (+1)
  • Full Member
  • ***
  • Offline Offline
  • Posts: 219
  • Last login:January 13, 2024, 07:19:01 pm
  • Orange Power! Go Pokes!
    • Cowboy Arcade Project
Coin "door"
« Reply #9 on: March 27, 2009, 06:41:55 pm »
Got my Single Front plate Assembly (40-0023-00P) from Happ, along with a Imonex $.25 & .984″ Token Coin Mech (42-2034-00) and an Amber Reject Button Assembly (42-0517-07). Once they arrived, I replaced the standard yellow button with the amber one and upgraded the graphic in the button at the same time.

We think it looks great! If you are interested, I created the artwork for the button in Freehand (you could use any graphics program you want) and had it output to film at a local graphics place. A couple of cuts with a very sharp utility knife and it slid right into place. The film is completely opaque where it is black and really shows up well.
Cowboy Arcade Project ThreadCowboy Arcade Project Website
If you are an obsessive/compulsive pyromaniac, you better make sure you wear flame retardant pajamas.

t3design

  • Trade Count: (+1)
  • Full Member
  • ***
  • Offline Offline
  • Posts: 219
  • Last login:January 13, 2024, 07:19:01 pm
  • Orange Power! Go Pokes!
    • Cowboy Arcade Project
Cowboy Arcade Plunger
« Reply #10 on: March 31, 2009, 05:18:21 pm »
Due in large part to the nice folks here, we decided we needed a real pinball plunger. I was reading about John’s Retro Arcade pinball plunger setup and the subsequent ideas people on the forum had for modding it. I decided to use the micro-switch push button at the end of the plunger concept. First though, I had to determine how I wanted to mount the plunger in the cab.

The way the control panel of our cab is designed, there is not enough room in the front face plate for the standard plunger we bought. So, we dismantled it.

Then we cut off the back of a standard black push button leaving slightly less than 3/4″ of the threads past the front bezel. This is so that when the finished item is inserted in the 3/4″ material of the cab it will NOT stick all the way through. Next we machined a piece of black Delron to fit into the button bezel. The piece has an initial OD that matches the ID of the bezel opening. This is as deep as the distance to the button stops inside the bezel, where it then necks down to that size. Once it is past the cut-off button it is threaded and the the total length is equal to the length of the shaft housing in the original base. The piece has a hole with the same ID as the original plastic sleeve that was in the base also.

Then we made a nut out of hex brass that is about 2″ wide and as deep as the amount of the new piece sticking out of the cut-off button. The piece slides into the button bezel from the front and that assembly would go into the 1 1/8″ hole in the panel from the front. The nut goes on from the back and seats against the back of the panel, pulling the bezel tight and preventing the plunger from breaking the plastic piece if it is push sideways while pulled out. Finally the plunger with all the original springs is installed into the new housing.

We will make a frame from aluminum to mount a standard push button at the end of the plunger. At rest, the plunger will depress the button. We will wire the normally closed side of the micro-switch to the computer. When the plunger is at rest the plunger button will appear to be un-pushed. When you pull out the plunger it will “depress” the button and start the input to the game. While not directly connected, pulling the plunger back farther will take more time and produce a “longer” pull shot. Oh, Boy! This is going to be great!
Cowboy Arcade Project ThreadCowboy Arcade Project Website
If you are an obsessive/compulsive pyromaniac, you better make sure you wear flame retardant pajamas.

Generic Eric

  • Trade Count: (+2)
  • Full Member
  • ***
  • Offline Offline
  • Posts: 4520
  • Last login:March 05, 2024, 09:02:23 am
  • Restore! Don't maim for MAME, build from scratch!
    • forum.arcadecontrols.com/index.php/topic,143226.0.html
Re: New MAME Arcade Cab Project: "Cowboy Arcade"
« Reply #11 on: April 01, 2009, 09:43:55 am »
Looks neat.  Like the coin reject image.  I'm interested to see your side art. 

t3design

  • Trade Count: (+1)
  • Full Member
  • ***
  • Offline Offline
  • Posts: 219
  • Last login:January 13, 2024, 07:19:01 pm
  • Orange Power! Go Pokes!
    • Cowboy Arcade Project
CPO and Marquee Final artwork
« Reply #12 on: April 03, 2009, 12:36:22 am »
I finished the final art for the CPO and the Marquee. Sending to MameMarquees.com tomorrow:
« Last Edit: April 03, 2009, 03:14:42 pm by t3design »
Cowboy Arcade Project ThreadCowboy Arcade Project Website
If you are an obsessive/compulsive pyromaniac, you better make sure you wear flame retardant pajamas.

t3design

  • Trade Count: (+1)
  • Full Member
  • ***
  • Offline Offline
  • Posts: 219
  • Last login:January 13, 2024, 07:19:01 pm
  • Orange Power! Go Pokes!
    • Cowboy Arcade Project
Side Art finished
« Reply #13 on: April 07, 2009, 05:00:06 pm »
Finally got the side art completed. Just posting one side as the other is a mirror image with Pistol Pete facing the right way.

The first is a full side shot, the second is zoomed in to "full size".

t3
Cowboy Arcade Project ThreadCowboy Arcade Project Website
If you are an obsessive/compulsive pyromaniac, you better make sure you wear flame retardant pajamas.

Zeguna

  • Trade Count: (0)
  • Jr. Member
  • **
  • Offline Offline
  • Posts: 6
  • Last login:May 25, 2015, 05:36:33 pm
Re: New MAME Arcade Cab Project: "Cowboy Arcade"
« Reply #14 on: April 12, 2009, 11:53:24 am »
I really like the marquee.

froggerman

  • Trade Count: (0)
  • Full Member
  • ***
  • Offline Offline
  • Posts: 311
  • Last login:March 01, 2015, 03:23:14 am
  • You want how many buttons?!
Re: New MAME Arcade Cab Project: "Cowboy Arcade"
« Reply #15 on: April 12, 2009, 04:34:15 pm »
I like your plunger idea. I wish there was a commercial product that would mount a small plunger in a standard button hole.

I think your idea will work very well.

Cheers.

system01

  • Trade Count: (+1)
  • Full Member
  • ***
  • Offline Offline
  • Posts: 283
  • Last login:March 04, 2023, 08:06:55 pm
  • System Idle Processes are the Devil's Playthings
Re: New MAME Arcade Cab Project: "Cowboy Arcade"
« Reply #16 on: June 19, 2009, 10:09:43 pm »
I know I'm a little late here but...

Some people are using the Pinball Wizard (http://www.nanotechent.com/hsdiscount.php).  They're taking it apart and throwing away most of it.  It comes with an analog plunger and an accelerometer board (nudge) built in.  The down side is they're $300 USD, but they have a sale every now and then.  If you look at BBB's HyperPin cab (http://www.hyperspin-fe.com/forum/showthread.php?t=2944), you can see the mounting holes required.  A possible problem in your case is that it might be too deep (long).

drventure

  • Trade Count: (+2)
  • Full Member
  • ***
  • Offline Offline
  • Posts: 4152
  • Last login:June 25, 2023, 02:23:57 pm
  • Laser Death Ray Bargain Bin! Make me an offer!
Re: New MAME Arcade Cab Project: "Cowboy Arcade"
« Reply #17 on: June 19, 2009, 11:11:17 pm »
Wow? 300$ for that?

The plungers and a switch are cheap, an accelerometer? Ultimarc is now selling one for usb, something like 50-60$.

If you're gonna put it in your own CP anyway....

system01

  • Trade Count: (+1)
  • Full Member
  • ***
  • Offline Offline
  • Posts: 283
  • Last login:March 04, 2023, 08:06:55 pm
  • System Idle Processes are the Devil's Playthings
Re: New MAME Arcade Cab Project: "Cowboy Arcade"
« Reply #18 on: June 19, 2009, 11:26:21 pm »
Oh, 300 bucks is steep, I agree.  If I were building my own pin cab, that would have to be the first or last thing I bought.  First - just to get expense out of the way, or Last - to avoid the buyers remorse.  If I were dumping $1k+ into a 42" LCD setup, I guess I wouldn't mind the 300 big ones.

It's totally bragging rights though.  How slick is it that you can pull the plunger all the way back and slowly return it, or those games where the skill shot requires you to "slap" the plunger with an open palm?

I'm not saying this is the way to go, but if you have the cash, it's a hell of a setup.

Wheres the accelerometers on Ultimarc?  I've never heard of them and I just browsed there and didn't see them.

sinkhead

  • Trade Count: (0)
  • Full Member
  • ***
  • Offline Offline
  • Posts: 53
  • Last login:November 08, 2009, 06:24:02 pm
Re: New MAME Arcade Cab Project: "Cowboy Arcade"
« Reply #19 on: June 20, 2009, 06:36:45 am »
Wheres the accelerometers on Ultimarc?  I've never heard of them and I just browsed there and didn't see them.
Take a look at their U-HID range. Specifically, the U-HID G.
« Last Edit: June 20, 2009, 05:16:01 pm by sinkhead »

Encryptor

  • Trade Count: (+34)
  • Full Member
  • ***
  • Offline Offline
  • Posts: 1287
  • Last login:December 21, 2023, 08:01:18 pm
Re: New MAME Arcade Cab Project: "Cowboy Arcade"
« Reply #20 on: June 20, 2009, 07:13:18 am »
t3,

Nice design!

I went to your website and when I click on any of the plans it comes up with a File Not Found error.


Encryptor

t3design

  • Trade Count: (+1)
  • Full Member
  • ***
  • Offline Offline
  • Posts: 219
  • Last login:January 13, 2024, 07:19:01 pm
  • Orange Power! Go Pokes!
    • Cowboy Arcade Project
Re: New MAME Arcade Cab Project: "Cowboy Arcade"
« Reply #21 on: January 27, 2010, 12:51:59 am »
Ok, we are back in business (I hope!). New plans (and drawing pdf's) are up on the website: www.cowboyarcadeproject.com .

I have made a lot of very minor changes which most people would never notice but they all mattered to me. Of course, no one here on this board has ever done that. My current goal is to get my cab finished before Mission Control  :notworthy:

We are hoping to get some time on the CNC router table this weekend, however, the potential for another winter storm may delay that yet again. Unfortunately, when I found out I had access to a CNC router I changed some of the design elements and moved into territory where it would be nearly impossible to do the sides manually. If someone wanted to not laminate the interior and was willing to just put in cleats to attach the horizontal pieces you could do the cab the way it is drawn.

Not for me though. I am sticking to my guns and building the cab I designed.

Cowboy Arcade Project ThreadCowboy Arcade Project Website
If you are an obsessive/compulsive pyromaniac, you better make sure you wear flame retardant pajamas.

Kman-Sweden

  • Trade Count: (+1)
  • Full Member
  • ***
  • Offline Offline
  • Posts: 526
  • Last login:October 23, 2015, 07:29:00 am
  • Up the Irons!
Re: New MAME Arcade Cab Project: "Cowboy Arcade"
« Reply #22 on: January 27, 2010, 03:55:50 am »
Wheres the accelerometers on Ultimarc?  I've never heard of them and I just browsed there and didn't see them.
Take a look at their U-HID range. Specifically, the U-HID G.
Well it's not exactly the same is it? Plunger v.s. Nudge/Tilt....

t3design

  • Trade Count: (+1)
  • Full Member
  • ***
  • Offline Offline
  • Posts: 219
  • Last login:January 13, 2024, 07:19:01 pm
  • Orange Power! Go Pokes!
    • Cowboy Arcade Project
Diamond in the Rough
« Reply #23 on: January 28, 2010, 09:49:55 pm »
Well, the weather is not cooperating. We are caught in the ice storm that is currently crippling the midwest so it is unlikely we will get to the CNC Router this weekend. So.....

Moving forward with parts that can be built. I decided it would be cool to have a kick plate on the cab door so my kids would have something to put their feet against while they play (I probably should have kick plates all along the walls of my house!) So I started messing around with a design concept. I was thinking polished aluminum diamond plate with my design logo (www.t3design.com) cut out so the black laminate of the door shows through, and color anodized orange to match the rest of the cab, finished off with polished carriage bolts to hold it on. After some sketching I came up with this:


Got the diamond plate in and drew up the plans which Steve (one of the best Tool & Die machinists in the universe) converted to Esprit so he could program it to run on our Chevalier VMC (a CNC vertical machining center). I really enjoy working with Steve. He is an old school machinist who has successfully adapted to all the numerically controlled equipment. The thing is, you can program the machine to move the tool around, but you still have to know what tools and what speeds and feeds and how to clamp and hold the work piece and about 10 billion other things. Steve got the piece clamped up and dialed in the center:


We used the mill to spot and center drill the holes for both the carriage bolts and the EDM start points. Then we changed to a end mill and milled the outer edge to create the rounded corners:


It took longer to draw, write the program, and clamp and set-up on the work piece than it did to mill it:


Unfortunately, we ran out of time today. If the roads are not to bad in the morning and we actually all make it to work we will program the Wire EDM and cut-out the T3.
Cowboy Arcade Project ThreadCowboy Arcade Project Website
If you are an obsessive/compulsive pyromaniac, you better make sure you wear flame retardant pajamas.

t3design

  • Trade Count: (+1)
  • Full Member
  • ***
  • Offline Offline
  • Posts: 219
  • Last login:January 13, 2024, 07:19:01 pm
  • Orange Power! Go Pokes!
    • Cowboy Arcade Project
Re: Cowboy Arcade - Back in the Saddle Again!
« Reply #24 on: January 29, 2010, 06:01:44 pm »
It is great to make things! I find it very satisfying to spend time working and then be able to hold the finished work in my hands. We made it to work today in spite of the very slick roads. I took my oldest son, Austin, with me. After checking that everything in the shop was working we went back to Tool & Die to get started on the Kick Plate.

Steve had already spot faced the areas where the carriage bolts will go, so we set up and broached the holes.


Resulting in nice square holes for the carriage bolts to seat into:


Then we set-up the piece in the Wire EDM, here is Steve and Austin indicating the part in to make sure it is square:


The EDM uses high voltage delivered through a very tiny wire to actually vaporize the metal along the cutting path. Here is the wire threaded through the first start location:


Once the program was loaded and checked, we started cutting.


Here is the first section cut out:


And the second section removed:


And the piece (held by Steve) after all three cuts were complete;


A little aluminum wheel polish and we are ready to go to the platers:


Monday I will send it out to be hard color anodized orange. This will tone down the part a little, match the color scheme of the cab, and help keep it from getting scratched as easy.
Cowboy Arcade Project ThreadCowboy Arcade Project Website
If you are an obsessive/compulsive pyromaniac, you better make sure you wear flame retardant pajamas.

bigpete405

  • Trade Count: (0)
  • Full Member
  • ***
  • Offline Offline
  • Posts: 152
  • Last login:April 30, 2014, 07:48:03 pm
Re: Cowboy Arcade - Back in the Saddle Again!
« Reply #25 on: January 30, 2010, 02:36:46 am »
thats really cool.

DashRendar

  • Trade Count: (+2)
  • Full Member
  • ***
  • Offline Offline
  • Posts: 488
  • Last login:November 06, 2015, 05:46:52 pm
  • "Don't get your servos in a twist pal."
Re: Cowboy Arcade - Back in the Saddle Again!
« Reply #26 on: January 30, 2010, 01:25:50 pm »
Do you have something to address the sharp metal edges on that kickplate (eg, will it be behind plexi or something)?

Turned out really nice!   8)
WANTED: Somebody to go back in time with me. This is not a joke. P.O. Box 322, Oakview, CA 93022. You'll get paid after we get back. Must bring your own weapons. Safety not guaranteed. I have only done this once before.

t3design

  • Trade Count: (+1)
  • Full Member
  • ***
  • Offline Offline
  • Posts: 219
  • Last login:January 13, 2024, 07:19:01 pm
  • Orange Power! Go Pokes!
    • Cowboy Arcade Project
Re: Cowboy Arcade - Back in the Saddle Again!
« Reply #27 on: January 30, 2010, 01:33:08 pm »
Thanks! I am really happy with the way it looks.

Do you have something to address the sharp metal edges on that kickplate (eg, will it be behind plexi or something)?

Turned out really nice!   8)

We used 280 grit wet sandpaper and smoothed out all the edges so they are still clean lines (not rounded) but they are not sharp at all. The whole thing will be flat against the door, so you would have to really work at catching something. If it ends up being an issue I will use the same program to cut the three pieces out of plain aluminum, anodize them black and fill the "T" in with them. I don't think it is going to be an issue though.
Cowboy Arcade Project ThreadCowboy Arcade Project Website
If you are an obsessive/compulsive pyromaniac, you better make sure you wear flame retardant pajamas.

t3design

  • Trade Count: (+1)
  • Full Member
  • ***
  • Offline Offline
  • Posts: 219
  • Last login:January 13, 2024, 07:19:01 pm
  • Orange Power! Go Pokes!
    • Cowboy Arcade Project
Re: Cowboy Arcade - Back in the Saddle Again!
« Reply #28 on: February 03, 2010, 07:55:31 pm »
Well, since we are kind of on hold with cutting out the sides and the CP on the CNC Router, I decided to work on stuff I could be making. So today I made the back panels. I know this is the last thing that will actually go on the cab, but it was work that could be done and progress that could be made.

The monitor "shelf" is in the middle of the cab and had a fan mounted in it to move air up through the cab for cooling. This means we need slots in the bottom and top for air flow. No one will ever see this part of the cab. It will be up against the wall. However, I am OCD and was not content with simple slots, so....

I drew what I wanted and we converted it to code for our CNC mill.


Then we clamped up and indicated in the blank material (1/8" Work Tempered Hardboard):


Then loaded up the program and started cutting:


We are using an 1/8" carbide endmill so there will be a 1/16" radius on all inside corners.


Here is the first piece finished:


Then we clamped up and dialed in the second piece and ran the second program:


Continuing the cuts...


The endmill 'frayed' the edges a little but we took a sanding block and ran over everything and it cleaned up great:


So the completed cuts: TOP...


BOTTOM...


and the WHOLE THING:


I still need to clean up the edges some, drill the mounting holes, and the paint them black.

So what do you think given that this is something no one will even see this?

:)
Cowboy Arcade Project ThreadCowboy Arcade Project Website
If you are an obsessive/compulsive pyromaniac, you better make sure you wear flame retardant pajamas.

t3design

  • Trade Count: (+1)
  • Full Member
  • ***
  • Offline Offline
  • Posts: 219
  • Last login:January 13, 2024, 07:19:01 pm
  • Orange Power! Go Pokes!
    • Cowboy Arcade Project
Re: Cowboy Arcade - Speaker Panel
« Reply #29 on: February 05, 2010, 12:54:05 am »
Another part that can be worked on....the speaker grill. Decided to go with a perforated aluminum for the speaker area on the cab. The perfed material is about 50% open, but since the whole speaker panel (27" x 6") will be perfed, the total open space is greater than a speaker cutout that is 100% open but just the size of the speaker. The speakers mount a little behind the  speaker panel (about 5" from panel to center of speakers) so they will be able to 'see' the entire speaker panel area:


In order to meet up properly with the marquee retainer, the upper edge needed to be bent back to 70° and the lower edge to 90°. It turned out that the aluminum wanted to bend on the holes and so we had to work really hard (and scrap one piece) to get the 6" face dimension right and everything else straight. Here is the piece as it will be seen from the front of the cab:


And the profile of the bends:


The edges are very rough as each hole creates a sharp point if it is cut across. I found some edge trim that is black rubber and fits exactly over the edge. I ordered a sample and it is perfect:


So now it is off to get powder coated in satin black!
Cowboy Arcade Project ThreadCowboy Arcade Project Website
If you are an obsessive/compulsive pyromaniac, you better make sure you wear flame retardant pajamas.

painterinfo

  • Trade Count: (0)
  • Full Member
  • ***
  • Offline Offline
  • Posts: 117
  • Last login:August 09, 2010, 05:29:27 am
  • Arcade10
Re: Cowboy Arcade - Back in the Saddle Again!
« Reply #30 on: February 05, 2010, 06:35:12 am »
Well, since we are kind of on hold with cutting out the sides and the CP on the CNC Router, I decided to work on stuff I could be making. So today I made the back panels. I know this is the last thing that will actually go on the cab, but it was work that could be done and progress that could be made.

.....

So what do you think given that this is something no one will even see this?

When you show off the machine and show someone everything properly, it is detail like that that adds the icing on the cake. Besides if you got access to a CNC machine why not use it all you can.

PS. dig the speaker grill, I want that for my next build.
Scripting Wizard

t3design

  • Trade Count: (+1)
  • Full Member
  • ***
  • Offline Offline
  • Posts: 219
  • Last login:January 13, 2024, 07:19:01 pm
  • Orange Power! Go Pokes!
    • Cowboy Arcade Project
Re: Cowboy Arcade - Bleeding Orange...
« Reply #31 on: February 05, 2010, 10:36:19 pm »
More progress on the back panels. Last night I laid out and drilled all the holes for the screws to attach the back panels to the cab and for the brackets to hold the led light bars for the ambient light effect. This morning I painted both sides of both panels satin black.


At this point I have already done way more than is reasonable for something that is going to be up against the wall and never even seen. But since I am OCD and NOT reasonable, I couldn't stop there. So...I painted the inside edge (1/8" thick material) of all the letters orange.


It is a little hard to see in the above shot, so here is a closeup:


And here is an angle where you can see more of the orange.


I took me about 2 hours to do each panel. I love how it looks! I will know it is back there whenever I am playing on my cab, so it was worth it to me. My wife is certain that I am insane.
Cowboy Arcade Project ThreadCowboy Arcade Project Website
If you are an obsessive/compulsive pyromaniac, you better make sure you wear flame retardant pajamas.

push2reject

  • Trade Count: (0)
  • Full Member
  • ***
  • Offline Offline
  • Posts: 110
  • Last login:January 28, 2014, 06:55:40 pm
Re: Cowboy Arcade - Back in the Saddle Again!
« Reply #32 on: February 05, 2010, 11:02:17 pm »
Amazing.  Just... yeah...  This is gonna be a work of art.  Keep the pictures coming.
On the other side of the screen, it all looks so easy.  -Kevin Flynn

t3design

  • Trade Count: (+1)
  • Full Member
  • ***
  • Offline Offline
  • Posts: 219
  • Last login:January 13, 2024, 07:19:01 pm
  • Orange Power! Go Pokes!
    • Cowboy Arcade Project
Re: Cowboy Arcade - Let There Be Light
« Reply #33 on: February 09, 2010, 10:37:11 pm »
Got the back lights mounted on the back panels tonight. I was waiting for the 4-40 Nylon screws and lock nuts to come in, so when they arrived in the mail today I knew what I was going to be doing this evening!

I had originally drilled the holes to mount the brackets based on what I thought would be most aesthetically pleasing (which would be funny if it weren't a little tragic since this is the BACK of the cab!) However, it had been a while since I had the lights out of the box and I had forgotten that the brackets coincided with particular locations on each light, namely, the ends. So once I had put all the brackets on and gotten the lights out of the box, none of them would fit. I know no one reading this has ever done something like this, so I am sure you cannot imagine how overjoyed I was.

Soooo, I re-marked and re-drilled all the mounting holes. Luckily, the wrong holes are under the lights once they are mounted, so all the people who are not going to see the back of the cab will also not see that I screwed up the mounting holes.

Here are the mounting brackets on the back:


And the way they look on the inside of the cab:


Here is what the four light bars look like mounted on one panel:


And here are the lights turned on:


But what is really cool is how it will look when the cab is against the wall:


Hopefully the materials for the cab come in tomorrow or Thursday and we can start cutting parts!
Cowboy Arcade Project ThreadCowboy Arcade Project Website
If you are an obsessive/compulsive pyromaniac, you better make sure you wear flame retardant pajamas.

t3design

  • Trade Count: (+1)
  • Full Member
  • ***
  • Offline Offline
  • Posts: 219
  • Last login:January 13, 2024, 07:19:01 pm
  • Orange Power! Go Pokes!
    • Cowboy Arcade Project
Re: Cowboy Arcade - Back in the Saddle Again!
« Reply #34 on: February 10, 2010, 08:55:59 am »
Look what the postman brought me this morning! Well, not the postman really, more like the guy who delivers our stuff from the platers. So I got to work this morning (early I might add) to find this sitting on my desk:


That is going to look so sweet on the front of the cab! The anodizing toned down the shine a little and the orange is nearly a perfect shade. Are we having fun yet? Yes we are!
Cowboy Arcade Project ThreadCowboy Arcade Project Website
If you are an obsessive/compulsive pyromaniac, you better make sure you wear flame retardant pajamas.

t3design

  • Trade Count: (+1)
  • Full Member
  • ***
  • Offline Offline
  • Posts: 219
  • Last login:January 13, 2024, 07:19:01 pm
  • Orange Power! Go Pokes!
    • Cowboy Arcade Project
Re: Cowboy Arcade - Back in the Saddle Again!
« Reply #35 on: February 10, 2010, 04:31:50 pm »
So, I'm in meetings all day, mostly out of my office. When I come back this afternoon, this was on my desk!


The speaker grill panel, back from the powder coater's. It is beautiful! The pic does not do it justice at all. Now if we just had some cab sides.....
Cowboy Arcade Project ThreadCowboy Arcade Project Website
If you are an obsessive/compulsive pyromaniac, you better make sure you wear flame retardant pajamas.

saleem

  • Trade Count: (0)
  • Full Member
  • ***
  • Offline Offline
  • Posts: 437
  • Last login:February 07, 2012, 08:03:39 am
Re: Cowboy Arcade - Back in the Saddle Again!
« Reply #36 on: February 10, 2010, 08:27:31 pm »
i am sure you are putting a lot of thought and time into your project and i am sure you will have real nice cab at the end,well it will be unique thats for sure,well everyones cabs end up being unique.

do you not think you might be going over the top?with all the lights and stuff you sure wont miss it when its all turned on!

is this just a working project ie:a project you can use and enjoy or is it something you just wanted to challenge yourself on and have it as a showpiece kinda thing?

you certainly know your workshopping and use of machines and have certainly used them to good use although be it a little over the top (but,thats just my opinion) as you went to trouble of routing out names and such on the rear panels,i know you need air for cooling,i mean with all the lights you will be using you sure will need it.
:)

t3design

  • Trade Count: (+1)
  • Full Member
  • ***
  • Offline Offline
  • Posts: 219
  • Last login:January 13, 2024, 07:19:01 pm
  • Orange Power! Go Pokes!
    • Cowboy Arcade Project
Re: Cowboy Arcade - Back in the Saddle Again!
« Reply #37 on: February 10, 2010, 08:56:45 pm »
do you not think you might be going over the top?

I am very surely going over the top. Unlike a lot of folks on this board, this is likely to be my only build. Really, I'm actually very surprised the wife let me do this once, no way it will happen a second time. I think when the whole thing is complete it will work as a whole piece. The backlighting is really the flashiest thing I am doing and it can be turned on or off.

is this just a working project ie:a project you can use and enjoy or is it something you just wanted to challenge yourself on and have it as a showpiece kinda thing?

Both. I have 6 kids, ages 15 down to 5. We are gonna play on this thing! I actually made a lot of decisions in the design based on durability and ease of keeping things clean. The cab will end up in my game room (not an arcade, just the rec room for the house) and the motif in there is Oklahoma State Cowboys (my alma mater). Two of the walls are orange. We have signed footballs, basketballs, game jerseys, memorabilia, etc. I even have an old Glasco Slider that I had redone and hand painted:


So it should fit right in!

you certainly know your workshopping and use of machines and have certainly used them to good use although be it a little over the top (but,thats just my opinion) as you went to trouble of routing out names and such on the rear panels,i know you need air for cooling,i mean with all the lights you will be using you sure will need it.

Yep. Guilty as charged. I told you guys that the "COWBOY ARCADE" and COWBOYS 4EVER" routed in the back as cooling vents were a complete OCD waste of time. But I like them and I will know they are back there, and I had fun designing and making the panels, so it works for me. I'm sure Pixelhugger (Mission Control) spent more time planing his build (not much, but more), but I plan to finish mine first!

Thanks for the response. Keep checking on me and let me know what you like and what you think is insane :)

P.S. I have been following your build. Very nice work and under less than ideal conditions. Good job.
Cowboy Arcade Project ThreadCowboy Arcade Project Website
If you are an obsessive/compulsive pyromaniac, you better make sure you wear flame retardant pajamas.

t3design

  • Trade Count: (+1)
  • Full Member
  • ***
  • Offline Offline
  • Posts: 219
  • Last login:January 13, 2024, 07:19:01 pm
  • Orange Power! Go Pokes!
    • Cowboy Arcade Project
Re: Cowboy Arcade - Side Art in Hand!
« Reply #38 on: February 18, 2010, 10:30:04 pm »
I just received my printed side art from Scott Prior at MameMarquees. I could not be happier! As you can see for yourself:


The object between the two panels is a yard stick. They are glorious! The black is glossy jet black. The orange neon really seems to be glowing! Wow!

Scott was easy to work with (I knew this as I already ordered and received my marquee and cpo from him) and the turn around was great. I messed up my order and actually ordered 2 sets of sideart instead of ordering two sides. Scott realized that I was not likely to actually need two sets, so he contacted me to make sure and then issued a refund for the second set.

MameMarquees is the real deal. Thanks Scott!
Cowboy Arcade Project ThreadCowboy Arcade Project Website
If you are an obsessive/compulsive pyromaniac, you better make sure you wear flame retardant pajamas.

t3design

  • Trade Count: (+1)
  • Full Member
  • ***
  • Offline Offline
  • Posts: 219
  • Last login:January 13, 2024, 07:19:01 pm
  • Orange Power! Go Pokes!
    • Cowboy Arcade Project
Cowboy Arcade - Light Bright
« Reply #39 on: March 11, 2010, 07:50:43 pm »
Testing the button lighting and need some opinions....

I have three different LEDs: Button Blaster (white) from Groovy Game Gear, Orange 15° (RL5-O5015) Beam from SuperBrightLEDs.com, and Orange 30° Beam (RL5-O4030) also from SuperBrightLEDs.com.

I also have the diffuser discs from Groovy Game Gear.

So, I took a piece of black melamine shelving and cut out the button holes according to my CP design. I then installed 6 buttons:  3 sets for the three LED types with and without the diffusers. Here is what they look like:


So, the question is....which one looks the best?

I do not like the white LED at all. As I suspected, it washes out the orange buttons and makes them look almost yellow.

I love the way the orange LEDs make the buttons look. I tried "standing" over the mock CP in approximately the position I would play and I think the buttons with NO diffuser shine too much light up into your eyes. So I like the diffusers. The pictures make the button centers look washed out. In person they are very orange.

Between the 15° and the 30° Beam, I like the wider beam as it seems to light up the whole button better.

Agree, disagree, arguments, personal attacks?
Cowboy Arcade Project ThreadCowboy Arcade Project Website
If you are an obsessive/compulsive pyromaniac, you better make sure you wear flame retardant pajamas.

saleem

  • Trade Count: (0)
  • Full Member
  • ***
  • Offline Offline
  • Posts: 437
  • Last login:February 07, 2012, 08:03:39 am
Re: Cowboy Arcade - Back in the Saddle Again!
« Reply #40 on: March 11, 2010, 08:08:20 pm »
i like all those with the diffuser installed.
 :)

Ginsu Victim

  • Yeah, owning a MAME cab only leads to owning real ones. MAME just isn't good enough. It's a gateway drug.
  • Trade Count: (+10)
  • Full Member
  • ***
  • Offline Offline
  • Posts: 10093
  • Last login:May 08, 2023, 02:40:58 pm
  • Comanche, OK -- USA
Re: Cowboy Arcade - Back in the Saddle Again!
« Reply #41 on: March 11, 2010, 08:10:10 pm »
Really hard to tell how lighted pushbuttons look when viewing a photo of them. Just go with what you like best.

rablack97

  • Trade Count: (+3)
  • Full Member
  • ***
  • Offline Offline
  • Posts: 2215
  • Last login:May 11, 2022, 06:50:10 pm
  • If you don't try, you have no chance at innovation
Re: Cowboy Arcade - Back in the Saddle Again!
« Reply #42 on: March 11, 2010, 10:15:48 pm »
First of all excellent work so far.  This is gonna be one of the Hall of Famers, just on technique alone.

I like the non-diffused, the others look like headlights, the non-diffused look more natural from the photo.

Seriously its gonna be whats pleasing to your eye though, pics arent the same as the real thing......

TEKNYNE

  • Guest
  • Trade Count: (0)
Re: Cowboy Arcade - Back in the Saddle Again!
« Reply #43 on: March 11, 2010, 10:49:43 pm »
I like the wide angle diffuser. light the whole button not just the center, Awesome cab by the way!

drventure

  • Trade Count: (+2)
  • Full Member
  • ***
  • Offline Offline
  • Posts: 4152
  • Last login:June 25, 2023, 02:23:57 pm
  • Laser Death Ray Bargain Bin! Make me an offer!
Re: Cowboy Arcade - Back in the Saddle Again!
« Reply #44 on: March 11, 2010, 11:46:44 pm »
I guess I'm not a huge fan of those all lit up buttons (I'm a tad partial to Ond, or was it Francos? ring lit buttons) , but I'd say with the diffuser looks best between those, definitely.

rablack97

  • Trade Count: (+3)
  • Full Member
  • ***
  • Offline Offline
  • Posts: 2215
  • Last login:May 11, 2022, 06:50:10 pm
  • If you don't try, you have no chance at innovation
Re: Cowboy Arcade - Back in the Saddle Again!
« Reply #45 on: March 12, 2010, 06:31:57 am »
It was Ond's, but he put some time into making those puppies.  Although the finished output was nice.  I guess it depends on if he wants a bold look or a warm glow (ie. Ond).

t3design

  • Trade Count: (+1)
  • Full Member
  • ***
  • Offline Offline
  • Posts: 219
  • Last login:January 13, 2024, 07:19:01 pm
  • Orange Power! Go Pokes!
    • Cowboy Arcade Project
Re: Cowboy Arcade - Back in the Saddle Again!
« Reply #46 on: March 12, 2010, 07:36:00 am »
I went and look at Ond's and Franco's various ring lighting techniques. Wow.

So I am thinking, I may have to change some things.....
Cowboy Arcade Project ThreadCowboy Arcade Project Website
If you are an obsessive/compulsive pyromaniac, you better make sure you wear flame retardant pajamas.

Santoro

  • Purveyor of Shiny Arcade Goodness
  • Santoro
  • Trade Count: (+32)
  • Full Member
  • *
  • Offline Offline
  • Posts: 3051
  • Last login:December 23, 2023, 07:05:04 pm
  • Boycott Quarters!!!
    • ArcadeReplay!
Re: Cowboy Arcade - Back in the Saddle Again!
« Reply #47 on: March 23, 2010, 05:54:15 pm »
Looks good!

You need better tokens though :)

t3design

  • Trade Count: (+1)
  • Full Member
  • ***
  • Offline Offline
  • Posts: 219
  • Last login:January 13, 2024, 07:19:01 pm
  • Orange Power! Go Pokes!
    • Cowboy Arcade Project
Cowboy Arcade - .055555555555556
« Reply #48 on: April 02, 2010, 04:07:39 pm »
That would be 1/18th Which happens to be the scale of the model I just got of the Cowboy Cab!

Justin Whitlock makes scale models of classic arcade cabs and when I contacted him about a custom he was very happy to oblige. So, I sent him drawings and art and more drawings (all to 1/18th scale already) and this was his reply:

     "OK, that's the best info I've gotten for a custom request yet, thanks!"

It took him a little while to complete the model and apparently he had some basement flooding problems which sidetracked his whole operation for awhile, but today he sent me this pic and my model cab is in the mail!


Now if I could just make some progress on the real thing  :-[
Cowboy Arcade Project ThreadCowboy Arcade Project Website
If you are an obsessive/compulsive pyromaniac, you better make sure you wear flame retardant pajamas.

t3design

  • Trade Count: (+1)
  • Full Member
  • ***
  • Offline Offline
  • Posts: 219
  • Last login:January 13, 2024, 07:19:01 pm
  • Orange Power! Go Pokes!
    • Cowboy Arcade Project
Updated! Project back on track!
« Reply #49 on: September 03, 2011, 02:32:38 pm »
This project has taken way too long (though not nearly as long as Mission Control...) but I am finally back on track and making good progress. I'm going to play catch-up by copying my blog entries into one long post and then keep updating as we go.

COIN DOOR REVISION (Aug 14)

I managed to get a coin door from an original Atari Tempest cab. Actually, I now have several of the same model of coin door, but one of them I know for a fact came out of a Tempest machine. I took that door, cleaned it up and had it powder coated to look original. Then I cleaned up the backplate and coin mech parts and put it all back together. One of the other doors I found had orange coin return buttons, so I cleaned those up and installed my own graphics. Apply 12V and:
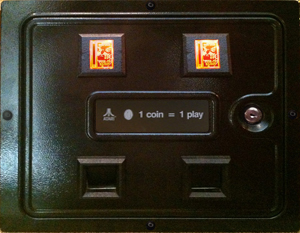


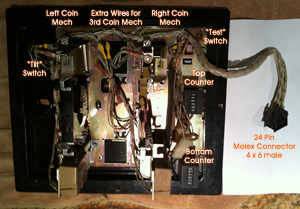
I'm very happy with it! I do not want to alter the wiring or hardware (love that I will be able to say it is an original Tempest coin door) so I needed to figure out the pinouts on the 24 pin Molex (4x6) connector. Using a multimeter I was able to pretty quickly determine:

1. Center Coin Switch
3. Right Coin Switch
3. Left Coin Switch
4. Reset ON & Momentary Switch
5. “Tilt” Switch
6. Switch Common (All Coin, Reset, Tilt)
7. Solenoid Common
8. Center Solenoid
9. Right Solenoid
10. Left Solenoid
11. Extra Counter A1
12. Extra Counter A2
13. Top Counter 1 (apply 6VDC either way to increment)
14. Top Counter 2
15. Bottom Counter 1 (apply 6VDC either way to increment)
16. Bottom Couter 2
17. Extra Counter B1
18. Extra Counter B2
19. Coin Return Lights Power (12VDC)
20. Coin Return Lights GND
21. Not Used
22. Not Used
23. Chassis GND
24. Chassis GND


Currently I am using 12VDC incandescent bulbs that I bought at the auto parts store.
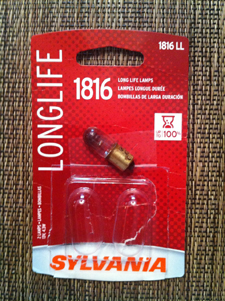


I have ordered LED bulbs that are packaged in a T3.25 Bayonet base. Both are orange, one is a dome covered package and the other is open. I will try them both and post the results of the comparison.

I will be using the "Test" switch as my free-play switch.

LONG TIME COMIN' (Aug 15)

After too long. Way too long. We are finally back on track. Let me recap...

February 2009: For my 45th birthday BFG offers to buy me a Tempest cab or pay for the components to build my own. I choose the "build your own" option and start on the journey.

January 2010: After almost a year of planning and acquiring parts we found out that a friend of mine had a full size CNC router table. I updated the plans to take advantage of this and have everything dado'd into the sides. Unfortunately, after another year plus we still hadn't been able to get aforementioned 'friend' to cut a single piece of wood.

August 2011: The cabinet guy that does work for my company turns out to have a full size CNC router table! Not wanting to get my hopes up, I sent him the plans and crossed my fingers.

Today I met with him for an hour to discuss details. He called this morning to tell me he had cut the sides and CP out of scrap material to test and wanted me to come see them! I almost wet myself.
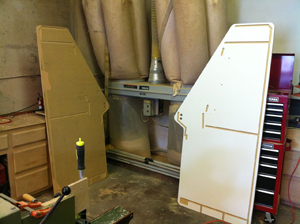
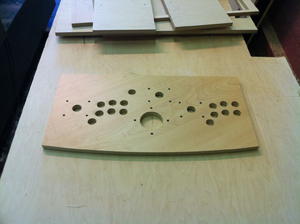


In addition to being able (and willing and ready) to cut the big pieces that I designed to be CNC routed, Bryce (that's his name) is also going to cut the rest of the parts and has offered several helpful ideas to make the assembly go smoother.

We are going to get this thing built!!!!

SOMETHING OLD, SOMETHING NEW... (Aug 26)

I got a hold of an original Tempest Control Panel with all the original controls in it. That's right, an original Tempest spinner and two Atari "volcano" buttons. Sweet! I already have a TurboTwist 2 from GGG, but I started thinking that it would be really cool to have the Tempest spinner in my cab. My first question was if the Tempest spinner would be a good controller for a MAME application. I posted on the BYOAC board and got a reply from RandyT (owner/operator of GGG):
Quote
For Tempest, the original control will be great.  But, if you plan to  play games which used a dial (potentiometer) based control, or games  which require high resolution, like Arkanoid, you will no longer have  the optimal resolution for accurate gameplay.
Of course, I would expect him to be biased toward his spinner, but I already bought one of his so it isn't like he is losing a sale if I go with the Tempest spinner. I still haven't decided, and in fact would like to be able to test both, so.....

First I took the spinner apart and Steve made a longer shaft so it would mount under my 3/4" CP instead of the thin metal CP of the Tempest cab.
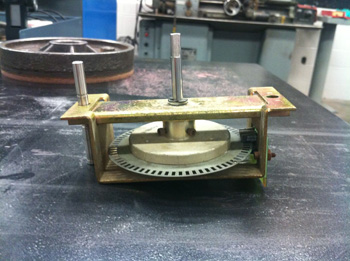


The old shaft is resting in the left mounting hole. The new shaft is assembled in the spinner. A little lube and she spins like new!

Second, I redesigned the CP to accommodate the Tempest spinner. This meant moving some things, which meant redesigning the CP Overlay, which if I was going to do meant I could fix whatever, so....

I added the volcano buttons as P1 and P2 button onto the CP. Worried that some day they might break and not be replaceable, I designed an insert for a standard button hole to mount the smaller volcano buttons in. If they ever go bad and can't be fixed or replaced I can pull out the insert and replace with a standard button.
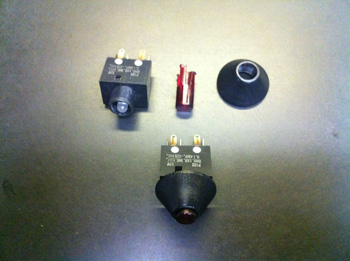


Additionally, since my cab is orange and black, I didn't really want red lens in the buttons. This is a problem as they have not been made for a long time and they were never made clear or orange, just black and red. A lot of searching and reading on the BYOAC board led me to <a href="http://www.flickr.com/photos/sky-lab/sets/72157603642874378/">this guy</a> who was casting his own replacement lens for the same buttons. I contacted him and he is making me a set of lens for my buttons!

Finally I had to adjust my CP Overlay to accommodate the parts movement and additions. During that process I dropped the numbers for P1 and P2 and created neon Atari player people like were on the early Atari games (including Tempest!) and the result is:
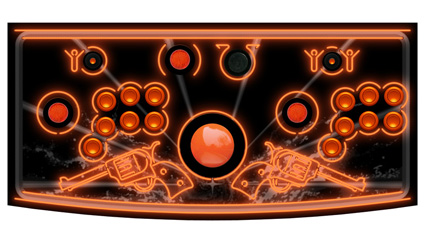


I like this version a LOT! Now I can mount either the TurboTwist 2 or the Tempest spinner and see how I like them in real game play. I get the original Atari cone buttons and P1 and P2 and I get the little Atari guys and all it cost me was about $90 for the original control panel, a few hours in the shop to make a new shaft and mounts for the volcano buttons, several hours redoing the CP Overlay art and the $ to reprint it. I'd say that's a bargain at twice the price :)

9 LIGHTS (Aug 26)

Actually the correct term is lamp. Some people call them bulbs, but that actually only refers to the glass globe that protects the filament from the rapid oxidation of the air. Of course, LEDs don't oxidize and so are often packaged very differently.

I ordered and tested 9 different lamps to light the coin return button in the coin door.
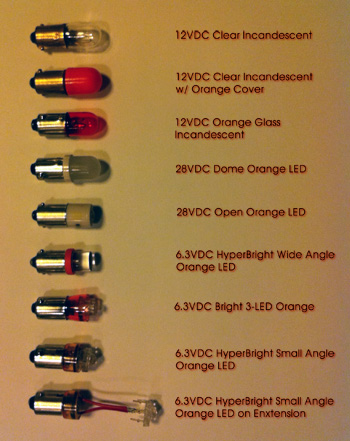


Frankly, the one I like best is the 12VDC Orange Glass Incandescent. The LEDs are not as bright and don't really create as much color as the "standard" lamp. I can see how the reduction of heat output and the longer life would be tempting, but I am going for look and feel here and I like the way the old school lamps look and feel.

Anybody need 2 each of 6 different LED lamps?

ORANGE BUTTONY GOODNESS (Sep 1)

Sean, the guy I told you about, sent me a pic of the test casting of my new Atari 'volcano' button lenses.
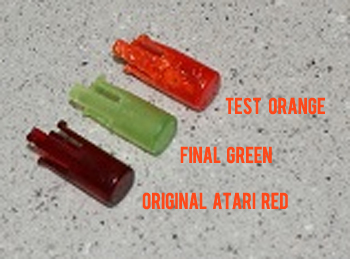


The bottom button is an original Atari red lens. The middle one is a finished lens in green that he had already made, and the top one is a test cast in orange. The final cast will be done in his pressure chamber to remove the bubbles so it looks like the green one (only orange)!

Thought it might be a good idea to test the switches I have, so I had Ky, one of our electrical engineers, put them on a meter and verify that the contacts work (I'm a mechanical engineer and electricity scares me...). Then Ky hooked up 5VDC to test the LEDs and surprise, surprise, surprise...they are RED.
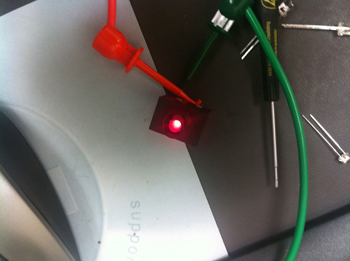


I don't know why I didn't think about that. Red lenses means they could have used white LEDs, however, Ky reminded me that white LEDs were not available in the late 1970's. So, a red LED is going to make my orange lens look red. No good.

So, Ky swapped out the LEDs for new ORANGE ones! Not an easy task as the switch is held together with brads and we didn't want to try to take it apart. Ky ended up chopping up the old LED from the top until he could clip out the remaining leads. Then it was fairly simple (for him!) to solder in new orange LED goodness.
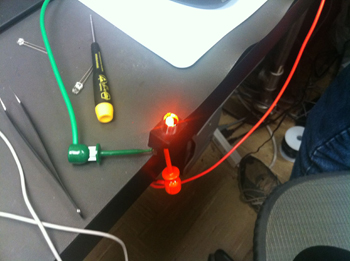


They are brighter at a lower current draw too. If I want them dimmer I can always increase the value of the resistor.

Meanwhile, Steve is machining the holders for these buttons. Here is the drawing in the shop of the part:
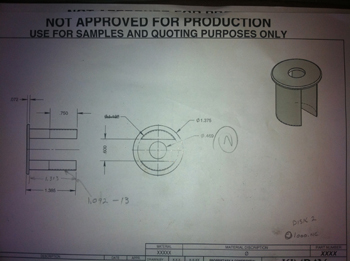


and here it is on the lathe being machined:
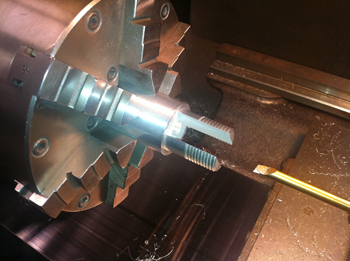


Steve machined the threads onto both ends of a piece of aluminum stock, then put it in the EDM machine and cut out the large slot for the switch housing to go into, then back into the lathe to bore the hole for the switch to stick through and then part it off. After it is cleaned up and polished it will go to the platers to be hard anodized black.

Also, tomorrow I go to Reid Cabinetry to cut the cabinet parts out!!!

Woot!

SHINY = GOOD (Sep 2)

Button mounts are finished and ready to go to the platers:

Mounts without switches in them....
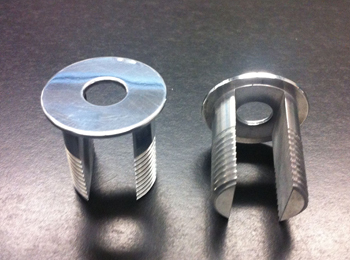


Mounts with switches installed...
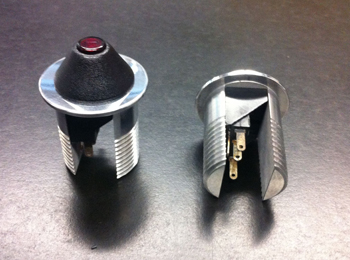


They will be hard anodized black before they are completely finished.

THE FIRST CUT IS THE DEEPEST (Sep 1)

Went to Reid Cabinetry today and cut some wood! We were a little short on time so we only cut one side and some of the internal pieces, but it was a blast getting things going.

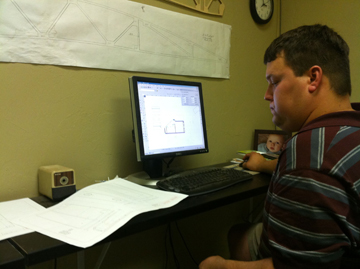
All my drawings are in PowerCADD, so I export DXF files and send them to one of my engineers. Dustin opens the files in AutoCADD and removes all the elements that are not related to a cutting path and makes sure all the lines connect and the path is continuous. He then saves the cleaned up drawing as a DXF. We send that file to Bryce and he imports it into his software to generate cutting paths and tool id info for the router table.

First we verified that we were cutting the right parts from the right material in the right orientation:


Then with the program sent to the router table we placed the material (5/8 birch ply laminated on the inside with black formica) on the table:
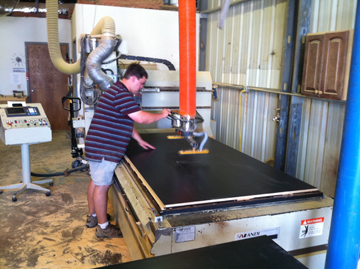


After Bryce set the tool depth and rechecked everything he pushed the button and the cutting started:
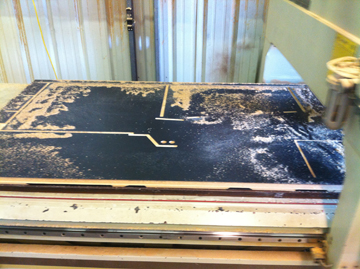


Once all the cutting was done you could see the various pieces still held in place by the vacuum:
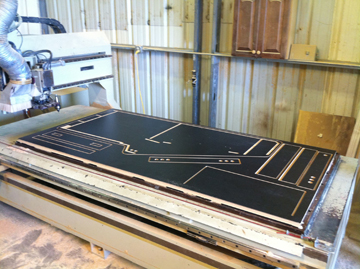


Then we separated everything and we could look at one side finished and ready to be assembled:
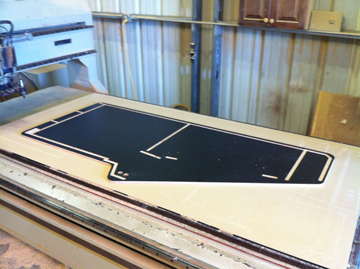


We are using angled cutters to cut the beveled edges of the pieces for below the CP and for the marquee light box. The edge is perfect and once we join the pieces together the finish and fit should be fantastic.

It was a great day for yummy arcade goodness! Stay tuned....

« Last Edit: September 03, 2011, 03:12:56 pm by t3design »
Cowboy Arcade Project ThreadCowboy Arcade Project Website
If you are an obsessive/compulsive pyromaniac, you better make sure you wear flame retardant pajamas.

mgb

  • Trade Count: (0)
  • Full Member
  • ***
  • Offline Offline
  • Posts: 3499
  • Last login:February 21, 2024, 06:18:13 pm
  • North East, US
Re: Cowboy Arcade - Brand new updates!
« Reply #50 on: September 03, 2011, 06:32:56 pm »
I like that panel layout. the buttons have a real nice flow to them.
progress is looking great.

t3design

  • Trade Count: (+1)
  • Full Member
  • ***
  • Offline Offline
  • Posts: 219
  • Last login:January 13, 2024, 07:19:01 pm
  • Orange Power! Go Pokes!
    • Cowboy Arcade Project
Re: Cowboy Arcade - Brand new updates!
« Reply #51 on: September 03, 2011, 09:04:29 pm »
Thanks mgb. I have followed your Vertical Retrace project. That's a great look you have going there too.
Cowboy Arcade Project ThreadCowboy Arcade Project Website
If you are an obsessive/compulsive pyromaniac, you better make sure you wear flame retardant pajamas.

mgb

  • Trade Count: (0)
  • Full Member
  • ***
  • Offline Offline
  • Posts: 3499
  • Last login:February 21, 2024, 06:18:13 pm
  • North East, US
Re: Cowboy Arcade - Brand new updates!
« Reply #52 on: September 03, 2011, 10:08:18 pm »
thanks, projects like yours have definitely been very influential.

t3design

  • Trade Count: (+1)
  • Full Member
  • ***
  • Offline Offline
  • Posts: 219
  • Last login:January 13, 2024, 07:19:01 pm
  • Orange Power! Go Pokes!
    • Cowboy Arcade Project
Re: Cowboy Arcade - Go Pokes!
« Reply #53 on: September 10, 2011, 02:05:32 pm »
Today is the start of football season. While I am not a really big sports fan per se, I am a HUGE Oklahoma State Cowboy's fan. So, in celebration of tonight's kickoff (I'll be there of course) I'm giving you a sneak peak at a possible front end skin for the Cowboy Arcade...


The large area in the lower left will be the list you can scroll through and the small area in the lower right will be game specific instructions.
« Last Edit: September 10, 2011, 02:07:03 pm by t3design »
Cowboy Arcade Project ThreadCowboy Arcade Project Website
If you are an obsessive/compulsive pyromaniac, you better make sure you wear flame retardant pajamas.

t3design

  • Trade Count: (+1)
  • Full Member
  • ***
  • Offline Offline
  • Posts: 219
  • Last login:January 13, 2024, 07:19:01 pm
  • Orange Power! Go Pokes!
    • Cowboy Arcade Project
Re: Cowboy Arcade - Spinning and Winning
« Reply #54 on: September 10, 2011, 02:10:43 pm »
I have to admit that I have as much fun doing the detailed planning and making the parts for this MAME cab as anything.

Finished up the spinner today. The frame is powder coated black. The aluminum flywheel and flywheel cap are anodized orange. All the cap screws have been replaced with stainless steel. The copper encoder wheel is polished. The bushings have been replaced with new ones from Arcade Shop and I was pleasantly surprised when they came in and were dark grey instead of baby blue like they showed on the web site! We machined a new shaft (longer) to accomodate the wood control panel. The circuit board was cleaned, checked for operation and coated, and finally we drilled and tapped holes to mount the Opti-Wiz. All that is left to do is solder the wires from the spinner output to the Opti-Wiz and plug it in...


I also got the P1 and P2 button housings back from the platers...


Also, we are cutting more parts for the cabinet today!

Finally, my OSU Cowboys are 2-0 after a complete blowout against Arizona last night. My wife and I were honored to be invited to sit in President Burns Hargis' suite for the game...


That's my wife enjoying the game. I have to admit that is does not suck to sit in a suite on the 50 yd line! GO POKES!
Cowboy Arcade Project ThreadCowboy Arcade Project Website
If you are an obsessive/compulsive pyromaniac, you better make sure you wear flame retardant pajamas.

t3design

  • Trade Count: (+1)
  • Full Member
  • ***
  • Offline Offline
  • Posts: 219
  • Last login:January 13, 2024, 07:19:01 pm
  • Orange Power! Go Pokes!
    • Cowboy Arcade Project
Re: Cowboy Arcade - Cuts like a knife
« Reply #55 on: September 10, 2011, 02:12:46 pm »
Got some more work done at Reid's this afternoon. Cut the second side and the top of the cab...


We also cut the control panel. This required cutting the through holes and routing out for the T-nuts from the top side and at the same time cutting out a hole in the material the exact same size as the control panel. Then we flipped the control panel over and put it in the other hole and routed out the spaces for the joysticks and the trackball on the underside. This ensures that the routing on both side matches up.


So I get the CP home and start fitting things into it and low and behold the joysticks will not fit into the recesses on the underside. I'm not really sure where I messed up. I thought I had measured the actual joystick bases, and I probably did, but I do not remember if I used those measurements on the CP layout. They are not off by much, but it is enough they won't go in. So we will have to cut another CP.
Cowboy Arcade Project ThreadCowboy Arcade Project Website
If you are an obsessive/compulsive pyromaniac, you better make sure you wear flame retardant pajamas.

t3design

  • Trade Count: (+1)
  • Full Member
  • ***
  • Offline Offline
  • Posts: 219
  • Last login:January 13, 2024, 07:19:01 pm
  • Orange Power! Go Pokes!
    • Cowboy Arcade Project
Re: Cowboy Arcade - Salvation is at Hand!
« Reply #56 on: September 10, 2011, 02:14:24 pm »
I woke up this morning thinking, "I know how to fix this." And by "this" I mean the problem of the joystick bases not fitting in the recesses that we cut in the control panel.

About an hour later and after some creative use of a box knife, a wood chisel and a straight edge....we are good to go.

Here is the Control Panel before the T-Nuts were installed:


Then I went ahead and installed everything to make sure it all fits and nothing interferes with anything else....


I am really happy with the way it looks and feels. I think it will be very playable.


Here it is with the overlay photoshopped in...


Next step is to laminate the CP and install the overlay then start wiring everything up. Oh Boy! This is going to be great!
« Last Edit: September 10, 2011, 04:27:43 pm by t3design »
Cowboy Arcade Project ThreadCowboy Arcade Project Website
If you are an obsessive/compulsive pyromaniac, you better make sure you wear flame retardant pajamas.

yotsuya

  • Trade Count: (+21)
  • Full Member
  • ***
  • Offline Offline
  • Posts: 19955
  • Last login:Today at 12:52:01 am
  • 2014 UCA Winner, 2014, 2015, 2016 ZapCon Winner
    • forum.arcadecontrols.com/index.php/topic,137636.msg1420628.html
Re: Cowboy Arcade - Brand new updates!
« Reply #57 on: September 10, 2011, 02:19:20 pm »
A) Congrats on beating the crap out of Arizona. As an Arizona State grad, nothing makes me happier.

B) I LOVE the volcano button holders! I would absolutely buy something like that if they were available!

Edit: Inspired by your button holders, I'm going to try and fashion the same thing out of those button plugs you can buy to cover up holes in your control panel. It's pretty much the same concept, just not as nice materials.  :cheers:
« Last Edit: September 10, 2011, 02:43:14 pm by yotsuya »
***Build what you dig, bro. Build what you dig.***

swaffar

  • Trade Count: (0)
  • Full Member
  • ***
  • Offline Offline
  • Posts: 216
  • Last login:February 21, 2016, 03:34:15 pm
Re: Cowboy Arcade - Brand new updates!
« Reply #58 on: September 10, 2011, 05:54:06 pm »
Great work!  Can you please post a higher res pic of that control panel with the art?  I love it!
My projects:
 

t3design

  • Trade Count: (+1)
  • Full Member
  • ***
  • Offline Offline
  • Posts: 219
  • Last login:January 13, 2024, 07:19:01 pm
  • Orange Power! Go Pokes!
    • Cowboy Arcade Project
Re: Cowboy Arcade - Higher Res Pic
« Reply #59 on: September 10, 2011, 05:57:54 pm »
Great work!  Can you please post a higher res pic of that control panel with the art?  I love it!

Here ya go....
« Last Edit: September 10, 2011, 06:01:40 pm by t3design »
Cowboy Arcade Project ThreadCowboy Arcade Project Website
If you are an obsessive/compulsive pyromaniac, you better make sure you wear flame retardant pajamas.

drventure

  • Trade Count: (+2)
  • Full Member
  • ***
  • Offline Offline
  • Posts: 4152
  • Last login:June 25, 2023, 02:23:57 pm
  • Laser Death Ray Bargain Bin! Make me an offer!
Re: Cowboy Arcade - Brand new updates!
« Reply #60 on: September 10, 2011, 08:49:58 pm »
Damn, that spinner needs to be on the OUTSIDE of the cab, not hidden away inside.

Nice work!

t3design

  • Trade Count: (+1)
  • Full Member
  • ***
  • Offline Offline
  • Posts: 219
  • Last login:January 13, 2024, 07:19:01 pm
  • Orange Power! Go Pokes!
    • Cowboy Arcade Project
Re: Cowboy Arcade - Brand new updates!
« Reply #61 on: September 11, 2011, 12:06:58 am »
Damn, that spinner needs to be on the OUTSIDE of the cab, not hidden away inside.

Nice work!

Right. Yes.

So I am willing to admit that I am OCD about this. (ok, about everything). However, I have to say I have always felt very much at home around this group...

I will know it is in there. I will know what it looks like and what I did to make it that way. I will love playing Tempest on a Tempest spinner. By posting here a few others will know and, like you, actually appreciate it. That is enough for me.

Thanks

T3
Cowboy Arcade Project ThreadCowboy Arcade Project Website
If you are an obsessive/compulsive pyromaniac, you better make sure you wear flame retardant pajamas.

t3design

  • Trade Count: (+1)
  • Full Member
  • ***
  • Offline Offline
  • Posts: 219
  • Last login:January 13, 2024, 07:19:01 pm
  • Orange Power! Go Pokes!
    • Cowboy Arcade Project
Re: Cowboy Arcade - Brand new updates!
« Reply #62 on: October 14, 2011, 10:34:38 pm »
A little more progress has been made. We had a little set back in terms of time to work on the cabinet, but got back to it this past week. Got the rest of the internal parts cut out and are almost ready to glue the thing up.


Here is the base fitted together (upside down of course)


And...

Today I got the custom vinyl letters I had Troy Robinson make for me.


Since I can't get AimTrak guns in orange I decided I would accent my guns. They will go nicely with my cabinet theme.
« Last Edit: October 14, 2011, 10:36:24 pm by t3design »
Cowboy Arcade Project ThreadCowboy Arcade Project Website
If you are an obsessive/compulsive pyromaniac, you better make sure you wear flame retardant pajamas.

fallacy

  • Trade Count: (0)
  • Full Member
  • ***
  • Offline Offline
  • Posts: 966
  • Last login:March 23, 2024, 12:27:45 am
Re: Cowboy Arcade - Brand new updates!
« Reply #63 on: October 15, 2011, 01:24:45 pm »
t3design Do you releaize you started this thread\project 2 and a half years ago?

t3design

  • Trade Count: (+1)
  • Full Member
  • ***
  • Offline Offline
  • Posts: 219
  • Last login:January 13, 2024, 07:19:01 pm
  • Orange Power! Go Pokes!
    • Cowboy Arcade Project
Re: Cowboy Arcade - Brand new updates!
« Reply #64 on: October 15, 2011, 02:08:10 pm »
t3design Do you releaize you started this thread\project 2 and a half years ago?

Unfortunately, I do.

I have had a lot of fun so far, in spite of the apparent lack of real progress. Behind the scenes have been countless hours of planning, designing, drawing and manufacturing parts and pieces. The decision to design for manufacture on a CNC table router threw a real kink in things as the guy who was supposed to do the routing strung me along for almost a year and a half. That was not time totally wasted as I did a lot of planning and got many things ready during that time.

We should get the cabinet built very soon and then things will move faster after that.

I'm sure that I am not the only one on this forum that has more to do most days than could be done in several. I've got six kids at home, a full time job as president of a medium-large manufacturing company (750 employees), sit on several boards and am very active in my kid's school's. Not complaining mind you, I have just had to acknowledge that this hobby gets a small portion of my time each month and I have to be happy with that. However, the cool thing is that my kids have participated in the design and construction and we have had a lot of fun together on this project.

I am forever grateful to those on this forum who have gone down this road before me. I read about a million posts in other's project threads and learned a lot of things to do and not do before I ever put pencil to paper (figuratively of course). I am sure that the information I got here saved me from mistakes that would have cost me many hours.

I still plan to finish is less time than pixelhugger....

 
Cowboy Arcade Project ThreadCowboy Arcade Project Website
If you are an obsessive/compulsive pyromaniac, you better make sure you wear flame retardant pajamas.

Nephasth

  • Guest
  • Trade Count: (0)
Re: Cowboy Arcade - Brand new updates!
« Reply #65 on: October 15, 2011, 02:21:50 pm »
I still plan to finish is less time than pixelhugger....

So did pixelhugger. :lol

Looking good! Designing and planning are probably my favorite parts of a build. Looking forward to seeing yours come together! :cheers:

martoon x

  • Trade Count: (0)
  • Full Member
  • ***
  • Offline Offline
  • Posts: 52
  • Last login:December 05, 2011, 09:01:49 pm
    • Defender Project
Re: Cowboy Arcade - Brand new updates!
« Reply #66 on: October 15, 2011, 02:41:05 pm »
can't get to your site or see your pictures. so I googled cowboyarcadeproject to see some cached images. From what i can se, your project looks epic!

t3design

  • Trade Count: (+1)
  • Full Member
  • ***
  • Offline Offline
  • Posts: 219
  • Last login:January 13, 2024, 07:19:01 pm
  • Orange Power! Go Pokes!
    • Cowboy Arcade Project
Re: Cowboy Arcade - Brand new updates!
« Reply #67 on: October 15, 2011, 02:45:16 pm »
I host all my personal sites and storage on secondary servers and my company and for some reason we can't get any of the DNS services to work today (or yesterday for that matter) so we are down right now.

Thanks!
Cowboy Arcade Project ThreadCowboy Arcade Project Website
If you are an obsessive/compulsive pyromaniac, you better make sure you wear flame retardant pajamas.

drventure

  • Trade Count: (+2)
  • Full Member
  • ***
  • Offline Offline
  • Posts: 4152
  • Last login:June 25, 2023, 02:23:57 pm
  • Laser Death Ray Bargain Bin! Make me an offer!
Re: Cowboy Arcade - Brand new updates!
« Reply #68 on: October 15, 2011, 03:20:23 pm »
2.5 year old incomplete build thread?

Bah, back in +MY+ day, we worked on a cab for 20 years with a whittlin' knife and a hot stick to solder with, and we liked it!

Seriously, though, glad to see it's still progressing!


t3design

  • Trade Count: (+1)
  • Full Member
  • ***
  • Offline Offline
  • Posts: 219
  • Last login:January 13, 2024, 07:19:01 pm
  • Orange Power! Go Pokes!
    • Cowboy Arcade Project
Re: Cowboy Arcade - Brand new updates!
« Reply #69 on: October 15, 2011, 04:52:15 pm »
can't get to your site or see your pictures. so I googled cowboyarcadeproject to see some cached images. From what i can se, your project looks epic!

My servers are back up. Pics should load now.
Cowboy Arcade Project ThreadCowboy Arcade Project Website
If you are an obsessive/compulsive pyromaniac, you better make sure you wear flame retardant pajamas.

t3design

  • Trade Count: (+1)
  • Full Member
  • ***
  • Offline Offline
  • Posts: 219
  • Last login:January 13, 2024, 07:19:01 pm
  • Orange Power! Go Pokes!
    • Cowboy Arcade Project
Re: Cowboy Arcade - Brand new updates!
« Reply #70 on: November 16, 2011, 12:56:09 am »
Worked for about 4 hours on the cabinet at Bryce's shop today! We are getting very close.

Here is the back of the marquee box glued up:


Then the whole marquee box together and fitted into a side:


Since the router bit used to cut the dado grooves won't cut a sharp corner we have to round off the corners of the parts going into the side dados. We used a laminate trimming router with a plunge bit set exactly as deep as the dados and then rounded off the corners where necessary. Once the part is fitted the sharp corners are flush against the inside surface of the side and look very neat.

Here is the base being glued up:


We used biscuits to make sure the pieces lined up exactly and are using an epoxy glue that takes a few hours to set. It is a void filling glue and has several times the strength of carpenters glue.

Here is the base with the joists ready to go in:


And here is the completed base with the cement for the laminate on it:


Here is the front panel (the part under the CP) glue together:


Here are the door and the "monitor shelf" (the monitor doesn't sit there...)


And here are a couple pics of the parts fitted into one or the other side:


Tomorrow we are going to glue the thing together! Stay tuned for pics of the complete cabinet.
Cowboy Arcade Project ThreadCowboy Arcade Project Website
If you are an obsessive/compulsive pyromaniac, you better make sure you wear flame retardant pajamas.

t3design

  • Trade Count: (+1)
  • Full Member
  • ***
  • Offline Offline
  • Posts: 219
  • Last login:January 13, 2024, 07:19:01 pm
  • Orange Power! Go Pokes!
    • Cowboy Arcade Project
Re: Cowboy Arcade - Brand new updates!
« Reply #71 on: November 17, 2011, 01:54:11 pm »
Well, last night we glued up the Cowboy Arcade cabinet! It went really well and all the planning and care taken to this point paid off in a great final assembly.

We had already test fit each part in each side, so we knew the thing could go together. With a side laying on the table of the router (flat, sturdy, big surface) we put epoxy glue in all the dado grooves that would be receiving parts. Then we put the parts in that side making sure each part was completely seated and correctly positioned. Then we put glue into the same slots on the other side and lifted it onto the assembly. Starting at the top of the cabinet we worked each component into place (sometime with a little help from a rubber mallet) until the whole side was seated over the ends of the components. We then used an air nailer and clamps to secure the side while the glue dried.


For the door, we used Bryce's edge bander to put a black PVC edging on the door before laminating the front.


Then we test fitted the CP and admin panel to get an idea of what everything will look like!


We got the CP laminated and the hinges on the door before we quit last night but I didn't get any pictures.

Tomorrow we will glue in the side pieces for the the back to attach to and make sure everything is complete and then it comes home!
« Last Edit: November 17, 2011, 01:56:32 pm by t3design »
Cowboy Arcade Project ThreadCowboy Arcade Project Website
If you are an obsessive/compulsive pyromaniac, you better make sure you wear flame retardant pajamas.

Le Chuck

  • Saint, make a poll!
  • Wiki Contributor
  • Trade Count: (+6)
  • Full Member
  • ***
  • Offline Offline
  • Posts: 5509
  • Last login:April 14, 2024, 06:01:28 pm
  • <insert personal text here>
Re: Cowboy Arcade - Brand new updates!
« Reply #72 on: November 17, 2011, 03:14:18 pm »
It is amazing what you can do with the right tools.  You're able to take the idea and make a professional reality.  I will be glued to this thread as you complete.  Awesome job. 

t3design

  • Trade Count: (+1)
  • Full Member
  • ***
  • Offline Offline
  • Posts: 219
  • Last login:January 13, 2024, 07:19:01 pm
  • Orange Power! Go Pokes!
    • Cowboy Arcade Project
Re: Cowboy Arcade - Brand new updates!
« Reply #73 on: November 20, 2011, 06:44:13 pm »
You Can Judge A Cab by It's Cover

The box is finished. Just 3 months shy of 3 years from inception and we finally have a cabinet to start putting things on and in!


Woot!

It's Not An Arcade Machine Without a Coin Door…

Even though it is getting ahead of what needs to be done I couldn't resist putting in the coin door.


My Arcade Name Up In Lights!

Got the lights and marquee installed! The upper part of the cabinet forms a box (which I call the marquee box...) that houses the lights, reflector, diffuser and marquee. The reflector is fabricated from a florescent light fixture reflector that I hacked into pieces and then pop riveted together to make a cut-down reflector. The reflector fits into grooves routed from side to side in the top and bottom of the marquee box:


Originally I had planned on mounting the led light bars on mounts attached to the box and then sliding the reflector into the box, turns out there is not a lot of room to work in there. So, I mounted the lights on the reflector itself.  Worked great...


During the design phase I was worried about the LED lights being to direct and being able to see bright spots. So, I cut a diffuser panel out of the diffuser from a florescent fixture and it slips into the same groove as the reflector and makes sure the light is even...


Then the marquee holders simply screw into the underside and top of the box, bent to match the angle of the marquee and powder coated black. Once the bottom holder is in place the marquee slips in and the top holder traps it.


I'm concerned about two things:

First, I ordered the marquee from MameMarquees and they did a great job, but the plexi they sent to sandwich it is too thin for my liking and I'm worried about it getting scratched. I think I'm going to get a piece of 0.25 tempered glass for the outside piece so I can clean it with glass cleaner and keep it nice and shiny.

Second, when I designed the art I did not really know how backlit film would handle the effect I was going for. Turns out that the B&W original Tempest art in the background "allows" light to pass through and washes out the orange. I am going to have to reduce the level of the background and saturate the orange neon to get it right.

Other than that I couldn't be happier!
Cowboy Arcade Project ThreadCowboy Arcade Project Website
If you are an obsessive/compulsive pyromaniac, you better make sure you wear flame retardant pajamas.

GingerTroll

  • Trade Count: (0)
  • Jr. Member
  • **
  • Offline Offline
  • Posts: 5
  • Last login:June 17, 2012, 02:26:45 am
Re: Cowboy Arcade - Brand new updates!
« Reply #74 on: November 22, 2011, 04:43:27 pm »
 Could you use a flourescent light cover to filter orange?  That would enhance your existing color and step down the brightness of a naked bulb.  http://www.wikihow.com/Add-Color-to-a-Fluorescent-Light

Vigo

  • the Scourage of Carpathia
  • Global Moderator
  • Trade Count: (+24)
  • Full Member
  • *****
  • Offline Offline
  • Posts: 6417
  • Last login:March 21, 2024, 08:20:28 am
Re: Cowboy Arcade - Brand new updates!
« Reply #75 on: November 22, 2011, 05:02:20 pm »
Nice!  :applaud: Your custom kickplate looks amazing on the cabinet. Wow!  :cheers:

t3design

  • Trade Count: (+1)
  • Full Member
  • ***
  • Offline Offline
  • Posts: 219
  • Last login:January 13, 2024, 07:19:01 pm
  • Orange Power! Go Pokes!
    • Cowboy Arcade Project
Re: Cowboy Arcade - Back Panels on
« Reply #76 on: November 22, 2011, 11:31:42 pm »
Well, from a picture standpoint, this is not much of an update. But from a work standpoint a lot has happened.

We are working hard to get all the drilling and painting and dust creating stuff done so we can move the Cowboy Arcade into the game room. As of this post, all the painting is done, the various mounts and misc things that had to be drilled, screwed in or glued are done. Also, the exterior plug has been wired to the interior outlet and the main power supply is in the cabinet.

Tonight we fitted the back pieces and then attached the lights to the power supply. We still need a strip of wood 3/4" wide and 1/8" thick to fit between the top and bottom backs. I left this off until now to make sure we had wiggle room. With the backs screwed in and the lights hooked up it looks like this:


Pushed against a wall with the room lights out:


So far I am very happy with the way things are coming together!
Cowboy Arcade Project ThreadCowboy Arcade Project Website
If you are an obsessive/compulsive pyromaniac, you better make sure you wear flame retardant pajamas.

t3design

  • Trade Count: (+1)
  • Full Member
  • ***
  • Offline Offline
  • Posts: 219
  • Last login:January 13, 2024, 07:19:01 pm
  • Orange Power! Go Pokes!
    • Cowboy Arcade Project
Re: Cowboy Arcade - Updated 12/1/2011
« Reply #77 on: December 01, 2011, 05:29:26 pm »
Well, as I told you in the last post, I was not too happy with the color of the marquee once everything was installed. I knew it needed darkened up, so I adjusted the art and resent it to GameOnGrafix. They got it done and sent to me in record time and I put the new version in and turned on the lights...

Still too washed out. Better, but not what I was looking for. Then it occurred to me that in all the button lighting tests I did, the white led's never looked very good (they washed out the orange too much), but orange led's looked great! So how to get orange led's in the marquee...or maybe, the led's don't need to be orange, just the light coming from them. I called a friend of mind who is in the sound and light business and asked if he had any orange film that they use to color stage lights. He did...


So I cut a piece of the film and taped it to the diffuser in the marquee box and installed everything back (including glass this time) and flipped the switch...


Beautiful!!!


And it looks good with room lights on too...


Onward and upward...
Cowboy Arcade Project ThreadCowboy Arcade Project Website
If you are an obsessive/compulsive pyromaniac, you better make sure you wear flame retardant pajamas.

t3design

  • Trade Count: (+1)
  • Full Member
  • ***
  • Offline Offline
  • Posts: 219
  • Last login:January 13, 2024, 07:19:01 pm
  • Orange Power! Go Pokes!
    • Cowboy Arcade Project
Re: Cowboy Arcade - Updated 12/1/2011
« Reply #78 on: December 01, 2011, 09:55:22 pm »
Well, no project gets done without some adjustments to the plan...

THE BAD NEWS:

Got the monitor out of storage to install in the cabinet (a Nieman Video 27″ Flat Tri-Mode CRT Display) and it will not fit in the mounting frame. I designed and built the frame from measurements I got off the specs for the monitor, but they are slightly off and there is no room for error.

THE GOOD NEWS:

After measuring several times (just to be sure) and overlaying the new dimensions on the drawing it appears that we can mill out some material and make everything work!


So, into the shop we go tomorrow to fix things and then back on track.
Cowboy Arcade Project ThreadCowboy Arcade Project Website
If you are an obsessive/compulsive pyromaniac, you better make sure you wear flame retardant pajamas.

t3design

  • Trade Count: (+1)
  • Full Member
  • ***
  • Offline Offline
  • Posts: 219
  • Last login:January 13, 2024, 07:19:01 pm
  • Orange Power! Go Pokes!
    • Cowboy Arcade Project
Re: Cowboy Arcade - Updated 12/1/2011
« Reply #79 on: December 07, 2011, 07:55:59 am »
Well, after several minor setbacks the monitor is installed and working! We milled the frame out to the dimensions necessary for the monitor and made some special nuts for the mounting bolts since the slots for the bolts were no longer slots but more like notches.

With the frame bolted into the cabinet we picked up the monitor and slid it into place. It fit perfectly and once bolted in is solid as a rock.


Of course, we had to go ahead and hook up the computer and get something up on the display. So we cobbled the pieces together and switched everything on and...

The monitor made a series of clicking noises accompanied by flashes on the screen and then nothing. Then it would repeat. Not what we were expecting. So I emailed Rick Nieman and described the problem I was having. (Remember that I bought this monitor almost two years ago.) I sent the email at 6:09 and he responded before 6:30. That my friends is customer service!

Turns out I just needed to set the display resolution of the computer correctly and all was well.


We have a LONG way to go, but it is so cool to see Donkey Kong (and Dig Dug, and Centipede, and Joust, and Tempest - the kids played games using the keyboard until I made them go to bed) on the monitor in MY arcade machine!
Cowboy Arcade Project ThreadCowboy Arcade Project Website
If you are an obsessive/compulsive pyromaniac, you better make sure you wear flame retardant pajamas.

warjunkie

  • Trade Count: (0)
  • Full Member
  • ***
  • Offline Offline
  • Posts: 16
  • Last login:August 01, 2013, 02:07:23 am
    • The Kingdom of Loathing
Re: Cowboy Arcade - Updated 12/7/2011 - Monitor In!
« Reply #80 on: June 30, 2012, 09:51:27 pm »
Hey t3design, loving your arcade, I can't believe this thread has been around for so long and I have never seen it.

Fantastic attention to detail. Any updates in the last 6 months?

t3design

  • Trade Count: (+1)
  • Full Member
  • ***
  • Offline Offline
  • Posts: 219
  • Last login:January 13, 2024, 07:19:01 pm
  • Orange Power! Go Pokes!
    • Cowboy Arcade Project
Re: Cowboy Arcade - Resurrection
« Reply #81 on: September 04, 2012, 11:16:50 pm »
Well, life is what happens while you're waiting to accomplish your plans. This has been a very difficult year and tons of things have happened and gotten done, but none of them had anything to do with the Arcade Project.


However, like a zombie, this thing has risen from the dead and is walking around again.


We pulled out all the stored parts and opened up the cabinet and started working on the permanent wiring. All the wiring will be held in wiring trays to keep the wires tidy and to separate power wiring (on one side of cabinet) from signal wiring (other side of cabinet). Today we cut the wiring tray material to length and got it installed:


Next up is to mount the DC power supply and finish the power wiring for all the lights. BFG has an IT guy trying to fix the computer configuration issues and we need to finish wiring in the coin door switches.

GOAL: fully playable before Christmas!
Cowboy Arcade Project ThreadCowboy Arcade Project Website
If you are an obsessive/compulsive pyromaniac, you better make sure you wear flame retardant pajamas.

t3design

  • Trade Count: (+1)
  • Full Member
  • ***
  • Offline Offline
  • Posts: 219
  • Last login:January 13, 2024, 07:19:01 pm
  • Orange Power! Go Pokes!
    • Cowboy Arcade Project
Re: Cowboy Arcade - Diggin It!
« Reply #82 on: September 04, 2012, 11:21:15 pm »
A little more progress! BFG came over to watch the OSU vs. Savannah State game (actually, he brought the wife and kids too). Since the game outcome was fairly obvious from about 4 minutes into the first quarter (84 - 0 final) we decided to try to fix some of the computer problems with the Cowboy Arcade.

He fired up the box and called a tech guy of his and after several alterations of files and startup stuff we were able to get the computer to boot up in the proper resolution and load MAME as default. Then we selected games and started messing around:


Playing Dig Dug using the keyboard.

That's right, keyboard. We still can't get MAME to recognize the inputs from the LEDWiz. The computer sees them in the configuration screens for a game controller, but they aren't making it into MAME....

That's the problem we will try to solve next.

Also got a little farther on wiring, installed power supply, and am working on wiring up the coin door stuff.
Cowboy Arcade Project ThreadCowboy Arcade Project Website
If you are an obsessive/compulsive pyromaniac, you better make sure you wear flame retardant pajamas.

t3design

  • Trade Count: (+1)
  • Full Member
  • ***
  • Offline Offline
  • Posts: 219
  • Last login:January 13, 2024, 07:19:01 pm
  • Orange Power! Go Pokes!
    • Cowboy Arcade Project
Re: Cowboy Arcade - Updated 9/12/2012
« Reply #83 on: September 12, 2012, 11:10:39 pm »
A little more progress! Got the overlay applied to the control panel this afternoon. Just to refresh your memory (since it's been over a year since the last time we talked about this) Scott Prior at Mame Marquees (www.gameongrafix.com) printed the CP Overlay for me (they are now Game On Grafix). I am very happy with the product, his service, and the way it held up rolled up in a tube for over a year before I applied it.

The trick was how to line up the artwork with the holes in the CP. We took a couple of extra buttons and cut the fingers that hold the micro switch off the bottom. Then we carefully indicated the center of the bottom of the button and drilled a hole with about the smallest drill in our drill set (and one we had two of).


Using a button housing nut to set the depth we inserted these into two button holes in the CP, one in the Player 1 group and one in the Player 2 group. We drilled the same hole in the CP overlay at the crosshairs for the same holes (we were smart enough to put crosshairs in the centers of ALL hole in the overlay art before having it printed). Then it was fairly easy to locate the holes in the button bases in the CP with a drill sticking through the holes in the overlay (a small finish nail would work too). Once everything was located properly we peeled back some of the backing on one side and adhered it (we had wiped everything down with alcohol first to make sure it was clean, oil free and dry) and then did the standard "pull the backing off while rubbing it down" move to adhere the rest. A wallpaper roller helped to make sure every inch was well stuck.

Using a click blade knife with a fresh (read sharp) tip we trimmed the edges even with the edges of the CP and carefully cut along the line between the CP and the T-molding on the front edge. Then it was just the effort to remount the controls and:


It looks fantastic in person too!
Cowboy Arcade Project ThreadCowboy Arcade Project Website
If you are an obsessive/compulsive pyromaniac, you better make sure you wear flame retardant pajamas.

mgb

  • Trade Count: (0)
  • Full Member
  • ***
  • Offline Offline
  • Posts: 3499
  • Last login:February 21, 2024, 06:18:13 pm
  • North East, US
Re: Cowboy Arcade - Updated 9/12/2012
« Reply #84 on: September 12, 2012, 11:50:05 pm »
Man, this is coming out fantastic.
Definitely one of my favorites.

t3design

  • Trade Count: (+1)
  • Full Member
  • ***
  • Offline Offline
  • Posts: 219
  • Last login:January 13, 2024, 07:19:01 pm
  • Orange Power! Go Pokes!
    • Cowboy Arcade Project
Re: Cowboy Arcade - Updated 9/12/2012
« Reply #85 on: September 13, 2012, 03:34:16 pm »
Thanks mgb! This has taken WAYYY longer than I ever imagined. However, it has been a lot of fun from start till now. There are days when I'm ot sure I really want to be done....
Cowboy Arcade Project ThreadCowboy Arcade Project Website
If you are an obsessive/compulsive pyromaniac, you better make sure you wear flame retardant pajamas.

t3design

  • Trade Count: (+1)
  • Full Member
  • ***
  • Offline Offline
  • Posts: 219
  • Last login:January 13, 2024, 07:19:01 pm
  • Orange Power! Go Pokes!
    • Cowboy Arcade Project
The Sound of....Blasters!
« Reply #86 on: September 15, 2012, 06:52:44 pm »
Every great arcade needs a great sound system to really belt out those 80's sounds. We bought a set of Logitech Z2300 computer speakers for this very thing.


We selected this particular speaker set for a single reason: the controller. The controller is remote from the speakers and has volume control, bass adjust and a headphone jack that turns off the speakers.


If you dismantle this you find a small circuit board:


The idea was to remove the control pots and the earphone jack from the board and use wire and connectors to remotely locate them in the cab. A guy at work offered to do the mod for me:


It looks a little clunky, which we could live with, if it worked. Unfortunately it doesn't. Not sure what went wrong, but when we plug it in nothing happens. The other controller works fine (the one we haven't butchered yet), so we know it isn't the speakers.

So now what? A little research on the world wide webs found that other people have experienced problems with this controller (without trying to mod it) and came up with a DIY controller. You can order the PCB from BatchPCB and the component list from Mouser Electronics:


So we ordered the components (about $32 including S&amp;H) and we will try to build the new controller using cable to connect the devices to the PCB. This should be fun!
Cowboy Arcade Project ThreadCowboy Arcade Project Website
If you are an obsessive/compulsive pyromaniac, you better make sure you wear flame retardant pajamas.

t3design

  • Trade Count: (+1)
  • Full Member
  • ***
  • Offline Offline
  • Posts: 219
  • Last login:January 13, 2024, 07:19:01 pm
  • Orange Power! Go Pokes!
    • Cowboy Arcade Project
The Devil is in the Admin Details
« Reply #87 on: September 15, 2012, 06:56:41 pm »
The plan for admin functions and other necessary items has changed several times over the last couple years. However, once the cabinet was cut and assembled it became much harder to make any real changes. The admin panel behind the main CP has three holes on each side (originally all for admin), the front of the CP box has three holes on the left (for sound controls) and one on the right (for pin plunger). There are also 2 button holes on each side of the cabinet for pin flippers and nudge. Between cutting those holes and now we found really cool USB connectors and added those to the "needed extras" list. The "needed" admin button list seems to be an ever changing thing, for now it is: Pause, Escape, Return and Tab. So the two extra holes in the admin panel become the USB ports. The plunger interfered with both the CP buttons and the flipper/nudge buttons so it got moved to a lower postion and the hole filled with a button that does nothing right now....


Another option is to add a hole to the right of the three left hole in the front of the box, shift the sound controls over to the right and put a USB in the farthest left hole and the other usb in the single right hole (old plunger location). This would free up the other two holes on the admin panel for two more admin buttons.

The admin buttons are orange (of course) and will have vinyl cutouts (from Troy Robinson) applied for the functions. We are still deciding whether to go positive or negative:


Currently we are planning on wiring the Coin Returns to switches for Player 1 and Player 2 coin buttons. If we move the USB ports down we could use the two extra Admin spaces for those.....decisions, decisions.

If we go with moving the USB ports down the admin panel would look like this:


We would have to drill another hole in the front of the box for the second USB port. The question is whether to put it next to the extra hole (old plunger location) or next to the sound controls. We are leaning toward the old plunger location....
« Last Edit: September 15, 2012, 10:47:08 pm by t3design »
Cowboy Arcade Project ThreadCowboy Arcade Project Website
If you are an obsessive/compulsive pyromaniac, you better make sure you wear flame retardant pajamas.

Nephasth

  • Guest
  • Trade Count: (0)
Re: Cowboy Arcade - Updated 9/15/2012
« Reply #88 on: September 16, 2012, 12:19:23 pm »
Those buttons look sharp! :cheers:

t3design

  • Trade Count: (+1)
  • Full Member
  • ***
  • Offline Offline
  • Posts: 219
  • Last login:January 13, 2024, 07:19:01 pm
  • Orange Power! Go Pokes!
    • Cowboy Arcade Project
Button, Button, who has the button...
« Reply #89 on: September 24, 2012, 11:15:58 pm »
I do. six of them in fact. Got the vinyl icons for the admin buttons from Troy Robinson, and they look fantastic.

When I designed and drilled the admin panel I hadn't picked out the buttons I was going to use. When I found the orange lit buttons I liked they were not "arcade" buttons:


and needed a different hole size. I already had the 1.125" holes and needed smaller opening so I made aluminum bushings that had an OD of 1.125" and an ID that matched the buttons.


Once the vinyl was applied to the colored disc and the button reassembled and mounted in the panel, they look like this:


Some temporary wiring and 12V DC and voila!


I'm lovin' it.
Cowboy Arcade Project ThreadCowboy Arcade Project Website
If you are an obsessive/compulsive pyromaniac, you better make sure you wear flame retardant pajamas.

t3design

  • Trade Count: (+1)
  • Full Member
  • ***
  • Offline Offline
  • Posts: 219
  • Last login:January 13, 2024, 07:19:01 pm
  • Orange Power! Go Pokes!
    • Cowboy Arcade Project
Cowboy Up!!
« Reply #90 on: September 27, 2012, 12:56:06 am »
Side art is such a critical part of the arcade look. Simple or complex, classic or modern, each game's graphics are a part of the total experience. When we were spending hours (and hours) in arcades in the early eighties we were mesmerized by Tempest. The game itself was (and still is) fantastic. Unlike many games of that time there is a variability to each and every level that keeps the player on alert. The game was also housed in a unique cabinet design and had outstanding graphics.

If you have been following this blog at all, you already know this. Our obsession with Tempest led to this entire project and heavily influenced the design. Tonight the project took a huge step forward (not really that big, but per the previous paragraph an exceedingly important one).

We applied the side art!


It looks even better in person than in the pictures! In the closer shot you can see the flipper and nudge buttons and the installed cup holder.


We are really pleased. Really. Really. Pleased.
Cowboy Arcade Project ThreadCowboy Arcade Project Website
If you are an obsessive/compulsive pyromaniac, you better make sure you wear flame retardant pajamas.

ViriiGuy

  • Trade Count: (0)
  • Full Member
  • ***
  • Offline Offline
  • Posts: 199
  • Last login:January 08, 2020, 12:30:46 pm
  • Terminus clone build in progress.
Re: Cowboy Arcade - Updated 9/26/2012
« Reply #91 on: September 27, 2012, 06:14:05 am »
Wow! That is slick looking!! Very nice job!

jimdeprado

  • Trade Count: (0)
  • Full Member
  • ***
  • Offline Offline
  • Posts: 25
  • Last login:April 09, 2024, 11:21:42 am
  • I want to build my own arcade controls!
Re: Cowboy Arcade - Updated 9/26/2012
« Reply #92 on: September 27, 2012, 07:12:59 am »
Very Nice!  Your artwork ties the entire project together. 

Jim

t3design

  • Trade Count: (+1)
  • Full Member
  • ***
  • Offline Offline
  • Posts: 219
  • Last login:January 13, 2024, 07:19:01 pm
  • Orange Power! Go Pokes!
    • Cowboy Arcade Project
Cowboy Arcade - Updated 9/26/2012
« Reply #93 on: September 27, 2012, 10:19:23 am »
Thanks guys! I am really happy with it.
Cowboy Arcade Project ThreadCowboy Arcade Project Website
If you are an obsessive/compulsive pyromaniac, you better make sure you wear flame retardant pajamas.

t3design

  • Trade Count: (+1)
  • Full Member
  • ***
  • Offline Offline
  • Posts: 219
  • Last login:January 13, 2024, 07:19:01 pm
  • Orange Power! Go Pokes!
    • Cowboy Arcade Project
Pics of Side Art install
« Reply #94 on: September 27, 2012, 11:13:23 pm »
Game On Graphics (was MameMarquees when I ordered this) printed the art for us. The file had plenty of extra black around it to overlap the sides. Once the cabinet was layed on its side we measured the actual width and height (as opposed to trusting the drawings) and also measured the distance top to bottom and side to side of the outside of the neon on the graphic. A little math later we knew that the black edge needed to be 15/16" on the vertical sides and 1 3/16" on the top and bottom. Then we carefully measured and cut a notch on two places on the back side and one place on the top:


We then aligned those edges with the outside edge of the cabinet to align the graphic and taped them in place:


Once the graphic was positioned and secure we removed the backing along the bottom edge and carefully applied it to the cabinet. (we had wiped everything down with alcohol and a lint free cloth first of course)


It is hard to see in the pic, but the light line slightly up from the bottom is where the backing was removed. Then it was simply a matter of one person holding up the graphic while another removed the backing and a third pressed the vinyl into place. We used lint free cloths to rub the vinyl into place and had very little trouble with bubbles.

Once the entire graphic was adhered and rubbed down the excess needed to be trimmed. We inserted a very sharp blade into the crack between the laminate covered cabinet side and the rubber T-molding and carefully sliced the vinyl all the way around the cabinet side:


This cut the graphic vinyl inside the edge of the rubber T-molding producing a really neat edge. We then cut out the holes for the flipper/nudge buttons and the studs for the cup holders:


We tilted the cabinet back upright and reinstalled the buttons and cup holders.

On a side note. we got this reply to our post about the LED Wiz/GP inputs not working in MAME:

Did you enable joystick input in mame.ini?
joystick=1 or something like that.

So a little file edit later and we were playing Tempest (and DK and Defender and DigDug) using the real arcade controls!
« Last Edit: September 27, 2012, 11:17:56 pm by t3design »
Cowboy Arcade Project ThreadCowboy Arcade Project Website
If you are an obsessive/compulsive pyromaniac, you better make sure you wear flame retardant pajamas.

brewerdude

  • Trade Count: (0)
  • Full Member
  • ***
  • Offline Offline
  • Posts: 28
  • Last login:March 22, 2019, 01:35:37 am
Re: Cowboy Arcade - Updated 9/27/2012
« Reply #95 on: September 28, 2012, 12:05:46 am »
Brother, that is one badass cab.  Keep up the great work!

I just noticed you put Panduit wire management on the inside.  Impressive!
« Last Edit: September 28, 2012, 12:07:57 am by brewerdude »

rockyrocket

  • Trade Count: (+1)
  • Full Member
  • ***
  • Offline Offline
  • Posts: 372
  • Last login:January 01, 2019, 02:13:03 pm
Re: Cowboy Arcade - Updated 9/27/2012
« Reply #96 on: September 29, 2012, 12:48:02 pm »
Very nice - well done!.
Really jealous of all your toys you boys play with in the shop.

t3design

  • Trade Count: (+1)
  • Full Member
  • ***
  • Offline Offline
  • Posts: 219
  • Last login:January 13, 2024, 07:19:01 pm
  • Orange Power! Go Pokes!
    • Cowboy Arcade Project
Orange Power!
« Reply #97 on: October 18, 2012, 02:36:00 am »
We decided to decase the MAME computer.


The tower case is bulky and there is not a good way to afix it to the arcade cabinet so that it won't move or fall over if we move the cabinet. A little www research led us to a bench test computer "case" that is basically a flat panel made of plexiglass with all the necessary mounts for the ATX mother board, power supply and drives.


So, while waiting for parts to show up it occurred to us that with the various components just out in the open, it would behoove us to tidy up the computer a bit. First thing was the industrial grey PSU (that's computer speak for Power Supply Unit). We decased the PSU and decided to paint it Gloss Orange and Hammered Finish Black.

The bare case, ready to paint:


Painted and in oven to hard set the finish (170° for about 2 hours):


The finished case waiting to be reassembled:


We are also going to replace the fans (PSU, CPU and case) with these:


We have (2) 80mm (PSU and CPU) and (2) 120mm (case and cabinet). These have 4 LEDs in them so the fans glow orange when they are running!
Cowboy Arcade Project ThreadCowboy Arcade Project Website
If you are an obsessive/compulsive pyromaniac, you better make sure you wear flame retardant pajamas.

t3design

  • Trade Count: (+1)
  • Full Member
  • ***
  • Offline Offline
  • Posts: 219
  • Last login:January 13, 2024, 07:19:01 pm
  • Orange Power! Go Pokes!
    • Cowboy Arcade Project
Power to the Players
« Reply #98 on: October 18, 2012, 02:40:17 am »
Continuing the modding of the Cowboy Arcade computer...

Decided to paint the optical drive orange too:


The new fans came in...


So I got them mounted:


and then plugged things in to see how it would look:


This is what it will look like in the cabinet:


Next is sleeving all the wiring and extending the wires from the PSU to the drives...
Cowboy Arcade Project ThreadCowboy Arcade Project Website
If you are an obsessive/compulsive pyromaniac, you better make sure you wear flame retardant pajamas.

t3design

  • Trade Count: (+1)
  • Full Member
  • ***
  • Offline Offline
  • Posts: 219
  • Last login:January 13, 2024, 07:19:01 pm
  • Orange Power! Go Pokes!
    • Cowboy Arcade Project
Holding up the Show
« Reply #99 on: October 18, 2012, 02:44:12 am »
We started working on the mounts to hold the monitor glass as well as the admin panel and the speaker grill. There are slots cut into the sides to hold mounting blocks:


The blocks have to fit into the slots, provide a surface for the admin panel (on the bottom) and the speaker grill (on the top) to mount to, and hold the glass. We selected standard mirror holders to hold the glass and came up with a design for the block...


...fitted into the slot in the cabinet side:


We will mount the admin panel with velcro since the only force it will experience is pressure towards the mounting blocks and the mirror mounts will hold the glass.


With the admin panel mounted there is a gap between the panel and the mounting block at the top for the glass to fit into:


Now we have to make similar mounting blocks for the top.
Cowboy Arcade Project ThreadCowboy Arcade Project Website
If you are an obsessive/compulsive pyromaniac, you better make sure you wear flame retardant pajamas.

t3design

  • Trade Count: (+1)
  • Full Member
  • ***
  • Offline Offline
  • Posts: 219
  • Last login:January 13, 2024, 07:19:01 pm
  • Orange Power! Go Pokes!
    • Cowboy Arcade Project
The Case of the DeCase
« Reply #100 on: October 22, 2012, 06:02:10 pm »
Finally finished the computer decasing and modding project. Just to remind everyone...

decided to decase the computer and mount on an open plane case. Then decided that the power supply and ODD needed to be orange and the fans needed to light up. Then decided that the wires all needed to be sleeved in orange...

Here is the sleeving job about midway:


This was straight forward but far from easy. Getting each molex pin of of it's connector was a bugger. Even with the right tool it was still very touchy and required just the right angle and pressure. One of the wires came out of it's pin during this process and it was very hard getting the pin out without a wire attached and putting everything back together.

We fabricated the 5-pin power cables for the drives as the new mounts have them too far away for the original cables to reach. The 4-pin and 24-pin power cables were dismantled and the reassembled using black plugs and applying the sleeving material.

Finally, everything was crammed back into the PSU and plugged in. There was a moment waiting for the power up that seemed like an eternity, but then it sprang to life and all was well:


We were very concerned that we could have mucked something up during the modding. So many wires removed and replaced and so much stuff moved around. It wouldn't have taken much to make a mistake.

We had made a template for the mounting holes:


so after carefully selecting the location we drilled pilot holes into the cab sides being careful not to go to deep, then the hole size needed for the threaded inserts, then a slightly larger size for just a bit to help get the threads started. Then the case panel just drops into place:


By some stroke of karma the updated LED Wiz/GP's came back in the mail today, so we can re-hook the controls and be back playing. Tomorrow we go get glass.
Cowboy Arcade Project ThreadCowboy Arcade Project Website
If you are an obsessive/compulsive pyromaniac, you better make sure you wear flame retardant pajamas.

Nephasth

  • Guest
  • Trade Count: (0)
Re: Cowboy Arcade - Updated 10/18/2012
« Reply #101 on: October 02, 2013, 09:06:23 am »
Bump!

t3design

  • Trade Count: (+1)
  • Full Member
  • ***
  • Offline Offline
  • Posts: 219
  • Last login:January 13, 2024, 07:19:01 pm
  • Orange Power! Go Pokes!
    • Cowboy Arcade Project
Cowboy Arcade - Updated June 25 2017
« Reply #102 on: June 11, 2017, 10:44:52 pm »
It's been over 4 years since this build last was updated here. Unfortunately, RL got very hectic and very little got done. When last seen, the build was about 90% physically done and about 50% software/emulator done. We could play games with the keyboard if dad got everything clipped together and working, but it was a pain and it didn't happen very often.

Then my youngest kids got not-so-young and they want the arcade to work! My 5th made me promise that we would get the arcade completely finished (he didn't yet understand that you are never really "done".) So we started working on the list:

"New" computer to resolve simple hardware issues that were impossible to overcome. DONE. We found a lightly used HP Pentium H8-1010 running a Core i7 at around 3.8 GHz, plenty of memory and plenty of HD space.

“Newer” version of Mame and get MaLa installed and working. DONE. We installed Mame 161 and Mala 174. We did struggle to get everything configured but after a lot of reading and messing around it all works.

“Hide” Windows stuff to make the startup more “Arcade like”. DONE. We followed the instructions in (http://forum.arcadecontrols.com/index.php?topic=113896.0) to the letter and then not so much to the letter and got our own animation and splash screen while getting rid of all Windows stuff. Haven’t hacked the bios to clear the HP power-up screen yet as we are a little afraid of that.

Get CPWizard installed and be able to pause game to see controls mapped on our CP. PARTIAL. We got CPWizard up and running and were able to map our control panel, but haven’t been able to enter the Spinner or the Trackball (HELP?) We also can’t get ShowCP to run in order to have the CP maps available in Mame.

Installer LED Blinky (or alternate) to have button, joy and trackball LED's light with games to show controls. DONE. finished wiring the LED's for the joysticks and the admin buttons. Cot everything mapped into LEDBlinky and even created some of our own animations. looks great!

Be able to plug in Playstation3 controllers for Player 3 and Player 4 and two Aimtrack lightguns for shooters. NOT DONE. This is a controller numbering stability issue that we are researching to no avail. The info is confusing to us.

Power up with external switch and power down on MaLa exit. NOT DONE. We have the stuff, just haven’t moved the switch outside the cabinet.

Mount new LED monitor and “bezel” the back of glass to hide cab guts. DONE. We had a Nieman Displays Tri-Mode CRT, but wanted better graphics for newer games so switched. CRT Monitor is for sale… Got the mount finished and installed.

Wire in Admin switches, DONE. Wired buttons to LEDWiz+GP #3 and lights to external 12V. MAME recognizes the buttons, MaLa does not. Sad Face....

Install, wire and hookup LED's for the Joystick Handles. DONE

Wire Coin Door into cab. NOT DONE. Have an original Atari double coin door with harness intact. I have the plug too. Will take considerable wiring work to get all that done.

Final touches on 5V and 12V wiring and tidy up cabinet internals. NOT DONE.

Get sound system controls wired, mounted and running. DONE. It took some serious work on the electronics board I built. In the end, I had swapped some wires. Swapped correctly everything worked. We mounted the volume and bass adjust knobs and the headphone jack. Looks and sounds awesome.

We will post as we make progress. We couldn’t have gotten this far without this community and we won’t finish without some more help. Thank you.
« Last Edit: June 25, 2017, 10:55:11 pm by t3design »
Cowboy Arcade Project ThreadCowboy Arcade Project Website
If you are an obsessive/compulsive pyromaniac, you better make sure you wear flame retardant pajamas.

t3design

  • Trade Count: (+1)
  • Full Member
  • ***
  • Offline Offline
  • Posts: 219
  • Last login:January 13, 2024, 07:19:01 pm
  • Orange Power! Go Pokes!
    • Cowboy Arcade Project
Cowboy Arcade Project ThreadCowboy Arcade Project Website
If you are an obsessive/compulsive pyromaniac, you better make sure you wear flame retardant pajamas.

rtkiii

  • Trade Count: (0)
  • Full Member
  • ***
  • Offline Offline
  • Posts: 288
  • Last login:March 16, 2022, 02:55:49 pm
  • Ready to Build! Not building? Making Movies!
    • RTKIII Productions YouTube Channel
Re: Cowboy Arcade - Updated 6/25/2017
« Reply #104 on: June 26, 2017, 04:14:41 pm »
Man I dig the style of the cabinet!  Nice work!