Main Restorations Software Audio/Jukebox/MP3 Everything Else Buy/Sell/Trade
Project Announcements Monitor/Video GroovyMAME Merit/JVL Touchscreen Meet Up Retail Vendors
Driving & Racing Woodworking Software Support Forums Consoles Project Arcade Reviews
Automated Projects Artwork Frontend Support Forums Pinball Forum Discussion Old Boards
Raspberry Pi & Dev Board controls.dat Linux Miscellaneous Arcade Wiki Discussion Old Archives
Lightguns Arcade1Up Try the site in https mode Site News

Unread posts | New Replies | Recent posts | Rules | Chatroom | Wiki | File Repository | RSS | Submit news


Author Topic: Jumping in Head First...First Pin Star Trek Next Generation !!!  (Read 5585 times)

0 Members and 1 Guest are viewing this topic.

Charles4400

  • Trade Count: (0)
  • Full Member
  • ***
  • Offline Offline
  • Posts: 229
  • Last login:February 18, 2016, 02:31:42 am
Jumping in Head First...First Pin Star Trek Next Generation !!!
« on: February 28, 2009, 03:09:58 pm »
Just got my first Pin MUCH earlier than expected (yesterday)!

Thanks to suggestions from this board I tried out a bunch of pins on VP and found many that I really liked, but from those I liked had to narrow it from those that I could find then finally out of those , the ones I could afford!

Wasn't even planning on buying a pin at first but was doing more research on building a FP dedicated Cabinet and looked what happened ended up getting a real pin! (wife's none to happy but that's another story altogether  :o )

Well here it is, Star Trek The Next Generation (I watched a little of it back in the day.......ok kinda often..............ALLRIGHT it watched it alot!!!  ;D)


Overall the game and components look good and I am happy with it!

There are certainly some physical flaws (playfield needs to be cleaned and waxed, sideart looks good but paint is bad under the legs, neutral zone is kinda worn, balls are all chewed up and need to be replaced <ordered new good ones from pinbits> and most notably the mission start area protector is worn and needs to be removed) but I believe I can fix these.

worn netral zone drop


bubbling start mission protector covering


sideart dame under legs (didn;t take picture before putting legs on but its pretty chewed up.


Other things I noticed were:
1. Error messages (Checkswitch f3 L.flipper EOs & Check switch f7 Spinner) Though both switches work?
2. Power shutting off sometimes - Happened a few times yesterday but hasn't happened yet today.
3. Ball shooting into kicker area after game end (sometimes in play) and trigger not being able to activate / ball shooting in kicker area and pin having to look for it. This happens every 6 games or so?


So what do you guys think?
Before telling you all how much I spent on it...how much do you think you would spend on it?
« Last Edit: February 28, 2009, 03:21:13 pm by Charles4400 »

JeepMonkey

  • Trade Count: (+1)
  • Full Member
  • ***
  • Offline Offline
  • Posts: 653
  • Last login:July 13, 2012, 01:51:24 pm
Re: Jumping in Head First...First Pin Star Trek Next Generation !!!
« Reply #1 on: February 28, 2009, 04:15:39 pm »
Congrats on your first pin.   :cheers:

I have not played STTNG yet, but it looks like it would be fun.

I don't have a real good guess, but I will say $2100.
Pins:  Theatre Of Magic, JP The Lost World, Revenge From Mars

Charles4400

  • Trade Count: (0)
  • Full Member
  • ***
  • Offline Offline
  • Posts: 229
  • Last login:February 18, 2016, 02:31:42 am
Re: Jumping in Head First...First Pin Star Trek Next Generation !!!
« Reply #2 on: February 28, 2009, 07:14:26 pm »
Thanks I'm stoked  :cheers:


Visitor Q

  • Trade Count: (0)
  • Full Member
  • ***
  • Offline Offline
  • Posts: 1187
  • Last login:May 01, 2019, 09:09:30 am
  • The Saw Is Family
Re: Jumping in Head First...First Pin Star Trek Next Generation !!!
« Reply #3 on: March 01, 2009, 10:12:29 am »
If you paid less than 2 grand for it, I would say you got a really good deal.

Buy a Cliffy Hole Protector to put on there that will solve, hide and prevent any further damage to the hole.

The legs are no big deal at all, very normal wear. Buy some leg protectors and that will hide that damage completely. I can recommend what I feel is the best setup if you like as there are many chooses out there.

That other picture you took is that from the bulb getting too close and too hot under the PF or is that wear on top of the PF?

As far as most of those other errors, just seems like to me you have a couple of switch to replace that will take care of the bulk of that.

Number one thing to buy is a service manual if the game did not come with one. It is invaluable in owning  any of these pinball machines IMO.

First modes after you fix the above, the laser mode to the turrets!

“Woe be unto him who opens one of the seven gateways to hell, because through that gateway evil will invade the world."

Charles4400

  • Trade Count: (0)
  • Full Member
  • ***
  • Offline Offline
  • Posts: 229
  • Last login:February 18, 2016, 02:31:42 am
Re: Jumping in Head First...First Pin Star Trek Next Generation !!!
« Reply #4 on: March 01, 2009, 12:46:13 pm »

The legs are no big deal at all, very normal wear. Buy some leg protectors and that will hide that damage completely. I can recommend what I feel is the best setup if you like as there are many chooses out there.

What do you mean by best setup? Best setup for the legs? Yes, please, I'm all ears for suggestions!

That other picture you took is that from the bulb getting too close and too hot under the PF or is that wear on top of the PF?


It's wear on top of the PF, I've been thinnking about removing that protective layer just over that area but havent got the guts yet to do it with goo gone in fear of removng paint...think I should try?

Number one thing to buy is a service manual if the game did not come with one. It is invaluable in owning  any of these pinball machines IMO.

Is the service manual different from the Operations manual. I have the operations manual (downloaded fron ipdb) but it didn't come with any service manual.

Thanks for the input , this all helps!

I paid in total $2400. Didn't pay shipping but picked it up. Think I paid too much?

I'm loving this pin regardless! It really is fun to play though the wife has shown ZERO interest in it!

Charles4400

  • Trade Count: (0)
  • Full Member
  • ***
  • Offline Offline
  • Posts: 229
  • Last login:February 18, 2016, 02:31:42 am
Re: Jumping in Head First...First Pin Star Trek Next Generation !!!
« Reply #5 on: March 01, 2009, 12:48:59 pm »
Oh also the 'continue' button has been replaced with a generic white non lit button...do you know where I can get a replacement lit button (preferably original). Or I suppose I could replace it with an extra button I have left over from the mame cab....do you know if these are lit by 5v or 12v?

Thanks!

Visitor Q

  • Trade Count: (0)
  • Full Member
  • ***
  • Offline Offline
  • Posts: 1187
  • Last login:May 01, 2019, 09:09:30 am
  • The Saw Is Family
Re: Jumping in Head First...First Pin Star Trek Next Generation !!!
« Reply #6 on: March 01, 2009, 02:34:13 pm »

The legs are no big deal at all, very normal wear. Buy some leg protectors and that will hide that damage completely. I can recommend what I feel is the best setup if you like as there are many chooses out there.

What do you mean by best setup? Best setup for the legs? Yes, please, I'm all ears for suggestions!

That other picture you took is that from the bulb getting too close and too hot under the PF or is that wear on top of the PF?


It's wear on top of the PF, I've been thinnking about removing that protective layer just over that area but havent got the guts yet to do it with goo gone in fear of removng paint...think I should try?

Number one thing to buy is a service manual if the game did not come with one. It is invaluable in owning  any of these pinball machines IMO.

Is the service manual different from the Operations manual. I have the operations manual (downloaded fron ipdb) but it didn't come with any service manual.

Thanks for the input , this all helps!

I paid in total $2400. Didn't pay shipping but picked it up. Think I paid too much?

I'm loving this pin regardless! It really is fun to play though the wife has shown ZERO interest in it!

The going rate on this game is between 2 and 3g depending on condition so if you are happy, I would say you got a good deal.

I am not 100% sure on this game, are those decals on the sides or is it silkscreened? The reason I ask is because this will determine on the leg protectors I recommend.

Operations manual is the same as the service.

The damaged area is that a sticker there then that has the damage or are you saying there is mylar over it?

My gf could care little about my pinball or arcade cab as well.  ::)
“Woe be unto him who opens one of the seven gateways to hell, because through that gateway evil will invade the world."

Charles4400

  • Trade Count: (0)
  • Full Member
  • ***
  • Offline Offline
  • Posts: 229
  • Last login:February 18, 2016, 02:31:42 am
Re: Jumping in Head First...First Pin Star Trek Next Generation !!!
« Reply #7 on: March 01, 2009, 03:38:02 pm »
The sideart of the cab I guess is silscreened...it's not a sticker so it seems to have been painted directly on the cab?

The damage area on the playfield is like a clear sticker in the shape of a long triangle which leads from the area shown directly to where the ball drops in the start mission hole.

The 'sticker' itself is clear, I don't know if it is mylar but was definately put over the playfield (as opposd to under whatever coating they used on the playfield) Nothing is coated over the clear sticker. I assume it was put their to protect the high traffic areas of the balls. There are also some semi-circle clear stickers in front of the 'bumbers' (right term?) (which are directly over the flippers) but those seems to be in fine condition.

Visitor Q

  • Trade Count: (0)
  • Full Member
  • ***
  • Offline Offline
  • Posts: 1187
  • Last login:May 01, 2019, 09:09:30 am
  • The Saw Is Family
Re: Jumping in Head First...First Pin Star Trek Next Generation !!!
« Reply #8 on: March 01, 2009, 06:23:25 pm »
The sideart of the cab I guess is silscreened...it's not a sticker so it seems to have been painted directly on the cab?

The damage area on the playfield is like a clear sticker in the shape of a long triangle which leads from the area shown directly to where the ball drops in the start mission hole.

The 'sticker' itself is clear, I don't know if it is mylar but was definately put over the playfield (as opposd to under whatever coating they used on the playfield) Nothing is coated over the clear sticker. I assume it was put their to protect the high traffic areas of the balls. There are also some semi-circle clear stickers in front of the 'bumbers' (right term?) (which are directly over the flippers) but those seems to be in fine condition.

Ok... So screen on, just go with the plastic leg protectors.

As far as the sticker goes, before you even attempt to remove it, have you found a replacement????
“Woe be unto him who opens one of the seven gateways to hell, because through that gateway evil will invade the world."

Charles4400

  • Trade Count: (0)
  • Full Member
  • ***
  • Offline Offline
  • Posts: 229
  • Last login:February 18, 2016, 02:31:42 am
Re: Jumping in Head First...First Pin Star Trek Next Generation !!!
« Reply #9 on: March 01, 2009, 07:42:44 pm »
Isn't that clear sticker just a protector on that one strip of the PF and not necessary for a home environment?

I just assumed that that clear covering in that area was just there because of all the abuse that that section of the playfield might have in a commercial environment....in my home I though that all I would need is just waxing of the PF with a carnuba wax and once I get that sticker off to just leave it off.... is that ill advised?

Q*Bert_OP

  • Wiki Contributor
  • Trade Count: (+7)
  • Full Member
  • ***
  • Offline Offline
  • Posts: 2089
  • Last login:October 25, 2012, 07:20:42 pm
  • Oh yes, we did!
Re: Jumping in Head First...First Pin Star Trek Next Generation !!!
« Reply #10 on: March 01, 2009, 11:41:54 pm »
Isn't that clear sticker just a protector on that one strip of the PF and not necessary for a home environment?

I just assumed that that clear covering in that area was just there because of all the abuse that that section of the playfield might have in a commercial environment....in my home I though that all I would need is just waxing of the PF with a carnuba wax and once I get that sticker off to just leave it off.... is that ill advised?

That's called "mylar", and you need it on there. The ball is propelled out of the Borg ship with a lot of force. After a few hundred hits, that area can get pretty chewed up if not mylared.

My advice would be to put new mylar down there.
WTB: The Grid by Midway (2001), looking for 2 or more complete games, and large marquee

Visitor Q

  • Trade Count: (0)
  • Full Member
  • ***
  • Offline Offline
  • Posts: 1187
  • Last login:May 01, 2019, 09:09:30 am
  • The Saw Is Family
Re: Jumping in Head First...First Pin Star Trek Next Generation !!!
« Reply #11 on: March 02, 2009, 01:30:03 pm »
I heard there is a trick to removing mylar. Take canned air and turn it upside down spraying it under the mylar as you peel it back. You want to try and freeze the sticky stuff as you pull it back to remove it.

 :timebomb: :timebomb: :timebomb:!!!!Please don't quote me on this as I have never tried to do so. I would look into it a little more before doing anything of the such!!!! :timebomb: :timebomb: :timebomb:
“Woe be unto him who opens one of the seven gateways to hell, because through that gateway evil will invade the world."

Charles4400

  • Trade Count: (0)
  • Full Member
  • ***
  • Offline Offline
  • Posts: 229
  • Last login:February 18, 2016, 02:31:42 am
Re: Jumping in Head First...First Pin Star Trek Next Generation !!!
« Reply #12 on: March 02, 2009, 10:50:24 pm »
I read this article about mylar removal for pinball PFs:
http://pinball.flippers.info/mylarremoval.asp

The articles mentions freexing (I think it was that article and also the other end of the spectrum of heating with a hair dryer but I'm gonna go with the method he recommends.

He recommends the 'Goo Gone' method. I think I'll try that since he's done it and shows the results. I'm not removing the whole playfield obviously so hopefully that strip will not be a problem....I couldn't find a strip of that exact shape of mylar but will probably cut some 3mil mylar from a sheet and apply.

Visitor Q

  • Trade Count: (0)
  • Full Member
  • ***
  • Offline Offline
  • Posts: 1187
  • Last login:May 01, 2019, 09:09:30 am
  • The Saw Is Family
Re: Jumping in Head First...First Pin Star Trek Next Generation !!!
« Reply #13 on: March 03, 2009, 07:05:21 am »
Take pix and keep use posted.

Good Luck!
“Woe be unto him who opens one of the seven gateways to hell, because through that gateway evil will invade the world."

Charles4400

  • Trade Count: (0)
  • Full Member
  • ***
  • Offline Offline
  • Posts: 229
  • Last login:February 18, 2016, 02:31:42 am
Re: Jumping in Head First...First Pin Star Trek Next Generation !!!
« Reply #14 on: March 03, 2009, 02:30:11 pm »
Thanks! Will hopefully tackle it today or tomorrow and will take pics as I go along...

Charles4400

  • Trade Count: (0)
  • Full Member
  • ***
  • Offline Offline
  • Posts: 229
  • Last login:February 18, 2016, 02:31:42 am
Re: Jumping in Head First...First Pin Star Trek Next Generation !!!
« Reply #15 on: March 04, 2009, 04:38:47 am »
All done and TOTAL SUCCESS!! WOOHOO!

Everything went well, I was very paranoid about paint peeling off but none did! Everything actually went as planned and Goo Gone is great!

Here's what went on:

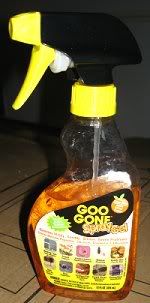
I couldn't find the regular Goo Gone which I think is more liquidy so had to get 'Goo Gone Gel Spray' at Home Depot, which actually turned out for the best...


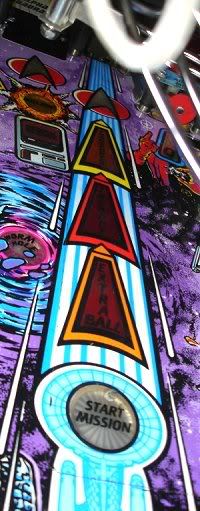
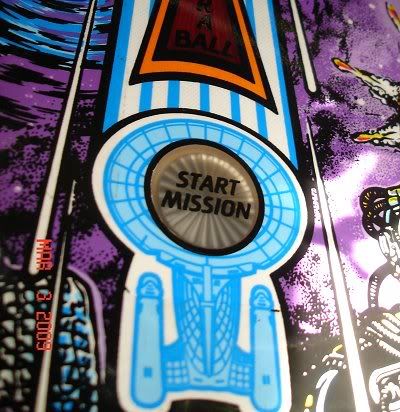
Heres the Mylar strip again and how long the strip is...a triangular shape leading to a ball drop:


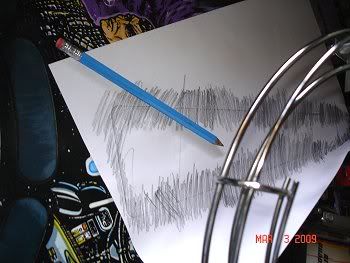
I traced the shape of the strip out in case the strip did not come out in one piece and I needed to replace the strip with the same dimesnions:


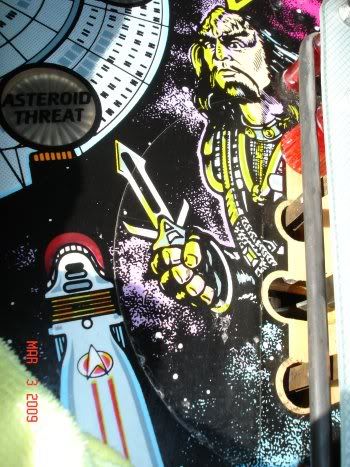
Ok first spray of Goo Gone, I let it soak a bit and then started the peeling just a little with my fingernail and slowlsy peeled so I could get a grip. I didn;t have any plastic razorblades and didn't want to use a real blade in fear of scratching the PF. Fingernail and sray of goo gone did the trick:


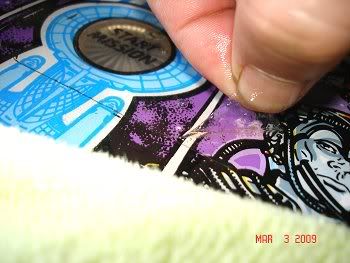
Spray more goo gone and peel little by little, tugging gently left and right, here's me going over the initial spot of damaged mylar...no problems , and NO PAINT PEELING!


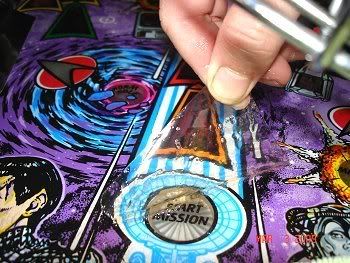
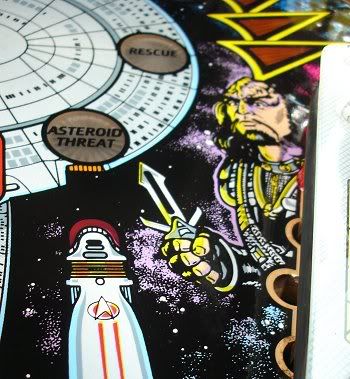
As I worked my way up I found that the gel form of goo gone is great for this application. It doesn't slide around everywhere and doesn't all get absorbed by your towel. What I ended up doing was getting a pool of the gel up against the mylar and bring my towel close enough so the pool would stay. I then didn't have to spray that much more goo gone and thus less mess and also made sure I always had a goo gone pool against the newly peeled mylar at all times!
Hard to see but there is a pool of goo gone gel there and I just followed it up as I peeled:


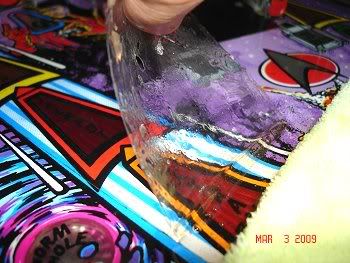
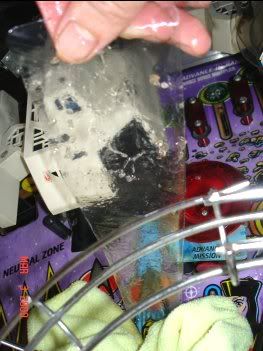
Allright almost done! As the Mylar narrowed it became much easier to peel and alot faster. All coming off in 1 strip and look at all that goop from the mylar glue on the mylar!


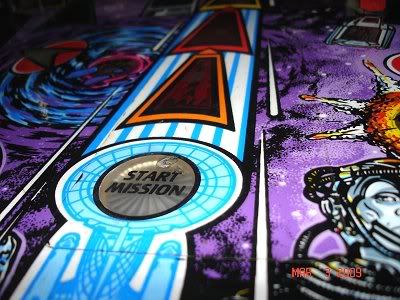
Here it is cleaned up! Smooth and clean and all parts intact!:


The two black marks near the two engines are under the coating, those seem to be printing defects and not from peeling mylar.  And for the life of me  I couldn't get that thin line of dirt running vertical from the left side of the hull off (don't know what that is, but also seems to be under the PF coating, its smooth and nothing I did would remove it)


This took about 30 mins mainly because I have never done anything like this before and I was very cautious at first. I felt however very confident after doing this and decided  to remove the 2 semi-cirlcle mylar pieces near the flipper bumpers...these came off easily and without a hitch:

Here's a before and after of one of them that I removed:


So I definately recommend goo gone for applications like this. I didn't have a problem and was pretty easy for a first timer such as myself.

I had read (and I forgot where) that the freezing method can cloud up inserts,and since my mylar was over many of them I didn't want to take a chance with that.

Anyways for me the Goo Gone Gel is the way to go !
« Last Edit: March 04, 2009, 04:51:19 am by Charles4400 »

Visitor Q

  • Trade Count: (0)
  • Full Member
  • ***
  • Offline Offline
  • Posts: 1187
  • Last login:May 01, 2019, 09:09:30 am
  • The Saw Is Family
Re: Jumping in Head First...First Pin Star Trek Next Generation !!!
« Reply #16 on: March 04, 2009, 07:07:38 am »
Nicely Done!

Thanks for posting pictures in case anyone else has to tackle this.

A few things...

Have you thought about or found where to buy that piece of mylar? Are you going to cut and make your own?

I would make sure to get all that Goo Gone off of the PF. I agree that stuff is great but some people don't even recommend using Novus 1 because of it being wet like that and soaking into the PF.

Ps. Tracing option was ingenious.  :applaud:
“Woe be unto him who opens one of the seven gateways to hell, because through that gateway evil will invade the world."

Charles4400

  • Trade Count: (0)
  • Full Member
  • ***
  • Offline Offline
  • Posts: 229
  • Last login:February 18, 2016, 02:31:42 am
Re: Jumping in Head First...First Pin Star Trek Next Generation !!!
« Reply #17 on: March 04, 2009, 06:26:05 pm »
Oh I forgot to mention that I used Naptha to remove the residue of the goo gone left over. I got the globs of glue left over using more goo gone on the table as well.

Thanks guys I felt really good that it was a success!

To replace the mylar I got one of these from marcospecialties (I couldn;t find anything that looked like it would match the original) :

Mylar, mini, 5" wide By the Foot
http://www.marcospecialties.com/itemdesc.asp?ic=MMFT

and plan to cut out the shape of the mylar needed.

I should have also gotten the semi circle pre-cut ones but didn't plan on replacing them at the time of order :(

Thanks for the suggestion and info about the 'stress crack' I'll certainly look into that to get that off...stress cracks and their dirt sucks!

BTW I waxed the area already with Mothers 100% step 3 Carnauba wax ...put on 2 heavy coats. I thought I would put wax before applying the new mylar in case I had to tear it off again. Was this a bad idea? (I plan on waxing over the new mylar as well)

If I shouldn't have waxed yet (and now I'm feeling I shouldn't) should I use some detergent to remove the wax on the areas I plan on putting back the mylar to?
« Last Edit: March 04, 2009, 06:32:38 pm by Charles4400 »

Charles4400

  • Trade Count: (0)
  • Full Member
  • ***
  • Offline Offline
  • Posts: 229
  • Last login:February 18, 2016, 02:31:42 am
Re: Jumping in Head First...First Pin Star Trek Next Generation !!!
« Reply #18 on: March 05, 2009, 01:09:36 am »
Well just reapplied the mylar over the wax job I did earlier and then waxed over the mylar. Figure if it doesnt work out and starts to peel, I'll just remove it and start again....

Visitor Q

  • Trade Count: (0)
  • Full Member
  • ***
  • Offline Offline
  • Posts: 1187
  • Last login:May 01, 2019, 09:09:30 am
  • The Saw Is Family
Re: Jumping in Head First...First Pin Star Trek Next Generation !!!
« Reply #19 on: March 05, 2009, 12:55:51 pm »
If this was me, I would first have gone over the PF with Novus 2 for a good clean. Then I would go over it again with Novus 2 to make sure I did not miss any spots. Next I would go over it with two coats of Wax (Mothers Carnauba). Oh ---steaming pile of meadow muffin--- and I forgot to tell you, replace the balls! Unless you did it already since you got it, be sure to replace the balls with new ones and wax them before putting them in the machine. Don't go too crazy with heavy, heavy coats of wax because sometimes too much build up can be a problem as well. You will start to get trails of the wax and it will get on the posts etc..
“Woe be unto him who opens one of the seven gateways to hell, because through that gateway evil will invade the world."

Charles4400

  • Trade Count: (0)
  • Full Member
  • ***
  • Offline Offline
  • Posts: 229
  • Last login:February 18, 2016, 02:31:42 am
Re: Jumping in Head First...First Pin Star Trek Next Generation !!!
« Reply #20 on: March 05, 2009, 01:11:55 pm »
Thanks guys...you two are definately my pinball counselors! Thanks!

Before waxing I just used windex to clean the surface of dust and such and used Novus 2 just on some specific areas where I saw slight surface scrathes, but didn't do the whole PF (maybe on the next big maintenance).

Didn't know that you werent supposed to wax mylar but will keep that in mind next time. (I actually thought I was supposed to put more wax on mylar  :P )

I did get new balls, ordered these from pinbits:
http://pinbits.com/index.php?main_page=product_info&cPath=10&products_id=283

Didn't know you could wax the balls so thanks will do that too!


Flake

  • Trade Count: (0)
  • Full Member
  • ***
  • Offline Offline
  • Posts: 1019
  • Last login:December 04, 2023, 03:02:46 pm
  • I am Evil Homer....I am Evil Homer....
Re: Jumping in Head First...First Pin Star Trek Next Generation !!!
« Reply #21 on: March 05, 2009, 06:33:25 pm »
Did factory's start clearcoating PF's at some point then?  I suppose its only the older games I hear about getting clearcoated......wait didnt the IJ restoration guy say he sent his off to be clearcoated?  That game isnt that old.

If this is right then what year did they start doing this?  Was it an industry standard from that point on?

Just curious....

pinballwizard79

  • The above mentioned items do not expel strawberries & pretty girls
  • Trade Count: (0)
  • Full Member
  • ***
  • Offline Offline
  • Posts: 1524
  • Last login:May 04, 2014, 09:18:00 pm
  • I sleep by my arcade every Friday
Re: Jumping in Head First...First Pin Star Trek Next Generation !!!
« Reply #22 on: March 05, 2009, 08:39:21 pm »
I think right around 1991-1993 (depending on the company) it all started.

Factory clear coats are far from the uber glass type of clear coats you see on these wicked restored machines.
"George Bush doesn't care about arcade people"

My FrankenPanel: http://forum.arcadecontrols.com/index.php?topic=110312.0

My Game Room: http://forum.arcadecontrols.com/index.php?topic=81323.0

Charles4400

  • Trade Count: (0)
  • Full Member
  • ***
  • Offline Offline
  • Posts: 229
  • Last login:February 18, 2016, 02:31:42 am
Re: Jumping in Head First...First Pin Star Trek Next Generation !!!
« Reply #23 on: March 05, 2009, 10:53:41 pm »
I read this in an article about waxing (not that I followed his waxing advice) but he mentions a brief and approx. clearcoating timeline:

right under the heading 'Introduction' in the below link:

"The first thing you need to do is to check what type of playfield you have. Older games (up until 1990) usually are paint which is sprayed with lacquer. More recent games are protected by a type of automotive polyurethane clearcoat. Williams games in the early 90ies had the Diamondplate logo on them to indicate this. Later games (1993 and up) don't have this logo anymore but they are all clearcoated.
Some prototypes of earlier games also had clearcoated playfields (Diner, Whirlwind, ..) so if your game is of the late 80ies, always check what type of playfield you have. What types of product you can/should use on clearcoated and lacquered playfields are very different !
"

http://www.flippers.be/playfield_wax.html


Visitor Q

  • Trade Count: (0)
  • Full Member
  • ***
  • Offline Offline
  • Posts: 1187
  • Last login:May 01, 2019, 09:09:30 am
  • The Saw Is Family
Re: Jumping in Head First...First Pin Star Trek Next Generation !!!
« Reply #24 on: March 06, 2009, 07:14:33 am »
For the record, I wax the entire pf including any mylar.

As far as waxing the balls.  :D


When replacing the balls just make sure there are no imperfections and throw a coat a wax on them to get any oils that maybe on them off. Honestly I think replacing the pinballs is one of the most important things you can do to keep that PF in good shape. Balls with nicks or surface way, not good.

Ok… So moving right along here. There is something else that is very important that you should do. Replace the batteries and mark it down when you do. This is something you should be doing on a yearly basis regarding whether the batteries are bad or not. The reason is if the batteries were to leak out onto the board, it would be more trouble cleaning that board than if you would have spent the little extra cash to replace those batteries.

A few tips with this…

To keep your hi scores, replace the batteries with the machine on, otherwise you will lose all your hi scores.

Secondly… Now is a great time to update the pinball’s rom to the latest version. If there is a home rom for the game, now would be the perfect time to upgrade to that version.

!!!NOTE!!! When upgrading the rom, do this with the machine OFF and UNPLUGED! You will lose all hi scores regardless, it is unavoidable when upgrading the rom.
« Last Edit: March 06, 2009, 07:27:23 am by Visitor Q »
“Woe be unto him who opens one of the seven gateways to hell, because through that gateway evil will invade the world."

Visitor Q

  • Trade Count: (0)
  • Full Member
  • ***
  • Offline Offline
  • Posts: 1187
  • Last login:May 01, 2019, 09:09:30 am
  • The Saw Is Family
Re: Jumping in Head First...First Pin Star Trek Next Generation !!!
« Reply #25 on: March 06, 2009, 11:09:28 am »
Why the hell does it need to be unplugged when you switch ROMs?  The power switch is a physical toggle...


Fail safe measure… You are removing a chip from the psychical board; it’s what I feel comfortable with.

I'm sure there are a lot of things you can do when working on your pinball machine like standing in a bucket of water, but why risk it?
“Woe be unto him who opens one of the seven gateways to hell, because through that gateway evil will invade the world."

Visitor Q

  • Trade Count: (0)
  • Full Member
  • ***
  • Offline Offline
  • Posts: 1187
  • Last login:May 01, 2019, 09:09:30 am
  • The Saw Is Family
Re: Jumping in Head First...First Pin Star Trek Next Generation !!!
« Reply #26 on: March 06, 2009, 03:53:20 pm »
So you think it's better for a machine to be ungrounded while you're tinkering with the boards? 

 :dizzy:


Must we?
“Woe be unto him who opens one of the seven gateways to hell, because through that gateway evil will invade the world."

Charles4400

  • Trade Count: (0)
  • Full Member
  • ***
  • Offline Offline
  • Posts: 229
  • Last login:February 18, 2016, 02:31:42 am
Re: Jumping in Head First...First Pin Star Trek Next Generation !!!
« Reply #27 on: March 06, 2009, 08:04:51 pm »
You guys......!


Well thanks for the tip about replacing the batteries, just did that with power off (didn;t want to keep those high scores because none of them were mine or anyone I know!)

Roms are good and I believe the latest version.

Question: If you have an error message on the DMD such as 'Check # Switch', even aftr you fx the error, will the error message still remain untill you remove and replace the batteries?

Visitor Q

  • Trade Count: (0)
  • Full Member
  • ***
  • Offline Offline
  • Posts: 1187
  • Last login:May 01, 2019, 09:09:30 am
  • The Saw Is Family
Re: Jumping in Head First...First Pin Star Trek Next Generation !!!
« Reply #28 on: March 06, 2009, 10:23:19 pm »
The error message will go away once you go into the switch test and pass the ball correctly over the said switch.
“Woe be unto him who opens one of the seven gateways to hell, because through that gateway evil will invade the world."

Charles4400

  • Trade Count: (0)
  • Full Member
  • ***
  • Offline Offline
  • Posts: 229
  • Last login:February 18, 2016, 02:31:42 am
Re: Jumping in Head First...First Pin Star Trek Next Generation !!!
« Reply #29 on: March 07, 2009, 01:32:12 am »
Thanks for the help guys throughout this! Your suggestions have definately helped me out alot! Appreciate it greatly!  :cheers:

My next project on this will be to replace the Opto Trough assembly. I was reading that that might be the cause of balls shooting out when they are not supposed to which happens sometimes.

I will be getting:7 Opto Trough Kit Assy.
This is an upgrade kit made from williams to address problems like this on this pin and a few other machines made around this time. ( I couldn't it on US sites so ordered it for $50 shipped from Aus)

Got it from this australian website: http://mrpinballa.cart.net.au/details/711454.html
(if your from the US make sure you change the currency conversion they have there)

Will post how the replacement went as soon as it gets in.

(I guess I will just make this thread my blog on the new pin as I have been doing, I'll just post any new additions or projects involving this pin here in case anyone wants to follow along!  ;D )

Once again thanks all for all the help and suggestions...will keep you updated on what happens next (if anyone is interested!).

I also find myself becoming borderline obsessed with this pin as I can't stop thinking about how to increase performance and make it cleaner, and whether I can find any tasteful mods to add!!!

Visitor Q

  • Trade Count: (0)
  • Full Member
  • ***
  • Offline Offline
  • Posts: 1187
  • Last login:May 01, 2019, 09:09:30 am
  • The Saw Is Family
Re: Jumping in Head First...First Pin Star Trek Next Generation !!!
« Reply #30 on: March 07, 2009, 09:51:14 am »
I also find myself becoming borderline obsessed with this pin as I can't stop thinking about how to increase performance and make it cleaner, and whether I can find any tasteful mods to add!!!

Welcome to my world!
“Woe be unto him who opens one of the seven gateways to hell, because through that gateway evil will invade the world."

Charles4400

  • Trade Count: (0)
  • Full Member
  • ***
  • Offline Offline
  • Posts: 229
  • Last login:February 18, 2016, 02:31:42 am
Re: Jumping in Head First...First Pin Star Trek Next Generation !!!
« Reply #31 on: March 11, 2009, 02:59:56 pm »
Well in anticiption of my new opto trough board upgrade kit getting in (which should be any day now  :angry:) I decided to take out the trough and take a look to see what I was up against.

I have been having problems with an extra ball shooting out into the kicker,or a ball shooting in the kicker and the kicker not launching it etc...and it seems like its all revolving around the trough boards.

A portion of an article I read:
"When the opto ball trough was first used on Indiana Jones, Star Trek Next Generation, Judge Dredd, Popeye, and Demoman, William bolted the opto boards right to the side of the trough. The vibrations from the trough often caused the leads on the large blue two watt resistors and the infra-red LED's on the opto transmitter board to break. This would cause the gameto start random multi-ball at just about anytime during the game. Often the game would never end (because the trough would not reconize when all the balls had drained).

To fix this problem, Williams redesigned the attachment points for the two opto boards. Instead of being bolted directly to the trough, the mounting holes on the opto boards were enlarged (and one hole moved). Then rubber gromets where inserted into the holes, and short metal tube bushings where inserted through the rubber gromets. When the opto board bolts where tightened down, they tightened on the metal tubes. This allowed the opto boards to "float" on the rubber gromet, reducing vibration considerably."

http://www.pinrepair.com/wpc/index3.htm#trough

And it seems like the previous owner tried to rig the boards to simulte the upgrade without buying one. The below can't be good:

Existing trough opto boards:


Maybe all the melted rubber on the PCBs is the problem in itself?

So because I have no soldering experience and am sweating whether to try my first solders on a PCB on my first pin (which I am reluctant but will do if I have to, I have a question:

These wires are connected to this opto board with tons fo soldering to do:


Here is the opposite side of the board, other side of where all the soldered wires are from the pic above:


It looks like I can attach all the soldered wires to some type of plastic piece and attach that plastic piece to the area pictured above intead of soldering it directly to the board.

Is this a correct assumption (is that piece pictured above meant for a plastic piece to clip onto as an option against soldering onto the board directly?)


If so does anyone know what that plastic piece is called where I could attach all those wires to? (and where to get one?) Thanks!
« Last Edit: March 11, 2009, 03:05:25 pm by Charles4400 »

Visitor Q

  • Trade Count: (0)
  • Full Member
  • ***
  • Offline Offline
  • Posts: 1187
  • Last login:May 01, 2019, 09:09:30 am
  • The Saw Is Family
Re: Jumping in Head First...First Pin Star Trek Next Generation !!!
« Reply #32 on: March 11, 2009, 03:26:11 pm »
That board looks pretty nasty. Best to practice a little on something you don't care about prior to your new pin when soldering, maybe that old board. I would buy a good iron as well with temp. control. I have yet to buy one myself but I do have two switch that are "iffy". They are roll over switch, I have the replacement parts but have yet to do so.

Sorry I did not really answer all of your questions.
“Woe be unto him who opens one of the seven gateways to hell, because through that gateway evil will invade the world."

jscott3093

  • Trade Count: (0)
  • Full Member
  • ***
  • Offline Offline
  • Posts: 10
  • Last login:September 22, 2009, 01:35:10 pm
Re: Jumping in Head First...First Pin Star Trek Next Generation !!!
« Reply #33 on: March 11, 2009, 04:59:33 pm »
It looks like they soldered the wires directly to the board. In that case I think you are going to have some trouble when you receive your new opto boards. The wires should be have connector that connects directly to the board.