Main Restorations Software Audio/Jukebox/MP3 Everything Else Buy/Sell/Trade
Project Announcements Monitor/Video GroovyMAME Merit/JVL Touchscreen Meet Up Retail Vendors
Driving & Racing Woodworking Software Support Forums Consoles Project Arcade Reviews
Automated Projects Artwork Frontend Support Forums Pinball Forum Discussion Old Boards
Raspberry Pi & Dev Board controls.dat Linux Miscellaneous Arcade Wiki Discussion Old Archives
Lightguns Arcade1Up Try the site in https mode Site News

Unread posts | New Replies | Recent posts | Rules | Chatroom | Wiki | File Repository | RSS | Submit news


Author Topic: Galaga upright restoration  (Read 18105 times)

0 Members and 1 Guest are viewing this topic.

kayoteq

  • Trade Count: (+6)
  • Full Member
  • ***
  • Offline Offline
  • Posts: 186
  • Last login:May 28, 2022, 02:15:51 pm
    • Webmonkees arcade bin
Galaga upright restoration
« on: May 31, 2008, 10:51:11 pm »
Acquired during the recent free-stuff fest seen elsewhere on the site, I have managed to drag a mostly complete Galaga (sans CRT) and spare parts aplenty. In anticipation of the cabinets impending dumpster doom, I have also gotten the power supplies and control panels off the other cabs. My scissors remained in the car, I promise.

Click here to view it.. haven't seen one before? :)

So hopefully I have all the power sources necessary, along with the wires to do so. 1 chip is labelled bad on the board, I am indifferent, having the bliss of having a intact galaga CPU board.


Lacking the CRT, i browsed the pile and extracted a broken Pac CRT frame and set that among my absconded parts.

Too many at once, eh, but this was spur-of-the-moment 'you're throwing THAT away??  :o

*message edited to remove ugly picture from view
« Last Edit: June 08, 2008, 10:55:30 pm by kayoteq »
If you order a pizza, put 1 quarter in their Galaga and the pizza's done before you are, you might be a video game junkie.. if you offer to tweak the crt , definitely.

Mauzy

  • Trade Count: (+2)
  • Full Member
  • ***
  • Offline Offline
  • Posts: 1191
  • Last login:September 23, 2020, 11:51:27 am
Re: Galaga upright restoration
« Reply #1 on: May 31, 2008, 11:47:31 pm »
Though Im super pissed that I am in central illinois, Im very glad to see someone saved this gem. Good show!
"Son, all hobbies suck. But if you keep at it, you might find you managed to kill some precious time."

SirPeale

  • Green Mountain Man
  • Global Moderator
  • Trade Count: (+23)
  • Full Member
  • *****
  • Offline Offline
  • Posts: 12963
  • Last login:August 04, 2023, 09:51:57 am
  • Arcade Repair in New England
    • Arcade Game and Other Coin-Op Projects
Re: Galaga upright restoration
« Reply #2 on: June 01, 2008, 06:35:41 am »
I saw quite a few monitors in that pile, why don't you grab a few?

kayoteq

  • Trade Count: (+6)
  • Full Member
  • ***
  • Offline Offline
  • Posts: 186
  • Last login:May 28, 2022, 02:15:51 pm
    • Webmonkees arcade bin
Re: Galaga upright restoration
« Reply #3 on: June 01, 2008, 02:12:03 pm »
I saw quite a few monitors in that pile, why don't you grab a few?
Unfortunately, most every CRT you see there has had the neck broken. Neighbor said they did it post-trash piling. One of the basic problems in prepping a monitor for trash pickup.. gotta break that vaccum.

I may go back there for one last run through and get the analog boards off the CRT chassis for the 'known' models that I have '19
or maybe I'll find one or two  that  hasn't had the bad hammer fix.

« Last Edit: June 01, 2008, 02:16:21 pm by kayoteq »
If you order a pizza, put 1 quarter in their Galaga and the pizza's done before you are, you might be a video game junkie.. if you offer to tweak the crt , definitely.

SirPeale

  • Green Mountain Man
  • Global Moderator
  • Trade Count: (+23)
  • Full Member
  • *****
  • Offline Offline
  • Posts: 12963
  • Last login:August 04, 2023, 09:51:57 am
  • Arcade Repair in New England
    • Arcade Game and Other Coin-Op Projects
Re: Galaga upright restoration
« Reply #4 on: June 01, 2008, 02:36:24 pm »
Hey, if you see any Sanyo 20-EZ or K7000 chassis...

kayoteq

  • Trade Count: (+6)
  • Full Member
  • ***
  • Offline Offline
  • Posts: 186
  • Last login:May 28, 2022, 02:15:51 pm
    • Webmonkees arcade bin
Re: Galaga upright restoration
« Reply #5 on: June 05, 2008, 01:41:49 am »
I tried spotting varied chassis that would be useful, but a majority were post 1990s and besides I wouldn't know a wells-gardner from a garden well. ;0 but I did get a few chassis for fun and amusement, will put them on the site once I've photographed them.

Back to Galaga:

Right off the bat, I'm not getting voltage past the big block. The switching power supply has no juice.  Time to go through the pile of switching power supplies and pick out a new one and start utterly over with the power upgradde mod.


I don't seem to have the wire  connector between the CPU video and the monitor. G07, that is. Must have alll been scavenged in storage. I have alternative connectors, but anyone with a spare-- I have plenty of spare minor cabinet parts to swap. PM me ..

Stage 1: Wiring

« Last Edit: June 08, 2008, 11:01:44 pm by kayoteq »
If you order a pizza, put 1 quarter in their Galaga and the pizza's done before you are, you might be a video game junkie.. if you offer to tweak the crt , definitely.

kayoteq

  • Trade Count: (+6)
  • Full Member
  • ***
  • Offline Offline
  • Posts: 186
  • Last login:May 28, 2022, 02:15:51 pm
    • Webmonkees arcade bin
Re: Galaga upright restoration
« Reply #6 on: June 11, 2008, 04:47:43 am »
Power problem found, wt?


two reasons I'm considering starting over with the spare.
The inset picture is a wire that was put aside with care,
while it's corresponding connector wire is.. a bit bare.
I would not, should not, plug in the CPU, even on a dare!

If you order a pizza, put 1 quarter in their Galaga and the pizza's done before you are, you might be a video game junkie.. if you offer to tweak the crt , definitely.

Mauzy

  • Trade Count: (+2)
  • Full Member
  • ***
  • Offline Offline
  • Posts: 1191
  • Last login:September 23, 2020, 11:51:27 am
Re: Galaga upright restoration
« Reply #7 on: June 11, 2008, 09:46:12 am »
Looks like they cut out the interlock switch. You could put a female connection on each of end and pick up a  up for like 3 bucks on eBay or elsewhere. With that switch missing, if everything other than those two problems is normal, you can plug in your CPU all you want. No power will go to it. The interlock switch on the back is a safety which causes the machine to go off when you open the back door.


I am jealous of your mad rhymes.
"Son, all hobbies suck. But if you keep at it, you might find you managed to kill some precious time."

kayoteq

  • Trade Count: (+6)
  • Full Member
  • ***
  • Offline Offline
  • Posts: 186
  • Last login:May 28, 2022, 02:15:51 pm
    • Webmonkees arcade bin
Re: Galaga upright restoration
« Reply #8 on: June 12, 2008, 02:28:25 pm »
Electrical mayhem resolved

Part 1: AC
Safety interlock switch rebuilt (remember, the spares pile?)
fuse replaced coin door lights replaced..
bzzz... the low pitched hum of something.
Slight glow from the flourescent and then spectacular meltdown of the ballast. Okay, not spectacular, but nonetheless it went.
(spare ballast installed)
Puzzled overnight with that.. even my incandescant fixture wouldn't work..
morning came and duh- change the fuse that properly blew after the ballast went.
Probe reading verifies 120v where I had 25 before..
Also changed the starter thing just for fun.
Blink-blinkety.. now I can be enlightened by the B- grade Galaga marquee and know when the power's hot!


Part 2: DC
Tweaked all the conenctors, and traced down the disconnected wire- yellow/white and goes to the corner of the cpu harness.
schematic says logic ground. So.. That _should_ mean the ground on the switching power, correct?

Getting as much correct as possible before even letting the cpu near it.

Off to Step 2: Video

Rainy day, so I hooked up the Galaga once I found the video cord.
Self test, stuck at RAM OK. Chip at 4D (which they had labeled as bad) is hot!
At least it lives.. just confused.


« Last Edit: June 14, 2008, 01:50:03 pm by kayoteq »
If you order a pizza, put 1 quarter in their Galaga and the pizza's done before you are, you might be a video game junkie.. if you offer to tweak the crt , definitely.

kayoteq

  • Trade Count: (+6)
  • Full Member
  • ***
  • Offline Offline
  • Posts: 186
  • Last login:May 28, 2022, 02:15:51 pm
    • Webmonkees arcade bin
Re: Galaga upright restoration
« Reply #9 on: June 15, 2008, 04:58:22 pm »
Sorry if I seem to be talking to myself, but hey, I read these forums all the time to see how someone else solved a problem..


Problem 1: I don't know how to designate CPU from video. it's the Video 4D that was funky.
it's an eprom, not a clock thing. Which had made the techs I bothered quite puzzled as to why I was getting a screen.

By incredible luck, I had an original eeprom on foam in the cabinet. put in its correct place and took the mod chip ("fast") is all it says
and put it in the Video 4D. The contents would be wrong, but safe.

No more blocky graphics, but still stuck at RAM OK.

When I was figuring out the chip problem, I noticed an discrepancy between my diagrams and my board. As in, one of the
z80 chips was upside down. Turned it around, same result RAM OK. Same result? as if, the z80 is dead??

Went to my junk pile and extracted an appropriate z80 CPU (not z80a) and put it in the flipped CPU's sockekt.

BOOM

The good kind. It lives. Strange, blocky shapes that attack me when I give it quarters. But I expected such results there.

Now on to the normal thing this topic is for, Restorations.  And a purchase of a new Video 4D  eeprom. And lots of restoration parts
that would otherwise been going towards someone else figuring out the two-chip problem.


If you order a pizza, put 1 quarter in their Galaga and the pizza's done before you are, you might be a video game junkie.. if you offer to tweak the crt , definitely.

SirPeale

  • Green Mountain Man
  • Global Moderator
  • Trade Count: (+23)
  • Full Member
  • *****
  • Offline Offline
  • Posts: 12963
  • Last login:August 04, 2023, 09:51:57 am
  • Arcade Repair in New England
    • Arcade Game and Other Coin-Op Projects
Re: Galaga upright restoration
« Reply #10 on: June 15, 2008, 07:42:11 pm »
Nice catch there.  So many times when troubleshooting it's your eyes that are the best tool.

WunderCade

  • Hey Saint, wanna update my custom title? ;D
  • Trade Count: (+1)
  • Full Member
  • ***
  • Offline Offline
  • Posts: 3041
  • Last login:April 11, 2023, 07:54:12 am
Re: Galaga upright restoration
« Reply #11 on: June 16, 2008, 01:24:59 am »
Can we get a nice, non-cellphone, pic of it? Good detective work so far.

I watched you talking to yourself, with rhymes.....very intriguing. And apparently productive.


Mauzy

  • Trade Count: (+2)
  • Full Member
  • ***
  • Offline Offline
  • Posts: 1191
  • Last login:September 23, 2020, 11:51:27 am
Re: Galaga upright restoration
« Reply #12 on: June 16, 2008, 11:34:19 am »


I watched you talking to yourself, with rhymes.....very intriguing. And apparently productive.


I saw that too. A little odd, but hey. Whatever works... ;D
"Son, all hobbies suck. But if you keep at it, you might find you managed to kill some precious time."

kayoteq

  • Trade Count: (+6)
  • Full Member
  • ***
  • Offline Offline
  • Posts: 186
  • Last login:May 28, 2022, 02:15:51 pm
    • Webmonkees arcade bin
Re: Galaga upright restoration
« Reply #13 on: June 16, 2008, 12:22:26 pm »
It's only a problem when you start arguing or bossing yourself around. Or thinking out loud.
Okay, per request:

Yep, gonna need t-molding.  Not pictured: the ugly back where friend loaded it in the truck on its back. Not again. Will insist on upright
travel next time. He probably did that so we couldn't load two cabinets ;)

The thing that helps  a lot..

(yest that's a metal plate from one of the yard Pac-Mans.. don't worry it was doa.)

..and the current state of the roms.. but not melting ROM.  The recycled CRT from Superman is working fine.. I can't even see
the burn in. Ah the days of reliable equipment. Where have they gone?


Reproduced it in MAME so it's 'normal' until I get my chip done.


So very glad repro cpos are available.. But I've seen one Galaga with a rubber strip across the bend in the cp.. hmm..
The white stuff in the upper left is from where they spraypainted a big X on the cabinet..
washed right off the glass, the panel, not so much. Agg!


Okay, off to find boxes and packing foam for other things. .

If you order a pizza, put 1 quarter in their Galaga and the pizza's done before you are, you might be a video game junkie.. if you offer to tweak the crt , definitely.

RetroACTIVE

  • Trade Count: (+8)
  • Full Member
  • ***
  • Offline Offline
  • Posts: 1429
  • Last login:January 28, 2024, 04:27:52 pm
  • Gramps
Re: Galaga upright restoration
« Reply #14 on: June 16, 2008, 01:15:21 pm »
Your "boxy" galaga's are most likely ram on the video PCB... depending upon your board configuration it could either be

6M-6J and 6F-6C (1 of 8 "2147" ics total)

or

6H and 6B (1 of 2 "2148" ics total)

 :cheers:
Happy Gaming!

Mauzy

  • Trade Count: (+2)
  • Full Member
  • ***
  • Offline Offline
  • Posts: 1191
  • Last login:September 23, 2020, 11:51:27 am
Re: Galaga upright restoration
« Reply #15 on: June 16, 2008, 03:53:52 pm »
Dont do a blue strip on the CPO! The 30 bucks for a high-end (atleast thats what I paid for mine and it was  really nice) is worth it for a minty cpo. I was surprised how nice it looked, though it made my paint job look awful somehow...
"Son, all hobbies suck. But if you keep at it, you might find you managed to kill some precious time."

kayoteq

  • Trade Count: (+6)
  • Full Member
  • ***
  • Offline Offline
  • Posts: 186
  • Last login:May 28, 2022, 02:15:51 pm
    • Webmonkees arcade bin
Re: Galaga upright restoration
« Reply #16 on: June 16, 2008, 08:59:41 pm »
Your "boxy" galaga's are most likely ram on the video PCB... depending upon your board configuration it could either be

6M-6J and 6F-6C (1 of 8 "2147" ics total)

or

6H and 6B (1 of 2 "2148" ics total)

 :cheers:
Thanks..as far as I can tell, Video 4D was definitely toast (and toasting, if I put a slice of chip-sized bread on it)
and I reproduced my spare chip swap in MAME to reassure myself, and it looks identical to what it's doing.
Later rounds, the mutant Galags have intact sprites. Odd bug there, in one round the scores turned 180 degrees on the screen.
Haven't been able to reproduce that one..

But it was a bit confused, what with a 3600E fast mod chip being used for sprite graphics. I'm sadistic.

As far as CPO goes, I guess if I'm restoring, then dangit I gotta get a sticker.  The other is hooked to a USB gamepad for authentic MAME Galaga.  No harm there, it didn't have a cp wiring harness hooked up.
If you order a pizza, put 1 quarter in their Galaga and the pizza's done before you are, you might be a video game junkie.. if you offer to tweak the crt , definitely.

RayB

  • I'm not wearing pants! HA!
  • Trade Count: (+4)
  • Full Member
  • ***
  • Offline Offline
  • Posts: 11279
  • Last login:March 31, 2024, 12:42:45 am
  • There's my post
    • RayB.com
Re: Galaga upright restoration
« Reply #17 on: June 17, 2008, 04:46:02 pm »
Try cleaning the CP first. A good scrubbing will clean that right up, and then you can paint in the spots on the bend.  The thing I don't like about repro overlays is they just don't "feel" the same. (Now if you can get NOS, then no problem!)
« Last Edit: June 17, 2008, 04:54:58 pm by RayB »
NO MORE!!

kayoteq

  • Trade Count: (+6)
  • Full Member
  • ***
  • Offline Offline
  • Posts: 186
  • Last login:May 28, 2022, 02:15:51 pm
    • Webmonkees arcade bin
Re: Galaga upright restoration
« Reply #18 on: June 19, 2008, 10:52:28 pm »
Try cleaning the CP first. A good scrubbing will clean that right up, and then you can paint in the spots on the bend.  The thing I don't like about repro overlays is they just don't "feel" the same. (Now if you can get NOS, then no problem!)
real NOS exists? I thought that was just the term folks use when they're selling a repro.  ::)

Anyway, I don't know yet about doing the 'strip paint and restick' thing. Given the number of my other preecious cabs that need real parts, a sticker is fairly low in priority and budget. There's tears in the side art, but there's still function I have to restore to it first.

 there's a buzz in the speaker whenever it's on, I finally put a grounded plug on it, and it's not the volume..

I adjusted the pot from normal to MAKE IT STOP!! levels and back, so that's working good.
 something not hooked up in there, or a symptom of the modern switching supply

or that missing power cord for the filter board does the trick of stopping the interference noise ? :sigh: more shopping.
PM me if you have a spare.. Do the filter boards go bad too, needing a rebuild? It's hard to tell without it being 'complete'.


Oh, and just a bit OT, these are from a Reseller up the road from me with interesting taste in t-molding.. 

Their Galaga features neon Green molding, but at least _it_ has all the art in the right places.
$650 and $550 respectively. Front, side art, correct paint color not included.
 I of course respect anybody who takes on redoing pinball machines, but.. 100%?
It's like one of those 'what's wrong with this picture?' puzzles.
If you order a pizza, put 1 quarter in their Galaga and the pizza's done before you are, you might be a video game junkie.. if you offer to tweak the crt , definitely.

RayB

  • I'm not wearing pants! HA!
  • Trade Count: (+4)
  • Full Member
  • ***
  • Offline Offline
  • Posts: 11279
  • Last login:March 31, 2024, 12:42:45 am
  • There's my post
    • RayB.com
Re: Galaga upright restoration
« Reply #19 on: June 20, 2008, 01:36:18 am »
real NOS exists? I thought that was just the term folks use when they're selling a repro.  ::)
They exist. I bought one in 1999. It has a real nice thick textured feel to it.
NO MORE!!

kayoteq

  • Trade Count: (+6)
  • Full Member
  • ***
  • Offline Offline
  • Posts: 186
  • Last login:May 28, 2022, 02:15:51 pm
    • Webmonkees arcade bin
Re: Galaga upright restoration
« Reply #20 on: June 22, 2008, 12:21:00 pm »
Forced the cap kit issue by bumping one loose.  :dizzy: Just finding the weak points. Restoration of capacitance in progress. 27 years fine, then I come along. Ah well, such is the risks of me. More (hopefully) non-destructive cleaning to continue.  Good news is I found a proper polarized plug for the CRT so no more guesswork on the mains polarity. Will use heatshrink tubing so it doesn't look hacked like it was. May put the unused power supply board back in place just for 'decor'. Still have the buzzing speaker problem.


Update: Caps swapped, screen clearer. EEPROM installed, but the computer is now fouling up again..
 It resets right when the boom should come along. Ahead 2 steps, back one..


« Last Edit: July 06, 2008, 11:09:39 pm by kayoteq »
If you order a pizza, put 1 quarter in their Galaga and the pizza's done before you are, you might be a video game junkie.. if you offer to tweak the crt , definitely.

coltchillin

  • Trade Count: (0)
  • Full Member
  • ***
  • Offline Offline
  • Posts: 98
  • Last login:February 06, 2010, 05:28:43 am
    • My Midway replica project Flickr
Re: Galaga upright restoration
« Reply #21 on: July 12, 2008, 08:56:20 am »
Quote


if that ms pac would have an alternative color scheme for the art (matching the black etc) it COULD look pretty cool!

kayoteq

  • Trade Count: (+6)
  • Full Member
  • ***
  • Offline Offline
  • Posts: 186
  • Last login:May 28, 2022, 02:15:51 pm
    • Webmonkees arcade bin
Re: Galaga upright restoration
« Reply #22 on: August 06, 2008, 06:02:49 pm »
Just thought I'd give a basic update. My cap replacement is still holding, the colors take a bit to all come in, sometimes it takes a bump to get the red to show up. I'm using a clone board at the moment as the PCBs are off at the shop. About time for the once-every-so-often checkin with the tech to see how things are going. I figure a week is a decent interval so as to not be annoying.

Got in my replacement sticker. I know, I know.. it's not really that bad, but stare at the two, compare the textures, and realize, "oh yeah, this thing has had constant use up to the point that it broke and they gave up on it.."

Plus I had to get one of those life lessons on NOS/not NOS. I"m sure someone knows where these came from originally, but hey,
copyright Midway is more accurate for a Midway game cabinet than oh, copyright Namco.. But wow, who leaves a whole word off?

Where's Waldo? The seller's picture, and what I got.


I stared and stared at my originals; the font is off on the instructions (should be bold and a bit more kerning)  the registration is a bit wonky in this corner, compared to the photo the seller sent me..  but that's a portion you kinda don't look at directly.

The colors are dead-on, despite my photo (inset) and even my originals have registration errors and some stencil leaks..

Of course, the photo they sent included the relevant missing word, so it was my fault. I was mesmerized by the shiny thing.

Preeecious repro art.. So cleeen and free of hobittses filthy finger presses.

This is going to be a rough time peeliing off an original to put this one on.. Oh, and the technique as well. I've been practicing on some generic conversion panels to get the method down.. much better than the first time I did sticker removal. I've been perusing the forum threads for methodology.. removing stickers, I've done.. but those were conversion overlays, not a original.. Oh boy.


I'm not up to that point, so anyone who wants to scream at me to stop, leave it be, feel free..

Do note that I'm doing this on the one that's not pictured, my spare panel with similar edge wear. So I'll always have one original to have and to keep.
If you order a pizza, put 1 quarter in their Galaga and the pizza's done before you are, you might be a video game junkie.. if you offer to tweak the crt , definitely.

WunderCade

  • Hey Saint, wanna update my custom title? ;D
  • Trade Count: (+1)
  • Full Member
  • ***
  • Offline Offline
  • Posts: 3041
  • Last login:April 11, 2023, 07:54:12 am
Re: Galaga upright restoration
« Reply #23 on: August 07, 2008, 01:56:27 am »
I have a tip for you on the removal of your old CPO. Use lacquer thinner. I recently did this on my old Ms. Pac CPO so I could prep it for sandblasting.

This is what I did. I worked the edge of the old CPO up off the control panel. I then titled the control panel down toward the ground using gravity to my advantage. I slowly poured lacquer thinner down into the crease between the CPO and metal. A second person helping me peeled the old CPO right off as I poured.

The lacquer thinner turned the old adhesive into a  gel-goo and the old CPO came right off easily. Followed up with a putty knife for removal of what was left of the gooey mess and that was that. It took like five minutes - tops.

Once the thinner comes in contact with that backing adhesive, you'll be amazed at how easily it peels.

**Do not use this method if you want to keep the old CPO, it will be useless afterward.
« Last Edit: August 07, 2008, 02:59:30 pm by WunderCade »

kayoteq

  • Trade Count: (+6)
  • Full Member
  • ***
  • Offline Offline
  • Posts: 186
  • Last login:May 28, 2022, 02:15:51 pm
    • Webmonkees arcade bin
Re: Galaga upright restoration
« Reply #24 on: August 18, 2008, 02:38:47 pm »
Slightly OT rant: the other  day, I encountered a 20th anniversary mspac/galaga cocktail. they wanted 50 cents for the priveidge. Ah well.. Whoah, that's a high score.. 637,000? Um..

About wave 8, I was thinking, this is too easy. stopped my regular fire button pattern and just held it down.

What?

It was like Rambo going out for tea and crumpets. A massacre.

Eventually around round 14, I lost the final fighter.

The lighting was bad in the place and you could hardly see.. excuses, excuses.

Then.. The Final Insult:

"Insert coin to continue"


Wha?


No wonder it had such a crazy high score.

 I was saving my other 50 for the pinball anyhow.

We will soon return to our regularly scheduled on-topic discussion.

*translation: writer prefers the original Midway 1980s program from the factory. And hadn't seen a anniversary edition before.

If you order a pizza, put 1 quarter in their Galaga and the pizza's done before you are, you might be a video game junkie.. if you offer to tweak the crt , definitely.

kayoteq

  • Trade Count: (+6)
  • Full Member
  • ***
  • Offline Offline
  • Posts: 186
  • Last login:May 28, 2022, 02:15:51 pm
    • Webmonkees arcade bin
Re: Galaga upright restoration
« Reply #25 on: August 28, 2008, 02:09:11 pm »
It lives again! greg at gls1 had a bit of a challenge, then a snafu with the post office, but if finally showed up.

I still have a loose red  signal wire somewhere that a precision whack to the side will fix,
but about to the point of reproducing the missing back door, locking the coin  box and declaring it functional, if not Midway Minty.

Not bad for something entirely assembled, funded and tweaked with someone else's trash, and forum user's cash..  ;D

Gotta save up for that high score kit, though. No need to burn in my game monitor when I'm not playing..
Suggestions welcomed on how best to conserve things.. I guess other than turning it off  ::)

over 100k 2nd game, still have a sticky leaf switch I have to fight sometimes..
but nice to have something original and working for a change.

If you order a pizza, put 1 quarter in their Galaga and the pizza's done before you are, you might be a video game junkie.. if you offer to tweak the crt , definitely.

WunderCade

  • Hey Saint, wanna update my custom title? ;D
  • Trade Count: (+1)
  • Full Member
  • ***
  • Offline Offline
  • Posts: 3041
  • Last login:April 11, 2023, 07:54:12 am
Re: Galaga upright restoration
« Reply #26 on: August 28, 2008, 02:22:13 pm »
So, no cosmetic restoration, just sort of a "get it functioning" restoration?

SirPeale

  • Green Mountain Man
  • Global Moderator
  • Trade Count: (+23)
  • Full Member
  • *****
  • Offline Offline
  • Posts: 12963
  • Last login:August 04, 2023, 09:51:57 am
  • Arcade Repair in New England
    • Arcade Game and Other Coin-Op Projects
Re: Galaga upright restoration
« Reply #27 on: August 28, 2008, 02:55:16 pm »
So, no cosmetic restoration, just sort of a "get it functioning" restoration?

Give the guy time!  I don't blame him for getting it functional first.

Mauzy

  • Trade Count: (+2)
  • Full Member
  • ***
  • Offline Offline
  • Posts: 1191
  • Last login:September 23, 2020, 11:51:27 am
Re: Galaga upright restoration
« Reply #28 on: August 28, 2008, 05:49:04 pm »
It lives again! greg at gls1 had a bit of a challenge, then a snafu with the post office, but if finally showed up.

I still have a loose red  signal wire somewhere that a precision whack to the side will fix,
but about to the point of reproducing the missing back door, locking the coin  box and declaring it functional, if not Midway Minty.

Not bad for something entirely assembled, funded and tweaked with someone else's trash, and forum user's cash..  ;D

Gotta save up for that high score kit, though. No need to burn in my game monitor when I'm not playing..
Suggestions welcomed on how best to conserve things.. I guess other than turning it off  ::)

over 100k 2nd game, still have a sticky leaf switch I have to fight sometimes..
but nice to have something original and working for a change.


Did he let you know what was wrong with it? He sent updates every couple days when I had him fix one of my Pac Boards
"Son, all hobbies suck. But if you keep at it, you might find you managed to kill some precious time."

kayoteq

  • Trade Count: (+6)
  • Full Member
  • ***
  • Offline Offline
  • Posts: 186
  • Last login:May 28, 2022, 02:15:51 pm
    • Webmonkees arcade bin
Re: Galaga upright restoration
« Reply #29 on: August 29, 2008, 02:07:24 pm »
Heh, well, it's really in fair to good shape,  and I have a few with actual structural work that needs to be done before a makeover on this one. Plus, it's all still all a learning process, digging through the forum archives, asking confusing questions..  :P

 the cabinet is a bit um..loose, about a 1/8 gap between the control panel sides, so it wouldn't hurt to get that a bit tighter. I am committing to doing the control panel overlay, which gives me back that nice and new look.

I would be more willing to strip and replace the artwork if the stuff was in bad shape.. or true reproductions..  that 'NOS' cpo kinda burnt me on that.  I also have  spare glass bezels, one of which is in better shape, but saving that for when I'm done pulling parts in/out.

So yeah, at this point I'm kinda using my budget on electronics before artwork.  I have a spare complete Galaga power supply/harness, and may go for restoring that to working order and get rid of the modern switching supply, so I consider that a 'restoration' as well.. :)

I have access to a complete workshop to fabricate anything I need cabinet-wise. And I do, at times. But my house is on a hill, and one really needs a well ventilated area for a good stripping/sanding/painting process. No garage,or even a paved driveway for that matter.

I know there's some who are 'restore the cabinet, then fix the game'. My specialty is electronics, so I tend to lean towards game first.

I would like to figure out how to restore that marquee.. the white areas have thinned out somewhat, but I'll practice on a broken marquee I have first. Tricky, that..

As far as the repair.. sorry, I thought I had posted the epic before. The wrong z-80 was from when I was trying my varied spares
to get things going, since my logic probing showed a stop around 1/2 way through the test cycle.  Gotta know when you're beat,
though, and refer servicing to qualified service personnel.


Here's what I found on your Galaga board set:

Stops at RAM OK

There were two reasons for this:

1) The Z-80 chip at location 4E was not a Z-80 CPU chip, it was a Z-80 PIO
chip - replaced with correct part.

2) The Custom Namco "06" chip at location 2L was blazing hot - chip was no
good - replaced with known good part.

Now, board almost completes boot-up, but gets to grid pattern and stops,
then resets, and does this process over and over again.

This problem caused by a failed Custom Namco chip "51" at location 4H.
Replaced 51 chip and board boots up all the way.

Next problem:

Board boots up, and coins up - start a game, and it goes for about 20-30
seconds, and freezes, then resets.

While examining the main program, testing device finds intermittent
failure while reading program chip 3M. Replaced all 4 main program chips
with last revision Galaga code. (3K, 3L, 3M and 3N)

Now the board plays without resetting - but the sound / music is not
exactly right - some tones are missing/distorted - this problem caused by
failed sound prom at location 1D - replaced, and the music is correct
again.

Board is ready to run for the 3-day burn-in.

Left running on a Friday, Came into shop on Monday, and the video has
lines in it - this problem caused by failing Custom Namco chip "02" at
location 4H on video board - replaced - video is good again.

Board is ready to run for the 3-day burn-in, for try #2

Board set runs fine for about 2 days, and starts resetting at random -
found a failed 74LS367 chip at location 1M - replaced, board runs fine
again.

Board is ready to run for the 3-day burn-in, for try #3

This time, the board runs for 3 days, and all is still OK.

As he put it, "sometimes it's a simple fix, sometimes not". That, and he's got about 10 more in the shop. Busy guy.


And I have a few to fix to working status before I start over again, going over the detailis and cleaning up/fixing cosmetics.
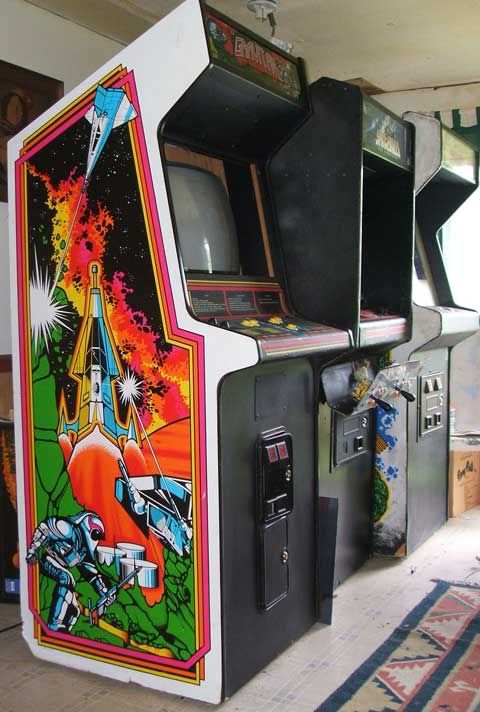

The Gravitar just needs a back door and fixing the back corner base that's kinda shredded/rotted.. um, besides fixing the vector chassis.
The Asteroids Deluxe- well, let's just say it's been converted into jamma oblivion as well as the panels glued over the original art.
The Centipede.. well, that's the first one I got and that's been an effort to get to something resembling original.
And that doesn't include the cocktail that needs custom controll panels due to a Trivia Whiz conversion. Not easy fitting controls
to Galaxian panels with 5 extra holes.. But that's all reversible once I end up with the proper parts.


If you order a pizza, put 1 quarter in their Galaga and the pizza's done before you are, you might be a video game junkie.. if you offer to tweak the crt , definitely.

Mauzy

  • Trade Count: (+2)
  • Full Member
  • ***
  • Offline Offline
  • Posts: 1191
  • Last login:September 23, 2020, 11:51:27 am
Re: Galaga upright restoration
« Reply #30 on: September 01, 2008, 05:38:34 pm »
Wow. Definitely got your money out of that repair. Whilst getting a Pac board fixed I asked how he can charge low flat rate like that. Apparently he gets a lot of single part fixes, but a few "real work" (like yours) fixes. It evens out. At any rate, he does great work.
"Son, all hobbies suck. But if you keep at it, you might find you managed to kill some precious time."

kayoteq

  • Trade Count: (+6)
  • Full Member
  • ***
  • Offline Offline
  • Posts: 186
  • Last login:May 28, 2022, 02:15:51 pm
    • Webmonkees arcade bin
Re: Galaga upright restoration
« Reply #31 on: September 01, 2008, 11:50:29 pm »
Yeah, I was impressed by his setup, and I think it's like any repair service; sometimes it's just one chip turned around, sometimes it's a major undertaking.
I had mixed feelings about this, being the techie sort.. more like 'I hope it's complicated', because I tried and tried to figure out the problem..

Only glitch I've had was some lines that appeared in the bug explosions, but they went away in the same game.. dunno what's going on there. More testing, more testing. I've been getting some good 160k+ scores. Guess it's the convenience of having a barstool and no distractions. I get my Rush mix tape going and I'm Twin Galaxies bound  ;D
If you order a pizza, put 1 quarter in their Galaga and the pizza's done before you are, you might be a video game junkie.. if you offer to tweak the crt , definitely.

Mauzy

  • Trade Count: (+2)
  • Full Member
  • ***
  • Offline Offline
  • Posts: 1191
  • Last login:September 23, 2020, 11:51:27 am
Re: Galaga upright restoration
« Reply #32 on: September 02, 2008, 07:17:40 pm »
I was worried about the same thing. I needed most of the chips on my 284 and 285 boards and all my video rams replaced on that Pac, so I was glad to see it was something I would have never figured out at that time.

Make sure you have the Exit... Stage Left version of YYZ on there. Good stuff for sure.
"Son, all hobbies suck. But if you keep at it, you might find you managed to kill some precious time."

kayoteq

  • Trade Count: (+6)
  • Full Member
  • ***
  • Offline Offline
  • Posts: 186
  • Last login:May 28, 2022, 02:15:51 pm
    • Webmonkees arcade bin
Re: Galaga upright restoration
« Reply #33 on: September 03, 2008, 05:59:58 pm »
Make sure you have the Exit... Stage Left version of YYZ on there. Good stuff for sure.

Heh, it was also a reference to the Futurama episode..


"Everybody: stay in straight lines and move left to right in formation!"
If you order a pizza, put 1 quarter in their Galaga and the pizza's done before you are, you might be a video game junkie.. if you offer to tweak the crt , definitely.

Mauzy

  • Trade Count: (+2)
  • Full Member
  • ***
  • Offline Offline
  • Posts: 1191
  • Last login:September 23, 2020, 11:51:27 am
Re: Galaga upright restoration
« Reply #34 on: September 03, 2008, 06:11:40 pm »
Yeah. I thought so, just making sure you make it right...  :cheers:
"Son, all hobbies suck. But if you keep at it, you might find you managed to kill some precious time."

vidmouse

  • Trade Count: (0)
  • Full Member
  • ***
  • Offline Offline
  • Posts: 588
  • Last login:November 08, 2021, 10:13:41 am
  • Oop! Ack! Thppphbt!
    • Vidmouse's Arcade
Re: Galaga upright restoration
« Reply #35 on: September 04, 2008, 04:34:05 pm »
Congrats on getting this working!
Been following this for awhile, was hoping you'd get it yet this summer.

Board is ready to run for the 3-day burn-in.

Is a 3-day burn-in typical?  Do they just plug it in and
let the attract mode (or whatever you call it) play
itself for 3 days to see if there's problems?  Why 3 days?

I re-fired my Galaga cocktail up after not messing with it
for a few weeks... it was having the same Rom 3H errors
and misc. resets... then I just let it warm up a bit and
now it seems like it runs ok... I'm leaving it plugged in now
at least overnight to see if the highscore resets or anything
else quirky goes on...


kayoteq

  • Trade Count: (+6)
  • Full Member
  • ***
  • Offline Offline
  • Posts: 186
  • Last login:May 28, 2022, 02:15:51 pm
    • Webmonkees arcade bin
Re: Galaga upright restoration
« Reply #36 on: September 08, 2008, 06:13:02 pm »
72 hours of continuous operation would put about everything to their average operating temperature for an extended time.

I don't think he accounts for crt heat, but seems a valid method of sorting out any problems that don't show up for a few hours.
It's always cycling through all the functions, sound, etc. and anything that would be going wrong would build up to an error in the data.
One bit not writing over that time would eventually crash it or cause visual anomalies.

So far it's working fine. I have a loose red wire that I need to dig in and fix, it's distracting.
The games have it easy compared to their prime, but they're older. Kinda like (some of) us.
I'm thinking of adding PC fans to all my games to keep em in a less extreme state.
If you order a pizza, put 1 quarter in their Galaga and the pizza's done before you are, you might be a video game junkie.. if you offer to tweak the crt , definitely.

kayoteq

  • Trade Count: (+6)
  • Full Member
  • ***
  • Offline Offline
  • Posts: 186
  • Last login:May 28, 2022, 02:15:51 pm
    • Webmonkees arcade bin
Re: Galaga upright restoration
« Reply #37 on: October 06, 2008, 10:57:31 pm »
Okay, step #34 of ? ? ? completed. The Repro Overlay Install.


Lots of tips ganked from others on here, but this went a _lot_ easier than some of my un-converting control panel overlays.

Vital Tool: Heat Gun. On low speed.

Method:
Remove everything. Duh. set aside for cleaning, putting the carriage bolts in a drill and polishing them with sandpaper results in keen cleen.
Consider the leaf switches to be very sensitive instruments and make sure there is no way for them to get bent in any fashion.
Do _not_ take them apart at the cork-metal-cork area unless you are there for a specific reason. Just removing them from the buttons/removing the metal panels from the joystick assembly.. Actually rebuilt the joystick because it had been going right randomly by itself. Not a desired symptom.
Tilt axle- grease (like axle grease) or some other grease? i went for motor oil for now since that was what was on-hand.

Anyhow.. now to the sacrilege. I stared and stared at my two panels deciding which would be the victim/restored one. Turns out that spraypaint the vendor had put on the
game (big X on the glass, which came off) helped the decision, as it wouldn't go away. Normally a person doesn't have that problem, but mine was a 'total'. Heh.

Heat gun on low speed, starting at the bottom front of the panel. a razor just to start things. I applied heat to the _back_ of the panel to help things along, and direct heat only
sparingly. I wanted to remove it as intact as possible, as you not only get some very unique stickers,  it's a lot less trouble to remove.
Back and forth, corner swapping, edges, razoring the stuck adhesive layer when it stayed on the metal. Patience.
As is common, the front edge in the middle was quite worn and has holes worn in it. if you've been 're-activating' the adhesive with the heat gun. it might even make it past there somewhat intact. Watch for splits and nip them in the bud or else you'll rip the thing. Keep using that heat on the back, move around, up to your heat tolerance.

At some point, you may need to go from the top of the panel. That part is folded over the metal, keep using the heat, at a distance, as your assistant. Again, from the back will get that metal pretty toasty and help that adhesive layer off.

At a point, the front edge (with all the worn holes may separate and so much for a fully intact original label. But, if you do this slowly and carefully enough, you've gotten the sticker all the way off with just a few stray adhesive layers that won't take much to remove. Since that layer doesn't have art, it's okay to heat it up a bit to get it loose. Surprisingly little of that remained. End result: a sticky, bare metal panel.

At this point some folks would sand and primer the panel. I lucked out in that this panel is about 98% rust-free, and again, quite sticky. So I went for the overlay install.

First, with the backing still on it, do a test fit with some bolts and buttons. Everything lining up right? (mine was pre-cut), so a test fitting showed that the button holes
were _not_ going to be perfectly covered. The buttons do that job. You mainly want the bolt holes to line up, then everything else will. Okay then.

Turn the panel on its side, so you can use the floor as a alignment point.

Once you've practiced enough, remove that backing. You're committed now,

Two sticky surfaces are quite attracted to each other, so try to get them as lined up as possible before letting them touch. I did the control surface first, making sure everything lines up before pressing out any air bubbles and/or committing to 'really stuck on there'. I had about 2 mismatches before getting it right. Worrying every time I had to pull apart. Okay, control surface done. now, go for the bend, pressing it from there downwards to the bottom.
If everything goes right and you lined up the bolt holes earlier, your lower two there will line up as well as the edges. Score! keep going over things once you know it's lined up, with your hands and/or a towel to really get these things together.

Everything hunky dory? Now you can go back up to the top of the panel, the upper edge, and fold it over the top and press that as well. If you have a decently adhesive overlay,
then this is no problem and the final step other than re-assembly of the controls. squish squish. now, you have a nice overlay, ready to put all those polished and cleaned buttons and things back on.

A tip on putting one of these back together if it's original parts: a little phenomenon called 'wire memory'. You'll be able to put the 1 2 start buttons and even the joystick lever leafs back in the right places by just relying on what shape the wires are. Both the buttons and the joystick have two alignments in their assembly mounts, so it should go back together swimmingly.
Have a test run. Everything working? I had a joystick leaf not make contact, so I violated the rules of leaf switches and bent it towards the contact.
Don't do this. Just because I got lucky and it worked.. The barest, minimal amount necessary for reliable operation.
There are tools for this, I don't have one. Again, don't.


Finally- all together. Now, have a game run. If you get about the same score, and if anything a bit more reliable control of the ship, then you've done good.
Now all you have to do is remember to clean your hands before playing, filthy slob you..

And my current opinion of the overlay I got: pretty good. Nice surface, good adhesive. Just that darn 'reserved' word missing, but overall it's a quality repro.

(looks back at posting) Whoa, that was a minor novel, wasn't it?


If you order a pizza, put 1 quarter in their Galaga and the pizza's done before you are, you might be a video game junkie.. if you offer to tweak the crt , definitely.

Level42

  • Wiki Contributor
  • Trade Count: (+5)
  • Full Member
  • ***
  • Offline Offline
  • Posts: 5965
  • Last login:November 13, 2018, 01:56:39 am
  • A Suzo stick is a joy forever...
Re: Galaga upright restoration
« Reply #38 on: October 07, 2008, 12:59:24 am »
2% of rust is the start of more.

kayoteq

  • Trade Count: (+6)
  • Full Member
  • ***
  • Offline Offline
  • Posts: 186
  • Last login:May 28, 2022, 02:15:51 pm
    • Webmonkees arcade bin
Re: Galaga upright restoration
« Reply #39 on: October 07, 2008, 12:10:28 pm »
Agreed, (I have a 74 Beetle), but in this case it was just the exposed area at the bend, just where the overlay had worn away.
I am going to refinish the controller, though. Cleaning the surface rust spots removed the microthin paint layer.. The luxury of having a spare..Glad I stopped selling them off before I ran out.

Now I've got a clean spot and will have to go outwards to match the look. Edges next, ganking methods from darth's project. This one isn't too bad compared to the Gravitar that loses base panel edge every time it gets moved.

After a while of playing and booting, the PCB hasn't acted up once since that one brief image rom hiccup. Guy does a keen job.

Still have an issue of it taking about 10-15 minutes for the CRT to 'warm up enough' to make the green show up. the connector has issues with red, and maybe the green signal isn't making contact till the boards expand enough (already did all the standard caps on this G07) So at a point I gotta pull the chassis and reflow the connectors for the rgb. I overlooked it the first time (and it was, indeed the first time doing a cap kit)

Worth it rather than having somebody over and having to wait for all the colors to show up..
The other G07 I have boots right up in color, so there's something not connecting right off.


If you order a pizza, put 1 quarter in their Galaga and the pizza's done before you are, you might be a video game junkie.. if you offer to tweak the crt , definitely.