Main Restorations Software Audio/Jukebox/MP3 Everything Else Buy/Sell/Trade
Project Announcements Monitor/Video GroovyMAME Merit/JVL Touchscreen Meet Up Retail Vendors
Driving & Racing Woodworking Software Support Forums Consoles Project Arcade Reviews
Automated Projects Artwork Frontend Support Forums Pinball Forum Discussion Old Boards
Raspberry Pi & Dev Board controls.dat Linux Miscellaneous Arcade Wiki Discussion Old Archives
Lightguns Arcade1Up Try the site in https mode Site News

Unread posts | New Replies | Recent posts | Rules | Chatroom | Wiki | File Repository | RSS | Submit news


Author Topic: Project A-kab = FINISHED!  (Read 18799 times)

0 Members and 1 Guest are viewing this topic.

ablizno

  • Trade Count: (+1)
  • Full Member
  • ***
  • Offline Offline
  • Posts: 177
  • Last login:August 15, 2011, 09:04:29 pm
  • [insert text here]
Re: Project A-kab
« Reply #40 on: May 16, 2008, 11:58:04 pm »
Surprised u dont like the tinted glass, also to fix your led problem did u try cutting wax paper and sticking them in the top of the buttons, it should even out the light and make it look nicer.

somunny

  • Trade Count: (+8)
  • Full Member
  • ***
  • Offline Offline
  • Posts: 1618
  • Last login:September 05, 2018, 02:22:25 pm
  • Is it hot in here?
Re: Project A-kab
« Reply #41 on: May 17, 2008, 12:03:49 am »
You could also try lightly sanding the led surface with sandpaper or an emery board.  That worked for me.

Franco B

  • Trade Count: (+10)
  • Full Member
  • ***
  • Offline Offline
  • Posts: 3766
  • Last login:February 15, 2024, 09:14:06 am
Re: Project A-kab
« Reply #42 on: May 17, 2008, 01:40:54 am »
Looking good!

I must say I prefer the look of the clear buttons to the Electric Ice ones, I cant say I have ever been a fan of them.

That CP looks sharp  8)

I take it you are not a Street Fighter fan?

Zobeid

  • Trade Count: (0)
  • Full Member
  • ***
  • Offline Offline
  • Posts: 238
  • Last login:April 21, 2021, 10:36:32 pm
Re: Project A-kab
« Reply #43 on: May 17, 2008, 07:56:41 am »
Surprised u dont like the tinted glass, also to fix your led problem did u try cutting wax paper and sticking them in the top of the buttons, it should even out the light and make it look nicer.

I haven't given up on the tinted glass yet.  Last night I adjusted the brightness and contrast settings of the video card, using the Nvidia control panel.  It actually shows a tiny TV test pattern which is extremely helpful if you know how to read it.  I also put in some adjustments in "vector.ini" to brighten up the vector games, and I'm much happier with the look now.

I already have diffuser discs (from GroovyGameGear) in the buttons, they help.  Since tuning down the brightness I think the buttons will be okay.


Zobeid

  • Trade Count: (0)
  • Full Member
  • ***
  • Offline Offline
  • Posts: 238
  • Last login:April 21, 2021, 10:36:32 pm
Re: Project A-kab
« Reply #44 on: May 17, 2008, 08:01:57 am »
I take it you are not a Street Fighter fan?

You are correct.  I designed it to be hostile to that game.  So if somebody comes in and wants to play Street Fighter, I have an excuse not to.  "Sorry, don't have the controls for it.  How about a nice two-player game of Joust?  Rip Off?  Gauntlet?  Alien Syndrome?  Raiden?  Wizard of Wor?"


psychotech

  • Trade Count: (0)
  • Full Member
  • ***
  • Offline Offline
  • Posts: 525
  • Last login:October 27, 2011, 11:01:50 pm
    • psychotech
Re: Project A-kab
« Reply #45 on: May 17, 2008, 09:01:40 pm »
I designed it to be hostile to that game.

:laugh2:

Anyway..

Zobeid,
Looks really awesome. Can't wait to see the final cabinet   :applaud:

And yes, gimme Wizard of Wor ..and a living opponent and  ........!!!!

All the best with the build  :cheers:

psychotech

Zobeid

  • Trade Count: (0)
  • Full Member
  • ***
  • Offline Offline
  • Posts: 238
  • Last login:April 21, 2021, 10:36:32 pm
Getting Near The End
« Reply #46 on: May 20, 2008, 10:15:41 am »
As of this morning. . . .


Note the wireless keyboard perched atop.  All configuration is done through that.

Note also that I changed the monitor angle and made it a little more vertical than it was at first.

I am not sure about the blue paint I used on the bezel frame, maybe I should go back and make it darker blue, or even black?  The bright blue looks a bit cheesy. . .  But the artwork is going to be brightly colored too, so maybe it won't seem so out of place after that's on.

Still to do. . . .

All The Artwork.  (marquee, sides, front)  This is the only BIG thing left, and I haven't even ordered it yet.  So it's going to take a while.

A few minor changes to the CP.  (I'll be getting one of the new deluxe spinner tops, for example.)

Better photos.  (I'm very limited right now because my main computer is out for repairs, and I can't run Aperture.)

And I want to write some more about the rotating monitor and how it works.  There's been a lot of interest lately in automated motorized systems, but I am very happy with how my manual setup is working.


Zeosstud

  • Trade Count: (0)
  • Full Member
  • ***
  • Offline Offline
  • Posts: 572
  • Last login:April 09, 2024, 08:13:15 pm
  • I want to build my own arcade controls!
Re: Project A-kab
« Reply #47 on: May 22, 2008, 10:37:39 am »
Cab looks pretty nice from what I can see.  I am sure the artwork will be the icing on the cake.  Looking forward to more info on your rotating monitor.

Zeosstud

Zobeid

  • Trade Count: (0)
  • Full Member
  • ***
  • Offline Offline
  • Posts: 238
  • Last login:April 21, 2021, 10:36:32 pm
Re: Project A-kab
« Reply #48 on: May 27, 2008, 08:30:02 am »
I put extended discussion of the rotating monitor into its own thread here:

http://forum.arcadecontrols.com/index.php?topic=80459.0

And while I'm posting, I'll take a moment to point out a few other things. . .

The Kreg Jig:  I pretty much assembled the whole cabinet using the Kreg Jig and pocket screws.  It lives up to its billing.  It makes joining two pieces of wood fast and so easy that even I could hardly mess it up.  Highly recommended.

The router:  When I was reading Saint's book, it gives the impression that you need a router to slot-cut your cabinet for T-molding, and by the way you might find a few other uses for it.  Ha!  I used mine for slot-cutting, trimming, cutting curves, cutting patterns, inletting and cutting acrylic sheet.  All this with a little Ryobi fixed-base router that I found at the pawn shop.  Don't waste time trying to figure out how to get by without a router.  Figure out how you can get one!

Ultrastik 360s:  A lot of people have been going on about these things as if they were the Holy Grail of joysticks.  I found out why.  It's because they are the Holy Grail of joysticks.  I love them to death.  I put in the stiffer springs, but no restrictors.  I love the feel and they work great for everything: Pac Man and Q*Bert, Robotron and Crazy Climber, and analog games like Star Wars.  Even many trackball games are quite playable with them.

I got the deluxe spinner top with the "Web Beast" graphics a few days ago.  It matches the graphics on my control panel.  It looks good, and it actually rotates smoother and easier than the old knob (with energy storage cylinder) did.  I guess the deluxe knob must be better balanced.  I blew away my high score at Typhoon 2001 last night.  TT2 and deluxe knob = highly recommended.


Zobeid

  • Trade Count: (0)
  • Full Member
  • ***
  • Offline Offline
  • Posts: 238
  • Last login:April 21, 2021, 10:36:32 pm
Frustration Day
« Reply #49 on: May 30, 2008, 05:33:53 pm »
Still trying to get my main computer fixed.  After two weeks of delays and excuses, the local repair shop finally got a new power supply for it.  Then they put in the new power supply and the computer still wouldn't start up.  Now they think I need a new motherboard.    :banghead:

Today my artwork arrived!  I put the marquee in with no problem, then started to work on the front kickplate art.  I tried to cut out a hole in the middle and then put it all the way around the coin door.  That didn't work, by the time I got to the bottom there was a huge wrinkle.  I tried to relieve the wrinkle by cutting it, but then there was a huge overlap that was unacceptable.  So, I ripped the whole thing off and tossed it in the trash, and ordered a replacement.  $50 down the drain.    :cry:

I'm not going to even try applying the side art until I get the new front panel art and get it applied successfully, to be sure I know what I'm doing.  I just flushed $50 away, I don't want to mess up $200 worth of side art next.


ablizno

  • Trade Count: (+1)
  • Full Member
  • ***
  • Offline Offline
  • Posts: 177
  • Last login:August 15, 2011, 09:04:29 pm
  • [insert text here]
Re: Project A-kab
« Reply #50 on: June 01, 2008, 12:12:36 am »
Now im nervous to put on my art work. ??? but can u at least take some pics of your artwork. I love Project A-ko and can not wait to see your artwork.

For some strange reason this makes me wish i did an astroboy cab (60s style not 80s)

Well better luck on next time. Sorry to hear that it didn't work.

Zobeid

  • Trade Count: (0)
  • Full Member
  • ***
  • Offline Offline
  • Posts: 238
  • Last login:April 21, 2021, 10:36:32 pm
Re: Project A-kab
« Reply #51 on: June 01, 2008, 04:47:55 pm »
Now im nervous to put on my art work. ??? but can u at least take some pics of your artwork. I love Project A-ko and can not wait to see your artwork.

I'll have to get back to you on that, my main computer is still down for repairs.

Also. . .   As I previously noted, the artwork has nothing to do with Project A-ko.  It's just off-the-shelf stuff.  So don't get your hopes up expecting something super special.

Zobeid

  • Trade Count: (0)
  • Full Member
  • ***
  • Offline Offline
  • Posts: 238
  • Last login:April 21, 2021, 10:36:32 pm
Finished!
« Reply #52 on: June 19, 2008, 08:59:03 pm »
I got the replacement front-panel art in the mail this morning, so I got busy and finished putting all the artwork on the machine.  I also have my new computer, so I was able to take a fairly decent photo. . . .
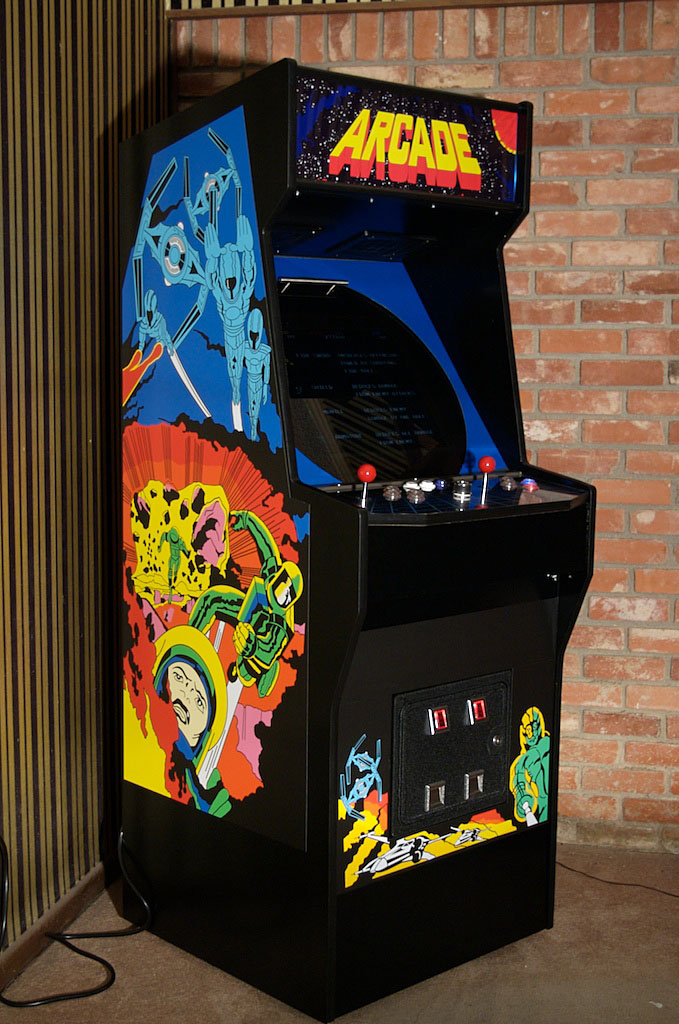


Yep, it's "Defender prototype" artwork.  Ever since I first saw that artwork, I loved it.  I also think it perfectly captures the 1980s classic arcade theme that I wanted.

I hereby declare this cabinet "mostly finished"!  I have a few quibbles that I'll probably be working on in the future.  To wit:

I'm still not 100% sure about the tinted front glass.  I may go back and create a clear one at some point.

I want to get a white housing for the PAUSE button.

I want to wire up red LEDs to the P1 and P2 start buttons, for the sake of those games which can flash the start buttons after you put in credits.

The smart strip isn't completely reliable, I can't ever seem to get it adjusted so it will always switch on and off when it's supposed to.  Not sure what to do about that.

I'm thinking about hooking up a pinball knocker for Q*Bert at some point in the future.  It's a bit complicated to do, though.

I may also put in a second NovaMatrix LED lightbar for the marquee sometime, it's not lit up as brightly as I would like.
« Last Edit: June 19, 2008, 09:02:40 pm by Zobeid »

spystyle

  • Thanks alot, now I have to build a time machine and warn myself yesterday!
  • Trade Count: (+1)
  • Full Member
  • ***
  • Offline Offline
  • Posts: 1430
  • Last login:February 23, 2021, 02:30:18 pm
Re: Project A-kab = FINISHED!
« Reply #53 on: February 17, 2011, 06:11:20 pm »
Radical :)