Main Restorations Software Audio/Jukebox/MP3 Everything Else Buy/Sell/Trade
Project Announcements Monitor/Video GroovyMAME Merit/JVL Touchscreen Meet Up Retail Vendors
Driving & Racing Woodworking Software Support Forums Consoles Project Arcade Reviews
Automated Projects Artwork Frontend Support Forums Pinball Forum Discussion Old Boards
Raspberry Pi & Dev Board controls.dat Linux Miscellaneous Arcade Wiki Discussion Old Archives
Lightguns Arcade1Up Try the site in https mode Site News

Unread posts | New Replies | Recent posts | Rules | Chatroom | Wiki | File Repository | RSS | Submit news


Author Topic: "The Reactivator" a work in progress *Now with No-Need-To-Rotate Monitor*  (Read 17347 times)

0 Members and 1 Guest are viewing this topic.

bfauska

  • Trade Count: (+2)
  • Full Member
  • ***
  • Offline Offline
  • Posts: 1372
  • Last login:December 28, 2023, 04:41:45 pm
  • "You're not wrong Walter, you're just an @##hole!"
Re: "The Reactivator" a work in progress *Another Marquee revision 10-18*
« Reply #40 on: October 20, 2007, 01:48:20 am »
I've tried to address some of the suggestions from the last version in a modified version.  I made the title brighter, and moved the tag line away from the title and darkened it up a bit.

I think it makes a big difference and makes my so-far-favorite marquee concept closer to being ready to print.

polaris

  • You're a genius! Sheer genius!
  • Wiki Contributor
  • Trade Count: (+1)
  • Full Member
  • ***
  • Offline Offline
  • Posts: 1405
  • Last login:May 21, 2012, 05:18:59 pm
  • veni vidi congai
Re: "The Reactivator" a work in progress *Another Marquee revision 10-18*
« Reply #41 on: October 20, 2007, 08:49:40 am »
much better, the main title definitely stands out the most now :cheers:
got COLOR codes from projects, post them here

add stuff to the uk wiki section

polaris

  • You're a genius! Sheer genius!
  • Wiki Contributor
  • Trade Count: (+1)
  • Full Member
  • ***
  • Offline Offline
  • Posts: 1405
  • Last login:May 21, 2012, 05:18:59 pm
  • veni vidi congai
Re: "The Reactivator" a work in progress *Another Marquee revision 10-18*
« Reply #42 on: October 21, 2007, 08:03:11 am »
been looking for led driver ideas, in kits ive only seen about ten circuits, so not enough, the luxury version of two ledwiz or pacdrives has been staring me in the face, not a cheap option though. :cheers:
got COLOR codes from projects, post them here

add stuff to the uk wiki section

bfauska

  • Trade Count: (+2)
  • Full Member
  • ***
  • Offline Offline
  • Posts: 1372
  • Last login:December 28, 2023, 04:41:45 pm
  • "You're not wrong Walter, you're just an @##hole!"
Re: "The Reactivator" a work in progress *Another Marquee revision 10-18*
« Reply #43 on: October 25, 2007, 02:40:21 am »
Here's the first attempt at a CPO, the top buttons are p1 start, 3 admins & p2 start.  There is a TB in the center.  I am thinking about making some kind of panel to swap in the TB or a spinner as needed, but for now just the TB.

I don't imagine that this CPO will make the cut w/o any modifications.  I am sure that the balance and flow of the graphics can use some tuning, I just don't know exactly what yet.  But that's what you guys are for.

metahacker

  • Trade Count: (0)
  • Full Member
  • ***
  • Offline Offline
  • Posts: 166
  • Last login:January 17, 2024, 03:09:39 am
Re: "The Reactivator" a work in progress *First CPO 10-25*
« Reply #44 on: October 28, 2007, 03:57:15 pm »
i like where the cpo is headed and the whole dark medical electronic feel of stuff and how it reinforces the re-animation from the dead thing

palette and execution definitely has me thinking EKG


this is a cool project.  the tray in that thing is especially neat.

how about changing the type face to something a bit more 'sharp' maybe thinner maybe wirey, but main change being trying to integrate the life pulse reading into the logo type.  i.e. taking advantange of the the shape of the letters A's and V's

« Last Edit: October 28, 2007, 04:01:02 pm by metahacker »

theCoder

  • Trade Count: (0)
  • Full Member
  • ***
  • Offline Offline
  • Posts: 1035
  • Last login:September 20, 2010, 10:48:47 pm
  • I'll clean up my mess, Honey, when I'm done...
Re: "The Reactivator" a work in progress *Another Marquee revision 10-18*
« Reply #45 on: October 29, 2007, 10:07:53 pm »
Here's the first attempt at a CPO, the top buttons are p1 start, 3 admins & p2 start.  There is a TB in the center.  I am thinking about making some kind of panel to swap in the TB or a spinner as needed, but for now just the TB.

I don't imagine that this CPO will make the cut w/o any modifications.  I am sure that the balance and flow of the graphics can use some tuning, I just don't know exactly what yet.  But that's what you guys are for.
It looks a bit too symmetrical.  I'd move the text to the upper right , and the two major red blips over to the left.  Also, the red line looks a little thin.  Ignore as you see fit.

bfauska

  • Trade Count: (+2)
  • Full Member
  • ***
  • Offline Offline
  • Posts: 1372
  • Last login:December 28, 2023, 04:41:45 pm
  • "You're not wrong Walter, you're just an @##hole!"
Re: "The Reactivator" a work in progress *First CPO 10-25*
« Reply #46 on: October 30, 2007, 02:11:44 am »
this is a cool project.  the tray in that thing is especially neat.

Thanks, the tray is a standard feature on these Dynamo cabinets, I really think if I ever did a cab from scratch I would try to incorporate something similar, the fact that it works like a table in the extended position is great for working on the boards, or in this case the computer.

I think I like this font and the size of it allows me to work some color interest into the design that just wasn't working for me on some thinner fonts I tried.  I do like the idea of working the ekg line into the text but I think I'll stick with this font for now.

It looks a bit too symmetrical.  I'd move the text to the upper right , and the two major red blips over to the left.  Also, the red line looks a little thin.  Ignore as you see fit.

I gave the less symmetrical thing a shot and I think I like the results.  I took the blip idea back toward where it is in the marquee while keeping it centered, the growth of it makes the weight shift to the right though, which makes up for the moved title.  I debated removing the title from the CPO all together, but it seemed nicer with it, I can have asymmetry and still be balanced.

Thanks for the input guys, here's the latest (and I think my favorite so far)

theCoder

  • Trade Count: (0)
  • Full Member
  • ***
  • Offline Offline
  • Posts: 1035
  • Last login:September 20, 2010, 10:48:47 pm
  • I'll clean up my mess, Honey, when I'm done...
Re: "The Reactivator" a work in progress *First CPO 10-25*
« Reply #47 on: October 30, 2007, 03:31:40 am »
There you go.  Nice.

rockin_rick

  • Trade Count: (+3)
  • Full Member
  • ***
  • Offline Offline
  • Posts: 495
  • Last login:May 27, 2017, 09:20:20 am
Re: "The Reactivator" a work in progress *First CPO 10-25*
« Reply #48 on: November 01, 2007, 12:16:29 am »
Latest CPO looks cool.  I like the theme/style.  I vote for the sequenced marquee, too - what's your latest plans/thoughts regarding this?

Is the circle representing the trackball actual size/scaled properly?  And thus will the trackball hole be big enough to cut into the trace?  If that's a 3", then it seems like it may be a bit small.


Rick
If I do not respond to your post in a timely manner, feel free to PM me.

bfauska

  • Trade Count: (+2)
  • Full Member
  • ***
  • Offline Offline
  • Posts: 1372
  • Last login:December 28, 2023, 04:41:45 pm
  • "You're not wrong Walter, you're just an @##hole!"
Re: "The Reactivator" a work in progress *First CPO 10-25*
« Reply #49 on: November 01, 2007, 03:48:57 am »
Thanks for the comments.

I am still pondering the chase.  We're doing a fiber-optic star curtain at work in the next week or so and I may be able to snatch some scraps to try some of my ideas out.

The trackball I'm currently going to use is a computer trackball that I've opened up and mounted the board to the underside of my test CP.  It's like 1 3/4 or 2 inch and if I remember correctly I measured it to do the CP layout in AutoCAD that I used for the artwork in Inkscape.  I also don't plan on printing the button and TB holes on the finished art, I'm using them now for visualization, but on the printout if I leave them blank I have a little more flexibility and room for error.

bfauska

  • Trade Count: (+2)
  • Full Member
  • ***
  • Offline Offline
  • Posts: 1372
  • Last login:December 28, 2023, 04:41:45 pm
  • "You're not wrong Walter, you're just an @##hole!"
Re: "The Reactivator" a work in progress *First CPO 10-25*
« Reply #50 on: November 01, 2007, 04:11:16 am »
Here's the newest CPO.  I know that the responses to the last one were mostly positive, but I thought I'd give a try to the dot at the end of the EKG line like the marquee has.  If I don't do the dot then it's back to a flat-line as it finishes the image and that doesn't work with the theme (anal much?)

I also changed the buttons to the colors I'm envisioning.  I think I want to do NovaGems for the admin, either clear w/tri-color LEDS or appropriate color buttons for the admin task.  I am also thinking about EE buttons for the action buttons w/tri-color LEDS and the 1 and 2up buttons are standard white 1 and 2up buttons.  In addition to the buttons, I'd be thrilled to light the joys and TB.  I think I can arrange custom bat-top handles for illumination and find an acrylic ball the right size for my TB.  All this stuff drives up the cost of what was until now a cabinet that only cost me about the cost of the encoder, but I guess eventually I'd have to buy something right?  Might as well make it some bling, and I like the idea of lighting the buttons needed for each game in MAME.

theCoder

  • Trade Count: (0)
  • Full Member
  • ***
  • Offline Offline
  • Posts: 1035
  • Last login:September 20, 2010, 10:48:47 pm
  • I'll clean up my mess, Honey, when I'm done...
Re: "The Reactivator" a work in progress *First CPO 10-25*
« Reply #51 on: November 03, 2007, 01:26:01 am »
As long as you're being anal...

The red line on the right just before the dot looks a tad long (or short).  Almost like it just went flatline.  Recommend either shortening it up to remove the flatline, or lengthening it a bit more to accentuating the flatline.

The center yellow admin button adds yet another color to the CP.  I'd recommend making it blue, white, or black; reducing the number of different colors by one. 

superbigjay

  • Trade Count: (0)
  • Full Member
  • ***
  • Offline Offline
  • Posts: 667
  • Last login:October 22, 2023, 02:50:03 pm
  • I'll always be a kid...
    • superbigjay website
Re: "The Reactivator" a work in progress *First CPO 10-25*
« Reply #52 on: November 03, 2007, 03:36:20 am »
Basically the same comment as Coder...

The red line needs to follow the pattern...
you don't want to have to rename your cab the flatliner  ;)

Also, I would go all red for the admins...

Jay  :cheers:

bfauska

  • Trade Count: (+2)
  • Full Member
  • ***
  • Offline Offline
  • Posts: 1372
  • Last login:December 28, 2023, 04:41:45 pm
  • "You're not wrong Walter, you're just an @##hole!"
Re: "The Reactivator" a work in progress *First CPO 10-25*
« Reply #53 on: November 03, 2007, 03:29:20 pm »
Thanks for pointing out the dot issue, I probably wouldn't have noticed it until I finally ordered and received the print.  I'll play around with a few sizes and options for the dot placement, probably just end up shortening it.

The button color problem stems from the fact that I thought green was an excellent start/enter/shift button color and red was a nice exit button.  While green exists nowhere else in the art I don't think it looks too bad.  I didn't want 2 of one color and 1 of another and if you are using green for enter/start and red for exit/stop the natural choice for pause is amber.  I think the best solution may be to use clear buttons w/labels and RGB LEDs, then I can decide at the last minute, and the attract mode will be really versatile. 

I did a print of the new artwork and, in addition to the problems you guys pointed out, I think the area around tagline isn't quite blue enough, and the title text could be a little bigger.  I've got some adjustments to make and I'll post an update sometime.

ON ANOTHER NOTE:
I just had an idea for my power button.  I could do an arrangement with a relay that would allow one of the buttons to light when the computer is turned off and become the power light, when the power comes on, the relay will connect the button to the encoder and LED-Wiz and disconnect it from the mother board and transformer.  It sounds screwy but I'm sure I could make it.  It would mean that I'd have to shut down from software but that's nothing difficult.  I really think I'm going to go this way.
« Last Edit: November 03, 2007, 03:33:17 pm by bfauska »

theCoder

  • Trade Count: (0)
  • Full Member
  • ***
  • Offline Offline
  • Posts: 1035
  • Last login:September 20, 2010, 10:48:47 pm
  • I'll clean up my mess, Honey, when I'm done...
Re: "The Reactivator" a work in progress *First CPO 10-25*
« Reply #54 on: November 04, 2007, 12:35:44 am »
I just had an idea for my power button.  I could do an arrangement with a relay that would allow one of the buttons to light when the computer is turned off and become the power light, when the power comes on, the relay will connect the button to the encoder and LED-Wiz and disconnect it from the mother board and transformer.  It sounds screwy but I'm sure I could make it.  It would mean that I'd have to shut down from software but that's nothing difficult.  I really think I'm going to go this way.
Sounds like a cool puzzle.  I look forward to hearing about your solution.

SodaPopinksi

  • Trade Count: (+1)
  • Full Member
  • ***
  • Offline Offline
  • Posts: 171
  • Last login:November 09, 2011, 03:38:29 pm
  • Cold, Smokey, Rich Diet Caffeine Free Coke
    • John Keeler
Re: "The Reactivator" a work in progress *First CPO 10-25*
« Reply #55 on: November 04, 2007, 01:41:03 am »
CP looks cool, what color trackball? Blue, or Red? Or Electronic Ice? Just curious :)
"Seimitsu LB-39's make me thirsty"- SodaPopinski

bfauska

  • Trade Count: (+2)
  • Full Member
  • ***
  • Offline Offline
  • Posts: 1372
  • Last login:December 28, 2023, 04:41:45 pm
  • "You're not wrong Walter, you're just an @##hole!"
Re: "The Reactivator" a work in progress *First CPO 10-25*
« Reply #56 on: November 04, 2007, 02:31:34 am »
Right now the TB is lame-ass computer beige.  I am going to try to find an acrylic replacement so it'll be clear or frosted w/ an RGB LED.

I have the relay circuit for the switch figured out, I think I'll do a basic schematic of it to show how it works.  It will actually serve double duty to power on any cabinet components not run off of the computer PSU.

SodaPopinksi

  • Trade Count: (+1)
  • Full Member
  • ***
  • Offline Offline
  • Posts: 171
  • Last login:November 09, 2011, 03:38:29 pm
  • Cold, Smokey, Rich Diet Caffeine Free Coke
    • John Keeler
Re: "The Reactivator" a work in progress *First CPO 10-25*
« Reply #57 on: November 04, 2007, 04:11:25 am »
Ah I had forgotten the part about your custom trackball, I remember a "Black Box" bar top project that had a small, clear translucent trackball (maybe the compusa 2" crystal trackball to be exact) that looked pretty nice.
"Seimitsu LB-39's make me thirsty"- SodaPopinski

bfauska

  • Trade Count: (+2)
  • Full Member
  • ***
  • Offline Offline
  • Posts: 1372
  • Last login:December 28, 2023, 04:41:45 pm
  • "You're not wrong Walter, you're just an @##hole!"
Re: "The Reactivator" a work in progress *First CPO 10-25*
« Reply #58 on: January 14, 2008, 12:02:36 am »
Here's a brief update and progress report on my super-slick-power-on-button.

First a picture with some mock-up artwork installed. I printed these out on a color laser printer on plain paper so they don't back light well or hold up to CPO abuse, but they gave me an idea about the look, I think after a few minor touch-ups I'm ready for printing.


Second is a picture to try to explain how I hooked up my "Enter" button on the CP to power up the cabinet and then return to it's mild-mannered-life as a lowly "Enter" button.


This same task could be accomplished easily if your MB supported power-up from password, but since mine doesn't I had to wire the power-on header to an arcade button (nothing new I know) and then I wanted it to become the enter button when in the frontend (that's the new part.) In the future I will also use this relay to power on the speakers and marquee. As for now, it's wired as shown in the picture. When the relay is off (no power to the coil) the MB power is connected to the button on the CP, when the button on the CP is pressed it turns on the computer and the coil of the relay is powered up from the PSU, switching the connection to the button over to the encoder instead of the MB. I initially hooked it up to only use one leg of the switch and leave the ground hooked up the whole time but that didn't seem to work, so I switched both legs. I should be able to switch one leg of the power for the marquee and speakers later and still have one pole of the relay left so that I can illuminate the power button from a wall-wort or battery when the computer is off and then connect it up to an LEDwiz when I power it up. I shut the computer down using a shifted key combination and windows shutdown, so I don't need the power button while the computer is running. I did leave the originally PC power button wired before the relay so that I can always use it if the computer locks up.

metahacker

  • Trade Count: (0)
  • Full Member
  • ***
  • Offline Offline
  • Posts: 166
  • Last login:January 17, 2024, 03:09:39 am
what a wonderful and elegant hack.  cheers to you, sir.

bfauska

  • Trade Count: (+2)
  • Full Member
  • ***
  • Offline Offline
  • Posts: 1372
  • Last login:December 28, 2023, 04:41:45 pm
  • "You're not wrong Walter, you're just an @##hole!"
OUCH. It hurts a little when you go to add to your project post and realize that you've been inactive so long that you get the warning about it being an old topic and maybe you should start a new one.  :o

I've resolved the need for a rotating monitor in my cabinet...  I picked up a 27" multisync monitor for free on CraigsList several months ago (Model 4PG) and now that I've installed it when I run vertical games I have about a 20" image and the full 27" on horizontal. If I had rigged a rotating monitor into my cab I think I would have been lucky to fit a 20" monitor without if having it to stick out the sides as it rotated. This monitor is supposed to support arcade refresh rates so I think I'll do some tinkering around to see how good of an image I can get, but so far I'm plenty happy.

If anybody has any information on this monitor I'd love to see it. I got the monitor and a remote, but no documentation and there is nothing online (or my GoogleFoo is weaker than I think.)

The first picture shows my cabinets in their new home in my new home, they also have a new friend (that Coke machine came with the house) and you can see my homebrew keg-fridge on the right.


Malenko

  • KNEEL BEFORE ZODlenko!
  • Trade Count: (+58)
  • Full Member
  • ***
  • Offline Offline
  • Posts: 13999
  • Last login:April 09, 2024, 07:27:18 pm
  • Have you played with my GingerBalls?
    • forum.arcadecontrols.com/index.php/topic,142404.msg1475162.html
looks good, I'd call it the Electro Kardio Game  :laugh2:
If you're replying to a troll you are part of the problem.
I also need to follow this advice. Ignore or report, don't reply.

bfauska

  • Trade Count: (+2)
  • Full Member
  • ***
  • Offline Offline
  • Posts: 1372
  • Last login:December 28, 2023, 04:41:45 pm
  • "You're not wrong Walter, you're just an @##hole!"
Personal Thread Necro...
So, after several years sitting dormant in my basement I've actually hauled my cabinet into the office at work to keep us busy on breaks and during long hours of being here to be available. The tagline for "The Reactivator" is "bringing arcade classics back to life" and now it looks like it's time to breath some new life into "The Reactivator".
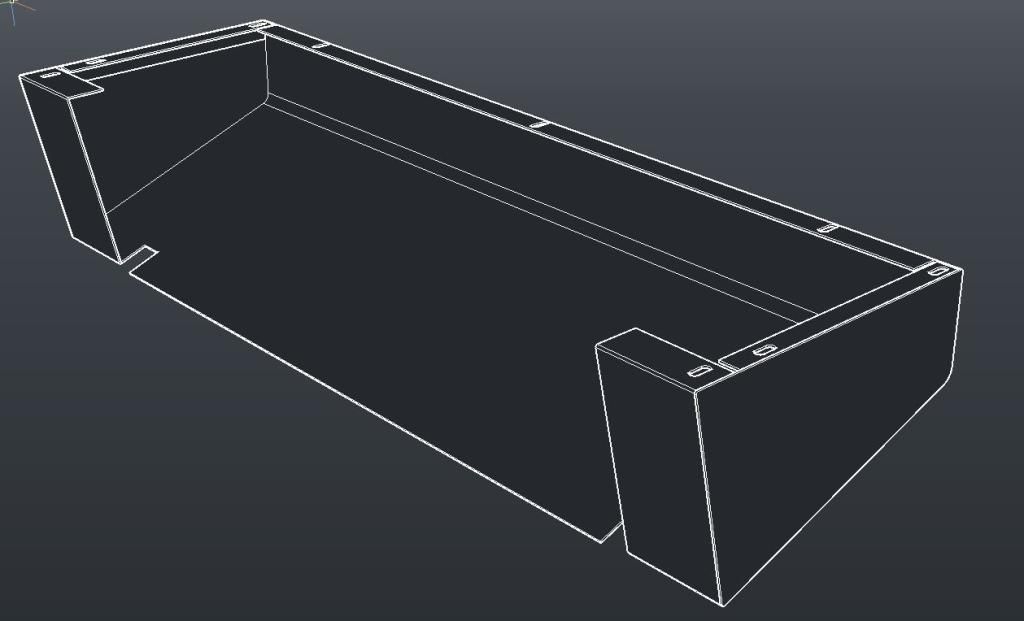
The first thing I realized is that the standard width CP just isn't going to cut it if I want to add a trackball and spinner (I know, too many controls, I also don't care) so I'm going to use the 4 player CP box that came with the cabinet when I picked it up 8 years ago.
Here's my progress so far...
Since I said some time ago when someone was looking for a 4 player Dynamo HS5 CP box that I'd measure mine I decided to make a 3d model of it in the computer. I still don't have a dimensioned drawing but if anyone wants the 3d model let me know, I still plan to make the drawing from which a metal shop could easily duplicate the box but I just haven't yet.

Next I figured out what I think I want my CP layout to be. I've chosen the 7 button layout based on having a 4 button row available, the Mortal Kombat 5 buton setup nearly replicated and a standard 6 button as well.
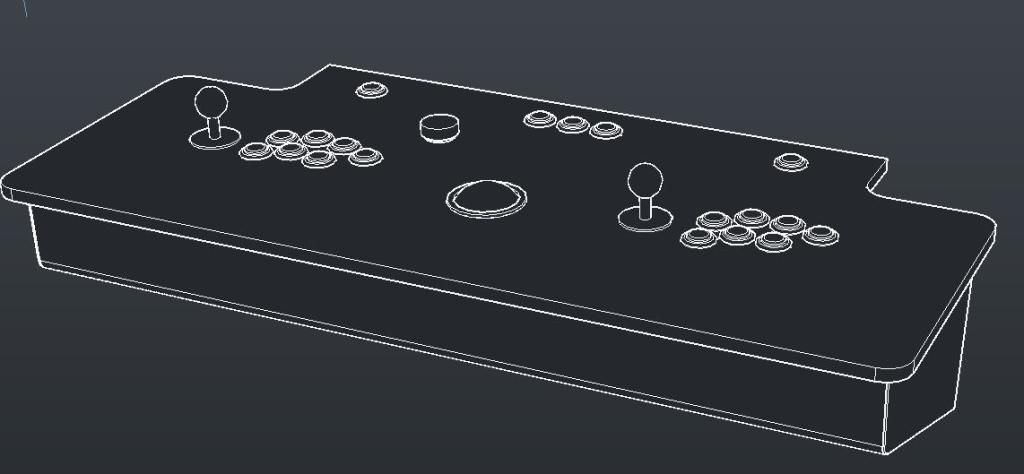
I think the 4 player panel has provided plenty of room to allow the controls to not be too tight.
Anyway that's my update for now.

wp34

  • Trade Count: (+3)
  • Full Member
  • ***
  • Offline Offline
  • Posts: 4794
  • Last login:April 10, 2022, 09:48:19 pm
Looks nice. Plenty of room but not too much.

You going to CNC it?

bfauska

  • Trade Count: (+2)
  • Full Member
  • ***
  • Offline Offline
  • Posts: 1372
  • Last login:December 28, 2023, 04:41:45 pm
  • "You're not wrong Walter, you're just an @##hole!"
Looks nice. Plenty of room but not too much.

You going to CNC it?
I will be CNC cutting it for sure. Since building the CNC I seem to have gotten pretty rusty at good old fashioned wood butchery. I'm also planning on doing some things that, while possible, would be absolutely silly for someone with a CNC to do manually.
One example is the way I'm mounting the trackball. Other than WP34's Tron Legacy I haven't seen any glowing rings around trackballs that I really like or that would work with a HAPP trackball, and I want RGB so I can't do EL sheet and doing it without the mounting plate is going to help make that possible, it is also cheaper to do it without the mounting plate and I'm a cheap skate so here is one reason I'm using the CNC to do this panel.


I'm also planning on doing glowing rings around the spinner and joysticks which will benefit from access to the CNC as well.
« Last Edit: March 09, 2015, 11:36:17 am by bfauska »

wp34

  • Trade Count: (+3)
  • Full Member
  • ***
  • Offline Offline
  • Posts: 4794
  • Last login:April 10, 2022, 09:48:19 pm
That trackball mount is off the hook.   :cheers:

I many times wished I had a CNC when I was cutting the top for mine. 

bfauska

  • Trade Count: (+2)
  • Full Member
  • ***
  • Offline Offline
  • Posts: 1372
  • Last login:December 28, 2023, 04:41:45 pm
  • "You're not wrong Walter, you're just an @##hole!"
That trackball mount is off the hook.   :cheers:

I many times wished I had a CNC when I was cutting the top for mine.
Thanks.
Your work with the laminate routing for your cp was amazing. The ONLY way I have the patience to do work as nice as this is using the CNC.

Malenko

  • KNEEL BEFORE ZODlenko!
  • Trade Count: (+58)
  • Full Member
  • ***
  • Offline Offline
  • Posts: 13999
  • Last login:April 09, 2024, 07:27:18 pm
  • Have you played with my GingerBalls?
    • forum.arcadecontrols.com/index.php/topic,142404.msg1475162.html
7 years later and I still like my name for the cab :)

Based on your model, I dont think its too many controls, but if you add a 4way or a flight stick it will be.
If you're replying to a troll you are part of the problem.
I also need to follow this advice. Ignore or report, don't reply.

bfauska

  • Trade Count: (+2)
  • Full Member
  • ***
  • Offline Offline
  • Posts: 1372
  • Last login:December 28, 2023, 04:41:45 pm
  • "You're not wrong Walter, you're just an @##hole!"
7 years later and I still like my name for the cab :)

Based on your model, I dont think its too many controls, but if you add a 4way or a flight stick it will be.

It's one of those funny things where the version of the name that would look most like electrocardiogram is electrocardiogame, but then the sound of electrocardiocab rolls off the tongue just a little closer sounding I think. Since I can't choose between the two I'll stick with my original name.

Malenko

  • KNEEL BEFORE ZODlenko!
  • Trade Count: (+58)
  • Full Member
  • ***
  • Offline Offline
  • Posts: 13999
  • Last login:April 09, 2024, 07:27:18 pm
  • Have you played with my GingerBalls?
    • forum.arcadecontrols.com/index.php/topic,142404.msg1475162.html
naw, wasnt saying mines better just still funny. I think its from breathing in all the bondo fumes.
If you're replying to a troll you are part of the problem.
I also need to follow this advice. Ignore or report, don't reply.

bfauska

  • Trade Count: (+2)
  • Full Member
  • ***
  • Offline Offline
  • Posts: 1372
  • Last login:December 28, 2023, 04:41:45 pm
  • "You're not wrong Walter, you're just an @##hole!"
Yeah, those'll get to you. We can't even use bondo in the shop at work because the painters' pulmonary toxicity reacts horribly to it. Sadly, as with most toxic products, the reason it still exists and we all want to use it all the time is because it does the job so much better than all the healthy alternatives.

bfauska

  • Trade Count: (+2)
  • Full Member
  • ***
  • Offline Offline
  • Posts: 1372
  • Last login:December 28, 2023, 04:41:45 pm
  • "You're not wrong Walter, you're just an @##hole!"
Started on my RGB buttons...

So my goal with the recent CNC offer to the community was that I could fund my hobby with my hobby and it's working out pretty well. In the past couple months I've managed to get a IPAC Ultimate and a pile of buttons to use in the updated CP. Since the building part of this hobby is actually the one I think I like the best I don't mind finding cheap ways to do things even if it means a bit more work so I've come up with a really low cost solution for folks looking to run RGB LEDs off their constant current drivers (I wouldn't like this system as much if it also required adding resisters to each setup).

On Ebay I found some really affordable 4pin jumper cables at about 25" long that when cut to whatever length you need give you 2 cables to run to an RGB LED. I picked up 50 common anode 5mm RGB LEDs, 20 "jumpers", and 100' of heat shrink for less than $23 shipped. The image below basically summarizes the steps to make 40 wired RGB LEDs with custom length wiring that work wonderfully with illuminated HAPP or IL buttons.


I did about 20 buttons yesterday in a couple hours including the drilling for the wires and LED. I'm a little disappointed in the brightness but I think for $0.50 each it's pretty effin good. In the pictures below they are mounted with the IPAC U and a U360 in my fightstick that I'm using to get the software set up on the new (old) PC before I migrate all the updates into the cabinet. I can't have the cabinet not work for much more than a couple days because it sits by my desk at work and if it didn't work my co-workers and I would have to. In some testing I did with the brightness I found that white paper or tape around the clear button shafts helps the light make it to the bezel before it gets wasted elsewhere and the backpainted clear plexiglas that I used for the CP on my fightstick kind of has the opposite effect. I think once I've got them in a wood panel with some light color wraps to mask the light leak and aid the diffusion I'll be even happier.

OFF


Green


Blue