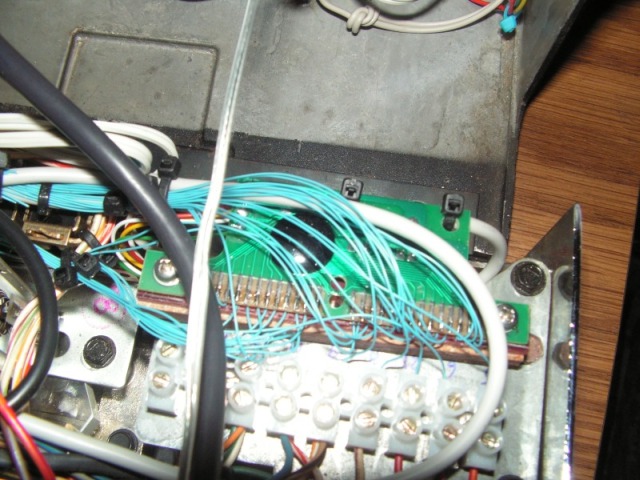
How to hook up the Wall box buttons: you will need to either salvage the encoder from an existing key board like I did, see the pic
or buy an encoder made for projects like you find on this forum. I'm pretty sure there are some links to good encoders that you can just buy. They should come with three big advantages, 1 - instructions/documentation, 2 - screw terminals for attaching leads to your buttons and 3 - programmable.
I chose the cost factor with salvaging a keyboard encoder. With one of these, before you tear it out you have to trace back all the leads to each key and create a connection map. Each make of keyboard is probably very different. The next difficulty is hooking leads down to a salvaged board. I scrapped off the carbon surface material off of the contacts that were used to mate with the traces on the upper and lower plastic sheets for the old keyboard. Then I used a small circuit board drill to make holes in the existing traces in order to anchor my leads in before soldering. I needed a magnifying glass to to this as it was too hard for me to see those tiny traces otherwise. Much patience and effort required to go this route vs buying nicer programmable encoder.
After removing all existing wiring in the wall box and cleaning everything up I used the Common and Normally Open contacts of each of the switches and wired them as follows: 0 - 9 wall box buttons to 0 - 9 across the top of the keyboard, Reset to the "Esc" key, switches I added to the side rotary knobs to page up & page down keys, volume up to F9, volume down to F11, and the coin return switch to the F6 key.
I then used Chris's controls.ini to remap those keys to their respective functions as follows:
0 to pause, 1 - 6 to A - F, 7 to Back, 8 to Skip, 9 to Radio,F9 to Volume Up, F11 to Volume Down and F6 to Shutdown.
At first I was interested in using just the numbers for selection and modified a skin to show just the numbers. This worked great on my main laptop with a 1024 x 768 screen size, but when I moved it to the laptop in the wall box it wouldn't re size properly to 800 x 600. It's something I did in editing the background for the skin I'm sure but still not sure why. I really wanted a few other functions anyway so I used the test skin and used the alpha toggle for selections. I may still want to go back to just numbers and will take advantage of your help Chris when I do. I know how to limit the numbers that are used but modifying the background so that it would work on the older laptop is what stopped me. The yellow letters are just labels I printed with a label maker. I want to redo that part with back-lit art work eventually.
Dan
 Edit by Chris: Fixed image link


 Home
Home Help
Help Search
 Login
Login Register

 Send this topic
 Print
Print Topic: Rock-ola TriVue with heart transplant (Read 8256 times)


