Main Restorations Software Audio/Jukebox/MP3 Everything Else Buy/Sell/Trade
Project Announcements Monitor/Video GroovyMAME Merit/JVL Touchscreen Meet Up Retail Vendors
Driving & Racing Woodworking Software Support Forums Consoles Project Arcade Reviews
Automated Projects Artwork Frontend Support Forums Pinball Forum Discussion Old Boards
Raspberry Pi & Dev Board controls.dat Linux Miscellaneous Arcade Wiki Discussion Old Archives
Lightguns Arcade1Up Try the site in https mode Site News

Unread posts | New Replies | Recent posts | Rules | Chatroom | Wiki | File Repository | RSS | Submit news


Author Topic: A Joust restoration.. this is going to take a while  (Read 24127 times)

0 Members and 1 Guest are viewing this topic.

Arroyo

  • Trade Count: (0)
  • Full Member
  • ***
  • Offline Offline
  • Posts: 1558
  • Last login:April 14, 2024, 01:44:51 am
  • Budgets are boring
    • newforum.arcadecontrols.com/index.php/topic,156267.0.html
Re: A Joust restoration.. this is going to take a while
« Reply #80 on: November 02, 2020, 08:08:52 am »
Beautiful work.   But man that service switch  ;D

bperkins01

  • Trade Count: (0)
  • Full Member
  • ***
  • Offline Offline
  • Posts: 895
  • Last login:September 24, 2023, 02:13:35 pm
  • Plenty of skills.. gaining experience..
Re: A Joust restoration.. this is going to take a while
« Reply #81 on: November 02, 2020, 09:15:26 am »
Beautiful work.   But man that service switch  ;D

Yes - full 100% credit to Mr. Arroyo for a fantastic reproduction of the original sticker.  Without it.. this is an ordinary non-authentic looking replica.
 :applaud: :applaud: :applaud:
My Arcade Cabinet Build and other projects here:
Centipede, Joust, Joust Cocktail, Asteroids, Galaga, Ms. Pacman Cabaret, Defender, Space Invaders Cocktail
https://bperkins.wordpress.com/

Arroyo

  • Trade Count: (0)
  • Full Member
  • ***
  • Offline Offline
  • Posts: 1558
  • Last login:April 14, 2024, 01:44:51 am
  • Budgets are boring
    • newforum.arcadecontrols.com/index.php/topic,156267.0.html
Re: A Joust restoration.. this is going to take a while
« Reply #82 on: November 02, 2020, 09:21:32 am »
Ha, couple of hours of my time.  You’ve done (and continue to do) all the hard work.  Looks fantastic.


Sent from my iPhone using Tapatalk

bperkins01

  • Trade Count: (0)
  • Full Member
  • ***
  • Offline Offline
  • Posts: 895
  • Last login:September 24, 2023, 02:13:35 pm
  • Plenty of skills.. gaining experience..
Re: A Joust restoration.. this is going to take a while
« Reply #83 on: November 20, 2020, 11:49:01 am »
Side Art Stenciling


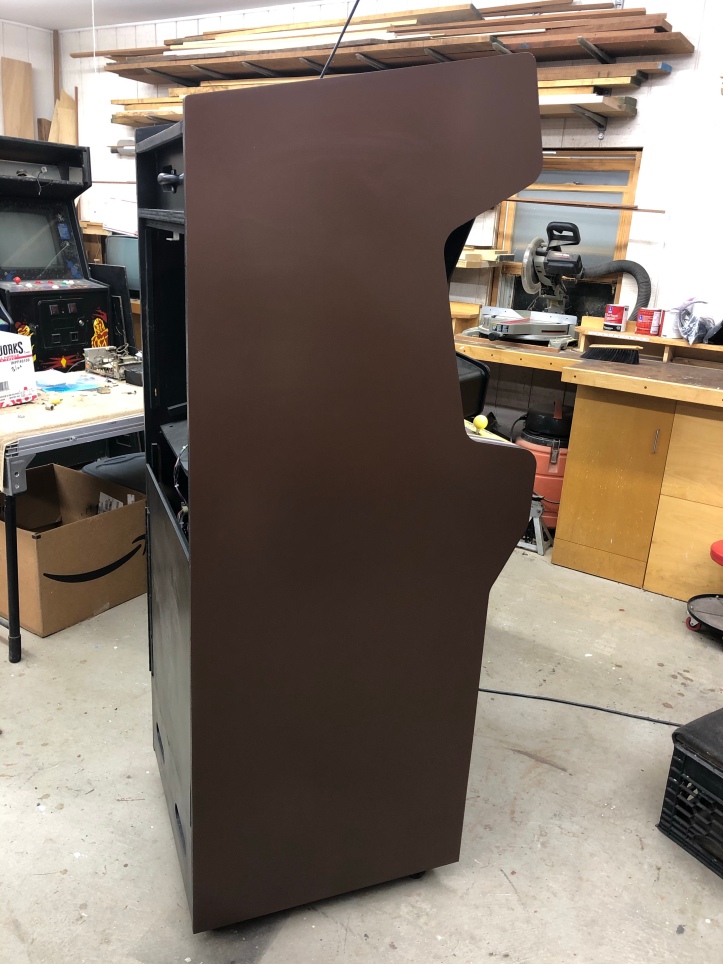
I’m starting with a very smooth base coat for the stencils. This base coat has been on for over a month because I have been working on a few other projects. Its quite hard/cured at this point.

My stencils from This Old Game are very high quality. I let them lay flat on the bench a few days to relax from being rolled up. Before starting I wiped the sides with alcohol to clean the surface and used compressed air to eliminate any bits of dust as much as possible.
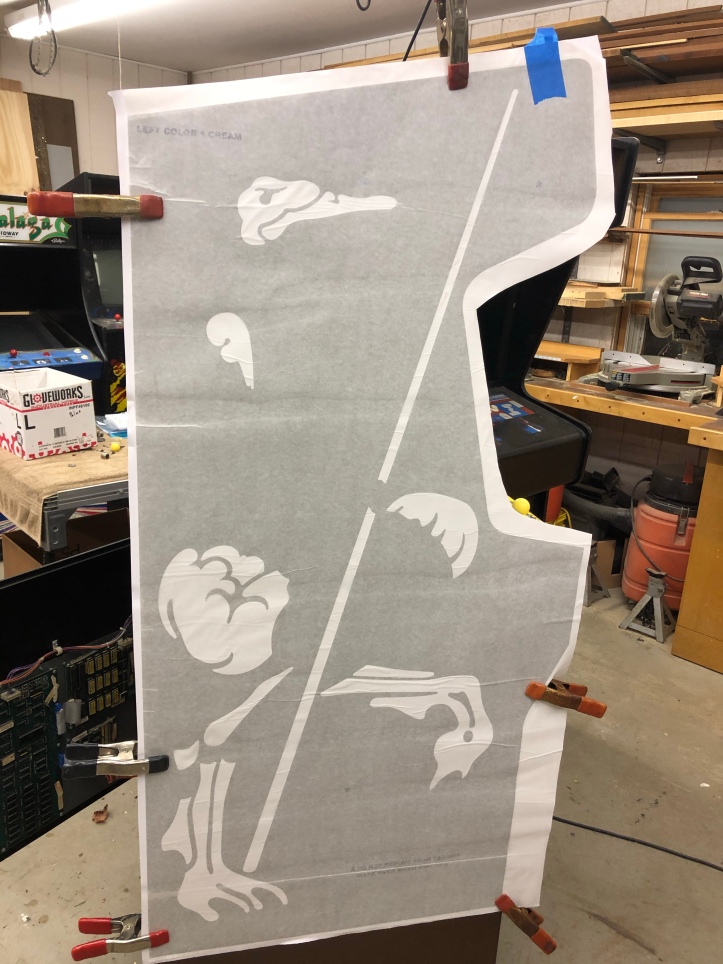


Getting the stencil lined up takes a little messing around. I tried tape, but the stencil itself is too heavy for everyday painters tape and it kept shifting and falling. Spring clamps did the best job holding it in place while I stretched and positioned the first side. On this one – I found the best way to align the stencil was to get the back edge even with the back of the cabinet and find a sweet spot for the top of the cabinet. The stencil doesn’t exactly match the top – but I’m certain these cabinets have plenty of variation in them. The important part is the back edge being in line with the back of the cabinet. The lower front will line up perfectly as a result and everything else will fall into place. Backlighting around the edge with a flashlight will help determine how close you are. Keep pulling the stencil tight and re-clamping until you find the right spot.


Here I did use a wide strip of painters tape and wrapped it around the narrow section at the monitor to assist in keeping the stencil in place. I let the top roll down and I cut off about 3 inches of the backer and using a plastic spreader, pressed the stencil in place working upward and from the center to the edges. You are not going to get every tiny bubble out at this point, and you won’t need to. You do want to eliminate all the wrinkles and get the sheet stuck down evenly. Careful with the scissors – I left little bits of paper on the sticky part of the stencil. It had no effect on the cutouts, but I’m using a razor the next time.
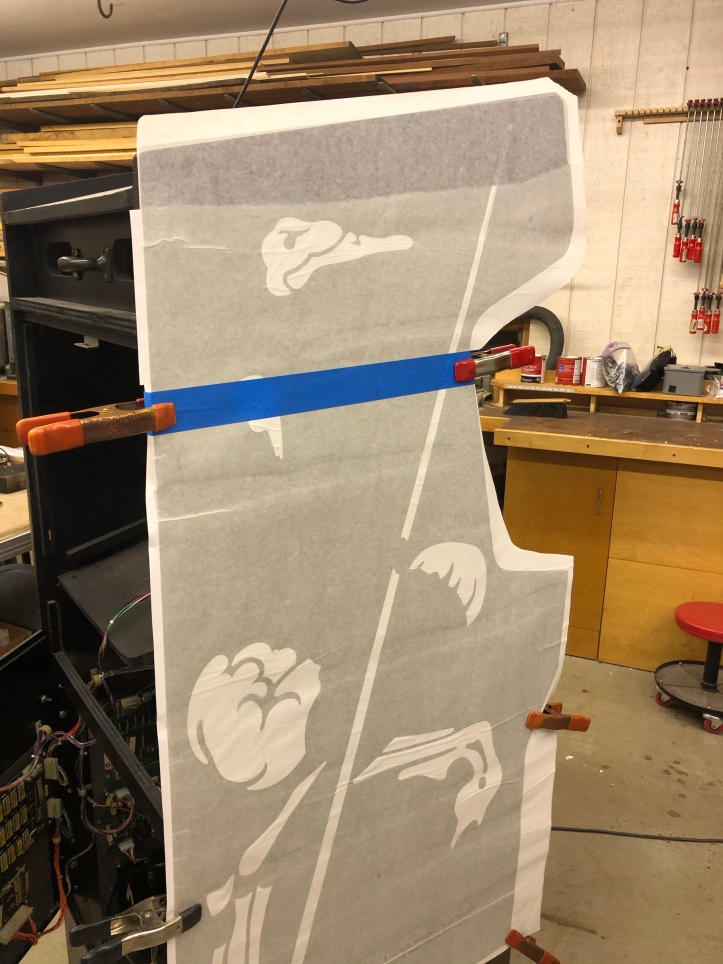


You should end up with the top section looking like this. One reason to start with a narrow strip is if for some reason you need to reposition it – you at least have a chance with so little being exposed. If you removed much more – you would likely compromise the cutouts and have a disaster on your hands. Now it becomes much easier… Remove the tape and all your clamps, slide your hand down the entire length of the stencil to verify it will lay flat and in place as you intended. There is no going back once you stick more on…
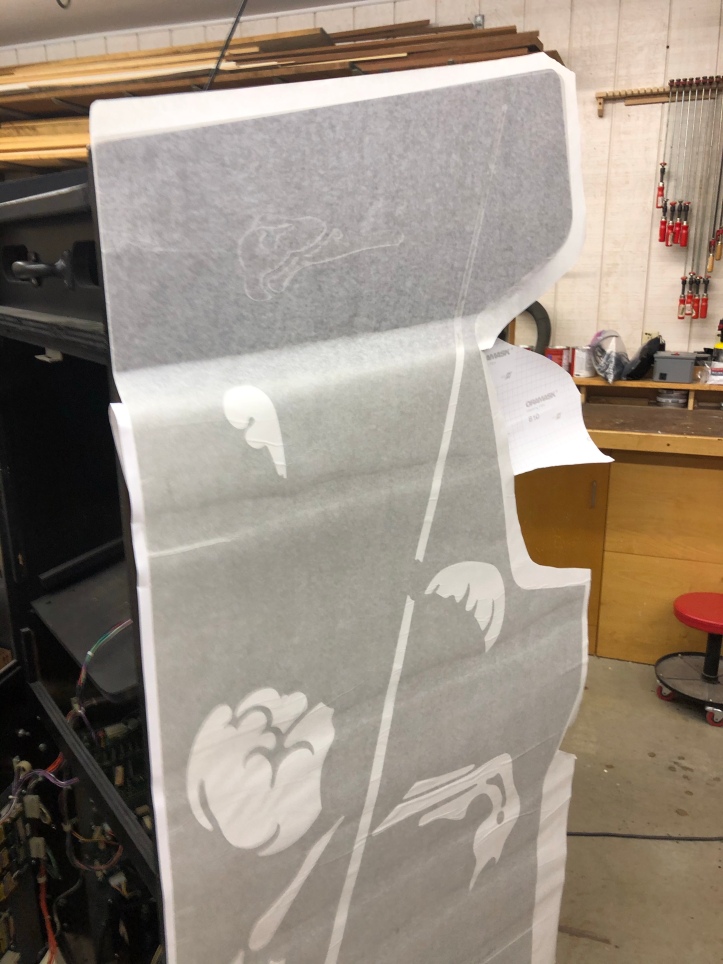


Peel the backer from underneath and roll it down a few more inches – then use the spreader/squeegee again to press downward and from the center out. Eliminate wrinkles and large bubbles and evenly continue down the side pulling the backer off as needed. Keep peeling and rolling down and spreading down.
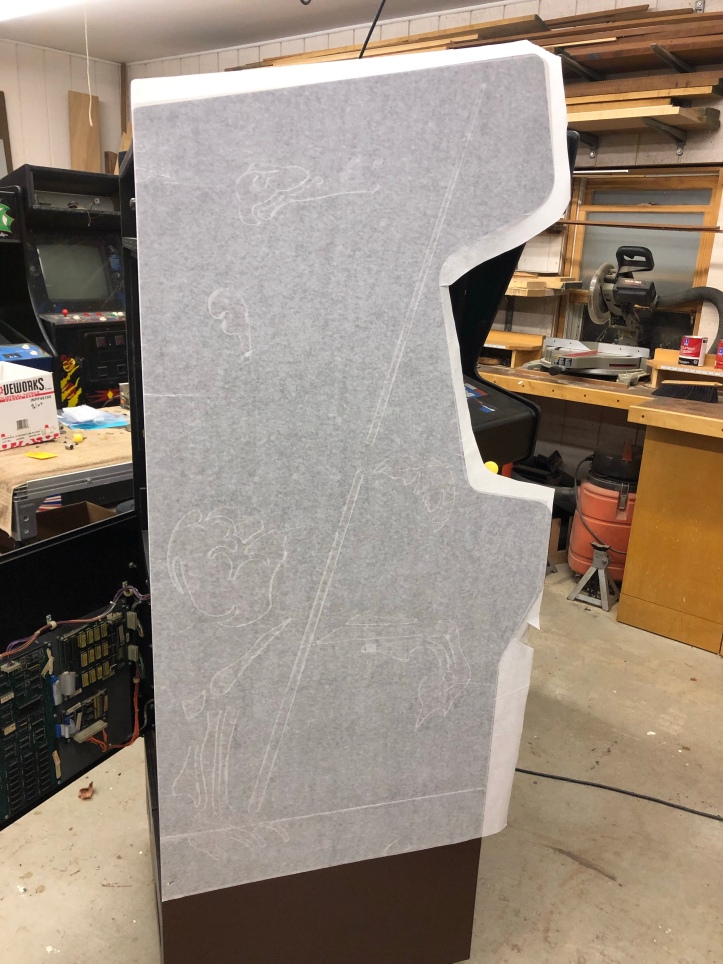


Backer completely removed with no hassle and very little chance of getting debris trapped inside.

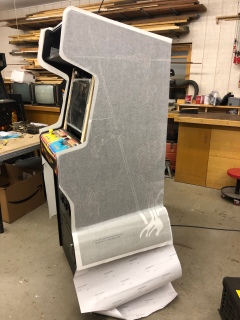
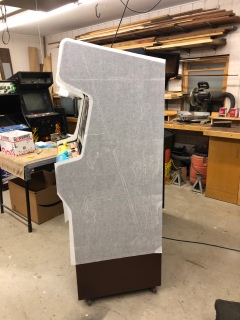

Same for the second side. It went faster. Its pretty easy to make sure the stencil is in the same alignment as the first side.
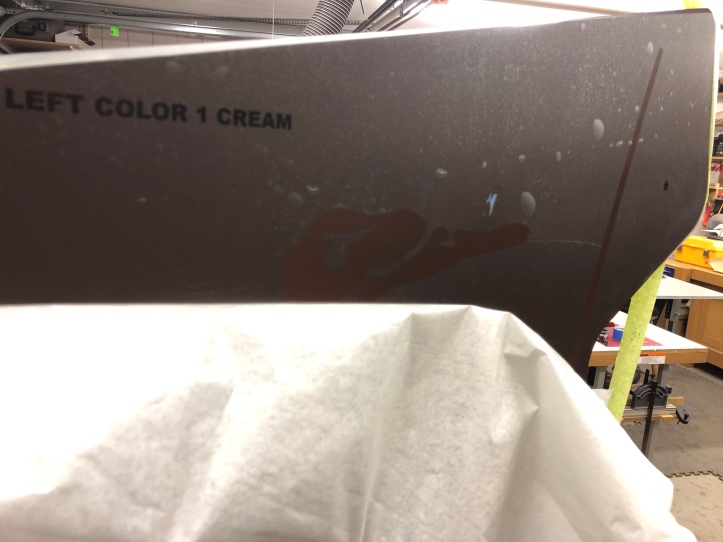


Now you can peel off the face of the stencil (not sure what you call it really, the front backer?) revealing the actual artwork. Here the ostrich head is emerging. There will be large bubbles here and there – they are not really relevant. The only important part is where the cut edges are for the image. Bubbles along those edges need to be pressed out with the plastic squeegee. Just slide the air bubble toward the opening to get the air out. You need to be careful as you peel it away to make sure the stencil stays stuck to the paint and not to the backer. Move slow and deliberately. Joust is not very intricate, but others such as Ms. Pacman have lots of little bits that will peel away easily.
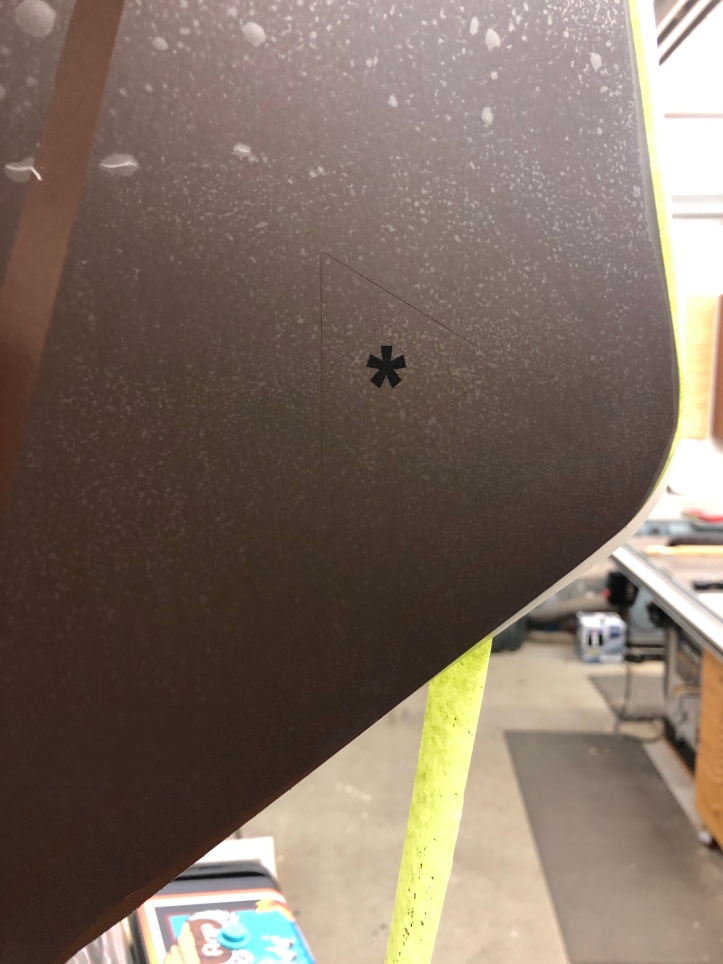


On the upper and lower part of the stencil are these * inside of a triangle. Use some painters tape and cover these. They are used to align the second and third layers. You can also see where a shred of paper backer got into the cutout. I had to lift that with an Exacto and pull it out with tweezers. Thankfully I didn’t stretch anything and it stuck back in place.
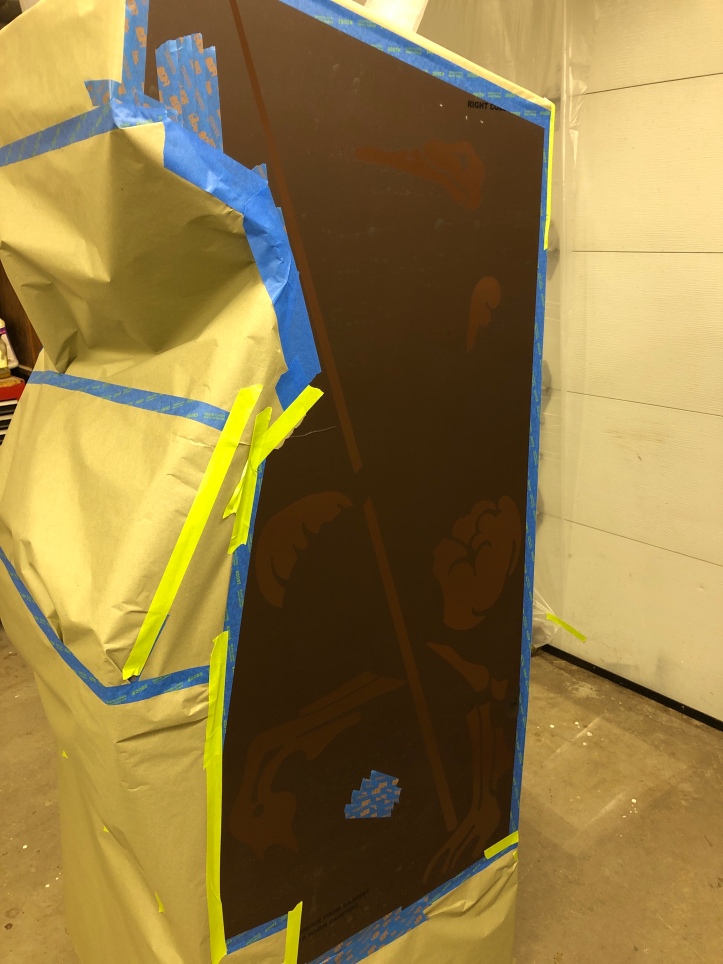


I couldn’t decide if I wanted to mask the cabinet first, then put the stencil or not. I stenciled first and masked second. Most likely I will have to re-mask the entire thing two more times. Otherwise using the spring clamps would be really difficult.. We’ll see… I re-wiped the cutouts with alcohol and used compressed air to blow any tiny dust & lint balls, etc. that were at the cutouts. Clean counts at that little seam where the stencil meets the base coat of paint.
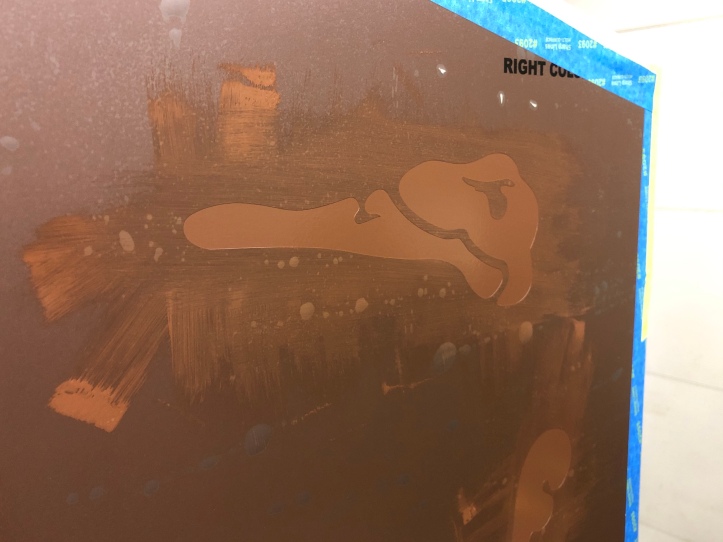


A little trick I picked up from the sign painters. Using some of the original brown base coat, I reduced it with mineral spirits to make a very thin wash coat of paint. I used a foam brush and painted into the seam, but kept the paint thin as you can see.

The goal is very simple: Seal the joint. If there is going to be any paint bleed at all, it will bleed the exact color of the base coat. When the color coat goes on, it will not be able to get under the stencil because you sealed it in brown. We will see how good that works very soon!

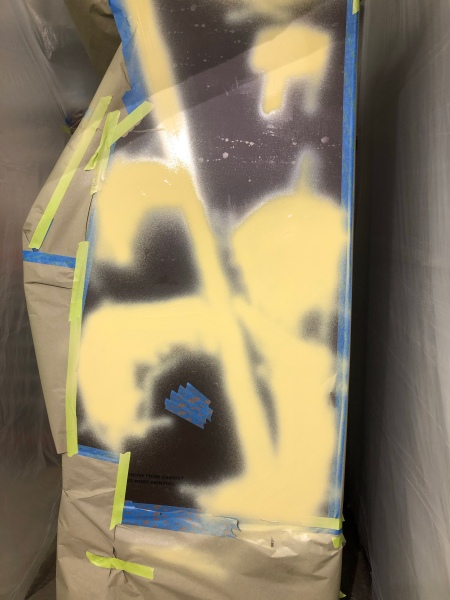

Man – that looks terrible huh? I did a close inspection a couple hours after this and the color coat leveled out great. There are a couple schools of thought on stencil removal – some pull it right away – others wait until its dry. I would normally go right away – but this time I decided to wait. Some little voice in my head said to leave it alone!
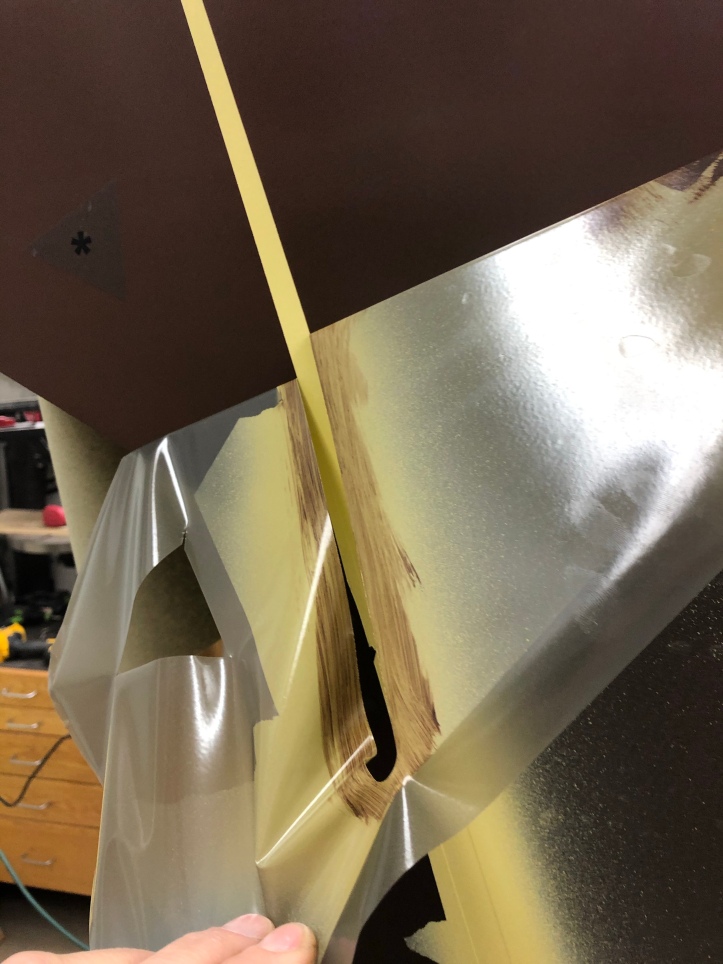


I couldn’t wait any longer. The paint 12 hours later still has just a little bit of tack to it.. But its firm enough to remove. I tested it on some of the masked areas that got painted and it was leaving a nice crisp edge. Whenever possible – peel the masking material so that its cutting back across the paint line like this above. You can’t always avoid areas that lift sorta straight up, but peeling back across itself is best for getting clean lines.
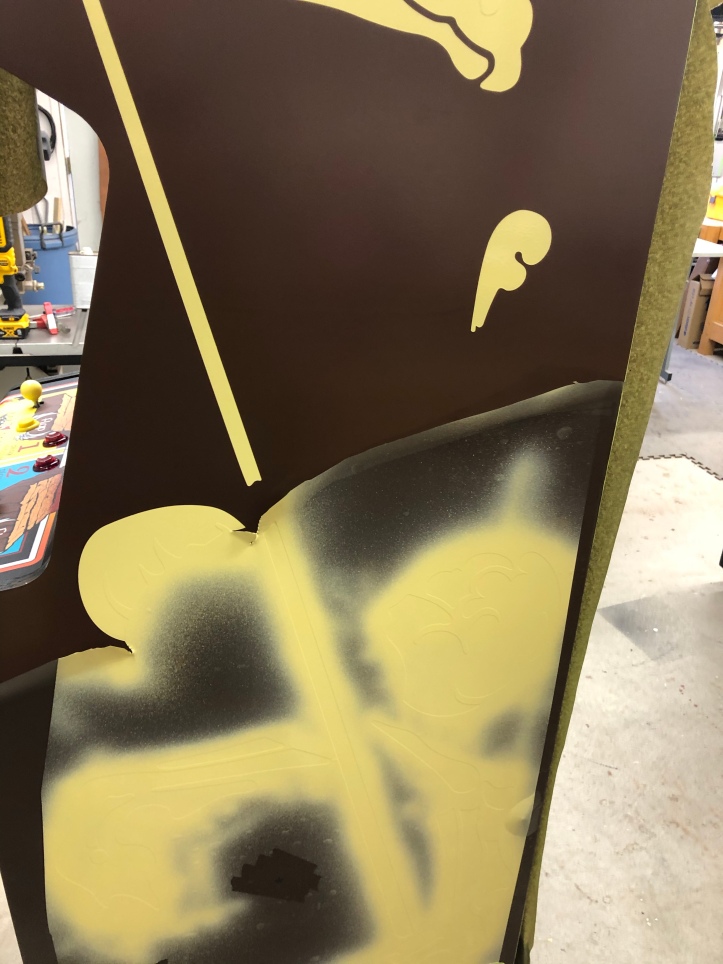


Keep a razor blade very handy (I keep the single edge one in my mouth) You want to trim and cut the masking so that it doesn’t fall back down and it provides the ability to peel back sections easily allowing you to pull back over itself as I mentioned. I little cut here and there can free up large areas of the masking so you can work deliberately.
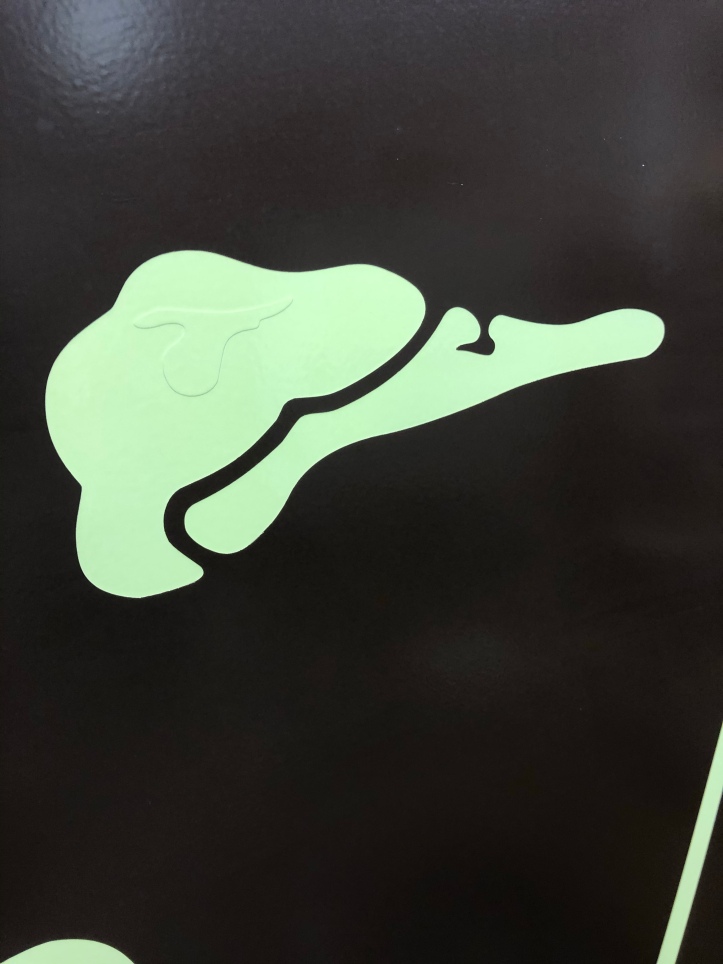


The lighting is causing the color to be off, its not green like this – but captive areas like the eye this can be delicately lifted with an Exacto to start and tweezers to peel it off.
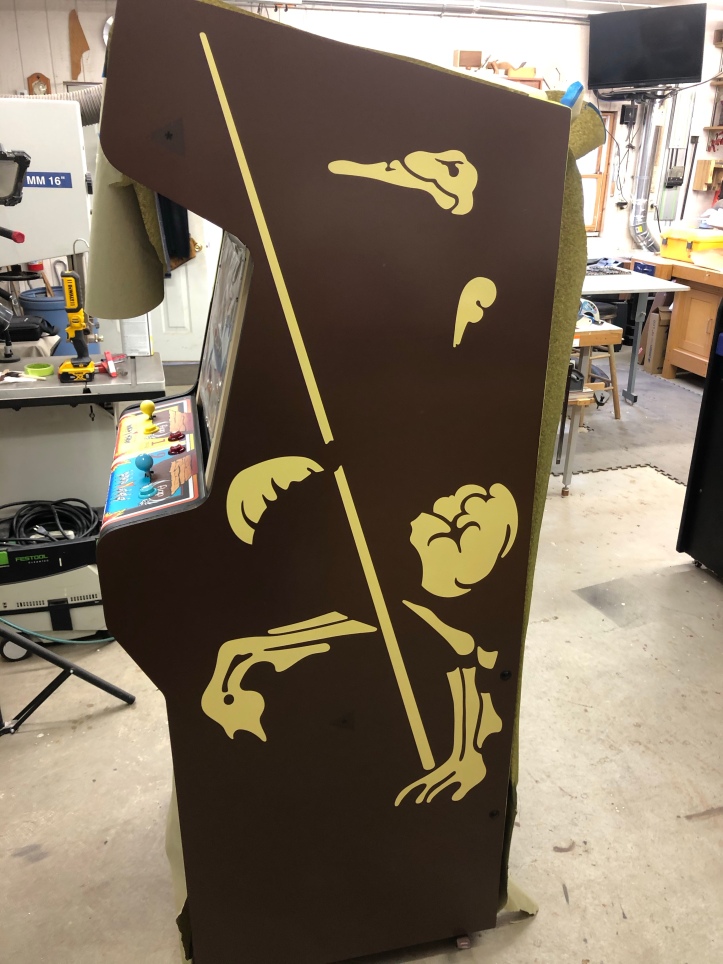


The step where I pre-bleed the brown to prevent the color coat from bleeding under the mask paid off. All of the lines are very very crisp! I’ll have to let this cure for at least a week and maybe more. The second stencil layer will go over the top of this color and I don’t want any chance of lifting the paint if it’s not ready to go.
« Last Edit: November 26, 2020, 09:12:39 am by bperkins01 »
My Arcade Cabinet Build and other projects here:
Centipede, Joust, Joust Cocktail, Asteroids, Galaga, Ms. Pacman Cabaret, Defender, Space Invaders Cocktail
https://bperkins.wordpress.com/

Mike A

  • Trade Count: (0)
  • Full Member
  • ***
  • Offline Offline
  • Posts: 5884
  • Last login:Today at 11:54:45 am
  • This plan is foolproof
Re: A Joust restoration.. this is going to take a while
« Reply #84 on: November 20, 2020, 11:51:08 am »
You do know that is ridiculously good...right?

bperkins01

  • Trade Count: (0)
  • Full Member
  • ***
  • Offline Offline
  • Posts: 895
  • Last login:September 24, 2023, 02:13:35 pm
  • Plenty of skills.. gaining experience..
Re: A Joust restoration.. this is going to take a while
« Reply #85 on: November 20, 2020, 11:55:36 am »
You do know that is ridiculously good...right?

Yes - on this one I agree - its really ridiculously good.   :) 

two colors to go...   ::)
My Arcade Cabinet Build and other projects here:
Centipede, Joust, Joust Cocktail, Asteroids, Galaga, Ms. Pacman Cabaret, Defender, Space Invaders Cocktail
https://bperkins.wordpress.com/

Arroyo

  • Trade Count: (0)
  • Full Member
  • ***
  • Offline Offline
  • Posts: 1558
  • Last login:April 14, 2024, 01:44:51 am
  • Budgets are boring
    • newforum.arcadecontrols.com/index.php/topic,156267.0.html
Re: A Joust restoration.. this is going to take a while
« Reply #86 on: November 20, 2020, 12:12:44 pm »
 :notworthy: :notworthy: :notworthy: :notworthy:

Off. The. Charts.

nexusmtz

  • Trade Count: (0)
  • Full Member
  • ***
  • Offline Offline
  • Posts: 489
  • Last login:June 01, 2022, 03:14:22 am
Re: A Joust restoration.. this is going to take a while
« Reply #87 on: November 20, 2020, 05:36:44 pm »
Took a detour to the source images to take in all the detail. Excellent job and process documentation!

bperkins01

  • Trade Count: (0)
  • Full Member
  • ***
  • Offline Offline
  • Posts: 895
  • Last login:September 24, 2023, 02:13:35 pm
  • Plenty of skills.. gaining experience..
Re: A Joust restoration.. this is going to take a while
« Reply #88 on: November 21, 2020, 09:13:55 am »
Thanks guys - the hard part is being patient..
My Arcade Cabinet Build and other projects here:
Centipede, Joust, Joust Cocktail, Asteroids, Galaga, Ms. Pacman Cabaret, Defender, Space Invaders Cocktail
https://bperkins.wordpress.com/

bperkins01

  • Trade Count: (0)
  • Full Member
  • ***
  • Offline Offline
  • Posts: 895
  • Last login:September 24, 2023, 02:13:35 pm
  • Plenty of skills.. gaining experience..
Re: A Joust restoration.. this is going to take a while
« Reply #89 on: November 23, 2020, 04:55:07 pm »


The paint was rock solid in 2 days, I waited 4. Lining up the second color stencil is simple and tricky at the same time. We left the little triangles behind previously to line up the next stencils. They are easy to locate on color 2 stencil . The way I did this was to cut away the back and the front VERY CAREFULLY with the Exacto to reveal just the triangle part. Its easy to cut through all of it – you need to go with the most delicate of touch. When you reveal the ‘sticky side’, use a piece of scrap backing to stick to it until you are ready to hang it..


Backlight and a marker makes it easy to locate the area to cut.


Stick it right to the existing triangle and line it up.


Get the lower one lined up as best you can. Here it will be ok to unstick and restick the stencil to get it as close as possible. I had to stretch it a bit because it never really lays 100% flat. You can get them both very accurate however. Clamp the sides in place near the top – Then roll back the first few inches – trim – stick and spread exactly like the first stencil. You will need to unstick the bottom again to roll the backer off – of course..


Stencil#2 has more intricate detail. When removing the face sheet, follow closely behind with the spreader and stick down the stencil material. I also used my fingers for parts of this – I’ll be re-cleaning it with alcohol right before painting to remove any oils.


Once its off, make sure all the openings are as tight as you can get them with a spreader or your finger – wipe with a lint free rag, alcohol, and clean the areas around the openings. I used compressed air to clean out any little dust and lint right at the seam.
One more IMPORTANT detail: Double check the stencil for any areas that were missed in the ‘weeding’ process. Weeding is where the peel off all of the parts that will get painted. A couple of these little tiny dots were not ‘weeded’. I would have been ‘missing’ the color in the final result. Use a photo of the finished art and check to be sure every little spot has been weeded. You will see the tiny cut line and be able to pluck it right out. I can see this being a big issue on more complicated designs and I get how they can be missed. Everything is really hard to see with white on white and a nearly clear stencil layer.


Its very clear where the yellow layer is going!


Thin wash coat of the base color to seal the stencil and prevent bleeding of the yellow.


I’ve been using my HVLP sprayer and Sherwin Williams oil based paint. The yellow was much thinner than the cream or brown so I only used a small amount of mineral spirits to reduce it a bit. Always strain paint before spraying – one little clot and it spits all over your work. A strainer costs about $.25 – worth it..


Yellow on – it’s much more nerve wracking than the base coat. I could sand and try again on the base and only lose time. These color coats I have to get right SIX TIMES! on the first try. Make sure you cover the alignment triangles again – going to need them one more time.


« Last Edit: November 26, 2020, 09:13:17 am by bperkins01 »
My Arcade Cabinet Build and other projects here:
Centipede, Joust, Joust Cocktail, Asteroids, Galaga, Ms. Pacman Cabaret, Defender, Space Invaders Cocktail
https://bperkins.wordpress.com/

jennifer

  • Trade Count: (0)
  • Full Member
  • ***
  • Offline Offline
  • Posts: 2895
  • Last login:August 11, 2023, 06:24:58 am
Re: A Joust restoration.. this is going to take a while
« Reply #90 on: November 23, 2020, 05:02:25 pm »
Nice job man, that is going to be a little cuttie...😜...I would only add if you didn't already, is pull that off while the paint is still wet or the will glue down and it would not only be horrible to remove, but it will leave a nasty paint ridge.
« Last Edit: November 23, 2020, 05:15:42 pm by jennifer »

bperkins01

  • Trade Count: (0)
  • Full Member
  • ***
  • Offline Offline
  • Posts: 895
  • Last login:September 24, 2023, 02:13:35 pm
  • Plenty of skills.. gaining experience..
Re: A Joust restoration.. this is going to take a while
« Reply #91 on: November 23, 2020, 10:11:12 pm »
@Jennifer - the stencil pulled clean - but you are right.  24 hours is too long..  I'm going back to 12 hours..  and now the update...


Yellow coat on. This side came out perfect. That said, 24 hours of dry time is a little too long for this paint. It had just a bit too much tug releasing from some of the painted areas and I had one small block start to lift on me. I’ll keep it to 12 hours or less for the final coat.

However – I did make a small mistake….


No matter how much I checked when painting, this little part was a bit thin.. I almost left it and chalked it up to allowing the machine to have a little ‘character’. But the best of the best figure out a way to fix these things.. I want to be one of those guys..

I used some of the clean masking material that was removed and cut a piece to go over the area in need of repair. Then I used the Exacto, a small straight edge and a relatively steady hand and re-cut a mini stencil in place on the yellow triangle. Brushed some brown paint into the seam to prevent bleed (again).


After a couple hours dry time, added fresh paint thinned with a couple drops of mineral spirits to help it level. It already looks good – I think it will make a full recovery. We’ll know in the AM..
My Arcade Cabinet Build and other projects here:
Centipede, Joust, Joust Cocktail, Asteroids, Galaga, Ms. Pacman Cabaret, Defender, Space Invaders Cocktail
https://bperkins.wordpress.com/

Arroyo

  • Trade Count: (0)
  • Full Member
  • ***
  • Offline Offline
  • Posts: 1558
  • Last login:April 14, 2024, 01:44:51 am
  • Budgets are boring
    • newforum.arcadecontrols.com/index.php/topic,156267.0.html
Re: A Joust restoration.. this is going to take a while
« Reply #92 on: November 23, 2020, 10:17:02 pm »
« Last Edit: November 23, 2020, 10:24:51 pm by Arroyo »

jennifer

  • Trade Count: (0)
  • Full Member
  • ***
  • Offline Offline
  • Posts: 2895
  • Last login:August 11, 2023, 06:24:58 am
Re: A Joust restoration.. this is going to take a while
« Reply #93 on: November 23, 2020, 10:37:31 pm »
You can do 12 minutes after your last coat, just be careful not to let it hit the workpiece as you pull it off, Slowly pull back and away kinda rolling the wet stencil as you go to keep it from getting out of hand...Wet paint strings pulling off around the edges is what you are avoiding, go slow and even...But...Since you pulled it off wet like that, the edges will continue to mellow as the paint cures and creates nice soft transition lines...Painters tape is the same thing, pull it off slow wet, back and away from itself...Your hands will be wet with paint, don't touch anything, clean them with thinner when done.
« Last Edit: November 23, 2020, 10:40:33 pm by jennifer »

bperkins01

  • Trade Count: (0)
  • Full Member
  • ***
  • Offline Offline
  • Posts: 895
  • Last login:September 24, 2023, 02:13:35 pm
  • Plenty of skills.. gaining experience..
Re: A Joust restoration.. this is going to take a while
« Reply #94 on: November 23, 2020, 10:42:00 pm »
Maybe I time it a bit closer on the last stencil set..  This paint takes a bit to set up..  But I see where you are going  ;)
I have to let this stuff cure 4 days or so...
My Arcade Cabinet Build and other projects here:
Centipede, Joust, Joust Cocktail, Asteroids, Galaga, Ms. Pacman Cabaret, Defender, Space Invaders Cocktail
https://bperkins.wordpress.com/

jennifer

  • Trade Count: (0)
  • Full Member
  • ***
  • Offline Offline
  • Posts: 2895
  • Last login:August 11, 2023, 06:24:58 am
Re: A Joust restoration.. this is going to take a while
« Reply #95 on: November 23, 2020, 10:50:55 pm »
Well with that patch fix...leaving that tape on there will bite into that uncured paint...You should pull it off as soon as you are done fixing or it will leave an adhesive wrinkle...Put it off wet...Nice job though, that is turning out nice😉
« Last Edit: November 23, 2020, 10:52:36 pm by jennifer »

bperkins01

  • Trade Count: (0)
  • Full Member
  • ***
  • Offline Offline
  • Posts: 895
  • Last login:September 24, 2023, 02:13:35 pm
  • Plenty of skills.. gaining experience..
Re: A Joust restoration.. this is going to take a while
« Reply #96 on: November 23, 2020, 10:51:31 pm »
ok - I gave it a shot..


97% good. There’s a little corner or two I may slice off when this is dry. But this is a super close up. Pulled the stencil after 1 hour..
The wife says it looks like decals..  She meant it as a compliment..
« Last Edit: November 23, 2020, 10:53:36 pm by bperkins01 »
My Arcade Cabinet Build and other projects here:
Centipede, Joust, Joust Cocktail, Asteroids, Galaga, Ms. Pacman Cabaret, Defender, Space Invaders Cocktail
https://bperkins.wordpress.com/

jennifer

  • Trade Count: (0)
  • Full Member
  • ***
  • Offline Offline
  • Posts: 2895
  • Last login:August 11, 2023, 06:24:58 am
Re: A Joust restoration.. this is going to take a while
« Reply #97 on: November 23, 2020, 10:53:57 pm »
Little jellious...Just saying🙄

bperkins01

  • Trade Count: (0)
  • Full Member
  • ***
  • Offline Offline
  • Posts: 895
  • Last login:September 24, 2023, 02:13:35 pm
  • Plenty of skills.. gaining experience..
Re: A Joust restoration.. this is going to take a while
« Reply #98 on: November 23, 2020, 11:23:00 pm »
Well with that patch fix...leaving that tape on there will bite into that uncured paint...You should pull it off as soon as you are done fixing or it will leave an adhesive wrinkle...Put it off wet...Nice job though, that is turning out nice😉

I just got what you were saying here..  The paper and painters tape were below the actual stencil material..  I put it there just in case there was any paint drool - which there was.  The stencil material was used on the entire perimeter of the yellow area under repair..  ;)
My Arcade Cabinet Build and other projects here:
Centipede, Joust, Joust Cocktail, Asteroids, Galaga, Ms. Pacman Cabaret, Defender, Space Invaders Cocktail
https://bperkins.wordpress.com/

jennifer

  • Trade Count: (0)
  • Full Member
  • ***
  • Offline Offline
  • Posts: 2895
  • Last login:August 11, 2023, 06:24:58 am
Re: A Joust restoration.. this is going to take a while
« Reply #99 on: November 24, 2020, 02:35:13 am »
I diddnt mean to get involved, just got a little excited, Painting is scary fun...All I was saying is 10 min after your last coat if you pull the tape the thinner in the paint makes the tape soft and it peels really easy, even after a hour it is set up and becomes more difficult to the point of potentially ripping the paint...But...Your use of thinners, and the paint gun should be noted, very well done and if I had to guess very minimal orange peel, and level paint surface flow, nice coverage, and from here the colors look right.
« Last Edit: November 24, 2020, 02:37:34 am by jennifer »

bperkins01

  • Trade Count: (0)
  • Full Member
  • ***
  • Offline Offline
  • Posts: 895
  • Last login:September 24, 2023, 02:13:35 pm
  • Plenty of skills.. gaining experience..
Re: A Joust restoration.. this is going to take a while
« Reply #100 on: November 24, 2020, 07:26:40 am »
@Jennifer - No worries.  Good call on pulling the stencil a little sooner.  24 hours was too long.  The paint had a little too much tug.  I went with a single coat.  This paint has really good pigment and with a little reducing, self levels perfect.  No orange peel at all.

One color to go.. w/o screwups  :P
My Arcade Cabinet Build and other projects here:
Centipede, Joust, Joust Cocktail, Asteroids, Galaga, Ms. Pacman Cabaret, Defender, Space Invaders Cocktail
https://bperkins.wordpress.com/

bperkins01

  • Trade Count: (0)
  • Full Member
  • ***
  • Offline Offline
  • Posts: 895
  • Last login:September 24, 2023, 02:13:35 pm
  • Plenty of skills.. gaining experience..
Re: A Joust restoration.. this is going to take a while
« Reply #101 on: November 28, 2020, 03:31:39 pm »


Well the red layer stencils put up a fight. I got one side done correctly, with a minor hiccup. Applied the stencil, did the seal coat of yellow and brown. Sprayed red.. This went fine.


I peeled the stencil after about 30 minutes, but got a little yellow drag though the red.. Ughh. I waited a day and brushed a little fresh red on top. Same as the fix before for the yellow area.

The big issue is on the second side, I somehow got the stencil improperly aligned to the point were it will not look right if I shoot the red paint. Need to wait until Monday to see if I can buy a replacement for the one I have on wrong.. Nothing lost except a little time. I can’t peel and reposition it. It will shred. So I wait. I can 100% finish the rest of the cabinet without the red on the second side. The last color coat will be very simple to mask and paint.


Shop lighting vs. daylight
My Arcade Cabinet Build and other projects here:
Centipede, Joust, Joust Cocktail, Asteroids, Galaga, Ms. Pacman Cabaret, Defender, Space Invaders Cocktail
https://bperkins.wordpress.com/

J_K_M_A_N

  • Trade Count: (0)
  • Full Member
  • ***
  • Offline Offline
  • Posts: 983
  • Last login:Today at 08:36:04 am
Re: A Joust restoration.. this is going to take a while
« Reply #102 on: November 29, 2020, 10:05:26 am »
That looks amazing! Major bummer on the misalignment.  :hissy: Hopefully you can get just the one to fix it.

J_K_M_A_N

bperkins01

  • Trade Count: (0)
  • Full Member
  • ***
  • Offline Offline
  • Posts: 895
  • Last login:September 24, 2023, 02:13:35 pm
  • Plenty of skills.. gaining experience..
Re: A Joust restoration.. this is going to take a while
« Reply #103 on: November 29, 2020, 10:27:42 am »
That looks amazing! Major bummer on the misalignment.  :hissy: Hopefully you can get just the one to fix it.

J_K_M_A_N

Thanks - its my own fault.  I wanted to 'fit it in' while cooking for Thanksgiving..   I 'may' expose my gaff once I get it fixed up.  :P
Oh well..  I'm sure it will work out fine and only us people here will ever know...  shhhhhhh...
My Arcade Cabinet Build and other projects here:
Centipede, Joust, Joust Cocktail, Asteroids, Galaga, Ms. Pacman Cabaret, Defender, Space Invaders Cocktail
https://bperkins.wordpress.com/

bperkins01

  • Trade Count: (0)
  • Full Member
  • ***
  • Offline Offline
  • Posts: 895
  • Last login:September 24, 2023, 02:13:35 pm
  • Plenty of skills.. gaining experience..
Re: A Joust restoration.. this is going to take a while
« Reply #104 on: December 14, 2020, 10:03:54 am »
Now for the learning experience..


It’s easier than you would think to get off course applying the stencil. The last one I just lost track of it until it was too late. Here you can see the lower alignment triangle is off by about 1/8″-3/16″. Which caused the rider to just about touch the jousting lance. There is way too much margin behind his foot and almost none in front of it..

Big takeaway from this is once the top section is stuck on and you are working your way down, make sure the back edge of the stencil stays aligned with the back of the cabinet. Its the reference point that keeps everything on track. You can peel the top section off while there is only a few inches attached and reposition it. But there is a point of no return where you will shred the stencil – which is what happened to me.

The people at This Old Game helped me out and sent a replacement stencil within a few days.


New stencil staying aligned with the back edge of the cabinet. Feet, knees and lance are all within the proper spacing now.


Full cabinet masked off except the red area, quick thin sealer coats of brown and yellow to prevent bleed and the final coat of red.


Came out great. Glad I waited to get a replacement stencil. I pulled it off after about 30 minutes and that really is the way to go. The paint is soft and levels off to a nice rounded edge. Just need to be exceptionally careful that the wet stencil doesn’t touch anything while taking it off. Keep a single edge razor in your hand (I keep it in my mouth) to cut away stencil material before it gets too big to handle during removal.
My Arcade Cabinet Build and other projects here:
Centipede, Joust, Joust Cocktail, Asteroids, Galaga, Ms. Pacman Cabaret, Defender, Space Invaders Cocktail
https://bperkins.wordpress.com/

Arroyo

  • Trade Count: (0)
  • Full Member
  • ***
  • Offline Offline
  • Posts: 1558
  • Last login:April 14, 2024, 01:44:51 am
  • Budgets are boring
    • newforum.arcadecontrols.com/index.php/topic,156267.0.html
Re: A Joust restoration.. this is going to take a while
« Reply #105 on: December 14, 2020, 11:18:33 am »


Beautiful

Mike A

  • Trade Count: (0)
  • Full Member
  • ***
  • Offline Offline
  • Posts: 5884
  • Last login:Today at 11:54:45 am
  • This plan is foolproof
Re: A Joust restoration.. this is going to take a while
« Reply #106 on: December 14, 2020, 11:35:48 am »
I think I might cry.

 :applaud:

javeryh

  • Trade Count: (+1)
  • Full Member
  • ***
  • Offline Offline
  • Posts: 7904
  • Last login:Today at 03:22:36 pm
Re: A Joust restoration.. this is going to take a while
« Reply #107 on: December 17, 2020, 04:54:06 pm »
I think I might cry.

 :applaud:

Same.  I just read through this entire thread and it's incredible work.   :applaud:

bperkins01

  • Trade Count: (0)
  • Full Member
  • ***
  • Offline Offline
  • Posts: 895
  • Last login:September 24, 2023, 02:13:35 pm
  • Plenty of skills.. gaining experience..
Re: A Joust restoration.. this is going to take a while
« Reply #108 on: December 17, 2020, 05:56:24 pm »
Thanks guys :)
My Arcade Cabinet Build and other projects here:
Centipede, Joust, Joust Cocktail, Asteroids, Galaga, Ms. Pacman Cabaret, Defender, Space Invaders Cocktail
https://bperkins.wordpress.com/

bperkins01

  • Trade Count: (0)
  • Full Member
  • ***
  • Offline Offline
  • Posts: 895
  • Last login:September 24, 2023, 02:13:35 pm
  • Plenty of skills.. gaining experience..
Re: A Joust restoration.. this is going to take a while
« Reply #109 on: January 01, 2021, 09:26:05 am »
Joust Upright – Finishing up.. maybe..
Down to the last steps now that the stencils are complete. Installing the T-molding was uneventful. Last part was this horrible Silkworm burn on the CRT.


It’s very noticeable during the game and just looks terrible.


First I recapped the chassis and tested it with the Silkworm tube – didn’t make anything worse. I found a free Craigslist TV. The Silkworm tube is the left one – and the TV tube on the right. One letter difference? Could I get lucky?


Chassis all washed, cleaned, recapped. New tube installed. I spent a couple hours working on convergence which is really a mystic art form. I’m not 100% crazy about the tube – but its up and running. I may mess with it again in the future.

Skipping ahead..


Restoration complete. This Old Game produces fantastic artwork. The marquee, bezel, CPO and stencils are all T.O.G. Pretty much every part of this cabinet needed something. It was a total disaster when I picked it up. The only thing that did work was the actual game board.

Shop cleaned – ready for the next project.
My Arcade Cabinet Build and other projects here:
Centipede, Joust, Joust Cocktail, Asteroids, Galaga, Ms. Pacman Cabaret, Defender, Space Invaders Cocktail
https://bperkins.wordpress.com/

Arroyo

  • Trade Count: (0)
  • Full Member
  • ***
  • Offline Offline
  • Posts: 1558
  • Last login:April 14, 2024, 01:44:51 am
  • Budgets are boring
    • newforum.arcadecontrols.com/index.php/topic,156267.0.html
Re: A Joust restoration.. this is going to take a while
« Reply #110 on: January 01, 2021, 10:56:26 am »


Seriously one of my favorite looking cabs. You might own the nicest in the world now.
« Last Edit: January 01, 2021, 12:00:19 pm by Arroyo »

J_K_M_A_N

  • Trade Count: (0)
  • Full Member
  • ***
  • Offline Offline
  • Posts: 983
  • Last login:Today at 08:36:04 am
Re: A Joust restoration.. this is going to take a while
« Reply #111 on: January 01, 2021, 11:52:59 am »
That looks absolutely incredible! Beautiful work. I agree that you probably own the nicest existing Joust out there now. I can't wait to come over and play it.  ;)  :cheers:

J_K_M_A_N

Gilrock

  • Trade Count: (0)
  • Full Member
  • ***
  • Offline Offline
  • Posts: 1049
  • Last login:March 30, 2024, 05:15:46 pm
Re: A Joust restoration.. this is going to take a while
« Reply #112 on: January 04, 2021, 02:40:14 pm »
Nice job.  When did you order the stencils?  I ordered from This Old Game February 16th and then asked for an update in August and never got a reply.  Just tried again this morning and no reply yet.

Update:  right after I posted they replied my stencils will ship this week and they refunded the bezel cost since I found another source.  I'll probably have mine running soon I spent time on it over holiday break.
« Last Edit: January 04, 2021, 02:44:53 pm by Gilrock »

wp34

  • Trade Count: (+3)
  • Full Member
  • ***
  • Offline Offline
  • Posts: 4794
  • Last login:April 10, 2022, 09:48:19 pm
Re: A Joust restoration.. this is going to take a while
« Reply #113 on: January 04, 2021, 03:23:23 pm »
That's really impressive work.  You make it look easy and we know it is not.   :cheers:

That also might be the most nonchalant tube swap I've ever seen.  Nice job.

bperkins01

  • Trade Count: (0)
  • Full Member
  • ***
  • Offline Offline
  • Posts: 895
  • Last login:September 24, 2023, 02:13:35 pm
  • Plenty of skills.. gaining experience..
Re: A Joust restoration.. this is going to take a while
« Reply #114 on: January 04, 2021, 03:31:46 pm »
The TOG people are much better at answering the phone than emails for the most part.
Glad you got yours.  They *seem* to be catching up.

Their supply chain got screwed up by Covid last Nov/Dec.  The suppliers of raw materials (China I'm assuming) closed up, which messed up their actual suppliers.. which messed them up.. and then they moved the business across the country..

That said - the product is fantastic and worth it it IMHO..

Hopefully they are working through the backlog and the lead times get better.
Good luck on the Stencils!
My Arcade Cabinet Build and other projects here:
Centipede, Joust, Joust Cocktail, Asteroids, Galaga, Ms. Pacman Cabaret, Defender, Space Invaders Cocktail
https://bperkins.wordpress.com/

bperkins01

  • Trade Count: (0)
  • Full Member
  • ***
  • Offline Offline
  • Posts: 895
  • Last login:September 24, 2023, 02:13:35 pm
  • Plenty of skills.. gaining experience..
Re: A Joust restoration.. this is going to take a while
« Reply #115 on: January 04, 2021, 03:36:38 pm »
That's really impressive work.  You make it look easy and we know it is not.   :cheers:

That also might be the most nonchalant tube swap I've ever seen.  Nice job.

Thanks wp34 - The tube swap was a good 4-6 hours of messing around.  I'm not all that crazy about it.
One thing I'm going to try is replace the width capacitor.  I've learned the width coil does pretty much nothing (which I agree with - I've never had a width coil do much more than break on me)
But the less well know - replace the width capacitor option is on the table.  I picked up an assortment of caps and I'm going to try the next size up to see if I can get the picture on the screen.  It may help with the sides/corner convergence that I don't care for..

We'll see ..  But the rest of it is really nice  ;)
My Arcade Cabinet Build and other projects here:
Centipede, Joust, Joust Cocktail, Asteroids, Galaga, Ms. Pacman Cabaret, Defender, Space Invaders Cocktail
https://bperkins.wordpress.com/

javeryh

  • Trade Count: (+1)
  • Full Member
  • ***
  • Offline Offline
  • Posts: 7904
  • Last login:Today at 03:22:36 pm
Re: A Joust restoration.. this is going to take a while
« Reply #116 on: January 06, 2021, 01:54:49 pm »
Stunning job.  Looks like it came off the assembly line yesterday.  I mean, it couldn't look any more perfect. 

 :notworthy: :notworthy: :notworthy:

ChanceKJ

  • Trade Count: (0)
  • Full Member
  • ***
  • Offline Offline
  • Posts: 3229
  • Last login:August 07, 2021, 02:52:06 pm
.
« Reply #117 on: January 06, 2021, 05:54:22 pm »
.
« Last Edit: March 19, 2021, 02:05:33 am by ChanceKJ »

bperkins01

  • Trade Count: (0)
  • Full Member
  • ***
  • Offline Offline
  • Posts: 895
  • Last login:September 24, 2023, 02:13:35 pm
  • Plenty of skills.. gaining experience..
Re: A Joust restoration.. this is going to take a while
« Reply #118 on: January 06, 2021, 07:39:42 pm »
Thanks guys  :)
Appreciate it.
 :cheers:
My Arcade Cabinet Build and other projects here:
Centipede, Joust, Joust Cocktail, Asteroids, Galaga, Ms. Pacman Cabaret, Defender, Space Invaders Cocktail
https://bperkins.wordpress.com/