Main Restorations Software Audio/Jukebox/MP3 Everything Else Buy/Sell/Trade
Project Announcements Monitor/Video GroovyMAME Merit/JVL Touchscreen Meet Up Retail Vendors
Driving & Racing Woodworking Software Support Forums Consoles Project Arcade Reviews
Automated Projects Artwork Frontend Support Forums Pinball Forum Discussion Old Boards
Raspberry Pi & Dev Board controls.dat Linux Miscellaneous Arcade Wiki Discussion Old Archives
Lightguns Arcade1Up Try the site in https mode Site News

Unread posts | New Replies | Recent posts | Rules | Chatroom | Wiki | File Repository | RSS | Submit news


Author Topic: A Joust restoration.. this is going to take a while  (Read 24145 times)

0 Members and 1 Guest are viewing this topic.

Gilrock

  • Trade Count: (0)
  • Full Member
  • ***
  • Offline Offline
  • Posts: 1049
  • Last login:March 30, 2024, 05:15:46 pm
Re: A Joust restoration.. this is going to take a while
« Reply #40 on: July 13, 2020, 10:46:29 am »
Nice.  I've been following along with your progress.  I've got a Joust scratch build going myself.  I'm just waiting on stuff I ordered from This Old Game back in February.  So I've got the sides painted the Chocolate Chip brown and its just wrapped in plastic sitting in the house waiting for the bezel and stencil before I can proceed.  The way I build it I need to rotate the cab face down and lay the bezel in there so I can use it as a guide to glue the supports behind it.  Just got notified the guy that makes the speaker grills for Joust is back at it so got that on order.

bperkins01

  • Trade Count: (0)
  • Full Member
  • ***
  • Offline Offline
  • Posts: 895
  • Last login:September 24, 2023, 02:13:35 pm
  • Plenty of skills.. gaining experience..
Re: A Joust restoration.. this is going to take a while
« Reply #41 on: July 13, 2020, 10:52:06 am »
Nice.  I've been following along with your progress.  I've got a Joust scratch build going myself.  I'm just waiting on stuff I ordered from This Old Game back in February.  So I've got the sides painted the Chocolate Chip brown and its just wrapped in plastic sitting in the house waiting for the bezel and stencil before I can proceed.  The way I build it I need to rotate the cab face down and lay the bezel in there so I can use it as a guide to glue the supports behind it.  Just got notified the guy that makes the speaker grills for Joust is back at it so got that on order.

Thanks - I'm waiting on T.O.G. too for Marquee, CPO, Stencils and Bezel.  They told me flat out Bezel will take forever since the industry has no glass availability.  The other stuff is in process I guess.  My order for the grill is already in (and for a Defender restore which is on deck for me).
At least I know for a fact there are two stencil orders!

My Arcade Cabinet Build and other projects here:
Centipede, Joust, Joust Cocktail, Asteroids, Galaga, Ms. Pacman Cabaret, Defender, Space Invaders Cocktail
https://bperkins.wordpress.com/

Gilrock

  • Trade Count: (0)
  • Full Member
  • ***
  • Offline Offline
  • Posts: 1049
  • Last login:March 30, 2024, 05:15:46 pm
Re: A Joust restoration.. this is going to take a while
« Reply #42 on: July 13, 2020, 05:11:52 pm »
Yes T.O.G. did ship my Marquee a few weeks ago.  I guess I'll end up paying for the Bezel 3 times.  I bought one from ArcadeShop back in January and I broke it trying to cut a 1/16" off of it with a wet saw.  I guess it was tempered glass and a bad idea...lol.  I made the mistake of designing the cab for the same dimension that worked for my Robotron bezel ( 24 5/16") but it turns out there is variation in the bezel width dimension and my Joust was 24 7/16".  Luckily I hadn't finished assembling the cab and only had to throw away the lower coin door piece I had cut and re-designed it to be 3/16" wider.

So any idea if the T.O.G. bezel is better quality than from ArcadeShop?  I'm tired of waiting so I just ordered another bezel from ArcadeShop this morning and I've already gotten the shipping notice.

bperkins01

  • Trade Count: (0)
  • Full Member
  • ***
  • Offline Offline
  • Posts: 895
  • Last login:September 24, 2023, 02:13:35 pm
  • Plenty of skills.. gaining experience..
Re: A Joust restoration.. this is going to take a while
« Reply #43 on: July 13, 2020, 05:22:46 pm »
hmm..  Your lucky.  I figured it they were making one marquee they would make all the open orders..  :(

My understanding with T.O.G is the only thing there is to complain about is the wait..  But I have no first hand experience (except for the wait) yet..
Stencil and CPO are the big holdups..  I can finish the restore w/o the Marquee and Bezel.

T.O.G. wouldn't take my Bezel order..

My Arcade Cabinet Build and other projects here:
Centipede, Joust, Joust Cocktail, Asteroids, Galaga, Ms. Pacman Cabaret, Defender, Space Invaders Cocktail
https://bperkins.wordpress.com/

bperkins01

  • Trade Count: (0)
  • Full Member
  • ***
  • Offline Offline
  • Posts: 895
  • Last login:September 24, 2023, 02:13:35 pm
  • Plenty of skills.. gaining experience..
Re: A Joust restoration.. this is going to take a while
« Reply #44 on: July 14, 2020, 07:51:35 am »


First coat of primer on - I'm using Kilz oil based primer.  The color coats are oil based and compatible.  It is also sandable.  For the stencils to work right - I need the surface as smooth as possible.  A sandable primer gets me there.


Kilz goes on pretty thick and leaves a fair amount of texture.  I sanded to 180 grit with the power sander to knock it down and finished by hand with a soft sanding block at 220 grit.  Power sanding is great - but you can't feel anything.  Hand sanding will let you know how smooth the surface is - you can feel it and hear it.  There were still some surface imperfections on the sides - a couple of scratches and dings.  Very very small - but just enough to skim on a little spackling compound. (yes the same Spackle used in drywall repairs)  For filling a scratch you could make with a thumbnail, on a flat surface then needs no structural strength over primer..  its good stuff.  It's not the same as drywall mud.  Its more dense but just as easily sandable.

I'll resand and reprime to make sure the surface has a consistent texture.


My next part is something I've wanted for a while - a media blaster.  This one cost less than $70.  But you need a big compressor.  One that can push 7+ CFM at 90 psi.  Mine is a 60 gallon, 11 cfm at 90 psi.  If you have a big compressor - then this is worth the money.  There is a less expensive version that does not include the siphon hose attachment.  Do NOT get that one.  I filled the little tank twice in about 10 minutes.. The siphon is a metal tube you stick into the media and it sucks it up a rubber hose. Surprisingly it works great.


My plan was to try to contain the blast media like a cabinet - but this really just made a sandstorm as it blew back up at me.  That said - it still worked reasonably well.  The media I'm using (coal slag) is single use so there is no reason to save it.  Next session will be freehand behind the shop where the coal dust can be raked into the grass.


The coin doors were pretty beat up and had some paint blistering with rust.  I could have kept going and got every last spec of paint off.  A small amount of hand sanding to make sure its all smooth is all that is really needed here.  This door has a little shape issue where it was likely kicked at some point..  I'm planning to press it out and fix any dings with Bondo (yes - using Bondo for its intended use - metal surface imperfection repair)


Same for the coin box door.  It cleaned up pretty nice.


Even carriage bolt heads were simple.  A quick shot and the rust was gone.

Stay tuned..
« Last Edit: July 14, 2020, 10:22:50 pm by bperkins01 »
My Arcade Cabinet Build and other projects here:
Centipede, Joust, Joust Cocktail, Asteroids, Galaga, Ms. Pacman Cabaret, Defender, Space Invaders Cocktail
https://bperkins.wordpress.com/

Mike A

  • Trade Count: (0)
  • Full Member
  • ***
  • Online Online
  • Posts: 5884
  • Last login:Today at 09:58:15 am
  • This plan is foolproof
Re: A Joust restoration.. this is going to take a while
« Reply #45 on: July 14, 2020, 07:56:33 am »
Quote
Power sanding is great - but you can't feel anything.  Hand sanding will let you know how smooth the surface is - you can feel it and hear it.

Yes.

I have a few blocks of wood of various sizes with a rubber mat glued to them. I think I used a kitchen drawer or tool drawer liner. It is amazing what you can hear and feel when you are not sanding with a hornet's nest.

Adios

  • Trade Count: (0)
  • Jr. Member
  • **
  • Offline Offline
  • Posts: 2
  • Last login:July 17, 2020, 02:56:55 am
Re: A Joust restoration.. this is going to take a while
« Reply #46 on: July 17, 2020, 02:03:52 am »
Nice Job! I ran across the restore looking for info on the Joust cocktail I'm restoring. Don't know if you ever got the glue off the control panel. I had the same problem with Robotron CP. I bought a (drill) spinning wheel gum eraser from Amazon it works wonders getting the glue residue off. I sanded it smooth after that.-FYI

bperkins01

  • Trade Count: (0)
  • Full Member
  • ***
  • Offline Offline
  • Posts: 895
  • Last login:September 24, 2023, 02:13:35 pm
  • Plenty of skills.. gaining experience..
Re: A Joust restoration.. this is going to take a while
« Reply #47 on: August 04, 2020, 09:01:45 am »
Progress being made during a vacation week..


Thankfully I was mistaken and the top panel was made of particle board and not MDF. (The edge looked like MDF..)  This looks terrible.  This technique should work on MDF too..  But all things being equal - particle board is better than MDF.


I used 80 grit paper and re-sanded it to as smooth as I could get.  The surface texture varies considerably, but at least it is flat.  I personally use a product called CPES that is an epoxy based wood stabilizer.  Two coats got brushed on to lock down the wood fibers.  There are many wood stabilizers available.  Very necessary to fix this up!  Once its set - sand again to smooth things up.


After that - 2 coats of Kilz oil based primer.  It's sandable, has some filler properties and evens out the texture.  I'm not trying to make a mirror - just an even texture like it was originally.


I knew the coin door panel was going to need a second coat based on how the first one went on.  Sand down the high spots and generally smooth out the surface.


After repainting, this is much better..  


Coin door panel ready to go as well..  Next up is sanding down the primed sides.  The original Joust had a very smooth base color coat for the side art stencil work. 

During all of this I've been working on the metal bits..


These are Joust upright and Joust cocktail parts mixed together.  They were pretty ratty.  Sandblasting and paint and they are good as new.


These cleaned up quite nicely.


And then this horrible thing happened..  Researched showed the hammered finish paint worked well for coin doors - it doesn't.  (I should have done a test piece - I know better)  Also - the can says black paint and it came out charcoal colored - its no where near black.  I can see this type of paint being useful for some stuff..  But not for this..

I'll be re-blasting these and repainting.  Digging a little deeper I found a video that shows a great way to get back the original textured finish.

More to come...


My Arcade Cabinet Build and other projects here:
Centipede, Joust, Joust Cocktail, Asteroids, Galaga, Ms. Pacman Cabaret, Defender, Space Invaders Cocktail
https://bperkins.wordpress.com/

Arroyo

  • Trade Count: (0)
  • Full Member
  • ***
  • Offline Offline
  • Posts: 1558
  • Last login:Yesterday at 06:17:46 pm
  • Budgets are boring
    • newforum.arcadecontrols.com/index.php/topic,156267.0.html
Re: A Joust restoration.. this is going to take a while
« Reply #48 on: August 04, 2020, 09:07:07 am »
Lookin good buddy.  Thanks for posting the details, it’ll be valuable for future me.

J_K_M_A_N

  • Trade Count: (0)
  • Full Member
  • ***
  • Offline Offline
  • Posts: 983
  • Last login:Today at 08:33:47 am
Re: A Joust restoration.. this is going to take a while
« Reply #49 on: August 04, 2020, 10:46:31 am »
I love this one. Joust is an awesome game. This thing is going to look phenomenal the way you are taking care of it.

J_K_M_A_N

bperkins01

  • Trade Count: (0)
  • Full Member
  • ***
  • Offline Offline
  • Posts: 895
  • Last login:September 24, 2023, 02:13:35 pm
  • Plenty of skills.. gaining experience..
Re: A Joust restoration.. this is going to take a while
« Reply #50 on: August 04, 2020, 11:47:16 am »
Lookin good buddy.  Thanks for posting the details, it’ll be valuable for future me.
I love this one. Joust is an awesome game. This thing is going to look phenomenal the way you are taking care of it.

J_K_M_A_N
Thanks guys - I'll keep them coming ;)
My Arcade Cabinet Build and other projects here:
Centipede, Joust, Joust Cocktail, Asteroids, Galaga, Ms. Pacman Cabaret, Defender, Space Invaders Cocktail
https://bperkins.wordpress.com/

bperkins01

  • Trade Count: (0)
  • Full Member
  • ***
  • Offline Offline
  • Posts: 895
  • Last login:September 24, 2023, 02:13:35 pm
  • Plenty of skills.. gaining experience..
Re: A Joust restoration.. this is going to take a while
« Reply #51 on: August 04, 2020, 05:08:40 pm »
Quick update:


Sandblasting fresh paint is WAY easier than sand blasting 40 year old paint.  It took me longer to drag the air hose and sand blasting stuff outside/inside than to remove that crappy hammered finish paint.  Maybe 10 minutes for 4 pieces.


Here is the completed door - its still wet so the gloss still has to tone down a bit.  I used Rustoleum Satin Black paint.  Spray in the base coat smooth as you normally would and wait 30 min or so for it to set up..  To get the texture - you have to spray a second coat - but EVER SO LIGHTLY press the button so the can barely spits out paint.  The little spitting gives the exact texture. Holding it just right requires a little practice.

I got the info from this video:  Bryan Kelly Coin Door Restoration

He did it with two different paints.  I just used Satin Black and it looks great.  All my surface metals that were textured get this going forward. 

Well worth the rework.
My Arcade Cabinet Build and other projects here:
Centipede, Joust, Joust Cocktail, Asteroids, Galaga, Ms. Pacman Cabaret, Defender, Space Invaders Cocktail
https://bperkins.wordpress.com/

Mike A

  • Trade Count: (0)
  • Full Member
  • ***
  • Online Online
  • Posts: 5884
  • Last login:Today at 09:58:15 am
  • This plan is foolproof
Re: A Joust restoration.. this is going to take a while
« Reply #52 on: August 04, 2020, 05:20:28 pm »
 :applaud:

bperkins01

  • Trade Count: (0)
  • Full Member
  • ***
  • Offline Offline
  • Posts: 895
  • Last login:September 24, 2023, 02:13:35 pm
  • Plenty of skills.. gaining experience..
Re: A Joust restoration.. this is going to take a while
« Reply #53 on: August 07, 2020, 09:45:18 am »


 :banghead: 4th times a charm if you include the crappy hammer finish paint.

Because no build thread is complete without sharing mistakes..  this cash box door put up a fight.  It was the first part I painted with the spatter/texture technique.  When you are barely pressing the nozzle and its spitting paint dots, a little puddle of paint builds up just below the nozzle on the rim of the can..  and then a big blob of paint falls on the part. 

I waited for it to dry and re-sand blasted it..

Then made the same exact mistake.. again..

Re-sand blasted it..

Have to make sure the paint can is never OVER the part..  spray from around the perimeter..


Since everything else was getting some touch-up.  These coin slot bezels got a quick hit of paint too..


The primer took some work to get smooth - this is before sanding. I used 80g with the power sander to knock down the high spots, then 120g to smooth it a bit more.  Finished with a soft sanding block and 180g by hand to make a perfectly smooth surface.  In total it took about 3 hours for both sides.  Best to sand in 'layers' to sneak up on the final finish vs. trying to get there all at once.


Here are the paint codes that I used.  The base color I was able to take from the original (which was under some other paint) and from someone else who did a restore.  It should be accurate.


First coat went on nice.  The HVLP gun worked well.  However I've done finish work for years and it still puts up a fight sometimes..  There were some thin spots, but there should have been since its supposed to go on thin and I planned on at least two coats.  I'm pretty sure the originals had a very smooth base coat so that the stencils would lay flat for the additional artwork.


The second coat.. not so much..  it orange-peeled on me.  I'll be hand sanding both sides with 120g to re-smooth it and likely 180g to remove the scratches.  I probably needed a little more mineral spirits in the paint.  Thought I had the mix right..   The upside is 3 coats of paint. 


« Last Edit: August 07, 2020, 09:48:38 am by bperkins01 »
My Arcade Cabinet Build and other projects here:
Centipede, Joust, Joust Cocktail, Asteroids, Galaga, Ms. Pacman Cabaret, Defender, Space Invaders Cocktail
https://bperkins.wordpress.com/

Arroyo

  • Trade Count: (0)
  • Full Member
  • ***
  • Offline Offline
  • Posts: 1558
  • Last login:Yesterday at 06:17:46 pm
  • Budgets are boring
    • newforum.arcadecontrols.com/index.php/topic,156267.0.html
Re: A Joust restoration.. this is going to take a while
« Reply #54 on: August 07, 2020, 10:30:29 am »
From the pictures all that paint work looks fantastic! Nice work.

Gilrock

  • Trade Count: (0)
  • Full Member
  • ***
  • Offline Offline
  • Posts: 1049
  • Last login:March 30, 2024, 05:15:46 pm
Re: A Joust restoration.. this is going to take a while
« Reply #55 on: August 07, 2020, 10:58:12 am »
...  It was the first part I painted with the spatter/texture technique.  When you are barely pressing the nozzle and its spitting paint dots,...

When I read the technique you use to recreate the old paint jobs it makes it sound like they were just rushing back then to get units out the door and now we try to duplicate the sloppy work...lol.

bperkins01

  • Trade Count: (0)
  • Full Member
  • ***
  • Offline Offline
  • Posts: 895
  • Last login:September 24, 2023, 02:13:35 pm
  • Plenty of skills.. gaining experience..
Re: A Joust restoration.. this is going to take a while
« Reply #56 on: August 07, 2020, 11:10:36 am »
...  It was the first part I painted with the spatter/texture technique.  When you are barely pressing the nozzle and its spitting paint dots,...

When I read the technique you use to recreate the old paint jobs it makes it sound like they were just rushing back then to get units out the door and now we try to duplicate the sloppy work...lol.
My bet is they went with the textured surface so the operators didn't have to clean sticky kid fingerprints off them all the time.  It would be simpler to just spray it once I think..  The other thing it covers up is if the first coat gets dust in it, the spatter coat hides all sins..   I like it actually.
My Arcade Cabinet Build and other projects here:
Centipede, Joust, Joust Cocktail, Asteroids, Galaga, Ms. Pacman Cabaret, Defender, Space Invaders Cocktail
https://bperkins.wordpress.com/

bperkins01

  • Trade Count: (0)
  • Full Member
  • ***
  • Offline Offline
  • Posts: 895
  • Last login:September 24, 2023, 02:13:35 pm
  • Plenty of skills.. gaining experience..
Re: A Joust restoration.. this is going to take a while
« Reply #57 on: August 26, 2020, 03:40:34 pm »
Small update - major milestone


At long last - the cabinet tear down and restore is complete.  Spraying paint after a long layoff is not like riding a bike, it doesn't come right back.  Its like playing your favorite game from when you were a kid..  after a few years you are just rusty but eventually it comes back.  5th coat was a charm.  The 4th one went on fine - there were just a couple of thin spots and some of the fine sanding scratches were visible through the paint.  I was going to leave it alone and the OCD in me said do it again..  Glad I did..  The feel for laying down a coat of just the right viscosity paint coupled with the right flow and coverage finally came together.

Black and brown are boring to look at..  But I can now start putting this cabinet back together while I wait on the stencils, CPO, etc..  Compared to the plywood shattered mess this once was - I'm pretty pleased with the outcome.
My Arcade Cabinet Build and other projects here:
Centipede, Joust, Joust Cocktail, Asteroids, Galaga, Ms. Pacman Cabaret, Defender, Space Invaders Cocktail
https://bperkins.wordpress.com/

Arroyo

  • Trade Count: (0)
  • Full Member
  • ***
  • Offline Offline
  • Posts: 1558
  • Last login:Yesterday at 06:17:46 pm
  • Budgets are boring
    • newforum.arcadecontrols.com/index.php/topic,156267.0.html
Re: A Joust restoration.. this is going to take a while
« Reply #58 on: August 26, 2020, 04:40:07 pm »
Sure looks purdy in the pics.  Guess I’ll know for sure soon enough

bperkins01

  • Trade Count: (0)
  • Full Member
  • ***
  • Offline Offline
  • Posts: 895
  • Last login:September 24, 2023, 02:13:35 pm
  • Plenty of skills.. gaining experience..
Re: A Joust restoration.. this is going to take a while
« Reply #59 on: August 26, 2020, 10:42:16 pm »
Sure looks purdy in the pics.  Guess I’ll know for sure soon enough
Thanks Arroyo - single digit days   :cheers:
My Arcade Cabinet Build and other projects here:
Centipede, Joust, Joust Cocktail, Asteroids, Galaga, Ms. Pacman Cabaret, Defender, Space Invaders Cocktail
https://bperkins.wordpress.com/

Arroyo

  • Trade Count: (0)
  • Full Member
  • ***
  • Offline Offline
  • Posts: 1558
  • Last login:Yesterday at 06:17:46 pm
  • Budgets are boring
    • newforum.arcadecontrols.com/index.php/topic,156267.0.html
Re: A Joust restoration.. this is going to take a while
« Reply #60 on: August 26, 2020, 11:18:16 pm »

HannibalAnthrope

  • Trade Count: (0)
  • Jr. Member
  • **
  • Offline Offline
  • Posts: 3
  • Last login:August 27, 2020, 10:00:25 am
  • I want to build my own arcade controls!
Re: A Joust restoration.. this is going to take a while
« Reply #61 on: August 27, 2020, 09:45:12 am »
Finding this thread has inspired me.... to abandon my dreams of building or restoring one myself someday! LOL  Sweet jeebus but that looks like a lotta work!  And you are obviously not skipping any details!

I can't help but wonder about the last owner.... what kinda person covers up a Joust ostrich with a picture of Jar-Jar Binks?!!?!?!! 
(yes, I know, but my first reaction was the above because in my memory it looked a bit more realistic back then lol)

bperkins01

  • Trade Count: (0)
  • Full Member
  • ***
  • Offline Offline
  • Posts: 895
  • Last login:September 24, 2023, 02:13:35 pm
  • Plenty of skills.. gaining experience..
Re: A Joust restoration.. this is going to take a while
« Reply #62 on: August 27, 2020, 11:25:45 am »
Finding this thread has inspired me.... to abandon my dreams of building or restoring one myself someday! LOL  Sweet jeebus but that looks like a lotta work!  And you are obviously not skipping any details!

I can't help but wonder about the last owner.... what kinda person covers up a Joust ostrich with a picture of Jar-Jar Binks?!!?!?!! 
(yes, I know, but my first reaction was the above because in my memory it looked a bit more realistic back then lol)

Thanks - if this was some crappy game like GoldenTee - it would have stayed dead..  But this Joust should be restored.  At least I have (almost) all the parts.
If I was restoring it for a living..  It wouldn't be viable..  too many hours.. 
My Arcade Cabinet Build and other projects here:
Centipede, Joust, Joust Cocktail, Asteroids, Galaga, Ms. Pacman Cabaret, Defender, Space Invaders Cocktail
https://bperkins.wordpress.com/

Howard_Casto

  • Idiot Police
  • Trade Count: (+1)
  • Full Member
  • ***
  • Offline Offline
  • Posts: 19400
  • Last login:April 15, 2024, 10:59:21 pm
  • Your Post's Soul is MINE!!! .......Again??
    • The Dragon King
Re: A Joust restoration.. this is going to take a while
« Reply #63 on: August 29, 2020, 03:16:42 pm »
Looking good man.  Remember, we don't do it for the money. 

bperkins01

  • Trade Count: (0)
  • Full Member
  • ***
  • Offline Offline
  • Posts: 895
  • Last login:September 24, 2023, 02:13:35 pm
  • Plenty of skills.. gaining experience..
Re: A Joust restoration.. this is going to take a while
« Reply #64 on: September 11, 2020, 09:46:03 am »


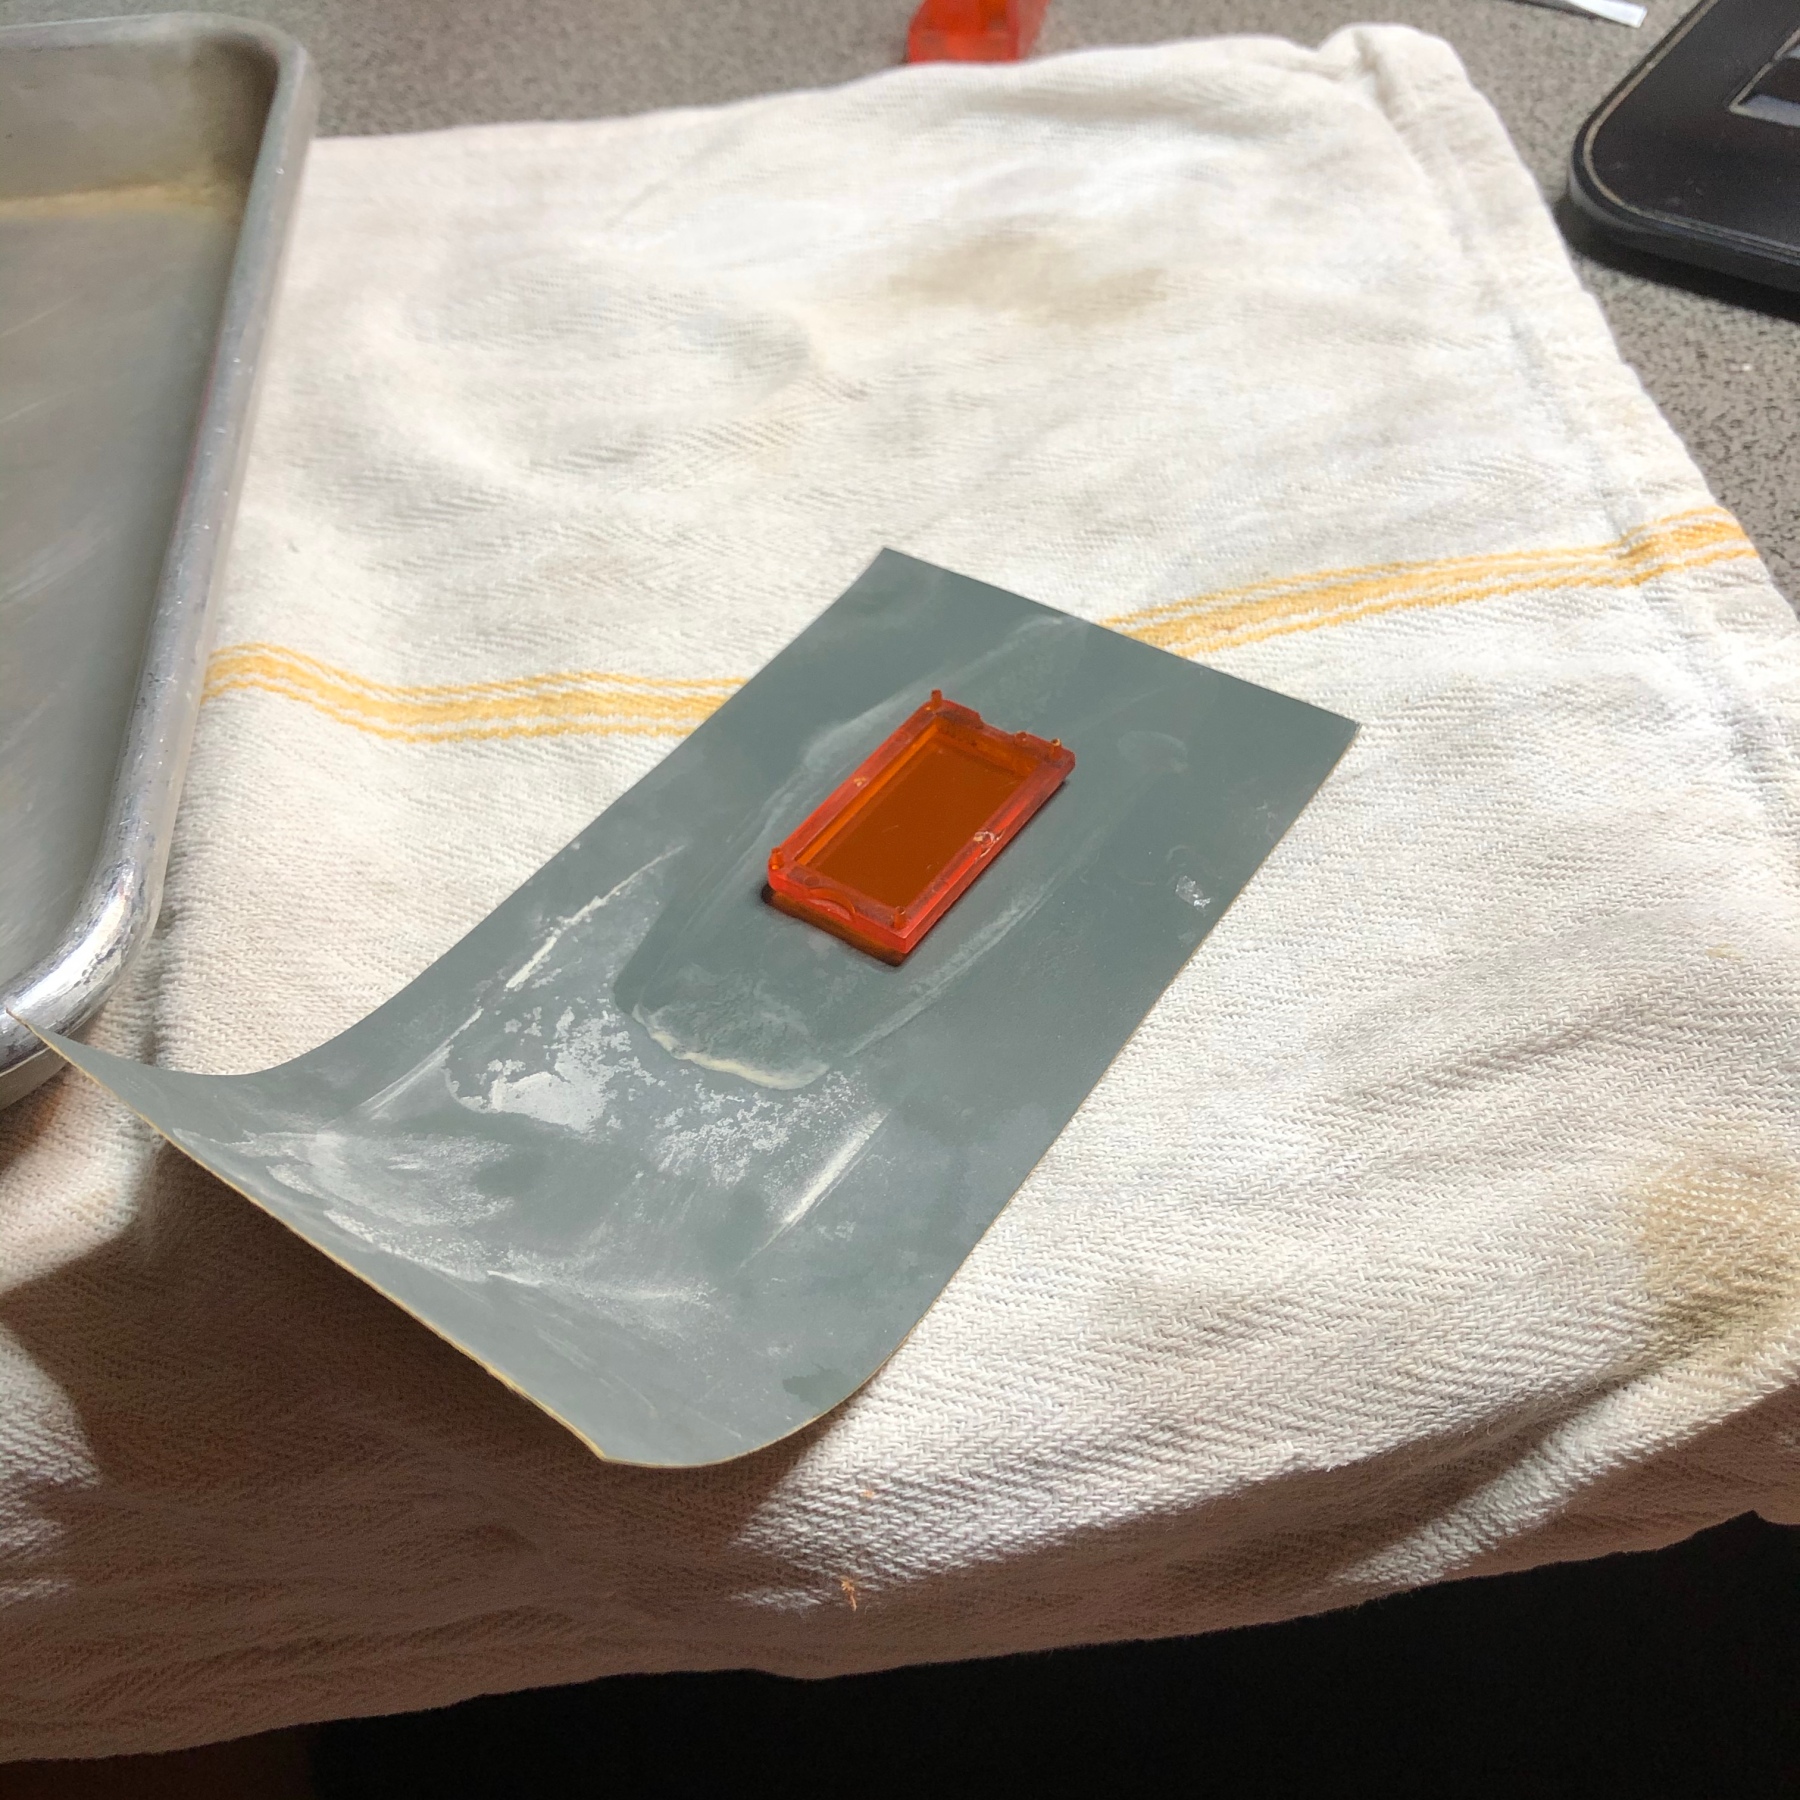
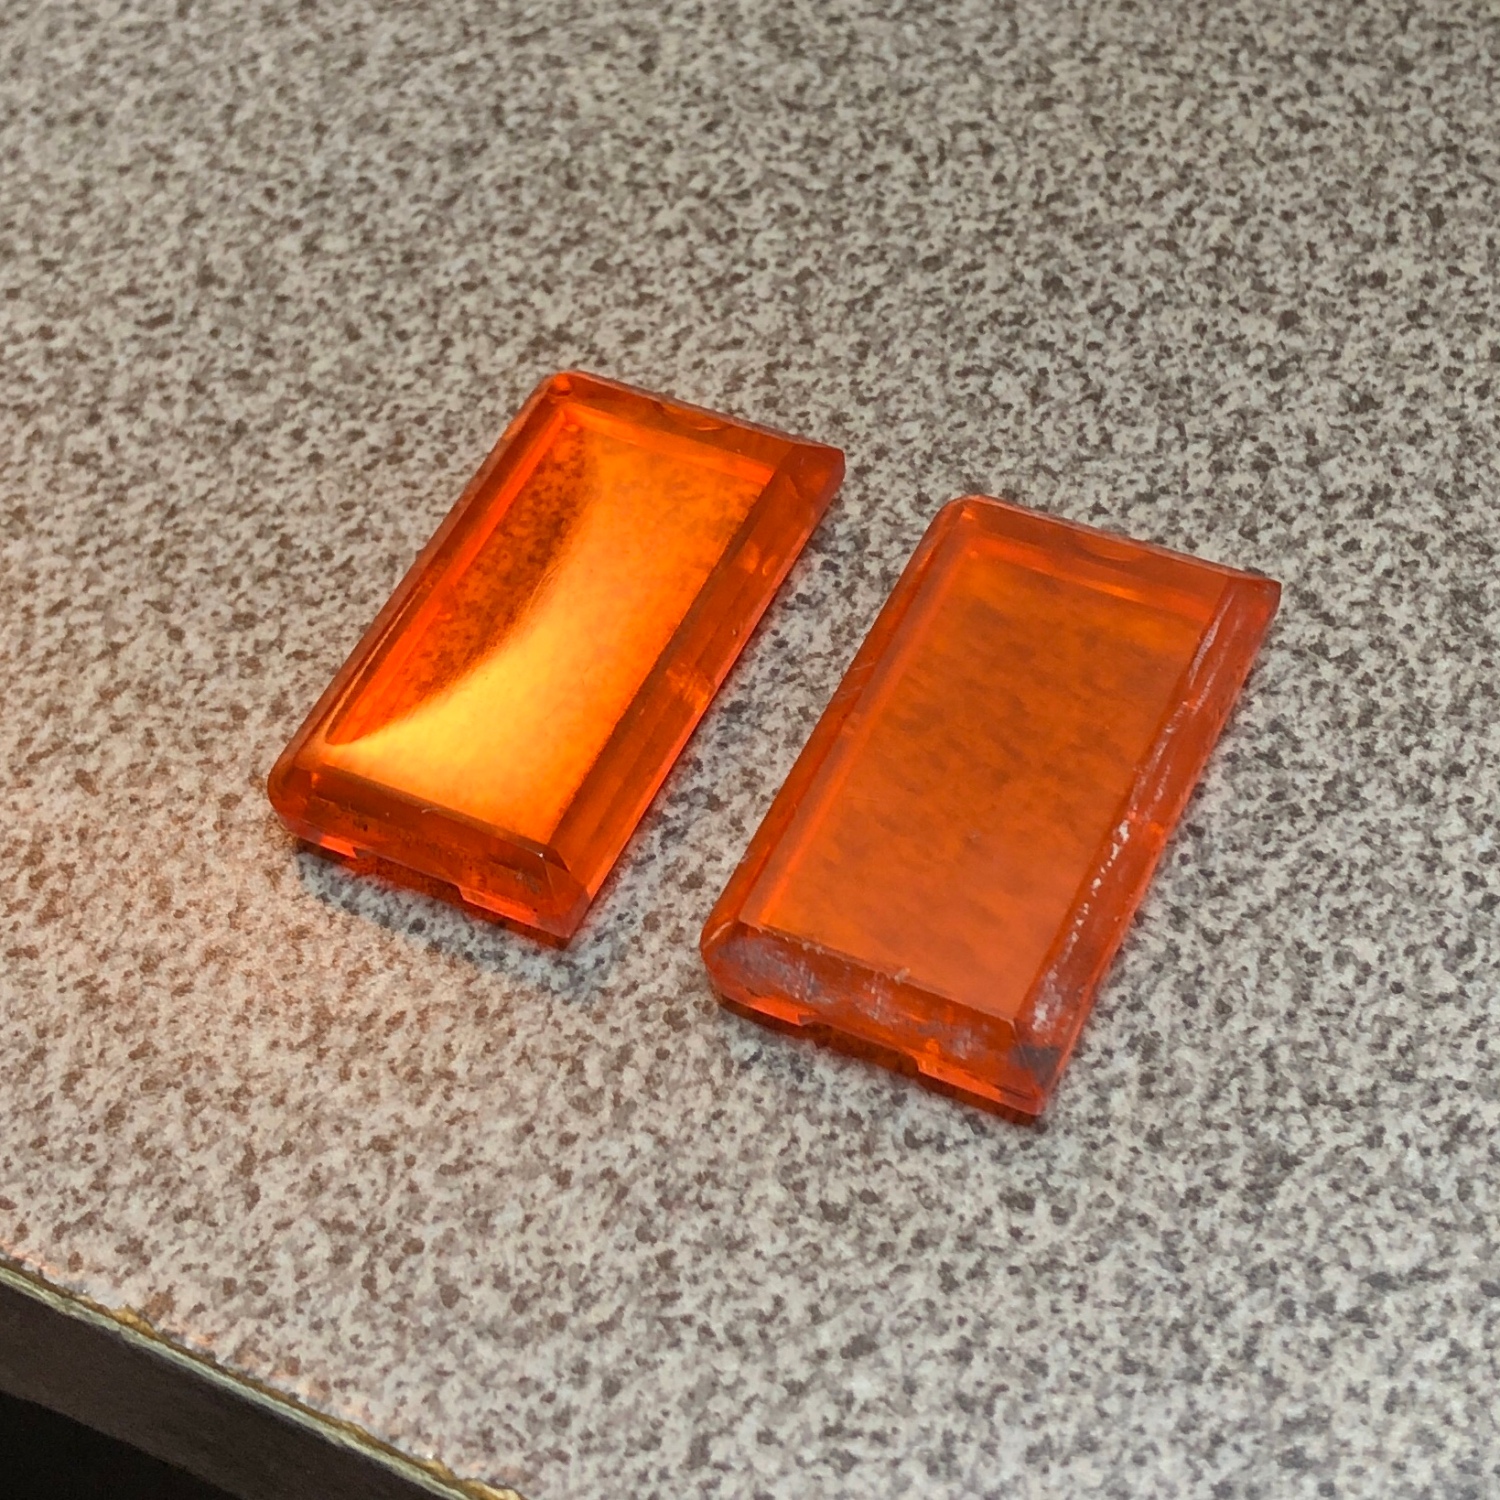
While sitting on endless Zoom sessions - I decided I'd polish up the coin eject buttons.  I found a good wet sandpaper selection on Amazon.  I started with 1000G to get a uniform scratch pattern.  Once you do that, sand through all the grits (1000, 1200, 1500, 2000, 2500, 3000, 5000).   I finished with some Novus compound.  It took 15-20 minutes to do both of them.  Before/after pic above.


Coin door back together.  Looks exacly like a 40 year old door again.  Except not all bent and hacked up.


The wiring harness had lots of black electrical tape on it.  There was no reason for it that I could see and online photos of the harness have no tape - as well as the cocktail had no tape..  So off with all the sticky tape.  The prior owner had put two full arcade systems in a single cabinet (what a hack job)..  Two harnesses, two power supplies, PCB's, swap-able control panels and he moved the video and speaker cables back and forth.  I'm guessing all the tape had something to do with that...


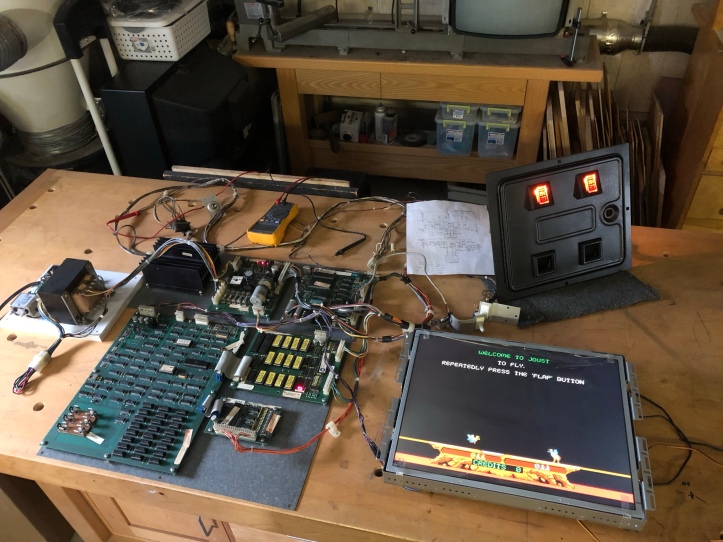
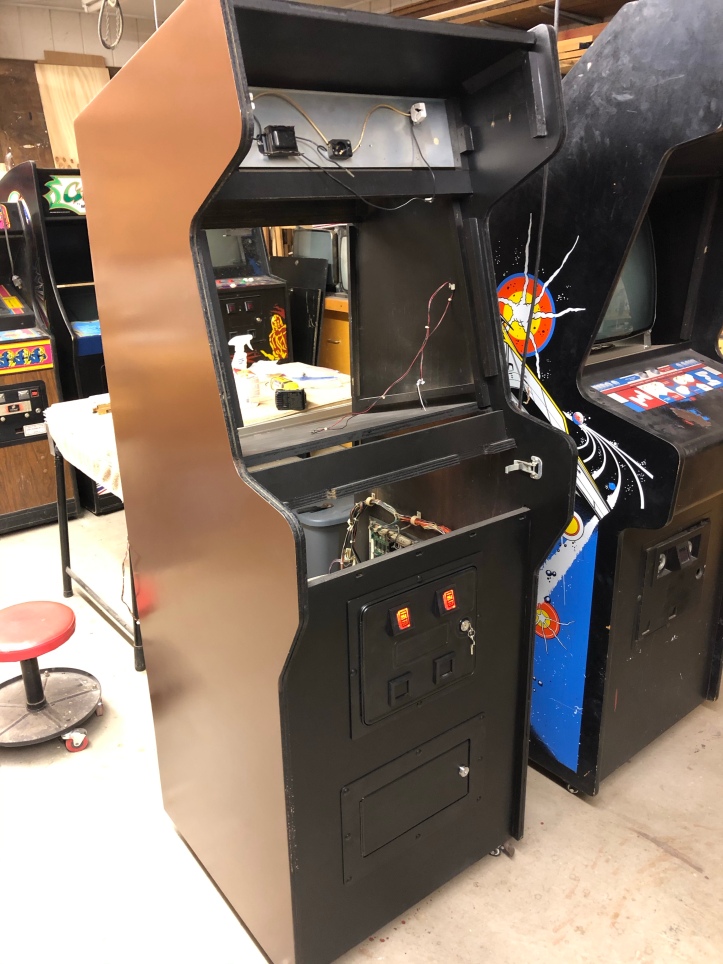
Joust upright - horizontal on the bench.  When I picked it up - I was told it worked..  It does.  I'll change the IDC connectors that carry the power to Molex connectors as a start.  The really do not stand the test of time.


Williams has a braided ground strap that is stapled around the entire inside of the cabinet.  I had removed all of it to replace the bottom sections.  It sat as a ball of braid for the past few months.  Pictures of the inside before I took it apart gave me enough information to restring it around the cab and get it stapled back in place as it was.  It was a bit of a puzzle at first.

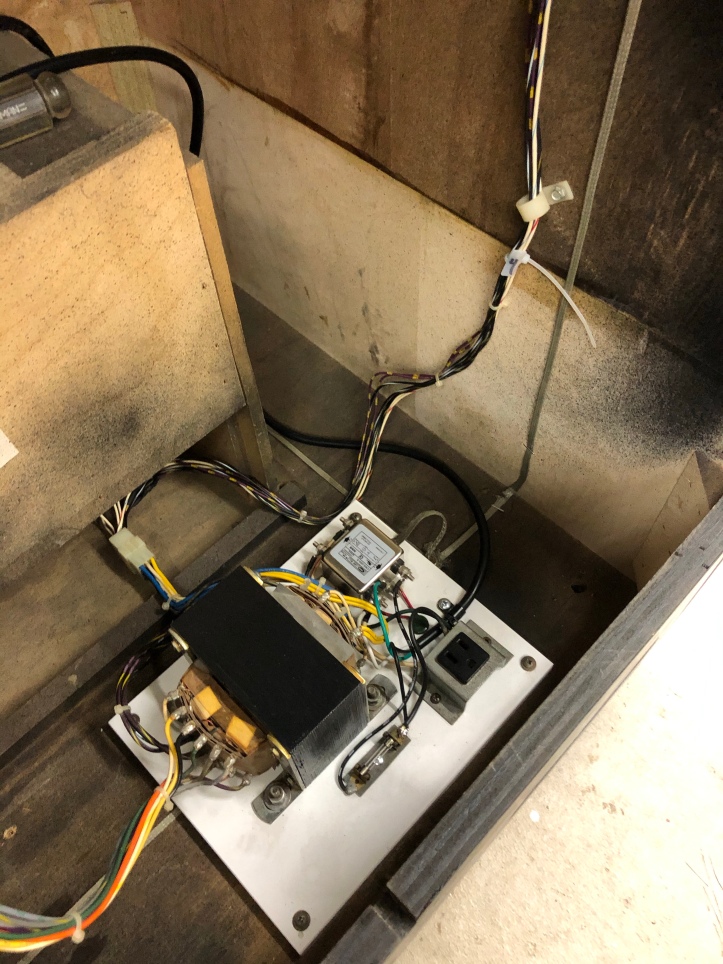
Joust has two wiring harnesses - the power harness and the 'data' harness' as I call it.  The transformer and power harness are put back in place here.  Got all of the clips and screws back in their original spots. 


Got the cashbox door in place and the marquee lighting set up.  However - it didn't work.  I checked connections, used the meter to test voltages, blew a couple of (new) bulbs before learning all about florescent lighting. 


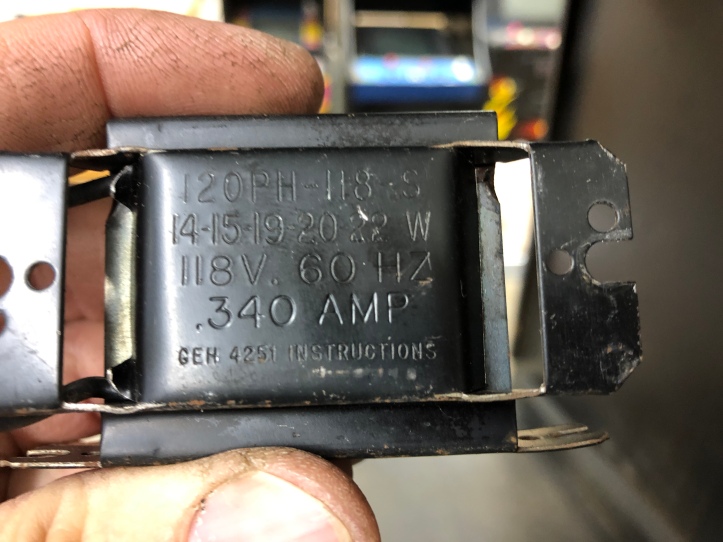
Here is the ballast - looks like a transformer - but its an inductor.  It limits current to the tube (as I understand it)  Turns out they die - my Defender cabinet has the exact same one and it had failed also - making diagnostics tricky since they were both reading 14 ohms ..  Not a dead short.. but enough to fry tubes.

Found the exact replacement on Amazon.  The replacement reads 32 ohms.  Problem solved.  Picked up a second one for Defender since I know its dead too.


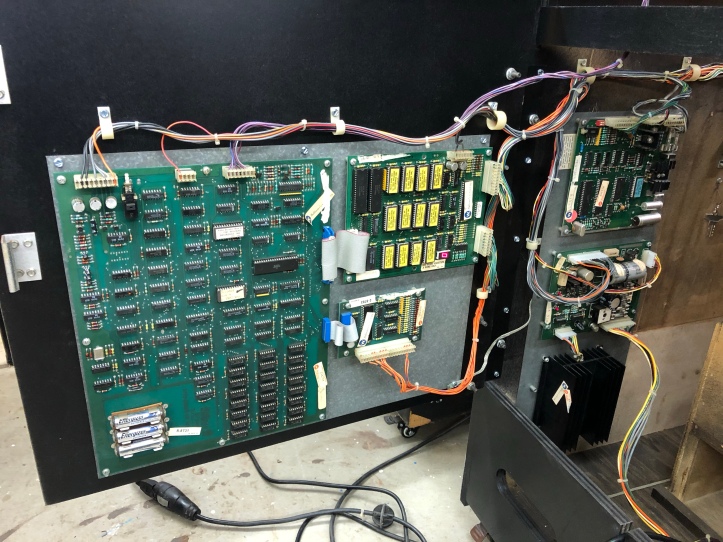
Fast forward a few hours - got the power regulator, sound board and system board in place with the wiring harness back in its original spot.  Look close - LED reads '0'  a joy in any Williams owners eyes.  I'm using lithium AA batteries on the board.  They are designed not to leak.  So no board damage in this machines future.


Coin door and coin door switches going into position.  These are not traditional interlock switches that power down the cabinet - they are part of the "Service Switch" circuits.  One is on the door and one you get to from the cash box.  Normally there is a 3 button panel to do this stuff - but this setup is different.  It appears Joust didn't have the service panel buttons - even though the manual shows them. 


The speaker panel is a disaster.  The original plastic mesh was busted up so they added a metal speaker grill.  It also has an oval 8 ohm 10w speaker.  Glad I checked, the original has a 4 ohm (round) speaker.  Replacement on order.


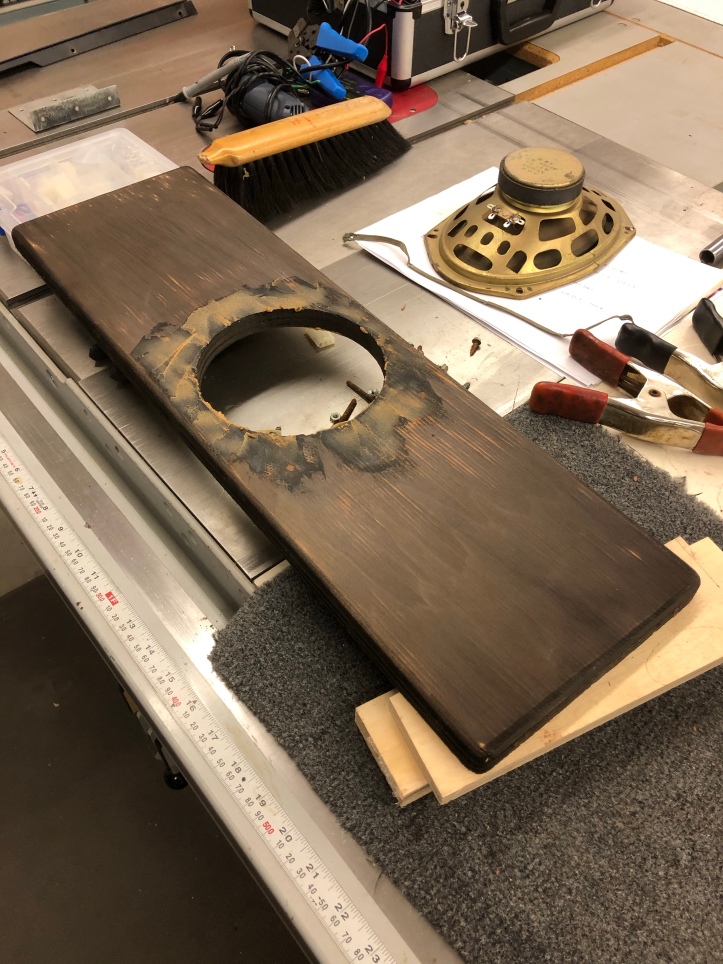
Staples and bolts hacked up the opening.  I'm filling with epoxy filler here.  If I leave the bolt holes - the marquee lighting will show through.  Have to wait for the new speaker anyway..  I also noticed they used a black stain on this board.  It shows black under the marquee bracket, its long since faded to brown.  Once this is all smoothed out I'll re-stain it black.


Cabinet is cabled up, marquee working and I'm using the LCD temporarily until I get the CRT that it came with straightened out.  I'll post an update on that once I get to it.  Next will be getting the control panel back together as much as I can.  Eventually I'll be waiting on the CPO and side art stencils before I can make further progress. 

« Last Edit: September 11, 2020, 10:06:10 am by bperkins01 »
My Arcade Cabinet Build and other projects here:
Centipede, Joust, Joust Cocktail, Asteroids, Galaga, Ms. Pacman Cabaret, Defender, Space Invaders Cocktail
https://bperkins.wordpress.com/

Arroyo

  • Trade Count: (0)
  • Full Member
  • ***
  • Offline Offline
  • Posts: 1558
  • Last login:Yesterday at 06:17:46 pm
  • Budgets are boring
    • newforum.arcadecontrols.com/index.php/topic,156267.0.html
Re: A Joust restoration.. this is going to take a while
« Reply #65 on: September 11, 2020, 10:04:33 am »
:applaud:  looks fantastic.

J_K_M_A_N

  • Trade Count: (0)
  • Full Member
  • ***
  • Offline Offline
  • Posts: 983
  • Last login:Today at 08:33:47 am
Re: A Joust restoration.. this is going to take a while
« Reply #66 on: September 11, 2020, 12:37:56 pm »
What a great Friday update! I really like what you are doing to this cab. It is looking awesome. I can't wait to see the final product. It will look like it is fresh off the assembly line, I'm sure (more likely, better).

J_K_M_A_N

bperkins01

  • Trade Count: (0)
  • Full Member
  • ***
  • Offline Offline
  • Posts: 895
  • Last login:September 24, 2023, 02:13:35 pm
  • Plenty of skills.. gaining experience..
Re: A Joust restoration.. this is going to take a while
« Reply #67 on: September 11, 2020, 12:45:24 pm »
What a great Friday update! I really like what you are doing to this cab. It is looking awesome. I can't wait to see the final product. It will look like it is fresh off the assembly line, I'm sure (more likely, better).

J_K_M_A_N
:applaud:  looks fantastic.

Thanks guys - they are way easier to put together than take apart.  I'm happy with it so far. :)
My Arcade Cabinet Build and other projects here:
Centipede, Joust, Joust Cocktail, Asteroids, Galaga, Ms. Pacman Cabaret, Defender, Space Invaders Cocktail
https://bperkins.wordpress.com/

Howard_Casto

  • Idiot Police
  • Trade Count: (+1)
  • Full Member
  • ***
  • Offline Offline
  • Posts: 19400
  • Last login:April 15, 2024, 10:59:21 pm
  • Your Post's Soul is MINE!!! .......Again??
    • The Dragon King
Re: A Joust restoration.. this is going to take a while
« Reply #68 on: September 14, 2020, 12:48:03 am »
Looks like it's made out of chocolate.  Is it made out of chocolate?  If so I'm gonna eat your cabinet.

bperkins01

  • Trade Count: (0)
  • Full Member
  • ***
  • Offline Offline
  • Posts: 895
  • Last login:September 24, 2023, 02:13:35 pm
  • Plenty of skills.. gaining experience..
Re: A Joust restoration.. this is going to take a while
« Reply #69 on: September 18, 2020, 01:34:52 pm »


Under the marquee bracket - the original stain was black.  They used cheap oil stain back in 1983.  Updated it to better oil stain here in 2020.  Its never seen anyway.


That oval speaker was all wrong.  I got the current replacement for the original part.  Added a new speaker wire since the original was hacked, put everything back the way it was and put on a Joust replacement speaker grill from a guy on KLOV who has been reproducing them.   Nice metal grill will last a long time.


Speaker back in place. 

I connected it all up - very faint sound.   Tested the sound board and was getting confusing info from it.  But it was certainly in the amplifier circuit since all the sounds worked, etc.  Replaced the TDA2002 amp.  Same thing.  Pulled a cap that could have been the issue.  Same thing.  Looked and the schematic for connections - knew I had them right.  Looked at my Defender cabinet... had them wrong.

Twice on this restore I've been bitten by the same mistake - If a connector is supposed to be keyed and its missing the key - ADD THE KEY TO IT! The speaker and potentiometer for volume are side by side with 4 pin Molex connectors.  The volume control should have been keyed and it wasn't.  So I looked right at them a number of times and had them backwards.

Oath:  I hear-by promise to always add keys to Molex connectors under any circumstances so that they can never be transposed again..

Sound works great - all sounds present and accounted for.


Turns out my Joust is completely missing the service switches and the bracket.  Whoever removed the original also removed the wiring on the coin door including the pins in the Molex connector, so no loose wires as a clue.  My Defender has the exact switch / bracket.  I looked around and realized there may be a market for these - they are not all that easy to come by.  I have 30 brackets showing up in a week or two. Once I figure out how to get the sticker reproduced - I can get the actual replacement service switches and sell a few of these things.  It's going to be a perfect match.


Which brings me back to the control panel.  I set this aside a while back - but its the last part standing.  First I cleaned up and flattened the area that's below the metal plate now that the swiss cheese has been removed.  I also removed the last of the CPO adhesive that is incredibly difficult to get off.  But its off.


Another test fit of the plate to make sure it sits flat.


I broke out my longboard from my boatbuilding days.  Its just a long flat sanding block.  Its useful in that you can't sand humps into your work.  It cuts the high spots while leaving the low spots alone.  You can't do that by hand or with a small sander over a large area.  Its most important around the front curves since any high/low areas along that part will result in the CPO having puckers and hollows that may show.


There were a few spots I wasn't quite sure I liked - so I skimmed on a thin filler coat of thickened epoxy to run over with using the longboard one more time.  After this is finished I can attach the sheet metal face, drill holes and wait for the CPO to show up.  I may put all of the controls/hardware in place  and test it since the CP harness is a mess and needs some repair.  It will be easy to remove if needed.

« Last Edit: September 19, 2020, 08:28:02 am by bperkins01 »
My Arcade Cabinet Build and other projects here:
Centipede, Joust, Joust Cocktail, Asteroids, Galaga, Ms. Pacman Cabaret, Defender, Space Invaders Cocktail
https://bperkins.wordpress.com/

J_K_M_A_N

  • Trade Count: (0)
  • Full Member
  • ***
  • Offline Offline
  • Posts: 983
  • Last login:Today at 08:33:47 am
Re: A Joust restoration.. this is going to take a while
« Reply #70 on: September 18, 2020, 02:51:40 pm »
I have exactly one bookmark and this is it. I love this thread. It is looking awesome. Great job on the speaker.

J_K_M_A_N

bperkins01

  • Trade Count: (0)
  • Full Member
  • ***
  • Offline Offline
  • Posts: 895
  • Last login:September 24, 2023, 02:13:35 pm
  • Plenty of skills.. gaining experience..
Re: A Joust restoration.. this is going to take a while
« Reply #71 on: September 18, 2020, 05:51:00 pm »
Looks like it's made out of chocolate.  Is it made out of chocolate?  If so I'm gonna eat your cabinet.

hmmmmm... chocolate..  ahhgggg..
The pics seem to come out with a different shade every time.  I hope its close to the real thing.. Should be.

I have exactly one bookmark and this is it. I love this thread. It is looking awesome. Great job on the speaker.

J_K_M_A_N

Thanks - I hope you are getting some good info from it. :)
My Arcade Cabinet Build and other projects here:
Centipede, Joust, Joust Cocktail, Asteroids, Galaga, Ms. Pacman Cabaret, Defender, Space Invaders Cocktail
https://bperkins.wordpress.com/

bperkins01

  • Trade Count: (0)
  • Full Member
  • ***
  • Offline Offline
  • Posts: 895
  • Last login:September 24, 2023, 02:13:35 pm
  • Plenty of skills.. gaining experience..
Re: A Joust restoration.. this is going to take a while
« Reply #72 on: September 22, 2020, 10:42:31 pm »


I long boarded the filler one last time with the faceplate in place.  The result is a perfectly fair finish with no humps and no possibility of imprinting at the seam.  The CPO material is pretty thick, I don't expect it to show the screws.  If I'm even slightly worried they will imprint, they will get a quick skim of Bondo.  But they were not filled originally.


 This next step will take a little explanation.  But essentially I need to drill a 5/8" hole, centered inside a 1 1/8" hole, which is delineated by a 1 3/16" hole - got that?  I'm certain there are a dozen ways to do this - but I decided to make a tool to make it stupid simple, no measuring, no thinking, no tools needed other that a drill press. Because I have a lathe - this is simple. 

Step 1 - I mounted a 1" dowel in the lathe and drilled a hole in its center using the tail stock and a drill bit (not shown)


Here is a small square of 1/2" thick acrylic.  I have double stick tape on the back holding it to the dowel and a screw through the front to hold the block to the dowel.  It needs to be held tight to turn the square into a circle.


Here is the drill centering tool turned down to 1 1/8".  All those shavings are the square part that is now gone.  Now it safe to remove the screw (in fact - its necessary)  I have the double stick tape there to hold on this disk.


Here is a 5/8" Forstner bit mounted on the tailstock.  The lathe spins the blank and the bit is stationary.  I slowly crank it in to drill the hole - perfectly centered in the blank.


All to make this little acrylic donut.  All in this took under 20 minutes - but why?


Here is the control panel - steel plate in place.  The holes in the steel are exactly where the originals were.  All I need to do is drill 1 1/8" holes with a centered 5/8" hole for the buttons - right?  If you miss by a little on the small hole - the button won't go in..  or.. you can drill bigger (sloppy) center holes..  or measure and find a center point for each button hole, drill a chaser hole.. There are many ways..  But this way provides (for me) a fast, simple, no measure way to do it. 

Clamp the CP to the drill press and drill all of the large holes centered in the metal cutouts 1/4" deep.


The metal hole is used for alignment and is just slightly larger than the drill bit. Repeat for all the holes.


After all the large holes are done - go back with the centering tool - use the small bit and drill all the way through the panel. 


Perfect every time.


Buttons are getting a test fit.  The new ones have a little flashing left over under the rim.  They need to be trimmed with a razor blade to sit flush to the surface.


My harness was a disaster.  More crappy black tape, Player 2 start is a micro switch and all around ratty wiring from the original panel hackery.  The diagram was helpful - but it was more difficult that I thought to get a picture of a real CP inside of a Joust.  I finally found a restoration video that had a clear view that I screen captured and printed as a reference.


Got all of the wire resorted.  Had to add a few wires that are not color matched to the original (unfortunately).  Waiting on a Player 2 - Start leaf switch that I didn't realize I needed.  I also need to get some of the braided ground strap that goes all over Williams cabinets for the CP.  There is supposed to be some in there.


The good news is it works great!  The sticks have a little play in them - but its not unreasonable.  My CPO from This Old Game will be here this week so I can finish the Control Panel.  May need to wipe it down though..  I'm already getting my greasy hands all over it.


My Arcade Cabinet Build and other projects here:
Centipede, Joust, Joust Cocktail, Asteroids, Galaga, Ms. Pacman Cabaret, Defender, Space Invaders Cocktail
https://bperkins.wordpress.com/

Arroyo

  • Trade Count: (0)
  • Full Member
  • ***
  • Offline Offline
  • Posts: 1558
  • Last login:Yesterday at 06:17:46 pm
  • Budgets are boring
    • newforum.arcadecontrols.com/index.php/topic,156267.0.html
Re: A Joust restoration.. this is going to take a while
« Reply #73 on: September 22, 2020, 10:51:43 pm »
Love the curves on that panel.  You are restoring nearly every piece on this machine, and it’s very fun to watch :applaud:

Mike A

  • Trade Count: (0)
  • Full Member
  • ***
  • Online Online
  • Posts: 5884
  • Last login:Today at 09:58:15 am
  • This plan is foolproof
Re: A Joust restoration.. this is going to take a while
« Reply #74 on: September 23, 2020, 05:44:20 am »
I'm such a hack.

Nice work on this.

bperkins01

  • Trade Count: (0)
  • Full Member
  • ***
  • Offline Offline
  • Posts: 895
  • Last login:September 24, 2023, 02:13:35 pm
  • Plenty of skills.. gaining experience..
Re: A Joust restoration.. this is going to take a while
« Reply #75 on: September 23, 2020, 07:42:31 am »
I'm such a hack.

Nice work on this.
Love the curves on that panel.  You are restoring nearly every piece on this machine, and it’s very fun to watch :applaud:

Thanks guys :)  I learn something new on every part I work on.
My Arcade Cabinet Build and other projects here:
Centipede, Joust, Joust Cocktail, Asteroids, Galaga, Ms. Pacman Cabaret, Defender, Space Invaders Cocktail
https://bperkins.wordpress.com/

Laythe

  • Trade Count: (0)
  • Full Member
  • ***
  • Offline Offline
  • Posts: 724
  • Last login:March 31, 2024, 02:52:10 am
  • "-smurfing- delivers." - Yots
    • forum.arcadecontrols.com/index.php/topic,149109.0.html
Re: A Joust restoration.. this is going to take a while
« Reply #76 on: September 28, 2020, 03:50:12 am »
I love to see a dedicated Joust being treated right. 

I like your approaches to things and your execution.  Seriously, I would let you fab parts for Shapeshifter.   :cheers:   (Not that it needs any that I need to farm out - just, as a statement of my approval.)


bperkins01

  • Trade Count: (0)
  • Full Member
  • ***
  • Offline Offline
  • Posts: 895
  • Last login:September 24, 2023, 02:13:35 pm
  • Plenty of skills.. gaining experience..
Re: A Joust restoration.. this is going to take a while
« Reply #77 on: September 28, 2020, 08:33:38 am »
I love to see a dedicated Joust being treated right. 

I like your approaches to things and your execution.  Seriously, I would let you fab parts for Shapeshifter.   :cheers:   (Not that it needs any that I need to farm out - just, as a statement of my approval.)

Thanks Laythe - Watching your work - high praise :)  Much appreciated..  and timely!  Some metal work.  If there is a way to get a tighter bend - let me know.

Back to the service switch:


Metal parts came in – perfect match in every way. Laser cutting is ridiculously clean and accurate.


I picked up a bench vice finger brake to put the bends in the metal.  For the price it works great.  The original's corners are very tight - I'm certain they had production machinery to produce these. Mine are as tight as I can get them with the tools I have.


The test that let me know these are identical – just stack the old and new. For something that is never seen inside the machine – no one will never know its not original. The Williams Service Switch restoration design team (Arroyo and MikeA) have been working with me for the replacement decal.


Here is an original Defender decal and an early revision of the replacement.  Once its done - I'll have replacement Williams coin door service switches available for sale for anyone doing restorations.  They were not easy to find which is what started this sub-project in the first place. 

« Last Edit: September 28, 2020, 08:36:59 am by bperkins01 »
My Arcade Cabinet Build and other projects here:
Centipede, Joust, Joust Cocktail, Asteroids, Galaga, Ms. Pacman Cabaret, Defender, Space Invaders Cocktail
https://bperkins.wordpress.com/

bperkins01

  • Trade Count: (0)
  • Full Member
  • ***
  • Offline Offline
  • Posts: 895
  • Last login:September 24, 2023, 02:13:35 pm
  • Plenty of skills.. gaining experience..
Re: A Joust restoration.. this is going to take a while
« Reply #78 on: November 01, 2020, 09:57:25 pm »
Been a while since my last update.  Got sidetracked on some other stuff.

These Williams service switch replacements are done.


Exact replacement for the originals and indistinguishable from them.  The last steps were getting the stickers reproduced and cut.  I was also able to source the exact replacement switches.  If you have a restoration and need this switch/bracket/sticker assemble.  Let me know.  $40 shipping included.

 
My Arcade Cabinet Build and other projects here:
Centipede, Joust, Joust Cocktail, Asteroids, Galaga, Ms. Pacman Cabaret, Defender, Space Invaders Cocktail
https://bperkins.wordpress.com/

bperkins01

  • Trade Count: (0)
  • Full Member
  • ***
  • Offline Offline
  • Posts: 895
  • Last login:September 24, 2023, 02:13:35 pm
  • Plenty of skills.. gaining experience..
Re: A Joust restoration.. this is going to take a while
« Reply #79 on: November 01, 2020, 10:06:28 pm »


I’ve been working on another restore for the past few weeks but got to a point where I could get back on my Joust. The CPO from This Old Game is absolute top quality. I’ve watched videos and have seen people struggle to put these on. You can make it easy on yourself if you try this way.

First – clean the control panel with naptha or acetone. Something to get any residual oils off the surface.

As seen above – line up the CPO to the exact spot along the top edge and backlight any button holes to make sure they are in the correct spot. Use some wide tape and hold it in place. Double and triple check to make sure you have it in the right spot because you are not likely to get a second chance. I then use spring clamps to make sure nothing shifts. You want to make sure that it wraps all the way around without wandering off course. It should be centered and square all the way around from top to bottom.


With the tape and spring clamps in place, roll back the top edge and peel off the backing material. Cut off the top 1-2 inches of the backing. I use gloves for these ‘sticky’ steps for a couple of reasons. First – you will not leave fingerprints / skin oil on the adhesive backing! It will stick better. Second – you won’t be afraid to grab the CPO where you need to because the gloves won’t cause any issues.


Use a plastic spreader and stick the CPO down working from the center to the edges. You want to make sure there are no bubbles and it lays flat. Try to keep the CPO sides off the control panel so that it is rolling down into position from center to edge. If you work from the center out you have the best chance of not having issues.


Once the top part is done, roll the CPO back and peel down a comfortable amount of backing and cut it off (I do 4-6 inches). Pictured here is the CPO rolled back before sticking it to the lower section of the control panel. You want to slowly use the spreader and press from the center out and continue down the overlay making sure there are no wrinkles or bubbles.


Using the heat gun to warm the CPO will assist in making it pliable for bending around the corner. Set the temp on the gun and test the temperature on your forearm. If its too hot – turn it down! You want hot hair drier temps – not melt your CPO temps.. At this point you can pull and press the CPO with your gloved hand. Center to edge, top to bottom. Follow up with the spreader to make sure it all gets pressed into place.


Last section – peel it off and more of the same. You can pre-warm the CPO while it has the backing on if you find its helping.


Once its on, backlighting each hole will help you to trim out the buttons. Use a brand new blade in the Exacto.


Buttons and trim strip in place.


Nice control panel overlay. Colors are fantastic.


My Arcade Cabinet Build and other projects here:
Centipede, Joust, Joust Cocktail, Asteroids, Galaga, Ms. Pacman Cabaret, Defender, Space Invaders Cocktail
https://bperkins.wordpress.com/