Of the few cabinets I've been inside - this one is pretty well constructed..Williams used plywood and actual dado joinery on Joust. Centipede is particle board, butt joints and staples. Galaga is MDF.

What makes it nice is what is going to also make it difficult to get apart. They used actual joinery with glue. Hopefully I can knock the sides apart and get the front off. One really nice feature of this cabinet is the monitor is on a plywood shelf. Unplug the power and video and slide it out. Super simple.
It has this fun feature.. A built in mirror behind the marquee that is angled down toward the screen.


You can slide the monitor backward by unbolting it from the forward hole and putting the bolt in the rear hole so it doesn't slide onto the floor. That distance gives you a little separation so the mirror can see the screen - very clever!

Coin door is all there - but in need of some straightening out and a fresh coat of paint.

Merry Christmas Joust cabinet - 1982.

Here is the power brick - need to clean it up and test it.. Its really just a transformer with a cable.. The Atari power brick has much more to it.. Maybe I'll check the resistance on the winding's before adding power. It doesn't look trustworthy. At minimum I'm replacing the power cord and the EMI filter.

Patient up on the operating table. The guys in the waiting room just need monitor work - no major surgery like Joust.
Here's the plan:- Remove the front coin door panel
- Remove the botton
- Cut 12" off each side and replace with new plywood
- Cut 6"-8" off the front and replace with new plywood
- Sand everything, prime, paint, stencil in Joust sideart

I might have replaced this back panel and the front coin panel, except if you look close here - the cabinet serial number is stamped on the part. Same for the front coin panel. Notice the staple too...

This type of repair isn't for everyone. It took me a while to figure out the best way to get this cabinet apart and not completely destroy it. Williams made a solid cabinet. The material is plywood, they used dado joinery, glue, staples and corner blocking.
After messing with it a bit - here is what works best to get this apart. The inside corner blocking needs to come off first. You can use an oscillating multi-tool saw and a pry bar to get them out. Best to work slow and try not to shred the plywood - but you are going to in some places..

My clamps have reversible heads so that they can push the sides apart. Use a bunch of them to spread the load evenly and work slow. As it crunches, cracks and pops - use the saw, putty knife or blade to help things work apart. Try to locate the staples and cut through them as you see them. The front and bottom will have to come off as one section because of the way the coin box is designed.
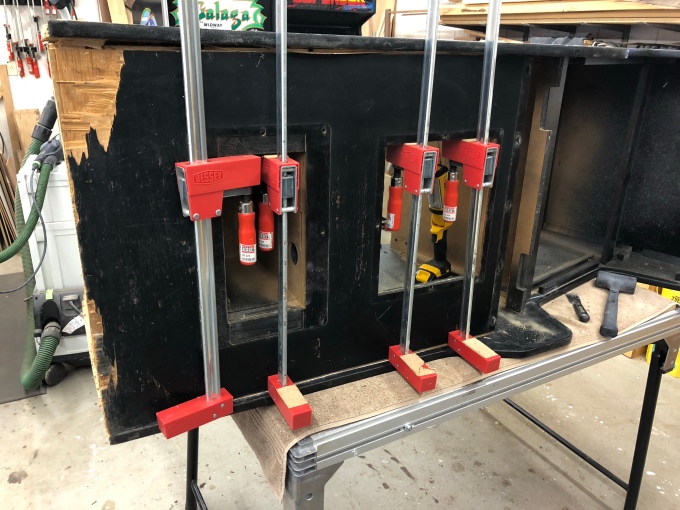
Well - the top is loose - but the bottom is still on - more clamp spreading from inside the coin door panel. Had to do this across the bottom as well. As soon as you see a staple - cut it inside the joint. Next time I'll try a magnet or stud finder to see if I can locate them to dig them out first.

It's apart - I'll focus on the sides first while I formulate a plan for the front..
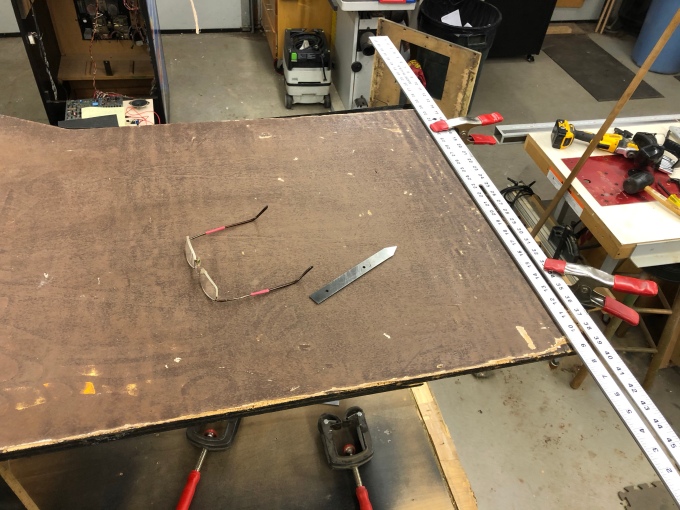
The bottom edge is trash. I'm using the straight edge to create a square reference point for cutting. Now I'm going to sleep on it and make sure when I wake up I still like this idea..


 Home
Home Help
Help Search
 Login
Login Register

 Send this topic
 Print
Print Topic: A Joust restoration.. this is going to take a while (Read 24198 times)


