Main Restorations Software Audio/Jukebox/MP3 Everything Else Buy/Sell/Trade
Project Announcements Monitor/Video GroovyMAME Merit/JVL Touchscreen Meet Up Retail Vendors
Driving & Racing Woodworking Software Support Forums Consoles Project Arcade Reviews
Automated Projects Artwork Frontend Support Forums Pinball Forum Discussion Old Boards
Raspberry Pi & Dev Board controls.dat Linux Miscellaneous Arcade Wiki Discussion Old Archives
Lightguns Arcade1Up Try the site in https mode Site News

Unread posts | New Replies | Recent posts | Rules | Chatroom | Wiki | File Repository | RSS | Submit news


Author Topic: My version of a bench power supply for CRT work  (Read 4871 times)

0 Members and 1 Guest are viewing this topic.

bperkins01

  • Trade Count: (0)
  • Full Member
  • ***
  • Offline Offline
  • Posts: 895
  • Last login:September 24, 2023, 02:13:35 pm
  • Plenty of skills.. gaining experience..
My version of a bench power supply for CRT work
« on: January 05, 2020, 11:18:28 am »
Working on this CRT (and potentially future ones) was becoming annoying..

Every time I wanted to 'try' something - I would break out the Atari Power brick and the Centipede wiring harness, plug it all together and use a Molex connector as a power switch on the Atari brick.  It all works fine - but at some point I'm going to want to put all that stuff back in the cabinet and I suspect the CRT will still be on the bench.


Time for a bench power supply for the CRT.  These have been done a number of different ways - but here's mine.

There isn't too much to it actually - the key is having an isolation transformer (mine is an Autobot) to provide the power for the CRT.  Much has been written on isolation transformers for powering electronics.  In a nutshell - the transformer is a 1:1 ratio transformer that provides the voltage to the CRT while not allowing that circuit to have a path back to earth ground.


The Atari power brick has an AC line filter which blocks electric noise (it seems). No reason not to do the same.

Here are the parts I used:


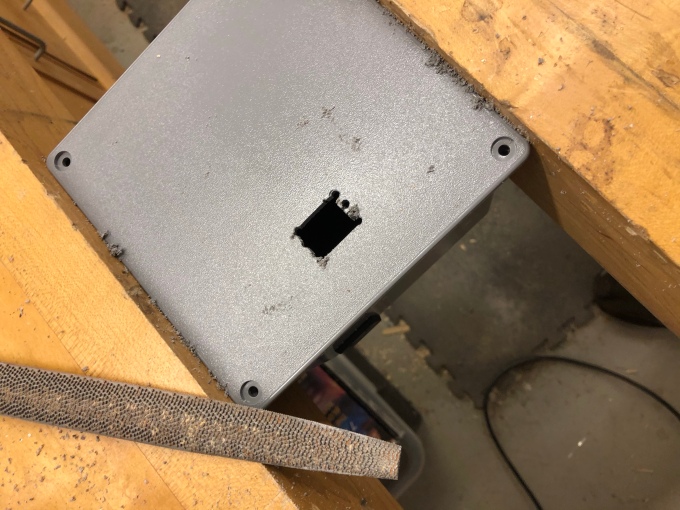
If there is a simple way to make square holes in plastic - I haven't found it.  Basically I draw an outline slightly smaller than the actual hole I need, use a drill to remove the center and a file to sneak up on the actual hole size needed.  Some people use a hot knife or blade type soldering tip.  But the last step is the same - use a file to sneak up on the final hole.


If you have a jigsaw - you can use the blade to speed up the 'filing' process.   But its all hand work to make them fit.


Skipping ahead - here is the completed power supply.   Power inlet/EMI filter on the bottom left, transformer bolted to the bottom, fuse holder on the side and power switch on the top.

Wiring:

  • Earth ground goes straight through to the power outlet and is grounded to the isolation transformer case.  The Atari wiring harness is set up this exact way.  (green wire)
  • Hot wire from the power input goes through the fuse holder and then to the power switch. 
  • Neutral wire from power input goes to the power switch.
  • Both primary wires from the transformer connect to the power switch. (white wires)
  • Both secondary wires from the transformer connect to the power outlet. (black wires)


Completed power supply:

Any standard power cord can be used to plug this into the wall.

On the output side for the monitor:

Cut the female end off another power cord and add a Molex connector that matches your monitor (mine is K4600).   For the earth ground - I added an alligator clip.  The Atari configuration has the chassis connected to earth ground - so that's what I'm doing.  The nice thing about this is if/when I get different chassis - I can make up another power cord for that chassis and plug it into the power supply.

The rocker switch has a build in LED and turns on when the switch is on.  This is so much easier.
« Last Edit: January 05, 2020, 11:24:27 am by bperkins01 »
My Arcade Cabinet Build and other projects here:
Centipede, Joust, Joust Cocktail, Asteroids, Galaga, Ms. Pacman Cabaret, Defender, Space Invaders Cocktail
https://bperkins.wordpress.com/

perjmolsen

  • Trade Count: (0)
  • Full Member
  • ***
  • Offline Offline
  • Posts: 429
  • Last login:December 08, 2022, 04:09:06 am
  • I want to learn, and try.. I NEWER give up :)
    • My gameroom
Re: My version of a bench power supply for CRT work
« Reply #1 on: January 07, 2020, 05:02:27 am »
Nice work and super inspiring guide  :applaud:

Arroyo

  • Trade Count: (0)
  • Full Member
  • ***
  • Offline Offline
  • Posts: 1558
  • Last login:April 17, 2024, 06:17:46 pm
  • Budgets are boring
    • newforum.arcadecontrols.com/index.php/topic,156267.0.html
Re: My version of a bench power supply for CRT work
« Reply #2 on: January 08, 2020, 01:19:13 pm »
This is exactly what I need to build to start testing my CRT tube swaps.  Thank you brotha!  Saves me a ton of time in research, thanks for the leg work.

bperkins01

  • Trade Count: (0)
  • Full Member
  • ***
  • Offline Offline
  • Posts: 895
  • Last login:September 24, 2023, 02:13:35 pm
  • Plenty of skills.. gaining experience..
Re: My version of a bench power supply for CRT work
« Reply #3 on: January 08, 2020, 01:53:13 pm »
Any time - It's compact, portable and modular  :)
For grins - I plugged in a socket tester just to see what it would do.
I suspected open ground - that is what this reads.


Which makes sense.  In a normal circuit - neutral *should* find its way back to earth ground.
With the isolation transformer - there is no way back to earth ground.  The desired state.

The ground wire is actually connected to earth ground - but it is not part of the circuit which is why the tester reads it as disconnected.
My Arcade Cabinet Build and other projects here:
Centipede, Joust, Joust Cocktail, Asteroids, Galaga, Ms. Pacman Cabaret, Defender, Space Invaders Cocktail
https://bperkins.wordpress.com/

behrmr

  • Trade Count: (+1)
  • Full Member
  • ***
  • Offline Offline
  • Posts: 459
  • Last login:April 23, 2021, 09:17:13 am
Re: My version of a bench power supply for CRT work
« Reply #4 on: January 08, 2020, 07:17:17 pm »
Very nice work. For those less crafty you can purchase an isotap that includes voltage selectors. This is great for working with Japanese monitors that need 100v instead of 120v.  And use an old lamp cord with alligator clips so you don’t have to keep making special connectors.

opt2not

  • Trade Count: (+15)
  • Full Member
  • ***
  • Offline Offline
  • Posts: 6173
  • Last login:April 02, 2024, 07:42:30 pm
Re: My version of a bench power supply for CRT work
« Reply #5 on: January 08, 2020, 07:58:07 pm »
Nice! I should look for an enclosure too. I like how neat it looks and is easily moveable.

I built my testbench PSU (for monitors and boards) on a small piece of ply (this is before I added the monitor hook-ups):

No frills, does it's job, but not really nice to look at or is portable.

I really like yours. If I were to do something like that, I'd probably put some connection ports for attaching the switching PS.

That, and a 100v/120v switch so I don't have to relocate the isolation wires when I'm working on japanese monitors.

bperkins01

  • Trade Count: (0)
  • Full Member
  • ***
  • Offline Offline
  • Posts: 895
  • Last login:September 24, 2023, 02:13:35 pm
  • Plenty of skills.. gaining experience..
Re: My version of a bench power supply for CRT work
« Reply #6 on: January 08, 2020, 10:41:57 pm »
I like yours too - I didn't think of supplying power to anything more than the CRT and didn't realize other monitors were not 120v (I'm learning on my first one)
I think we have the exact same transformer.

How do you do 100v/120v?  Is that on the one you have now? or is that something planned?

I'll have to read up on that a bit.

If (when?) I get to bench testing other stuff that needs the switching power supply - I'll have to come up with something clever for it  :)


My Arcade Cabinet Build and other projects here:
Centipede, Joust, Joust Cocktail, Asteroids, Galaga, Ms. Pacman Cabaret, Defender, Space Invaders Cocktail
https://bperkins.wordpress.com/

opt2not

  • Trade Count: (+15)
  • Full Member
  • ***
  • Offline Offline
  • Posts: 6173
  • Last login:April 02, 2024, 07:42:30 pm
Re: My version of a bench power supply for CRT work
« Reply #7 on: January 09, 2020, 12:17:19 am »
How do you do 100v/120v?  Is that on the one you have now? or is that something planned?
Yeah I have that one currently. The top label shows what pins on the xformer supplies the 100v/120v. I wanna put a toggle switch on it so I can just use the same output connector and flip it to whatever I’m testing or repairing at the time.

bperkins01

  • Trade Count: (0)
  • Full Member
  • ***
  • Offline Offline
  • Posts: 895
  • Last login:September 24, 2023, 02:13:35 pm
  • Plenty of skills.. gaining experience..
Re: My version of a bench power supply for CRT work
« Reply #8 on: January 09, 2020, 07:41:36 am »
I just looked - pins 10 - 6 are the 120v. 
Guess I need to find which on of 7/8/9 is the 100v.

It reads high with no load.  Mine read 130v.
I see v2 coming up.. 
My Arcade Cabinet Build and other projects here:
Centipede, Joust, Joust Cocktail, Asteroids, Galaga, Ms. Pacman Cabaret, Defender, Space Invaders Cocktail
https://bperkins.wordpress.com/

bperkins01

  • Trade Count: (0)
  • Full Member
  • ***
  • Offline Offline
  • Posts: 895
  • Last login:September 24, 2023, 02:13:35 pm
  • Plenty of skills.. gaining experience..
Re: My version of a bench power supply for CRT work
« Reply #9 on: January 12, 2020, 10:06:15 pm »
I was going to do a V2 mod of this power supply.  The transformer I have does not expose the windings to provide 100v.  Looking around - they sell a completely separate 120v -> 100v isolation transformer.  So if I need 100v someday - I can put another one of these together in about an hour.

V2 has going to have a digital voltage readout though..  It would have been cool.  I like making tools as much as buying them.
My Arcade Cabinet Build and other projects here:
Centipede, Joust, Joust Cocktail, Asteroids, Galaga, Ms. Pacman Cabaret, Defender, Space Invaders Cocktail
https://bperkins.wordpress.com/

nhoney10

  • Trade Count: (0)
  • Jr. Member
  • **
  • Offline Offline
  • Posts: 1
  • Last login:May 06, 2021, 03:32:33 pm
  • I want to build my own arcade controls!
Re: My version of a bench power supply for CRT work
« Reply #10 on: February 24, 2021, 12:40:32 am »
Hello -   Like your article -   I am after a similar thing except i live in the UK and have 240v AC, but i want to test some 120v AC Wells Gardner CRT's.

Do you think think there would  be a isolation transformer similar to this except 240AC  - 120 AC ?

(or would i have to have some sort of 240v - 120v step down transformer before the isolation transformer?

thanks

nick

Zebidee

  • Trade Count: (+9)
  • Full Member
  • ***
  • Offline Offline
  • Posts: 3248
  • Last login:Today at 01:49:12 pm
Re: My version of a bench power supply for CRT work
« Reply #11 on: February 24, 2021, 03:31:06 pm »
Hello -   Like your article -   I am after a similar thing except i live in the UK and have 240v AC, but i want to test some 120v AC Wells Gardner CRT's.

Do you think think there would  be a isolation transformer similar to this except 240AC  - 120 AC ?

(or would i have to have some sort of 240v - 120v step down transformer before the isolation transformer?

thanks

nick

Yes mostly you want a single transformer that is both step-down 240v/120v and isolation - though you could use two separate transformers too if necessary.

Something to be aware of when shopping for iso transformers - the shop staff might not really understand what you want. I've previously bought a transformer that the electrical specialist shop staff assured me was a 240/120v stepdown isolation transformer, only to get it home and test it to find that it isn't an ISO at all. To be fair to them I was shopping in a second language, but to be fair to myself I was very clear about what I wanted.

So take your multimeter down to the shop with you. To test, use your multimeter to check for continuity between the primary and secondary windings. For an ISO it should be all open circuit, no connection.

EDIT: Just wanted to adds a thanks to bperkins01 for the nice writeup

« Last Edit: February 24, 2021, 03:33:15 pm by Zebidee »
Check out my completed projects!


bperkins01

  • Trade Count: (0)
  • Full Member
  • ***
  • Offline Offline
  • Posts: 895
  • Last login:September 24, 2023, 02:13:35 pm
  • Plenty of skills.. gaining experience..
Re: My version of a bench power supply for CRT work
« Reply #12 on: February 24, 2021, 04:29:16 pm »
This one was a while ago - but I use my ISO cube all the time..  Its never dusty...
My Arcade Cabinet Build and other projects here:
Centipede, Joust, Joust Cocktail, Asteroids, Galaga, Ms. Pacman Cabaret, Defender, Space Invaders Cocktail
https://bperkins.wordpress.com/

Zebidee

  • Trade Count: (+9)
  • Full Member
  • ***
  • Offline Offline
  • Posts: 3248
  • Last login:Today at 01:49:12 pm
Re: My version of a bench power supply for CRT work
« Reply #13 on: February 24, 2021, 05:35:52 pm »
This one was a while ago - but I use my ISO cube all the time..  Its never dusty...

:lol I have a couple I "made" myself by just screwing it all down to a piece of hardwood. They are always dusty when not in use, but fortunately they clean up pretty well. Think I should upgrade with a line filter.
Check out my completed projects!