It's finally time for another big update!

I'm playing catch up on posting so this should be fairly lengthy with lots of pics. Back in September / October I finally went out and picked up all the major lumber I thought I would need. After getting advice from a number of folks and debating between MDF vs Ply, I opted to go with Ply. Then I researched where to get Baltic Birch in my area since that seemed to be the hot choice around here. After speaking with others including bperkins on it, I was then convinced it wouldn't be necessary and he pointed me to a Sande Plywood stocked by Home Depot that was quite a bit cheaper than the 115+ a sheet I was seeing for 8x4 Baltic Birch. This stuff was more like 39 a sheet which left me with more budget to try out laminate.

Unfortunately after spending just a few days in my garage I noticed some warping was occurring. The top 1/2 inch sheet got it the worst with a wicked bend. You can also see the pvc pipes I picked up for about 1.25 a piece that I'll be using later for laminating.

That's when I cleared a space in my basement storage area and brought all my lumber in doors. Fortunately the top most warped piece was a spare so hopefully the other pieces are still decent enough to use. We shall soon find out.
I ordered a bunch more parts over the past several months. You never realize just how much there is to buy until you're deeper into this I guess. Among these items were castors from Penn Elcom as recommended by Arroyo. These weren't cheap and shipping was just as much as the castors! However an important factor here is that they are rated to hold more than enough weight indefinitely. Many castor varieties are intended for shorter term movement where these are intended to be like legs.

I also ordered leg levelers from eBay. I had a hard time finding ratings on these to hold enough weight. These were supposed to hold 250 per pair. I'm hoping between those and the castors I should be more than fine.

One important thing to note with these however was that when I got them, I discovered one of the mounting plates was improperly welded. It's just a simple nut welded onto a metal plate, and there was a big gap on one side of the weld resulting in the leg leveler not being anywhere close to level. Kinda defeats the purpose! So my backup was to run to home depot and grab T-Nuts instead.
I wanted to approach this project in manageable components / sections that challenge my building skills incrementally while also showing broad progress towards a complete cabinet. As such I decided to start with the base. It seems simple in concept but ultimately had me using most of my tools and presented all kinds of challenges.

I started by plotting every piece out in a layout in photoshop to give me a nice reference and help me find any potential measurement flaws in the 3d model. There were plenty. Turns out 3d Studio Max does some interesting rounding that could make for things being off by a 1/16th in some situations. Once I averaged those things out and triple checked my work, I printed it off and with the help of my oldest son, measured and plotted everything on a scrap piece of 3/4 ply from my kitchen remodel. I was going back and forth on the thickness of the base and ultimately went back to keeping it 3/4 for strength and needed thickness to support the castors and leg levelers. Even with that, there were problems that you'll see in a bit. One important lesson in this part... notice I marked all new edges for my base inside the wood scrap. This is because I discovered that even factory edges can sometimes have flaws, and the other sides I had cut definitely had issues. I even discovered the giant T square I got for dry wall has 1/16th of play in it so I ended up trusting my solid metal 48" ruler to get everything perfectly square. Other reasons for this approach was that there were little tacks embedded in the edge of this piece that I couldn't easily get out, and the size of my base just barely fit to avoid all the flaws in the wood.
First I needed to setup shop in my cold garage with crap lighting. This was my make shift solution to get more light where I needed it with a bonus of a little more heat from the lights.

I even found a way to get my boys to help out. They measured some of the underlying structure and I let them do some cutting as well.
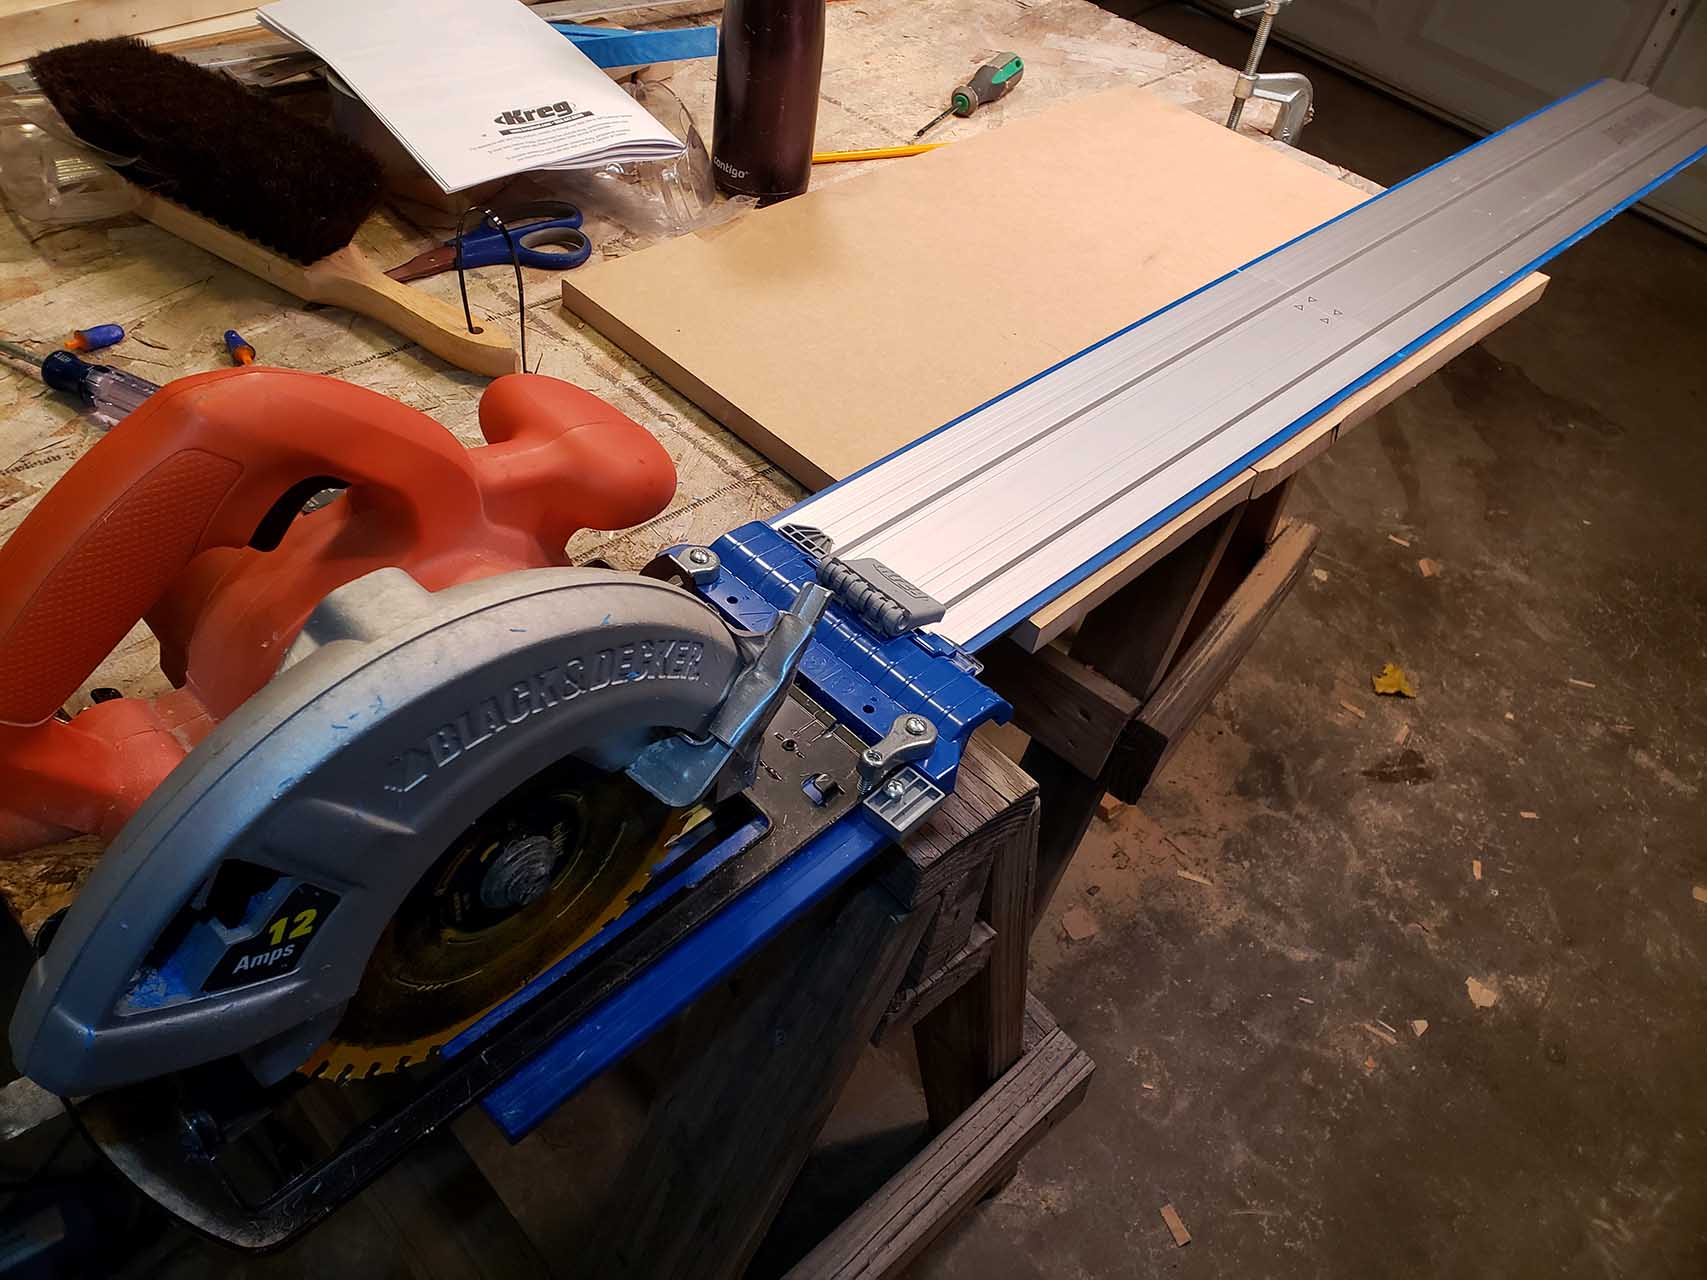
One tool I picked up to help with getting straight cuts was the Accu-Cut from Kreg. I got this local at Home Depot and it is a fantastic tool!

Before doing anything serious with it I tested it out on some scrap MDF.

You simply set it down directly on your cut line and slowly move the saw across the track. The results are an incredibly straight cut I could never achieve on my own.

There were some tricks I had to develop as I continued working with the Accu Cut. In general, if your wood is flat, and dust free, the rubber under the track is plenty to keep it in place. However if you're dealing with slightly warped plywood, it can cause for some issues where it spins on the high surface. To counter this, I either used some speed clamps (Harbor Freight special for 3 bucks a pop...WELL worth it! Shown further down with my portable drill press) and placed one on the far end well passed my stop point, or I walked my hand in front of the saw pushing down on the track as I went. That plus the weight of the saw kept it straight. I guess Kreg makes special clamps that attach underneath the track that I might look into, but so far my work arounds are sufficient.
With a good result in the tests, I moved on to the base.


Since I opted to use threaded inserts so I can take this thing apart to get it into my basement, I needed to revise several things with my initial design. I also realized I had other detail work still remaining. Turns out for me it's easier to make a 3d model that looks pretty but still miss details necessary for the actual build. One of the changes was a way to thread the side panels onto the base without taking away additional space on the inside. Along with this I needed to find a way to confidently drill perfectly. The solution I arrived at was a 35 dollar portable drill press from Home Depot Online.

It's got a bit of play in it, but ultimately does a far better job than I could do by hand. It also has a handy depth stopper which is necessary for this work. Here I did a practice hole that needed to be inset to the right depth to work with the length of hex bolts I went with.
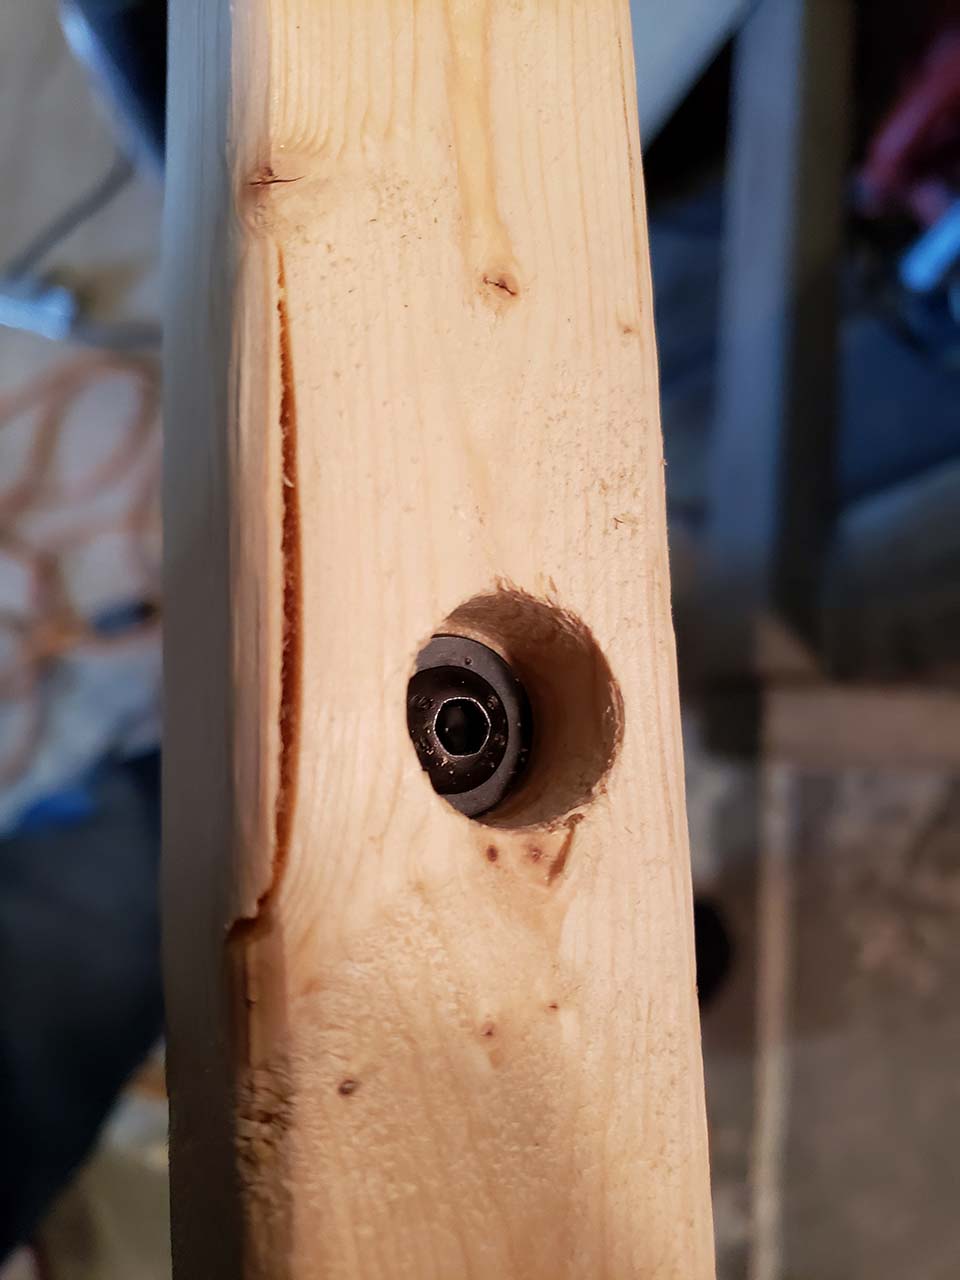


I decided to use black hex bolts (amazon) everywhere for ease of working with in tight spaces and being far less likely to ever strip. I went with 2 different lengths at 1/4-20 x 1.5mm and 1/4-20x .75mm. I also got a small kit of assorted lengths that I ended up using most of on my castors (they take 14 a piece and although that's likely overkill, I like the look better with all the holes full.)


Once I had the base cut out I sanded off the white veneer from the ply so I had a good wood on wood surface to glue and screw into. It was a shiny veneer that was quite slippery and glue didn't take to it at all.
I picked up a little trick on the net for glue spreading. Bought a threaded rod from Lowes for less than a buck and used it to quickly and evenly spread glue over large wood surfaces.

I went with locktite III for my glue and got some gorilla glue for backup.
All these 1 6/16" boards were the cheap stuff from HD. In retrospect it would have been nicer to work with a slightly better quality wood but I figured it would suffice for this purpose. In general it didn't splinter too badly when cutting, but it was really hard to find decent pieces in the store to begin with and all had flaws. I also accidently grabbed star bit style screws when looking for exterior screws of a shorter length. Maybe it was intentional subconsciously since I wanted to work with star bits... who knows. Either way it should be plenty protected and solid.

This top piece required a bit of routing.

The castors have a lot of uniqueness to their shape with subtle 32nd extrusions and such that can cause some headache. I used the jigsaw on most of these cuts (and my boys helped) as I figured ultimately it didn't matter to much if it was dead on or not. I ended up breaking out a file and doing a bunch of sanding because it was ultimately too tight of a fit.
Here's the base fully assembled from the bottom with castors and leg levelers on. I will probably go back and remove the remaining veneer and prime / paint it for extra protection... and to look nice for all the dust mites passing under it.


I then sanded the top veneer off. Here you can start to see the little problem I ran into. My depth was somehow off on both my leg levelers. I was supposed to have 1/8th left but I didn't account for the thickness of the veneer and it's possible the diagram I looked at for the bolt size was slightly off too. Given my success at depth with the other threaded inserts coming out perfect, that's the best answer I can come up with.

Now I'm left wondering what I should do here. My intention is to laminate the top with the same black laminate going all over the cabinet. However I don't know if I should go over the top of the holes and risk it cracking over time if it's ever pressed on. I also need to get some washers to prevent the leg lever from screwing up quite so high. Another alternative would be to keep the holes and add holes in the new laminate so it can move up another 8th or so. Generally speaking you shouldn't ever need to drop the front legs this much but I tried to give it equal movement up and down for versatility.
If I tried filling in the hole any I'm not sure of the best way to do it. I'm guessing bondo but would it be enough to really matter for strength?

I checked that everything was level and walked and jumped on the base a few times to ensure it was sturdy. It can be moved with the right motion but it also doesn't have much weight to it yet. With the full cabinet I think it will be quite solid.
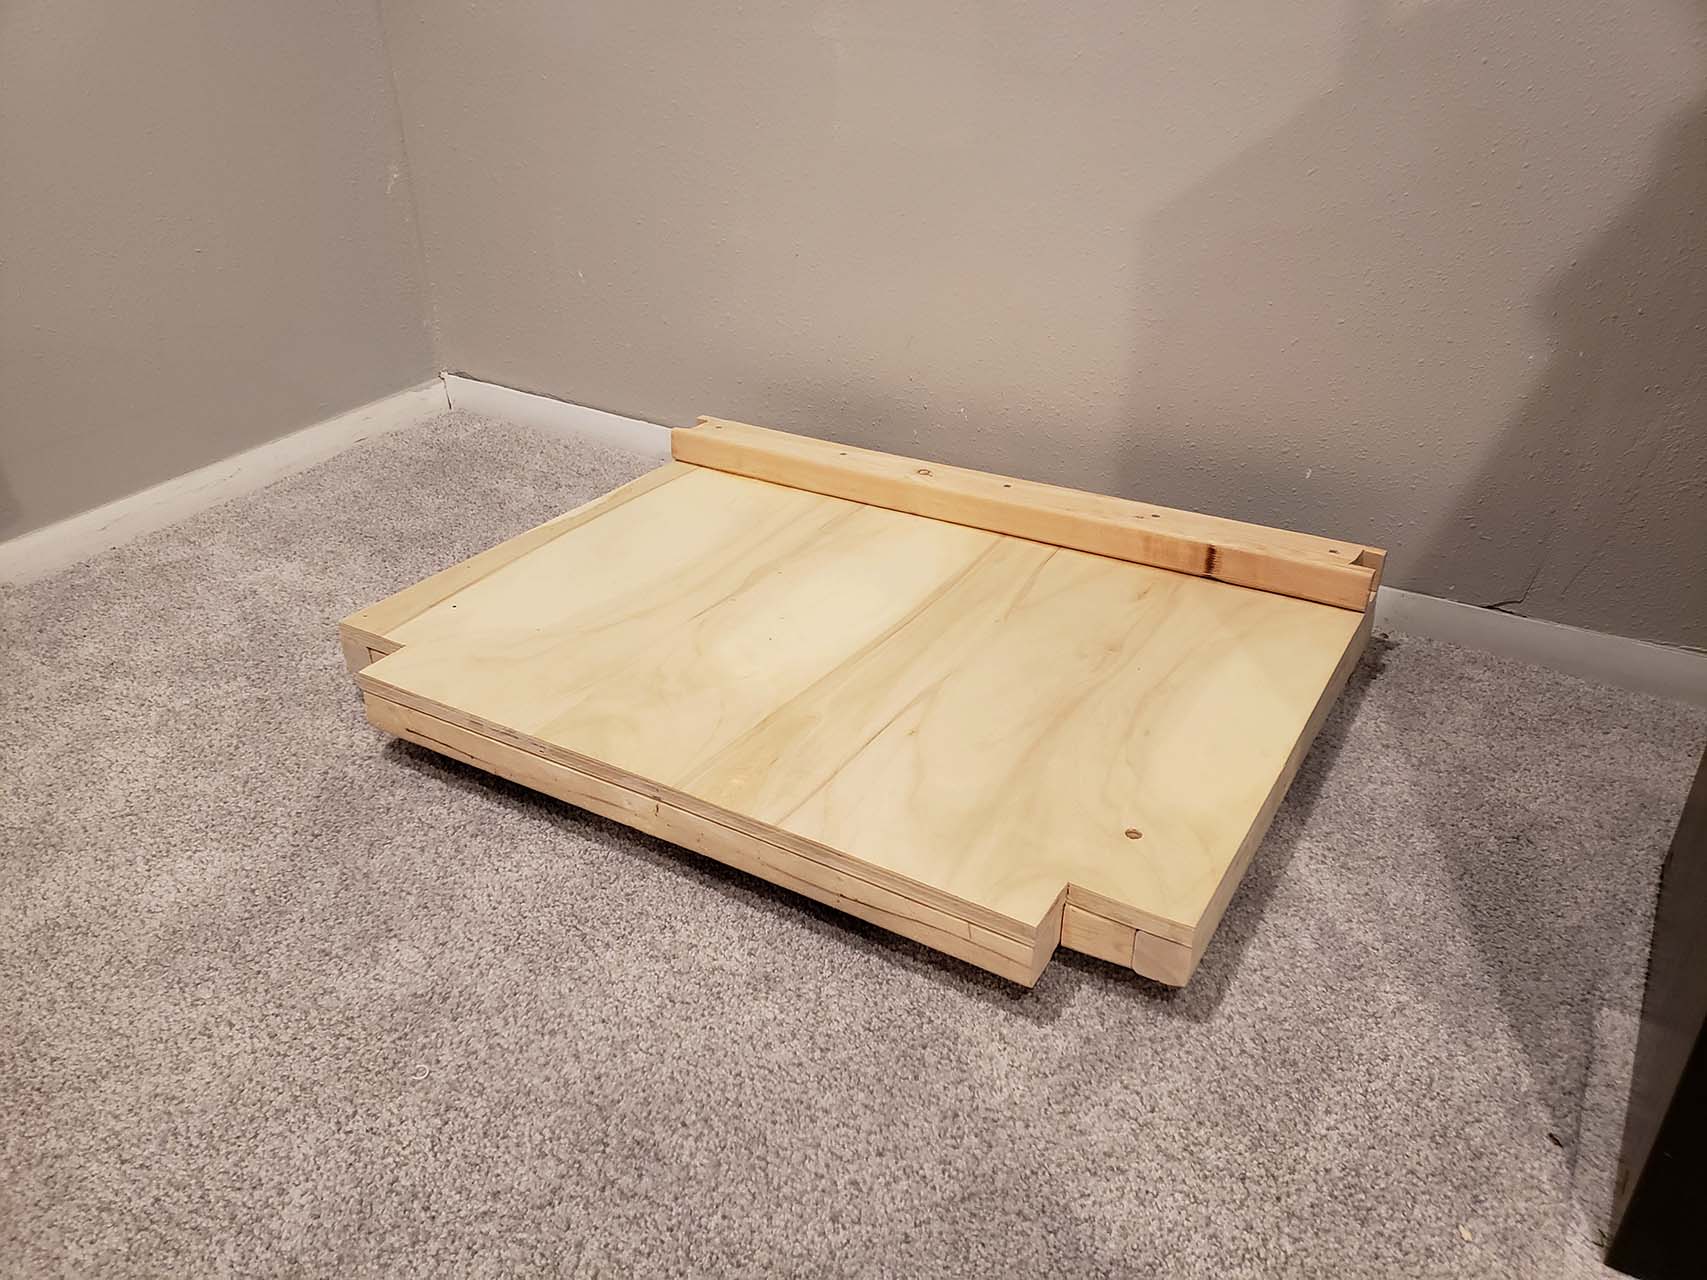
Here's the base trying out it's future home in my basement.
Next I was debating on attempting to laminate, but with the outstanding hole issue I decided I want to wait a while to tackle laminating and focus on building progress. I was debating moving on to tackle my gun holsters next as a complex little project that starts to address some remaining LED lighting issues as well, but ultimately decided I wanted to feel like I'm making bigger progress on the cabinet. To me the answer was clearly to continue with the sides.
Here I am plotting that out in the comfort of my basement. This one I did myself and spent a good amount of time making sure everything was perfectly aligned. Given the switch over to plywood I found my original designs needed some adjusting. I had planned on MDF a year ago which meant slightly bigger sheets. That meant I needed to bring each of my side panels in by about an 8th to have it fit and have a comfortable wiggle room space between them for a clean cut. Once I got that all sorted out, here's the end plot.

For the cutting I wanted to use my accu cut as much as possible but couldn't use it as much given all the angles. I ended up using a combo of a lot of jig saw cuts and then going over them again with the accu cut where possible. The first side was a rougher go with more fine tuning needed. For the second, I simply traced my first, then rough cut it with the jig saw, and then was able to use the accu cut in more places. A fatal mistake as I went was the drill holes I used to turn the jig saw. The fatter drill bits tend to jump a bit when starting, so if you start too close to your finish line, you end up screwing things up. I had that happen in one area. I'm hoping it's a small enough indent to not really matter and be hidden by the T-Molding. Otherwise I'm guessing I have to use bondo and rebuild the corner.

I filed down areas where my jig saw didn't do a great job and used a small finishing sanding block on all of the edges. Generally the chipping wasn't bad, but I do have some sections that I may need to use bondo on to clean up. I guess that's one of the down sides to plywood.

This all ended up taking me a lot longer than I expected. I'd enter the garage thinking I could knock something out in an hour and then look at the clock and 3 hours had gone by. Either way it's a fun process and I'm trying to keep myself tasked with something daily when possible so I can keep moving.

Can anyone tell me if I really have to round off every corner for t-molding to lay down correctly? Right now I have a couple 90 degree angles on the sides. Are there techniques to make this work? If not, what's the minimum I have to round off by?
Thanks to all the great insights provided from the community that has helped get me this far. As always all thoughts, advice, opinions, etc are very welcome. Let me know how I'm doing so far and help keep me motivated to cross the finish line! Next up are the major cross supports so I can get a standing cabinet. There will be many challenges including a method to precisely drill the threaded insert holes in the side panels that perfectly align to the holes in the cross supports. Any recommended techniques to help with that other than just really accurate measuring?


 Home
Home Help
Help Search
 Login
Login Register

 Send this topic
 Print
Print Topic: The Kline's Arcade - 4 player - first build, help needed! (Read 52275 times)


