Main Restorations Software Audio/Jukebox/MP3 Everything Else Buy/Sell/Trade
Project Announcements Monitor/Video GroovyMAME Merit/JVL Touchscreen Meet Up Retail Vendors
Driving & Racing Woodworking Software Support Forums Consoles Project Arcade Reviews
Automated Projects Artwork Frontend Support Forums Pinball Forum Discussion Old Boards
Raspberry Pi & Dev Board controls.dat Linux Miscellaneous Arcade Wiki Discussion Old Archives
Lightguns Arcade1Up Try the site in https mode Site News

Unread posts | New Replies | Recent posts | Rules | Chatroom | Wiki | File Repository | RSS | Submit news


Author Topic: Centipede restoration - My first - There will be plenty of pics  (Read 23701 times)

0 Members and 1 Guest are viewing this topic.

bperkins01

  • Trade Count: (0)
  • Full Member
  • ***
  • Offline Offline
  • Posts: 895
  • Last login:September 24, 2023, 02:13:35 pm
  • Plenty of skills.. gaining experience..
Re: Centipede restoration - My first - There will be plenty of pics
« Reply #80 on: February 09, 2020, 08:48:10 am »
The restoration is at a point were I can get the cabinet back together and work out the final kinks..


Replacement rear kick panel(?) in place.  Not sure what its called - the original was junk.


New rear panel fitted - I added a small metal plate to prevent the destruction of the top panel.


I showed the new coin door panel getting fabricated earlier.  To put it in place - I clamped the sides and bottom to pull everything tight before screwing it into place.  It helps to square up the cabinet and close any small gaps so the screws don't have to work so hard.


When I removed the wiring harness - I wanted it to go back to the exact same spot.  Down to the screw holes.  I found these cheap cable ties I could label and take pictures of the mounting locations (not every one - just enough to be able to sort them out)


It worked out pretty well.  Got the harness back in its original spot - no screws left over!


I plugged it in, used the MikeA "pull the interlock switch" trick and got the marquee to light up. 

Working on the coin door and control panel this weekend.  Hopefully I'll get a quick test in with everything up and running.  The monitor is still not where I want it to be.  It will be the last hill I climb!


My Arcade Cabinet Build and other projects here:
Centipede, Joust, Joust Cocktail, Asteroids, Galaga, Ms. Pacman Cabaret, Defender, Space Invaders Cocktail
https://bperkins.wordpress.com/

Mike A

  • Trade Count: (0)
  • Full Member
  • ***
  • Offline Offline
  • Posts: 5885
  • Last login:Today at 12:53:10 pm
  • This plan is foolproof
Re: Centipede restoration - My first - There will be plenty of pics
« Reply #81 on: February 09, 2020, 09:29:34 am »
I feel honored that I am the poster boy for people who didn't know how the interlock switch worked. A guy I bought my first cab from showed me that.

Arroyo

  • Trade Count: (0)
  • Full Member
  • ***
  • Offline Offline
  • Posts: 1558
  • Last login:April 17, 2024, 06:17:46 pm
  • Budgets are boring
    • newforum.arcadecontrols.com/index.php/topic,156267.0.html
Re: Centipede restoration - My first - There will be plenty of pics
« Reply #82 on: February 09, 2020, 03:06:09 pm »
Beautiful work Bob, all around.  The attention to detail, and effort in getting the right look is really coming through.  You kept this thing from getting MAME’d for sure!  Keep doing God’s work

bperkins01

  • Trade Count: (0)
  • Full Member
  • ***
  • Offline Offline
  • Posts: 895
  • Last login:September 24, 2023, 02:13:35 pm
  • Plenty of skills.. gaining experience..
Re: Centipede restoration - My first - There will be plenty of pics
« Reply #83 on: February 09, 2020, 05:20:41 pm »
The last few bits have gone quick - I guess because I had all of the prep-work done already. 


Coin door reassembled and in place.


I got my control panel overlay at Phoenix Arcade.  Nice screen printed reproduction of the original artwork.   


There are many videos on putting this stuff on.  I basically installed the fire button and the track ball - then taped the sides in place on the front. 

Next I cut & peeled half of the backing off so that the cut line fell roughly down the center of the front edge.  Pull it snug and press it into position smoothing it all away around the bottom.  One thing I did was put on latex gloves so that I could touch the sticky part without leaving fingerprints and ruining the adhesive.  It worked quite well.

Once the underside was on, I removed the button and trackball and, peeled the remaining backing and smoothed it on around the front.  No problem.


Trackball, volcano buttons and fire button back in place.


How packaging never ceases to amaze me..  They had a selection of 10 of these for $3-4 and 100 for $10.  So I have a lifetime supply.


It runs!!!!!!  I didn't make anything worse.  But there is more to do on the video side of the house.  The screen is still compressed horizontally.  I have a suspicion that this is now something happening on the PCB.  The screen is more normal sized on the test pattern generator.  I'll have to start looking at the PCB horizontal circuit looking for bad caps..


New old stock - just what I was going for.  Once I get the video fixed I'll get it off the dolly and into a more permanent place in my shop.   


Hit the test switch for the first time.  I have convergence issues and (I think) a problem with the blue transistor on the neck board.  But this screen is much smaller than the same one from the test pattern generator.  Which makes me think the horizontal circuit on the PCB is involved.  I could be way off..
My Arcade Cabinet Build and other projects here:
Centipede, Joust, Joust Cocktail, Asteroids, Galaga, Ms. Pacman Cabaret, Defender, Space Invaders Cocktail
https://bperkins.wordpress.com/

Arroyo

  • Trade Count: (0)
  • Full Member
  • ***
  • Offline Offline
  • Posts: 1558
  • Last login:April 17, 2024, 06:17:46 pm
  • Budgets are boring
    • newforum.arcadecontrols.com/index.php/topic,156267.0.html
Re: Centipede restoration - My first - There will be plenty of pics
« Reply #84 on: February 09, 2020, 05:41:10 pm »
Wow that’s clean!

That the new tube?

bperkins01

  • Trade Count: (0)
  • Full Member
  • ***
  • Offline Offline
  • Posts: 895
  • Last login:September 24, 2023, 02:13:35 pm
  • Plenty of skills.. gaining experience..
Re: Centipede restoration - My first - There will be plenty of pics
« Reply #85 on: February 09, 2020, 06:07:10 pm »
Yes - new tube..  I'm forever hunting for CR23 necks at this point.
I *just * found a bad transistor on the interface board causing issues with the blue. 
Thanks to Randy Fromm -  I swapped it with the green transistor and the issue moved.  So that is at least figured out.. 

Now to figure out where to get one..  hopefully it will fix more that one thing once replaced :)

The CRT still needs some converging, etc. But *so far* everything else works.
My Arcade Cabinet Build and other projects here:
Centipede, Joust, Joust Cocktail, Asteroids, Galaga, Ms. Pacman Cabaret, Defender, Space Invaders Cocktail
https://bperkins.wordpress.com/

Arroyo

  • Trade Count: (0)
  • Full Member
  • ***
  • Offline Offline
  • Posts: 1558
  • Last login:April 17, 2024, 06:17:46 pm
  • Budgets are boring
    • newforum.arcadecontrols.com/index.php/topic,156267.0.html
Re: Centipede restoration - My first - There will be plenty of pics
« Reply #86 on: February 09, 2020, 06:13:28 pm »
That first game is gonna be very satisfying.

bperkins01

  • Trade Count: (0)
  • Full Member
  • ***
  • Offline Offline
  • Posts: 895
  • Last login:September 24, 2023, 02:13:35 pm
  • Plenty of skills.. gaining experience..
Re: Centipede restoration - My first - There will be plenty of pics
« Reply #87 on: February 15, 2020, 09:55:19 am »
Working on the electronics..

Thoughts of a first timer..

Once I got everything back together and the machine fired up I was in a position to actually do some testing.  When I first got the machine, I determined there was a sound issue and no high score retention.  During bench testing of the CRT - I was having trouble with the blue gun..  It worked - but there was no blue scale - it was either on or off in the test pattern.

Guys who have been doing this for years have a process and a routine - but this is my first time..  I had checked the power brick and was 100% certain it was good.  Then it hit me... The ARII board and the PCB have voltage test points all over them - I'll check them all and see whats going on.

PCB Test Points
Test Point            Actual Voltage

+5v                        +5.063v
-5v                          0.569v
+15v                        0.001v
-15v                        -15.12v
+22v                       +24.72v    (unregulated)
-22v                        -24.93v    (unregulated)
-30v                        -14.00v

ARII Test Points
Test Point            Actual Voltage
-5v                        -1.263v
+12v                     +12.08v
+10.3v                  +12.66v      (unregulated)
-sense                     0.187
+22v                      +24.86       (unregulated)
-22v                        -24.87      (unregulated)
+Sense                  +5.125
36v AC                   36.91vac

All this stuff wrong?  Why is anything working at all?  I was rather surprised, in fact I thought I was doing a few things wrong at the start.  After digging into this a bit further - the machine is more than a power cord in and a screen showing the game.  All of these are little power supplies for all of the different circuits that require different voltages.


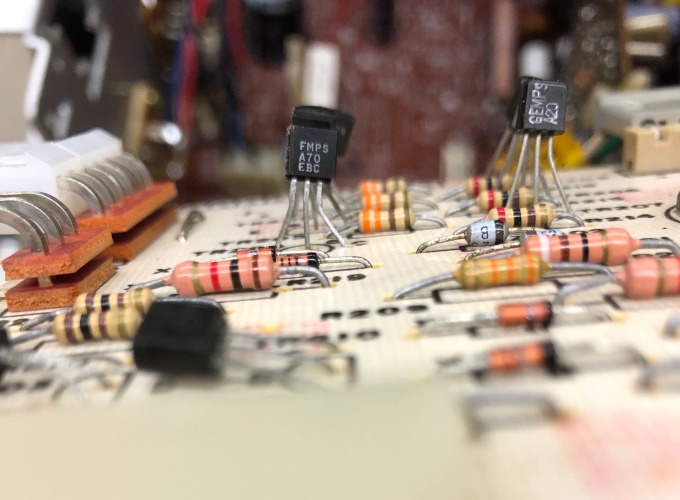
First troubleshooting task was the blue gun on the CRT.  After watching Randy Fromm videos - his video circuit troubleshooting advice made sense.  Each color (Red, Green, Blue) have identical circuitry which makes it easier to diagnose.  One of the transistors on the interface board (one of the blue ones) read just a little different than the other two.

So I swapped the questionable blue transistor with the green one.  Problem moved to green!  Bad transistor identified.


On the ARII board - The -5v test wasn't working.  Checking the schematic - there is a -5v regulator chip.  I put the meter on it, no -5v!  Another bad chip identified.  Reading the schematic, -5v is part of the audio circuit.  During testing - the audio did weird things after 10-15 minutes of play.  Maybe its resolved?  Time will tell.


On to my +15v issue.  From the schematic - There is a 7815 +15v Voltage regulator (VR2).  It should be +22v on the input side and +15v on the output side.  Quick check with the meter..  Bad voltage regulator!  Another chip identified.


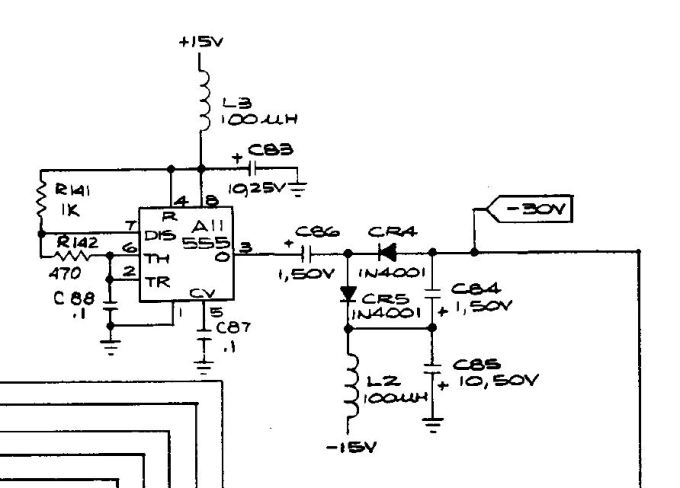
The good part of this is that the +15v is part of the retain high score circuit feeding the 555 timer chip.  My -30v issue is also in the same area.  If I replace the +15v regulator - It should fix the -30v issue too, right?
Well I replaced the voltage regulator and there was no change on the -30v side.  A quick check of the the diode and capacitor said they were fine.

The only thing left is the 555 chip.  So I socketed and replaced it.  Problem solved!  -30v at the test point.


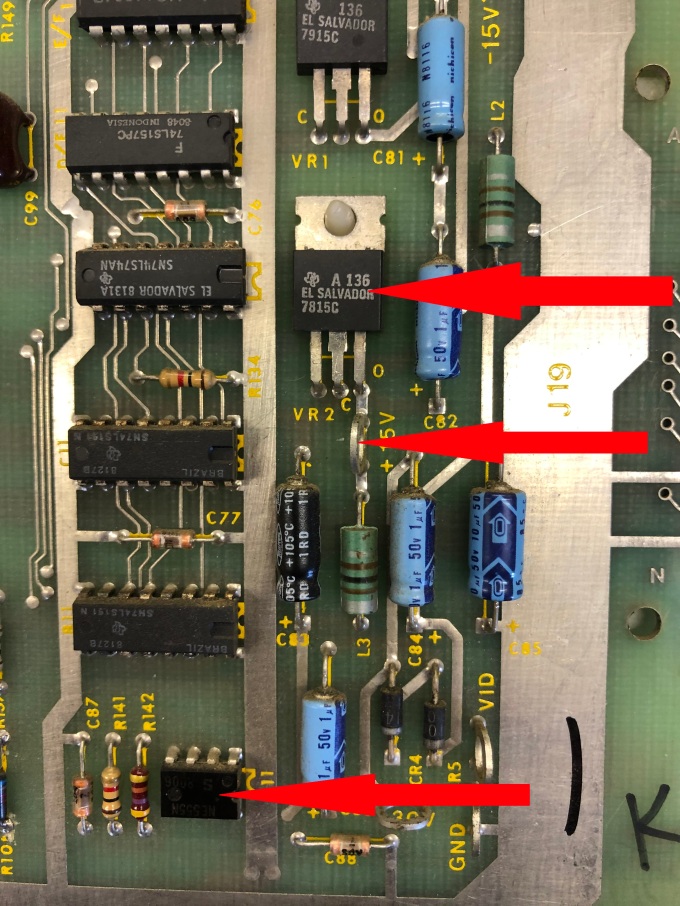
Here is the 7815 voltage regulator, +15v test point and the 555 chip - before replacing.  All pretty close to each other and very serviceable.


Purchasing parts:  Its a real balancing act.  If I could plan and make big purchases - I'd get everything from mouser or the arcade repair sites that keep a lot of the parts on the shelf.  The issue really comes down to shipping.  A single +15v regulator costs $0.49 at mouser.com - shipping is $7.99.   Not an issue when you have a cart full of stuff.  The kit above has a selection of 70 voltage regulators (many also on these PCBs) and was delivered Amazon Prime for $17.   Same story for transistors.  $0.15 for a single.  $8.99 delivered for an assortment of 250.   I'm 100% certain they are not the same quality - but everything is a trade off.  If you can be patient (I'm not) - make a big list and get a bunch of stuff at once.


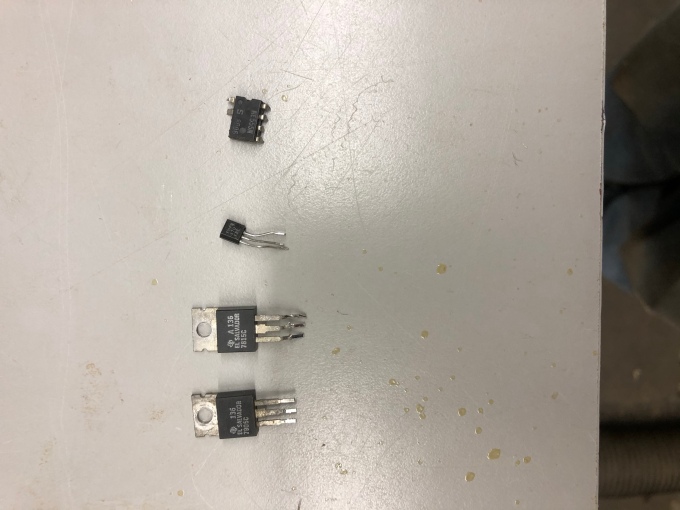
Here are my offending components at the moment.

Game status:

  • All of the power test points are showing proper voltages.
  • Still need to test high score retention and the audio.
  • CRT - still needs converging and testing.
  • PCB - Not convinced the video is outputting correctly.  Need to test with a known working monitor.

All of this checking, thinking, looking at schematics happened over the course of a week or so..  Once I got the feel for it - it starting going faster.  It was pretty cool to look at the schematic - look at the chips around a test point and go..  hmm.. that should have one voltage on one side and a different one of the other - then find a bad chip - replace it and get the right voltage.   The Atari PCB schematics are really good about supplying great detail.   
I'm now looking to do the same sort of thing on the K4600 monitor.  The schematics are not nearly as good.  More thinking, looking and testing to do.
« Last Edit: February 18, 2020, 05:33:36 pm by bperkins01 »
My Arcade Cabinet Build and other projects here:
Centipede, Joust, Joust Cocktail, Asteroids, Galaga, Ms. Pacman Cabaret, Defender, Space Invaders Cocktail
https://bperkins.wordpress.com/

jennifer

  • Trade Count: (0)
  • Full Member
  • ***
  • Offline Offline
  • Posts: 2895
  • Last login:August 11, 2023, 06:24:58 am
Re: Centipede restoration - My first - There will be plenty of pics
« Reply #88 on: February 15, 2020, 10:48:32 am »
I can understand the impatience factor but sometimes it is a shipping sucks thing And I need it so Whatever (unless you live in Canada) apparently they got some other issues with VAT or something...That super kit of everything looks fun, and I would have to agree with your quality assessment, Normally I buy quantity of things, when you buy in bulk the parts get cheaper and you got  control over quality...However that's not for everybody, since that gets really expensive buying virtually everything virtually for every machine ever built (service truck mentality)...Nice job on this project man 😉

bperkins01

  • Trade Count: (0)
  • Full Member
  • ***
  • Offline Offline
  • Posts: 895
  • Last login:September 24, 2023, 02:13:35 pm
  • Plenty of skills.. gaining experience..
Re: Centipede restoration - My first - There will be plenty of pics
« Reply #89 on: February 15, 2020, 11:45:16 am »
I can understand the impatience factor but sometimes it is a shipping sucks thing And I need it so Whatever (unless you live in Canada) apparently they got some other issues with VAT or something...That super kit of everything looks fun, and I would have to agree with your quality assessment, Normally I buy quantity of things, when you buy in bulk the parts get cheaper and you got  control over quality...However that's not for everybody, since that gets really expensive buying virtually everything virtually for every machine ever built (service truck mentality)...Nice job on this project man 😉

Thanks Jennifer.   When I looked at the small parts kits..  there were a fair amount of the other components on the board that I had not determined to be bad. 
Plus those little voltage regulators are on everything.. 
My Arcade Cabinet Build and other projects here:
Centipede, Joust, Joust Cocktail, Asteroids, Galaga, Ms. Pacman Cabaret, Defender, Space Invaders Cocktail
https://bperkins.wordpress.com/

Arroyo

  • Trade Count: (0)
  • Full Member
  • ***
  • Offline Offline
  • Posts: 1558
  • Last login:April 17, 2024, 06:17:46 pm
  • Budgets are boring
    • newforum.arcadecontrols.com/index.php/topic,156267.0.html
Re: Centipede restoration - My first - There will be plenty of pics
« Reply #90 on: February 18, 2020, 05:21:46 pm »
This is some EXCELLENT documentation.  I like how you describe your thought process, it helps to see the approach and of course the solution.  Keep it up!
« Last Edit: March 26, 2020, 04:57:50 pm by Arroyo »

wp34

  • Trade Count: (+3)
  • Full Member
  • ***
  • Offline Offline
  • Posts: 4794
  • Last login:April 10, 2022, 09:48:19 pm
Re: Centipede restoration - My first - There will be plenty of pics
« Reply #91 on: February 18, 2020, 10:07:27 pm »
This is some EXCELLENT documentation.  I like how you get describe your thought process, it helps to see the approach and of course the solution.  Keep it up!

+1 

Some great info in here.  Your documentation is top notch.

bperkins01

  • Trade Count: (0)
  • Full Member
  • ***
  • Offline Offline
  • Posts: 895
  • Last login:September 24, 2023, 02:13:35 pm
  • Plenty of skills.. gaining experience..
Re: Centipede restoration - My first - There will be plenty of pics
« Reply #92 on: February 18, 2020, 10:14:23 pm »
This is some EXCELLENT documentation.  I like how you get describe your thought process, it helps to see the approach and of course the solution.  Keep it up!

+1 

Some great info in here.  Your documentation is top notch.

Thanks guys - more to come as I get the video figured out...
My Arcade Cabinet Build and other projects here:
Centipede, Joust, Joust Cocktail, Asteroids, Galaga, Ms. Pacman Cabaret, Defender, Space Invaders Cocktail
https://bperkins.wordpress.com/

bperkins01

  • Trade Count: (0)
  • Full Member
  • ***
  • Offline Offline
  • Posts: 895
  • Last login:September 24, 2023, 02:13:35 pm
  • Plenty of skills.. gaining experience..
Re: Centipede restoration - My first - There will be plenty of pics
« Reply #93 on: February 19, 2020, 03:24:10 pm »
I bumped into this today:  bitslicer -30v power

Great article on how the 555 timer creates the -30V circuit for the high score circuit.  When I replaced it - I didn't know how it worked - but I was pretty sure it was the cause of my problem.  Now I know. 
My Arcade Cabinet Build and other projects here:
Centipede, Joust, Joust Cocktail, Asteroids, Galaga, Ms. Pacman Cabaret, Defender, Space Invaders Cocktail
https://bperkins.wordpress.com/

bperkins01

  • Trade Count: (0)
  • Full Member
  • ***
  • Offline Offline
  • Posts: 895
  • Last login:September 24, 2023, 02:13:35 pm
  • Plenty of skills.. gaining experience..
Re: Centipede restoration - My first - There will be plenty of pics
« Reply #94 on: February 29, 2020, 08:13:57 pm »
I've been out of town for a few days, but started back at it.
Except - I took a bit of a side route.

I've been unhappy with the the screen width (extra room below the shooter).  I was convinced there was something wrong with the video circuit on the PCB.  Inquiry and asking over on KLOV was interesting to say the least. 

What I learned was - Go check MAME if you have questions about screen sizes!
MAME say's Centipede is: 256x240
Other vertical games such as dig dug and ms pacman are 288x224

So there is my shorter screen, 4 rows..   Even then I was a little skeptical that I didn't have some odd thing happening making the screen artificially small.

Part of digging into this is because I'm teaching myself board repair like so may others. I'm an above average problem solver - but when you don't know what you don't know - it takes a while to gain experience. I picked up a pair of dead Centipede boards from a KLOV'r purely to learn how to fix them. Having a working Centipede as a reference is helpful of course.

Long story short - I managed to get one of the two boards working enough that the game fired up and displayed. The screen width was identical (to the millimeter) as my game.. (Its on my LCD at the moment).

Here is what I did with the dead boards:

I connected them to my cabinet and checked voltages - both boards had all of them (surprised)
Board 1 - locked up dead - LED - but nothing...
Board 2 - managed to get it into self test screen.. and it all worked.. but no game play

I decided to pop, clean and reseat all of the EPROMS.
Lost the Self test screen... however I got activity on the screen - but it was a mess.. Screwed up graphics, it was the attract screen.  A red block centipede was moving through green lines.
Pulled the board to check my work and ROM 211 was hot! (forget where I saw that ... feel the chips for heat.. they're probably bad)
So I swapped it from the dead Board 1
Test screen came back (I'm pretty sure, I forget the order now..)..
But no game play..
So I swapped each EPROM one at a time from the dead board.. ROM 207 was also bad it turns out.
Once I replaced that - game popped up!

Normal display screen - but during play - fleas only drop mushrooms either far right or far left..
I believe that is a RAM error, but I'm pretty happy about the progress for not really trying.

I still have to get my K4600 running a bit better and (grrrrr) converged properly.. I don't cave to stuff like that.. I'll win.  But its been kicking my butt for a while now.

A friend had access to an old analog oscilloscope - I connected that up and managed to see signals on my board.. I'd never touched one until this week. I'll use a logic probe on the dead boards to find the issues for now.

Overall - happy to get to work on some other boards.
All I really have left is to get my CRT converged and the machine will be fully operational.
There are a few little items after that..
I'll update until its 100%!

My Arcade Cabinet Build and other projects here:
Centipede, Joust, Joust Cocktail, Asteroids, Galaga, Ms. Pacman Cabaret, Defender, Space Invaders Cocktail
https://bperkins.wordpress.com/

bperkins01

  • Trade Count: (0)
  • Full Member
  • ***
  • Offline Offline
  • Posts: 895
  • Last login:September 24, 2023, 02:13:35 pm
  • Plenty of skills.. gaining experience..
Re: Centipede restoration - My first - There will be plenty of pics
« Reply #95 on: March 22, 2020, 08:43:11 am »
Its been a while since I've updated this entry..  I've made incremental progress on the K4600 monitor.

I picked up a dead chassis so that I could compare and potentially swap components, etc.
One thought I was having was that the neck board was giving me issues in general.  Earlier in this thread I mentioned to check, double check and check again for broken off parts.  Turns out there were 3 tiny capacitors on the neck board broken off.


Look at C408, C409, C410.   These ones are not even shown on the schematic that I have, but they are on the parts list.  I swapped the neck boards and it appeared a little color bleeding went away..  But nothing significant.

On the inability to shut off color guns with the TPG, I figured out why that was an issue. My K4600 uses the P305 interface card which doesn't have pull down resistors like nearly all of the other cards:


You can see the 3 resistors connected to the RGB pins 1,2,3 on the right.  I added the resistors to my card so that I can turn off the individual guns. When I was turning off the guns with the TPG, the voltage was floating and the guns just made the entire screen the color I was turning off.  One more thing learned...

During this Learning to fix crt phase - I've watched many Randy Fromm videos.  He has a book - Randy Fromm's Big Blue Book of Really Great Technical Information that I picked up.. 

One thing I thought I understood - but not well enough was this:
The alignment of the convergence rings on the neck of the tube.


My swapped tube had an all in one unit of yoke and rings.  I had to use the K4600 yoke and rings.  Turns out the geometry of the swapped tube didn't allow for the proper alignment  The gun gap was in a position that the 2 part yoke/ring combination would not line up vs the one part original.  I had a LOT of practice aligning and un-alignable configuration..

I have another donor tube to experiment with - I'm pretty sure I can get them lined up and I'll try again..

All that said - this chassis probably was not the original since it had Pacman and 1942 burned into the tube.  I've been watching Facebook Marketplace and came across a guy who was selling 3 arcade monitors.

One of which is impossible to believe:  BTW - I did not know this is what I was going to pick up..  The owner never sent the model# picture.. 


This is a brand new, never used, K7200.  Manufactured in 2003.  If you look at the power wires - they have never seen a connector.    It came as is - I'm guessing the guy who sold it to me took it out of a box or bag or something..   I did a quick test on the TPG to make sure it fired up and finished the monitor portion of the Centipede machine.


My wife tells me I lead a charmed life when this sort of thing happens..  I'm not disagreeing on this one..


My Arcade Cabinet Build and other projects here:
Centipede, Joust, Joust Cocktail, Asteroids, Galaga, Ms. Pacman Cabaret, Defender, Space Invaders Cocktail
https://bperkins.wordpress.com/

Mike A

  • Trade Count: (0)
  • Full Member
  • ***
  • Offline Offline
  • Posts: 5885
  • Last login:Today at 12:53:10 pm
  • This plan is foolproof
Re: Centipede restoration - My first - There will be plenty of pics
« Reply #96 on: March 22, 2020, 01:41:09 pm »
 :applaud:

jennifer

  • Trade Count: (0)
  • Full Member
  • ***
  • Offline Offline
  • Posts: 2895
  • Last login:August 11, 2023, 06:24:58 am
Re: Centipede restoration - My first - There will be plenty of pics
« Reply #97 on: March 22, 2020, 02:13:37 pm »
Congratulations, That is Awesome!...On that other tube, Convergence is a big deal, some claim to do that by feel, and eyeballs, But they lie, Personally I use a Klein Convergence scope with excellent results, You can actually see the convergence and purity, Not perfect mind you, but certianly good enough for the quality control inspectors on this side of the tracks,, If you go sourcing one they make different ones for different resolutions (Diddnt know that when I got mine, and just lucky) since Jenn is not a rich girl, that could have gotten spendy buying all 3...But luckily it has already all worked out for you on this project, That is just a little sweetie.

bperkins01

  • Trade Count: (0)
  • Full Member
  • ***
  • Offline Offline
  • Posts: 895
  • Last login:September 24, 2023, 02:13:35 pm
  • Plenty of skills.. gaining experience..
Re: Centipede restoration - My first - There will be plenty of pics
« Reply #98 on: March 22, 2020, 02:58:08 pm »
Congratulations, That is Awesome!...On that other tube, Convergence is a big deal, some claim to do that by feel, and eyeballs, But they lie, Personally I use a Klein Convergence scope with excellent results, You can actually see the convergence and purity, Not perfect mind you, but certianly good enough for the quality control inspectors on this side of the tracks,, If you go sourcing one they make different ones for different resolutions (Diddnt know that when I got mine, and just lucky) since Jenn is not a rich girl, that could have gotten spendy buying all 3...But luckily it has already all worked out for you on this project, That is just a little sweetie.

This?
https://www.kleininstruments.com/convergence-gauge

If I could get it remotely close with the test pattern generator I'd be happy... 
I have a few monitors to work on now, once the game restorations are done.

Haven't started the 'Asteroids' restoration thread yet..

My Arcade Cabinet Build and other projects here:
Centipede, Joust, Joust Cocktail, Asteroids, Galaga, Ms. Pacman Cabaret, Defender, Space Invaders Cocktail
https://bperkins.wordpress.com/

opt2not

  • Trade Count: (+15)
  • Full Member
  • ***
  • Offline Offline
  • Posts: 6173
  • Last login:April 02, 2024, 07:42:30 pm
Re: Centipede restoration - My first - There will be plenty of pics
« Reply #99 on: March 22, 2020, 03:38:38 pm »
NOS monitor?! You lucky sonava... :lol

Nice get, this restoration just kicked up a notch in quality now. And if/when you re-sell, you can definitely ask for top dollar!

Arroyo

  • Trade Count: (0)
  • Full Member
  • ***
  • Offline Offline
  • Posts: 1558
  • Last login:April 17, 2024, 06:17:46 pm
  • Budgets are boring
    • newforum.arcadecontrols.com/index.php/topic,156267.0.html
Re: Centipede restoration - My first - There will be plenty of pics
« Reply #100 on: March 22, 2020, 04:28:26 pm »
:applaud:

That’s looking like a museum quality piece with that final touch.  Especially knowing it’s your grail, I can only imagine how happy you must be.


Just thought I’d leave this here:

So here I go - my first (last?) original arcade machine

Based on that pic I’d say this question is answered.

Welcome to the club.....lifer  ;)

bperkins01

  • Trade Count: (0)
  • Full Member
  • ***
  • Offline Offline
  • Posts: 895
  • Last login:September 24, 2023, 02:13:35 pm
  • Plenty of skills.. gaining experience..
Re: Centipede restoration - My first - There will be plenty of pics
« Reply #101 on: March 22, 2020, 04:57:12 pm »
NOS monitor?! You lucky sonava... :lol

Nice get, this restoration just kicked up a notch in quality now. And if/when you re-sell, you can definitely ask for top dollar!

Yea - I made a nuisance of myself yesterday with MikeA and Arroyo about it ..  Pretty sure MikeA blocked me  :P
Arroyo said it - its my Grail - So It won't be going anywhere..

:)
 
My Arcade Cabinet Build and other projects here:
Centipede, Joust, Joust Cocktail, Asteroids, Galaga, Ms. Pacman Cabaret, Defender, Space Invaders Cocktail
https://bperkins.wordpress.com/

bperkins01

  • Trade Count: (0)
  • Full Member
  • ***
  • Offline Offline
  • Posts: 895
  • Last login:September 24, 2023, 02:13:35 pm
  • Plenty of skills.. gaining experience..
Re: Centipede restoration - My first - There will be plenty of pics
« Reply #102 on: March 22, 2020, 05:00:01 pm »
:applaud:

That’s looking like a museum quality piece with that final touch.  Especially knowing it’s your grail, I can only imagine how happy you must be.


Just thought I’d leave this here:

So here I go - my first (last?) original arcade machine

yea yea.. If I find the right clunkers..  I'll get them :)

Based on that pic I’d say this question is answered.

Welcome to the club.....lifer  ;)
My Arcade Cabinet Build and other projects here:
Centipede, Joust, Joust Cocktail, Asteroids, Galaga, Ms. Pacman Cabaret, Defender, Space Invaders Cocktail
https://bperkins.wordpress.com/

Mike A

  • Trade Count: (0)
  • Full Member
  • ***
  • Offline Offline
  • Posts: 5885
  • Last login:Today at 12:53:10 pm
  • This plan is foolproof
Re: Centipede restoration - My first - There will be plenty of pics
« Reply #103 on: March 22, 2020, 06:53:57 pm »
I didn't block you. It was just hard to get a noose around my neck while balancing on a chair ,holding a beer and texting at the same time.

bperkins01

  • Trade Count: (0)
  • Full Member
  • ***
  • Offline Offline
  • Posts: 895
  • Last login:September 24, 2023, 02:13:35 pm
  • Plenty of skills.. gaining experience..
Re: Centipede restoration - My first - There will be plenty of pics
« Reply #104 on: March 26, 2020, 02:52:20 pm »
My machine did not come with a coin box, and the originals are pretty ratty looking.  So I'm a little off script in that I made one from some scrap materials laying around the shop.

This is left over from a boat I made - its marine grade Okume plywood.  Really nice to work with.  I created a quick model in Sketchup and put it together over the course of two evenings.


A few pics of the parts and getting assembled - Simple box with a 7 deg slope to match the coin box mount in the machine.


 Here are 2 small strips of aluminum, rounded to the radius of the washer.  The were drilled and used as the arms of the handle.


Per MikeA - it would not sound right unless there was metal for the coins/tokens to hit.  So I give you the MikeA 304 scrap stainless steel sound bar.  Every time you feel a little poke in the head - Centipede got a coin. 


My Arcade Cabinet Build and other projects here:
Centipede, Joust, Joust Cocktail, Asteroids, Galaga, Ms. Pacman Cabaret, Defender, Space Invaders Cocktail
https://bperkins.wordpress.com/

J_K_M_A_N

  • Trade Count: (0)
  • Full Member
  • ***
  • Offline Offline
  • Posts: 983
  • Last login:Today at 01:35:52 pm
Re: Centipede restoration - My first - There will be plenty of pics
« Reply #105 on: March 26, 2020, 03:18:34 pm »
Good lord that thing looks great! Well done.  :applaud: :cheers:

J_K_M_A_N

wp34

  • Trade Count: (+3)
  • Full Member
  • ***
  • Offline Offline
  • Posts: 4794
  • Last login:April 10, 2022, 09:48:19 pm
Re: Centipede restoration - My first - There will be plenty of pics
« Reply #106 on: March 26, 2020, 03:30:26 pm »
In some of the pictures that cabinet is starting to look NOS.  Very nice work.

Arroyo

  • Trade Count: (0)
  • Full Member
  • ***
  • Offline Offline
  • Posts: 1558
  • Last login:April 17, 2024, 06:17:46 pm
  • Budgets are boring
    • newforum.arcadecontrols.com/index.php/topic,156267.0.html
Re: Centipede restoration - My first - There will be plenty of pics
« Reply #107 on: March 26, 2020, 03:38:30 pm »
Well done buddy, that’s some fine metal work.  Love the handle!

Mike A

  • Trade Count: (0)
  • Full Member
  • ***
  • Offline Offline
  • Posts: 5885
  • Last login:Today at 12:53:10 pm
  • This plan is foolproof
Re: Centipede restoration - My first - There will be plenty of pics
« Reply #108 on: March 26, 2020, 03:49:28 pm »
The metal plate is the best part.

pbj

  • Trade Count: (+4)
  • Full Member
  • ***
  • Offline Offline
  • Posts: 10875
  • Last login:Today at 12:01:53 am
  • Obey.
    • The Chris Burke Band
Re: Centipede restoration - My first - There will be plenty of pics
« Reply #109 on: March 26, 2020, 03:50:54 pm »
I would like to hear more about the boat.


bperkins01

  • Trade Count: (0)
  • Full Member
  • ***
  • Offline Offline
  • Posts: 895
  • Last login:September 24, 2023, 02:13:35 pm
  • Plenty of skills.. gaining experience..
Re: Centipede restoration - My first - There will be plenty of pics
« Reply #110 on: March 26, 2020, 03:51:02 pm »
The metal plate is the best part.
I only wish I could have stenciled it or something  :P
My Arcade Cabinet Build and other projects here:
Centipede, Joust, Joust Cocktail, Asteroids, Galaga, Ms. Pacman Cabaret, Defender, Space Invaders Cocktail
https://bperkins.wordpress.com/

bperkins01

  • Trade Count: (0)
  • Full Member
  • ***
  • Offline Offline
  • Posts: 895
  • Last login:September 24, 2023, 02:13:35 pm
  • Plenty of skills.. gaining experience..
Re: Centipede restoration - My first - There will be plenty of pics
« Reply #111 on: March 26, 2020, 03:53:41 pm »
I would like to hear more about the boat.

You won't be able to shut me up about the boat....


The Miss Sheri Lynn
My Arcade Cabinet Build and other projects here:
Centipede, Joust, Joust Cocktail, Asteroids, Galaga, Ms. Pacman Cabaret, Defender, Space Invaders Cocktail
https://bperkins.wordpress.com/

Mike A

  • Trade Count: (0)
  • Full Member
  • ***
  • Offline Offline
  • Posts: 5885
  • Last login:Today at 12:53:10 pm
  • This plan is foolproof
Re: Centipede restoration - My first - There will be plenty of pics
« Reply #112 on: March 26, 2020, 04:01:59 pm »
When I come out there we definitely have to reenact scenes from Indiana Jones with that boat.

bperkins01

  • Trade Count: (0)
  • Full Member
  • ***
  • Offline Offline
  • Posts: 895
  • Last login:September 24, 2023, 02:13:35 pm
  • Plenty of skills.. gaining experience..
Re: Centipede restoration - My first - There will be plenty of pics
« Reply #113 on: March 26, 2020, 04:04:53 pm »
When I come out there we definitely have to reenact scenes from Indiana Jones with that boat.

Except for the part where it gets cut in half/explodes and otherwise is destroyed..   :cheers:
My Arcade Cabinet Build and other projects here:
Centipede, Joust, Joust Cocktail, Asteroids, Galaga, Ms. Pacman Cabaret, Defender, Space Invaders Cocktail
https://bperkins.wordpress.com/

Mike A

  • Trade Count: (0)
  • Full Member
  • ***
  • Offline Offline
  • Posts: 5885
  • Last login:Today at 12:53:10 pm
  • This plan is foolproof
Re: Centipede restoration - My first - There will be plenty of pics
« Reply #114 on: March 26, 2020, 04:49:28 pm »
That is why you have to build a couple of stunt boats to take the damage.