Main Restorations Software Audio/Jukebox/MP3 Everything Else Buy/Sell/Trade
Project Announcements Monitor/Video GroovyMAME Merit/JVL Touchscreen Meet Up Retail Vendors
Driving & Racing Woodworking Software Support Forums Consoles Project Arcade Reviews
Automated Projects Artwork Frontend Support Forums Pinball Forum Discussion Old Boards
Raspberry Pi & Dev Board controls.dat Linux Miscellaneous Arcade Wiki Discussion Old Archives
Lightguns Arcade1Up Try the site in https mode Site News

Unread posts | New Replies | Recent posts | Rules | Chatroom | Wiki | File Repository | RSS | Submit news


Author Topic: Xanitron - A Return  (Read 17795 times)

0 Members and 1 Guest are viewing this topic.

gingecko

  • Trade Count: (0)
  • Full Member
  • ***
  • Offline Offline
  • Posts: 177
  • Last login:February 13, 2022, 04:11:37 pm
  • I'm working on it!
Xanitron - A Return
« on: March 18, 2019, 04:11:17 pm »
Back in 2006, I mostly finished up a cab: http://forum.arcadecontrols.com/index.php/topic,52641.msg516195.html#msg516195

I barely knew what I was doing, but in-person, people were pretty impressed with what I had done. It got farther along than the last few pics, but sadly I didn't take any 'finished' pics. Too busy playing the thing or 'never completed syndrome'?

Flash forward, the wife is gone, the cab is gone, a new username, new wife, and now kids...and an itch to build again.

I kept all the joys, buttons, and the KeyWhiz encoder. Should be simple enough to throw something together, right? Well, been spending the last couple weeks browsing the forum here and looks like a lot has changed since then. A number of people I remember are gone, new people have come, new products, new designs. But most of all, lots of questions.

Design - inspired by the Vigo Lix cabs.

Encoder - I-pac Ultimate I/O.

Materials - MDF - buy a shopvac! What a difference that has made! vs wood. I used MDF on my first cab. It's heavy, cheaper, has the right finish when painted. It's also messy as @#$%. Months later, there was still MDF dust coating the garage. Wood, less messy, easier to screw up.

Brains - refurb'd Dell Optiplex

Monitor - Acer 22" 16:10 monitor currently, but looks like I might want something bigger.
nope, I'm not doing the heavyweight monitor this time around. Was a beast to move and takes up too much space. Lighter weight flat panel computer monitor (sorry, purists!) this time.

Number of players: 1-2. (option for 3-4 to be brought in with USB game pads)

Controls: 2 joys and 7 buttons, 1 trackball (still debating), 1 Spinner (still debating).

Favorite games: Robotron, Joust, Defender, Dig Dug, Black Tiger, Centipede, Galaga, Phoenix, Ms Pac Man, Xenophobe, Double Dragon, Street Fighter, etc. I find that with most of those games the number of buttons is small. But you can't beat the Street Fighter like games for two-player fun. Still torn on the 'want to have it all' but also 'want to streamline'. Leaning towards streamline.

Paint: Blue/Black (same colors as last time, but using oil based paint).

Art: I managed to find my original vector illustration for the Marquee. I'll re-purpose that. Art was a stopping block for me last time, especially the control panel and side art. This time around, I have the teen helping out with art chores. We will work something up for the control panel, after I've got the controls situated the way I like. I want to get this done sooner, so it's not an after thought that seems to never get finished. Already got a few roughs for the side art.

Other: Polylaminate artwork over control panel. Plexiglass over control panel? I had that last time, but there are better options. Would like to mimic the rounded front/arcade control panel look.

Speakers - Logitech Multimedia 2.1 Speakers Z213 (cheap, but love the sound on them).

Bezel - another unknown. Looking to do what Delusional did with spray painting one side of acrylic sheet.

Coin door - check.

Hopefully will have most of this worked out by by end of Summer.

Humble Beginnings!


Moving Right Along


« Last Edit: August 19, 2019, 11:54:34 am by gingecko »

J_K_M_A_N

  • Trade Count: (0)
  • Full Member
  • ***
  • Offline Offline
  • Posts: 983
  • Last login:Today at 01:35:52 pm
Re: Xanterion - A Return
« Reply #1 on: March 19, 2019, 09:00:03 am »
I am guessing you would put the 4-way and/or spinner above the trackball? How does the reach feel for that? I would like to do an all in one (trackball/spinner/4-way/8-ways) but I worry that the reach would not feel great or the buttons would be tough to place for the 4-way games. I have been thinking about getting a servo stick to remove the 4-way joystick need. Maybe you can look into that as an upgrade. :) The one I am working on now actually has the U360 stick and I am thinking that might be ok too but I do like the feel of the restrictor plates.  :dunno

J_K_M_A_N

gingecko

  • Trade Count: (0)
  • Full Member
  • ***
  • Offline Offline
  • Posts: 177
  • Last login:February 13, 2022, 04:11:37 pm
  • I'm working on it!
Re: Xanterion - A Return
« Reply #2 on: March 19, 2019, 11:00:02 am »
Yep, that's the idea. I had a joystick in there at one point. I don't recall how well it worked though. Seems like the reach wouldn't be too bad. Maybe better for a Spinner than a 4-Way. I'll be testing out the layout over time. I think I have a Happs 4-Way Super Joy w/ Top Fire button, which I would mount there.

I also have a Happs Perfect 360, which I guess are impossible to find now. I didn't like how stiff that joystick is though. I'm considering the 'heat the spring' trick or seeing if I can replace the spring with something else. Another item to test and get the feel for. The U360 is like a Happs Perfect 360? How is the U360 for most 4-Way games? Any games that it performs better or worse?

Spinner wise, I think I need to re-evaluate how many games actually use spinners. The price on them is steep, and not sure there are too many that would really compel me to buy. Arkanoid and Tempest are the two that come to mind.

Hmm, the spinner does sit lower on the control panel and would probably look better aesthetically than an additional joy. Combine that with a Servo stick, and it would be way less clutter on the control panel. Which is my end goal.

gingecko

  • Trade Count: (0)
  • Full Member
  • ***
  • Offline Offline
  • Posts: 177
  • Last login:February 13, 2022, 04:11:37 pm
  • I'm working on it!
Re: Xanterion - A Return
« Reply #3 on: March 19, 2019, 12:01:04 pm »
Well, I wasn't watching a lot of YouTube back in 2006. But it looks like there are a lot of videos out there now. Would've been nice to have some of these back then. I started watching some of the videos from Retro Active Arcade: https://www.youtube.com/channel/UCtK1dBCZzVTdjbXk_WUdAfQ

Good refresher on some basic stuff, and think he has convinced me to stick with MDF. So, crossing that one off.

J_K_M_A_N

  • Trade Count: (0)
  • Full Member
  • ***
  • Offline Offline
  • Posts: 983
  • Last login:Today at 01:35:52 pm
Re: Xanterion - A Return
« Reply #4 on: March 19, 2019, 01:03:24 pm »
I really like the U360 in 4 way mode. I think it works great. But I do miss the feel of the restrictor so that is why I am thinking of trying the servo stick.

I do have a spinner and I like it but it is expensive. I basically use it for 2 games. Tempest for sure (one of my all time favorites). I also play Arkanoid at times but not as much.

I do sometimes regret buying things like that but then after 2-3 months you get back financially and it is nice to have. I still have a tough time spending that much though. I have to really want it or just I just keep going back and forth until I say screw it and just buy it.  ;D

J_K_M_A_N

gingecko

  • Trade Count: (0)
  • Full Member
  • ***
  • Offline Offline
  • Posts: 177
  • Last login:February 13, 2022, 04:11:37 pm
  • I'm working on it!
Re: Xanterion - A Return
« Reply #5 on: March 19, 2019, 01:42:21 pm »
Which spinner do you use? I originally had grandiose plans of making my own using an old mouse and wheel, etc. But I don't have quite as much time these days, so I would likely buy one. I'll be buying things piecemeal to start, making it easier on the wallet.

Looks like the u360 just plugs in via USB? Do you use an encoder?

J_K_M_A_N

  • Trade Count: (0)
  • Full Member
  • ***
  • Offline Offline
  • Posts: 983
  • Last login:Today at 01:35:52 pm
Re: Xanterion - A Return
« Reply #6 on: March 19, 2019, 02:24:59 pm »
I got the TurboTwist from GGG. It is very nice. I got the extra weight also for more spin. It connects USB. You do have to get the setting in each game correct though to have the right feel. It worked well for me.

The U360 does connect to USB so I just use that. I believe you have to use that if you want analog function. I use that for Sinistar but it is not quite the same. At least playable for me though. I could not play with a regular 8 way.

You can hook it up the U360 to an encoder but then it is basically an 8 way from what I understand. The 8 buttons are not quite enough so I am going to wire some extras into the GPIO pins on the Raspberry Pi.

J_K_M_A_N

gingecko

  • Trade Count: (0)
  • Full Member
  • ***
  • Offline Offline
  • Posts: 177
  • Last login:February 13, 2022, 04:11:37 pm
  • I'm working on it!
Re: Xanterion - A Return
« Reply #7 on: March 19, 2019, 04:51:24 pm »
Oh man, I remember back when the TurboTwists were just coming out. Thanks for that video! Will be really helpful if I get one and need to configure it. I forgot that Tron also used a spinner. Another great game.

Sinistar is another game I really liked. I should try that out with the P360 as well.

J_K_M_A_N

  • Trade Count: (0)
  • Full Member
  • ***
  • Offline Offline
  • Posts: 983
  • Last login:Today at 01:35:52 pm
Re: Xanitron - A Return
« Reply #8 on: March 19, 2019, 05:16:49 pm »
I just noticed that it embedded the video. If you click to watch it on youtube instead, it has more info for games in the description.

J_K_M_A_N

gingecko

  • Trade Count: (0)
  • Full Member
  • ***
  • Offline Offline
  • Posts: 177
  • Last login:February 13, 2022, 04:11:37 pm
  • I'm working on it!
Re: Xanitron - A Return
« Reply #9 on: March 19, 2019, 10:31:36 pm »
Yea, I read through most of the comments on the video. One of which took me to a link back here on spinner rotation numbers for different games. Bookmarked that one too!

gingecko

  • Trade Count: (0)
  • Full Member
  • ***
  • Offline Offline
  • Posts: 177
  • Last login:February 13, 2022, 04:11:37 pm
  • I'm working on it!
Re: Xanitron - A Return
« Reply #10 on: June 03, 2019, 12:29:52 pm »
Really, need to get some new pics up. Things are still slow going, partially me, partially waiting for orders. I have the panels mostly cut, controls picked out, etc. Even though I've put in a good chunk of time, I know that I still have a long road ahead.

While working on yet another prototype of the control panel (ignore the overhanging buttons above the trackball), yet another question popped up.

"If you're applying polylaminate artwork over the top of the control panel, do you need to smooth out the surface of the trackball mounting plate?"


The surface of the mounting plate is not smooth and has a bit of texture, which I don't know if it would be noticeable or not with polylaminate over the top. I'm not going to put acrylic over the top, by the way. I'm also wondering if it would be super difficult to remove the trackball if I use bondo to fill in the gaps around the mounting plate?

The time I had to mess around with this prototype, allowed me to try out a forstner bit for button holes. Get a feel for the router by recessing out the mounting plate, and a joystick adapter plate. Also try out undermounting joysticks. Most of that work is on the underside. It's also just freehand, so not that pretty right now. I tested out the roundover bit on the front edge as well. It's serviceable, but I want to practice that some more with some scrap to really get the edge I want.


javeryh

  • Trade Count: (+1)
  • Full Member
  • ***
  • Offline Offline
  • Posts: 7906
  • Last login:Today at 12:52:34 pm
Re: Xanitron - A Return
« Reply #11 on: June 03, 2019, 12:44:44 pm »
If you use bondo on the mounting plate, you will probably want to buy another mounting plate if you wanted to move the trackball.  But the trackball itself should just unscrew from underneath no problem.

Gilrock

  • Trade Count: (0)
  • Full Member
  • ***
  • Offline Offline
  • Posts: 1049
  • Last login:March 30, 2024, 05:15:46 pm
Re: Xanitron - A Return
« Reply #12 on: June 03, 2019, 02:41:33 pm »
Not sure how thick that polylaminate is but if its like the Robotron control panel overlay I bought from ArcadeShop it would probably go over that textured metal just fine.  It wasn't like other artwork I've applied where every spec of dust shows through.

gingecko

  • Trade Count: (0)
  • Full Member
  • ***
  • Offline Offline
  • Posts: 177
  • Last login:February 13, 2022, 04:11:37 pm
  • I'm working on it!
Re: Xanitron - A Return
« Reply #13 on: June 04, 2019, 11:22:51 am »
Thanks, based on recommendations from the forum I'm likely going to buy the overlay from Lucian045. Assuming he's still around by the time I'm done! I guess if I'm extremely careful with the routing around that mounting plate, I might be able to get by without using Bondo then. Perhaps some wood filler would be good enough.

Okay, backtracking on the pics a little bit...here's a shot of the little one playing the first prototype control panel. I had originally put contact paper on top, thinking that would be a smart way to determine the art layout for the control panel. Too early to be doing that at this stage.


I tried to explain this project to my family, since my first cabinet was long gone before I got remarried. I'm not sure they really understood this BYOAC thing. I don't think it will dawn on them until there is a living, breathing, painted arcade cabinet with art and lights and noises. But letting them play a few games on the prototype control panel was already a hit.


The little one had fun with Centipede, Missile Command, and Ladybug. I don't think I had ever heard of Ladybug until this forum. It's a nice Pac Man knockoff with a few little twists. The teenager and my Wife, enjoyed Street Fighter CE when I fired that up on the next prototype control panel.

Or was that the fourth one?


Never get too cocky or rushed when drilling holes. I had finished the 2nd player, but then screwed up the second to the last hole. I'm having a bit more luck with a Forstner bit now. Though I think I'm going to heed some advice I read, about pilot holes and drilling both sides, when I get to my final control panel top.

Next time around, I should share some pics of shopping and a trip. Sounds like fun?!

J_K_M_A_N

  • Trade Count: (0)
  • Full Member
  • ***
  • Offline Offline
  • Posts: 983
  • Last login:Today at 01:35:52 pm
Re: Xanitron - A Return
« Reply #14 on: June 04, 2019, 12:19:03 pm »
If you do the pilot hole and drill from both sides for the button, make sure you drill the pilot hole straight so they line up nicely. I usually don't have any problem with a forstner bit just going straight through. I do go a little slow though.

For routing the hole for the trackball, maybe line up a piece of wood to use as a straight edge guide for each side. That should make the sides straight for the plate. Just try not to go too far to one side or the other. :)

J_K_M_A_N

gingecko

  • Trade Count: (0)
  • Full Member
  • ***
  • Offline Offline
  • Posts: 177
  • Last login:February 13, 2022, 04:11:37 pm
  • I'm working on it!
Re: Xanitron - A Return
« Reply #15 on: June 11, 2019, 12:11:07 pm »
As promised, "shopping and a trip".

Shopping


Yep, the age old pilgrimage to the big HD. Putting that sheet of mdf on the cart all by myself was comical. I should have brought the teen along, but then there wouldn't be any room in the car. Done is done.


Always fun getting a package from Paradise Arcade. I ordered a few different buttons/switches to try out and get the feel of them. The Japanese/Korean buttons won't really work with 3/4" mdf, so I opted for the IL buttons. We preferred the really light 20 gram microswitch with concave buttons. We haven't thoroughly tested the Rollie Leaf switches yet, and that comparison will happen once I get things a little farther along. Right now it seems like finalizing the control panel layout will be the last thing I do.

The Happs joy in the picture, came from my first cab. The Zippy joystick was super cheap, so I figured why not. I'm not too crazy about it, though the teen likes it. I'll save it (and a lot spare controls) for the possibility of a future project. Also picked up a U360 and Ipac from Ultimarc. I like the U360 so far, but needs more testing and a final decision whether I want to spring for a ServoStik. Ah, I also got some joystick adapter plates from Paradise Arcade....so I potentially don't have to make a final joystick decision right away.

Trip

While trying to puzzle through cabinet dimensions and design....I decided a field trip to a local arcade was in order.

Ground Kontrol

Pretty nice arcade, serves some snacks and beer. They expanded since I was last there and now have 3 rooms plus an upstairs.


(Would love to play that 10-player Killer Queen some day!)

Lastly, I managed to get on the High Score board (#4) for Robotron. That made my night, though I know that score is piddly compared to some of the maniacs around here!


My arcade recon trip was good, but I got kind of side-tracked with playing games. Durh.

My first cabinet started off over 6' high, which was much too big. Even afterwards, it was probably around 6' and seemed too big. Poking around the arcade, a lot of cabinets are about that height, so 6' is probably just fine. The cab I'm working on will be a bit shorter though, which is also just fine.

It's always cool to play arcade games, but it was really interesting noticing how these controls do out in the wild. The Centipede game's trackball would barely scroll right. Arkanoid's spinner wasn't doing so well. The Tempest was just fine, and it's been quite some time since I played that game. There always seems to be a tech servicing the pinball machines 24-7. Which makes me glad that pinball has never been my thing. Would have loved to talk to a tech about what controls they use in the arcade machines.

All in all a fun time. We played quite a bit of Rampart and Robotron. Funny, because the guys who went with me were much younger than I and grew up on Nintendo consoles. So it was interesting to see them really get into older games like Robotron and Track and Field. I told myself that next time I would pay even more attention to control panel layouts, but well, we know how that goes!

JKMAN - thanks for the advice on the drilling/routing. I just free-handed the routing job on the trackball plate quickly (it sure shows!). On the final CP, will certainly use a guide. Perhaps something L or U shaped so I don't go too far left/right.
« Last Edit: June 11, 2019, 12:13:19 pm by gingecko »

J_K_M_A_N

  • Trade Count: (0)
  • Full Member
  • ***
  • Offline Offline
  • Posts: 983
  • Last login:Today at 01:35:52 pm
Re: Xanitron - A Return
« Reply #16 on: June 11, 2019, 12:30:11 pm »
L-shape would probably work pretty well. You could do 2 sides and then reposition and do the other 2 sides. Good idea.

Not a bad arcade. I went to a place here called Can Can Wonderland. It was not too bad. A little spendy for games but ok. Fun to see them all together in an arcade setting. A decent amount of EM pinball machines also. I love those. That clicking sound when starting and it is resetting all the targets and the scores. Good stuff.

J_K_M_A_N

gingecko

  • Trade Count: (0)
  • Full Member
  • ***
  • Offline Offline
  • Posts: 177
  • Last login:February 13, 2022, 04:11:37 pm
  • I'm working on it!
Re: Xanitron - A Return
« Reply #17 on: June 11, 2019, 02:03:05 pm »
We were at the arcade early on a weekday, so it looks sort of dead. Definitely picks up later on.

Most of the arcades I've seen in our area, have sadly been taken over by ticket machines. I like Skee ball okay, but nothing beats putting some quarters into Robotron, Defender, etc. There was no cover, and games were the same price as when I was a kid. I could also get a pretzel with cheese, and tote a beer around.

Can Can looks pretty good, I'll have to check that out if we ever head over to midwest!

Mike A

  • Trade Count: (0)
  • Full Member
  • ***
  • Offline Offline
  • Posts: 5885
  • Last login:Today at 12:53:10 pm
  • This plan is foolproof
Re: Xanitron - A Return
« Reply #18 on: June 11, 2019, 02:15:25 pm »
If you come to the Midwest, you need to visit Alpha Centuri. You drink for free there.

Sent from my Pixel 3 using Tapatalk


gingecko

  • Trade Count: (0)
  • Full Member
  • ***
  • Offline Offline
  • Posts: 177
  • Last login:February 13, 2022, 04:11:37 pm
  • I'm working on it!
Re: Xanitron - A Return
« Reply #19 on: June 11, 2019, 02:27:13 pm »
That would be stop #1, Mike! Then I might be able to stumble to Can Can...

Love that wood paneling on the ceiling, and you have an amazing collection of games. Been a long time since I've played Time Pilot and Pengo. Pleiades?! That looks like a classic that I've never actually played! How has that happened? Name sounded really familiar, but the gameplay pics on KLOV, don't ring a bell at all. Though I can't say I always trust the old memory these days.

opt2not

  • Trade Count: (+15)
  • Full Member
  • ***
  • Offline Offline
  • Posts: 6173
  • Last login:April 02, 2024, 07:42:30 pm
Re: Xanitron - A Return
« Reply #20 on: June 11, 2019, 02:31:28 pm »
Does Ground Kontrol still have that 6-player LCD X-men cabinet they claim runs on original hardware? 

Vigo

  • the Scourage of Carpathia
  • Global Moderator
  • Trade Count: (+24)
  • Full Member
  • *****
  • Offline Offline
  • Posts: 6417
  • Last login:March 21, 2024, 08:20:28 am
Re: Xanitron - A Return
« Reply #21 on: June 11, 2019, 02:56:22 pm »
I went to a place here called Can Can Wonderland. It was not too bad. A little spendy for games but ok. Fun to see them all together in an arcade setting. A decent amount of EM pinball machines also. I love those. That clicking sound when starting and it is resetting all the targets and the scores. Good stuff.

J_K_M_A_N

Next time you go, invite me.  8)

gingecko

  • Trade Count: (0)
  • Full Member
  • ***
  • Offline Offline
  • Posts: 177
  • Last login:February 13, 2022, 04:11:37 pm
  • I'm working on it!
Re: Xanitron - A Return
« Reply #22 on: June 11, 2019, 03:28:56 pm »
Does Ground Kontrol still have that 6-player LCD X-men cabinet they claim runs on original hardware?

There was an X-Men game there. I can take a pic next time I'm there.

I can't say I paid too much attention to it, as the X-Men game doesn't interest me too much. I love superheroes, but that game just feels more like a console game to me than an arcade game. Maybe because that's how I first played through the game?

J_K_M_A_N

  • Trade Count: (0)
  • Full Member
  • ***
  • Offline Offline
  • Posts: 983
  • Last login:Today at 01:35:52 pm
Re: Xanitron - A Return
« Reply #23 on: June 11, 2019, 03:39:43 pm »
Next time you go, invite me.  8)

I thought you lived down by St Joseph or something? Not terribly far but a pretty good trip none the less. :)

J_K_M_A_N

opt2not

  • Trade Count: (+15)
  • Full Member
  • ***
  • Offline Offline
  • Posts: 6173
  • Last login:April 02, 2024, 07:42:30 pm
Re: Xanitron - A Return
« Reply #24 on: June 11, 2019, 03:53:46 pm »
Does Ground Kontrol still have that 6-player LCD X-men cabinet they claim runs on original hardware?

There was an X-Men game there. I can take a pic next time I'm there.

I can't say I paid too much attention to it, as the X-Men game doesn't interest me too much. I love superheroes, but that game just feels more like a console game to me than an arcade game. Maybe because that's how I first played through the game?

Well the controversy is they claim that it's running on an original 6-player board, with some kind of one-off video circuit converter that was built by Clay Cowgill.
The original 6-player board outputs to 2 monitors, and one of the outputs is flipped due to the nature of how the second monitor is mounted in the original cab with a mirror.

A lot of people on KLOV have called shinanigans on this claim, and believe they're just running a PC with MAME, outputting to a widescreen LCD.

They took down their build-log of this cabinet, but the wayback machine has it cached.
https://web.archive.org/web/20150322081428/http://groundkontrol.com/category/6-days-of-x-men/

Notice how they avoid mentioning anything about the video output.

pbj

  • Trade Count: (+4)
  • Full Member
  • ***
  • Offline Offline
  • Posts: 10875
  • Last login:Today at 12:01:53 am
  • Obey.
    • The Chris Burke Band
Re: Xanitron - A Return
« Reply #25 on: June 11, 2019, 04:03:20 pm »
Maybe because that's how I first played through the game?

 :lol  No.  Don't toy with 90s PBJ emotions.

Notice how they avoid mentioning anything about the video output.

C'mon, man.  I mean, let's consider the possibilities here.  A great deal of effort for no real reward on the one hand... and $50 PC running MAME on the other....


Vigo

  • the Scourage of Carpathia
  • Global Moderator
  • Trade Count: (+24)
  • Full Member
  • *****
  • Offline Offline
  • Posts: 6417
  • Last login:March 21, 2024, 08:20:28 am
Re: Xanitron - A Return
« Reply #26 on: June 11, 2019, 04:50:20 pm »
Next time you go, invite me.  8)

I thought you lived down by St Joseph or something? Not terribly far but a pretty good trip none the less. :)

J_K_M_A_N

I right in the SE metro area. Inver Grove.   Maybe next time Mike A is in town for one of his pickup runs, we can meet up at Can Can.   :cheers:

opt2not

  • Trade Count: (+15)
  • Full Member
  • ***
  • Offline Offline
  • Posts: 6173
  • Last login:April 02, 2024, 07:42:30 pm
Re: Xanitron - A Return
« Reply #27 on: June 11, 2019, 05:25:19 pm »
C'mon, man.  I mean, let's consider the possibilities here.  A great deal of effort for no real reward on the one hand... and $50 PC running MAME on the other....
I dunno, I just get a gross feeling with the idea that an arcade business is running MAME in their commercial cabinets.

J_K_M_A_N

  • Trade Count: (0)
  • Full Member
  • ***
  • Offline Offline
  • Posts: 983
  • Last login:Today at 01:35:52 pm
Re: Xanitron - A Return
« Reply #28 on: June 11, 2019, 05:32:16 pm »
Next time you go, invite me.  8)

I thought you lived down by St Joseph or something? Not terribly far but a pretty good trip none the less. :)

J_K_M_A_N

I right in the SE metro area. Inver Grove.   Maybe next time Mike A is in town for one of his pickup runs, we can meet up at Can Can.   :cheers:

Well hell. I am in Burnsville. We will have to go there sometime.

J_K_M_A_N

pbj

  • Trade Count: (+4)
  • Full Member
  • ***
  • Offline Offline
  • Posts: 10875
  • Last login:Today at 12:01:53 am
  • Obey.
    • The Chris Burke Band
Re: Xanitron - A Return
« Reply #29 on: June 11, 2019, 06:16:38 pm »
C'mon, man.  I mean, let's consider the possibilities here.  A great deal of effort for no real reward on the one hand... and $50 PC running MAME on the other....
I dunno, I just get a gross feeling with the idea that an arcade business is running MAME in their commercial cabinets.

Yes, and people like you are the reason they've been less than forthcoming about it. 


I mean, some of us walk up to a 6 player X-Men and go, "holy ---steaming pile of meadow muffin---, haven't seen one of those in 25 years" and some of us... are you.


opt2not

  • Trade Count: (+15)
  • Full Member
  • ***
  • Offline Offline
  • Posts: 6173
  • Last login:April 02, 2024, 07:42:30 pm
Re: Xanitron - A Return
« Reply #30 on: June 11, 2019, 06:41:22 pm »
C'mon, man.  I mean, let's consider the possibilities here.  A great deal of effort for no real reward on the one hand... and $50 PC running MAME on the other....
I dunno, I just get a gross feeling with the idea that an arcade business is running MAME in their commercial cabinets.

Yes, and people like you are the reason they've been less than forthcoming about it. 

I mean, some of us walk up to a 6 player X-Men and go, "holy ---steaming pile of meadow muffin---, haven't seen one of those in 25 years" and some of us... are you.
Truth be told, I do want them to be running an original board, with their claimed video combining circuit. That device has been sought after for a while by a lot of people, I myself had a project in mind to have a single widescreen video output from an original 6-player board.

But they couldn't show proof of it in action, which is kinda shady. I mean if they're running a PC with MAME, fine, that's their choice.  But to claim that they have a device that people have been looking for, and not actually show it working is kinda shady.

gingecko

  • Trade Count: (0)
  • Full Member
  • ***
  • Offline Offline
  • Posts: 177
  • Last login:February 13, 2022, 04:11:37 pm
  • I'm working on it!
Re: Xanitron - A Return
« Reply #31 on: June 13, 2019, 10:41:52 am »
:lol  No.  Don't toy with 90s PBJ emotions.

Sorry man, we all have our faves for sure. I think the only arcade game I seriously played during the 90s was Street Fighter 2. We found an arcade in the mall near campus and that was the first time I saw the game. But most my time was spent doing a lot of other stuff during the 90s. Gaming was mostly on the computer, sometimes a console.

Actually, I take that back. For awhile they had 2-3 cabs in a spot on campus when I first got there. We played quite a bit of Ataxx and Rampart. Not sure if they got rid of the arcade machines, or we kind of forgot about them.

pbj

  • Trade Count: (+4)
  • Full Member
  • ***
  • Offline Offline
  • Posts: 10875
  • Last login:Today at 12:01:53 am
  • Obey.
    • The Chris Burke Band
Re: Xanitron - A Return
« Reply #32 on: June 13, 2019, 10:43:44 am »
What I meant was - X-men the arcade game never came out on consoles. 

 :'(

opt2not

  • Trade Count: (+15)
  • Full Member
  • ***
  • Offline Offline
  • Posts: 6173
  • Last login:April 02, 2024, 07:42:30 pm
Re: Xanitron - A Return
« Reply #33 on: June 13, 2019, 11:31:35 am »
It came out on Xbox Live. 6-player version. 

gingecko

  • Trade Count: (0)
  • Full Member
  • ***
  • Offline Offline
  • Posts: 177
  • Last login:February 13, 2022, 04:11:37 pm
  • I'm working on it!
Re: Xanitron - A Return
« Reply #34 on: June 13, 2019, 12:00:20 pm »
Oh yea, looks like the console version was different than the Arcade one. Maybe we'll have to try and beat the Marvel games once I get this cab done. Ok, scrap everything, 4 players it is!

Just kidding. I've already decided if we ever want 4 players, we would go the controller route.

gingecko

  • Trade Count: (0)
  • Full Member
  • ***
  • Offline Offline
  • Posts: 177
  • Last login:February 13, 2022, 04:11:37 pm
  • I'm working on it!
Re: Xanitron - A Return
« Reply #35 on: June 18, 2019, 01:24:14 pm »
Well, "today's the day".


I applied the last layer of paint to the bottom interior board last night. I tried painting both sides a different type of paint for a test (and a slightly different color because of that). One side was acrylic primer and acrylic paint. Pretty much the exact same thing I used on my first cabinet. The other side I painted with an oil based primer and oil paint.

I read through OND's painting thread and watched his video. Pretty amazing, but mine is not going to be anywhere near as perfect. If I can get a finish that looks smooth from an arm's length using canned paint and a roller, then that will be good enough for most people who would see the cabinet. With a little one in the house, it's likely to be colored on with crayons and adorned with stickers in no time anyways.

I'll check the final result of the paint finish tonight after work, but here are the results so far:

(Before I forget, I sanded before each layer, usually with a 180-240 grit paper. Both primers were also tinted, so they are grey)

Oil primer - beautiful stuff. The first application was super smooth. I really, really, really didn't want to work with oil because of the cleanup, etc. But this really won me over. Saves a lot of time with only really needing one layer as well.

Acrylic primer - was ok, took two coats. Gummy when trying to sand. Coverage was ok. No real surprises there, as it's what I used on my first cab.

Oil paint - so I was loving the oil primer and thought I had put a nail in the coffin...but when I tried the oil paint, it was a bit tacky and ended up with a lot of lint showing up from the roller. Also small bits of paint were marring the finish. The second time around, I tried taking some tape to the roller just to make sure any excess lint was removed beforehand. Still no dice on that.

Acrylic paint - again, it's what I had used before, so the results aren't too surprising. The oil paint seems to dry quicker. But the acrylic has a nice rubbery feel after it dries, which I kind of liked. It also didn't attract the lint from the roller so heavily, so the finish is a bit better. Just like the acrylic primer, it gums up sandpaper in no time at all, which is a chore.

So, unless I change my mind after tonight's results...it looks like I want to go with an oil-based primer and an acrylic paint over the top. It sounds so weird to me to do that, but supposedly it can be done. I don't know if anyone here has had problems with that combo?

Next steps for this weekend?
A) Do another series of paint tests with the oil primer and acrylic paint over the top.
OR
B) Screw in 1x2 framing pieces temporarily, test fit everything together and finalize dimensions.

On B above, I can't remember when I attached the 1x2 frames on my first cab. I'm pretty sure I painted all the panels first, as well as those strips, then attached them. But I was also bolting most everything together, so there was very little worry about having to screw things in, take the screws out, and screw it back into the mdf again. I'm guessing if I use very few screws and don't glue till everything is ready, it should all be fine?
« Last Edit: June 18, 2019, 01:26:19 pm by gingecko »

gingecko

  • Trade Count: (0)
  • Full Member
  • ***
  • Offline Offline
  • Posts: 177
  • Last login:February 13, 2022, 04:11:37 pm
  • I'm working on it!
Re: Xanitron - A Return
« Reply #36 on: July 30, 2019, 12:26:40 pm »
I can't believe it's nearly August! The good news is that I've made some more progress on the cabinet.

The base.


That proved trickier than I thought it would. Trying to figure out where to secure the wood and still have spots to screw in the plate was quite the exercise. Also, the plates on the wheels are slightly different sizes. So if I set them one way, the wheels would suddenly scrape the wood.

But the fun didn't stop there...


I got it all painted up, only to realize I had put the wheels on the wrong side of the board!!  :timebomb:
The wheels should have gone on the long side and not the short. I nearly exploded when I realized that, but our son was with me, so I tried to keep my cool.

So, I ripped off the wheel supports, salvaging what I could and cut some replacement boards. Then repainted.


Even after Bondo, it didn't turn out quite as nice, but luckily it's mostly inside stuff.

While redoing it, I did notice that the oil paint fared way better with wear and tear than the acrylic/latex paint. Also the acrylic paint was still sort of sticky, so I changed my mind and am going oil all the way. The oil paint looked a little better after it had been worn a bit too. So maybe I'll try some light sanding or buffing after the final coat.

At this point, I was happy to have got back to the point I was before, but decided that I will be cutting/fitting all the wood before doing anymore painting. That way screw ups won't end up costing me more time. This is how I'm attaching the boards inside. Basically cut those support pieces up, pre-drill holes, and glue them together beforehand. Then just attach the panels to them. They have been pretty sturdy so far, even without glue. I'll use glue during the last part of assembly though.


Coin door and box. Glad I picked up a jigsaw for this part. I remember using one in wood shop in school, and all I could do with it was make jagged lines. I don't know if it was me, a bad tool, or the tech is a lot better 30 years later. Regardless, they are an invaluable tool for this sort of project.


And speaking of jigsaws again, couldn't have cut this access panel without it. Used a storage container lid as a nice template.


Lastly, I needed to trim up the side panels. The original goal was to make a full size Vigolix, but just scaling up the dimensions didn't work like I thought it would.


I ended up deciding to modify things and trim this corner flush. We have a teen and a little one, and I can imagine that corner would be a tripping hazard and probably just snap off at some point.

Of course I forgot I had removed the front panel when I made my line, and trimmed off 3/4" too much on the first cut. Luckily I lined it back up before I cut the second panel. I glued an extra piece on there, trimmed it to size, and recut the slots for t-molding. The end result, two pretty nice side panels.


Feels like I've made some decent progress and slowly getting better with the woodworking tools. On the other hand it also feels like there is still a lot to do.

Mike A

  • Trade Count: (0)
  • Full Member
  • ***
  • Offline Offline
  • Posts: 5885
  • Last login:Today at 12:53:10 pm
  • This plan is foolproof
Re: Xanitron - A Return
« Reply #37 on: July 30, 2019, 12:42:43 pm »
Nice work so far.

Thank you for including a coin door. :applaud:

gingecko

  • Trade Count: (0)
  • Full Member
  • ***
  • Offline Offline
  • Posts: 177
  • Last login:February 13, 2022, 04:11:37 pm
  • I'm working on it!
Re: Xanitron - A Return
« Reply #38 on: July 30, 2019, 12:59:07 pm »
Thanks Mike! Yea, it just doesn't seem like an arcade machine without a coin door.

Mike A

  • Trade Count: (0)
  • Full Member
  • ***
  • Offline Offline
  • Posts: 5885
  • Last login:Today at 12:53:10 pm
  • This plan is foolproof
Re: Xanitron - A Return
« Reply #39 on: July 30, 2019, 01:00:02 pm »
Be careful. People want to poke me with pointy sticks when I say stuff like that.

Arroyo

  • Trade Count: (0)
  • Full Member
  • ***
  • Offline Offline
  • Posts: 1558
  • Last login:April 17, 2024, 06:17:46 pm
  • Budgets are boring
    • newforum.arcadecontrols.com/index.php/topic,156267.0.html
Re: Xanitron - A Return
« Reply #40 on: July 30, 2019, 03:23:22 pm »
Nice work, it's looking good.  Do you have a render/drawing of what it will look like when finished?

gingecko

  • Trade Count: (0)
  • Full Member
  • ***
  • Offline Offline
  • Posts: 177
  • Last login:February 13, 2022, 04:11:37 pm
  • I'm working on it!
Re: Xanitron - A Return
« Reply #41 on: July 30, 2019, 04:37:50 pm »
Thanks Arroyo, I've been having fun following your project as well!

Other than a few sketches, I don't have a decent render. Mostly I saw the image of the Vigolix, took a 6' board, sawed it in half diagonally, and went from there.

In some it's cool to be winging it, because it will be a little bit different in design. On the other hand it's a headache, not having a plan.

I'd say the bottom half of the machine is all worked out right now, but I'm not completely sure how tall it's going to be. I'm waiting to get some other parts cut up and then will fit them together to see whether I want to trim some off the top or not.

I should have a decent pic of it standing by the next update or two.


Vigo

  • the Scourage of Carpathia
  • Global Moderator
  • Trade Count: (+24)
  • Full Member
  • *****
  • Offline Offline
  • Posts: 6417
  • Last login:March 21, 2024, 08:20:28 am
Re: Xanitron - A Return
« Reply #42 on: July 31, 2019, 10:39:11 am »
Looking great so far. Solid work. Can't wait to see the next pics!

gingecko

  • Trade Count: (0)
  • Full Member
  • ***
  • Offline Offline
  • Posts: 177
  • Last login:February 13, 2022, 04:11:37 pm
  • I'm working on it!
Re: Xanitron - A Return
« Reply #43 on: July 31, 2019, 01:19:46 pm »
Thanks Vigo! Your Vigolix was a big inspiration in designing the cab, even though it won't turn out the same. I probably would have built another Lusid inspired cabinet if I hadn't stumbled across yours and Delusional's threads.

It's been fun veering off the path a bit. I aimed for something practical but also was easily recognizable as an arcade machine. I think I'll hit that mark.

Vigo

  • the Scourage of Carpathia
  • Global Moderator
  • Trade Count: (+24)
  • Full Member
  • *****
  • Offline Offline
  • Posts: 6417
  • Last login:March 21, 2024, 08:20:28 am
Re: Xanitron - A Return
« Reply #44 on: July 31, 2019, 01:33:41 pm »
Thanks, gingecko! That's what this place is about. Take something and evolve it to the next level. I can't wait to see how you evolve what I built! So far it looks very promising!  :cheers:

gingecko

  • Trade Count: (0)
  • Full Member
  • ***
  • Offline Offline
  • Posts: 177
  • Last login:February 13, 2022, 04:11:37 pm
  • I'm working on it!
Re: Xanitron - A Return
« Reply #45 on: August 02, 2019, 11:51:22 am »
Going to share the last few pics before heading into the weekend (where I always hope I will get a ton of work done!).

Original plan was to add 2 intake fans on the bottom and 2 fans up top to vent out the hot air. My original cab was pretty warm, but it also had a larger/older computer and a giant monitor. Unfortunately, I found out there wasn't enough room to mount the two 120mm fans on the bottom rear panel. so I opted for just vents. Should probably be okay. I'll add a screen/filter behind them at some point.


I came up with a little jig for the router, to keep things neat. It was pretty fun, just remove a board from the bottom before each cut, to slide the router down. I then placed the whole thing on top of the rear panel as a guide. Probably better ways to do this, but it worked out all right and I might use it again for the top panel.


The next part I started hacking away at, was the rear/hatch door. It was too hot last night, and I was tired, so procrastination happened. I want a longer piece of framing to go down the side, but ran out of that wood, so instead of working I made a trip to the store. This weekend I hope to get the frame bits done (and magnets installed), door handle, and possibly a key lock. I'd love to get both top and bottom panels done, but will see.


Also on the agenda is finishing up the control panel box, speaker panel, and marquee dimensions.

@Vigo, thanks! I just hope it's "evolve" and not "devolve", haha!

Arroyo

  • Trade Count: (0)
  • Full Member
  • ***
  • Offline Offline
  • Posts: 1558
  • Last login:April 17, 2024, 06:17:46 pm
  • Budgets are boring
    • newforum.arcadecontrols.com/index.php/topic,156267.0.html
Re: Xanitron - A Return
« Reply #46 on: August 02, 2019, 01:49:04 pm »
Nice jig and execution with it.  Good work Gingecko.

gingecko

  • Trade Count: (0)
  • Full Member
  • ***
  • Offline Offline
  • Posts: 177
  • Last login:February 13, 2022, 04:11:37 pm
  • I'm working on it!
Re: Xanitron - A Return
« Reply #47 on: August 12, 2019, 11:48:53 am »
Oh yea, I was supposed to update the weekend before last, right?! Well, things are slow, as usual. I'm making progress, but also getting antsy about getting the damned garage organized again after I get done with woodworking. At the same time, stressing out and trying to take my time to make sure I don't screw up.

The weekend before last, was another hot one. I had seen the Emerson Straight Edge clamp from Arroyo's thread and nearly bought one...but I really like how easy my sawboard is to use. Make your line, clamp the sawboard on top and run the saw over the sawboard. But maybe I could modify it with clamps underneath?!

Exhibit A:


Exhibit B:


The clamps have 'star knobs' that I can unscrew/adjust. In theory, it was a great idea (I had seen something similar somewhere online, I'm sure) but in practice...the clamps sometimes got in the way of lining up the board on the sawhorses and took just as much time to clamp down as the clutch clamps I normally use. I've finally figured out the sweet spot where I need to place the board/sawboard on the sawhorse to get it clamped nicely. A little late in the game, but oh well. Worth a try I guess.

My main struggle that weekend was the bottom rear door. I had spent a good deal of time routing out space for magnets in the framing pieces and the door. I spent most of that Saturday morning building a jig that I thought was going to make it all perfect. Then turned out, I didn't have enough depth. The sun was baking down, and I needed to eat...so I grumpily waited until the evening. Finally finished, but after checking it out, turns out the thin magnets were too weak.

So I ordered more magnets, more cutting, and eventually ended up with this:


Doors are definitely a weak point for me, but at least this one will be better than the one on my first cabinet. Which wasn't even flush:


I'll have another door up top, but I'm hoping all the sweat I put into the first one, will make the second much easier.

I've pretty much been building from the floor up. And then will decide the final height of the side pieces on the cab. So next steps were Control Panel and Speaker panel. I'm close to done on the CP.

I made an angled cut to align the sides of the CP using the jig saw. I was pretty amazed that I guessed the angle correctly and it ended up that snug.


I basically re-cut all the control panel boards and tested angles and whatnot on scraps as I went. The top board got a 3/8" roundover (thank YouTube for the correct sized bit to use!) that turned out super sweet. Unfortunately I must have been too excited, wet my pants, and forgot to take pics.

For the CP, I have one cut to make on the top board as it's too long right now. I erred on the side of over-cutting everything after a number of mistakes. The top is just about perfect, so I'm going to have to be extra careful when cutting out the trackball, button/joy holes.

Then I'll try to trim the top edge of the front CP face, so the top panel will sit snug across the sides and front. That seems to be a really tricky angle to get right, so I'll have to test on quite a few scraps first.


Mike A

  • Trade Count: (0)
  • Full Member
  • ***
  • Offline Offline
  • Posts: 5885
  • Last login:Today at 12:53:10 pm
  • This plan is foolproof
Re: Xanitron - A Return
« Reply #48 on: August 12, 2019, 11:57:56 am »
You should look at how the back side of many original arcade cabinets are built. They have a really simple and easy door solution. It is just one large slab held in place with a barrel lock.

gingecko

  • Trade Count: (0)
  • Full Member
  • ***
  • Offline Offline
  • Posts: 177
  • Last login:February 13, 2022, 04:11:37 pm
  • I'm working on it!
Re: Xanitron - A Return
« Reply #49 on: August 12, 2019, 12:20:53 pm »
You should look at how the back side of many original arcade cabinets are built. They have a really simple and easy door solution. It is just one large slab held in place with a barrel lock.

Yea, on the first cab I had no clue. Searching for images of 'rear access Arcade' didn't yield very helpful results. ;)

Image searches are better now than back then, and I've got a vague idea how the Arcade doors look. But I guess the "problems" I was trying to solve were: "How to keep the door tight/secure but also make it easily removable without too much wear and tear?". Also, try to keep it looking more or less like an arcade machine. Obviously failing on that last part.

I had thought about using a barrel lock, and using pins/dowels to push fit the door into place. I figured that's more friction though and would eventually wear out either the pins or the holes. So, I over-complicated the damned thing. Best to listen to that little voice in your head when it starts saying "This doesn't look right...".

gingecko

  • Trade Count: (0)
  • Full Member
  • ***
  • Offline Offline
  • Posts: 177
  • Last login:February 13, 2022, 04:11:37 pm
  • I'm working on it!
Re: Xanitron - A Return
« Reply #50 on: August 14, 2019, 05:22:04 pm »
Work feels like it's moving along a bit. I test cut the angle for the top of the control panel last night on a piece of scrap. Looks like I got it right, and hopefully will make the last of the cuts for the control panel tonight. (Don't screw it up!!)

The other day, I put together the hole saw to work on the speaker panel. Ends up looking like a Jack Kirby comic book gadget:


The speaker panel came together fairly well, with only a minor setback. I still need to figure out a smarter way to guide the router. I keep rigging stuff up, and then find it out doesn't work. Last night I basically just clamped a couple boards to make an L shape, where I could. Did each speaker corner, one at a time, then flipped them around to do the other sides. I should try and make some sort of adjustable U-shaped contraption for this stuff. I'm probably near the end of routing out patterns though.


The speakers will get strapped in there with some velcro straps and hardware. Still trying to decide on volume control and where to place it. I'm not sure it would look very good on the speaker panel, but I also don't want it to get confused with the spinner, if I put it on the control panel.

Mike A

  • Trade Count: (0)
  • Full Member
  • ***
  • Offline Offline
  • Posts: 5885
  • Last login:Today at 12:53:10 pm
  • This plan is foolproof
Re: Xanitron - A Return
« Reply #51 on: August 14, 2019, 06:37:59 pm »
That drill is way to clean. You need to drop it a few times. Maybe drag it behind your car.

gingecko

  • Trade Count: (0)
  • Full Member
  • ***
  • Offline Offline
  • Posts: 177
  • Last login:February 13, 2022, 04:11:37 pm
  • I'm working on it!
Re: Xanitron - A Return
« Reply #52 on: August 15, 2019, 10:59:04 am »
That drill is way to clean. You need to drop it a few times. Maybe drag it behind your car.

Haha, thanks Mike!

Picked that one up on sale. My old drill's battery isn't holding a charge much these days and a corded drill is really nice when drilling out a whole bunch of button holes.

I've started to dub this project the "Money Pit" though. Thinking it wouldn't cost much to build, when I already have some controls....was damned naive. On the plus side, I'll have a lot of tools and materials for other projects.

gingecko

  • Trade Count: (0)
  • Full Member
  • ***
  • Offline Offline
  • Posts: 177
  • Last login:February 13, 2022, 04:11:37 pm
  • I'm working on it!
Re: Xanitron - A Return
« Reply #53 on: August 19, 2019, 11:46:29 am »
Well, another weekend down. Feel like I got a fair amount accomplished and getting closer to getting out of the woodworking stage. Good news for me at least.

One man blocking/assembly, while my helper is away


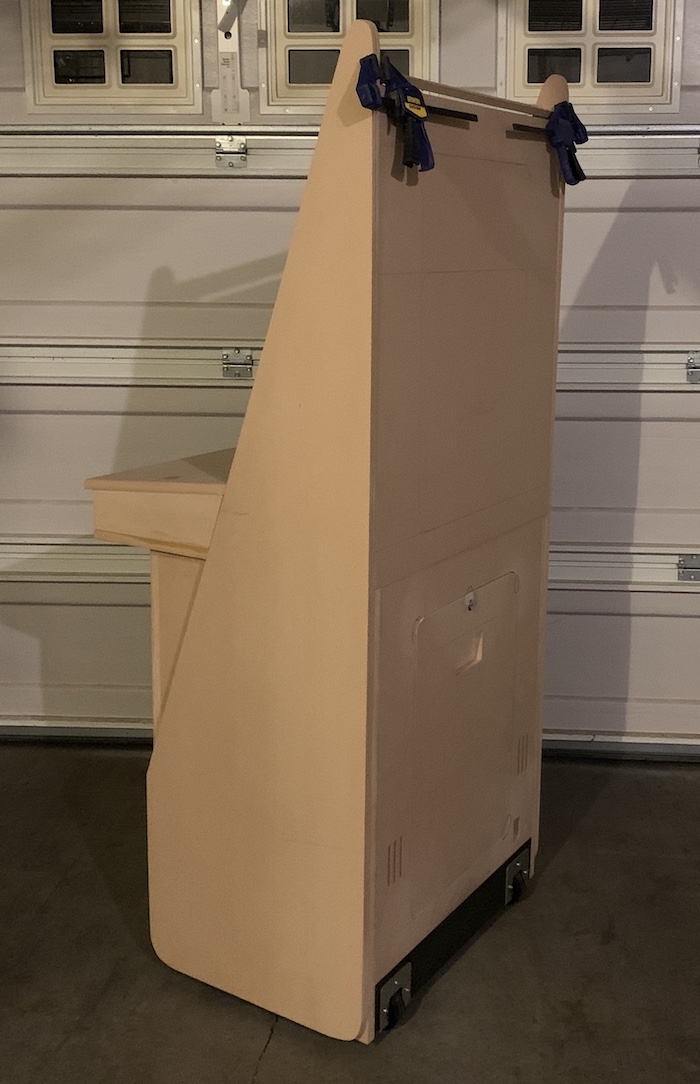
Closer


Late Night, Saturday Night


Sunday morning, tear it back apart to trim the rounded top off.


Got that done, cut another small access door in the upper part. Added some vents, and glued a strip up top to close the height gap.

Thought I was all done with the router, but looks like the fans I wanted to install don't have enough clearance. So I'm probably going to route out a spot for them tonight.

I also need to figure out how to get the front of the control panel attached. I had stupidly drilled into the 'end grain' when attaching the sides to the bottom of the control panel, and of course some splitting started to happen. I could try drilling bigger pilot holes, but I just don't trust it not to split. Problem is, there isn't much room on the inside of the control panel for support pieces to attach to. Maybe I'll just try making some dowels and gluing it together.

After that, it's figuring out the final arrangement on the control panel top. Drilling all them holes, and then move on to Bondo and sanding.

[Edit] Feel like I'm learning/re-learning a ton lately. If I ever make another cab, so many things I would do differently the next time around. But I'm sure there are other new/old mistakes I would still make. Such is life.
« Last Edit: August 19, 2019, 11:53:35 am by gingecko »

Arroyo

  • Trade Count: (0)
  • Full Member
  • ***
  • Offline Offline
  • Posts: 1558
  • Last login:April 17, 2024, 06:17:46 pm
  • Budgets are boring
    • newforum.arcadecontrols.com/index.php/topic,156267.0.html
Re: Xanitron - A Return
« Reply #54 on: August 19, 2019, 12:12:27 pm »
Damn man, it's really coming together.  That's an interesting shape, and I see now the Vigolix inspiration.  I don't think I commented on it before but those are some are some sweet doors and vents.  Keep it up!

gingecko

  • Trade Count: (0)
  • Full Member
  • ***
  • Offline Offline
  • Posts: 177
  • Last login:February 13, 2022, 04:11:37 pm
  • I'm working on it!
Re: Xanitron - A Return
« Reply #55 on: August 21, 2019, 03:47:43 pm »
Thanks Arroyo, it turned out much different than what I thought it would. But I think it will work in the long run.

Well, sometimes things go great, like the other night. Sometimes they just go south...

I started off thinking I would saw a metal rod that I had planned to use to extend the volume knob. Throw it in a vice. Hacksaw. Nope. Dremel cutting tool. Nope. Jigsaw with metal blade?! Nope. Crap.

Ok, what else can I work on instead? Cut the holes for the fans on the back panel....line up the fans and filter, get out the hole saws. 5", too big. 4", too small. Grumble, grumble. Order a 4.5" one online...not happening tonight.

What else? Cut hole for Vandal Switch. Should be easy enough...except the nut is stuck. About 15 minutes later, finally get that unscrewed. Drill a hole into the MDF with a forstner bit. All smooth and good, a little too small. Sand out just enough room to get the switch in there. Hmmm, need to route out space for the nut. Dremel that out. Screw it in. Looking good. Now...just take it out so I can paint someday. NOT coming out. Damned threads must be stripped or something, because it does not want to unscrew all the way. Can get a turn left/right but then it gets stuck hard. WD-40, no go. Frustration sets in, and out comes the chisel. Maybe I can break the switch to get it out. Durh, MDF gives way before metal does.


Instead of making any progress, I just added more gluing, Bondo, and sanding time. Sucks, but sometimes that's how it goes. Luckily, not all the time.

gingecko

  • Trade Count: (0)
  • Full Member
  • ***
  • Offline Offline
  • Posts: 177
  • Last login:February 13, 2022, 04:11:37 pm
  • I'm working on it!
Re: Xanitron - A Return
« Reply #56 on: August 23, 2019, 12:22:39 pm »
Not much time lately, but I managed to fix up the mistake from last time.


I'm not in love with the stuff, but Bondo sure has saved my butt a number of times.

The aluminum rod I ordered came in the mail, so it was time to tackle the volume knob again.


I don't know if that will the he final knob. They are just push fit though, and I have a variety of them. So no need to fret, when I can change it on the fly.

To get there, took a bit of work. One of these volume boxes, an extender piece, a rod to extend through the panel and finally the knob.


The aluminum rod was super easy to cut with the hacksaw. But it wasn't quite "6mm". I tried filing it down with a Dremel burr bit. Worked okay, but took a chunk of time. Then it turned out I underestimated the length of the rod, and had to cut another longer piece. This time I filed the rod down by sticking it in my drill, and holding some sandpaper around it. That worked pretty nicely.

I've tested the Volbox with my speakers, and I think that's going to work out really well as a volume control. I'll mainly just want to set the volume a little higher than I want, as it basically reduces the volume level.

I still need to figure out exactly how I will mount the Volbox inside. I was thinking of opening it up and drilling a screw/bolt through the bottom. The volume control sticks out at a slight angle from the box, so I'll have to take that into account either way. But it's nice to be mostly done with that part and have a decent solution for it.

The next big question has been how to attach the front control panel board, when there isn't enough room for a supporting bracket. I didn't want to risk screwing into the butt end of the wood again, and have it split on me.


I had thought "dowels" might be the answer. But I knew I'd probably screw up the alignment of the dowels. So, I ended up getting a Kreg Pocket Screw jig.

I opted to test first, and seems pretty dummy proof.


Jig set for 3/4" and clamped on.


Nice.

Even with just 1 screw in there, the boards were pretty firmly attached. So that looks like my solution for getting the last board attached to this bad boy. Had I known how simple the whole pocket hole thing could be, I might have done the whole cab that way. It's not entirely too late, so I might end up using it or at least putting a few pocket screws in spots to strengthen things.
« Last Edit: August 23, 2019, 12:27:02 pm by gingecko »

Vigo

  • the Scourage of Carpathia
  • Global Moderator
  • Trade Count: (+24)
  • Full Member
  • *****
  • Offline Offline
  • Posts: 6417
  • Last login:March 21, 2024, 08:20:28 am
Re: Xanitron - A Return
« Reply #57 on: August 23, 2019, 01:52:21 pm »
Nice fix! Really digging how this is looking as it is coming together!  :cheers:

gingecko

  • Trade Count: (0)
  • Full Member
  • ***
  • Offline Offline
  • Posts: 177
  • Last login:February 13, 2022, 04:11:37 pm
  • I'm working on it!
Re: Xanitron - A Return
« Reply #58 on: August 23, 2019, 02:39:25 pm »
Thanks Vigo! The original idea was to include the 'side attachments' you used. Mainly for decoration, but I also figured that I could attach the bottom and top of the control panel to the side support. Allowing me to have a wider control panel overall.


However, once I got the control panel situated, I realized that the cab would fit perfectly through the doorway without removing the control panel. So the side supports will get left out, which makes it look less like a Vigolix to me. My design just changed over time, and that's ok.

I'm fairly happy with it so far. I still need to "fix" the design part where the t-molding ends at the control panel, since the side supports won't be there. I'm thinking a line of paint, more than likely.

Vigo

  • the Scourage of Carpathia
  • Global Moderator
  • Trade Count: (+24)
  • Full Member
  • *****
  • Offline Offline
  • Posts: 6417
  • Last login:March 21, 2024, 08:20:28 am
Re: Xanitron - A Return
« Reply #59 on: August 23, 2019, 02:47:04 pm »
Makes sense! Sometimes the practical side of things takes hold, but in this case, it made it cool looking in a different way.

I also have to say you have a good eye for getting the proportions right on this. Details like the speaker panels just feel very right! I think this cab is going to turn out to be one of my favorite wide screen cabinets.  :cheers:

gingecko

  • Trade Count: (0)
  • Full Member
  • ***
  • Offline Offline
  • Posts: 177
  • Last login:February 13, 2022, 04:11:37 pm
  • I'm working on it!
Re: Xanitron - A Return
« Reply #60 on: September 09, 2019, 02:14:25 pm »
Vigo - Thanks again for the super kind words! Maybe some of the art classes I took rubbed off on me and helped with proportions. I seem to just intuit most of that stuff.

Well, it's been a spell. The wife's idea of a vacation is not "spend a week building an arcade cabinet", so not too much progress. She does keep the kids out of my hair when I get some garage time in though, so she deserves a lot credit in making this thing (eventually) happen.

We were on a cruise for a week, and when I heard they had an arcade, had to check it out. It was empty of people, and filled with super loud shooting games. Not really my style. They did have this one generic box, and I gave it a try. The menu seemed pretty intuitive, so it had that going for it. Ever try playing Robotron with a joystick in your left paw and buttons on the right though?!


Before I left for vacation, I had snapped this pic. Maybe a "last goodbye?". Maybe I was just happy to have to gotten the fans cut out:


Woodworking wise, I pretty much reached the end. I think some final adjustments to the monitor brace to get it to where I want and secure it.

I had been stressing about marquee/bezel retainers, like trying to arrange a puzzle in my head. But I think I got it sorted out, special thanks to Delusional for his idea of using corner protectors from Home Depot! That plus some dowels seems to work pretty well.


I don't think either of those are the final piece, but it gives a good idea on how the acrylic sheet will sit on top of the speaker panel. The corner protectors are clear, so I had to spray them with Black spray paint. Go for the nail on ones, if you get them, as the adhesive inside will muck with your paint. Yes, I found out the hard way. I ended up spraying them probably 2-3 times per piece, just to get a nice solid coat.

I also went pocket hole crazy this last weekend. I've been looking at all the support blocks I have inside the cabinet and trying to replace as many of those with pocket holes instead. I'll still have some of those support boards, but I think in the end, the inside will be a bit cleaner and maybe fewer boards to assemble/paint in the long run.


And lastly, speaking of paint....woodworking has come far enough along that I think I've pretty much finalized things. So I took a look at the boards I have and figured out which ones I could start with. Mainly boards that will be on the back. Theoretically, my painting will get better as I go, so I'll start with the least visible boards first. Unfortunately, the weather is crap this week, so painting progress might not be the greatest.


Just seeing some basic paint on the boards has been exciting to me though, as the mistakes start to get covered up and it doesn't look like some crappy hobbled together thing.

gingecko

  • Trade Count: (0)
  • Full Member
  • ***
  • Offline Offline
  • Posts: 177
  • Last login:February 13, 2022, 04:11:37 pm
  • I'm working on it!
Re: Xanitron - A Return
« Reply #61 on: September 30, 2019, 12:33:42 pm »


Yep, progress has felt a bit like that lately. (that little guy managed to crawl through our back door and I stumbled upon him after a late night painting session)

Feels like an eternity sinceI had the cab standing up like this:


This what I've been slogging through for quite some time. A coat a night, 3 coats primer on each side.


I was sanding down the primer in-between and getting it silky smooth. Then applied the first couple coats of black. Too glossy and the finish wasn't anywhere what I thought it would be. Panic set in. I had read that Sherwin Williams makes good paint, so I took down some pieces to show them what I'm lamenting about and they set me up with their "Emerald" line.

The first couple coats ended up looking like this:


More panic.

I tried to hold in there, and just keep sanding, applying more coats. After 4 coats, I'm getting  finish that looks something like this:


That's something I can live with at least. If weather holds out and I have the time, I might try to get 1-2 more coats on there. Possibly try out wet sanding at 600 grit. We're getting super close to the "all rain/all the time" season though, so will see. It's a race against time at this point.

Control panel - I was really nervous about cutting the final control panel top after all the work I've done. I had managed to get an angled cut on the back side and bevelled the front lip just right. I knew those were not going to happen again. So, I slowly and carefully cut out the button, joy, and spinner holes. Luckily, no mess ups. I had planned on routing out a small bit off the top to get the mounting plate flush, but I knew that I would end up screwing that up....so I opted to buy Ultimarc's trackball instead.

I like the looks of it and the trim piece is a nice touch. Since I'm using 3/4" mdf, I needed to route out a small section underneath so it would sit high enough on top. I opted to use my own threaded insert nuts. I found some that fit the screws that came with the trackball. Marked the spots where the bolts would go in and carefully inserted the nuts.


Things went pretty well, except only three of the bolts lined up. I could try to take out the nut, bondo, and place it again, but I have a feeling it will be fine with just 3 bolts.


Looks pretty slick once installed.


So where am I at now? Still painting. I applied the last coat of primer, so now it's just getting all the coats of paint on. Unfortunately, the SW Tricorn Black requires a lot of coats before it covers everything. I think I was sanding back way too much hoping to get a super smooth finish, but that doesn't seem to be working. So now I'm scuffing in-between coats. Either way, it's taking a good 4+ coats of paint to cover. The blue I bought from them, went on just fine, turned out smooth, and covered in just 2 coats. I thought I would be done painting last week, but I have at least another week. Looking forward to getting past this stage and getting things assembled again.

Arroyo

  • Trade Count: (0)
  • Full Member
  • ***
  • Offline Offline
  • Posts: 1558
  • Last login:April 17, 2024, 06:17:46 pm
  • Budgets are boring
    • newforum.arcadecontrols.com/index.php/topic,156267.0.html
Re: Xanitron - A Return
« Reply #62 on: September 30, 2019, 03:09:34 pm »
Nice work gingecko, that last paint job looks really good.  Keep slogging through it, it'll be worth it when you get that thing all back together again.
« Last Edit: September 30, 2019, 05:24:45 pm by Arroyo »

gingecko

  • Trade Count: (0)
  • Full Member
  • ***
  • Offline Offline
  • Posts: 177
  • Last login:February 13, 2022, 04:11:37 pm
  • I'm working on it!
Re: Xanitron - A Return
« Reply #63 on: September 30, 2019, 04:43:23 pm »
Thanks Arroyo. It's mainly baby steps right now. Each part is one more chip off the iceberg though!

gingecko

  • Trade Count: (0)
  • Full Member
  • ***
  • Offline Offline
  • Posts: 177
  • Last login:February 13, 2022, 04:11:37 pm
  • I'm working on it!
Re: Xanitron - A Return
« Reply #64 on: November 19, 2019, 06:47:32 pm »
Time for some updates. I've mainly been in the art stage, so I should start getting this thread caught up to date. I also started a blog in the meantime, as some of the people from my miniatures painting blog were interested in what I've been up to. Most of the content will be similar to what I post here, but I may go into other details over there. The blog has also been a great way to host images.

https://arcadedreams.home.blog

I got the outlet socket wired. Thanks to a visit from the brother-in-law. Super nice guy, who is always doing stuff for us when he visits. I know he has a degree in Engineering, so I sprung this on him, and he had us all wired up in no time. In exchange, he looks forward to playing some arcade games next time they come out, haha!


He even plugged it in and tested it out. Confident of his own work!

I finished up the speaker panel. Took a little fiddling to get things the way I wanted, but turned out decent enough. The plan was to have it removable so I could get access to internals from the front and also remove the acrylic as needed. Now I'd probably only do that as a last resort, because the paint will start to peel off.


There's a little spot where the paint got marred in the center, which is annoying to me. But I'm probably going to work up an instruction card to place on there anyways.

I also started adding some metal tape to help reflect light in prep for the marquee. That tape is kind of weird to work with. Sticks to itself very easily.


That is the upper back panel above. Something I would completely redesign if I did this again. Building the doors was a pain, and the upper door really only gives access to the lower portion of the monitor. Getting the back panel, marquee, and front glass together is a like a jigsaw. And yep, Mike had some sage advice about making the back panel like the original cabinets. I just wasn't sure what that meant or how. Now I knowwwwww.

And in other exciting news, painting was finished, t-molding applied, and I got the thing mostly reassembled in these pics.


Come along a way, but there is still more to go. Art and Wiring. With my cable management skills, I wouldn't count on that being "Wiring Art"!

Also, I have plans to tear it all apart when the weather gets nicer next year. There are a few spots where bare wood shows, and it has already got some scrapes from moving it out of the room. Which is bound to be worse, as we're planning on moving soon as well. So some touchup painting will be in order at some point.

Till next time!


« Last Edit: November 19, 2019, 11:15:02 pm by gingecko »

J_K_M_A_N

  • Trade Count: (0)
  • Full Member
  • ***
  • Offline Offline
  • Posts: 983
  • Last login:Today at 01:35:52 pm
Re: Xanitron - A Return
« Reply #65 on: November 19, 2019, 10:21:19 pm »
Nice paint job. It looks very nice. Cool setup too. I can't wait to see it "finished". (Are they ever really finished?)

J_K_M_A_N

gingecko

  • Trade Count: (0)
  • Full Member
  • ***
  • Offline Offline
  • Posts: 177
  • Last login:February 13, 2022, 04:11:37 pm
  • I'm working on it!
Re: Xanitron - A Return
« Reply #66 on: November 19, 2019, 11:24:16 pm »
Thanks J_K_M_A_N. Took a long time to get the paint there, and it's not even near close to some of the finishes I've seen around here. I think it will do though.

Yea, these can be big, seemingly never ending projects. I'm just glad I've made the progress I have. There were times while working on the project that I thought was just going to quit and leave the damned pieces in the garage. So I'm happy to see something like this, that has so far ended up way better than my first cabinet.

Arroyo

  • Trade Count: (0)
  • Full Member
  • ***
  • Offline Offline
  • Posts: 1558
  • Last login:April 17, 2024, 06:17:46 pm
  • Budgets are boring
    • newforum.arcadecontrols.com/index.php/topic,156267.0.html
Re: Xanitron - A Return
« Reply #67 on: November 20, 2019, 02:37:55 pm »
Nice job!  That paint job looks solid.  What a pain to take it all apart, paint and then put it all back together....not looking forward to that.  Looking forward to your progress.

gingecko

  • Trade Count: (0)
  • Full Member
  • ***
  • Offline Offline
  • Posts: 177
  • Last login:February 13, 2022, 04:11:37 pm
  • I'm working on it!
Re: Xanitron - A Return
« Reply #68 on: November 20, 2019, 05:50:48 pm »
Thanks Arroyo! Yea, it sounds pretty lame to have to take it apart to repaint....but it's not as bad as it sounds. (I say that now, we will see if I eat those words later)

One, it will just be touch up paint on a few panels, not the whole thing. Two, the way I designed the cab, it comes apart fairly easily. It has support blocks along the insides that just need to be unscrewed to remove panels. I don't want to do that too often, but for the occasional house move, it will come in handy. Had I thought more about it, I might have used insert nuts instead of screws. Guess I could still go that route.

Mike A

  • Trade Count: (0)
  • Full Member
  • ***
  • Offline Offline
  • Posts: 5885
  • Last login:Today at 12:53:10 pm
  • This plan is foolproof
Re: Xanitron - A Return
« Reply #69 on: November 20, 2019, 05:52:40 pm »
It looks good. :applaud:

opt2not

  • Trade Count: (+15)
  • Full Member
  • ***
  • Offline Offline
  • Posts: 6173
  • Last login:April 02, 2024, 07:42:30 pm
Re: Xanitron - A Return
« Reply #70 on: November 20, 2019, 06:12:42 pm »
Agreed, nice looking cabinet.  :cheers:

gingecko

  • Trade Count: (0)
  • Full Member
  • ***
  • Offline Offline
  • Posts: 177
  • Last login:February 13, 2022, 04:11:37 pm
  • I'm working on it!
Re: Xanitron - A Return
« Reply #71 on: November 20, 2019, 06:19:59 pm »
Thanks Mike and Opt2not! I know it's not what a lot of people would probably build, but I think it will fit the needs of our fam.

One thing I forgot, when I was looking back through my pics...


I've used the spray paint trick that Delusional does. Masking off the acrylic and spraying one side. It's really a nice way to create a bezel. My first attempt turned out beautifully....except the acrylic had been resting on top of the dowel holders when I marked off the monitor! After I finished painting it and put it back in the cab, I discovered that the 'window' was way too low! So I had to do the whole thing over again.

On the second try, the paint immediately started crackling (pic above). It was like watching ice crystals form. Had no idea what was happening, but was pretty bummed. Turns out there are a few different reasons, old paint, outside temp, foreign materials on surface, etc. I ended up sanding off the paint, cleaning the surface again, and giving it another go. Much lighter passes, and waiting a couple minutes before hitting it with another pass. Even with 3 coats per spraying session, it still took me about a good 4 days to get things completely opaque. Quite the pain. This time around, the paint had gotten a bit under the tape too. I have a feeling we won't really notice it. If I don't like it though, I might end up buying some pieces of opaque black plastic from TAP and using it to make a bezel underneath. Better than re-spraying the acrylic over and over, and hoping I get it right. Or maybe I'll be a pro after so many mistakes?!

Mike A

  • Trade Count: (0)
  • Full Member
  • ***
  • Offline Offline
  • Posts: 5885
  • Last login:Today at 12:53:10 pm
  • This plan is foolproof
Re: Xanitron - A Return
« Reply #72 on: November 20, 2019, 06:26:52 pm »
Quote
I know it's not what a lot of people would probably build, but I think it will fit the needs of our fam.

You are building what you want.

You take creative criticism.

You are building with care for what you are doing.

What more could anyone ask for?

javeryh

  • Trade Count: (+1)
  • Full Member
  • ***
  • Offline Offline
  • Posts: 7906
  • Last login:Today at 12:52:34 pm
Re: Xanitron - A Return
« Reply #73 on: November 21, 2019, 05:31:08 am »
Looks really nice.

For your bezel. You could buy some black matte board with a solid core and cut out the shape of the monitor.  It is only 1/16” thick and once it is sitting behind plexiglas, it will basically disappear.  Might be easier than trying to repaint.


Sent from my iPad using Tapatalk

gingecko

  • Trade Count: (0)
  • Full Member
  • ***
  • Offline Offline
  • Posts: 177
  • Last login:February 13, 2022, 04:11:37 pm
  • I'm working on it!
Re: Xanitron - A Return
« Reply #74 on: November 21, 2019, 10:02:08 am »
Thanks Mike, means a lot! :)

Thanks Javeryh, that was one other route I had thought about. Wasn't quite sure where to get matte board for a decent price. Maybe a Michaels craft store? I kind of like the idea of some thin plastic, as it would be more durable in the long run. Though likely way harder to cut than matte board.

I've already tested out the plexiglass with spray painted back, and although I can see some spots where it looks like it should be obscuring the monitor a little bit...I haven't seen it when I fired up a game. Though I probably was so excited about seeing Rampage on that big screen, that I forgot about it. I'll scrutinize it more closely at some point, then decide if I need to redo things or not. Hopefully it will be just fine.

The other thing I need to double check is light bleed. Even though I see quite a few gaps, I surprisingly haven't noticed any major light bleed yet. The plan is to use weathering tape to fix up any spots. It worked pretty good on my first cab.


gingecko

  • Trade Count: (0)
  • Full Member
  • ***
  • Offline Offline
  • Posts: 177
  • Last login:February 13, 2022, 04:11:37 pm
  • I'm working on it!
Re: Xanitron - A Return
« Reply #75 on: December 02, 2019, 01:45:20 pm »
I might have mentioned it before, but a small wrench in the works as we move houses. It did give me a chance to snap a few pics as I got the beast ready for the move.


Out the door and down the stairs you go!


After getting it in the new place, I mounted the PC and subwoofer inside with some shelf brackets. This will help as I get situated in its new spot in the house. I also snapped a couple pics of the 'screen tape' I used to cover the vent holes. Kinda like how that worked out.


J_K_M_A_N

  • Trade Count: (0)
  • Full Member
  • ***
  • Offline Offline
  • Posts: 983
  • Last login:Today at 01:35:52 pm
Re: Xanitron - A Return
« Reply #76 on: December 02, 2019, 03:02:44 pm »
That looks VERY nice. I like the screen on the vent holes. Good thinking. And the magnets for holding the back door on. Great job all around.

J_K_M_A_N

stigzler

  • Trade Count: (0)
  • Full Member
  • ***
  • Offline Offline
  • Posts: 977
  • Last login:February 11, 2022, 03:01:48 pm
  • It seemed like a good idea at the time....
    • Mago Arcade
Re: Xanitron - A Return
« Reply #77 on: December 02, 2019, 03:24:08 pm »
Wow. That's tidy.

Arroyo

  • Trade Count: (0)
  • Full Member
  • ***
  • Offline Offline
  • Posts: 1558
  • Last login:April 17, 2024, 06:17:46 pm
  • Budgets are boring
    • newforum.arcadecontrols.com/index.php/topic,156267.0.html
Re: Xanitron - A Return
« Reply #78 on: December 03, 2019, 09:09:23 am »
How good did it feel to put that control panel on?  Looks great gingko, must feel really good to have put that together.  I see some images on the marquee, are you doing an art package?

Edit: Whoops, sorry gingecko

Arollpolly out! :laugh2:  Where do we come up with these ridiculous screen names eh?
« Last Edit: December 03, 2019, 11:32:00 am by Arroyo »

gingecko

  • Trade Count: (0)
  • Full Member
  • ***
  • Offline Offline
  • Posts: 177
  • Last login:February 13, 2022, 04:11:37 pm
  • I'm working on it!
Re: Xanitron - A Return
« Reply #79 on: December 03, 2019, 11:16:25 am »
Thanks all!

J-K_M_A_N, I found the screen tape (like almost everything) on Amazon: https://www.amazon.com/gp/product/B0738M9P7S/
Figured it might cut down on the dust a tad. Maybe keep the spiders out. The magnets turned out not to be necessary as the door is too tight a fit after painting.

Arollpolly - That's "Gin-Gecko"! C'mon, man! Haha! The Control Panel has been off and on for awhile now, and I can't recall the first time it got attached....but I do remember finally getting the angle cut and having it line up perfectly. Especially since I knew I could never get that right again! Sharp eye, yep, that was one of the test prints of my marquee art. I got the marquee and control panel art done, working on the sides now. The next post I make will probably center around  art.

Mike A

  • Trade Count: (0)
  • Full Member
  • ***
  • Offline Offline
  • Posts: 5885
  • Last login:Today at 12:53:10 pm
  • This plan is foolproof
Re: Xanitron - A Return
« Reply #80 on: December 03, 2019, 11:19:42 am »
Nice paint job Geico. Well done.

gingecko

  • Trade Count: (0)
  • Full Member
  • ***
  • Offline Offline
  • Posts: 177
  • Last login:February 13, 2022, 04:11:37 pm
  • I'm working on it!
Re: Xanitron - A Return
« Reply #81 on: December 03, 2019, 01:27:04 pm »
Thanks Mickey B! Yeesh!

It's funny, the last few photos really highlighted the warts to me. Once we get settled after the move, I will be pushing on regardless. Always time to fix up the little things later.

Motto of the Day: Don't get too hung up on it, have some fun!

Mike A

  • Trade Count: (0)
  • Full Member
  • ***
  • Offline Offline
  • Posts: 5885
  • Last login:Today at 12:53:10 pm
  • This plan is foolproof
Re: Xanitron - A Return
« Reply #82 on: January 29, 2020, 07:21:02 am »
So how is the cab coming along?

Mike A

  • Trade Count: (0)
  • Full Member
  • ***
  • Offline Offline
  • Posts: 5885
  • Last login:Today at 12:53:10 pm
  • This plan is foolproof
Re: Xanitron - A Return
« Reply #83 on: February 07, 2020, 10:16:42 am »
.

Sent from my Pixel 3 using Tapatalk