Main Restorations Software Audio/Jukebox/MP3 Everything Else Buy/Sell/Trade
Project Announcements Monitor/Video GroovyMAME Merit/JVL Touchscreen Meet Up Retail Vendors
Driving & Racing Woodworking Software Support Forums Consoles Project Arcade Reviews
Automated Projects Artwork Frontend Support Forums Pinball Forum Discussion Old Boards
Raspberry Pi & Dev Board controls.dat Linux Miscellaneous Arcade Wiki Discussion Old Archives
Lightguns Arcade1Up Try the site in https mode Site News

Unread posts | New Replies | Recent posts | Rules | Chatroom | Wiki | File Repository | RSS | Submit news


Author Topic: Jon's Raspberry Pi Bartop build  (Read 14965 times)

0 Members and 1 Guest are viewing this topic.

jkolton

  • Trade Count: (0)
  • Jr. Member
  • **
  • Offline Offline
  • Posts: 6
  • Last login:January 01, 2018, 11:19:45 am
  • I want to build my own arcade controls!
    • Jon Kolton Design
Jon's Raspberry Pi Bartop build
« on: June 09, 2016, 12:20:57 pm »
Hey guys! This is my first build. I went through a lot of plans trying to find the right design to work with, and settled on the set provided by floriski.nl in his evo XR cade build here: Floriske.nl's "evo XR cade" xbox bartop I know the size is a bit overkill for a raspberry pi build, but I love the distinctly 70's / 80's vibe it has, and I wanted to be able to utilize a sizable screen without problems.

I'm an art director and graphic designer by trade, so I'll be handling all the design and printing of the graphics for the cabinet. It's not 100% finalized, but before I go into the parts and pieces, here is a mockup of what I'm planning for the cab to look like:


I settled on the name retrocade before I knew about it's other uses, but I still like the ring of it.

The cabinet itself will be built from .75" MDF, with the outer sections sleeved in 4 color printed Floor Vinyl for durability. I'll be receiving my buttons and joysticks tonight and will post more about those and the rest of the parts when they arrive.

taxidriver6

  • Trade Count: (0)
  • Full Member
  • ***
  • Offline Offline
  • Posts: 22
  • Last login:January 02, 2024, 02:46:44 pm
  • I want to build my own arcade controls!
Re: Jon's Raspberry Pi Bartop build
« Reply #1 on: June 09, 2016, 07:43:05 pm »
Love the art!

yotsuya

  • Trade Count: (+21)
  • Full Member
  • ***
  • Offline Offline
  • Posts: 19955
  • Last login:Today at 12:03:57 am
  • 2014 UCA Winner, 2014, 2015, 2016 ZapCon Winner
    • forum.arcadecontrols.com/index.php/topic,137636.msg1420628.html
Re: Jon's Raspberry Pi Bartop build
« Reply #2 on: June 09, 2016, 08:12:30 pm »
It reminds me of the alien on the side of a Galaga cab. It all kind of fits. Kudos.

Sent from my SM-G386T using Tapatalk

***Build what you dig, bro. Build what you dig.***

GSXRMovistar

  • Trade Count: (0)
  • Full Member
  • ***
  • Offline Offline
  • Posts: 436
  • Last login:November 02, 2023, 07:10:28 pm
  • Gez, this is gonna be expensive!
    • forum.arcadecontrols.com/index.php/topic,148135.0.html
    • CoffeeCade
Re: Jon's Raspberry Pi Bartop build
« Reply #3 on: June 10, 2016, 04:51:51 am »
Love that artwork, very slick.  8)

menace

  • Trade Count: (+5)
  • Full Member
  • ***
  • Offline Offline
  • Posts: 2564
  • Last login:September 18, 2023, 10:57:06 am
Re: Jon's Raspberry Pi Bartop build
« Reply #4 on: June 10, 2016, 07:14:08 am »
Funky art--I like it--the 3/4" MDF will make it pretty heavy though--no problem if it has a permanent home but if its meant to be moved around it'll be a bugger..
its better to not post and be thought a fool, then to whip out your keyboard and remove all doubt...

jkolton

  • Trade Count: (0)
  • Jr. Member
  • **
  • Offline Offline
  • Posts: 6
  • Last login:January 01, 2018, 11:19:45 am
  • I want to build my own arcade controls!
    • Jon Kolton Design
Re: Jon's Raspberry Pi Bartop build
« Reply #5 on: June 10, 2016, 12:30:44 pm »
Thanks guys! Buttons and the backlit print for the Marquee arrived last night. Once I've gotten a chance to unpack everything I'll do a post with the parts I've acquired so far.

In the mean time, here's one piece that I've finished so far - the coin credit buttons. I saw something similar on another site, but wanted to make the graphic more realistic, so I bought the blank red buttons and had my artwork printed on a transparency. I think it came out pretty good. They look great lit up.


On the topic of buttons, let me ask this completely noob question. I'd like to be able to play games from C64 all the way up to N64 on this cabinet. How many buttons do I need total for retropie? I have these two coin buttons, 16 28mm buttons, 5 16mm momentary switches and 1 19mm momentary LED power switch at my disposal. You can sort of see the layout I'm playing with in the mockup, but do I need more buttons than that? Fewer? I'd like to label them by etching the acrylic overlay I think, and I'm going to CNC the parts next week, so I need to button (no pun intended) the details down. From what I understand, I need the following:

12 Play buttons
1 Power
4 Control - Start, Select, Menu, Exit?
2 - Player 1, Player 2
2 - Coin buttons (which is more an esthetic thing?)

Am I missing anything? Is this overkill?

Frank Drebin

  • Trade Count: (0)
  • Full Member
  • ***
  • Offline Offline
  • Posts: 263
  • Last login:January 11, 2022, 04:27:19 pm
  • I want to build my own arcade controls!
Re: Jon's Raspberry Pi Bartop build
« Reply #6 on: June 10, 2016, 01:16:24 pm »
Love that art!

Charlie97L

  • Trade Count: (0)
  • Full Member
  • ***
  • Offline Offline
  • Posts: 153
  • Last login:July 03, 2017, 03:35:56 pm
Re: Jon's Raspberry Pi Bartop build
« Reply #7 on: June 10, 2016, 08:14:08 pm »
I went with 7 with pretty much the same game range... That should cover you for most things I think?

(aside from the c-stick on the N64, which... is an issue).

leapinlew

  • Some questionable things going on in this room with cheetos
  • Trade Count: (+4)
  • Full Member
  • ***
  • Offline Offline
  • Posts: 7906
  • Last login:April 17, 2024, 07:51:43 pm
Re: Jon's Raspberry Pi Bartop build
« Reply #8 on: June 10, 2016, 09:11:03 pm »
Beautiful bartop! Is that color t-molding available?

The width going to be in the 24" range? I built a 24" bartop similar to this and I'd suggest you might should just make it full size because unless you already have somewhere to put it in mind, you'll end up putting it on a table or something.

« Last Edit: June 13, 2016, 10:19:38 pm by leapinlew »

yotsuya

  • Trade Count: (+21)
  • Full Member
  • ***
  • Offline Offline
  • Posts: 19955
  • Last login:Today at 12:03:57 am
  • 2014 UCA Winner, 2014, 2015, 2016 ZapCon Winner
    • forum.arcadecontrols.com/index.php/topic,137636.msg1420628.html
Re: Jon's Raspberry Pi Bartop build
« Reply #9 on: June 10, 2016, 09:17:22 pm »
Kudos to you for going with a 4:3 monitor. I picked up a working one yesterday for $8. They can be found.

Sent from my SM-G386T using Tapatalk

***Build what you dig, bro. Build what you dig.***

emphatic

  • Trade Count: (0)
  • Full Member
  • ***
  • Offline Offline
  • Posts: 2009
  • Last login:Yesterday at 02:38:52 pm
  • -"Suck it, Donny!" -"No, YOU suck it.... more".
    • Emphatic's Video Game Collection
Re: Jon's Raspberry Pi Bartop build
« Reply #10 on: June 11, 2016, 07:45:54 pm »
Concept art looks great!  :cheers:

jkolton

  • Trade Count: (0)
  • Jr. Member
  • **
  • Offline Offline
  • Posts: 6
  • Last login:January 01, 2018, 11:19:45 am
  • I want to build my own arcade controls!
    • Jon Kolton Design
Re: Jon's Raspberry Pi Bartop build
« Reply #11 on: June 13, 2016, 12:41:30 pm »
Leapinlew: The width is 504mm, so close to 21.25 inches. Not quite two feet, but it will be stationary, so I'm not too worried about the weight.

I haven't had too much time to work on it the past few days, and there's not much left to do without the pieces I'm CNC'ing, so here's just a quick update to the control panel artwork.


The left and right chrome 16mm buttons will be start and select for both players. I haven't settled on a use for the red buttons on top, but the white buttons will be player one, player two.

MrThunderwing

  • Trade Count: (0)
  • Full Member
  • ***
  • Offline Offline
  • Posts: 1054
  • Last login:April 17, 2024, 05:31:43 pm
  • As I pass, do I give you the ass or the crotch?
Re: Jon's Raspberry Pi Bartop build
« Reply #12 on: June 13, 2016, 02:58:16 pm »
The concept art looks very impressive. I love the coin credit buttons.

jkolton

  • Trade Count: (0)
  • Jr. Member
  • **
  • Offline Offline
  • Posts: 6
  • Last login:January 01, 2018, 11:19:45 am
  • I want to build my own arcade controls!
    • Jon Kolton Design
Re: Jon's Raspberry Pi Bartop build
« Reply #13 on: February 04, 2017, 12:47:56 am »
Hey, I know, lets necro my own thread! I can't believe it's been so long since I started this post, but A LOT has happened since then. New job, new house, new city. But best of all, now I have a 2000 sqft basement to cram full of tools to build stuff. Obviously, the first priority was finishing this bartop.

The design of the control panel has changed slightly, but we're pretty much right on track with the original mockup. I'll post my progress photos, starting from the end of June right after my last post, and try and quickly get everyone back up to speed with where I'm at now (almost done!)

So my first job after the concept, was to choose the components. I knew this was going to run on a raspberry pi 3. The hard part was finding the perfect monitor. Obviously no one (or nearly no one) makes 4:3 monitors any longer, but I wanted that size for the old school feel. I trolled ebay for a few weeks and finally settled on the HP LP2065. It's a  20" TFT Panel LCD Monitor. 1600 x 1200 resolution and a pretty good contrast ratio.


It was $70 and fit perfectly in to the design I had already settled on. It broke down pretty easy. Here it is set up on a table top easel for testing.

Right about the time of that photo, I was finding out how much it would cost to have the pieces CNC'd. After I recovered from the quote, I decided to expand my knowledge of woodworking instead. I ran to home depot and picked up a single sheet of .75" MDF and had them cut the pieces to their rough sizes.

I had a bunch of freelance projects using 3 & 6mm PVC, so I capitalized on that to have some templates routed out for the sides of the machine, and the monitor bezel.


I clamped the template to the MDF, traced them out and used a jig saw to rough cut the shape of each. I reclamped the template to the mdf and used a router with a template cutting bit to make the identical sides. I also used the router to roundover the two marquee pieces.


The part that I wasn't confident I could produce was the control panel. This I decided was worth having laser cut, so I finalized my design and sent them off to Ponoko. Which is awesome. I had 2 pieces of .25" mdf laser cut for the control panel itself, and 1 piece of 3mm or so scuff resistant plexiglass. I also used the router to roundover the bottom of the CP and put a bevel on the edge of the plexi.


Next I attached some 1x2's to make assembling the everything reasonably fool proof. It worked pretty well, though I don't have a photo of the finished product.


Once that was assembled, I did the next most exciting part. The marquee lighting. It was pretty easy. I got an 8' strip of LED lights with a power supply and adhered them to the marquee backer which was one of the pieces I had routed out of the PVC. I surrounded the interior edges with aluminum tape to maximize the light output.


With the plexi I had cut for the CP, I also had a back and front cut for the marquee. I also printed the marquee design on backlit film. This is where the project finally started to feel official!


This is also where the project sat for several months. The next day I was laid off. BUT! The joke was on them, because earlier that week I had interviewed for a much better job, and had found out that same day that I got it. They were super confused by how unfazed by the whole thing I was.

But anyway, thats not why you're here. You're here to see some sweet, sweet bartop action. There's been quite a bit of progress since then, but this post is already way too long, so I'll post the balance tomorrow and get everything up to date. I'm super psyched to have come this far. Stay tuned for more!

Titchgamer

  • Trade Count: (0)
  • Full Member
  • ***
  • Offline Offline
  • Posts: 4222
  • Last login:December 17, 2023, 08:05:48 am
  • I have a gaming addiction.....
Re: Jon's Raspberry Pi Bartop build
« Reply #14 on: February 04, 2017, 04:29:02 am »
Looking good dude, I like the CP and the artwork :)

Mike A

  • Trade Count: (0)
  • Full Member
  • ***
  • Offline Offline
  • Posts: 5885
  • Last login:Yesterday at 08:20:44 pm
  • This plan is foolproof
Re: Jon's Raspberry Pi Bartop build
« Reply #15 on: February 04, 2017, 01:08:59 pm »
I can tell you are a graphic designer. Everything flows together in a coherent concept. It just looks "right". I like it.

jkolton

  • Trade Count: (0)
  • Jr. Member
  • **
  • Offline Offline
  • Posts: 6
  • Last login:January 01, 2018, 11:19:45 am
  • I want to build my own arcade controls!
    • Jon Kolton Design
Re: Jon's Raspberry Pi Bartop build
« Reply #16 on: February 04, 2017, 10:15:35 pm »
Thanks guys! This next set of photos picks up about a month ago.

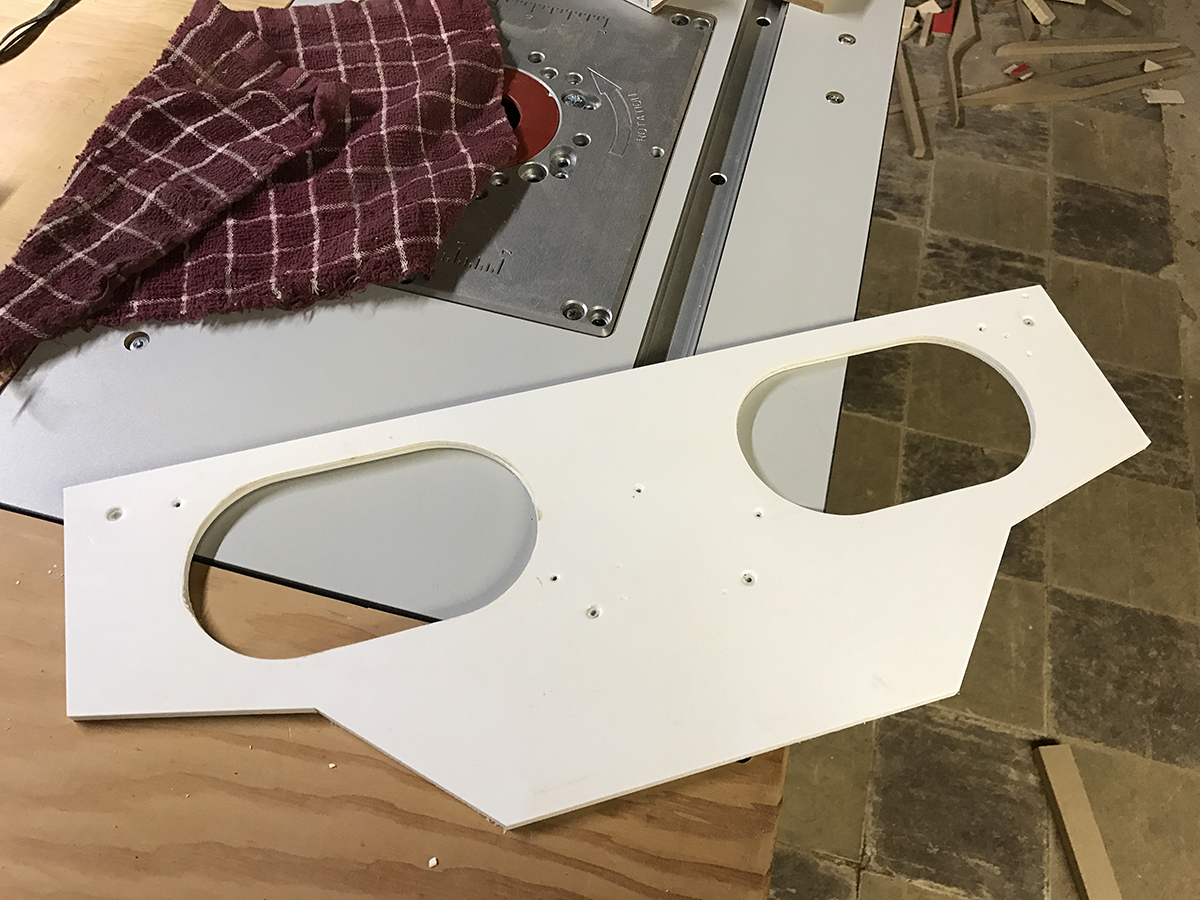
The first order of business was cutting my speaker holes. I used this template to rout the holes out of my top piece of mdf:


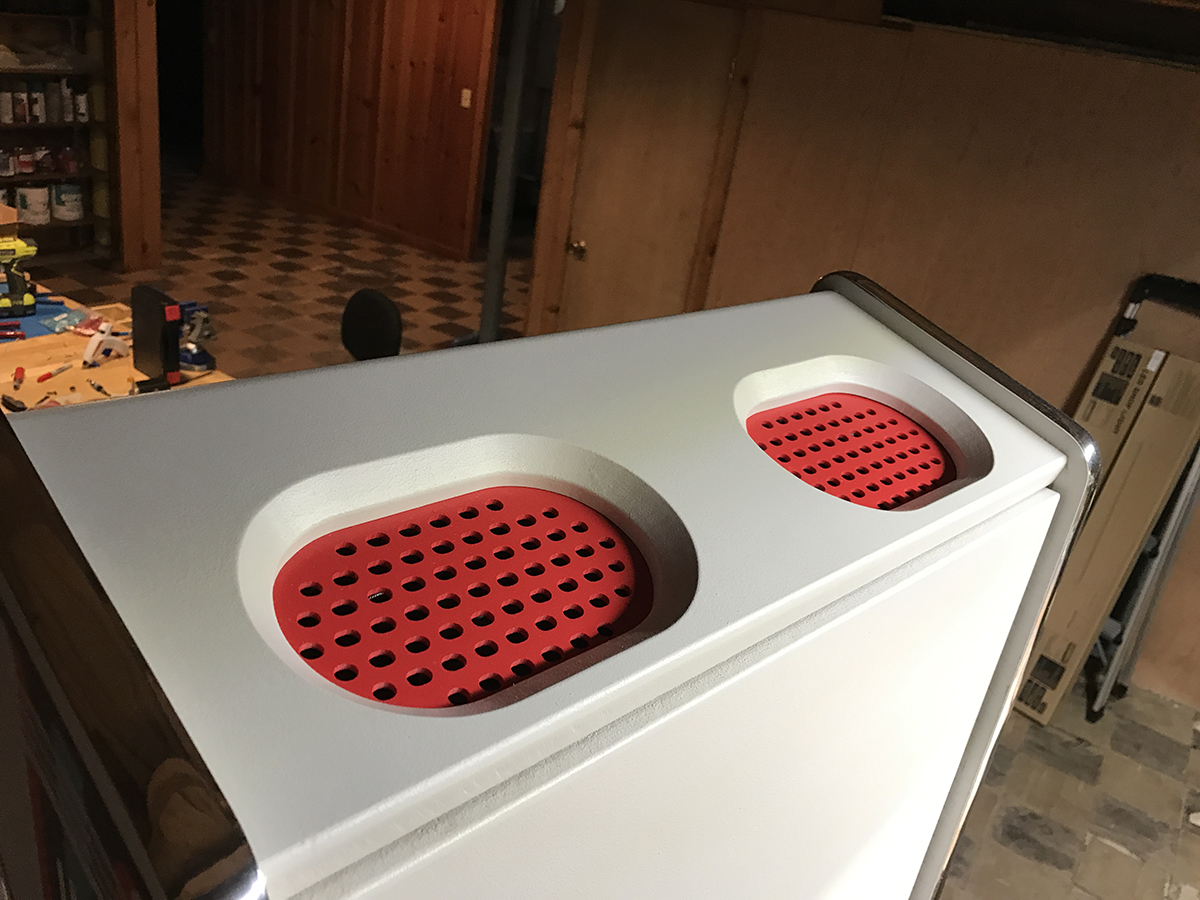
And then I used a bevel bit to give the holes some shape. Here you can see the finished product with the grills I had routed out of PVC.


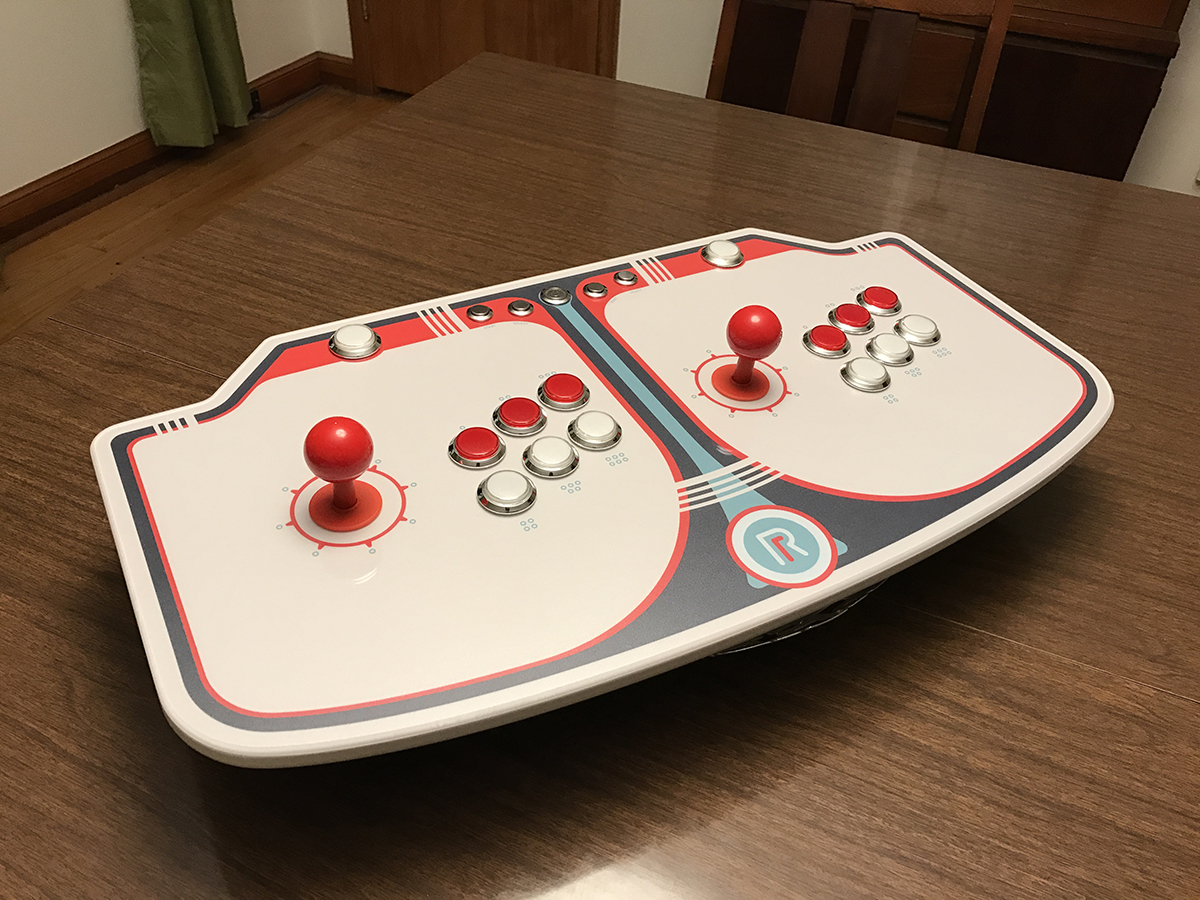
I put the final details on the artwork. Specifically the control panel, and landed on a final button count.


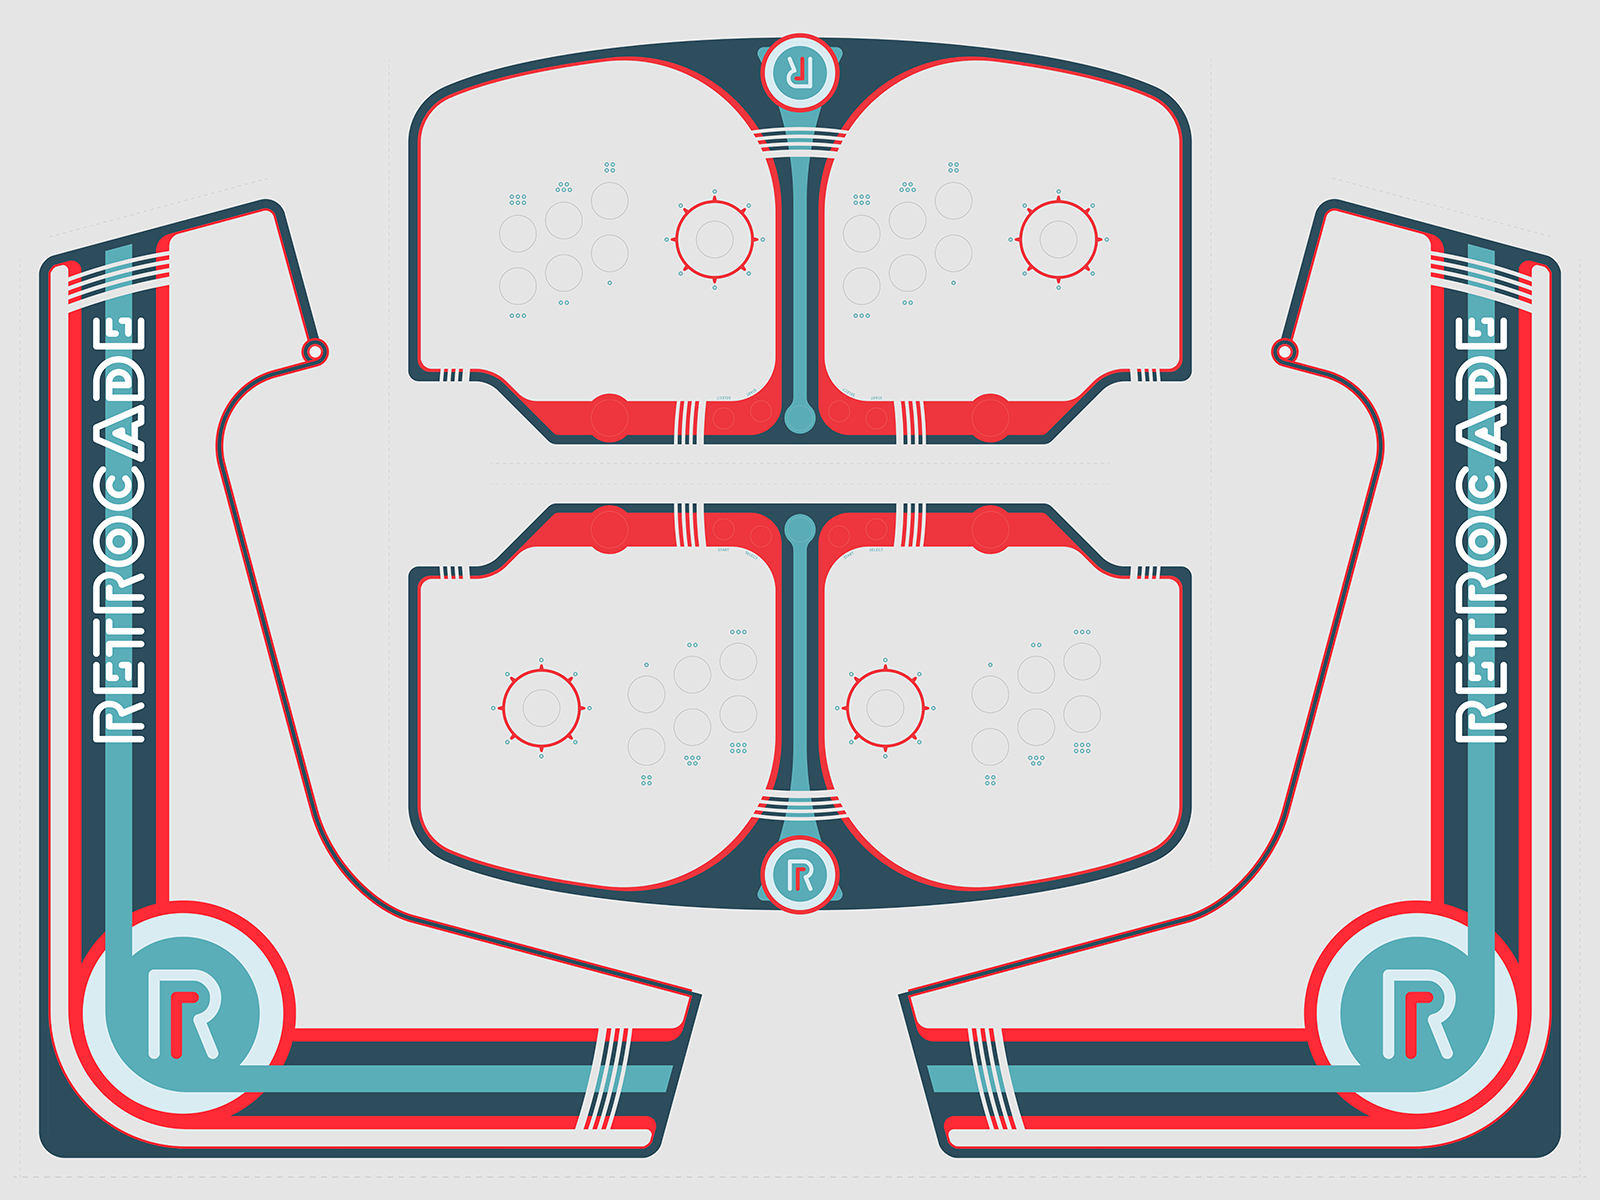
6 player buttons plus a start and select each and a 1 and 2 player button I'll also have the coin buttons, but I figure I can wire them in to the same spot as the 1 and 2 player buttons.

Other than the control panel, the thing I was most worried about was being able to apply the graphics to the cabinet without bubbles, etc. Because of this, I decided to give a material called footprints a shot. It's essentially an adhesive vinyl with a tough as nails clear laminate on top. This does two things. It makes it really easy to line up because it's semi-rigid, and makes the print nearly indestructible because you'd have to scuff through the laminate to ever even touch the artwork.

Application was pretty easy. I used a circle cutter to remove the button holes, and then lined that up with the control panel. Once it was adhered, I started by trying to cut the excess off with an exacto knife, but I couldn't get close enough. Then I had a brain wave. The material is essentially just very thin PVC. So I got out a sanding block and a file, and I filed the edges at a 45 degree angle to the edge of the MDF. After a few passes, this had the effect of cutting off the graphics to the exact size of the piece. I really couldn't be happier with how it turned out.


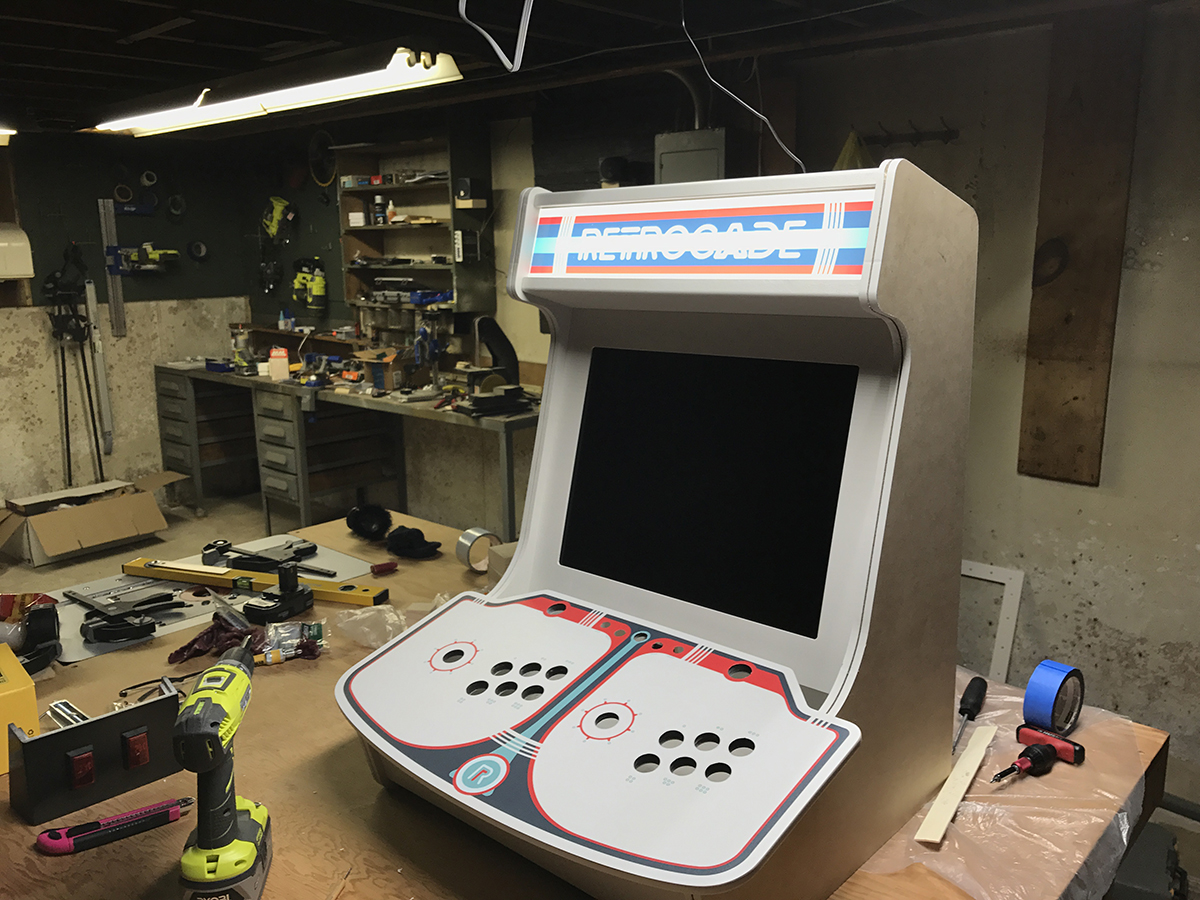
You can also see in that image that I've mounted the monitor, and fit the bezel I had routed out of 3mm pvc. Everything has also been painted a very light grey color to match the background of the CP and side graphics.

Rinse and repeat for the sides:


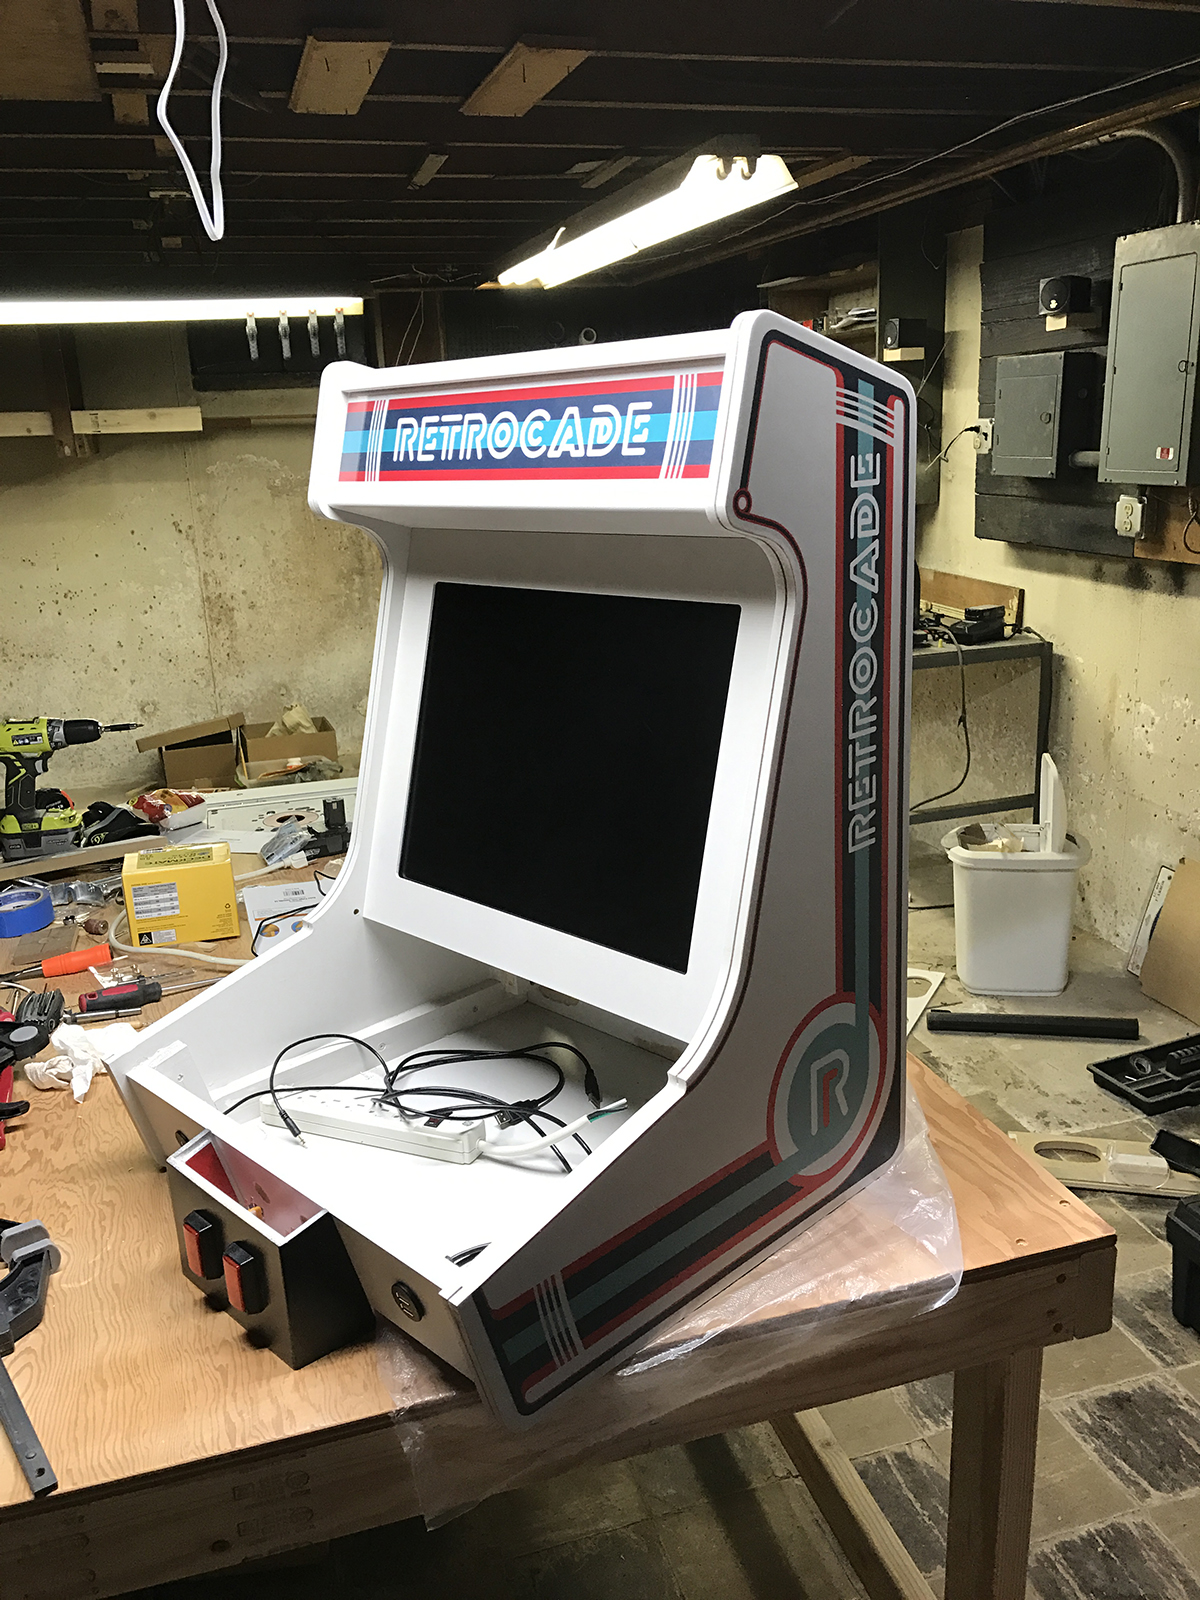
You can also see in that shot that I've added a 2 port automotive USB extension to the right of the coin buttons and a headphone jack to the left. The headphone jack poses a slight problem, which I think I've solved, but more on that later.

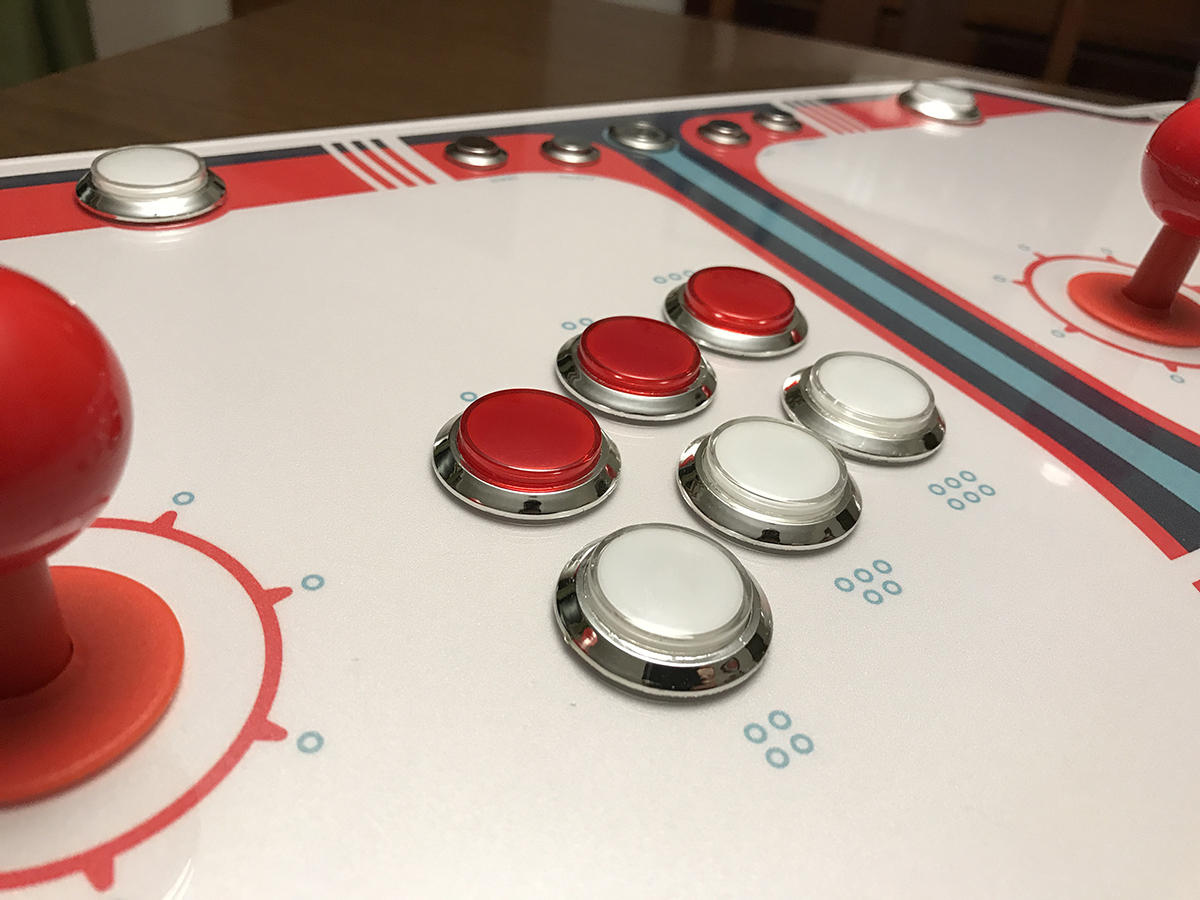
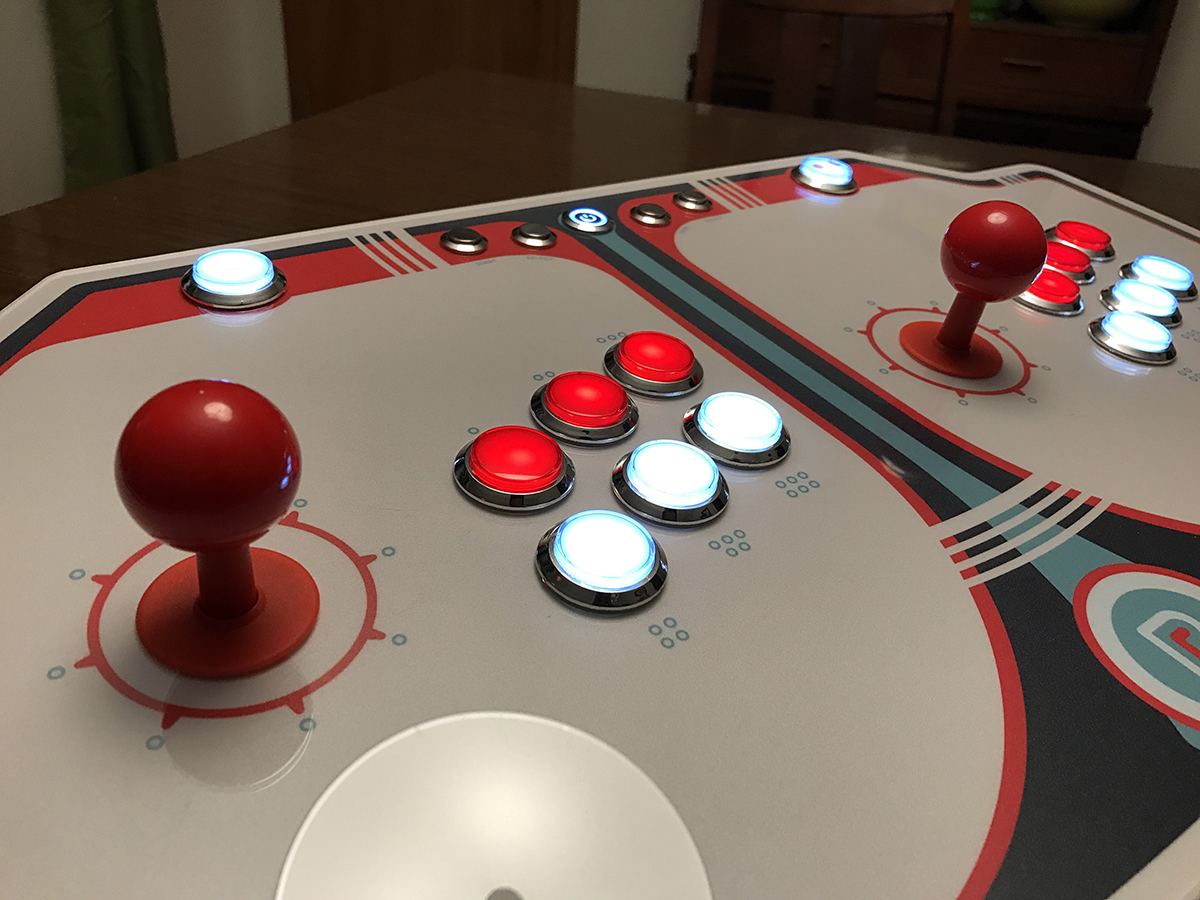
After that was finished, I couldn't wait to get the control panel put together. I've spent a lot of late nights locked in my basement, feverishly working on this project, but wiring the CP was pleasant because I could do it hanging out on the couch, watching TV. These buttons were purchased off ebay as a 2 player bundle. They came with the CY-822B control boards which used mostly 3 pin wires to power both the LED and the button. The wires are currently a bit of a mess, so I'm only going to show you the finished top!


And powered:


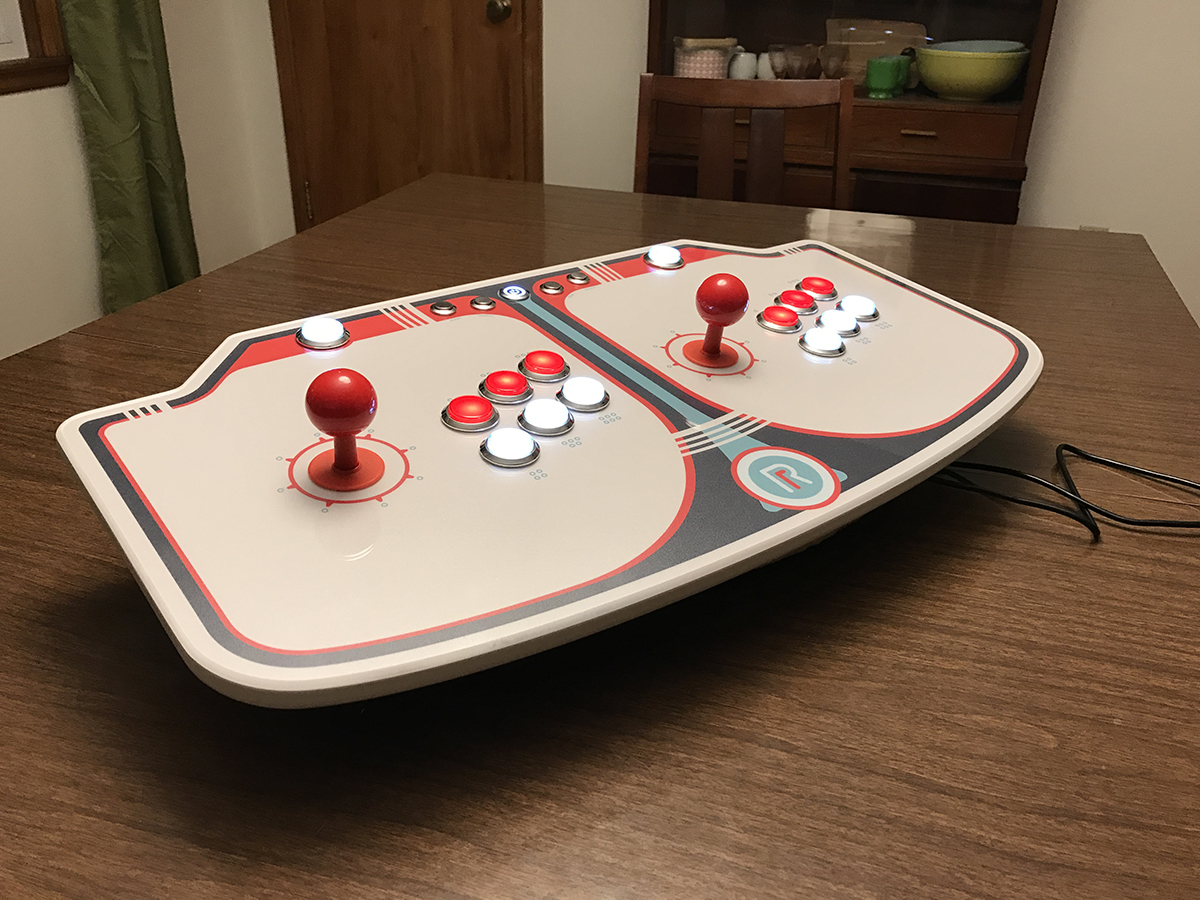
Next: T-Molding. My original plan was to get the semi-translucent kind and paint the edge of the MDF the same blue-green color as some of the details in the artwork. I even went to Lowes and had it color matched. But upon further reflection, I decided to go with chrome to match the buttons. This was another one of the parts I was worried about, but it went on like a charm. 15 minutes, and a bunch of hammering later, here we are:


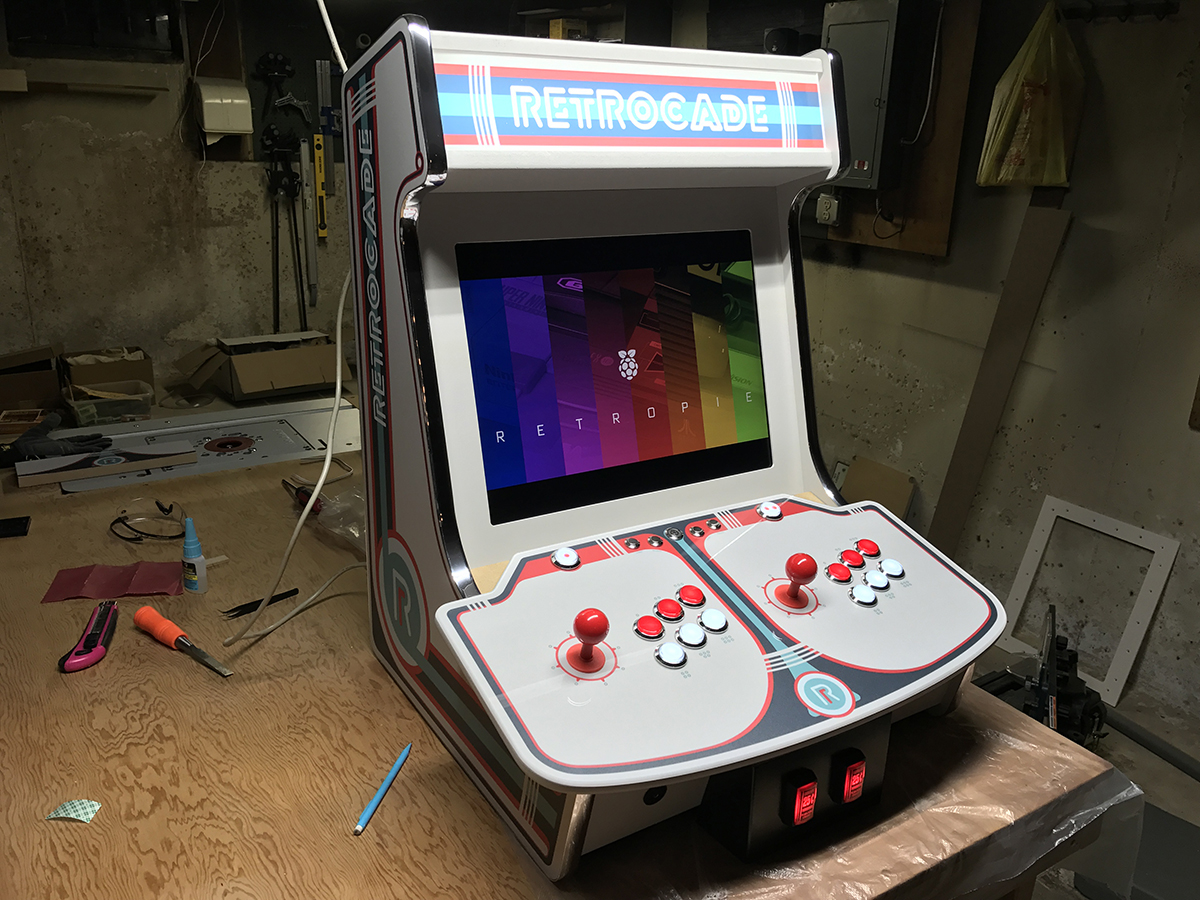
In this state, she's totally playable and just about ready to go. You can see my updated 1 and 2 player buttons there. In the previous shots, the red circles were transparency film. It just didn't look good. The ink density was too low, and too much light shone through washing out the color. To correct this, I took the red inner light diffuser from 3 extra red buttons I had and used a punch in my drill press to remove perfect little disks from them. To mount them into the white diffusers, I squared off a drill bit of the same size on my belt sander, and ground two flat bottomed holes. After a whole bunch of sanding, the red circles are perfectly inlaid, retain their bright red color when lit, and look pretty great.

So I spent the next week or so, fooling around with the software, trying to get the buttons set up correctly for the games I wanted to play. I'm not sure if it's the cheapo control boards, or if I'm not setting up retro pie correctly, but I'm having a really hard time getting them to work in the way I'd expect. I've ordered an I-pac 2, and I'm going to re-wire the CP using that.

Does anyone have any experience with using an i-pac with retropie? I'm sure I could use some pointers.

I'm also not sure how I'm going to go about powering the buttons LED's. My current thought is to bypass the old control boards and have them load directly to a USB hub. Again, if anyone has any suggestions, I'd really appreciate it.

I've got a few more pieces to get together, and then we're pretty close to completion. One major piece which I should have done tonight, and a few minor things I'll take care of tomorrow hopefully. Hope I'm not boring everyone with these long winded posts. Stay tuned!
« Last Edit: February 04, 2017, 10:23:39 pm by jkolton »

Mike A

  • Trade Count: (0)
  • Full Member
  • ***
  • Offline Offline
  • Posts: 5885
  • Last login:Yesterday at 08:20:44 pm
  • This plan is foolproof
Re: Jon's Raspberry Pi Bartop build
« Reply #17 on: February 04, 2017, 10:31:32 pm »
That came together beautifully.

wp34

  • Trade Count: (+3)
  • Full Member
  • ***
  • Offline Offline
  • Posts: 4794
  • Last login:April 10, 2022, 09:48:19 pm
Re: Jon's Raspberry Pi Bartop build
« Reply #18 on: February 05, 2017, 12:00:28 am »
There is a lot to like here. But those speaker grills...Wow!

leapinlew

  • Some questionable things going on in this room with cheetos
  • Trade Count: (+4)
  • Full Member
  • ***
  • Offline Offline
  • Posts: 7906
  • Last login:April 17, 2024, 07:51:43 pm
Re: Jon's Raspberry Pi Bartop build
« Reply #19 on: February 05, 2017, 04:15:41 pm »
Loving it. My favorite thing is the bump out you did for the quarter buttons. That really gives it a authentic look. I'm curious what your thoughts are on those buttons. I tried to use them for my last build, and I couldn't stand them. The build quality was bad and I realized how much I prefer concave buttons.

I notice on your artwork you avoided any shadows anywhere. I'm always terribly out of date with my style, so I'm curious, is no shadow a recent trend? It gives it a flatter look, that I'm not sure what I think about just yet.

jkolton

  • Trade Count: (0)
  • Jr. Member
  • **
  • Offline Offline
  • Posts: 6
  • Last login:January 01, 2018, 11:19:45 am
  • I want to build my own arcade controls!
    • Jon Kolton Design
Re: Jon's Raspberry Pi Bartop build
« Reply #20 on: February 05, 2017, 11:20:39 pm »
Thanks guys! I'm really psyched with how the grills ended up as well.

leapinlew: The buttons are... ok. I actually replaced the microswitches that they came with with a set of GroovyGameGear.com's Standard Soft-Touch microswitches. The original switches were FAR too hard to push, and SUPER loud. I kept the original switches in the 1 and 2 player buttons and in the coin slot buttons though. I'll confess to not having played an actual arcade game in forever, so the difference between the convex and concave doesn't bother me. Though I suspect the concave ones would be a bit more comfortable.

As far as the art, it's really all down to personal preference. I've always been a fan of clean crisp design, and in the wider world, it seems like that's what is beginning to trend again. I enjoy the simplicity, and retro-ness of it. But that being said, if drop shadows are what works for your project, go for it! Don't feel you have to force yourself to emulate anything else.

And that brings me to this latest update. Got a lot of work done last night and this morning.

I was all set to be done, and realized that the place the bartop was going to live in the old house, doesn't exist in the new house, so I've been forced to turn it into a stand up cab with a pedestal:


So another sheet of MDF and a few hours later, here we are. Fortunately I had just enough t-molding left over for the front of the pedestal. I added two shelves to store the retro style USB controllers I purchased and any other accessories. And I finished it off by adding some red craft foam on top to keep it from scuffing the bottom of the cabinet.

And here it is, sat on top:


I just have to re-attach the coin buttons, and start the wiring of everything to the i-pac 2. I'm also planning on adding a volume knob to the space between the monitor bezel and the back of the control panel on one side, and a switch that will toggle between the speakers and the headphone jack on the bottom left. It'll be my first major soldering project, so wish me luck. I'll keep you guys updated!

rablack97

  • Trade Count: (+3)
  • Full Member
  • ***
  • Offline Offline
  • Posts: 2215
  • Last login:May 11, 2022, 06:50:10 pm
  • If you don't try, you have no chance at innovation
Re: Jon's Raspberry Pi Bartop build
« Reply #21 on: February 06, 2017, 09:41:29 am »
any chance you'd release the artwork :)

Very nice build.

wp34

  • Trade Count: (+3)
  • Full Member
  • ***
  • Offline Offline
  • Posts: 4794
  • Last login:April 10, 2022, 09:48:19 pm
Re: Jon's Raspberry Pi Bartop build
« Reply #22 on: February 06, 2017, 12:26:35 pm »
That stand turned out nice.  How does it hold up to game play?

Alphastacker

  • Trade Count: (0)
  • Jr. Member
  • **
  • Offline Offline
  • Posts: 4
  • Last login:June 07, 2021, 05:57:06 am
  • I want to build my own arcade controls!
Re: Jon's Raspberry Pi Bartop build
« Reply #23 on: May 23, 2017, 11:34:49 am »
Looks great! Would you be willing to release the graphics file?  Also where did you get it printed?

KenToad

  • Trade Count: (0)
  • Full Member
  • ***
  • Offline Offline
  • Posts: 1500
  • Last login:Yesterday at 12:31:06 am
  • Flap Flap Flap
Re: Jon's Raspberry Pi Bartop build
« Reply #24 on: May 24, 2017, 06:38:00 pm »
The pedestal you made is super cool. I've thought many times about making one for my 2 player bartop. Yours is the first that I've seen. I could see it being a way to vary a height for a cab, allowing it to grow up with a child, for example. Nicely done.

equlizer

  • Trade Count: (+1)
  • Full Member
  • ***
  • Offline Offline
  • Posts: 363
  • Last login:November 17, 2019, 02:56:48 am
  • All your base are belong to us
Re: Jon's Raspberry Pi Bartop build
« Reply #25 on: May 24, 2017, 11:51:16 pm »
Love it!  On a side note, don't your hands and fingers get tired mashing those buttons? I find them quite stiff.