Main Restorations Software Audio/Jukebox/MP3 Everything Else Buy/Sell/Trade
Project Announcements Monitor/Video GroovyMAME Merit/JVL Touchscreen Meet Up Retail Vendors
Driving & Racing Woodworking Software Support Forums Consoles Project Arcade Reviews
Automated Projects Artwork Frontend Support Forums Pinball Forum Discussion Old Boards
Raspberry Pi & Dev Board controls.dat Linux Miscellaneous Arcade Wiki Discussion Old Archives
Lightguns Arcade1Up Try the site in https mode Site News

Unread posts | New Replies | Recent posts | Rules | Chatroom | Wiki | File Repository | RSS | Submit news


Author Topic: Pac-Man Mini Restoration  (Read 4802 times)

0 Members and 1 Guest are viewing this topic.

CharlesDeMar

  • Trade Count: (+1)
  • Full Member
  • ***
  • Offline Offline
  • Posts: 32
  • Last login:October 11, 2017, 11:46:41 am
Pac-Man Mini Restoration
« on: March 05, 2016, 02:59:22 pm »
Hi guys,

Been hunting for a game that I can restore for awhile now. Just came across and picked up this cabinet:


It's in pretty rough shape, but not too bad. It's missing the back door with the plastic bubble for the monitor. I am worried that this will be hard to find. I'm also missing coin mechs, coin acceptor, coin bucket with lid, and lamp holders behind the coin slot thingys.  Besides that, everything else seems to be there. If anyone has a line on any of this stuff, please let me know.

When I picked it up, I realized that there is pretty bad water damage on the bottom, sides, and front. The bottom is completely messed up and the sides and front have damage about 8 inches up. I'm debating on wether to cut and replace the bad wood, or try and get some sort of wood hardener. I think the wood hardener would give me more issues in the end, but the side laminate is in pretty good shape and I hate to trash it by cutting up the sides. What do you guys think?

The main issue was that the game would not boot up. In fact, nothing would even turn on. Here's a pic of the power supply:


My first step was to get the game running. The pcb was on the floor of the cab and the daughter boards were all disconnected and laying on the floor as well. After I put things back in their place, I decided to re-do the power supply. I added a new power cord, new fuse blocks, and mounted to a new piece of wood. Here's the finished product. You can see the water damage in this pic as well:


I then cleaned the contacts on the pcb and also cleaned the edge connector. Turned it on and... we have life.


Checked my connections again and noticed a board was not seated all the way on the monitor chassis. Reseated the board, turned it on and we have Pac-Man!  I had to make a bunch of monitor adjustments (shout out to Bob Roberts for help with some adjustments). The next picture is the best I could get it (unless I'm missing a knob or something). As you can see, the screen is the wrong color on the bottom right corner. The picture is also smaller on the left side. I am guessing that a cap kit might fix my issue. Has anyone seen this before?


One final thing I have on my mind... the marquee and bezel are in pretty good shape. A couple paint flakes on the bezel, but not bad at all. I'd like to preserve the marquee and bezel, but I wasn't sure how to do it. I read something about someone spraying on some sort of protectant, but I'm unsure what it is. Anyone used it before?

Thanks in advance. Pretty excited about the restore. I've built a couple small cabs front scratch, but never a restore. Glad I could save it before it got any worse.

Any and all advice/criticism is greatly appreciated.


CharlesDeMar

  • Trade Count: (+1)
  • Full Member
  • ***
  • Offline Offline
  • Posts: 32
  • Last login:October 11, 2017, 11:46:41 am
Re: Pac-Man Mini Restoration
« Reply #1 on: March 05, 2016, 03:08:52 pm »
Here's a quick list of stuff that I'll be searching for. A lot of the stuff can be found online for a decent price. But, some of the stuff will be difficult. If anyone has any good sources for Pacman parts (original, if possible), let me know.   Thanks!

Back cabinet door with monitor bubble
Coin acceptor/coin shoot (1)
Coin door lamp holders (2)
Coin mechs (2)
Coin bucket and top
Pac-man badge (for back)

Also, not sure what I'm going to do about the control panel. Someone painted over the stencils on the front of the machine. I doubt I'm going to be able to save it. I'm all ears if someone has an idea. I'd like to keep things as close to original as possible.

Thanks again!


yotsuya

  • Trade Count: (+21)
  • Full Member
  • ***
  • Offline Offline
  • Posts: 19955
  • Last login:April 12, 2024, 11:03:32 pm
  • 2014 UCA Winner, 2014, 2015, 2016 ZapCon Winner
    • forum.arcadecontrols.com/index.php/topic,137636.msg1420628.html
Re: Pac-Man Mini Restoration
« Reply #2 on: March 05, 2016, 03:25:28 pm »
I think someone on KLOV was reproducing the monitor bubbles. You might want to look there.
***Build what you dig, bro. Build what you dig.***

CharlesDeMar

  • Trade Count: (+1)
  • Full Member
  • ***
  • Offline Offline
  • Posts: 32
  • Last login:October 11, 2017, 11:46:41 am
Re: Pac-Man Mini Restoration
« Reply #3 on: March 05, 2016, 03:33:05 pm »
I think someone on KLOV was reproducing the monitor bubbles. You might want to look there.

Will do. Thanks for the tip!

Malenko

  • KNEEL BEFORE ZODlenko!
  • Trade Count: (+58)
  • Full Member
  • ***
  • Offline Offline
  • Posts: 13999
  • Last login:April 09, 2024, 07:27:18 pm
  • Have you played with my GingerBalls?
    • forum.arcadecontrols.com/index.php/topic,142404.msg1475162.html
Re: Pac-Man Mini Restoration
« Reply #4 on: March 05, 2016, 03:35:42 pm »
the miscoloration at the bottom left is probably a degauss issue. People say you can try turning the cab 90 or 180 degrees to see if it changes, or even running an electri drill near it. I usually take an old CRT monitor and put it face to face with the arcade monitor and hit the degauss button. Works every time.

Cab looks good, Im jelly.
If you're replying to a troll you are part of the problem.
I also need to follow this advice. Ignore or report, don't reply.

yotsuya

  • Trade Count: (+21)
  • Full Member
  • ***
  • Offline Offline
  • Posts: 19955
  • Last login:April 12, 2024, 11:03:32 pm
  • 2014 UCA Winner, 2014, 2015, 2016 ZapCon Winner
    • forum.arcadecontrols.com/index.php/topic,137636.msg1420628.html
Re: Pac-Man Mini Restoration
« Reply #5 on: March 05, 2016, 03:41:49 pm »


I usually take an old CRT monitor and put it face to face with the arcade monitor and hit the degauss button. Works every time.


Genius!!!!
***Build what you dig, bro. Build what you dig.***

CheffoJeffo

  • Cheffo's right! ---saint
  • Wiki Master
  • Trade Count: (+2)
  • Full Member
  • *****
  • Offline Offline
  • Posts: 7780
  • Last login:April 08, 2024, 03:49:06 pm
  • Worthless button pusher!
Re: Pac-Man Mini Restoration
« Reply #6 on: March 05, 2016, 04:12:31 pm »
I usually take an old CRT monitor and put it face to face with the arcade monitor and hit the degauss button. Works every time.
Genius!!!!

In all these years, that one has never occurred to me.

 :dizzy:
Working: Not Enough
Projects: Too Many
Progress: None

Slippyblade

  • Trade Count: (+2)
  • Full Member
  • ***
  • Offline Offline
  • Posts: 3167
  • Last login:November 16, 2023, 11:39:51 am
  • And to the death god we say, "Not today!"
Re: Pac-Man Mini Restoration
« Reply #7 on: March 05, 2016, 04:51:41 pm »
Looking forward to this, the Pac-Man cabaret is one of my favorite cabs.

macattack

  • Trade Count: (+1)
  • Full Member
  • ***
  • Offline Offline
  • Posts: 293
  • Last login:August 03, 2018, 05:35:16 pm
  • Cabinet builder to the stars!
Re: Pac-Man Mini Restoration
« Reply #8 on: March 06, 2016, 10:25:28 am »
I should have a line of monitor bubbles shortly and replacement doors for these cabarets.
Pm me for custom cnc needs...

CharlesDeMar

  • Trade Count: (+1)
  • Full Member
  • ***
  • Offline Offline
  • Posts: 32
  • Last login:October 11, 2017, 11:46:41 am
Re: Pac-Man Mini Restoration
« Reply #9 on: March 06, 2016, 01:51:08 pm »
I should have a line of monitor bubbles shortly and replacement doors for these cabarets.

Pm sent!

Thanks guys. I'll post more when I make more progress.

Again, any suggestions are greatly appreciated.

behrmr

  • Trade Count: (+1)
  • Full Member
  • ***
  • Offline Offline
  • Posts: 459
  • Last login:April 23, 2021, 09:17:13 am
Re: Pac-Man Mini Restoration
« Reply #10 on: March 07, 2016, 03:31:45 pm »
As mentioned degauss your tube.  I good degauss coil will help but if your monitor's degauss circuit is working after a couple of cold starts it may remedy itself.  From the looks of it you probably rotated the cabinet with the game on.   Your H-FREQ is also out of adjustment which causes that curl on the right side.  If you can't adjust it out, and it's a G07, then there's the "curl mod" with a couple of caps that may help.   

CharlesDeMar

  • Trade Count: (+1)
  • Full Member
  • ***
  • Offline Offline
  • Posts: 32
  • Last login:October 11, 2017, 11:46:41 am
Re: Pac-Man Mini Restoration
« Reply #11 on: March 14, 2016, 09:03:15 pm »
Here's a quick update on this project...

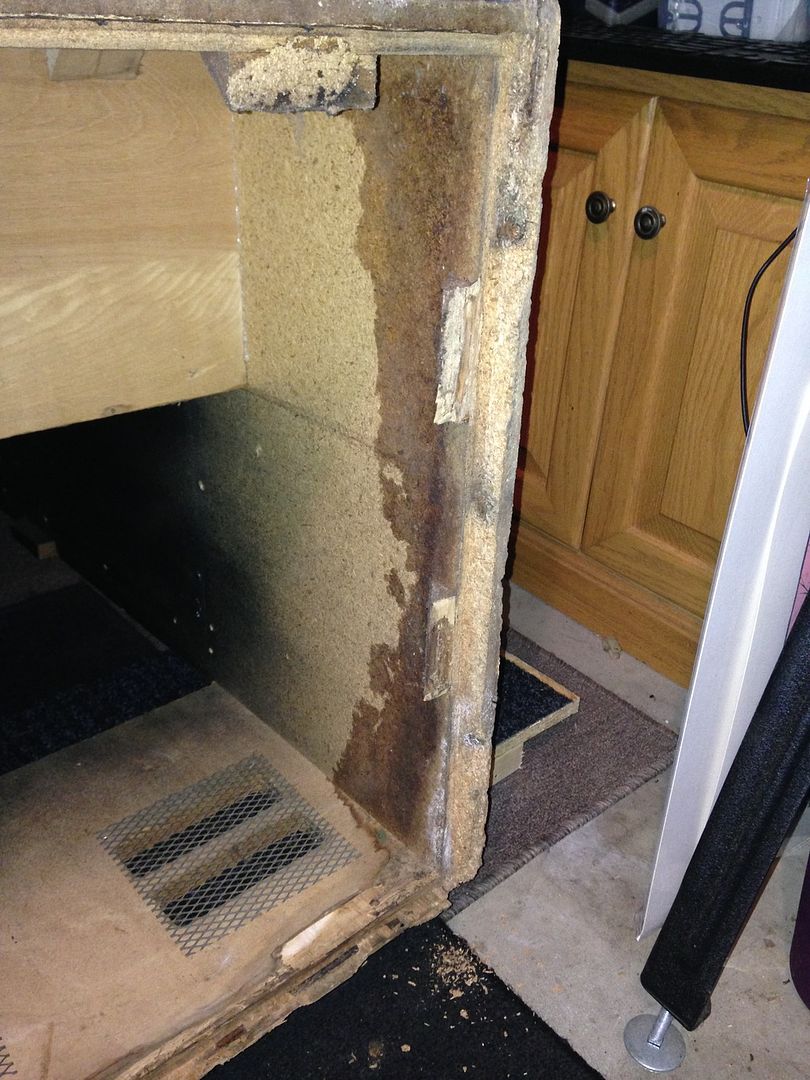
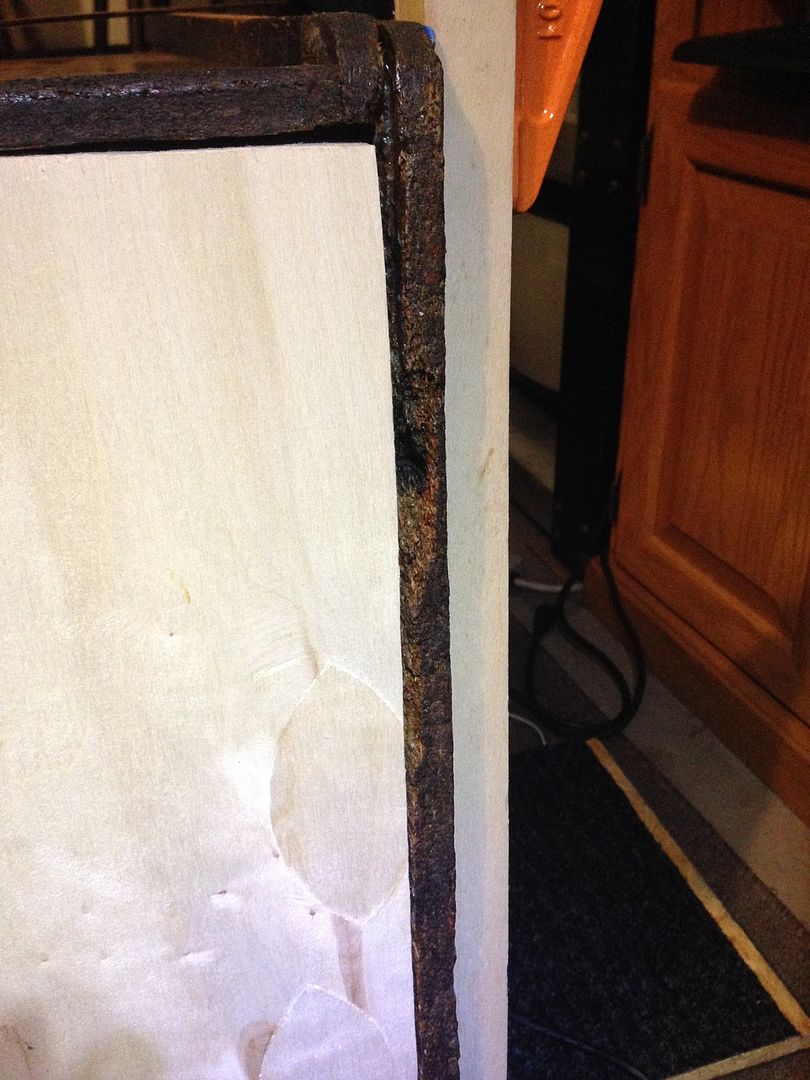
As you can see in the picture of the power supply at the bottom of the cab, there is some water damage. The bottom panel is completely shot, I knew that. I also thought about 8 inches from the bottom of the cab were shot as well. Don't get me wrong, there is water damage. The sides are swelled a bit and the lower back of the cab is pretty rough. I was planning on ripping off the vinyl, cutting away all the water damage and replace with fresh wood. However, when I removed the bottom of the cab, the sides were in pretty decent shape. The vinyl on the sides wasn't too bad either. Soooo, I've decided to keep this cab as original as possible. I figure I can always redo the sides at a later date. I love the idea of keeping this game as original as possible. Here's what I did.

Here's a pic after I removed the bottom. This is the worst side. I scraped off as much flaky wood as possible. Then painted it all with Minwax wood hardener.


Then I put some wood glue in the gaps (sides pulling away a bit) and clamped it down.


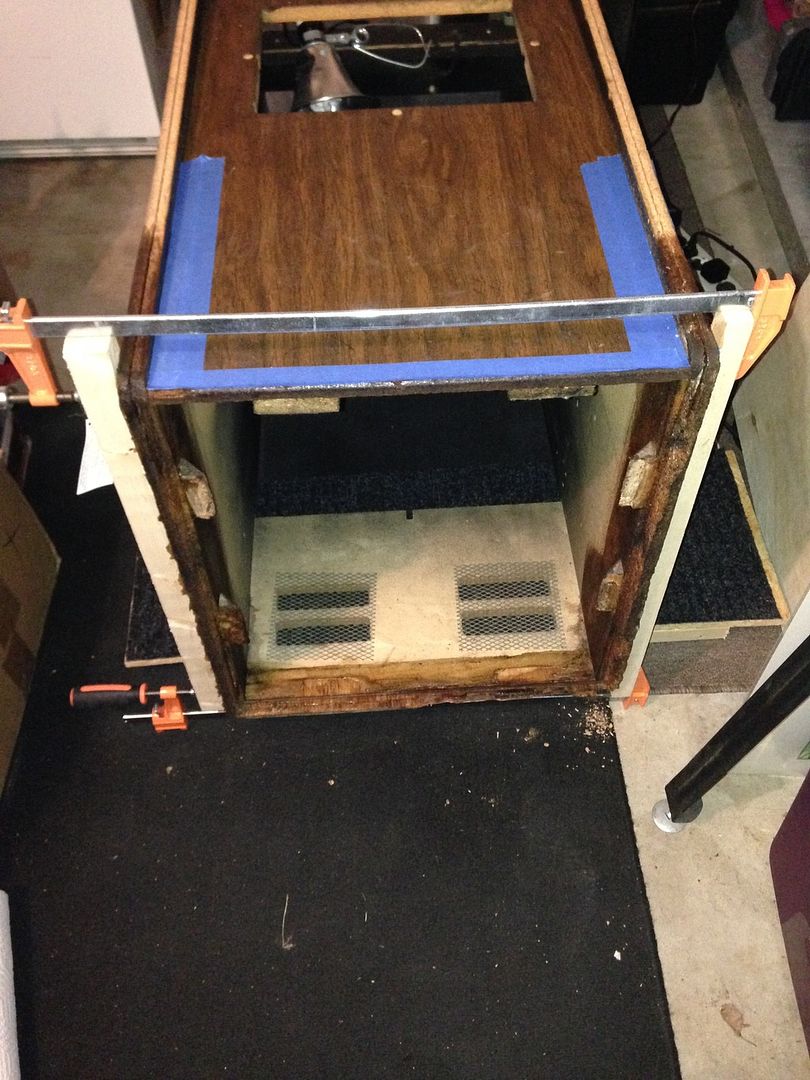
I cut a new bottom for it and glued it into place.


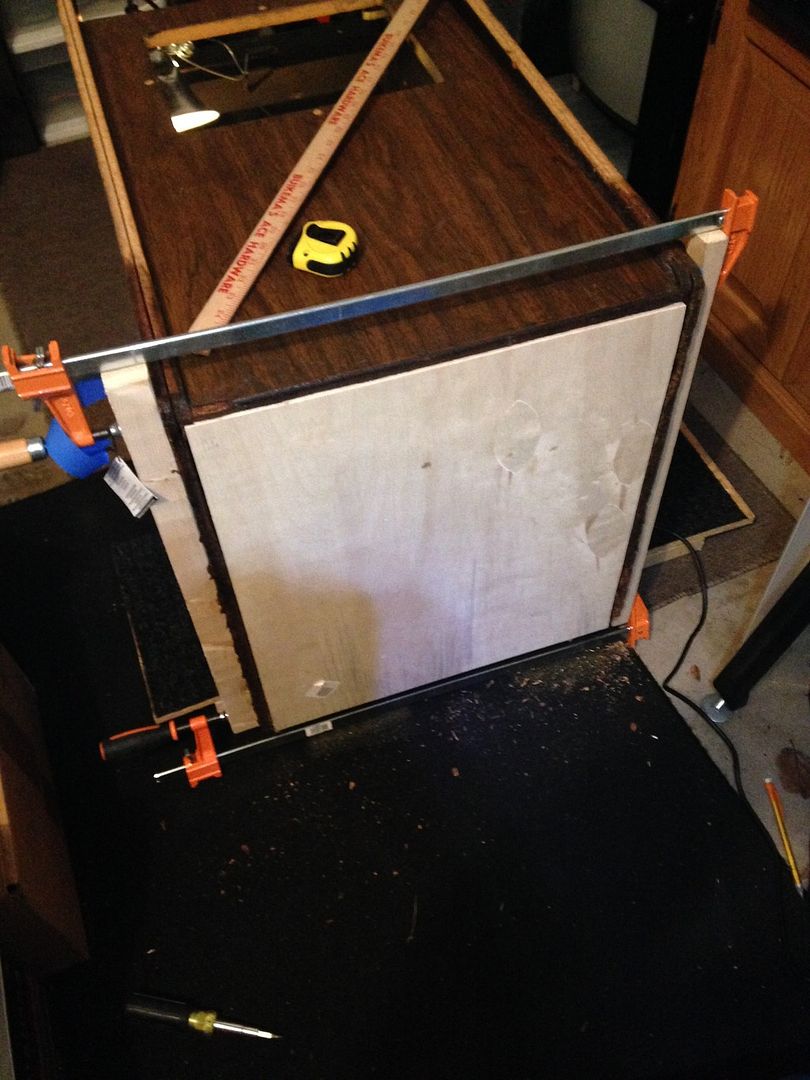
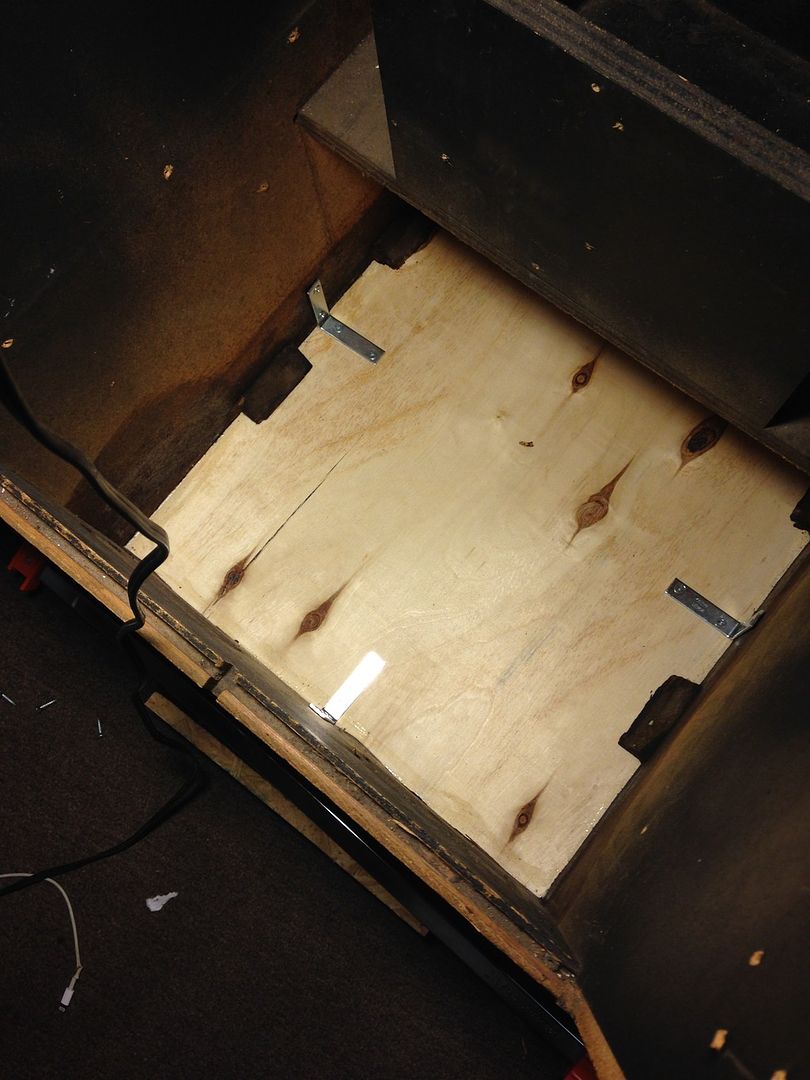
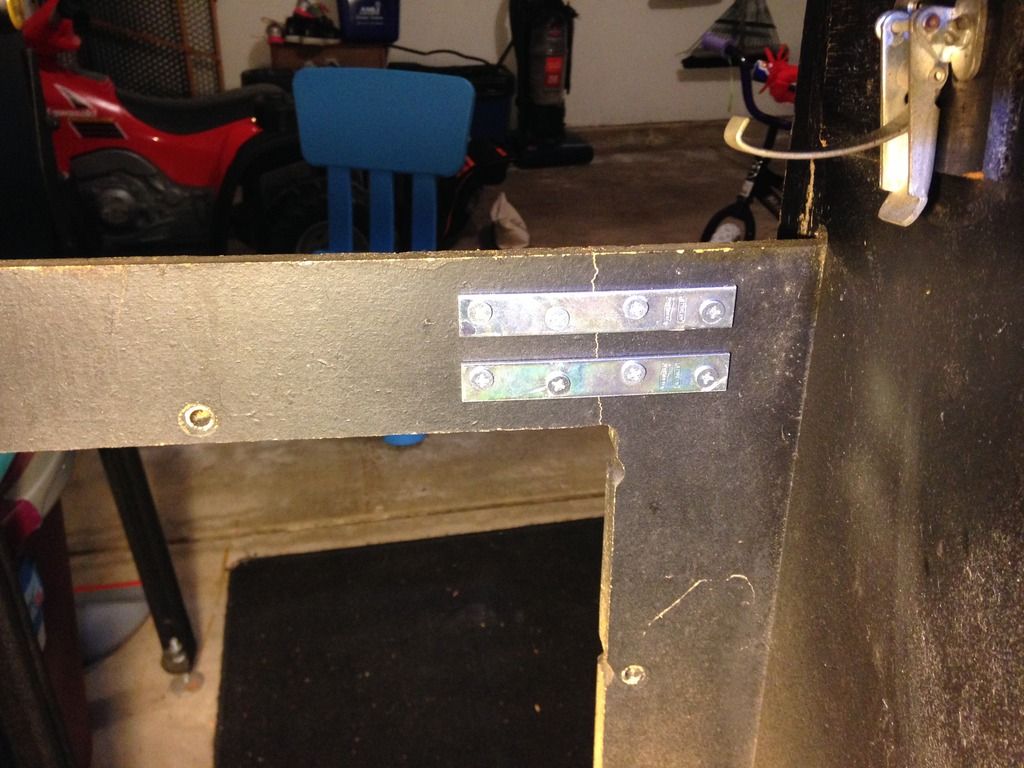
I added a few L-brackets on the inside for added stability. I was able to use the old braces from the original bottom as well.


Here's the gap on the side after I put on the base. I filled those gaps with Dap Plastic Wood and sanded it down.


I remember the coin door rubbed the bottom of the coin door frame when I opened and closed it. Found this crack when I was cleaning the inside of the cab.


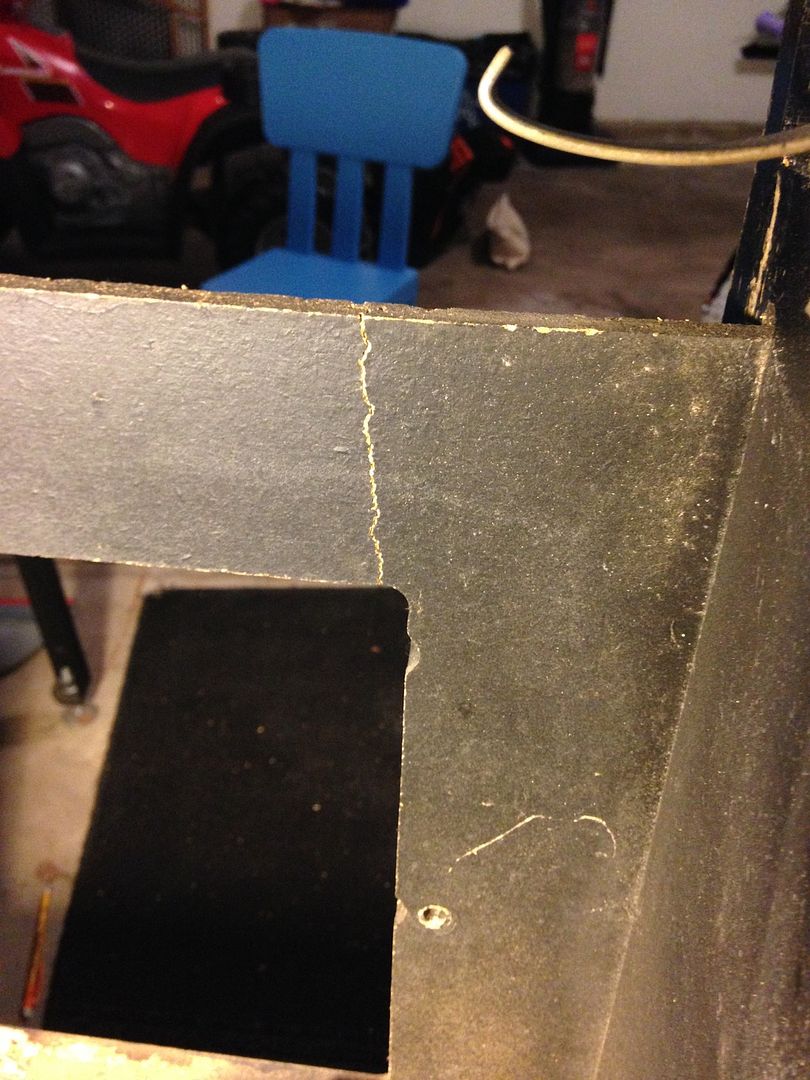
A little wood glue and some mending braces will hopefully do the trick.


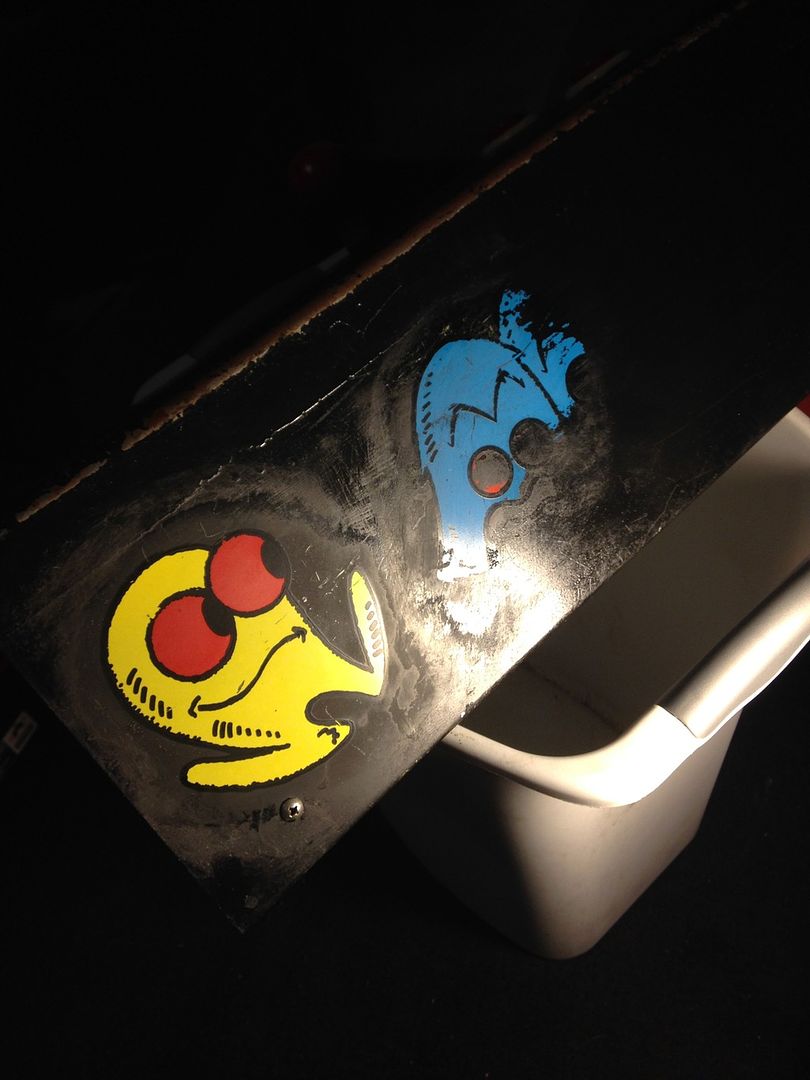
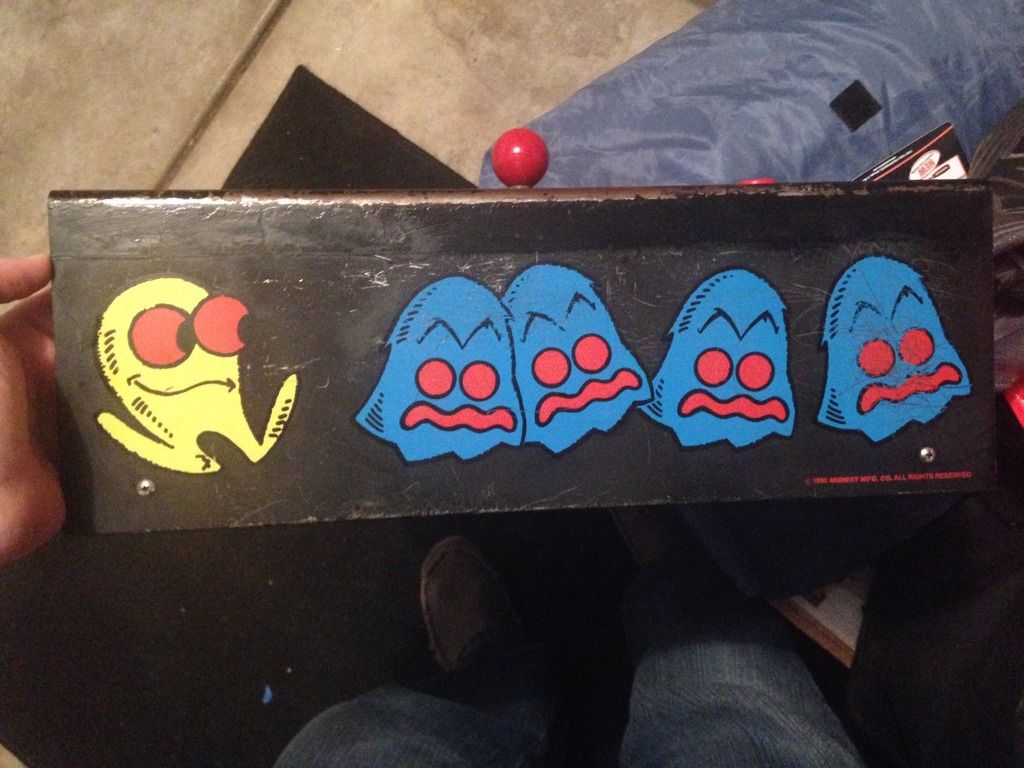
Also found this on the inside of the cab. Not quite sure why, but this got me excited.


As you can see in the pics up top, the front of the control panel had been painted black. I could see the outline of the original silkscreened decals, but they had long been covered up with layers of paint. In keeping with the "original as possible" theme, I decided to see if I could strip away some of those layers of paint and see what's left underneath. I got a bottle of Goof Off and started wiping. After awhile, I started to see something...


After an entire bottle of Goof Off and a roll of paper towel, I got to this...


The original silkscreen is definitely scratched, which is why they probably covered it up. But, it doesn't really bother me. I plan on stripping the rest of the cp, somehow protect the original decals (I saw JohnsArcade use some sort of liquid mask), and repainted it black. The top of the cp is pretty bad, so I'll probably just buy a new cp overlay for that. Maybe nos, if I can find it.

That's all I have for now. I've got a bunch of parts on order (leg levelers, monitor cap kit, new bulbs, etc). Excited to see the finished product. Long road ahead, but looking forward to it.

Again, any criticism/accolades are much appreciated. Also, anyone with Pacman mini parts, let me know. Working on a rear door with bubble right now.

More to come...


macattack

  • Trade Count: (+1)
  • Full Member
  • ***
  • Offline Offline
  • Posts: 293
  • Last login:August 03, 2018, 05:35:16 pm
  • Cabinet builder to the stars!
Re: Pac-Man Mini Restoration
« Reply #12 on: March 14, 2016, 11:23:43 pm »
Looking good, nice fix. I picked up a wrecked one that I am cnc'ing a new cab and transferring the other parts over. Love these cabarets. Hope to knock a bunch out this summer.
Pm me for custom cnc needs...

Hanzie

  • Trade Count: (0)
  • Full Member
  • ***
  • Offline Offline
  • Posts: 29
  • Last login:April 23, 2018, 06:16:47 pm
  • Offline
Re: Pac-Man Mini Restoration
« Reply #13 on: March 15, 2016, 11:52:50 pm »
Nice looking cabaret,I keep looking for a ms pac mini, not that I need it ... I have two full sized ones allready but I love how the minis look

behrmr

  • Trade Count: (+1)
  • Full Member
  • ***
  • Offline Offline
  • Posts: 459
  • Last login:April 23, 2021, 09:17:13 am
Pac-Man Mini Restoration
« Reply #14 on: March 16, 2016, 09:47:57 am »
It's tedious but I have done it.  You can just use thin width painters tape in small runs to mask off the outline of the ghosts. Then go back cover the rest of them.  However if you are going to strip the panel I am not sure any kind of masking would protect it from sanding or chemical strippers.


Sent from my iPhone using Tapatalk

dmckean

  • Trade Count: (0)
  • Full Member
  • ***
  • Offline Offline
  • Posts: 729
  • Last login:January 13, 2024, 08:50:41 pm
Re: Pac-Man Mini Restoration
« Reply #15 on: March 16, 2016, 06:14:37 pm »
the miscoloration at the bottom left is probably a degauss issue. People say you can try turning the cab 90 or 180 degrees to see if it changes, or even running an electri drill near it. I usually take an old CRT monitor and put it face to face with the arcade monitor and hit the degauss button. Works every time.

Cab looks good, Im jelly.

Wow!

I just tried this on an old TV that has always had a slightly fuzzy and discolored corner and it worked spectacularly.


Malenko

  • KNEEL BEFORE ZODlenko!
  • Trade Count: (+58)
  • Full Member
  • ***
  • Offline Offline
  • Posts: 13999
  • Last login:April 09, 2024, 07:27:18 pm
  • Have you played with my GingerBalls?
    • forum.arcadecontrols.com/index.php/topic,142404.msg1475162.html
Re: Pac-Man Mini Restoration
« Reply #16 on: March 16, 2016, 09:52:59 pm »
the miscoloration at the bottom left is probably a degauss issue. People say you can try turning the cab 90 or 180 degrees to see if it changes, or even running an electri drill near it. I usually take an old CRT monitor and put it face to face with the arcade monitor and hit the degauss button. Works every time.

Cab looks good, Im jelly.

Wow!

I just tried this on an old TV that has always had a slightly fuzzy and discolored corner and it worked spectacularly.

 :cheers:

If you're replying to a troll you are part of the problem.
I also need to follow this advice. Ignore or report, don't reply.

CharlesDeMar

  • Trade Count: (+1)
  • Full Member
  • ***
  • Offline Offline
  • Posts: 32
  • Last login:October 11, 2017, 11:46:41 am
Re: Pac-Man Mini Restoration
« Reply #17 on: March 20, 2016, 05:37:18 pm »
Hi guys,

I have a question...

I taking apart the CP and I am wondering if the metal (could be hard plastic) part right below the ball is supposed to be removeable?


I had a heck of a time getting the rubber bushing off because it was rusted on. I'm wondering if this piece is rusted on as well, or if it's part of the stick. I don't see it on any of the other sticks I see on the internet.

If anyone knows, please chime in. Thanks!

behrmr

  • Trade Count: (+1)
  • Full Member
  • ***
  • Offline Offline
  • Posts: 459
  • Last login:April 23, 2021, 09:17:13 am
Re: Pac-Man Mini Restoration
« Reply #18 on: March 20, 2016, 08:52:26 pm »
Yes that piece is supposed to come off.

CharlesDeMar

  • Trade Count: (+1)
  • Full Member
  • ***
  • Offline Offline
  • Posts: 32
  • Last login:October 11, 2017, 11:46:41 am
Re: Pac-Man Mini Restoration
« Reply #19 on: March 20, 2016, 09:31:16 pm »
∆ Thank you! ∆

behrmr

  • Trade Count: (+1)
  • Full Member
  • ***
  • Offline Offline
  • Posts: 459
  • Last login:April 23, 2021, 09:17:13 am
Re: Pac-Man Mini Restoration
« Reply #20 on: March 20, 2016, 11:27:06 pm »
Just remember I said "supposed to come off" not "will come off". 

CharlesDeMar

  • Trade Count: (+1)
  • Full Member
  • ***
  • Offline Offline
  • Posts: 32
  • Last login:October 11, 2017, 11:46:41 am
Re: Pac-Man Mini Restoration
« Reply #21 on: March 26, 2016, 12:51:11 pm »
Hi guys,

Anybody have one of these laying around that they want to get rid of?  If you do, shoot me a price. Maybe we can work something out.

Thanks!


CharlesDeMar

  • Trade Count: (+1)
  • Full Member
  • ***
  • Offline Offline
  • Posts: 32
  • Last login:October 11, 2017, 11:46:41 am
Re: Pac-Man Mini Restoration
« Reply #22 on: May 08, 2016, 12:42:09 pm »
Does anyone have a picture of the back of a Pac Man Cabaret?  I was able to find a bubble for the back, but I need to cut the door. Curious if it has vent holes, etc. I can't find a pic online for this particular cabinet. Let me know if someone can help me out.

Thanks!

macattack

  • Trade Count: (+1)
  • Full Member
  • ***
  • Offline Offline
  • Posts: 293
  • Last login:August 03, 2018, 05:35:16 pm
  • Cabinet builder to the stars!
Re: Pac-Man Mini Restoration
« Reply #23 on: May 08, 2016, 12:57:24 pm »
Does anyone have a picture of the back of a Pac Man Cabaret?  I was able to find a bubble for the back, but I need to cut the door. Curious if it has vent holes, etc. I can't find a pic online for this particular cabinet. Let me know if someone can help me out.

Thanks!
Just finished it yesterday, just need to sort out vac forming the bubbles now. Here's what the back should look like
Pm me for custom cnc needs...

CharlesDeMar

  • Trade Count: (+1)
  • Full Member
  • ***
  • Offline Offline
  • Posts: 32
  • Last login:October 11, 2017, 11:46:41 am
Re: Pac-Man Mini Restoration
« Reply #24 on: May 08, 2016, 01:19:22 pm »
Looks great!  Thanks for posting this.
« Last Edit: May 12, 2016, 04:30:53 pm by CharlesDeMar »

CharlesDeMar

  • Trade Count: (+1)
  • Full Member
  • ***
  • Offline Offline
  • Posts: 32
  • Last login:October 11, 2017, 11:46:41 am
Re: Pac-Man Mini Restoration
« Reply #25 on: May 12, 2016, 05:12:17 pm »
It's been pretty slow going, but I am making progress. I've taken everything apart and repainted all the metal.


Also some paint to the cab.


For the CP, I painted on liquid masking to preserve the original graphics (seen on JohnsArcade.com restoration), the spray painted over it.


Not sure if I should have peeled off the liquid masking sooner, but it didn't just peel off. I had to go around each graphic with an Xacto knife. Still turned out pretty good.


I bought a new cp overlay and used the original buttons. Here's it all painted and cleaned up.


I even gave the monitor a cap kit.


I found a reproduction door bubble for the back. No actual door, so I had to make one myself.


That's all I have for now. Just finishing some final touches, then I'll post a few more pics. Comments/criticism always welcome. Thanks!


macattack

  • Trade Count: (+1)
  • Full Member
  • ***
  • Offline Offline
  • Posts: 293
  • Last login:August 03, 2018, 05:35:16 pm
  • Cabinet builder to the stars!
Re: Pac-Man Mini Restoration
« Reply #26 on: May 12, 2016, 05:23:24 pm »
Nice, looking sweet


Sent from my iPhone using Tapatalk
Pm me for custom cnc needs...