Hi all, like most of you, after you build your first cabinet, you soon get the itch to build another. So under the threat of an expensive divorce, I had to find an "opportunity" to get this itch scratched.
So, when our non-profit's fundraising gala came up and just happened to have a game night theme, I approached her about building something that they could auction off using some spare parts (3/4" T molding, yellow balltop joystick, buttons, 13" inch CRT, smoked plexi) that I had laying around.

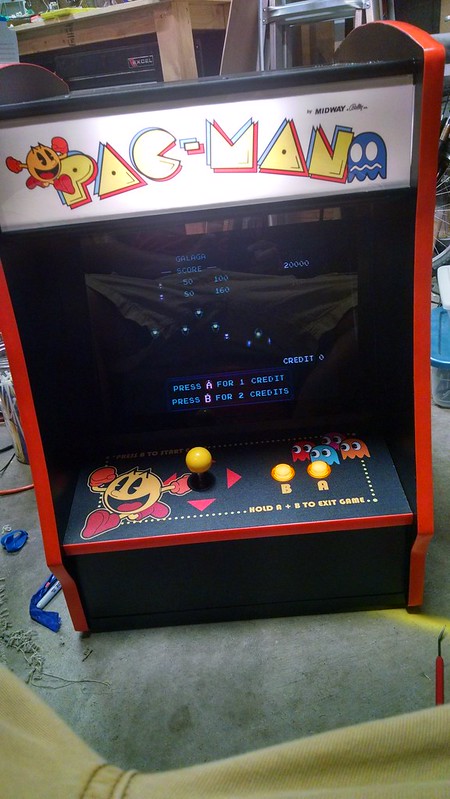
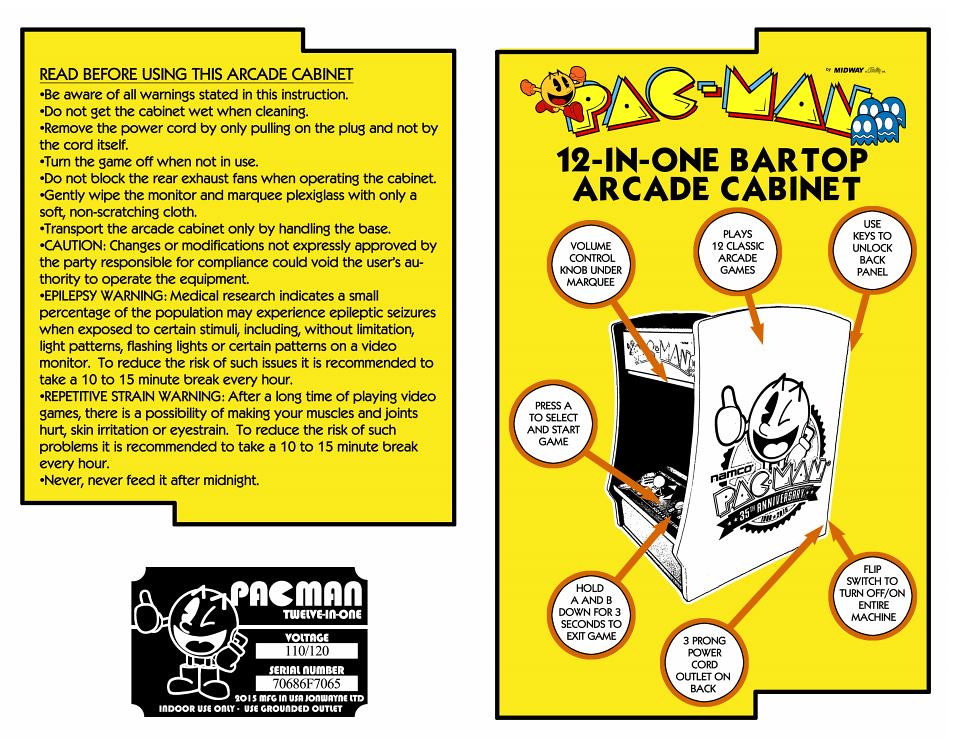
I decided on Pac Man because they were still selling the Namco Bandai 12 in 1 TV plug and play on Amazon and I wanted the person buying it to have as many games that was legally possible and that was still cheap.
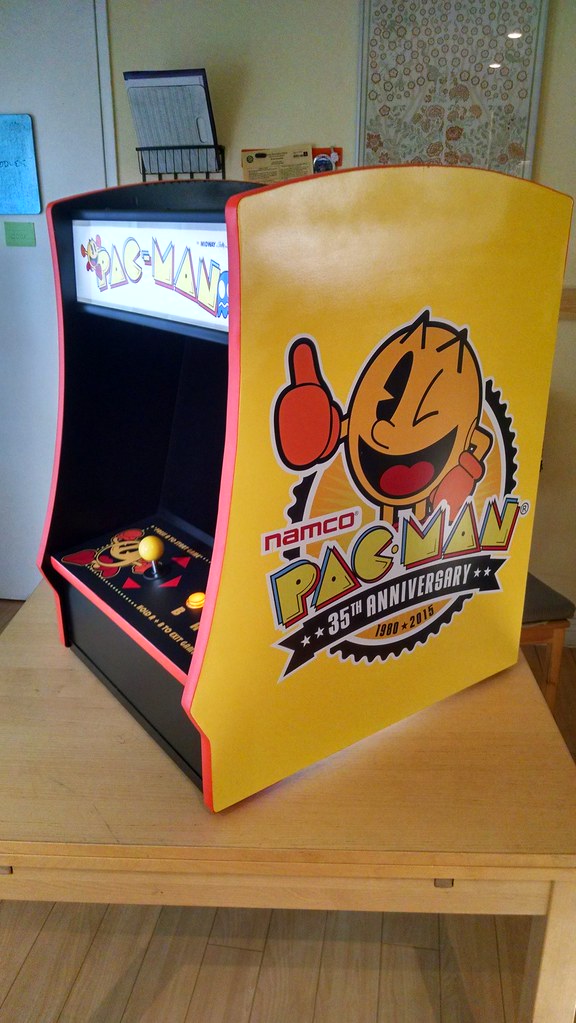
I originally intended to use a free 13" inch CRT TV so because of its large footprint, I decided to go with Brian Bishop's bartop plans that has a side profile very similar to that of a Pac Man cabinet.
I've never used MDF before and because of its already smooth surface that would make spray painting easier, I decided to go with it. Painting is the part of the build that I hate the most because it can make or break how professional looking the project looks. I used a jigsaw to cut out the 3/4" MDF (make sure you use a mask and shopvac cause dust goes everywhere!) sides and then used that to sketch out and cut the other side. I used my multitool sander to clean things up and round the edges.

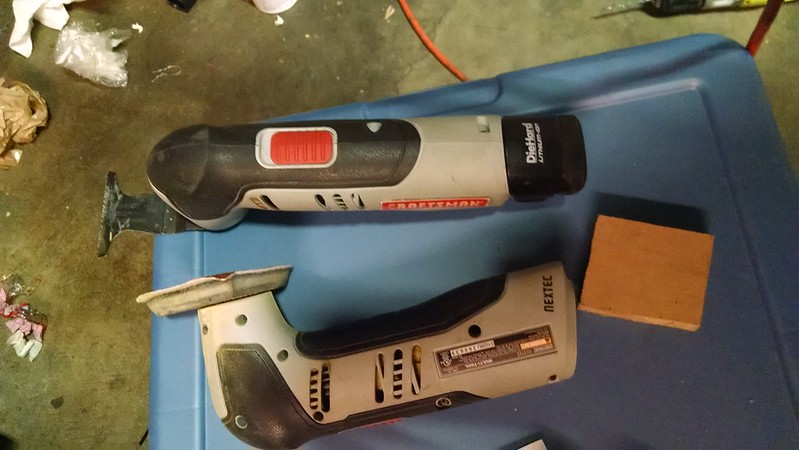
Like all builds, one should get the guts to work first before installing it into the cabinet. I took apart the plug and play and the pcb was different from the one from ChanceKJ's build. I decided to keep all of the microswitches on pcb and solder the joystick and button wires to the back of the pcb. Like many before me, the pcb is well labelled as if they knew that people were going to take it apart and make arcade cabinets out of them.
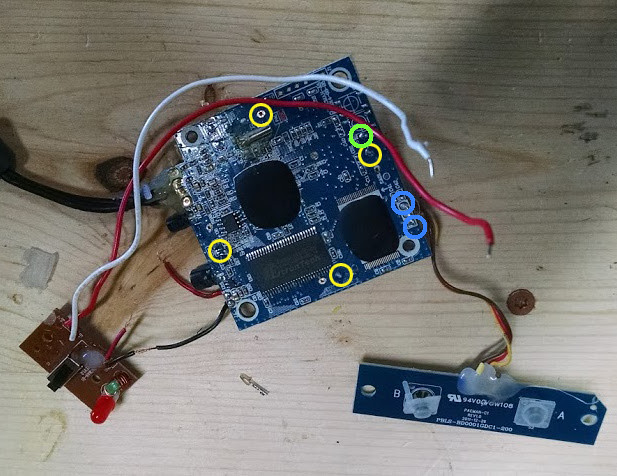
Yellow - 4 directions
Green - Ground
Blue - A & B buttons
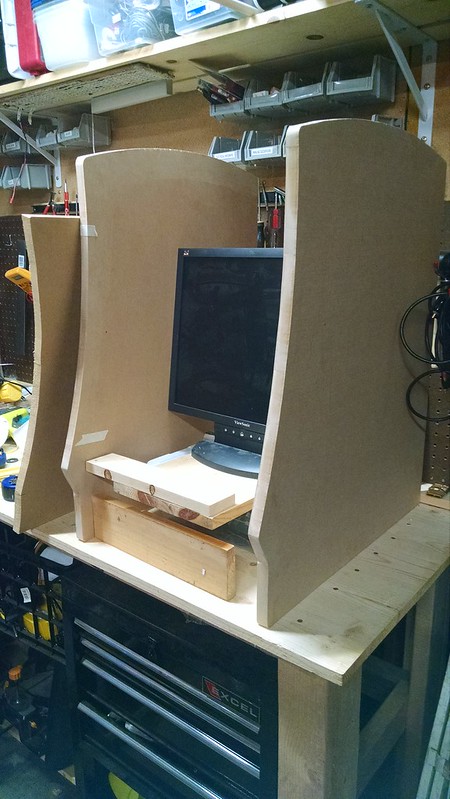
I connected the wires to my Zippy joystick and buttons and things worked great when plugged into the CRT TV. However, the TV looked really small (especially vertically) in relationship to the rest of the arcade cabinet. I had picked this size because of the long depth of the CRT TV. At this point, I decided to go with a 19" LCD monitor that I had around that fit the size of the cabinet better but that meant I would lose the TV speakers and had to get a RCA to VGA converter to connect it to the monitor.
One troubleshooting thing that I discovered with the RCA to VGA converter was that when I had first installed it, there was a lot of wavy lines on the screen. I thought it was just a function of this being RCA. I switched out the 5V 1A power supply that came with it with different 5V 2A power supply, all of the problems went away and the screen jitters went away.
[/url]
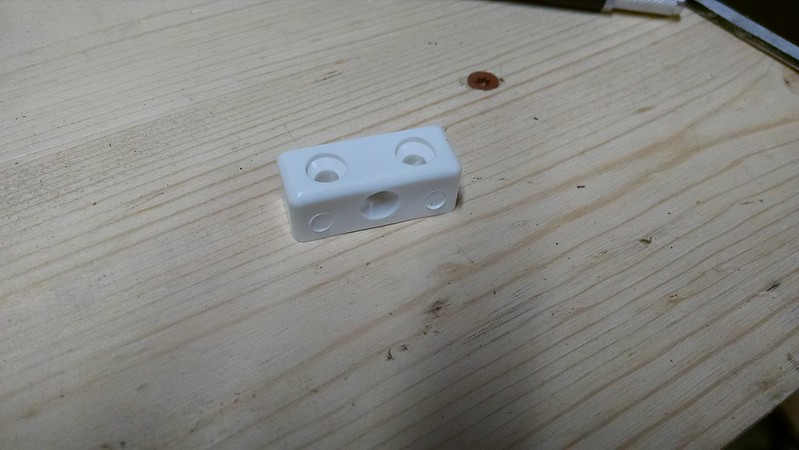
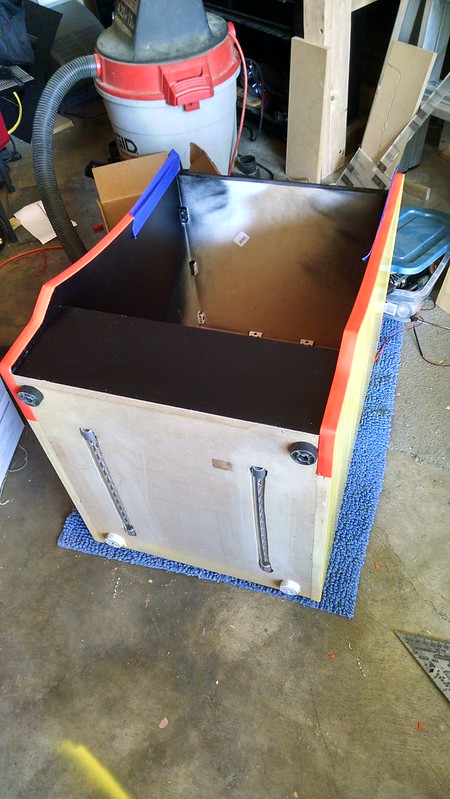
I then use a friend's table saw to cut all of the horizontal pieces to roughly the same size. Luckily I didn't do this until I finally decided to go with the lcd monitor. In my last build, I made battens out of square dowels but it was time consuming because I had to drill every single hole so my screws wouldn't split the battens. So when I was reading through other people's post came upon these little plastic modesty or fixit blocks that were predrilled and countersunk already for drywall screws. The funny thing was that when I googled these items I couldn't find them sold in the US. All of the dealers were in the UK. So I ordered a pack of 100 of them from the UK for about $10 shipped. So for every joint, I put three or four of these things with 1" drywall screws and a little wood glue. Fingers crossed.

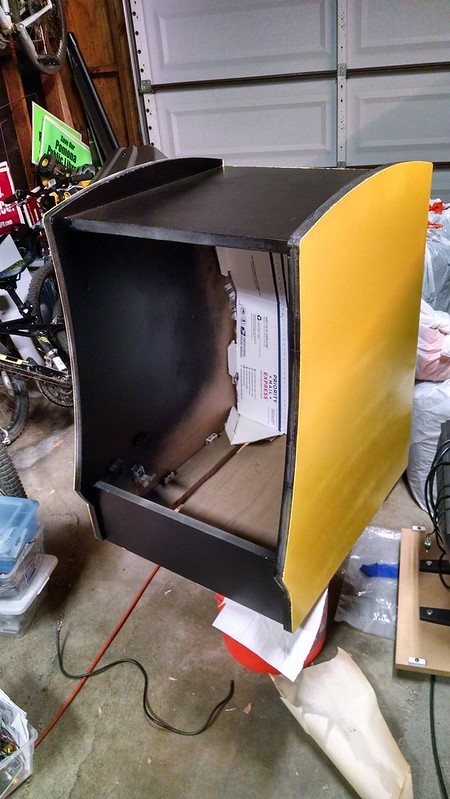
I then put together the basic structure of the arcade cabinet using these fixit blocks. I used wood putty to hide any of the imperfections from cutting and then sanded it. For my last cabinet, the Ikeakade, I used latex paint with a variety of brushes but I was never able to get a nice smooth finish. So this time I thought I would try spray painting. From this site, lots of builders swear by the comfort grip handle. I thought it was dumb but ordered it anyway. It makes a huge difference! It makes the sweeping motion of getting a good spray so much easier. I primered with the Zinsser 1-2-3 Bulls Eye Spray Primer
During this entire time I was trying to see if I could get away from getting a router for doing the T molding but because I didn't want to spend any more, I again enlisted the T blade of my multitool to cut the slots. I measured and drew a line and I slowly went up and down, cutting the slot on the side and control panels. The T blade was probably the best blade for the job because since it is longer it helps keeping the cut straight. Like on my Ikeakade, once I cut a slightly larger slot at the beginning of the T molding strip, it was able to tightly hammer it in the rest of the way. A few nails in the beginning and at the end ensures that it won't come out.
Also, as you can see from the bottom of the cabinet, I cut two long slots where I put some led strips to make the bottom of the cabinet look like it was glowing. I had to angle the strips so that they would shine light out of the sides. In hindsight, I should have cut the slot closer to the edge but I didn't want to weaken the bottom of the cabinet too much. I enclosed the strips with acrylic tubes to protect them.
For the marquee and holder, I had some acrylic and leftover angle bars that I spray painted using the Rustoleum Satin Black that John from John's arcade swears by. I bought a acrylic scorer to help me score and snap the acrylic and I must be doing something wrong as I could not snap it even somewhat clean. I kept getting shards on either side of the score. I ended going back to Homedepot and bought some Lexan which I promptly cut with a blade on my multitool. Not super straight but close enough to be hidden by the angle bars.
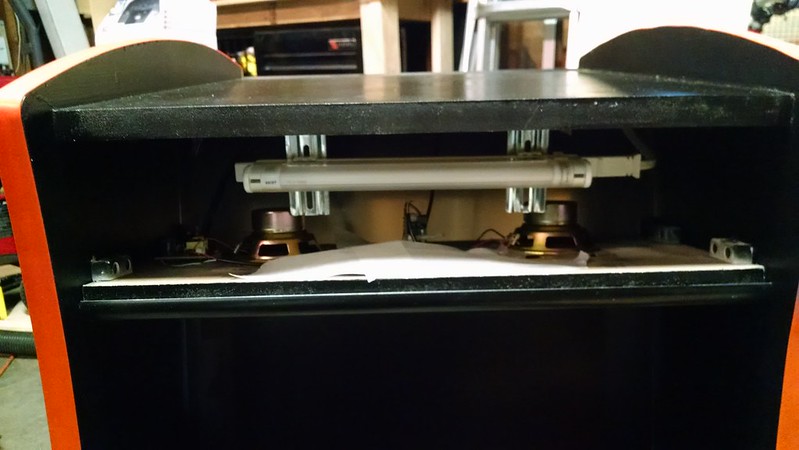
For the marquee light I had bought a 8" florescent tube undercounter light but for the life of me I couldn't get it to light up 100% of the time. Something was off or loose. Once I got it lit it would work fine but when I would turn it on the next day, it wouldn't light up without me adjusting the tube positioning. I ended up using a 12" 5050 led strip that I had lying around and hooking it up to the 12V supply. The reason I didn't go with this originally was that I always had hot spots whenever I used leds in the marquee. However, this time with the translite material it diffused the leds perfectly. Will definitely use this in whatever future builds I have.
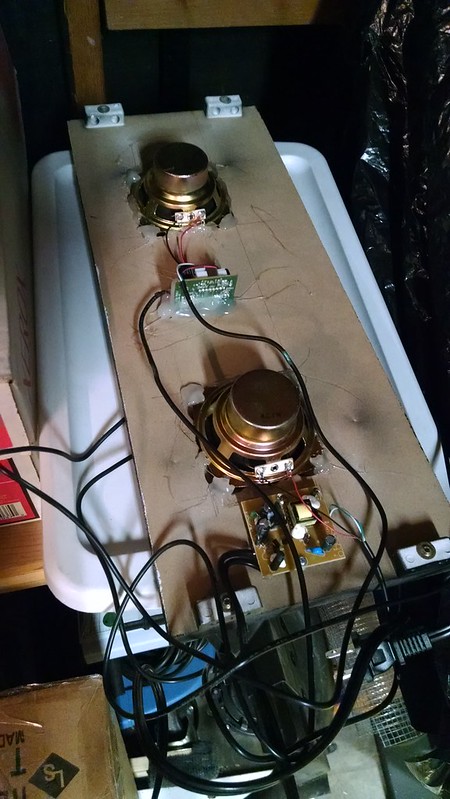
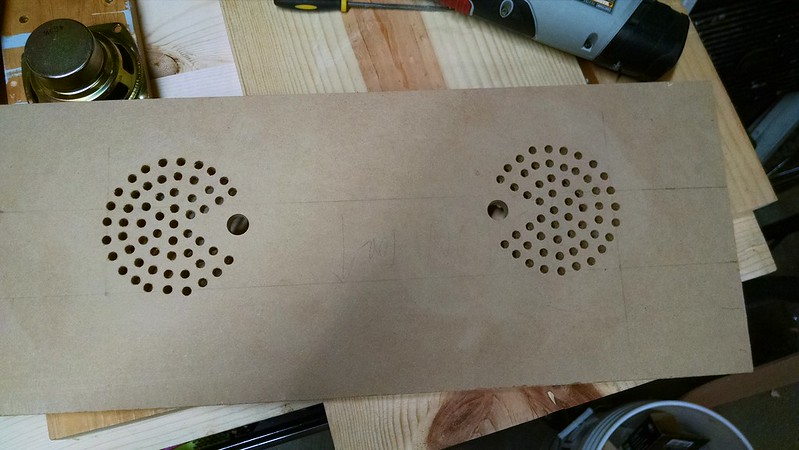
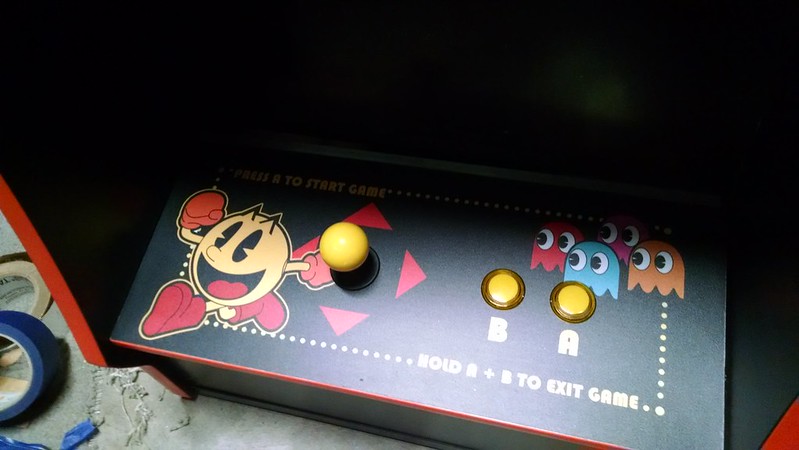
Since I wasn't going with the CRT TV anymore and its speakers, I bought a pair of Logitech S120 speakers which I promptly decased. The speakers that came with it were a little small so I decided to use a another set of speakers which I soldered to the S120 amp. The reason I chose the S120 was that they plug into the power outlet directly without needing a power adapter with a plug, I always get static with USB speakers, and that there is only one knob as an control (both on/off and volume). I wouldn't have to line up multiple holes for a power button, volume control knob, and other useless things like the base or treble controls that a lot of cheap overseas computer speakers have. It is also pretty long so I didn't have to extend it. Will definitely be using this again! I then drilled a bunch of speaker holes in a Pac Man looking shape. I'm not sure if the user will see it but Pac Man's mouth saved me from having to drill 15% of the holes.
I briefly ran into a problem when I tried hooking up the speakers to the Plug and Play unit. I used a 1 rca to 2 rca splitter to get sound coming out of two speakers and when I hooked it up I got a lot of static coming out of the speakers. I thought the series of adapters was giving me static so I swapped them all out and was getting the same issue. I then thought my new set of speakers was the issue so I got one of those tripath 2020 amps that are popular with builders and I still got the same issue. The weird thing was that when I plugged it into my TV it would work perfectly. Then one time I accidentally nudged the power wires coming out of the PCB and that fixed the static. I looked at the power wires and it seemed like one of them wasn't soldered very well. I reflowed it and it worked great after that. Needless to say, I hot glued all of the wires and solder points after that. None of those wires were going to ever move again!
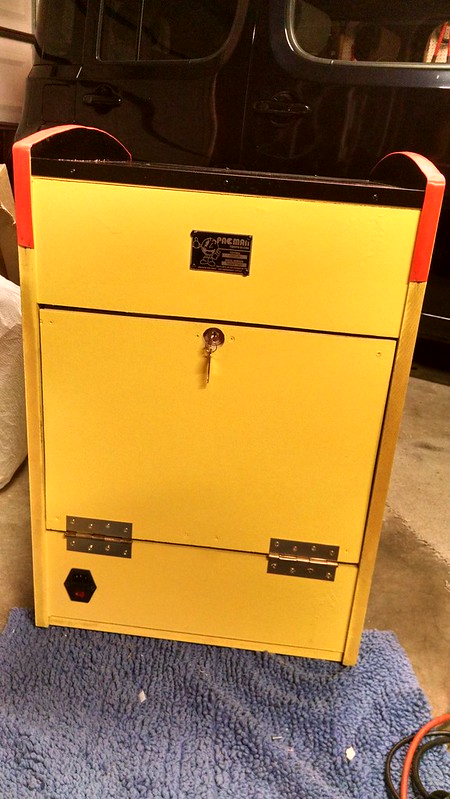
I cut a piece of plywood that I had left over, installed a latch lock and hinges for the back door. I JB-welded some magnets to some of the modesty blocks that I referred to earlier and the plywood door snuggly closes shut.
All of the devices plug into a power strip located inside in which I cut the plug off and wired it to the fuse/switch/outlet in the lower left hand corner, using the instructions found on the arcadecontrols wiki.

I then drilled some holes into the plug and play case that lined up with the VESA mount holes as well as entry points for the joystick and power wires. I removed the originally buttons and joystick from the case, remounted the modified pcb into the Pac Man case, screwed the case back together again and mounted it to the back of the monitor.
Also from the photo you might have noticed the white grid thing. I didn't want to have to neatly tie up everything, so I cut up this ceiling light diffuser that acts like a lid for all of the cables under it.
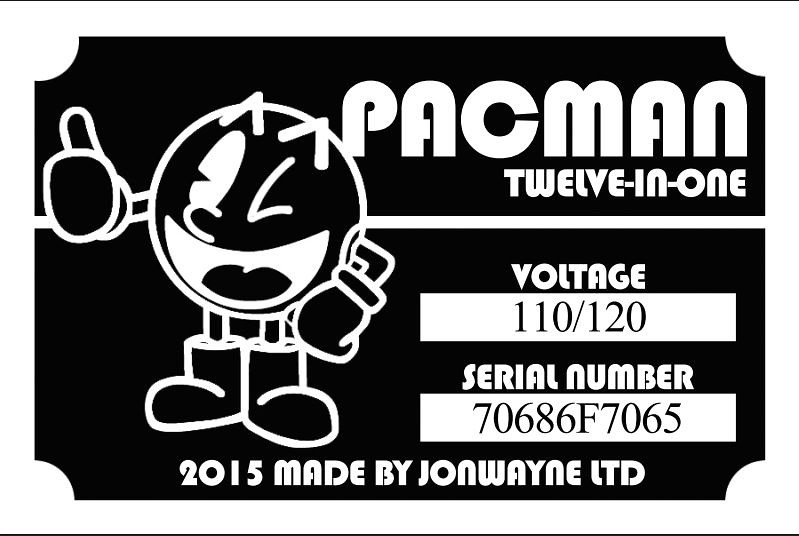
Finally, I made a custom serial plate using the directions from this youtube video:
I printed out the picture onto a clear sticker. Then I stuck it on a piece of aluminum flashing that you get from Home Depot for like 60 cents. I cut it out using some metal snips and then put a few coats of clear on it. Drill some holes and then mounted it with screws.

Though I wanted it to look like a classic Pac Man machine, I really hated the original US and Japanese artwork for Pac Man aka Puckman. So looking on line, somebody had vectorized a version of the 25th anniversary winking Pac Man (the one with the punching gloves and boots) and using that as a base, I started making the side, marquee and control panel art in Photoshop.
I've never ordered custom vinyl art before but through lots of recommendations on this site, I eventually went with stpcore (Ken Cromwell). As a noob, he pretty much walked me through the process like making sure I got the textured polycarbonate for the control panel overlay, the translite for the marquee, and checking with me if I wanted the side art and cp holes to be machine cut instead of just printing it out and having me cut it myself with an exacto. The prints came out great and since he uses the Oracal RapidAir vinyl, it was really easy to install. Line it up, really painter's tape one half of it, peel and cut off the backing. I used a wide plastic ruler as my squeegy to affix the bottom half without any bubbles. Since the bottom half isn't going anywhere, remove the painters tape, peel the backing off the top and squeegy it into place.
For the buyer who might not be into arcade games, I decided to make a instruction booklet using some of the text from the Namco plug and play instructions.

Things I would do differently:
1. Build a 70% size version of this or use a different bartop shape since I ended up using an lcd. In its current state, it's not the easiest thing to move.
2. Put in a hinge for the front panel so I can access things from the front instead of having to pop out the control panel
3. Be patient when painting. Its tough when you have a limited amount of time each day to get a project done so I probably sanded too quickly when I should have waited for the paint to dry a little more.
4. A project costs more than you first realize


 Home
Home Help
Help Search
 Login
Login Register

 Send this topic
 Print
Print Topic: Another PacMan Bartop with Namco Bandai Plug and Play Guts (Read 9372 times)


