Main Restorations Software Audio/Jukebox/MP3 Everything Else Buy/Sell/Trade
Project Announcements Monitor/Video GroovyMAME Merit/JVL Touchscreen Meet Up Retail Vendors
Driving & Racing Woodworking Software Support Forums Consoles Project Arcade Reviews
Automated Projects Artwork Frontend Support Forums Pinball Forum Discussion Old Boards
Raspberry Pi & Dev Board controls.dat Linux Miscellaneous Arcade Wiki Discussion Old Archives
Lightguns Arcade1Up Try the site in https mode Site News

Unread posts | New Replies | Recent posts | Rules | Chatroom | Wiki | File Repository | RSS | Submit news


Author Topic: TobiKomi Scratch Build - -7/20/2021 - 100% Complete  (Read 31350 times)

0 Members and 1 Guest are viewing this topic.

wp34

  • Trade Count: (+3)
  • Full Member
  • ***
  • Offline Offline
  • Posts: 4794
  • Last login:April 10, 2022, 09:48:19 pm
TobiKomi Scratch Build - -7/20/2021 - 100% Complete
« on: October 02, 2015, 10:38:22 pm »
My daughter's favorite movie is Wreck-it-Ralph and her favorite game is Donkey Kong.  So you can see where I am headed with this. 

We have been planning a build for several years and have finally made some sawdust fly today.

The goals: 

- Make the cabinet look like new.  Neither of us care for the fake "lived in" look of the Disney built cabinets
- Use an original Donkey Kong joystick
- Use an arcade monitor
- Don't get carried away trying to replicate a Nintendo cabinet perfectly
- Get the cabinet built at a significantly faster rate than my previous efforts   ;D

« Last Edit: July 26, 2021, 01:37:29 pm by wp34 »

wp34

  • Trade Count: (+3)
  • Full Member
  • ***
  • Offline Offline
  • Posts: 4794
  • Last login:April 10, 2022, 09:48:19 pm
Re: TobiKomi Scratch Build
« Reply #1 on: October 02, 2015, 10:38:47 pm »
Save it for later.   :burgerking:

wp34

  • Trade Count: (+3)
  • Full Member
  • ***
  • Offline Offline
  • Posts: 4794
  • Last login:April 10, 2022, 09:48:19 pm
Re: TobiKomi Scratch Build
« Reply #2 on: October 02, 2015, 10:48:26 pm »
I picked up a beat-up Nintendo Unisystem off CL a couple of years ago with the idea that I would use it as a template for this project.  My play was to sell the game for what I paid for it after this project was completed but now I'm thinking about restoring it as well.  But that is another story.


Making copies...


The corners on this cabinet are really mangled making it near impossible to make a good template.  I ended up squaring off the bad corners with the intent of "manually" making the rounded corners after the fact.


wp34

  • Trade Count: (+3)
  • Full Member
  • ***
  • Offline Offline
  • Posts: 4794
  • Last login:April 10, 2022, 09:48:19 pm
Re: TobiKomi Scratch Build
« Reply #3 on: October 02, 2015, 10:50:55 pm »

A year or so ago I made a trace of the front corner of a DK cabinet that was at our local auction.


Turns out the PVC template I used for my Tron build is an perfect-enough match for the radius.


wp34

  • Trade Count: (+3)
  • Full Member
  • ***
  • Offline Offline
  • Posts: 4794
  • Last login:April 10, 2022, 09:48:19 pm
Re: TobiKomi Scratch Build
« Reply #4 on: October 02, 2015, 10:56:26 pm »

Template done.


wp34

  • Trade Count: (+3)
  • Full Member
  • ***
  • Offline Offline
  • Posts: 4794
  • Last login:April 10, 2022, 09:48:19 pm
Re: TobiKomi Scratch Build
« Reply #5 on: October 02, 2015, 11:03:45 pm »

Had a very odd thing happen today when I was cutting the sides.  The bearing came apart on my pattern bit while I was copying the 2nd side.


Fortunately I was almost done cutting when this happened.  Unfortunately it mangled not only the side I was cutting but the original as well.  It is the lower back side so it should be easy enough to fix with bondo.


leapinlew

  • Some questionable things going on in this room with cheetos
  • Trade Count: (+4)
  • Full Member
  • ***
  • Offline Offline
  • Posts: 7906
  • Last login:April 17, 2024, 07:51:43 pm
Re: TobiKomi Scratch Build
« Reply #6 on: October 03, 2015, 11:02:01 am »
MAJOR BUMMER!

At least it didn't fly off and hurt someone. Everytime I'm trace routing something it's at the family jewels level...

Good work. You ever think when you're building and spending all the time to get the radius of the corner right, "no one is going to notice all this hard work". lol

wp34

  • Trade Count: (+3)
  • Full Member
  • ***
  • Offline Offline
  • Posts: 4794
  • Last login:April 10, 2022, 09:48:19 pm
Re: TobiKomi Scratch Build
« Reply #7 on: October 03, 2015, 11:25:00 am »
You ever think when you're building and spending all the time to get the radius of the corner right, "no one is going to notice all this hard work". lol

The first thing my daughter said when I showed her the messed up corners was "I'll never notice that".   :cheers:

yotsuya

  • Trade Count: (+21)
  • Full Member
  • ***
  • Offline Offline
  • Posts: 19955
  • Last login:April 12, 2024, 11:03:32 pm
  • 2014 UCA Winner, 2014, 2015, 2016 ZapCon Winner
    • forum.arcadecontrols.com/index.php/topic,137636.msg1420628.html
Re: TobiKomi Scratch Build
« Reply #8 on: October 03, 2015, 01:58:32 pm »
You ever think when you're building and spending all the time to get the radius of the corner right, "no one is going to notice all this hard work". lol

The first thing my daughter said when I showed her the messed up corners was "I'll never notice that".   :cheers:
Good for her. She can throw a fit when all the interior wiring doesn't match colors. :cheers:
***Build what you dig, bro. Build what you dig.***

ChanceKJ

  • Trade Count: (0)
  • Full Member
  • ***
  • Offline Offline
  • Posts: 3229
  • Last login:August 07, 2021, 02:52:06 pm
Re: TobiKomi Scratch Build
« Reply #9 on: October 03, 2015, 03:59:09 pm »
Awsome!  :applaud:

I've added this to the Nintendo build thread. :)

DeLuSioNal29

  • Global Moderator
  • Trade Count: (+6)
  • Full Member
  • *****
  • Offline Offline
  • Posts: 4778
  • Last login:October 20, 2023, 11:39:06 pm
  • Build the impossible -"There is no Spoon"
    • DeLuSioNaL's YouTube Videos
Re: TobiKomi Scratch Build
« Reply #10 on: October 03, 2015, 10:34:30 pm »
Subscribed!  It's the year of Nintendo and I'm really falling in love with these cabs!

D
Stop by my Youtube channel and leave a comment:

talkgeek

  • Trade Count: (0)
  • Full Member
  • ***
  • Offline Offline
  • Posts: 199
  • Last login:February 03, 2024, 02:30:46 am
  • Every day you wake up breathing is a GOOD day!
Re: TobiKomi Scratch Build
« Reply #11 on: October 04, 2015, 06:02:49 pm »
Awsome!  :applaud:

I've added this to the Nintendo build thread. :)

+1   :cheers:
Currently building http://forum.arcadecontrols.com/index.php/topic,137777.0.html Mass-Replicate
Built "n0tsq3" cocktail cab http://forum.arcadecontrols.com/index.php/topic,133913.0/all.html
..and restoring a Sega MegaLo 410 Candy Cab & Moon Patrol Cab

jdbailey1206

  • Trade Count: (+1)
  • Full Member
  • ***
  • Offline Offline
  • Posts: 2656
  • Last login:March 11, 2023, 01:32:56 pm
  • No. It's your top score on Pole Position.
Re: TobiKomi Scratch Build
« Reply #12 on: October 24, 2015, 03:07:21 pm »
Yah the bit blowing up on you sucks ass WP.  Had it happen to me.  Wood filler and everything should be good.  Love your progress.  Glad to see you are building one.   :cheers:

wp34

  • Trade Count: (+3)
  • Full Member
  • ***
  • Offline Offline
  • Posts: 4794
  • Last login:April 10, 2022, 09:48:19 pm
Re: TobiKomi Scratch Build
« Reply #13 on: October 24, 2015, 08:25:11 pm »
Yah the bit blowing up on you sucks ass WP.  Had it happen to me.  Wood filler and everything should be good.  Love your progress.  Glad to see you are building one.   :cheers:

Thanks JD.  I was able to repair the damage but it still torqued me off when that bit flamed out.   :banghead:

wp34

  • Trade Count: (+3)
  • Full Member
  • ***
  • Offline Offline
  • Posts: 4794
  • Last login:April 10, 2022, 09:48:19 pm
Re: TobiKomi Scratch Build
« Reply #14 on: October 24, 2015, 08:35:39 pm »
My CP overlay turned out to be slightly smaller than the CP.  I'm trying to decide if this will be an issue or if I should just leave it that way.  I bought my artwork from RidicRick a while ago and didn't notice it was smaller until now.


What do you think?
« Last Edit: November 01, 2015, 09:08:30 pm by wp34 »

leapinlew

  • Some questionable things going on in this room with cheetos
  • Trade Count: (+4)
  • Full Member
  • ***
  • Offline Offline
  • Posts: 7906
  • Last login:April 17, 2024, 07:51:43 pm
Re: TobiKomi Scratch Build
« Reply #15 on: October 25, 2015, 12:01:40 am »
Not worth the work. The original Donkey Kong machine has the plexi just bolted to the wood. Doubt anyone would notice the extra work.

wp34

  • Trade Count: (+3)
  • Full Member
  • ***
  • Offline Offline
  • Posts: 4794
  • Last login:April 10, 2022, 09:48:19 pm
Re: TobiKomi Scratch Build
« Reply #16 on: October 25, 2015, 12:10:04 am »
Thanks Lew.  My concern is more for the protection of the plexiglass. I'm wondering if it would last better if the edges were protected.

ChanceKJ

  • Trade Count: (0)
  • Full Member
  • ***
  • Offline Offline
  • Posts: 3229
  • Last login:August 07, 2021, 02:52:06 pm
.
« Reply #17 on: October 25, 2015, 12:13:05 am »
.
« Last Edit: March 19, 2021, 04:07:28 am by ChanceKJ »

leapinlew

  • Some questionable things going on in this room with cheetos
  • Trade Count: (+4)
  • Full Member
  • ***
  • Offline Offline
  • Posts: 7906
  • Last login:April 17, 2024, 07:51:43 pm
Re: TobiKomi Scratch Build
« Reply #18 on: October 25, 2015, 12:25:41 am »
I did notice today that the CP plexi is smaller than the control panel.  For some reason I thought that with DK's the CPO was the same size as the CP

I remember being surprised too! I've done 2 DK's and I took some freedoms with my last one (red ball top joystick and red button). The most brittle area on mine seemed to be the speaker grill and some chipping there. The bases seem to always be trashed for some reason too.

Like Chance said, I'm sure the first person that tries to put their cigarette on the CP will get a thwack on the back of the head.

wp34

  • Trade Count: (+3)
  • Full Member
  • ***
  • Offline Offline
  • Posts: 4794
  • Last login:April 10, 2022, 09:48:19 pm
Re: TobiKomi Scratch Build
« Reply #19 on: October 26, 2015, 12:22:20 pm »
I did notice today that the CP plexi is smaller than the control panel.  For some reason I thought that with DK's the CPO was the same size as the CP

I remember being surprised too! I've done 2 DK's and I took some freedoms with my last one (red ball top joystick and red button). The most brittle area on mine seemed to be the speaker grill and some chipping there. The bases seem to always be trashed for some reason too.

Like Chance said, I'm sure the first person that tries to put their cigarette on the CP will get a thwack on the back of the head.

The bases do seem to get thrashed pretty good.  I'm kicking around not even building a base for this one and putting casters on it.  The cabinet is for my daughter and even though she is years away from moving out I'm trying to build it such that she can move it around easily and also doesn't have to worry too much about maintenance. 

ChanceKJ

  • Trade Count: (0)
  • Full Member
  • ***
  • Offline Offline
  • Posts: 3229
  • Last login:August 07, 2021, 02:52:06 pm
.
« Reply #20 on: October 26, 2015, 11:24:35 pm »
.
« Last Edit: March 19, 2021, 04:05:41 am by ChanceKJ »

wp34

  • Trade Count: (+3)
  • Full Member
  • ***
  • Offline Offline
  • Posts: 4794
  • Last login:April 10, 2022, 09:48:19 pm
Re: TobiKomi Scratch Build
« Reply #21 on: October 26, 2015, 11:28:00 pm »

ChanceKJ

  • Trade Count: (0)
  • Full Member
  • ***
  • Offline Offline
  • Posts: 3229
  • Last login:August 07, 2021, 02:52:06 pm
.
« Reply #22 on: October 26, 2015, 11:29:27 pm »
.
« Last Edit: March 19, 2021, 04:05:18 am by ChanceKJ »

wp34

  • Trade Count: (+3)
  • Full Member
  • ***
  • Offline Offline
  • Posts: 4794
  • Last login:April 10, 2022, 09:48:19 pm
Re: TobiKomi Scratch Build
« Reply #23 on: November 01, 2015, 09:07:00 pm »
Finally got the main carcass together and standing upright today.  She is about 1" shorter than my Nintendo cabinet at this point as I haven't built a base yet and have casters installed.  My daughter is lobbying for me to leave it this way because she likes the cabinet shorter.  I'm likely going to build a base and raise the height though.  Someday she wants her own DK cabinet and I told her it would look funny if the two cabinets were side-by-side.   ;D


Here is a picture with the speaker grill from my Nintendo cabinet.  I was just curious what it would look like.


I spent a little time practicing with the router today as I need to make the speaker grill next.  Routing 3/4" birch is not proving to be as easy as routing 3/4" MDF.  When I first plunge the bit I get a little blade creep.  The cut itself is straight but it is almost like the router is having trouble plunging through the wood initially.
jdbailey1206

  • Trade Count: (+1)
  • Full Member
  • ***
  • Offline Offline
  • Posts: 2656
  • Last login:March 11, 2023, 01:32:56 pm
  • No. It's your top score on Pole Position.
Re: TobiKomi Scratch Build
« Reply #24 on: November 02, 2015, 06:39:10 am »
Yikes...  I don't even know where that came from!?

her·e·sy
ˈherəsē/Submit
noun
noun: heresy; plural noun: heresies
belief or opinion contrary to orthodox religious (especially Christian) doctrine.
"Huss was burned for heresy"
synonyms:   dissension, dissent, nonconformity, heterodoxy, unorthodoxy, apostasy, blasphemy, freethinking; More
opinion profoundly at odds with what is generally accepted.
"cutting capital gains taxes is heresy"
Origin

Middle English: from Old French heresie, based on Latin haeresis, from Greek hairesis ‘choice’ (in ecclesiastical Greek ‘heretical sect’), from haireisthai ‘choose.’

Thats where heresy comes from yo.

When I first plunge the bit I get a little blade creep.  The cut itself is straight but it is almost like the router is having trouble plunging through the wood initially.


Dont worry.  Mine did it too.  You probably notice it more on the birch since it is denser than MDF.  You put anything traveling 5400 rpms into something its going to tweak.  Thats just Physics mah friend.  I used a file and some patience and it was all good.
« Last Edit: November 02, 2015, 06:41:16 am by jdbailey1206 »

wp34

  • Trade Count: (+3)
  • Full Member
  • ***
  • Offline Offline
  • Posts: 4794
  • Last login:April 10, 2022, 09:48:19 pm
Re: TobiKomi Scratch Build
« Reply #25 on: November 02, 2015, 09:50:01 am »
Thanks JD.   That is likely what is happening.

I did notice that the grill I'm copying isn't perfect either having been made in the days before CNC.

johnrt

  • Guest
  • Trade Count: (0)
Re: TobiKomi Scratch Build
« Reply #26 on: November 02, 2015, 03:53:27 pm »
I spent a little time practicing with the router today as I need to make the speaker grill next.  Routing 3/4" birch is not proving to be as easy as routing 3/4" MDF.  When I first plunge the bit I get a little blade creep.  The cut itself is straight but it is almost like the router is having trouble plunging through the wood initially.
Take a look here:
http://forum.arcadecontrols.com/index.php/topic,147025.msg1542564.html#msg1542564

wp34

  • Trade Count: (+3)
  • Full Member
  • ***
  • Offline Offline
  • Posts: 4794
  • Last login:April 10, 2022, 09:48:19 pm
Re: TobiKomi Scratch Build
« Reply #27 on: November 02, 2015, 04:45:35 pm »
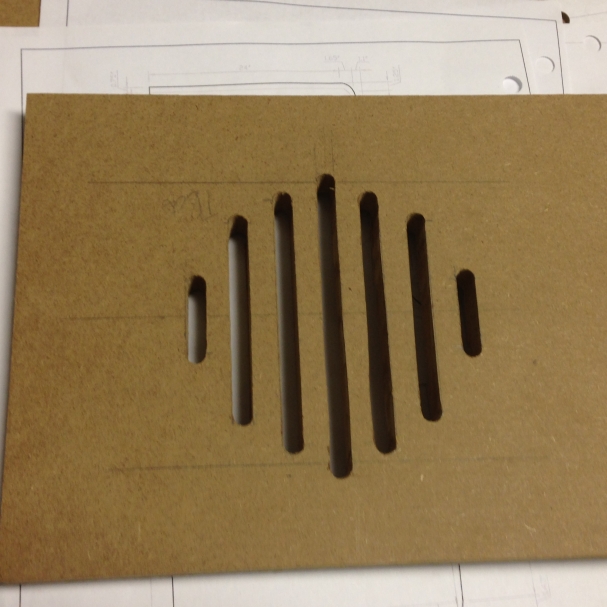
Thanks for posting that John.  I wish I would have seen it this morning.  I've been working on mine most of the day.  What I ended up doing was drilling a pilot hole for each vent using a bit which is the same size (5/16") as my router bit.  Then I used that hole to line up my router/edge guide.  I fired up the router with the bit already plunged into the pre-drilled hole.  This eliminated the issue of "startup creep" and also made lining up the edge guide a breeze.


Here it is sitting on top of the original.  It is an almost perfect match. 


The router did creep a little to the side on one of the vents (4th from the bottom).  I'm going to try and patch that with some bondo.  If I can't make it look good I'll try again but this time I may use John's method.

johnrt

  • Guest
  • Trade Count: (0)
Re: TobiKomi Scratch Build
« Reply #28 on: November 02, 2015, 04:50:35 pm »
Also, remember to screw a scrap piece of wood on the back side. Check this:
http://forum.arcadecontrols.com/index.php/topic,142992.msg1494987.html#msg1494987

jdbailey1206

  • Trade Count: (+1)
  • Full Member
  • ***
  • Offline Offline
  • Posts: 2656
  • Last login:March 11, 2023, 01:32:56 pm
  • No. It's your top score on Pole Position.
Re: TobiKomi Scratch Build
« Reply #29 on: November 04, 2015, 06:25:28 am »
I did the pilot holes also with mine WP.  It helps.  Once she sanded and painted you probably wont even notice.

wp34

  • Trade Count: (+3)
  • Full Member
  • ***
  • Offline Offline
  • Posts: 4794
  • Last login:April 10, 2022, 09:48:19 pm
Re: TobiKomi Scratch Build
« Reply #30 on: November 04, 2015, 10:06:20 pm »
JD - you are correct it looks a lot better with paint on it.  I'm still not sure if I'm 100% happy with it. It needs a little more filing.  Also I found a scrap piece of 3/4 MDF and may try cutting one more before I move on.


Tonight I also installed the marquee shelf.

The vents are in a tight spot so I decided to hit the area with a little black paint and then installed them before I installed the shelf rather than after I was done painting the cabinet.


It looks like I may run out of good weather before I'm ready to paint.  My plan was to try oil-based paint (at least for the black) but I may have to move the cabinet in the basement and use latex depending on the weather next week.

wp34

  • Trade Count: (+3)
  • Full Member
  • ***
  • Offline Offline
  • Posts: 4794
  • Last login:April 10, 2022, 09:48:19 pm
Re: TobiKomi Scratch Build
« Reply #31 on: November 19, 2015, 05:39:46 pm »
I need some help pulling my head out of ---my bottom---.  I'm up against the clock and have spent the afternoon trying to get this monitor to fit.  Do I need a vertical mounting bracket? I've tried moving the monitor down and a little closer but then it gets hard to see through the bezel.


johnrt

  • Guest
  • Trade Count: (0)
Re: TobiKomi Scratch Build - Monitor mounting question
« Reply #32 on: November 20, 2015, 03:45:31 am »
Really? The monitor doesn't fit? Have you got a picture from the front?

ChanceKJ

  • Trade Count: (0)
  • Full Member
  • ***
  • Offline Offline
  • Posts: 3229
  • Last login:August 07, 2021, 02:52:06 pm
.
« Reply #33 on: November 20, 2015, 05:09:48 am »
.
« Last Edit: March 19, 2021, 03:07:59 am by ChanceKJ »

ChanceKJ

  • Trade Count: (0)
  • Full Member
  • ***
  • Offline Offline
  • Posts: 3229
  • Last login:August 07, 2021, 02:52:06 pm
.
« Reply #34 on: November 20, 2015, 05:21:53 am »
.
« Last Edit: March 19, 2021, 03:08:14 am by ChanceKJ »

DeLuSioNal29

  • Global Moderator
  • Trade Count: (+6)
  • Full Member
  • *****
  • Offline Offline
  • Posts: 4778
  • Last login:October 20, 2023, 11:39:06 pm
  • Build the impossible -"There is no Spoon"
    • DeLuSioNaL's YouTube Videos
Re: TobiKomi Scratch Build - Monitor mounting question
« Reply #35 on: November 20, 2015, 08:44:12 am »
Get rid of the metal case and it will fit.

Take some 1x2 pieces of wood and mount them to the inside of the cab.  Make sure to drill pilot holes first so they don't crack in half.  Then take the advice outlined in this the thread below to mount 4 brackets to the 1x2 pieces you just made.  Again, drill pilot holes so the screws do not crack the wood in half.  The chassis can then be mounted on that shelf you have there.  I did something similar with my 27" monitor to make it fit in my cabinet:


The bracket method:
http://forum.arcadecontrols.com/index.php/topic,147025.msg1530314.html#msg1530314

D


Stop by my Youtube channel and leave a comment:

wp34

  • Trade Count: (+3)
  • Full Member
  • ***
  • Offline Offline
  • Posts: 4794
  • Last login:April 10, 2022, 09:48:19 pm
Re: TobiKomi Scratch Build - Monitor mounting question
« Reply #36 on: November 20, 2015, 09:06:22 am »
Chance - I very much appreciate you taking the time to confirm this for me.  My family was pretty impressed that some dude in Canada would confirm my mistake at 3am.   :cheers:    Seriously thank you very much.

Delusional - Thanks for that tip.  I'll look into it but may not have time to implement it initially as I have to get the cabinet in the basement ready for paint today and have all my sawdust making tools put away for the winter.

Nothing like waiting until the last minute.   :dizzy:

wp34

  • Trade Count: (+3)
  • Full Member
  • ***
  • Offline Offline
  • Posts: 4794
  • Last login:April 10, 2022, 09:48:19 pm
Re: TobiKomi Scratch Build - Monitor mounting question
« Reply #37 on: November 20, 2015, 10:08:32 am »
John - Here is a picture from the front.  This is from my second attempt to move the monitor close to the front and a little lower.  This attempt did not get the frame in the cabinet and made it harder to see the monitor over the lower bezel bracket.

ChanceKJ

  • Trade Count: (0)
  • Full Member
  • ***
  • Offline Offline
  • Posts: 3229
  • Last login:August 07, 2021, 02:52:06 pm
.
« Reply #38 on: November 20, 2015, 03:25:52 pm »
.
« Last Edit: March 19, 2021, 03:49:16 am by ChanceKJ »

wp34

  • Trade Count: (+3)
  • Full Member
  • ***
  • Offline Offline
  • Posts: 4794
  • Last login:April 10, 2022, 09:48:19 pm
Re: TobiKomi Scratch Build - Monitor mounting question
« Reply #39 on: November 20, 2015, 06:43:06 pm »
Yeah it is a brand new monitor.  It is supposed to go in my scratch build Multi-Williams eventually.  For that reason I really don't want to screw with the frame. 

I'm not sure I want to "waste" such a nice monitor on this cabinet though.   ;D