Main Restorations Software Audio/Jukebox/MP3 Everything Else Buy/Sell/Trade
Project Announcements Monitor/Video GroovyMAME Merit/JVL Touchscreen Meet Up Retail Vendors
Driving & Racing Woodworking Software Support Forums Consoles Project Arcade Reviews
Automated Projects Artwork Frontend Support Forums Pinball Forum Discussion Old Boards
Raspberry Pi & Dev Board controls.dat Linux Miscellaneous Arcade Wiki Discussion Old Archives
Lightguns Arcade1Up Try the site in https mode Site News

Unread posts | New Replies | Recent posts | Rules | Chatroom | Wiki | File Repository | RSS | Submit news


Author Topic: "Streets of Rage - Robinson Edition" : Racing Cab Project  (Read 21846 times)

0 Members and 1 Guest are viewing this topic.

ghetoprobe

  • Trade Count: (0)
  • Full Member
  • ***
  • Offline Offline
  • Posts: 99
  • Last login:January 25, 2017, 01:00:42 pm
  • SENSES FAIL
Re: "Streets of Rage - Robinson Edition" : Racing Cab Project
« Reply #40 on: December 18, 2014, 01:32:59 pm »
Next up - some glitz & glam - I normally feel that LEDs and glowing computer fans are gaudy and take away from the overall appearance of most things.  "Let the machine be the show" is my usual stance, but then I saw gbeef's build and how well he integrated the LEDs into the cabinet.  Not over-the-top, in-your-face LED's - just a little bit of a light show to accent the cabinet.  And beyond that, you can easily turn them off if they're too distracting.

I dropped the IR down through an existing hole in the main cabinet board, you can barely see it, but it does pretty well picking up the remote from across the room.  The controller is mounted toward the right-hand wall of the cabinet and I'm using a 12v 4a power supply from an old laptop (I originally used a 12v 1a power supply and blew it up.  Whoops!  Should have checked the label.).  I also installed a "green" HP power strip so when the PC/PS3 turns on, everything else turns on as well.


ghetoprobe

  • Trade Count: (0)
  • Full Member
  • ***
  • Offline Offline
  • Posts: 99
  • Last login:January 25, 2017, 01:00:42 pm
  • SENSES FAIL
Re: "Streets of Rage - Robinson Edition" : Racing Cab Project
« Reply #41 on: December 18, 2014, 01:46:23 pm »
I had to add a board to the bottom of the seat base to accommodate the LED strips.  I wanted the light to be as even as possible so I purchased some 90° elbows off eBay for the LED strips.  Bad move...  these things are terrible and I DO NOT recommend them.  Save yourself the trouble and just solder the connections yourself.  I think I'm going to flip the cabinet over and solder every connection point by hand.  What a waste of time and money.  I guess that's what happens when you try to take shortcuts.


ghetoprobe

  • Trade Count: (0)
  • Full Member
  • ***
  • Offline Offline
  • Posts: 99
  • Last login:January 25, 2017, 01:00:42 pm
  • SENSES FAIL
Re: "Streets of Rage - Robinson Edition" : Racing Cab Project
« Reply #42 on: December 18, 2014, 01:53:43 pm »
With the LED strips all pinned in place I used 1/2" split loom to hide the wiring.  A also cut a single piece of LEDs to use as a test - if these turn on and the rest of the cab is dark, at least I know the power supply and controller are okay.


ghetoprobe

  • Trade Count: (0)
  • Full Member
  • ***
  • Offline Offline
  • Posts: 99
  • Last login:January 25, 2017, 01:00:42 pm
  • SENSES FAIL
Re: "Streets of Rage - Robinson Edition" : Racing Cab Project
« Reply #43 on: December 18, 2014, 02:04:16 pm »
With the LED strips all pinned in place I used 1/2" split loom to hide the wiring.  I also cut a single piece of LEDs to use as a test - if these turn on and the rest of the cab is dark, at least I know the power supply and controller are okay.

Forgot to mention the LED strips I'm using are RGB 5050's with the weather-proof rubber on them.  I used these for our halloween costumes this year and they took abuse from a 2-year-old and I running around all night.  They also can do WAY more colors than the 3528's.  Well worth the few extra dollars.


« Last Edit: December 18, 2014, 03:02:07 pm by ghetoprobe »

BadMouth

  • Moderator
  • Trade Count: (+6)
  • Full Member
  • *****
  • Offline Offline
  • Posts: 9226
  • Last login:Yesterday at 05:42:45 pm
  • ...
Re: "Streets of Rage - Robinson Edition" : Racing Cab Project
« Reply #44 on: December 18, 2014, 02:15:45 pm »
Forgot to mention the LED strips I'm using are RGB 5050's with the weather-proof rubber on them.  I used these for our halloween costumes this year and they took abuse from a 2-year-old and I running around all night.  They also can do WAY more colors than the 3528's.  Well worth the few extra dollars.

 :lol  Pretty sure I saw those pics on the front page of Reddit around Halloween.  :cheers:

ghetoprobe

  • Trade Count: (0)
  • Full Member
  • ***
  • Offline Offline
  • Posts: 99
  • Last login:January 25, 2017, 01:00:42 pm
  • SENSES FAIL
Re: "Streets of Rage - Robinson Edition" : Racing Cab Project
« Reply #45 on: December 18, 2014, 02:26:55 pm »
BadMouth, hope you don't mind, but I kind of stole your idea for my buttons.  I just loved the way yours looked so I modeled mine after them.  Thanks for sharing your build with us, it definitely gave me a few good ideas.


BadMouth

  • Moderator
  • Trade Count: (+6)
  • Full Member
  • *****
  • Offline Offline
  • Posts: 9226
  • Last login:Yesterday at 05:42:45 pm
  • ...
Re: "Streets of Rage - Robinson Edition" : Racing Cab Project
« Reply #46 on: December 18, 2014, 02:57:29 pm »
BadMouth, hope you don't mind, but I kind of stole your idea for my buttons.  I just loved the way yours looked so I modeled mine after them.  Thanks for sharing your build with us, it definitely gave me a few good ideas.


I put it out there because I thought it was the best solution and hoped it would become the standard.
I still think when connected to a keyboard encoder, it's the best possible setup for navigating PC game menus.

ghetoprobe

  • Trade Count: (0)
  • Full Member
  • ***
  • Offline Offline
  • Posts: 99
  • Last login:January 25, 2017, 01:00:42 pm
  • SENSES FAIL
Re: "Streets of Rage - Robinson Edition" : Racing Cab Project
« Reply #47 on: December 18, 2014, 03:08:36 pm »
Here she is, all lit up.  If you've never seen these LED kits, they're pretty cool - you can fade, flash, brighten, darken, even create a "custom" color.


« Last Edit: December 19, 2014, 10:55:43 am by ghetoprobe »

ghetoprobe

  • Trade Count: (0)
  • Full Member
  • ***
  • Offline Offline
  • Posts: 99
  • Last login:January 25, 2017, 01:00:42 pm
  • SENSES FAIL
Re: "Streets of Rage - Robinson Edition" : Racing Cab Project
« Reply #48 on: December 18, 2014, 03:18:48 pm »
This may be a little off-topic, but I have a confession to make.  I'm messy.  Very, very messy.  After losing my drill for well over 15 minutes (it was behind me) I figured it was time to clean up my work space a little bit.  Here's the before and after - hopefully a few of you can relate.  I'm sure it will degrade again quickly.


ghetoprobe

  • Trade Count: (0)
  • Full Member
  • ***
  • Offline Offline
  • Posts: 99
  • Last login:January 25, 2017, 01:00:42 pm
  • SENSES FAIL
Re: "Streets of Rage - Robinson Edition" : Racing Cab Project
« Reply #49 on: December 18, 2014, 03:49:21 pm »
Moving on!  My faux carbon fiber vinyl finally arrived!  Time to wrap the shifter housing.  I was sure to wrap the bottom as well - you never know when someone might fall on the floor and look up at the hideous, bare MDF...  what is wrong with me...

I'm glad I did the shifter housing first, as opposed to the actual cabinet decals.  There's definitely a learning curve to getting the razor blade to cut just right.  My advice for cutting vinyl is to use a brand new razor blade.  Cutting at a 30°-45° angle away from the wood really seemed to be the sweet spot for accurate cuts.  I also put some t-molding on the shifter housing so you can start to get an idea of the art-direction. 


« Last Edit: December 18, 2014, 03:53:57 pm by ghetoprobe »

ghetoprobe

  • Trade Count: (0)
  • Full Member
  • ***
  • Offline Offline
  • Posts: 99
  • Last login:January 25, 2017, 01:00:42 pm
  • SENSES FAIL
Re: "Streets of Rage - Robinson Edition" : Racing Cab Project
« Reply #50 on: December 18, 2014, 07:05:48 pm »
Here's the top of the shifter housing being mounted to the cabinet.  It's solid as a rock.  There are a few other things that need to be addressed before permanently mounting the shifter so we'll come back to that.


ghetoprobe

  • Trade Count: (0)
  • Full Member
  • ***
  • Offline Offline
  • Posts: 99
  • Last login:January 25, 2017, 01:00:42 pm
  • SENSES FAIL
Re: "Streets of Rage - Robinson Edition" : Racing Cab Project
« Reply #51 on: December 18, 2014, 07:34:14 pm »
Let's cut some diamond plate.  This isn't the really thick diamond plate, it's the thin, embossed type of sheet you can get at Home Depot.  We'll see how well it holds up, but I don't intend to put this thing on route.  I roughed up the underside of the diamond plate and the places I would be gluing it to.  Sprayed it with a little bit of water and used Gorilla Glue to glue it down.  I used Irwin clamps (love them) whenever I could, but for the large plate at the base of the cabinet I just used heavy blocks of wood to apply pressure.

I also made some corner/edge protectors that I'll be painting black.  They're a little thick, keeping the seat base from mating with the cabinet well.  I may end up pulling these if I can find a thinner 90° piece of metal.  I used a #8 countersink so the screws would sit flat in the metal trim.


Generic Eric

  • Trade Count: (+2)
  • Full Member
  • ***
  • Offline Offline
  • Posts: 4520
  • Last login:March 05, 2024, 09:02:23 am
  • Restore! Don't maim for MAME, build from scratch!
    • forum.arcadecontrols.com/index.php/topic,143226.0.html
Re: "Streets of Rage - Robinson Edition" : Racing Cab Project
« Reply #52 on: December 18, 2014, 10:10:09 pm »
Very cool so far.

ghetoprobe

  • Trade Count: (0)
  • Full Member
  • ***
  • Offline Offline
  • Posts: 99
  • Last login:January 25, 2017, 01:00:42 pm
  • SENSES FAIL
Re: "Streets of Rage - Robinson Edition" : Racing Cab Project
« Reply #53 on: December 20, 2014, 04:56:05 pm »
The next two steps kind of went hand-in-hand.  I needed to build the base for the steering wheel and also needed to take into account a shelf for the Z-5500's sub woofer.  This would be a VERY tight fit between the two, not to mention the steering wheel base needed to be at an angle to bring the steering wheel to a more natural position.  Here's how I made the shelf for the sub woofer :

After cutting the shelf to size I realized it was going to block most of the airflow from the lower part of the cabinet.  I drilled out two holes for 80mm fans and two holes for cabling running up the sides of the cab.  Then it was time to cut the angled pieces along the sides of the cab.  I tried to keep the sub woofer shelf as level as possible since the inner board in the cabinet slopes down toward the back of the cabinet.  Now I can easily remove the shelf without disturbing any cabling, mounting brackets, etc.


ghetoprobe

  • Trade Count: (0)
  • Full Member
  • ***
  • Offline Offline
  • Posts: 99
  • Last login:January 25, 2017, 01:00:42 pm
  • SENSES FAIL
Re: "Streets of Rage - Robinson Edition" : Racing Cab Project
« Reply #54 on: December 20, 2014, 05:20:25 pm »
After consulting my wife, she and I both felt that the steering wheel position was too far from the driver when the seat was pushed back for a 5'8"or larger person.  So, I threw caution to the wind and purchased an additional set of seat rails.  In the pictures you will first see the base, then the steering wheel mounting board with the t-molding slot cut.  You can get an idea of how steep the angle needed to be to get the wheel facing down toward the driver.


« Last Edit: December 20, 2014, 05:28:44 pm by ghetoprobe »

ghetoprobe

  • Trade Count: (0)
  • Full Member
  • ***
  • Offline Offline
  • Posts: 99
  • Last login:January 25, 2017, 01:00:42 pm
  • SENSES FAIL
Re: "Streets of Rage - Robinson Edition" : Racing Cab Project
« Reply #55 on: December 20, 2014, 05:50:31 pm »
Here's the upper board that the steering wheel will be mounted to.  After mounting the rails I realized I would need to drill holes into the steering wheel plastic so it would sit flat against the board.  Kind of nerve-racking, drilling into a brand new toy.


ghetoprobe

  • Trade Count: (0)
  • Full Member
  • ***
  • Offline Offline
  • Posts: 99
  • Last login:January 25, 2017, 01:00:42 pm
  • SENSES FAIL
Re: "Streets of Rage - Robinson Edition" : Racing Cab Project
« Reply #56 on: December 20, 2014, 06:09:52 pm »
Faux carbon fiber wrap applied with some black t-molding to help everything blend in with the dashboard.  I'm trying to keep the entire steering wheel mounting and slider as hidden as possible. I also had to recess the bolts that lock the steering wheel in place so the slider lever could move freely.  In the end, adding these sliders gives the wheel about 2-inches of travel.  That may not sound like a lot, but it's a HUGE difference.  Now, even with the seat all the way back for a 6'5" body, it feels just right.  VERY happy that I put in the extra effort for the sliders.

You may notice that the bottom slider rails have washers under the bolts, while the top slider rails do not.  The washers made everything fit snugly, so there is very little wiggle when FFB kicks in.


« Last Edit: December 20, 2014, 06:17:37 pm by ghetoprobe »

ghetoprobe

  • Trade Count: (0)
  • Full Member
  • ***
  • Offline Offline
  • Posts: 99
  • Last login:January 25, 2017, 01:00:42 pm
  • SENSES FAIL
Re: "Streets of Rage - Robinson Edition" : Racing Cab Project
« Reply #57 on: December 20, 2014, 06:34:38 pm »
Black trim pieces for the diamond plate are painted and mounted.  Also peeled the protective layer from the diamond plate to expose the chrome.  It's finally starting to feel like an arcade.  So many little steps are finally adding up to something tangible.


ghetoprobe

  • Trade Count: (0)
  • Full Member
  • ***
  • Offline Offline
  • Posts: 99
  • Last login:January 25, 2017, 01:00:42 pm
  • SENSES FAIL
Re: "Streets of Rage - Robinson Edition" : Racing Cab Project
« Reply #58 on: December 21, 2014, 07:31:56 am »
I came home to find a package leaning against the front door.  Clear the dining room table sweetie!  It's time to get this build moving!

Originally, I went over to a local sign store to get a quote for the decals.  $600+ after tax.  Crazy.  Speaking with the salesman, I could tell that he had never printed decals for a project quite like this and his suggestions on the material were questionable.  Spending that much money on an educated guess wasn't good enough for me to pull the trigger.

Then, I remembered that Lucian045 had offered his printing services to the community.  I contacted him, we chatted for an hour and I could tell my artwork was in good hands.  As I mentioned in my first post, Lucian045 is a huge asset to this community.  I made the artwork - he made it a reality.  He is knowledgeable, helpful, and got the artwork to my door very quickly.  If there's any question in your mind whom to use for your next set of decals, Lucian045 (Brad) is the best.  Hands down.

http://forum.arcadecontrols.com/index.php/topic,134866.msg1391705.html#msg1391705

The packaging was top-notch.  It had an outer layer of protective paper and it even came with an applicator!  Thanks, Brad!


ghetoprobe

  • Trade Count: (0)
  • Full Member
  • ***
  • Offline Offline
  • Posts: 99
  • Last login:January 25, 2017, 01:00:42 pm
  • SENSES FAIL
Re: "Streets of Rage - Robinson Edition" : Racing Cab Project
« Reply #59 on: December 21, 2014, 08:10:56 am »
Time for some fun!  3/4" t-molding never seems to cover 3/4" wood.  There always seems to be the slightest gap showing so I used a glossy black Sharpie paint pen to paint the t-molding channel edges.  After the first decal was applied and cut to shape, the edge of the artwork had white showing.  I hit it again with the Sharpie paint pen which hid the edge nicely.  Orange t-molding applied.


« Last Edit: December 21, 2014, 08:24:45 am by ghetoprobe »

ghetoprobe

  • Trade Count: (0)
  • Full Member
  • ***
  • Offline Offline
  • Posts: 99
  • Last login:January 25, 2017, 01:00:42 pm
  • SENSES FAIL
Re: "Streets of Rage - Robinson Edition" : Racing Cab Project
« Reply #60 on: December 21, 2014, 09:07:51 am »
On to the left side...


ghetoprobe

  • Trade Count: (0)
  • Full Member
  • ***
  • Offline Offline
  • Posts: 99
  • Last login:January 25, 2017, 01:00:42 pm
  • SENSES FAIL
Re: "Streets of Rage - Robinson Edition" : Racing Cab Project
« Reply #61 on: December 21, 2014, 09:23:38 am »
Now for the "license plate".  This was my wife's idea and I think it turned out so well.  I started off with orange t-molding at the bottom, but realized it was a little overkill.  Replaced it with some black t-molding and I think it looks much better.

My little helper kept the soundtrack going the entire time, "Let it go!  Let it go!!". 


ghetoprobe

  • Trade Count: (0)
  • Full Member
  • ***
  • Offline Offline
  • Posts: 99
  • Last login:January 25, 2017, 01:00:42 pm
  • SENSES FAIL
Re: "Streets of Rage - Robinson Edition" : Racing Cab Project
« Reply #62 on: December 21, 2014, 09:47:01 am »
Seat base hardware is painted black and the seat base is all put together.  The brackets on the back are for mounting the rear speakers.  Mounting the speakers into the seat's headrest just wasn't going to cut it.  I wanted the Z-5500's rear speakers intact behind the driver to provide the best sound possible.  Although our party guests won't likely care about the immersive experience that the 5.1 surround offers, I will. 

Keeping this project looking like an arcade while offering more of a sim-racing experience has been quite the challenge.  If I'm spending this much time and money on the project I want it to handle the newer racing games to the fullest extent possible.  The rear speakers won't be the most attractive setup ever conceived, but they'll get the job done and will move around with the cabinet once installed (I didn't want to have separate speaker stands).  Let's hope my plan pans out...


« Last Edit: December 21, 2014, 05:39:27 pm by ghetoprobe »

Malenko

  • KNEEL BEFORE ZODlenko!
  • Trade Count: (+58)
  • Full Member
  • ***
  • Offline Offline
  • Posts: 13999
  • Last login:April 09, 2024, 07:27:18 pm
  • Have you played with my GingerBalls?
    • forum.arcadecontrols.com/index.php/topic,142404.msg1475162.html
Re: "Streets of Rage - Robinson Edition" : Racing Cab Project
« Reply #63 on: December 21, 2014, 10:20:51 am »
BadMouth, hope you don't mind, but I kind of stole your idea for my buttons.  I just loved the way yours looked so I modeled mine after them.  Thanks for sharing your build with us, it definitely gave me a few good ideas.

I used that idea of his too when I had a racing cab:


Your build is coming together both fast and furiously (PUN!)   Great work so far, you trying to get this done by this Thursday or something? ;)
If you're replying to a troll you are part of the problem.
I also need to follow this advice. Ignore or report, don't reply.

ghetoprobe

  • Trade Count: (0)
  • Full Member
  • ***
  • Offline Offline
  • Posts: 99
  • Last login:January 25, 2017, 01:00:42 pm
  • SENSES FAIL
Re: "Streets of Rage - Robinson Edition" : Racing Cab Project
« Reply #64 on: December 21, 2014, 11:37:33 am »
Great work so far, you trying to get this done by this Thursday or something? ;)

I'd love to get this done for Christmas, but I don't know if that'll happen.  The build is almost done so I'm not blowing through it as quickly as my posts would suggest.  I'm just now getting around to putting up all the pictures and explanation.  Hopefully I can get a video up before Christmas.

I really like your button artwork.  The gradient on the color rays and the blended checkered flag look really good.  Very cool!  Once I finish up this project (at least until it's Playstation3-playable) I'd like to look through all of your cab builds and restores.  You've been busy!

Malenko

  • KNEEL BEFORE ZODlenko!
  • Trade Count: (+58)
  • Full Member
  • ***
  • Offline Offline
  • Posts: 13999
  • Last login:April 09, 2024, 07:27:18 pm
  • Have you played with my GingerBalls?
    • forum.arcadecontrols.com/index.php/topic,142404.msg1475162.html
Re: "Streets of Rage - Robinson Edition" : Racing Cab Project
« Reply #65 on: December 21, 2014, 11:50:23 am »
I haven't been that busy, just been around for 15 years :)   As a Flyers Fan, I love the colors you chose and I must say that faux vanity plate is a nice touch!
If you're replying to a troll you are part of the problem.
I also need to follow this advice. Ignore or report, don't reply.

yotsuya

  • Trade Count: (+21)
  • Full Member
  • ***
  • Offline Offline
  • Posts: 19955
  • Last login:April 12, 2024, 11:03:32 pm
  • 2014 UCA Winner, 2014, 2015, 2016 ZapCon Winner
    • forum.arcadecontrols.com/index.php/topic,137636.msg1420628.html
Re: "Streets of Rage - Robinson Edition" : Racing Cab Project
« Reply #66 on: December 21, 2014, 12:39:25 pm »
Love the license plate. I did something similar on my racing cab - I used a 12v neon motorcycle license plate holder and had a custom motorcycle plate made up for mine:

***Build what you dig, bro. Build what you dig.***

ghetoprobe

  • Trade Count: (0)
  • Full Member
  • ***
  • Offline Offline
  • Posts: 99
  • Last login:January 25, 2017, 01:00:42 pm
  • SENSES FAIL
Re: "Streets of Rage - Robinson Edition" : Racing Cab Project
« Reply #67 on: December 22, 2014, 02:05:48 pm »
As a Flyers Fan, I love the colors you chose

I hadn't even noticed...  shame on me, being from Philly and all...   I actually chose these colors to pay homage to my best friend.  He and I used to race around in our cars when we were younger and everything he bought and wore was black and orange.  Thought I'd give him a surprise when he eventually gets over to my place and sees this thing.

I did something similar on my racing cab

I love the look of neon.  Wish I could have put neon bulbs on the underside of the cabinet, but they were too expensive.  Great idea with the motorcycle plate, I should have picked up a real one.
« Last Edit: December 22, 2014, 02:35:33 pm by ghetoprobe »

ghetoprobe

  • Trade Count: (0)
  • Full Member
  • ***
  • Offline Offline
  • Posts: 99
  • Last login:January 25, 2017, 01:00:42 pm
  • SENSES FAIL
Re: "Streets of Rage - Robinson Edition" : Racing Cab Project
« Reply #68 on: December 22, 2014, 02:06:13 pm »
Time to print the buttons.  Again, a quick thank you to BadMouth for the inspiration. 

I went to Staples and bought Avery 15660 labels which are clear and sized right.  I also downloaded a Photoshop template for the 15660's to make my life easier.  For the buttons I bought a pack of SuzoHapp buttons used in a poker machine (I'm assuming).  Took a little sandpaper and scraped off the text to leave a white face for the new button art. 


ghetoprobe

  • Trade Count: (0)
  • Full Member
  • ***
  • Offline Offline
  • Posts: 99
  • Last login:January 25, 2017, 01:00:42 pm
  • SENSES FAIL
Re: "Streets of Rage - Robinson Edition" : Racing Cab Project
« Reply #69 on: December 22, 2014, 02:24:53 pm »
Next up was the Marquee Plexi.  What a terrible adventure this was.  Shaping Plexi is probably the most miserable thing I've had to do thus far.  I did a rough trace of the marquee hole, then cut the oval out with my scroll saw.  From there it was all belt sander...  I used the coarsest grit I had (120), taking a little bit off at a time, trying not to leave the Plexi on the belt long so it wouldn't melt.  Once I was satisfied I polished the edges with a buffing wheel.  Maybe took an hour to get it looking acceptable.  Not perfect, but once it's mounted I don't think anyone will be able to notice the imperfections.

Drilled out the holes, pealed the plastic protector and applied the marquee with some soap and water - just a rough cutout to get the air bubbles out.  Now to let it dry overnight...


« Last Edit: December 22, 2014, 02:29:33 pm by ghetoprobe »

ghetoprobe

  • Trade Count: (0)
  • Full Member
  • ***
  • Offline Offline
  • Posts: 99
  • Last login:January 25, 2017, 01:00:42 pm
  • SENSES FAIL
Re: "Streets of Rage - Robinson Edition" : Racing Cab Project
« Reply #70 on: December 22, 2014, 02:34:48 pm »
The marquee has dried so now it's time to take a razor blade to it!  After the initial cutout, cut each of the twelve mounting holes, popped in the small screws and mounted it to the marquee housing.  Wow!  It looks absolutely amazing in person.


« Last Edit: December 22, 2014, 02:43:25 pm by ghetoprobe »

Malenko

  • KNEEL BEFORE ZODlenko!
  • Trade Count: (+58)
  • Full Member
  • ***
  • Offline Offline
  • Posts: 13999
  • Last login:April 09, 2024, 07:27:18 pm
  • Have you played with my GingerBalls?
    • forum.arcadecontrols.com/index.php/topic,142404.msg1475162.html
Re: "Streets of Rage - Robinson Edition" : Racing Cab Project
« Reply #71 on: December 22, 2014, 05:10:20 pm »
since I cant convince you to make me one, can you send me a template for the plexi?   the marquee in my FTS cab is shattered cant trace it.

Yours looks amazeballs
If you're replying to a troll you are part of the problem.
I also need to follow this advice. Ignore or report, don't reply.

MrThunderwing

  • Trade Count: (0)
  • Full Member
  • ***
  • Offline Offline
  • Posts: 1054
  • Last login:Yesterday at 03:30:55 pm
  • As I pass, do I give you the ass or the crotch?
Re: "Streets of Rage - Robinson Edition" : Racing Cab Project
« Reply #72 on: December 22, 2014, 07:26:03 pm »
Wow, that's shaping up very nicely. Outstanding work!

ghetoprobe

  • Trade Count: (0)
  • Full Member
  • ***
  • Offline Offline
  • Posts: 99
  • Last login:January 25, 2017, 01:00:42 pm
  • SENSES FAIL
Re: "Streets of Rage - Robinson Edition" : Racing Cab Project
« Reply #73 on: December 22, 2014, 09:24:29 pm »
Thanks for the kind words, slowly but surely, I'm getting there...

Malenko, let me finish up this project and maybe in the next month or so I can whip something up for you.  I'll need to take the marquee apart to make a template for you.

ghetoprobe

  • Trade Count: (0)
  • Full Member
  • ***
  • Offline Offline
  • Posts: 99
  • Last login:January 25, 2017, 01:00:42 pm
  • SENSES FAIL
Re: "Streets of Rage - Robinson Edition" : Racing Cab Project
« Reply #74 on: December 22, 2014, 09:37:04 pm »
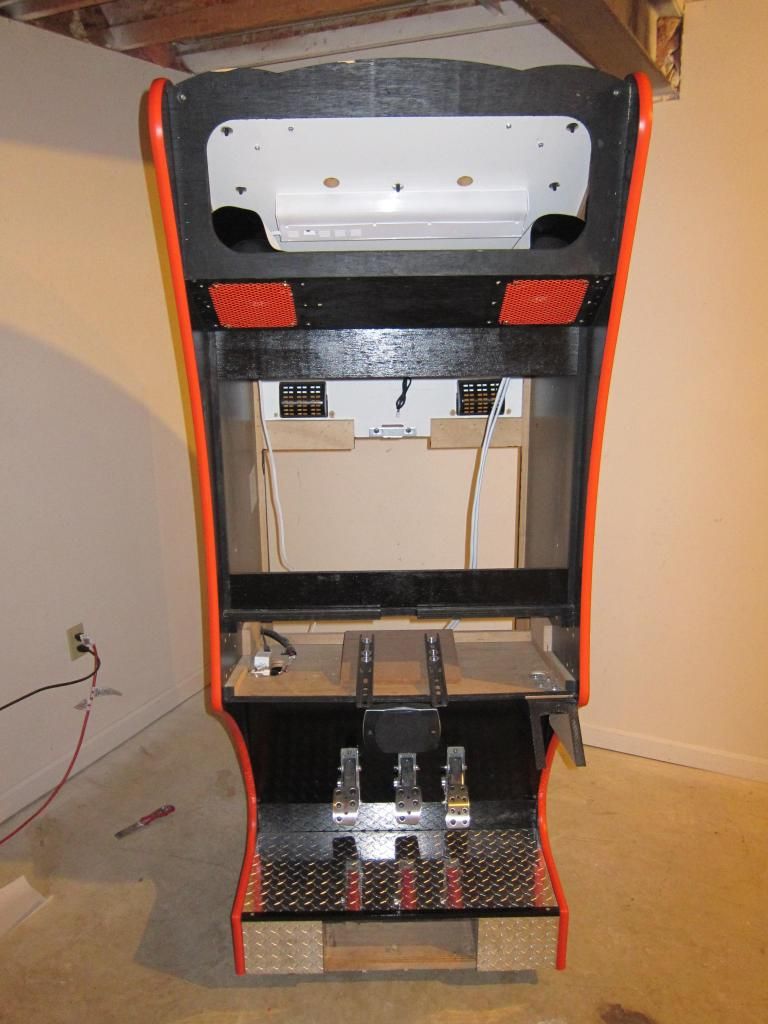
Oh man!  Time to prep the cabinet!  I filled in all the holes that I wouldn't be using and prepped the edges to get as close to a 90° angle as possible.  Looking forward to finally getting the artwork finished!!


Here are a few images of the base and cabinet almost ready to be bolted together :


ghetoprobe

  • Trade Count: (0)
  • Full Member
  • ***
  • Offline Offline
  • Posts: 99
  • Last login:January 25, 2017, 01:00:42 pm
  • SENSES FAIL
Re: "Streets of Rage - Robinson Edition" : Racing Cab Project
« Reply #75 on: December 22, 2014, 10:11:07 pm »
I sanded down the cabinet and the t-molding edges, used "Goo Gone" to get any little pieces of glue left over from the original decals, hit it with some 91% isoproyl, and then used a tack cloth to get any remaining bits of dust.  This is my first time using tack cloth and I'm in love...  I'll never do another project without it.  All edges got the glossy-black-Sharpie-paint-pen treatment.

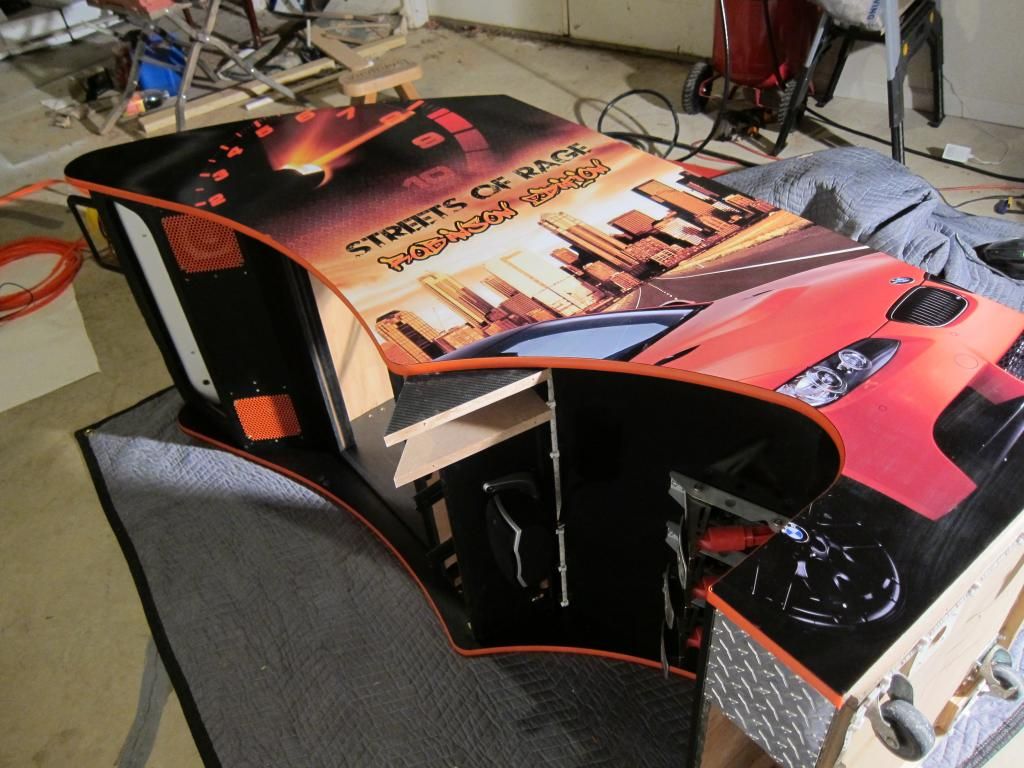
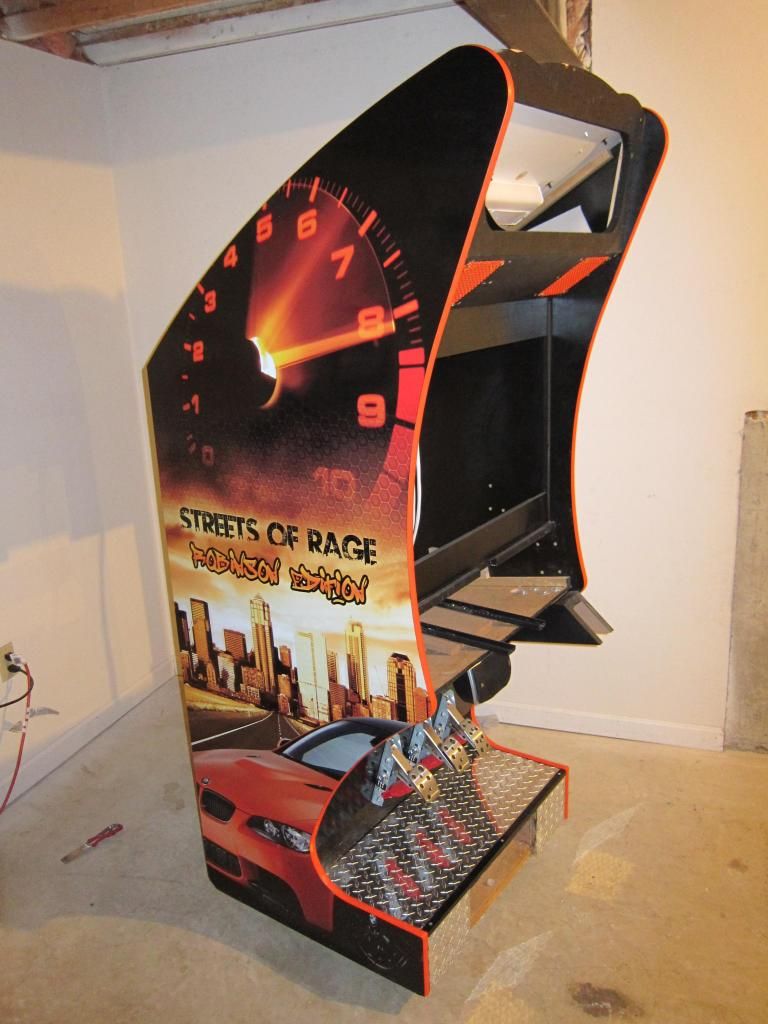
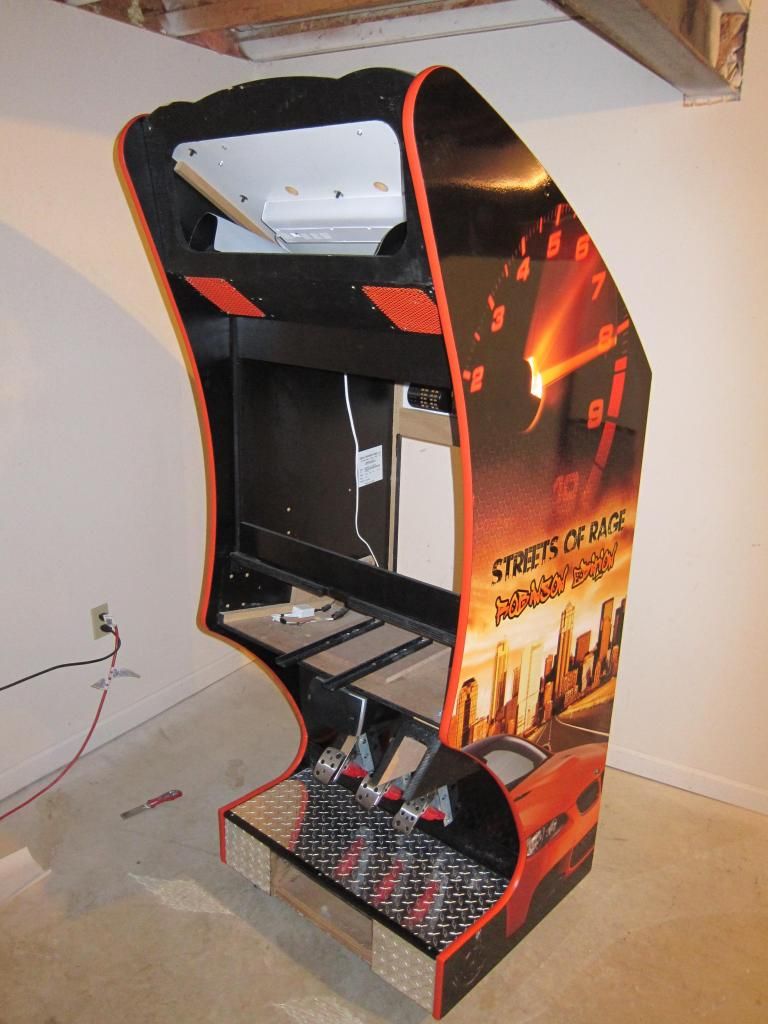
THANK YOU to my wife.  I could not have applied the cabinet decals without her.  They're each 37"x74".  That is a huge, very expensive, hard-to-work-with sheet of amazingness that I would have TOTALLY screwed up if she hadn't been there to help.  We put the cabinet down on its side, my wife stood on a stool holding up the artwork, and we slowly rolled the backing a couple inches at a time.  Slowly, we worked out the air bubbles and managed to get a pretty incredible end-result.  A few times there was the smallest speck of dust that would get caught - we would just pull up the artwork, pick it off with a razor blade, and re-apply.  The material itself was extremely easy to work with, on the other hand, the size of the print was not.  Another thank you to Lucian045 for helping me out with the printing process.

So here she is!!!
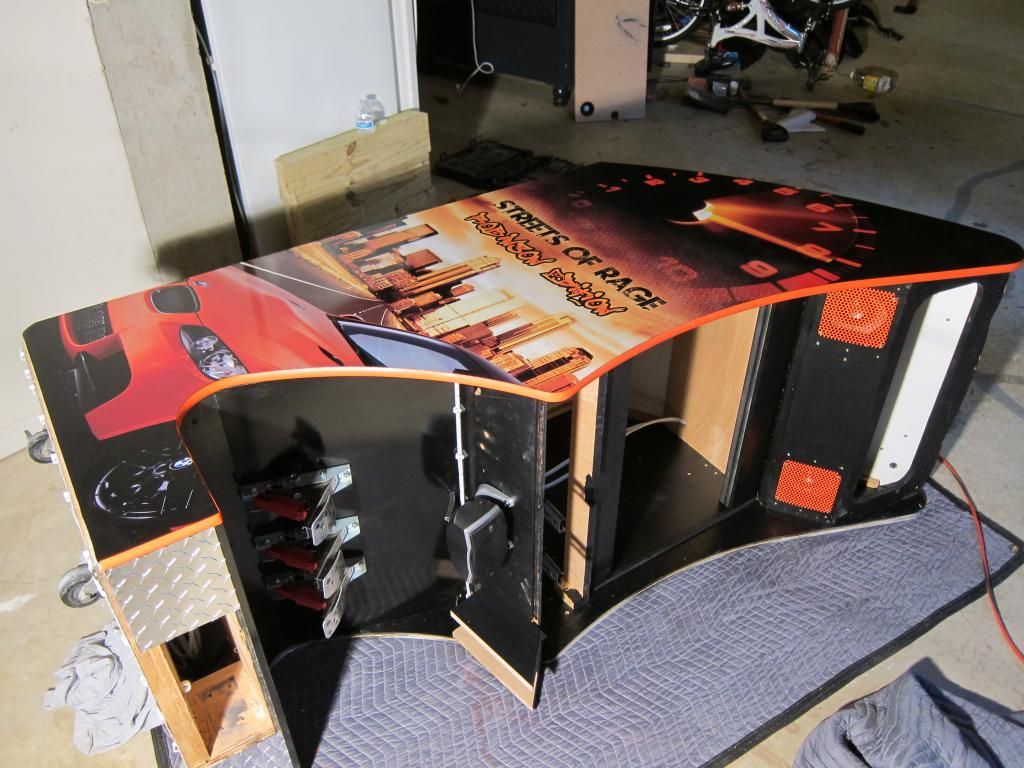


« Last Edit: December 22, 2014, 10:46:39 pm by ghetoprobe »

Malenko

  • KNEEL BEFORE ZODlenko!
  • Trade Count: (+58)
  • Full Member
  • ***
  • Offline Offline
  • Posts: 13999
  • Last login:April 09, 2024, 07:27:18 pm
  • Have you played with my GingerBalls?
    • forum.arcadecontrols.com/index.php/topic,142404.msg1475162.html
Re: "Streets of Rage - Robinson Edition" : Racing Cab Project
« Reply #76 on: December 22, 2014, 11:03:33 pm »
looks amazeballs.  You going to put the subwoofer under the seat?
If you're replying to a troll you are part of the problem.
I also need to follow this advice. Ignore or report, don't reply.

yotsuya

  • Trade Count: (+21)
  • Full Member
  • ***
  • Offline Offline
  • Posts: 19955
  • Last login:April 12, 2024, 11:03:32 pm
  • 2014 UCA Winner, 2014, 2015, 2016 ZapCon Winner
    • forum.arcadecontrols.com/index.php/topic,137636.msg1420628.html
Re: "Streets of Rage - Robinson Edition" : Racing Cab Project
« Reply #77 on: December 22, 2014, 11:35:57 pm »
Looks great! Brad provides a great product.
***Build what you dig, bro. Build what you dig.***

ghetoprobe

  • Trade Count: (0)
  • Full Member
  • ***
  • Offline Offline
  • Posts: 99
  • Last login:January 25, 2017, 01:00:42 pm
  • SENSES FAIL
Re: "Streets of Rage - Robinson Edition" : Racing Cab Project
« Reply #78 on: December 23, 2014, 06:24:48 am »
Thanks!  Wish I could have put the sub under the seat, but it's huge and it barely fits in the back of the cabinet.  I had to build a custom shelf so I had somewhere to put it.  My first attempt at the surround sound was with a Logitech Z-640 and it just wasn't up to the task.  That sub woofer fit under the seat, but once the plate and seat were installed you couldn't hear it at all.  That's why I ended up going with the Z-5500 - it shakes the house.

ghetoprobe

  • Trade Count: (0)
  • Full Member
  • ***
  • Offline Offline
  • Posts: 99
  • Last login:January 25, 2017, 01:00:42 pm
  • SENSES FAIL
Re: "Streets of Rage - Robinson Edition" : Racing Cab Project
« Reply #79 on: December 23, 2014, 06:25:28 am »
Now that the artwork is done it's time to cut some holes.  When I originally got the cabinet it was missing half of the bolts and associated hardware.  I looked everywhere for the flat, black bolts that sit flat in the side of the cabinet.  After wasting hours on the search I ended up getting carriage bolts designed for garage doors (http://www.garagedoorpartsupply.com/bolt-carriage-plated-1-4-20-x-2-1-4-12-pk/) (if anyone knows where to get the "real" bolts I'd love to know for future reference).  I painted them black and they worked perfectly.  Once painted, you can't tell the difference between the original bolts and the new ones (except for length).

Once the hardware was installed I permanently attached the gear shift housing and shifter.


« Last Edit: December 23, 2014, 06:27:43 am by ghetoprobe »