Main Restorations Software Audio/Jukebox/MP3 Everything Else Buy/Sell/Trade
Project Announcements Monitor/Video GroovyMAME Merit/JVL Touchscreen Meet Up Retail Vendors
Driving & Racing Woodworking Software Support Forums Consoles Project Arcade Reviews
Automated Projects Artwork Frontend Support Forums Pinball Forum Discussion Old Boards
Raspberry Pi & Dev Board controls.dat Linux Miscellaneous Arcade Wiki Discussion Old Archives
Lightguns Arcade1Up Try the site in https mode Site News

Unread posts | New Replies | Recent posts | Rules | Chatroom | Wiki | File Repository | RSS | Submit news


Author Topic: An Original Fix It Felix Build --- 100% Complete!  (Read 83579 times)

0 Members and 1 Guest are viewing this topic.

jdbailey1206

  • Trade Count: (+1)
  • Full Member
  • ***
  • Offline Offline
  • Posts: 2656
  • Last login:March 11, 2023, 01:32:56 pm
  • No. It's your top score on Pole Position.
An Original Fix It Felix Build --- 100% Complete!
« on: October 14, 2013, 11:27:08 am »
Hey All.  Getting close to finishing my weecade so I thought I would do something even more original and start a Fix It Felix.   ;D

The Computer Specs
  • 1.86 GHz Socket 775 Core 2 Duo E6300 - Refurbished
  • Gigabyte GA-G41MT-S2PT - 2.1 - motherboard
  • 8 GB Ram
  • 19" LCD Dell Monitor
  • Dell Keyboard and MouseUsed sparingly for diagnostics when build is complete
  • Windows XP Service Pack 3 with no other software
  • .NET Framework 4, XNA Framework 4, DirectX 9.0c


I opted out of the video card since the on board video was sufficient to run any 'gaming software'.

The Cabinet Materials  Subject to change
  • (4) 5/8 4X8 MDF                                    Lake Orion Lumber
  • Amico 1.5" Caster Wheels                       Amazon.com
  • 35' Nintendo Flat T Molding                     T Molding.com
  • Nintendo Art Bezel Retainer                    mikesarcade.com
  • Nintendo Top Marquee Bracket                mikesarcade.com
  • Nintendo Bottom Bezel Bracket               mikesarcade.com
  • Control Panel Latch                                mikesarcade.com
  • Strike Bracket                                       mikesarcade.com
  • (2) Cabinet Handles                               arcadeemulator.net
  • 19" LCD Monitor Kit                               arcadeshop.com
  • 19" LCD Bezel                                       arcadeshop.com
  • 1/8" 24X24" Smoked Plexi                     estreetplastics.com
  • Nintendo Replacement Joystick               twistedquarter.com
  • (4) Classx Buttons                                 groovygamegear.com
  • iPac                                                      ultimarc.com
  • Lepai Mini Amp                                      ebay.com
  • Nintendo Coin Door                                ebay.com
  • 18" Fluorescent Under Cabinet Light        homedepot.com
  • (2) Lexan Poly Carbonate Sheet              homedepot.com
  • Paint                                                     homedepot.com
  • Cabinet Art                                            gameongrafix.com

I recieved a couple of measurements I needed from Automark before my edit.  Thanks for help.  On to the build!
« Last Edit: August 26, 2020, 10:43:22 am by jdbailey1206 »

jdbailey1206

  • Trade Count: (+1)
  • Full Member
  • ***
  • Offline Offline
  • Posts: 2656
  • Last login:March 11, 2023, 01:32:56 pm
  • No. It's your top score on Pole Position.
Re: Fix It Felix Build
« Reply #1 on: October 14, 2013, 11:33:05 am »
Laying out and cutting the sides and cutting my angles for the bottom support.
« Last Edit: January 23, 2014, 01:57:52 pm by jdbailey1206 »

Automark

  • Trade Count: (0)
  • Full Member
  • ***
  • Offline Offline
  • Posts: 169
  • Last login:October 24, 2023, 03:55:08 pm
  • Arcade in Spain ?
Re: Fix It Felix Build
« Reply #2 on: October 14, 2013, 11:44:29 am »
nice,
always like to see a DK cab
Ill take the measerements now .....

Automark

  • Trade Count: (0)
  • Full Member
  • ***
  • Offline Offline
  • Posts: 169
  • Last login:October 24, 2023, 03:55:08 pm
  • Arcade in Spain ?
Re: Fix It Felix Build
« Reply #3 on: October 14, 2013, 11:49:48 am »
coin door A = 27,2 cm
coin door B = 42,5 cm

C = 5 mm

Dont know how much in inch though  :dunno

meyer980

  • Trade Count: (0)
  • Full Member
  • ***
  • Offline Offline
  • Posts: 385
  • Last login:March 29, 2024, 04:00:11 pm
  • Building fun things for fun
    • sergiostuff.com/2020/04/15/felix-son-arcade-game/
    • Sergio Stuff
Re: Fix It Felix Build
« Reply #4 on: October 14, 2013, 04:48:21 pm »
Awesome! I'm in the middle of a Felix build too, but it's my first ever cabinet so it's going slowly. It'll be nice to watch your build.

Are you getting artwork Ridicrick or doing something different? And you're right, Sjaak and his contributors did a great job on the software.

Automark

  • Trade Count: (0)
  • Full Member
  • ***
  • Offline Offline
  • Posts: 169
  • Last login:October 24, 2023, 03:55:08 pm
  • Arcade in Spain ?
Re: Fix It Felix Build
« Reply #5 on: October 14, 2013, 05:23:08 pm »
seeing this, wants to copy my original nintendo cab for something similar  :cheers:

jdbailey1206

  • Trade Count: (+1)
  • Full Member
  • ***
  • Offline Offline
  • Posts: 2656
  • Last login:March 11, 2023, 01:32:56 pm
  • No. It's your top score on Pole Position.
Re: Fix It Felix Build
« Reply #6 on: October 15, 2013, 07:03:59 am »
Thank you for the help Automark.  It's perfectly fine that it's in cm and mm's.  I can convert online to get my measurments.  The conversions were in decimals so  I picked up what is called an Engineers measuring tape.  I was excited too because I thought I would have to get out my Engineers scales and measure with that.  Would not be fun.  By the way Automark were you able to get the "D" measurement for me?  I would greatly appreciate it.  And good to hear that you are inspired.  At least you have a Nintendo cab to work off of.  I have to rely on the kindness of strangers.  (No homo)   ;D

I didn't do a lot last night.  Got the speaker hole measured out and drew it on the mdf.  I also used our plotter at work yesterday morning and found that when I printed out the CP the Jump and Fix buttons were off yellow and did not match the rest of yellows on the CP.  Nothing too bad.  Just have to fix it in Inkscape.   :)

Hopefully I can get motivated tonight.
« Last Edit: October 15, 2013, 08:31:34 am by jdbailey1206 »

Automark

  • Trade Count: (0)
  • Full Member
  • ***
  • Offline Offline
  • Posts: 169
  • Last login:October 24, 2023, 03:55:08 pm
  • Arcade in Spain ?
Re: Fix It Felix Build
« Reply #7 on: October 15, 2013, 07:13:29 am »
d is 12 mm

jdbailey1206

  • Trade Count: (+1)
  • Full Member
  • ***
  • Offline Offline
  • Posts: 2656
  • Last login:March 11, 2023, 01:32:56 pm
  • No. It's your top score on Pole Position.
Re: Fix It Felix Build
« Reply #8 on: October 15, 2013, 08:40:51 am »
Thank you Automark.  You're a lifesaver.  I was at a loss on where I could actually find that thin of plywood but I found it at Joann Fabrics of all places.  Go figure.   :dunno  They had 3/16" 24X24" sheets.  Must be for small scale modelers.  Might come in hand if I completely lose my brain and do a mini cab.  I attached a picture marked 'C' to show how small the width was I was looking for.
« Last Edit: October 15, 2013, 08:47:00 am by jdbailey1206 »

Automark

  • Trade Count: (0)
  • Full Member
  • ***
  • Offline Offline
  • Posts: 169
  • Last login:October 24, 2023, 03:55:08 pm
  • Arcade in Spain ?
Re: An Original Fix It Felix Build
« Reply #9 on: October 15, 2013, 09:52:29 am »
no problem  :cheers:

here's a close up of mine

if you need more detailed pics, let me know.

« Last Edit: October 16, 2013, 10:43:06 am by Automark »

jdbailey1206

  • Trade Count: (+1)
  • Full Member
  • ***
  • Offline Offline
  • Posts: 2656
  • Last login:March 11, 2023, 01:32:56 pm
  • No. It's your top score on Pole Position.
Re: An Original Fix It Felix Build
« Reply #10 on: October 16, 2013, 11:15:30 am »
Looking for five more measurements if you can swing it Automark.  I appreciate all your help thus far sir.  Pictures at the bottom.  From what I could gather this morning the measurement marked A has to be 1/2" high because CP is 5/8 minus a 1/8th inch notch that is cut out.
« Last Edit: October 16, 2013, 11:19:06 am by jdbailey1206 »

jdbailey1206

  • Trade Count: (+1)
  • Full Member
  • ***
  • Offline Offline
  • Posts: 2656
  • Last login:March 11, 2023, 01:32:56 pm
  • No. It's your top score on Pole Position.
Re: An Original Fix It Felix Build
« Reply #11 on: January 23, 2014, 10:46:39 am »
Welp it's been quite an interesting winter so far.  In between my grandmothers 90th birthday bash, Thanksgiving, Christmas, and finding out that I am finally a father for the first time, I am still going strong on my project but I keep forgetting to update my post.  For all of those who have been waiting for updates (which I'm sure is in the negative numbers  :laugh:)  I've uploaded all my recent pictures over the past three months, got them sized and hopefully I can take some time tonight, since I'm waiting on parts (one important one that I had to re order since I'm a clumsy ---fudgesicle---  :banghead: ) and I don't want to paint, to finally update the post. 

Thanks again for everyone who has helped over the past three months, directly or indirectly by posting a thread for me to gain information from, thank you and I'll be posting again tonight.

« Last Edit: January 23, 2014, 10:58:53 am by jdbailey1206 »

meyer980

  • Trade Count: (0)
  • Full Member
  • ***
  • Offline Offline
  • Posts: 385
  • Last login:March 29, 2024, 04:00:11 pm
  • Building fun things for fun
    • sergiostuff.com/2020/04/15/felix-son-arcade-game/
    • Sergio Stuff
Re: An Original Fix It Felix Build
« Reply #12 on: January 23, 2014, 11:16:42 am »
Awesome, looking forward to seeing how it's coming!

Maybe I misread, but you're not painting your cabinet? Are you using vinyl then?

jdbailey1206

  • Trade Count: (+1)
  • Full Member
  • ***
  • Offline Offline
  • Posts: 2656
  • Last login:March 11, 2023, 01:32:56 pm
  • No. It's your top score on Pole Position.
Re: An Original Fix It Felix Build
« Reply #13 on: January 23, 2014, 11:55:13 am »
Awesome, looking forward to seeing how it's coming!

Maybe I misread, but you're not painting your cabinet? Are you using vinyl then?

You didn't misread meyer.  I am painting my cab.  I'm just not a big fan doing it.  My OCD comes out and I tend to work and rework an area. 

meyer980

  • Trade Count: (0)
  • Full Member
  • ***
  • Offline Offline
  • Posts: 385
  • Last login:March 29, 2024, 04:00:11 pm
  • Building fun things for fun
    • sergiostuff.com/2020/04/15/felix-son-arcade-game/
    • Sergio Stuff
Re: An Original Fix It Felix Build
« Reply #14 on: January 23, 2014, 12:46:48 pm »
Got it, painting is a mixed bag. It's such a minor thing (compared to all the other work on the cabinet) but if done wrong can make the rest look like crap.

Oh, congrats on being a dad!

jdbailey1206

  • Trade Count: (+1)
  • Full Member
  • ***
  • Offline Offline
  • Posts: 2656
  • Last login:March 11, 2023, 01:32:56 pm
  • No. It's your top score on Pole Position.
Re: An Original Fix It Felix Build
« Reply #15 on: January 23, 2014, 09:16:33 pm »
To start my build I decided to create my base after measuring and cutting all my pieces.  As they say you can't have a good build without a solid foundation.   :)  To create the base I used 1 x 6 x 8 #2 & Better Kiln Dried Whitewood Board from Home Depot.  This pine board was sturdy enough for me to score one board in half and measure the length I needed for each side.  I took the measurements from Jakobuds plans and made my 45 degree angle cuts and dry fit my boards before I glued and put together with finishing nails.


The easiest thing I found to do was take my back and left piece and before I fit them into the corner clamp I used some Loctite Clear Power Grab adhesive.  This glue is nice because it is strong enough for what I need and I dries clear.


After the pieces of the foundation were glued I hammered 5 finishing nails into the boards to keep them together.  The whole time I kept my level on my boards just to make sure I didn't kick anything out of whack when I was working on my bottom piece.


All together and level.   ;D


Got tired of being cold so I went indoors and set to drafting out my guidelines for my speaker holes and button/joystick holes. 


jdbailey1206

  • Trade Count: (+1)
  • Full Member
  • ***
  • Offline Offline
  • Posts: 2656
  • Last login:March 11, 2023, 01:32:56 pm
  • No. It's your top score on Pole Position.
Re: An Original Fix It Felix Build
« Reply #16 on: January 23, 2014, 09:47:43 pm »
The following Saturday I accomplished more than I set out to do which is always a good thing.  Having my base together I reinforced it with small pieces I cut from a 2x4.  I drilled small recessed holes into the center pieces on each side which can't be seen.  After I glued and screwed my support pieces into my base I ran two quick coats of Rustoleums Painters Touch Ultra Cover on my base.  I used a semi gloss and it gave the wood a nice finish which can be seen in the following pictures.


I like how the paint saturated enough into the wood that the texture of the wood still showed through. 

While my paint was drying in between coats I drilled the pilot holes for my speaker holes so I could router the holes from top to bottom. 


After applying my router guide to my router it was easy enough just to adjust the length and follow the one side of the speaker board to make my holes. 


All finished.  Just some quick sanding with my files to clean it up.


Towards the end of the day I measured and cut the recesses for the back of the cab.  I picked up a piece of 7/16th 4x8 sanded plywood from Home Depot.  It was on the expensive side but it gives the original look of the back of the old DK cabinets. 


Pretty clean fit if I do say so.


I dry fit my speaker board and coin door board and called it a day.
« Last Edit: January 23, 2014, 09:50:37 pm by jdbailey1206 »

jdbailey1206

  • Trade Count: (+1)
  • Full Member
  • ***
  • Offline Offline
  • Posts: 2656
  • Last login:March 11, 2023, 01:32:56 pm
  • No. It's your top score on Pole Position.
Re: An Original Fix It Felix Build
« Reply #17 on: January 24, 2014, 08:47:21 am »
Found some time in the next week to start to piece the cab together.  It was getting cold and I pushed myself to get the majority of the cab together so I could pull it inside (with some help of course) and paint it. 

Once I got the base connected to the bottom piece and one side of the cab I set it on it's side on my 'work table'  ;D and began to cut my support pieces out of 3x1 square dowel.  Finding this was a life saver.  Before I found the square dowel I had the awesome task of cutting down a pine board into 1x1" pieces for my weecade.  Oh well.  Live and learn.

Before the construction began I grabbed the piece for my coin door and cut it out.  Figured it might be easier when it was loose.   :)


I only had a couple of hours this day so I got all my pieces except the left side put on with the square dowel and glue and screws and called it a day.
« Last Edit: January 24, 2014, 09:32:59 am by jdbailey1206 »

Boxxle

  • Trade Count: (0)
  • Full Member
  • ***
  • Offline Offline
  • Posts: 13
  • Last login:July 17, 2020, 12:12:18 pm
  • I want to build my own arcade controls!
Re: An Original Fix It Felix Build
« Reply #18 on: January 24, 2014, 11:50:48 am »
Excellent work so far! I'll be following this one. 

wp34

  • Trade Count: (+3)
  • Full Member
  • ***
  • Offline Offline
  • Posts: 4794
  • Last login:April 10, 2022, 09:48:19 pm
Re: An Original Fix It Felix Build
« Reply #19 on: January 24, 2014, 02:14:44 pm »
Your build is looking great so far.  Thanks for posting pictures of how you routed the speaker grill.   :cheers:

Generic Eric

  • Trade Count: (+2)
  • Full Member
  • ***
  • Offline Offline
  • Posts: 4520
  • Last login:March 05, 2024, 09:02:23 am
  • Restore! Don't maim for MAME, build from scratch!
    • forum.arcadecontrols.com/index.php/topic,143226.0.html
Re: An Original Fix It Felix Build
« Reply #20 on: January 24, 2014, 05:04:51 pm »
Your build is looking great so far.  Thanks for posting pictures of how you routed the speaker grill.   :cheers:
Where does he get those wonderful toys?

The router guide looks handy!

PixelPaul

  • Trade Count: (0)
  • Full Member
  • ***
  • Offline Offline
  • Posts: 77
  • Last login:October 26, 2020, 08:10:46 am
Re: An Original Fix It Felix Build
« Reply #21 on: January 24, 2014, 05:28:01 pm »
This looks really good! Watching with interest as I build my DK cabinet.

bobfrankly

  • Trade Count: (0)
  • Full Member
  • ***
  • Offline Offline
  • Posts: 11
  • Last login:March 20, 2015, 04:15:11 pm
  • I want to build my own arcade controls!
Re: An Original Fix It Felix Build
« Reply #22 on: January 24, 2014, 05:31:14 pm »
Great start! I gotta get me one of those joinery clamps  :tool:

jdbailey1206

  • Trade Count: (+1)
  • Full Member
  • ***
  • Offline Offline
  • Posts: 2656
  • Last login:March 11, 2023, 01:32:56 pm
  • No. It's your top score on Pole Position.
Re: An Original Fix It Felix Build
« Reply #23 on: January 31, 2014, 11:48:59 am »
Excellent work so far! I'll be following this one. 

Your build is looking great so far.  Thanks for posting pictures of how you routed the speaker grill.   :cheers:

This looks really good! Watching with interest as I build my DK cabinet.

Thanks for the support guys.  This build (knock on MDF) seems to be going a lot easier than my Weecade build.

Your build is looking great so far.  Thanks for posting pictures of how you routed the speaker grill.   :cheers:
Where does he get those wonderful toys?

The router guide looks handy!

It's a huge help.  When I did the speaker holes for my Weecade I completely forgot about it and used some MDF as guides and remembered I had it when I was done routing the holes.  All I could hear was the Price is Right horn in my head.


Louis Tully

  • Trade Count: (+5)
  • Full Member
  • ***
  • Offline Offline
  • Posts: 1800
  • Last login:February 13, 2015, 09:41:03 pm
Re: An Original Fix It Felix Build
« Reply #24 on: January 31, 2014, 12:43:15 pm »
.
« Last Edit: February 12, 2015, 04:19:36 pm by Louis Tully »

jdbailey1206

  • Trade Count: (+1)
  • Full Member
  • ***
  • Offline Offline
  • Posts: 2656
  • Last login:March 11, 2023, 01:32:56 pm
  • No. It's your top score on Pole Position.
Re: An Original Fix It Felix Build
« Reply #25 on: January 31, 2014, 01:31:07 pm »
By the next weekend I was able to complete making my cuts on my square dowels and get everything tightened up.


When I got to the construction of the marquee area I ran into a snag.  I went to install some support pieces for the bottom of the board for the marquee and realized I couldn't quite get my drill at a good angle to install my screws. 


Then I remembered that Dewalt carried a nice little Right Angle Drill Adapter.  Saved my butt for the tight squeeze.


Not too shabby.   :D

I got the cab on its feet finally and was able to do some quick work for side pieces that the CP sits on.  After combing the threads I was able to find a reference photo and cut my piece from the dimensions.  The piece was taken from a DK3 cab but I had no problem using the dimensions and lightly tweaking it for my needs.


Not much difference and the piece came out better than I expected.


All ready to go. 


Couldn't resist the marquee. 

All level.
« Last Edit: January 31, 2014, 01:33:53 pm by jdbailey1206 »

meyer980

  • Trade Count: (0)
  • Full Member
  • ***
  • Offline Offline
  • Posts: 385
  • Last login:March 29, 2024, 04:00:11 pm
  • Building fun things for fun
    • sergiostuff.com/2020/04/15/felix-son-arcade-game/
    • Sergio Stuff
Re: An Original Fix It Felix Build
« Reply #26 on: January 31, 2014, 02:14:53 pm »
Very beautiful. The close pictures of the side pieces the CP sits on are very useful for me too.

jdbailey1206

  • Trade Count: (+1)
  • Full Member
  • ***
  • Offline Offline
  • Posts: 2656
  • Last login:March 11, 2023, 01:32:56 pm
  • No. It's your top score on Pole Position.
Re: An Original Fix It Felix Build
« Reply #27 on: February 05, 2014, 12:21:18 pm »
I found some spare time the following weekend to do a some work on the back of the cabinet.  I got a package from chompingquarters.com earlier in the week.  It contained my Nintendo bracket set.  I'll have to track down some black screws that will fit the brackets.  Shouldn't be too hard but that will come at a later date.


It was cold that weekend so I just spent a quick two hours measuring out and cutting the back panels.  I got my hands on a Dremel Saw Max.  It was a little on the expensive side but I was over making jagged uneven cuts with my jigsaw.  Even with guides the jig saw was giving me fits.  The Saw Max was nice.  It was quick and made some nice precise cuts.  The sanded plywood I had picked up was really nice to work with.  It was easy to cut and matched the back of the old DK cabinets nicely.


The only draw back of the sanded plywood I used is that it likes to bow.  Hopefully once I get it screwed down it will give the back a nicer look.

pinballsmith

  • Trade Count: (0)
  • Full Member
  • ***
  • Offline Offline
  • Posts: 32
  • Last login:June 04, 2021, 01:52:02 pm
  • I want to build my own arcade controls!
Re: An Original Fix It Felix Build
« Reply #28 on: February 05, 2014, 09:44:18 pm »
I almost had my build finished and then I managed to buy a real one. A friend of mine was making a perfect recreation of the artwork.

« Last Edit: January 31, 2015, 07:08:49 pm by pinballsmith »

jdbailey1206

  • Trade Count: (+1)
  • Full Member
  • ***
  • Offline Offline
  • Posts: 2656
  • Last login:March 11, 2023, 01:32:56 pm
  • No. It's your top score on Pole Position.
Re: An Original Fix It Felix Build
« Reply #29 on: February 07, 2014, 09:04:53 am »
I almost had my build finished and then I managed to buy a real one. A friend of mine was making a perfect recreation of the artwork. He's gauging interest for the artwork at the moment. Here's a sample:

Geh.  Don't even get me started on buying one.   :)  I started looking back in July of last year.  The first one I found was in great shape for $50.  The downfall was it was in Florida from the Arcade Boneyard.  Couldn't justify paying $600 for shipping.  I also found one local but I tried to get the guy down from $200 to $150 and then when I talked to him again he went up to $350.  Makes me shudder to think he will contribute to the gene pool one day if he hasn't already.   :lol  The last one I found was a DK3 cabinet that would have served better as a restoration and not a full conversion. 

Oh well.  The artwork looks great.  I got a copy from one of the guys over at the KLOV forum. 
« Last Edit: February 07, 2014, 09:06:50 am by jdbailey1206 »

jdbailey1206

  • Trade Count: (+1)
  • Full Member
  • ***
  • Offline Offline
  • Posts: 2656
  • Last login:March 11, 2023, 01:32:56 pm
  • No. It's your top score on Pole Position.
Re: An Original Fix It Felix Build
« Reply #30 on: February 07, 2014, 09:21:37 am »
That Sunday I was able to do some quick work on the CP and Bezel retainer.  I wasn't sure what wood I could use but I found that I could rip down a piece of 2X8 and it worked out quite well.  I was reluctant to use the 2X8 because most wood anymore isn't of true size.  Following the Jakobud plans I needed a piece that was going to be 2 inches thick.  The 2X8 was only off by an 1/8 of an inch.  It wasn't a problem for what I needed.  Again I cut my wood to the inner length of the cabinet and used my router guide, the appropriate bits and added my two pieces of square dowel and gave it quick sanding and called it good. 


« Last Edit: February 07, 2014, 10:27:46 am by jdbailey1206 »

meyer980

  • Trade Count: (0)
  • Full Member
  • ***
  • Offline Offline
  • Posts: 385
  • Last login:March 29, 2024, 04:00:11 pm
  • Building fun things for fun
    • sergiostuff.com/2020/04/15/felix-son-arcade-game/
    • Sergio Stuff
Re: An Original Fix It Felix Build
« Reply #31 on: February 07, 2014, 12:31:18 pm »
This may be a dumb question...but the notch on the bottom of the board. Does the control panel "fit" into that? I had assumed the control panel just edged up to that board but now I'm starting to think it goes in deeper.

jdbailey1206

  • Trade Count: (+1)
  • Full Member
  • ***
  • Offline Offline
  • Posts: 2656
  • Last login:March 11, 2023, 01:32:56 pm
  • No. It's your top score on Pole Position.
Re: An Original Fix It Felix Build
« Reply #32 on: February 07, 2014, 01:39:29 pm »
....but now I'm starting to think it goes in deeper.


jdbailey1206

  • Trade Count: (+1)
  • Full Member
  • ***
  • Offline Offline
  • Posts: 2656
  • Last login:March 11, 2023, 01:32:56 pm
  • No. It's your top score on Pole Position.
Re: An Original Fix It Felix Build
« Reply #33 on: February 07, 2014, 01:45:30 pm »
But in all seriousness you are correct.  The control panel fits in that notch and is latched down.  Probably for those of us who get a little too involved in our games.

pinballsmith

  • Trade Count: (0)
  • Full Member
  • ***
  • Offline Offline
  • Posts: 32
  • Last login:June 04, 2021, 01:52:02 pm
  • I want to build my own arcade controls!
Re: An Original Fix It Felix Build
« Reply #34 on: February 07, 2014, 02:43:15 pm »
I almost had my build finished and then I managed to buy a real one. A friend of mine was making a perfect recreation of the artwork. He's gauging interest for the artwork at the moment. Here's a sample:

Geh.  Don't even get me started on buying one.   :)  I started looking back in July of last year.  The first one I found was in great shape for $50.  The downfall was it was in Florida from the Arcade Boneyard.  Couldn't justify paying $600 for shipping.  I also found one local but I tried to get the guy down from $200 to $150 and then when I talked to him again he went up to $350.  Makes me shudder to think he will contribute to the gene pool one day if he hasn't already.   :lol  The last one I found was a DK3 cabinet that would have served better as a restoration and not a full conversion. 

Oh well.  The artwork looks great.  I got a copy from one of the guys over at the KLOV forum.

I meant a real disney-made machine, but I agree that the prices of bare cabs are outrageous at the moment. A local guy was trying to unload his bare cabinet and monitor for $750.

jdbailey1206

  • Trade Count: (+1)
  • Full Member
  • ***
  • Offline Offline
  • Posts: 2656
  • Last login:March 11, 2023, 01:32:56 pm
  • No. It's your top score on Pole Position.
Re: An Original Fix It Felix Build
« Reply #35 on: February 10, 2014, 10:26:29 am »
A local guy was trying to unload his bare cabinet and monitor for $750.

Nice.  It's like these people are doing us a favor by letting us buy their used cabs. 

jdbailey1206

  • Trade Count: (+1)
  • Full Member
  • ***
  • Offline Offline
  • Posts: 2656
  • Last login:March 11, 2023, 01:32:56 pm
  • No. It's your top score on Pole Position.
Re: An Original Fix It Felix Build
« Reply #36 on: February 10, 2014, 11:19:42 am »
I did a little work on my cab during the week.  Trying to get the major work done before I pulled it in the house before the cold really set in.

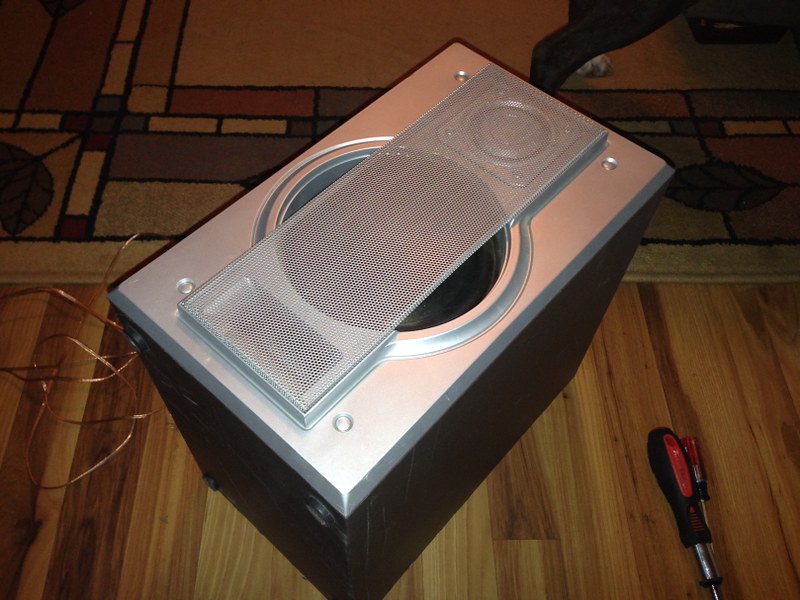
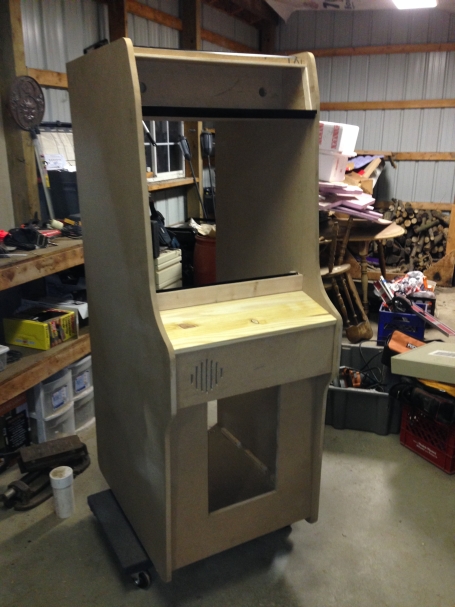
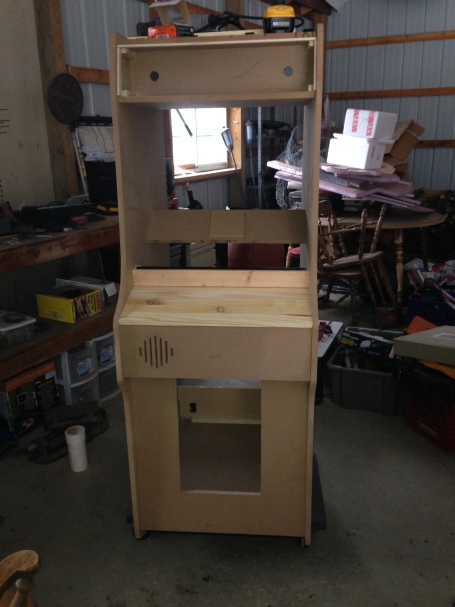
I was able to find a speaker at my local thrift shop for $2.  I wanted to get this for the actual speaker grill and didn't want to spend close to $30 for the grill when it is just going to the upper back vent holes.  A hammer, some tin snips and a quick coat of paint to it and it worked out perfectly.


I also got my wheels from Amazon in the mail.  I was able to reference other builds and found that Amico sold a caster wheel really close to the original DK wheels.  They can be found here.


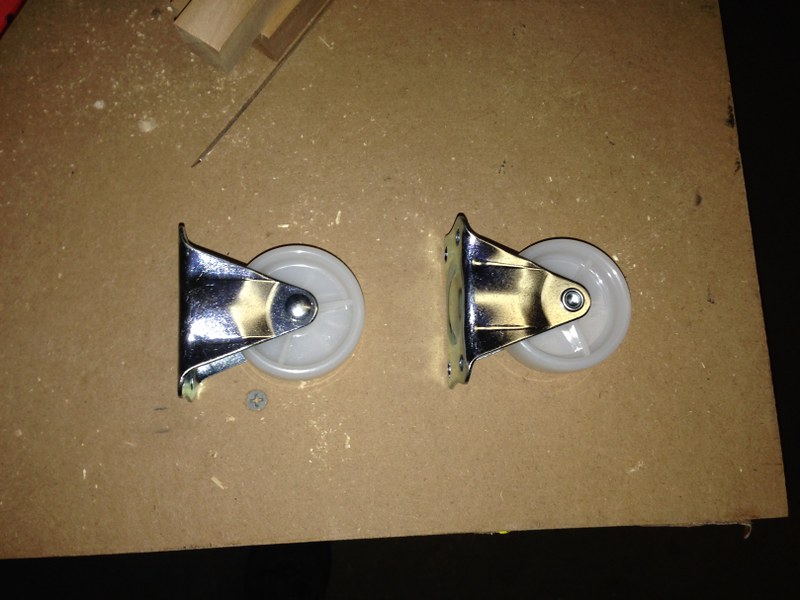
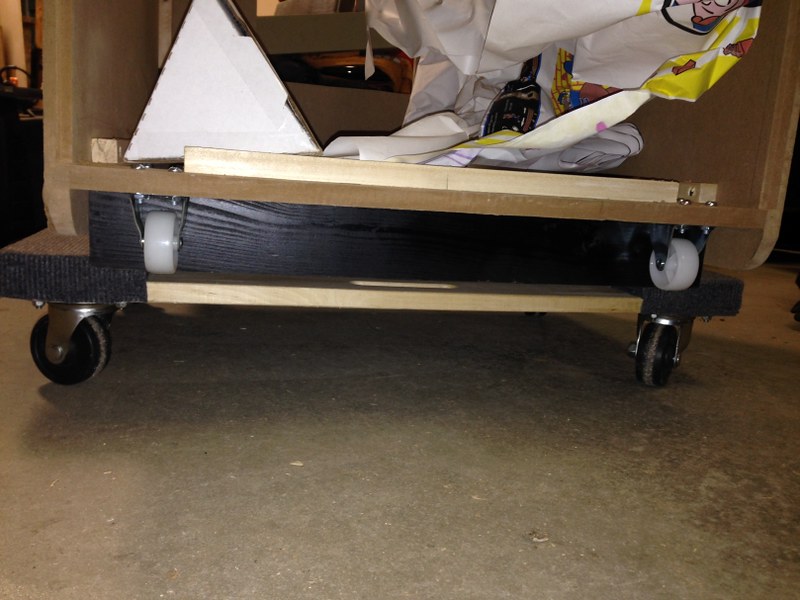
Didn't take much to install the wheels.  I thought the wheels were going to be too big but when I dry fit them to the cab they were perfect.  Just close enough to the ground.


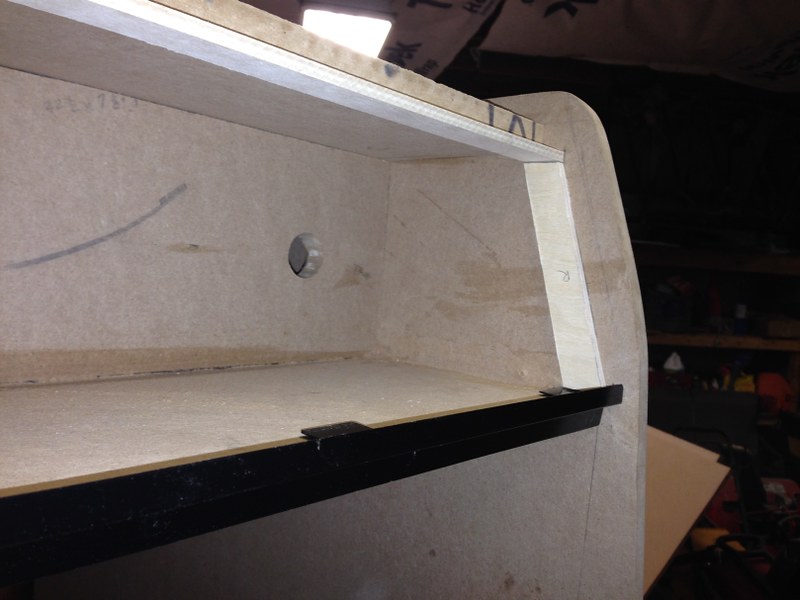
I was also able to drill my holes for the cord that goes to the marquee light.  I was really happy I had picked up a fostner bit set eariler in the year.  They take out a lot more material and don't tend to wear down like spade bits.  I also found some 3/16" balsa wood to create the supports for my marquee.  I was afraid I wasn't going to be able to find some that thin locally but tracked some down at Joann Fabrics of all places.   :dunno


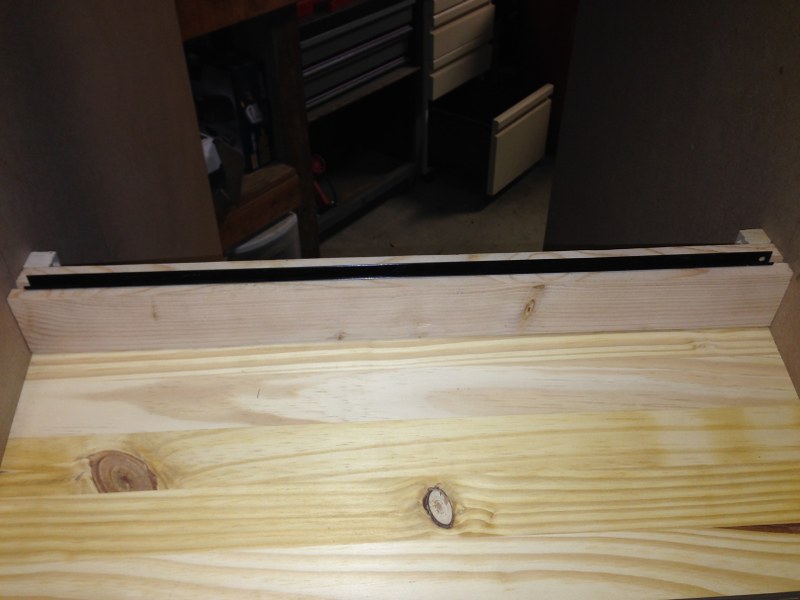
I got my control panel retainer installed and went to work on my control panel which I was making out of MDF.  I had gotten my holes drilled and completely funked up my board when I went to rip the small 1"x1/8" notch on the back.  Completely unhappy with how the MDF acted I went to Home Depot and found this nice piece of 5/8" pine board.  I came home and re did my notch and it worked out beautifully.  This board is 10x sturdier and makes an awesome "thunk" sound when throwing around my joystick.   ;D


After I got home I screwed in my dowel supports for the back bottom and top pieces.  I did a dry fit of pieces and called it good.  The pieces don't fit perfectly but I am going to fill it with some wood putty. 


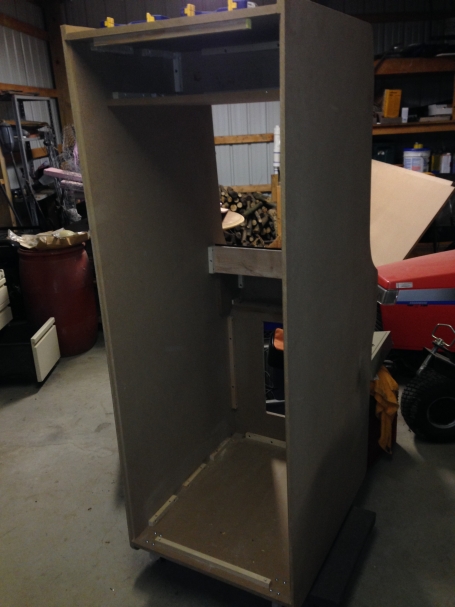
It was getting late so I did a quick monitor mount and called it a day. 

« Last Edit: February 10, 2014, 11:23:16 am by jdbailey1206 »

wp34

  • Trade Count: (+3)
  • Full Member
  • ***
  • Offline Offline
  • Posts: 4794
  • Last login:April 10, 2022, 09:48:19 pm
Re: An Original Fix It Felix Build
« Reply #37 on: February 10, 2014, 08:05:49 pm »
Looks great.  Always exciting to see one upright!

jdbailey1206

  • Trade Count: (+1)
  • Full Member
  • ***
  • Offline Offline
  • Posts: 2656
  • Last login:March 11, 2023, 01:32:56 pm
  • No. It's your top score on Pole Position.
Re: An Original Fix It Felix Build
« Reply #38 on: February 11, 2014, 11:58:59 am »
Looks great.  Always exciting to see one upright!

Thanks WP.  I'm glad I was able to finish most of the building and get it inside before it got too cold.  December was a complete bust due to the holidays but I picked it back up without a hitch at the beginning of this year.

jdbailey1206

  • Trade Count: (+1)
  • Full Member
  • ***
  • Offline Offline
  • Posts: 2656
  • Last login:March 11, 2023, 01:32:56 pm
  • No. It's your top score on Pole Position.
Re: An Original Fix It Felix Build
« Reply #39 on: February 11, 2014, 04:12:16 pm »
It was a quiet New Years Eve so before the wife and I watched the ball drop I made to quick cardboard template to see how the monitor would workout.  In the picture it looks like the bezel is cutting off the bottom of the monitor but once you get up close it is spaced nicely.  The 19" monitor seems a little too big for the application and I may downsize to a smaller monitor at a later date but the one I have now was the best price.  Free.   :D


The next day when my wife was at work I took a little time and worked on the back pieces.  I took the speaker grill that I had mentioned earlier and stapled them in place in the back.  You can't really tell from the picture but they look really close to the original.


I threw some DAP Plastic Wood in the screw holes and gaps and it didn't look half bad after a quick sanding.