 AllInOneFYC
Here I will try to write a manual with examples for AllInOneFYC.
Mainly what the program can do three things:
+ Remap.
+ Launch programs / processes.
+ Killing programs / processes.
+ Any extra or I've been getting added on the fly as PC sound control, or change resolution for Windows.
The program could be controlled with keys but its power is focused to be used with an arcade machine using a control panel. Hence the name FYC (For your cabinet).
AllInOneFYC works with two files:
AllInOneFYC.exe
AllInOneFYC.iniThe first is the executable and the second ini file that gets the information and acts and works accordingly.
Ini file note: He has translated the frontend setup program ini file but not its content so it is highly recommended to change the ini file through
AllInOneFYC only.
AllInOneFYC could come with a couple of most used files to make the program as a windows service , these files would
instsrv.exe and
srvany.exe.
If
AllInOneFYC.exe launched by double-clicking or from the command line , the program will look in the same directory AllInOneFYC.ini file and then read the configuration.
Similarly , we can run the program passing as a first parameter a different ini file , for example :
AllInOneFYC.exe manicminer.iniThis file
manicminer.ini serve to have specific settings for the game
ManicMiner when we use
Spectrum emulator and so for each game.
First of all we will discuss that in the ini file there is a variable called
ProgramMode . This variable determines the mode of operation of the program depending on the value of that variable can be:
NORMAL
CONFIG
TESTIf it contains the
NORMAL value, AllInOneFYC will run normally.
If it contain the
CONFIG value ,AllInOneFYC will enter in configuration mode and we can set the ini file visually.
If it contain the TEST value,AllInOneFYC will enter in buttons's detection mode our control panel. (Only necessary to detect buttons.If you use IPAC or similars you need keys.)
As a recommendation, I would not touch this parameter leaving in
NORMAL and we use the second option to enter
CONFIG mode both as the
TEST mode.
The alternative would be launched from command line adding the two words (one or another) as a parameter:
AllInOneFYC.exe CONFIGregardless of the value that is in the file
AllInOneFYC.ini,
AllInOneFYC enter in configuration mode.
Similarly, if we execute
AllInOneFYC.exe TESTAllInOneFYC would enter in buttons detection mode.
When you enter in test mode you can see this window

At this moment, you can press the buttons in your control panel and see the number of each one.
The number under the red arrow corresponds with our joystick 2. To select another different joystick will press the corresponding number (not the numeric block).
The red rectangle shows the number of our button once you press it , so we could shoot a photo to our control panel and then crank up the number of the button that corresponds to not forget us.
It's what I've done for example with my gamepad of the Xbox 360

and so I have not to launch the program every few minutes.
We can do two direct accesses, one for
Config and another for
Test mode.
Then go into
CONFIG mode to go see what we could configure.
We launched
AllInOneFYC of any form previously seen to enter configuration mode, preferably the shortcut.
The first thing you would see a screen similar to this:
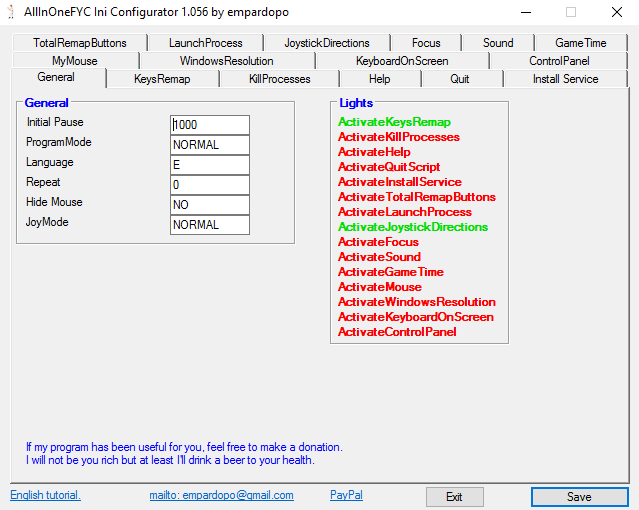
We can see is that it is divided into tabs.
We have two buttons one to exit and save the changes and another to exit without saving changes,
Save and
Exit, respectively.
We appear with the
General tab selected.
Here we can see that we have several parameters which are as follows.
GeneralInitial PauseThis variable will get a number in milliseconds and it will be the break that will make the program after being released before you start work.
ProgramModeWe have explained above that it serves and their possible values as recommended would always leave the value
NORMAL.
LanguageThis variable can only contain two letters as either an E values to set the language to English or a S to put it in Spanish.
For this tab I think no need examples as more or less everything has been explained, however if anyone has any questions just have to comment.
Then we will move to the next tab named
KeysRemap.
In this section we will have a simple remapping one or two keys or buttons.This means that when you press the key defined in
KeysToRemap (here would be worth buttons) will be remapped which define in
RemappedKey(here are only valid keys and buttons).
You could see a screen similar to this:
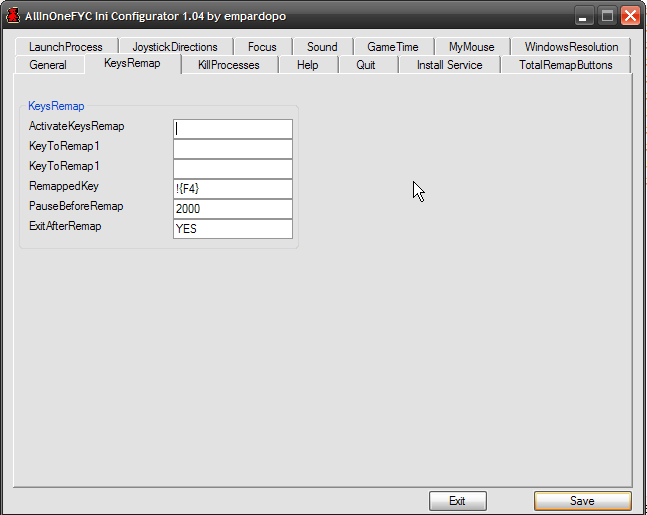 KeysRemapActivateKeysRemap
This initial variable serves as we'll see in most sections to enable the section that we are, in this case RemapeoTeclas section. The variable must contain the value YES, NO, or leave it blank it would be the equivalent to the value NO. In the screenshot of example we can see that the section would not be active.
KeysToRemap1In this variable we can define a key or button that would be the one physically would click on your computer, control panel, gamepad, ect.
KeysToRemap2In this variable we can define a second key or button that would be one that would click on your computer physically, maca, gamepad, etc.. If you define this second variable should be pressed at the same time what we define to variable 1 and in this variable.
It is not necessary to place a value on the two previous variables.If left blank, the key defined in
RemappedKey will be remapped.
RemappedKeyThis variable define the key or keys to be remapped when you press the keys or buttons defined in
KeysToRemap1 and
2.
Here you can define multiple values, for example:
! {F1} {F4} {F5}PauseBeforeRemapTime in milesonds to pause the program before performing AllInOneFYC remapping.
ExitAfterRemapThis variable will contain the value YES or NO and it will do is that in the case of containing the value YES, AllInOneFYC will close once the remapping.
KeysRemap Examples1.- An example would be the
Fusion emulator. To exit this emulator have to press the
Alt+F4Imagine you'll use the button 1joy7 to close Fusion. Configure AllInOneFYC.ini file like this:
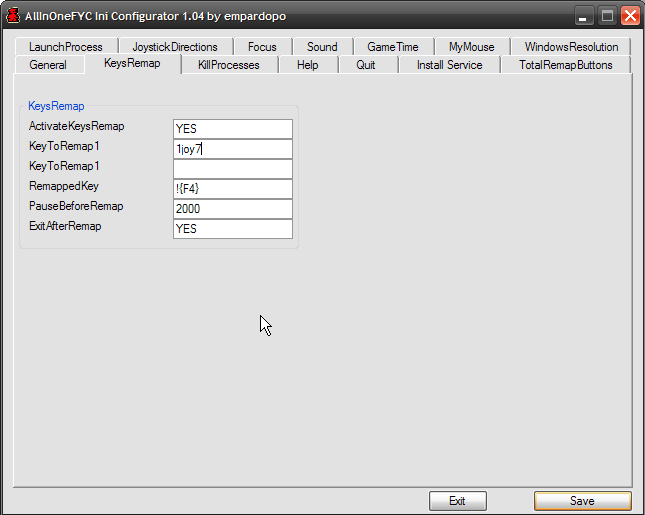
where we see that we have enabled the section, we have defined
1joy7 as pressing a button so that when you press that button the result will be pressing
Alt+F4.
2.- Consider a second example of an
emulator X, in which there is no way to launch it in
fullscreen mode. To put it in fullscreen mode you need to press the key combination
Alt+Enter.
This problem could look at it two ways, one would solve it as in the above example would be pressing the button we wanted from our control panel. Another way would not define any button to press so that
AllInOneFYC wait the time defined in the variable
PauseBeforeRemap then automatically remap the keys defined.
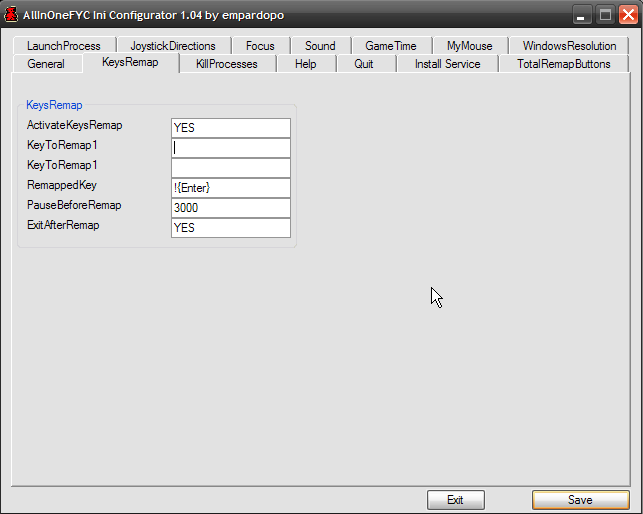
As we can see in this last example, we have activated the section. We have not set any key or button press and defined
Alt+Enter. These keys will be remapped after
3 seconds.
In both examples, the
ExitAfterRemap variable contains the value
YES, so once has remapped the keys
AllInOneFYC will close.
+++++++++++++++++++++++++++++++++++++++++++++++++++++++++++++++++++++++KillProcessesIn this section you can define up to
8 processes to kill. They may be killed when you press keys or buttons that define in the corresponding variables. If left blank these variables,
AllInOneFYC will pause and then kill the processes.
You could see a screen similar to this:
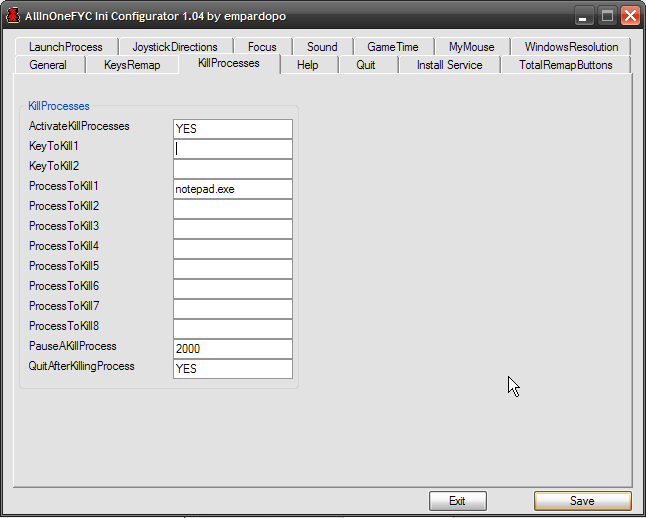 ActivateKillProcesses
This variable serves to enable this section. It must contain the value YES or NO.
KeyToKill1In this variable we can define a key or button that would be the one physically would click on your computer, control panel, gamepad, ect to kill the defined processes.
KeyToKill2In this variable we can define a second key or button that would be the one physically would click on your computer, control panel, gamepad, ect to kill the defined processes. If you define this second variable should be pressed at the same time what we define to variable 1 and in this variable.
It is not necessary to place a value on the two previous variables. If left blank, the processes defined in
ProcessToKill1 to
8 will be killed once the time set in the
PauseAKillProcess variable is complete.
ProcessToKill1
ProcessToKill2
ProcessToKill3
ProcessToKill4
ProcessToKill5
ProcessToKill6
ProcessToKill7
ProcessToKill8In each of these variables we can define a process (one only process for each variable).
These would be the processes to kill pressing the keys or buttons configured, or after the required pause.
PauseAKillProcessNumeric value in milliseconds that correspond with
AllInOneFYC will pause before killing processes defined.
QuitAfterKillingProcessThis variable will contain the value
YES or
NO. If it contains the value
YES, once killed processes
AllInOneFYC will close.
KillProcesses Examples1.- As a first example, we have the screenshot above we can see that we have enabled the section. We selected the
notepad.exe process as the only process to be killed without defining any key or button for it, so in this case
AllInOneFYC wait 2 seconds before killing the process
notepad.exe2.- As a second example, we have a game called
Maldita Castilla whose process is the same name of the game. We want to kill the process when you press the 7 button of your joystick 1 (
1joy7).
Configure the appropriate section as follows:
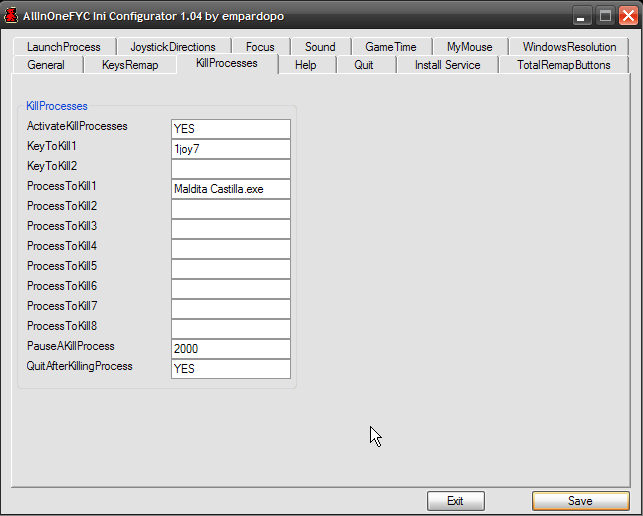
We see that we have enabled the section. We have defined the
1joy7 button to kill the
Maldita Castilla.exe process.
AllInOneFYC will pause 2 seconds after you press the
1joy7 button until it kills the
Maldita Castilla.exe process and finally will close.
+++++++++++++++++++++++++++++++++++++++++++++++++++++++++++++++++++++++HelpIn earlier versions this tab was created to view the contents of ini file. In the current version can already be seen entering config mode. In principle, might just leave it as a
About this.
A view of the section would be:
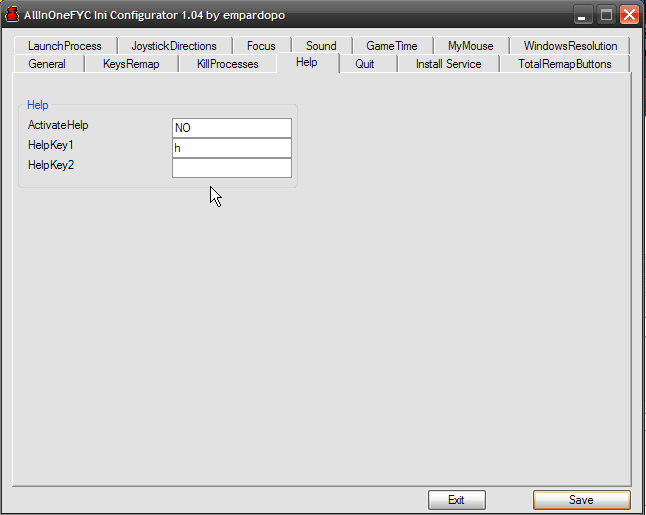 ActivateHelp
This variable serves to enable this section. It must contain the value YES or NO.
HelpKey1In this variable we can define a key or button that would be the one physically would click on your computer, control panel, gamepad, ect to see the content of ini file. About this in the future.
HelpKey2In this variable we can define a second key or button that would be the one physically would click on your computer, control panel, gamepad, ect to see the content of ini file. About this in the future.
If you define this second variable should be pressed at the same time what we define to variable 1 and in this variable.
I think that not necessary examples for this section.
QuitThis section serves to define keys or buttons that close AllInOneFYC at any time.
A view of the section would be:
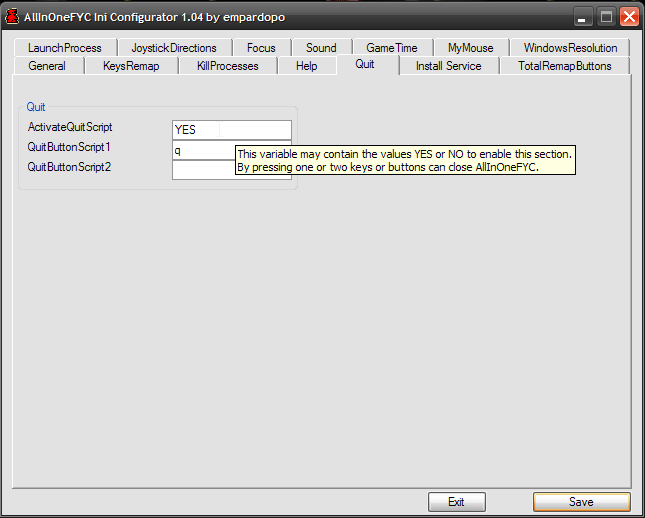 ActivateQuitScript
This variable serves to enable this section. It must contain the value
YES or
NO.
QuitButtonScript1In this variable we can define a key or button that would be the one physically would click on your computer, control panel, gamepad, ect to close
AllInOneFYC.
QuitButtonScript2In this variable we can define a second key or button that would be the one physically would click on your computer, control panel, gamepad, ect to close
AllInOneFYC.
If you define this second variable should be pressed at the same time what we define to variable 1 and in this variable.
I think that not necessary examples for this section but we can comment on the screenshot where we can see that the section was enabled and if you press
q,
AllInOneFYC be closed.
Install ServiceThis section was created to try to
AllInOneFYC run as a windows service.
Not 100% tested.A view of the section would be:
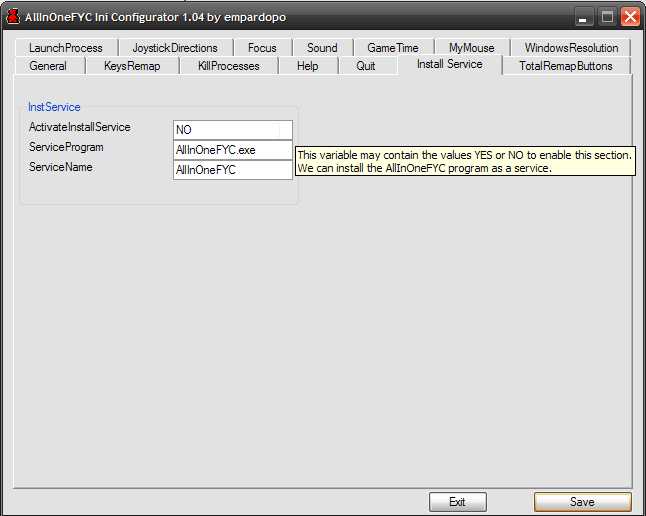 ActivateInstallService
This variable serves to enable this section. It must contain the value
YES or
NO.
ServiceProgramIn this variable we want to define the process that works as a Windows service.
ServiceNameThis variable define the name we want to have the service in Windows.
There are no examples for this section.
You must have
instsrv.exe and
srvany.exe programs in the same directory as
AllInOneFYC.exeTotalRemapButtonsThis section is to remap all the buttons you need such as PC gaming or Spectrum emulator. We remap
up to 24 keys or buttons.
A view of the section would be:
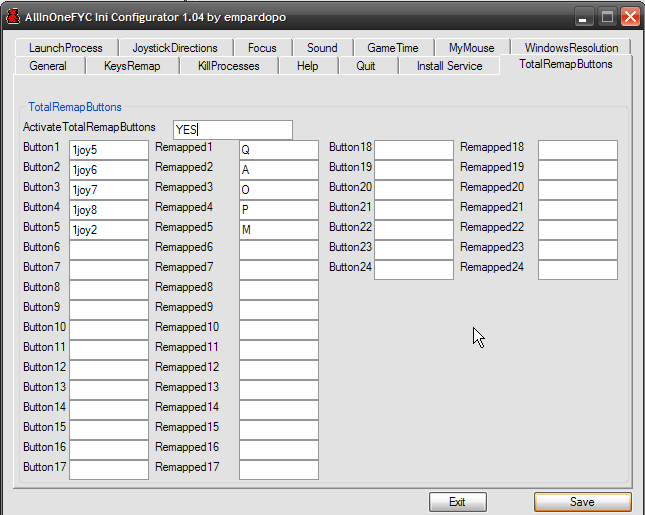 ActivateTotalRemapButtons
This variable serves to enable this section. It must contain the value YES or NO.
Button1 to 24In this variable you can define a key or button to be remapped (which you'd want). It will be the key or button you pressed physically.
Remapped1 to 24In this variable will define the key or button is remapped. It will be the key or button that is defined in the emulator or program.
Each botónX matches your RemappedX.
In the screenshot above, we can see that the section is active and we have several buttons with remapped keys used typical Spectrum games.For example, when you press the button 5 of our joystick 1 (
1joy5), the result would be as if the
Q key had been pressed. Moreover, if we open the notepad and press that button, we could see how you would write a
Q. Same for the other buttons defined.
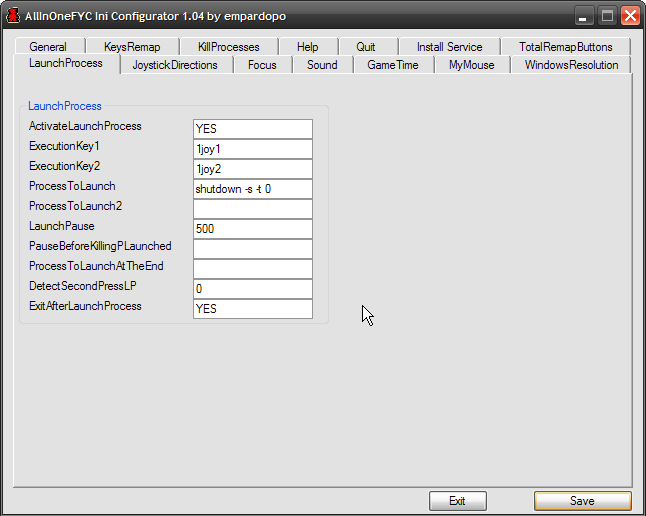
TotalRemapButtons ExamplesIn short, I will put an example.+++++++++++++++++++++++++++++++++++++++++++++++++++++++++++++++++++++++LaunchProcessThis section is to launch processes by pressing keys or buttons.
A view of the section would be:
 ActivateLaunchProcess
This variable serves to enable this section. It must contain the value
YES or
NO.
ExecutionKey1In this variable we can define a key or button that would be the one physically would click on your computer, cabinet, gamepad, ect to launch processes.
ExecutionKey2In this variable we can define a second key or button that would be the one physically would click on your computer, cabinet, gamepad, ect to launch processes.
If you define this second variable should be pressed at the same time what we define to variable 1 and in this variable to launch processes.
ProcessToLaunchIn this variable we can define a process to run.
ProcessToLaunch2In this variable we can define a second process to run.
LaunchPauseThis variable will contain a
numeric value in milliseconds that corresponds to the pause that
AllInOneFYC will do before launching the processes selected in the above variables.
PauseBeforeKillingPLaunchedThis variable will contain a numeric value in milliseconds that corresponds to the pause that
AllInOneFYC will do before killing the processes previously have been launched.
If left blank the variable,
AllInOneFYC will not kill previous processes.
ProcessToLaunchAtTheEndIn this variable will define a process that will only be executed if the
PauseBeforeKillingPLaunched variable is not blank.
DetectSecondPressLPThis variable will contain a numeric value in milliseconds which corresponds with the time that would have to be pressing at the same time the keys or buttons defined in the
ExecutionKey1 and
ExecutionKey2 variables.
If the value is 0, just press them together.
ExitAfterLaunchProcessThis variable will contain the value
YES or
NO. If it contains the value
YES, once launched the processes,
AllInOneFYC will close.
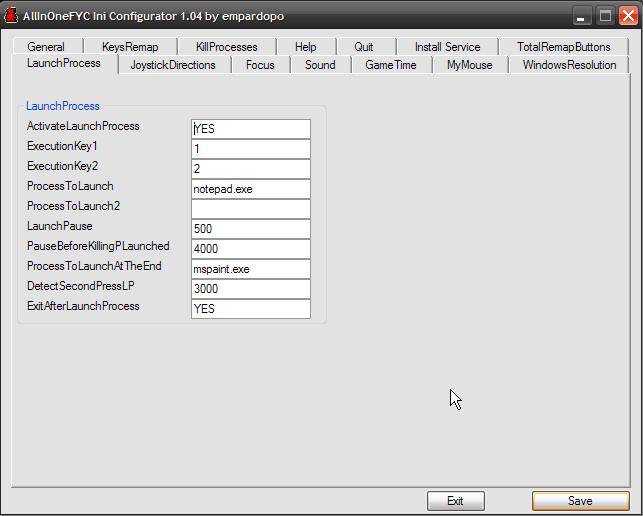
LaunchProcess Examples1.- In the screenshot above we can see that the section is enabled. To launch the
notepad.exe process will have to hold down the
1 and
2 buttons
for 3 seconds (
3000 milliseconds).Before launching this process,
AllInOneFYC pauses for half a second.
At 4 seconds
AllInOneFYC kill
notepad.exe process to finally run the process
mspaint.exe.
AllInOneFYC will be closed after executing the process
mspaint.exe.
2.- We might want to turn off the PC with a combination of buttons, for example
1joy1 and
1joy2.
To do this we could create our batch file called
apagaOrd.bat.
Your content could be:
@echo off
shutdown -s -t 0
This file would put it as a process to run , leaving something like this.
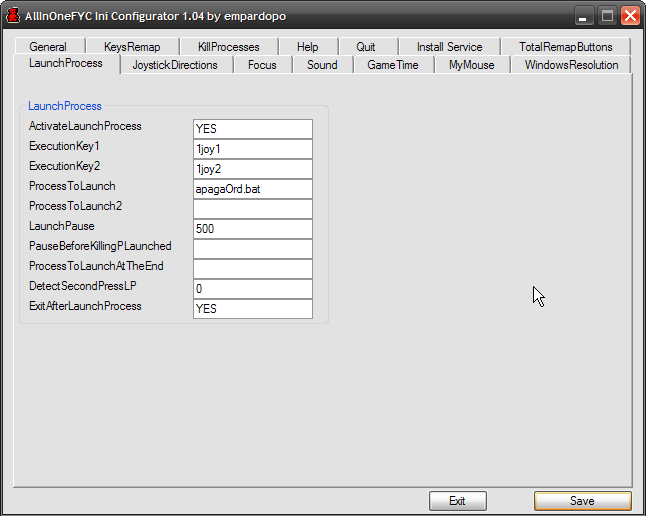
Or not create the bat file and configure
AllInOneFYC well
 3.-
3.- Just imagine the power of
AllInOneFYC . You can create any batch file or executable you want and launch it with a key combination ...
+++++++++++++++++++++++++++++++++++++++++++++++++++++++++++++++++++++++JoystickDirectionsThis section will attempt to remap the addresses of an analog joystick.
Here I need testers and ideas because I've only tested with an Xbox 360 controller. This is what I have and initially worked.
A view of the section would be:
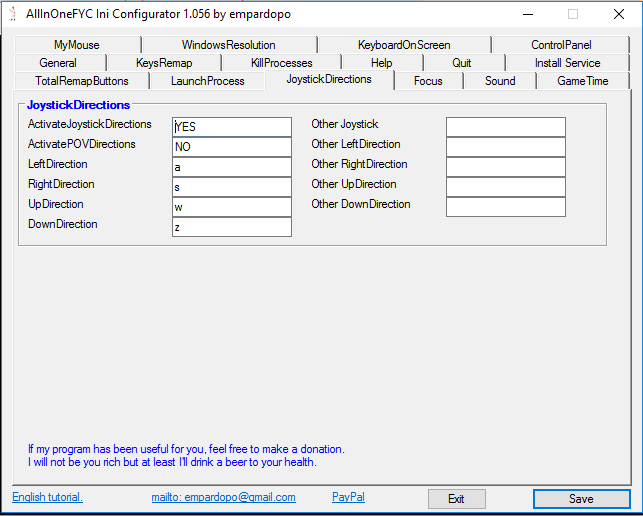 ActivateJoystickDirections
This variable serves to enable this section. It must contain the value YES or NO.
LeftDirectionThis variable define the key to be remapped when you press
left our analog joystick.
RightDirectionThis variable define the key to be remapped when you press
right our analog joystick.
UpDirectionThis variable define the key to be remapped when you press
up our analog joystick.
DownDirectionThis variable define the key to be remapped when you press left
down analog joystick.
JoystickDirections ExamplesIn the screenshot above we can see that the section is enabled and that the keys to be remapped are
qaop. I tested with a
Xbox 360 controller, I opened the notepad and when I press the command of the Xbox 360

we can see that these letters were remapped.
+++++++++++++++++++++++++++++++++++++++++++++++++++++++++++++++++++++++to be continued...


 Home
Home Help
Help Search
 Login
Login Register

 Send this topic
 Print
Print Topic: Instructions AllInOneFYC 1.04 (Read 9600 times)


