EDIT The DK Micro is listed as the world's smallest playable DK cab in the 2012 Guiness Book of world records Gaming edition, it's on the DK page unfortunately no pictures but it's still fun to be included
Well I've been working on this for a while. I wanted to make a tiny tiny working DK cab that was very playable, battery powered, had real controls, and ran vertical MAME games
I've seen one smaller MAME cab built out of a Ipod nano but the nano was sticking out of the side and the controls on the Nano.. Well... Suck, so I'm not counting that

I was really inspired by patrickl's
Pocket Galaga(approx 11" tall)
But couldn't see building one for only one game, plus I wanted to make it even smaller, 1/8 scale to be exact(approx 8.25" tall) and even though that doesn't sound that small it is as that is a linear scale, and by volume it is 512 times smaller than an actual DK Cab
So on to the good stuff I've been doing research on the many handheld Systems out there now that do a decent job running MAME, and the two I settled on that had the right screen size(exactly 1/8 scale to a 19" arcade monitor) were the Dingoo A320 and The GP2X Wiz, so I picked up one of each and The Wiz ended up being a far better machine, OLED Screen and faster processor, so I decided to use that for the guts, the other issue was finding a small enough joystick that worked well, and I had a couple of options there and found one that worked Quite well, but more on that in the build details, to come
I took a bunch of Progress Pics and I'll post them here later, just wanted to get some Pics up cause I was so exited to see it all finished up
Oh yeah, it has a lit marquee and tinted glass, too!

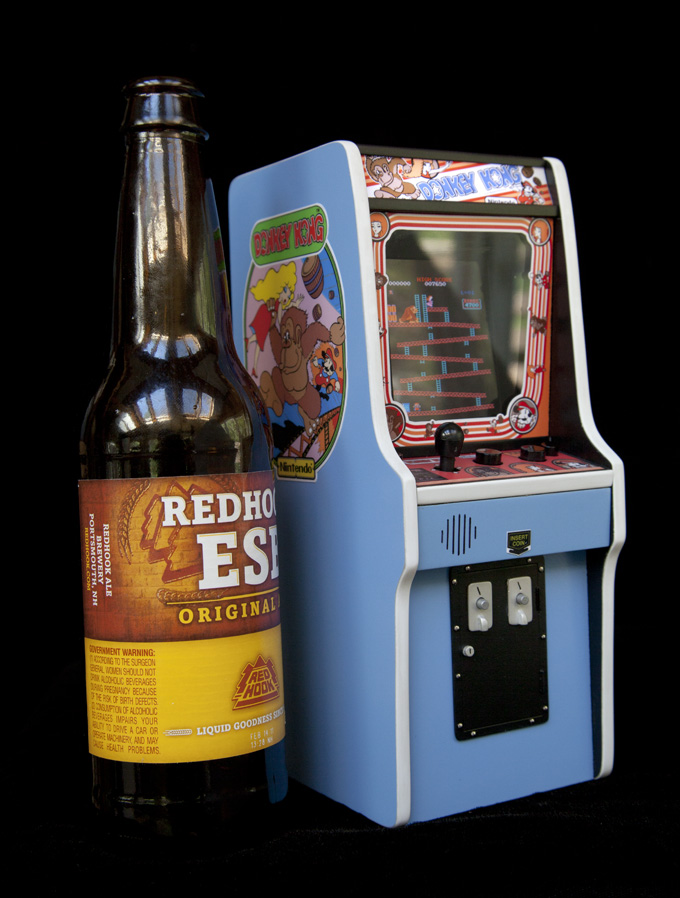


so here you can really see the scale up against a full sized DK
EDIT: 7/10/11 Progress picsHere are the promised progress pics!

These are the coin door parts and marquee/bezel retainers before painting, all made from model maker's styrene sheet and profiles
I als used styrene strips with the edges rounded(by carefully sanding) to simulate the T-molding

Here is the coin door painted and the pinheads I cut and glued in to use as rivits
I did some test paint on scrap to practice how to get the textured look to the paint, basically I used a can of semi-flat spray paint and would, do pretty heavy coats to get a subtle orange peel effect that looks a lot like real coin door

These are the coin buttons used painted with same silver paint I used on the coin mechs
9.5mm tack switch from radio shack hereI als used these for the volume and Pause buttons on the back

The finished coin door installed

Marquee/Bezel retainers painted and coated with a satin clear coat, and the bottom of the CP panel with faux speaker grill, I made indentations then filled the indents with black paint to get the lines


these are all CP controls from the front and the back and with a regular button for scale
I installed the larger buttons below the artwork so the silver rim wouldn't be seen, I found it a little distracting
Joystick from Digi-Key HereLarger buttons Here well turns out these buttons are too stiff, I'll post an update when we find the right ones
UPDATE The ones I used are hereC&K 8532
Smaller buttons from radio shack here although I got mine at a physical store and they had a different top that I like better
I also used this used this
button from radio shack for the power button on the back, I also recessed it so it would be hard to hit accidentally

Back hacked up wiring on the Wiz

This is the back/monitor/computer support thingy and the top painted and clear coated

Here is the back/monitor/computer support thingy with everything installed

And here it is running with the marquee light lit!!!
you can see the 15pin connector there in the corner that goes to the control panel

I used a usb LED light like this I got from ebay for like $4 and decased it and literally cut the last 1/3 of the board off LED's and all so it would fit inside the marquee are, and wired it to a 3.7v lead on the wiz board

here are my two first plexi bezels, the clear was too light and the smoked was too dark so I ended up putting the lightest car window tinting stuff on the back side of the clear one and it was perfect, unfortunately I didn't take any pics of that


 Home
Home Help
Help Search
 Login
Login Register

 Send this topic
 Print
Print Topic: World's Smallest Donkey Kong/MAME Cab!*it's Official Guinness Gaming ed. 2012* (Read 61470 times)


