Main Restorations Software Audio/Jukebox/MP3 Everything Else Buy/Sell/Trade
Project Announcements Monitor/Video GroovyMAME Merit/JVL Touchscreen Meet Up Retail Vendors
Driving & Racing Woodworking Software Support Forums Consoles Project Arcade Reviews
Automated Projects Artwork Frontend Support Forums Pinball Forum Discussion Old Boards
Raspberry Pi & Dev Board controls.dat Linux Miscellaneous Arcade Wiki Discussion Old Archives
Lightguns Arcade1Up Try the site in https mode Site News

Unread posts | New Replies | Recent posts | Rules | Chatroom | Wiki | File Repository | RSS | Submit news


Author Topic: Star Wars mini - Finished! With pics  (Read 49034 times)

0 Members and 1 Guest are viewing this topic.

Bender

  • Trade Count: (+1)
  • Full Member
  • ***
  • Offline Offline
  • Posts: 1919
  • Last login:November 28, 2016, 08:12:21 pm
    • Happ to Tron Conversion tutorial
Re: Star Wars mini
« Reply #40 on: June 28, 2011, 07:02:24 pm »
I've bought a few 8" screen from what appears to be the manufacturer (different seller) and they are decent quality
I'm pretty happy with them

I set the os to a 4:3 resolution (600x800) and check the preserve aspect ratio and they look great!

LeedsFan

  • Trade Count: (0)
  • Full Member
  • ***
  • Offline Offline
  • Posts: 1042
  • Last login:January 17, 2021, 06:14:23 am
Re: Star Wars mini
« Reply #41 on: July 01, 2011, 01:53:46 pm »
Update time.  :D

First of all trhank you Corbo for the link to those small TFT monitors. One or two do look very useable and are much cheaper than what I originally found. I'd still like to see a monitor actually running though or at least read some kind of a review before I put money down for one. So for now I'm sticking with what I have but I will be monitoring (sic) that situation for a future change.


Back panel now done with hole cutout for the speaker volume control and a handle to hold for when wheeling the little thing around.  :P
Original machine had a rectangular vent I believe in the position the handle is in, so it kinda follows the design.

Cabinet build is now 98% finished prior to painting the awkward edges and adding any artwork. Only things left to do are cut the T-molding slot and position the new fixed castor wheels I got to replace the swivel ones I had at first.  Pics.....


This pic looks strange as it looks as though the whole cabinet is lopsided... but it's not.


and yes.. those speaker holes ARE lopsided... whaaaaaaaaaaa!!   :hissy:


So next thing to think about is the painting and trimming. I've decided to trim the top and back panels in black satin vinyl instead of painting them. Each panel will be trimmed individually and the  joints/gaps will be covered with some well placed black plastic strip. The panels will then be able to be removed individually should I ever need to get inside for repairs/upadates etc.

shrunkenmaster

  • Trade Count: (0)
  • Full Member
  • ***
  • Offline Offline
  • Posts: 636
  • Last login:July 24, 2022, 10:17:33 am
Re: Star Wars mini
« Reply #42 on: July 01, 2011, 02:02:57 pm »
Looking good my man, nice to see that bezel in situ.

LeedsFan

  • Trade Count: (0)
  • Full Member
  • ***
  • Offline Offline
  • Posts: 1042
  • Last login:January 17, 2021, 06:14:23 am
Re: Star Wars mini
« Reply #43 on: July 03, 2011, 02:37:18 pm »


This pic looks strange as it looks as though the whole cabinet is lopsided... but it's not.

WELL IT WAS!!!  :banghead:

I couldn't quite put my finger on it but when I returned to work on it after seeing that pic I posted I kept looking... and looking... and it definitely looked a bit skew-wiff. Then I realised that the plexi in the marquee wasn't sloping at the same angle on each side. The bottom right corner was in effect sticking out more than the left bottom corner. Kinda hard to explain but I just spent most of the afternoon fixing it.  :dizzy:

So not much progress except I'm happy I've solved a problem that would have bugged the hell out of me if I hadn't seen it till after it was finished.

T-molding slot cut, bezel primed but still plenty of rubbing down to go with 400 grit paper.  Not much worthy of new pics.

vcoleiro1

  • Trade Count: (0)
  • Full Member
  • ***
  • Offline Offline
  • Posts: 93
  • Last login:August 09, 2018, 09:24:38 am
Re: Star Wars mini
« Reply #44 on: July 06, 2011, 11:58:03 am »
Looks to be coming along nicely, youre doing a great job. Cant wait to see it finished.

Woodshop Flunky

  • Trade Count: (0)
  • Full Member
  • ***
  • Offline Offline
  • Posts: 681
  • Last login:August 20, 2017, 05:24:57 am
Re: Star Wars mini
« Reply #45 on: July 06, 2011, 01:26:57 pm »
This is looking GREAT!  I can't wait to see the finished product.  :applaud:

My cab was slightly twisted when I put it together.  I couldn't tell at the bottom (which is where I was doing all my initial construction), but by the time I got to the top it was off nearly 1/8th inch!  I was able to fix it, but it would have really chapped my  :censored: if I hadn't noticed it so soon.

Complete mini arcade cabinet plans available.

LeedsFan

  • Trade Count: (0)
  • Full Member
  • ***
  • Offline Offline
  • Posts: 1042
  • Last login:January 17, 2021, 06:14:23 am
Re: Star Wars mini
« Reply #46 on: July 06, 2011, 02:43:13 pm »
This is looking GREAT!  I can't wait to see the finished product.  :applaud:

My cab was slightly twisted when I put it together.  I couldn't tell at the bottom (which is where I was doing all my initial construction), but by the time I got to the top it was off nearly 1/8th inch!  I was able to fix it, but it would have really chapped my  :censored: if I hadn't noticed it so soon.

Yeah it's strange because I started out with 2x identical side panels. I know this because I used a flush trim bit to make the second one and the two panels sat on top of each other perfectly. So you would think if you made sure all the gaps around the edges (marquee section for example) were the same both sides then you couldn't really go wrong. But somewhere it still does!  :angry:

Anyway... here a small update....


Bezel and speaker panel primed. I've spent all week for an hour or so after work sanding and priming that bezel bit by bit. It's looks OK in this pic but when you sit in front of it you can tell it's home made. I know I wasn't going to get it perfect but I didn't want it to look too amateurish. I guess model making is not my strong point. It might look better when it's painted black because the imperfections look obvious to me in a light coloured primer.

I did take a pic of the cabinet primed also, but for some reason it just will not upload to Photobucket. I'll try a new pic of that tomorrow.

crashwg

  • Trade Count: (+10)
  • Full Member
  • ***
  • Offline Offline
  • Posts: 3076
  • Last login:May 24, 2019, 11:01:05 am
Re: Star Wars mini
« Reply #47 on: July 06, 2011, 05:23:44 pm »
The bezel looks amazing.  Good work.
If there's bees in the trap I'm catching em
By the thorax and abdomen
And sanding the stingers down to a rough quill
Then I dip em in ink, and I scribble a bit
But if it they wriggle then I tickle em until they hold still
Lemme say it again
In my land of pretend
I use bees as a mf'n pen

shrunkenmaster

  • Trade Count: (0)
  • Full Member
  • ***
  • Offline Offline
  • Posts: 636
  • Last login:July 24, 2022, 10:17:33 am
Re: Star Wars mini
« Reply #48 on: July 06, 2011, 05:28:12 pm »
Bezel looks great from here mate, must've been twice as hard to make considering it's a lot smaller than the original  :applaud:

opt2not

  • Trade Count: (+15)
  • Full Member
  • ***
  • Offline Offline
  • Posts: 6173
  • Last login:April 02, 2024, 07:42:30 pm
Re: Star Wars mini
« Reply #49 on: July 06, 2011, 05:34:14 pm »
Dude, that looks great!  I can't seen any mistakes from the photo, and I'm sure no one else will. It's only your eye that's picking it up because you built it. :)

After it's fully painted, yoke installed, this is really going to ramp up quick.  Keep going, and don't worry about the small imperfections (that no one but you are going to notice).  :lol

LeedsFan

  • Trade Count: (0)
  • Full Member
  • ***
  • Offline Offline
  • Posts: 1042
  • Last login:January 17, 2021, 06:14:23 am
Re: Star Wars mini
« Reply #50 on: July 07, 2011, 01:48:45 pm »


Cabinet primed. I will rub this down a bit before painting the edges black. I primed the whole of both sides though just so the artwork might adhere better than to unpainted wood. I dunno though.


Here's the little mouse hack I recently did. It's just the board out of a Logitech mouse and I soldered wires to the "live" pins of the left and right mouse buttons.  Power for the bulbs is taken from the 12V molex supply. I've not had a chance to test this mouse hack yet, but it should work (fingers crossed). USB cable is missing in this pic. It just plugs into the board on the right hand side.

LeedsFan

  • Trade Count: (0)
  • Full Member
  • ***
  • Offline Offline
  • Posts: 1042
  • Last login:January 17, 2021, 06:14:23 am
Re: Star Wars mini
« Reply #51 on: July 09, 2011, 01:48:15 pm »


Bezel and speaker grille now black.


And here's the first bit of the artwork applied. I was worried about getting the image in the marquee straight and central. I managed to get it just about spot on. But there is a small issue where the bottom curve to the speaker panel isn't quite right, though you may not see it in this pic. It's not massive but there's no going back now. At least the art is straight which is the main thing I was concerned with.

I also had a go at painting the top and back panels. I wasn't too happy with the results so I trimmed those panels with black satin vinyl. Again it's not turned out brilliant but it's better than the painting. Trouble with the vinyl I have is that it's thin enough to show any imperfections or small specks of dirt that might get in there. Quite difficult to apply, but as I say, it beats painting. I find applying artwork to be the most stressful part of any build. Not so bad if you print your own as you can always run off a few more. But when it's expensive and came all the way over the Atlantic you get a bit jittery at how it might turn out.  :scared

I want to get the software side of things finalised next so that when the bezel goes in it will stay in. I can remove the bezel if I wish for modifications, but I don't want to be taking it in and out all the time. I'm thinking of dropping RotJ and just having the two vector games... so that I might "borrow" Shrunkenmaster's excellent art for Mala frontend.   :drool

shrunkenmaster

  • Trade Count: (0)
  • Full Member
  • ***
  • Offline Offline
  • Posts: 636
  • Last login:July 24, 2022, 10:17:33 am
Re: Star Wars mini
« Reply #52 on: July 09, 2011, 02:26:12 pm »
The paint job is really bringing this together my man. I've used the self-adhesive vinyl before, you really need to watch the dust to get it smooth.

By all means use the MALA images, let me know if you want any other resolutions, or anything changed, I'm quite happy to edit them for a fellow SW builder.

I would agree that dropping ROTJ is a good move, I never play the game anyway!

LeedsFan

  • Trade Count: (0)
  • Full Member
  • ***
  • Offline Offline
  • Posts: 1042
  • Last login:January 17, 2021, 06:14:23 am
Re: Star Wars mini
« Reply #53 on: July 09, 2011, 02:36:48 pm »
The paint job is really bringing this together my man. I've used the self-adhesive vinyl before, you really need to watch the dust to get it smooth.

By all means use the MALA images, let me know if you want any other resolutions, or anything changed, I'm quite happy to edit them for a fellow SW builder.

I would agree that dropping ROTJ is a good move, I never play the game anyway!

Thank you!   :notworthy:   I didn't just want to go ahead and use them without giving you props.

I will need to play around with them in Paint anyway as I'm using a smaller screen area. I take it you just replaced the marquee images with these? How do you get the screen to stop "flashing" as you select the other game?

shrunkenmaster

  • Trade Count: (0)
  • Full Member
  • ***
  • Offline Offline
  • Posts: 636
  • Last login:July 24, 2022, 10:17:33 am
Re: Star Wars mini
« Reply #54 on: July 09, 2011, 02:48:06 pm »
I used snaps, not marquee, to display the image:

In MALA Layout, I created a new layout, then unchecked everything that is on display by default. Then I checked the 'snaps' box, and made this full-size, so it will only display each full-screen image. I set MALA to NOT wrap the gamelist.

 Also set the background to black with no image. Not sure what you mean about the flashing though?

« Last Edit: July 09, 2011, 02:52:14 pm by shrunkenmaster »

LeedsFan

  • Trade Count: (0)
  • Full Member
  • ***
  • Offline Offline
  • Posts: 1042
  • Last login:January 17, 2021, 06:14:23 am
Re: Star Wars mini
« Reply #55 on: July 09, 2011, 05:07:16 pm »
OK I been playing around with Mala on my desktop and I've got it running just how you have.  :cheers:

I also got the .avi files to play in the background as each game is selected, just by making the video window so small you don't see it. I had to turn off the video delay though to get the sounds to start asap. I also trimmed the first couple of seconds off the Starwars.avi in Windows Moviemaker because it had a strange glitchy sound at the start. I wanted it to kick right into the music it has after a couple of seconds or so.

Thanks again!!!   :applaud:

shrunkenmaster

  • Trade Count: (0)
  • Full Member
  • ***
  • Offline Offline
  • Posts: 636
  • Last login:July 24, 2022, 10:17:33 am
Re: Star Wars mini
« Reply #56 on: July 09, 2011, 05:14:25 pm »
Glad it's all working for you. I did the same thing with the videos too.

Still waiting for my artwork so I can throw mine together at last...

LeedsFan

  • Trade Count: (0)
  • Full Member
  • ***
  • Offline Offline
  • Posts: 1042
  • Last login:January 17, 2021, 06:14:23 am
Re: Star Wars mini
« Reply #57 on: July 10, 2011, 04:11:44 pm »
Managed to get in a full day today and made plenty of progress. I really feel I'm on the home straight now as most of the niggly/difficult problems have been overcome. However today wasn't all plain sailing....

I started off by trying to get the software side of things finalised so I could place the bezel in. Once it's in I don't get full Windows desktop so today was the day to get that sorted. However this morning I discover that for some reason the on board sound has totally decided to go on strike. I dunno how or why because it was working perfectly well a few weeks back in the house. But now in the garage it was a no-go. I tried all I knew in Windows and three different headsets/sound systems. Eventually I gave in and threw in a spare Sounblaster Audigy I had with updated driver... and voila! Normal service was resumed. Still don't know how or why the Realtek onboard stopped. But no matter now.  :w00t

So I now got Mala shelled to boot straight into Shrunkenmaster's excellent Snaps with everything positioned nicely within the bezel aperture.

I also got to work "repairing" the little glitch I had at the bottom of the marquee. It was bugging me (I think I might be OCD) and it had to be fixed. This was done on and off throughout the day as I added bits of wood putty in and sanded appropriately.


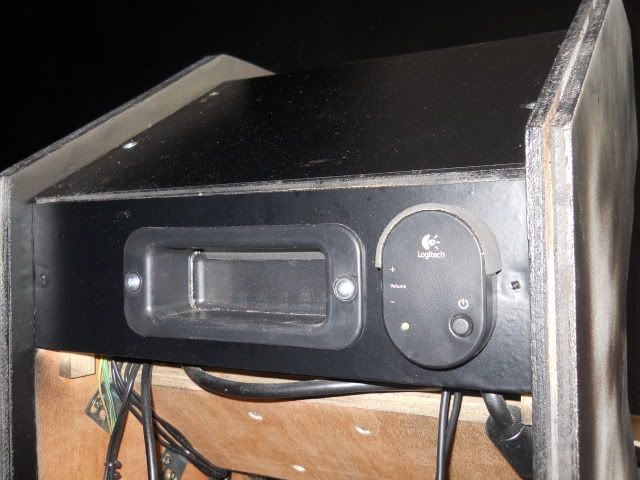
Upper back panel trimmed and sound volume control installed. The sound of the 2.1 system is excellent! No distortion at full volume.... but ofc it won't run at that in the house.  :-X


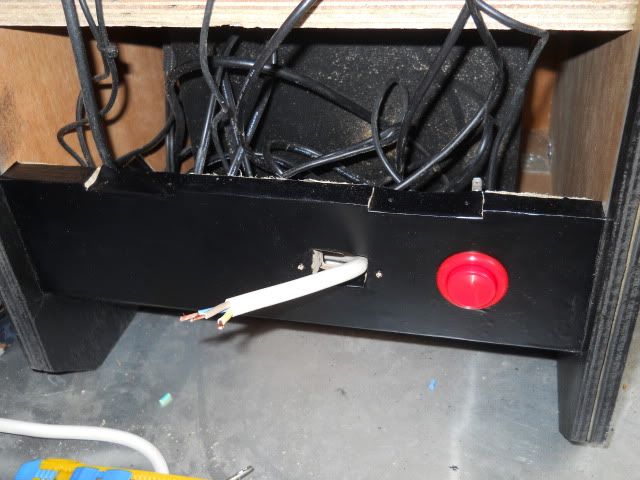
This is where I got to at the end of the day. I ran out of terminals to finish this bit off but will get more tomorrow.


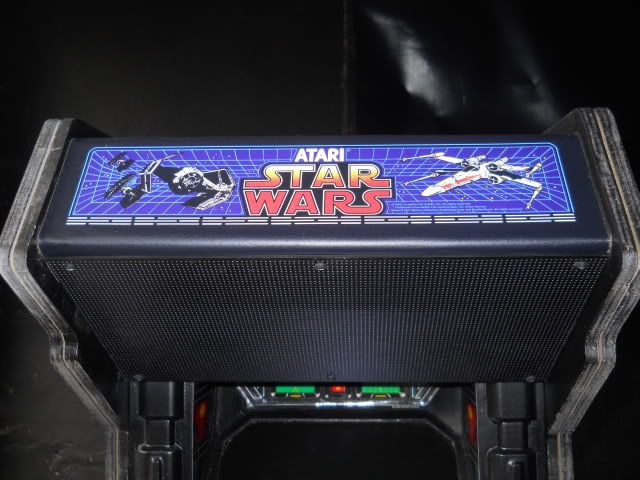
I'm nuch more happy with this marquee now. The problem was the bend towards the speaker panel was starting earlier on the left than on the right.. even though the panel underneath was straight. It meant that in the light the reflection on the bend made it look like the left side was shorter than the right. Yeah... I'm OCD!   :-*  In fact in this pic you can still see it's very slightly off. But it was much more pronounced than this before so I'm a happy bunny with it.

The marquee doesn't seem to light up at all in normal ambient light. I pulled down the garage door to make it darker and you can definitely see it glow. But it's nothing like a normal marquee would be. I suppose the original must have been similar, no?


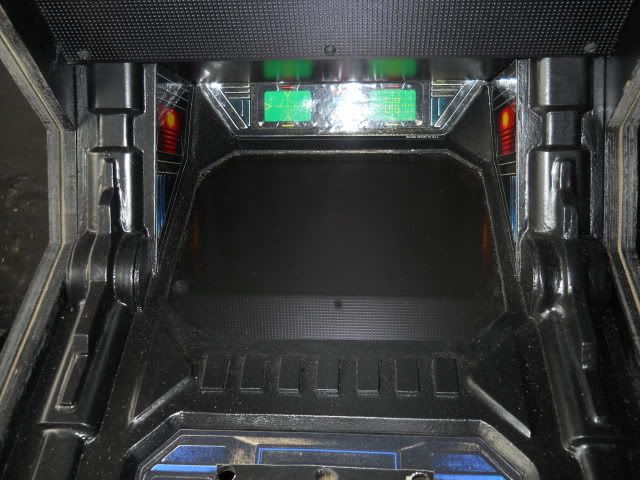
Bezel sits nicely in there now. The acrylic is just taped in there on the underside with masking tape. But it can't drop out because it's flush with the base of the bezel and so rests against the glass of the monitor. I didn't want to glue it in just in case I ever want to change it if ever it gets scratched or something.


Got the CPO art installed too. This was much easier than I thought... I just hope the side art goes as smoothly.  :droid

There's dust everywhere in these pics. I try to keep stuff clean in the garage but it's a futile cause most of the time. The dust is just on the surface and isn't set in the paint or anything. A thorough clean is due when it's finally finished.

I also had a play with the yoke loosely installed when I was finalising the software. I did have a problem with this though as I couldn't get the yoke calibrated in windows. Basically button 4 was shorting out all the time which made calibration impossible (you have to press a button to move on to the next step).  You could see the red button flashing on and off in the Windows property box for button 4 as I moved the yoke about.  I eventually took off the handle of the yoke (after buying imperial hex keys) to find a little spring had got caught on a wire leading from the button and lodged itself in a perfect manner to short out the contact with the mounting screw! It was a spare spring that had dropped in there on assembly because all the other springs were intact. I'm just glad it was an easy fix 'cos it had me concerned as I was dismantling the handle.

I also found that on testing I had to tweak a few more settings in Mame. At first I was getting what seemed like lag on moving the yoke in the game. I did a bit of a search on here and Google and someone suggested that reducing the joystick deadzone from 0.3 to 0.1 would help. Well it did! So I repeat it here in case it helps someone else. I also had to reduce all the sensitivity settings in the game to 1. There were originally at something like 30, 50 and 70 (which seems like a huge reduction). Basically I could not hold the crosshairs steady in certain areas of the screen. It was jittering about all over the place at times. But now with the deadzone and sensitivities tweaked it's smooth as silk.  ;D

TeamTEOR

  • Trade Count: (0)
  • Full Member
  • ***
  • Offline Offline
  • Posts: 149
  • Last login:December 14, 2018, 09:43:43 pm
  • Off to the Edge of Reality
    • My Website
Re: Star Wars mini
« Reply #58 on: July 10, 2011, 04:27:14 pm »
Impresive! The force is strong with this one!

vast

  • Trade Count: (0)
  • Full Member
  • ***
  • Offline Offline
  • Posts: 64
  • Last login:June 27, 2023, 07:18:57 pm
Re: Star Wars mini
« Reply #59 on: July 10, 2011, 05:25:15 pm »
Looking nice dude!

shrunkenmaster

  • Trade Count: (0)
  • Full Member
  • ***
  • Offline Offline
  • Posts: 636
  • Last login:July 24, 2022, 10:17:33 am
Re: Star Wars mini
« Reply #60 on: July 11, 2011, 04:57:58 am »
Fantastic progress my man, and you answered my question on hex keys - I'd tried all the metric ones I had to undo my yoke! Where'd you get imperial ones from???


kingchimp

  • Trade Count: (0)
  • Full Member
  • ***
  • Offline Offline
  • Posts: 62
  • Last login:July 17, 2023, 08:59:20 am
Re: Star Wars mini
« Reply #61 on: July 11, 2011, 05:09:01 am »
[Insert bad joke about The Galactic Empire here]

TeamTEOR

  • Trade Count: (0)
  • Full Member
  • ***
  • Offline Offline
  • Posts: 149
  • Last login:December 14, 2018, 09:43:43 pm
  • Off to the Edge of Reality
    • My Website
Re: Star Wars mini
« Reply #62 on: July 11, 2011, 05:29:12 am »
If you have a hard time getting imperial hex keys we can just ship them out from the US for ya.
Just don't tell Palpatine or Vader, lol.

LeedsFan

  • Trade Count: (0)
  • Full Member
  • ***
  • Offline Offline
  • Posts: 1042
  • Last login:January 17, 2021, 06:14:23 am
Re: Star Wars mini
« Reply #63 on: July 11, 2011, 04:31:13 pm »
Fantastic progress my man, and you answered my question on hex keys - I'd tried all the metric ones I had to undo my yoke! Where'd you get imperial ones from???


My local Motosave has plenty of them in stock in different size packs. But be warned...  the Star Wars yoke manual from Ram Controls clearly states to use a 5/64" hex key for the handles. But that doesn't fit either! I still didn't get a proper fitting key but I managed to get them undone by holding a smaller one in at an angle. Luckily the hex nuts weren't too tight in there so I got them out. I would advise taking the yoke to a Motosave (if there's one near you) and ask them to try the keys in a pack. Staff at my local one are very helpful and would no doubt let me do this.

On an update note tonight I got the back panels trimmed with vinyl and back door installed and finished wiring up the power socket and power button. I trimmed and tidied up all the wiring in the cab (no more rats nest of cables as in previous pic  :P) and got the castor wheels on. Then I fell asleep in the garage on the sofa bed so no pics as I had to rush to the shop for beer and crisps.  :cheers:

Things left to do.... trim the base panel and install little feet for cab to rest on.  Stick on front panel art and install coin door. (Got some LED lights for the coin door buttons today from Motosave).  Add side art and T-molding. Oh yeah... and bolt in the yoke. Should be done by this weekend.

LeedsFan

  • Trade Count: (0)
  • Full Member
  • ***
  • Offline Offline
  • Posts: 1042
  • Last login:January 17, 2021, 06:14:23 am
Re: Star Wars mini
« Reply #64 on: July 12, 2011, 03:24:19 pm »


Wiring tidied up inside the cabinet. Hard drive removed prior to moving the cab on it's back/front etc. as it wasn't fixed in yet.


Back panels and door trimmed and castor wheels installed. There will be some finishing to do where I cover up the screw heads with those little plastic covers, paint touchups and fitting some profiles over where the panels meet. That will hide the gap just above the wheels on the left hand side.  :P


Base trimmed and some self adhesive feet added. Although I also screwed them in as well because they have a tendency to become "un-adhesive" if a bit of sideways pressure is applied.


Front panel artwork applied prior to cutting out the hole for the coin door. This art I feel is a little darker than the original but it still looks OK.


Coin door installed. Tomorrow I will do a final test to make sure everything is OK and then do some touch ups and clean ups before I attempt the final stages. (Side art and T-molding)

shrunkenmaster

  • Trade Count: (0)
  • Full Member
  • ***
  • Offline Offline
  • Posts: 636
  • Last login:July 24, 2022, 10:17:33 am
Re: Star Wars mini
« Reply #65 on: July 12, 2011, 03:47:28 pm »
Another day, another step forward my man. Look forward to seeing this fired up!  :applaud:

opt2not

  • Trade Count: (+15)
  • Full Member
  • ***
  • Offline Offline
  • Posts: 6173
  • Last login:April 02, 2024, 07:42:30 pm
Re: Star Wars mini
« Reply #66 on: July 12, 2011, 04:32:33 pm »
Another day, another step forward my man. Look forward to seeing this fired up!  :applaud:
I'm just looking forward to seeing the yoke installed!

LeedsFan

  • Trade Count: (0)
  • Full Member
  • ***
  • Offline Offline
  • Posts: 1042
  • Last login:January 17, 2021, 06:14:23 am
Re: Star Wars mini
« Reply #67 on: July 15, 2011, 02:40:05 pm »
Another day, another step forward my man. Look forward to seeing this fired up!  :applaud:
I'm just looking forward to seeing the yoke installed!

Well I'm getting closer to that. I got the art installed on the yoke today. But it was a real pita to get the security hex screws out of the font panel cover. They take a 1/8" security bit which is really hard to find here in the UK. I ended up getting them out but it took way longer than I thought it would. I could have just made the holes in the art large enough to go over the hex nuts completely without needing to remove them, but that wouldn't have looked as neat.

I still have some little touch up bits to do but the sideart and T-molding will be applied over this weekend, and then it's all done. (If they are ever really "finished")

LeedsFan

  • Trade Count: (0)
  • Full Member
  • ***
  • Offline Offline
  • Posts: 1042
  • Last login:January 17, 2021, 06:14:23 am
Re: Star Wars mini
« Reply #68 on: July 16, 2011, 02:57:24 pm »
Well this project is now 99.9% finished. I still have one or two areas to touch up tomorrow but the next pics will be finished pics. The sideart went on very nicely. The t-molding was a bit awkward in some areas mainly due to the fact that the barb wasn't very tight. I had to fold over some masking tape round the barb in some spots to make it hold in the slot. I also hope to get some videos uploaded of this plus the other bartops I've built.

LeedsFan

  • Trade Count: (0)
  • Full Member
  • ***
  • Offline Offline
  • Posts: 1042
  • Last login:January 17, 2021, 06:14:23 am
Re: Star Wars mini (now finished! With pics)
« Reply #69 on: July 17, 2011, 01:22:14 pm »
After a few minor tweaks and touch-ups this project is now officially complete! Just had to fix some light leakage and recalibrate the yoke to get it dead centre together with some paint and details finishes.

I changed the coin door bulbs (again!) from the LEDs to 5W normal bulbs. The LEDs were bright but only gave good light right at the end of the bulb, whereas the 5W bulbs spread it out more. The reject buttons look better than ever now. I can keep the LEDs spare for the car anyway. I may need to add a fan in the rear door as the CPU fan keeps cranking up to higher speeds when the cab has been on for some time. Eventaully it runs at the higher speed all the time and the sound increase is quite noticeable. Adding a fan may not make much difference though as it's not hot inside the cab... just a little warm.

Anyway... the finished pics....   (still hope to get a video made soon)


jfunk

  • Trade Count: (+3)
  • Full Member
  • ***
  • Offline Offline
  • Posts: 625
  • Last login:October 24, 2018, 04:36:39 pm
  • BYOAC Wannabe
    • JFunk's Arcade
Re: Star Wars mini - Finished! With pics
« Reply #70 on: July 17, 2011, 01:39:13 pm »
Awesome.  Just awesome.

Woodshop Flunky

  • Trade Count: (0)
  • Full Member
  • ***
  • Offline Offline
  • Posts: 681
  • Last login:August 20, 2017, 05:24:57 am
Re: Star Wars mini - Finished! With pics
« Reply #71 on: July 17, 2011, 01:57:43 pm »
Excelent job! :applaud:

Those 3 machines look great together!

Complete mini arcade cabinet plans available.

opt2not

  • Trade Count: (+15)
  • Full Member
  • ***
  • Offline Offline
  • Posts: 6173
  • Last login:April 02, 2024, 07:42:30 pm
Re: Star Wars mini - Finished! With pics
« Reply #72 on: July 17, 2011, 02:05:13 pm »
Gorgeous! This project really turned out great!
Good job, and I can't wait to see the video!

jimmy2x2x

  • Trade Count: (+1)
  • Full Member
  • ***
  • Offline Offline
  • Posts: 1216
  • Last login:December 19, 2018, 01:29:48 am
Re: Star Wars mini - Finished! With pics
« Reply #73 on: July 17, 2011, 02:27:55 pm »
Amazing!

Congratulations  :cheers:

yotsuya

  • Trade Count: (+21)
  • Full Member
  • ***
  • Offline Offline
  • Posts: 19955
  • Last login:April 12, 2024, 11:03:32 pm
  • 2014 UCA Winner, 2014, 2015, 2016 ZapCon Winner
    • forum.arcadecontrols.com/index.php/topic,137636.msg1420628.html
Re: Star Wars mini - Finished! With pics
« Reply #74 on: July 17, 2011, 03:12:28 pm »
Looks good, my friend!  :cheers:
***Build what you dig, bro. Build what you dig.***

emphatic

  • Trade Count: (0)
  • Full Member
  • ***
  • Offline Offline
  • Posts: 2009
  • Last login:Yesterday at 02:28:32 pm
  • -"Suck it, Donny!" -"No, YOU suck it.... more".
    • Emphatic's Video Game Collection
Re: Star Wars mini - Finished! With pics
« Reply #75 on: July 17, 2011, 03:54:20 pm »
 :o That Yoke looks HUGE. A very awesome result, pleased you must be.  :applaud:

shrunkenmaster

  • Trade Count: (0)
  • Full Member
  • ***
  • Offline Offline
  • Posts: 636
  • Last login:July 24, 2022, 10:17:33 am
Re: Star Wars mini - Finished! With pics
« Reply #76 on: July 17, 2011, 04:00:26 pm »
Looks great, my man!  :applaud:

Although you already have it pictured next to your other machines, can we get a pic of a human next to them for scale?


Martijn

  • Trade Count: (0)
  • Full Member
  • ***
  • Offline Offline
  • Posts: 822
  • Last login:January 25, 2024, 10:34:36 am
  • Akira!
    • ModMyBox
Re: Star Wars mini - Finished! With pics
« Reply #77 on: July 17, 2011, 04:07:23 pm »
Great work! Now Yoda can play it  :angel:

BobA

  • Trade Count: (+14)
  • Full Member
  • ***
  • Offline Offline
  • Posts: 5943
  • Last login:July 11, 2018, 09:52:14 pm
  • What Me Worry?
Re: Star Wars mini - Finished! With pics
« Reply #78 on: July 17, 2011, 05:29:25 pm »
Looks great.  Excellent attention to detail and custom work.  :applaud: :applaud:

Do you have to be 4 ft high to play it?

alfonzotan

  • Trade Count: (0)
  • Full Member
  • ***
  • Offline Offline
  • Posts: 534
  • Last login:November 28, 2023, 08:39:45 am
    • The Cab With No Name
Re: Star Wars mini - Finished! With pics
« Reply #79 on: July 17, 2011, 08:24:43 pm »
Sir Charles Barkley was once known as the "Living Legend From Leeds" (Alabama, in his case).

Chaz can go ahead and hand over the title.  Awesome job!   :applaud: :applaud: :applaud: